Brick barbecue simple and complex. Brick brazier: the best projects, repair features and ideas for building a brazier (95 photos). Interesting projects for creating a brazier, oven or brick barbecue
Good day to all!
Today we are going to talk about how suburban area put up a grill. Not portable metal, but brick stationary. What is good about this grill? First of all, design qualities. Made not only in the original form, but even in a simple design, it will bring an element to your summer cottage. landscape design and become a place of comfort.
Step-by-step instructions for a brick barbecue
So, we decided to build a brick brazier. What do we need for this? Let's start with tools and materials. First of all, since we have a brick brazier, then we will need a brick. Since we are building a kind of oven, therefore, we will need a special oven, or fireclay brick. It is a fire-resistant brick that can withstand large temperature fluctuations. The mortar for laying bricks is a mixture of clay and sand, pre-soaked. For the barbecue, since it is stationary, a foundation will be needed. For its manufacture, we need cement, sand, formwork boards, rebar, stones and crushed stone. To fasten additional elements, it is necessary to prepare metal corners, gratings, various valves and a sheet of iron.
As for tools, a shovel, trowel, buckets, a trough for mortar will be needed here.
The number of bricks depends on the project that you draw yourself, or find one already finished. Below are several options for a brick brazier.
If you don't want to bother with complex schemes of your structure, but you just want to put up a fairly simple brazier, then the following scheme may be suitable.
We make the foundation
The foundation of the brazier must be even, for which you can use the building level. Also for waterproofing it will be necessary to use roofing material
Based on the size of the brazier in the project, we dig a hole. We lay out the bottom of this pit with a stone with rubble and install the formwork. Then fill the hole concrete mix(if anyone does not remember its proportions of cement and sand are 1: 3), while laying a reinforcing mesh.
In the meantime, the concrete is curing, you can prepare a clay mortar for masonry. To do this, in a special container (tub, barrel) we soak the clay for a week. Stir occasionally and add water if necessary. After that, we pour sand. To check the quality of the solution, you need to mix a little clay with dry sand, then roll the mixture into a bundle with a diameter of 1 cm. If it does not lose its shape, does not crack or spread, then everything is fine.
After the concrete has completely hardened, you can start laying bricks.
Brickwork
We start laying with the construction of three supporting walls- two side and one back. If you need a through design option, then the back wall can be omitted.
The figures below show the ordering of the bricks.
If necessary, in the brazier, you can make compartments, one for frying, and the other for dishes. To do this, we arrange cavities in the supporting part by placing another intermediate wall in half a brick.
After laying out all the walls, we block them with a concrete slab. For this purpose we use OSB board suitable size. We install it from below in such a way that after the concrete has hardened, it is possible to safely remove the formwork. On top we put a square frame of edged boards, the height of which is equal to the thickness of the slab to be poured.
We put dense polyethylene on the OSB and fill it with a solution with a layer thickness of 1-2 cm. After that, we lay four reinforcing bars with a diameter of 12-14 mm and fill the entire formwork with fine-grained concrete (crushed stone fraction 0.5-1 cm).
In general, there are a lot of options for a simple barbecue. You don’t even have to bother with mortars, but simply stack bricks on top of each other, as in the figure below:
But if you want a design, then you can offer such models.
Brazier made of bricks with a stove under the cauldron. Brick ordering
Another version of the brazier that you can put at home is the brazier, which has an oven for a cauldron added.
It means that next to the brazier a traditional oven is installed under the cauldron. Both of these designs are separate, but for aesthetics and to give the appearance of a single whole, a connecting seam is made between them.
The order of construction of such a brazier is the same as in the previous version. Just add the installation of the furnace under the cauldron.
We start the whole process by laying the first row without using a clay-sand mortar. To do this, first lay out all corner bricks, which should form a rectangle. We stretch the string between these bricks. Next, we lay the bricks of the first row and check the correctness of the masonry. For this purpose, we measure the diagonals of the formed rectangle, if they are equal, then lay out the bricks on the mortar. If not, then we make adjustments to the masonry. We lay out the bricks of the first row on the mortar, the thickness of the seams should be equal to 3-4 mm.
Well, further laying is carried out according to the chosen order. Below are a few examples of this ordering that you can use for your construction.
Installing the oven under the cauldron includes the following steps.
Laying the 1st row.
We lay completely red brick. We start with a whole brick. Next, we apply this method to each odd row.
Masonry 2nd row.
A red brick is laid around the perimeter, and fireclay in the middle. The row starts with a half brick. The same is done with all other paired rows. The second row will be the bottom of the firebox. In the first two rows, we leave a place for the ash pan, where we build the door of this ash pan into the masonry.
3rd row masonry.
It is made solid, with the exception of the space above the ash pan. Here the grate is installed. To do this, we cut grooves in the brick of the third row. In addition, we block and fix the ash pan door in the same row.
Masonry 4 and 5 rows.
The brick is laid in such a way that holes are made for the firebox door and for the chimney. We divide the oven into two parts. One will become the outer wall of the stove, and the second will be its central part. We make a small space between them. The central part is made in the form of a square with a circle in the middle, which is a firebox.
The central part is laid out of fireclay bricks. We fix the firebox door.
Masonry of the 6th row.
We do everything in the same way as when laying the previous row. The only thing is to block the outer hole for the chimney. The brick should bandage the seams of the previous row.
Masonry 7-11 rows.
The 7th row covers the firebox door. In the 9th row, holes must be made through which flue gases will exit. In the 11th row we make a circulation hole in the front of the crucible. Next, we put the 12th row and fasten plates with a hole for the cauldron on it.
Brick brazier with a roof do-it-yourself drawings and photos
Sometimes, while preparing a delicious barbecue on your country grill, unexpected rain spoils the whole action. Naturally, the question arises about the need to place a brazier under the roof.
It should be noted that there are many factory designs of such barbecues. One of them is presented below.
But, as you can see, this is completely metal grill and we are building a brick one. The easiest and most natural option is to put up a canopy. Below are several options for such awnings.
If you are planning to make a brazier with a roof, then the drawing of the brazier itself is best done immediately with such a structure. Of course, you can first build the brazier itself and only then attach a canopy to it.
The choice of material for a canopy is an important step. For the roof itself, materials such as metal tiles are best suited, cellular polycarbonate or slate. The sides of the canopy can be assembled from metal pipes with a section of 30x30x1.5 mm or 40x40x1.5 mm
In general, it is not difficult to make a canopy, the main thing is to approach this issue creatively and everything will work out.
And finally, two videos showing how to make a brick brazier yourself.
Good luck with your construction and delicious kebabs!
Well if on personal plot there is a metal brazier, but not only practicality is important for a person, one also wants beauty. Functionality and attractive appearance It's a brick barbecue. There are both simple models, the manufacture of which does not require special skills, and there are very complex structures - real brick complexes that only a professional can make. It’s better not to take on the construction of such structures without experience, and everyone can try to put together a simple brick brazier or a barbecue oven.
What is the difference between a grill, a fireplace, an oven and a barbecue
At the fireplace, stove and barbecue, there is a brick wall on the back of the brazier, which the grill does not have. It is necessary to keep the heat, and to reflect it on the frying food.
The design of the fireplace, stove and barbecue provides for the construction of a chimney that allows you to remove heated air and smoke away from the cook, the grill does not have this element.
In fireplaces and stoves, the heat is located in the firebox, in the grill device there is a metal tray for this.
The heat at the grill, fireplace and barbecue is retained only during the burning of the fuel, and the stove is capable of long time stay warm.
Barbecues and stoves combine the function of a heating device with cooking, a grill is needed only for cooking, and a fireplace is exclusively a heating device.
What tools and materials will be required to build a brick barbecue:
Preparing the masonry mix
To build a barbecue with your own hands from bricks, you need to choose high-quality mortars. You can use 2 options for such solutions:
- ready-made compositions (separate mixtures for walls and fireboxes);
- clay mixed with pure sand.
Such compositions have their drawbacks and advantages, they need to be examined in detail. Previously, only clay was used in the construction of furnaces, but it has a serious drawback. Heating structures, folded on a solution of clay, must be well protected from moisture. It cannot be used for laying bricks on a pipe; in such places, mixtures based on cement or lime are used. IN last years refractory compositions have become available, which are sold dry in hardware stores. They go to work after dilution with water.
Clay is the cheapest binder that is completely environmentally friendly.
For masonry, you must choose dark red clay. Checking the quality of raw materials and the finished mixture is carried out as follows:
- You need to take 500 gr. clay, stir it with 200 ml of water so that it does not stick to your hands.
- A lump is made of this mass and thrown onto the floor or against a wall, if cracks appear on the lump - the clay is too greasy, if the lump immediately crumbles - there is too much sand in the solution, a good clay mixture for laying the stove should look like plasticine.
- For laying 1000 bricks, approximately 50-70 liters of the mixture will be required. To increase the strength of the mixture, 0.5 cups of edible salt are added to the composition for each bucket of clay. To increase the strength of the masonry, on slightly heated sections of the structure, it is permissible to add cement to the mixture no more than 500 gr. on a bucket of clay.
- The resulting mixture, outwardly, should resemble thick homemade sour cream.
- Often, when building brick heating devices, various dry mixes are used. The methods of their preparation and use are always indicated in the instructions.
Do not forget that they sell formulations that are designed for different temperature conditions heating the oven. There are mixtures intended only for laying fireboxes and there are simple compositions for arranging the walls of a fireplace or stove.
How many bricks do you need
Before building a brick barbecue with your own hands, you need to calculate how much it will take. There are many programs designed for such a calculation. You can roughly calculate the need using a pre-prepared barbecue drawing. Standard brick dimensions:
- length - 25 cm;
- width - 12 cm;
- height - 6.5 cm, together with the solution, the height reaches 7 cm.
Taking into account the design and dimensions of the brick, a calculation is made. Instead of a brick chimney, you can install a tin pipe. Before work, focusing on the drawings and photographs of a brick barbecue, be sure to prepare layer-by-layer sketches of the masonry. There are 28 layers of bricks in the figure, 18 rows of them are the distance to the pipe and 10 rows to the lattice of the structure. Make 18 drawings, schematically mark the sequence of laying bricks on them. Don't forget that the bottom brick should always be overlapped by 2 bricks on top. Also, a brick lying longitudinally should be overlapped from above by 2 transverse bricks. The finished oven can be seen in the photo of a brick barbecue.
Need to pick up comfortable spot to build a barbecue, while you need to consider:
- barbecue should be no closer than 5 meters from the neighboring area (better further);
- the structure is built at a maximum distance from wooden buildings;
- there should be no shrubs or trees on the lawn near the barbecue;
- it is necessary to bring lighting and water to the barbecue;
- it should be possible to build a canopy or gazebo.
Foundation device
Immediately you need to make markings for the barbecue foundation at the selected place, its dimensions must correspond to the order of the brick barbecue and take into account the masonry drawings. In addition, the dimensions depend on the layout of the site - whether there will be a gazebo nearby, or whether you need to make a foundation just for building a barbecue. It is best to use a slab base:
- According to pre-installed markers, they dig a pit 40-50 cm deep.
- It is covered with a mixture of gravel and coarse sand to the level of the soil, rammed and a formwork 150 mm high is installed on top.
- In the assembled structure, the reinforcing cage is assembled.
- A concrete solution is poured into the formwork, it is well tamped so that there is no air left in the body of the foundation.
- Check the level of the platform with a level.
- After that, everything is covered with wet burlap in order to increase the drying time and prevent cracking of the concrete.
The foundation will be completely ready in three days, then you can remove the formwork.
Barbecue wall construction

To protect the foundation and brick from moisture penetrating from the soil, the walls of the foundation must be treated with tar, 2-3 layers of roofing material are laid on top of it. Mix the mortar for masonry (the recipe is listed above). The first row of bricks is laid on the roofing material, spread on the foundation. On rows 7 and 10, metal plates are inserted into the masonry. Sheets of metal should already be kiln on? brick length.
When laying bricks, be sure to take long breaks that are necessary for the mortar to set, otherwise the tall structure may creep.
Fresh mortar sags, the seams between the rows of bricks dry out and become smaller, for this reason deviations from the project are possible. The shrinkage of the walls takes 2-3 days, this is affected by the ambient temperature. Do-it-yourself construction allows for breaks in work - this is a significant advantage over the use of hired builders who try to complete the object as quickly as possible.
With a saw or a grinder, 1/2 half of the brick is cut off so that a sheet of metal can be laid in the groove made. We raise the walls further, laying bricks according to the drawings. On the 15th row, it is necessary to lay out the vault; for this, semicircular wooden templates are used. A template of the required curvature is made from plywood, a cut line is marked with a pencil and cut with a jigsaw. Prepare the second board in the same way. To strengthen the vault template, another board is inserted between the boards, and everything is connected. The ready template can be used. It is placed between the walls of the furnace, and the laying of bricks begins, connecting them with mortar.

The middle brick of the vault should be exactly in the center of the firebox opening.
For laying the firebox and the barbecue pipe, it is necessary to use heat-resistant bricks.
They start laying the pipe from the 18th row, to reduce the width of the hole in each row, the masonry is removed? brick width. Thus, 28 rows of masonry are laid out. Instead of a brick arch, you can prepare a metal box and mount it in the masonry.
What you need to pay attention to:
- Using a barbecue on your site can not break the rules fire safety Otherwise, your holiday may be ruined.
- You can not kindle a barbecue with gasoline or kerosene, use special compounds for this purpose;
- It is not necessary to impregnate coals or firewood with ignition compounds, they only sprinkle kindling from above;
- Do not forget that high-quality fuel - good vacation and delicious food. For this reason, take care of dry firewood in advance. Connoisseurs advise using birch coals, from which products become fragrant and tasty.
We build a simple brick brazier with our own hands. Step by step instructions with photo
Brick barbecue grill - a stationary building where barbecue, vegetables, fish and other food are cooked on outdoors. Cooking takes place with the help of hot smoke and heat coming from an open fire.
Unlike collapsible metal structures, a brick brazier is a solid structure that has been used for years. It can serve as an alternative to the stove and smokehouse. On suburban area he can still be original decoration territory.
We will tell you how do-it-yourself brick barbecues are built (drawings, photos, orders at the end of the article).
How to make a brick brazier in the country

Decided to build a street barbecue made of bricks with your own hands? There are a huge number of photos of designs of barbecues, schemes, orders. How to choose the right option?
There are homemade brick barbecues with and without a roof. A garden barbecue without a roof is a brazier of various heights.
A simple design that does not require special costs and efforts during construction, but you will not be able to use the barbecue during rain.
The presence of a roof implies the presence of a chimney, which is covered with a visor from precipitation. This brazier looks like a fireplace.
Closed braziers are solid street structures, they are often completed additional elements. It could be grill grate, oven-oven, cauldron. Brazier with a place for a cauldron can be used for cooking pilaf Or to warm up food. If the cauldron is removed, a full-fledged brazier remains. If the hole for the cauldron is closed with rings, you can put any dishes on them, like on a stove. The structure can be added niches for firewood, coals and utensils.
What elements will be included and how to make a country brazier out of brick so that it suits you is determined at the design stage, based on the planned dimensions, how much food will be cooked in the brazier simultaneously, and what types of food will be prepared on it.
We design a brick brazier
Building order - expensive pleasure, But with minimal masonry skills, you can freely build a brick brazier with your own hands. What elements will be needed (a cauldron, a place to heat food, a grill grate, a smokehouse) should be thought out in advance. There are many drawings. Below is an example of building a simple closed barbecue with a pipe.
ATTENTION! We strongly recommend that you take the design seriously. Many summer residents build brick barbecues with their own hands, while they do not use drawings. As a result, the design at best turns into a flower bed. Since it is not possible to use a home-made brazier made of bricks for its intended purpose. Uncomfortable.
When choosing or drafting a project, one should proceed from the dimensions of the future building. They depend on plot size. It is worth remembering that the land occupied by the barbecue, will no longer be used for other purposes.. The size of the firebox will depend on how much food will be cooked in the grill at the same time.
Projects of brick barbecues: drawings, photos
Peculiarities: the length of the firebox should not exceed 1 m - this is enough for 8-10 skewers at the same time. The width should be consistent with the length of a standard skewer - 47-62 cm. The height of the frying platform, ideally, is just above the waist of the one who will cook.
Since the stationary barbecue often becomes central decorative element site, this should be taken into account when designing and choosing a location. Its reverse side looks like a solid brick wall, so it is advisable to position the structure so that With reverse side it was not viewed. Or provide for its decoration, taking into account fire safety.
Choosing a place for the barbecue
A barbecue area is also a place to relax. Nobody wants to build a stationary brick brazier with their own hands so that it is not convenient to use it. When choosing where to place it, be sure to consider a number of points:
- proximity to the place of rest- not far from the gazebo, summer kitchen or shed with benches and a table;
- level ground, specially equipped;
- obligatory convenient approach, ideally - a few;
- proximity to a water source(often a water supply system is connected to the barbecue and a sink is equipped. In this case, water will have to be drained from the system in the winter to avoid cracking pipes);
- weather protection(canopy), sometimes they equip a brazier and a place of rest under one canopy;
- sufficient distance from trees, flower beds and beds- from high temperature plants wither and may die;
- sufficient distance from garbage containers and toilets;
- Direction of the wind(if it is unchanged, place the barbecue so that the smoke is not blown towards the dwelling, but towards the wasteland).
Important! Brazier is a fire hazardous object. It should be located in the garden far enough from the house, flammable wooden buildings, platforms for cars.
Tools and materials
Before you build a brick brazier in the country, you need a ready-made or pre-made project independently calculate the required amount of materials.
This is necessary in order not to face a shortage of them or, conversely, excessive remaining surpluses. Based on the quantities of material calculated for the project, an estimate is drawn up.
The calculation is done so that the material is with a small margin. Of the tools you will need:
- shovel;
- trough or a concrete mixer;
- buckets for solution;
- Master OK;
- level, plumb line;
- circular saw A.
- fireclay (furnace) brick, which can withstand temperature changes without cracking;
Consumables:
- foundation material(rubble stone, cement, sand, crushed stone, boards or smooth plywood for formwork);
- reinforcing mesh;
- iron sheet;
- metal gratings, latches, corners, doors.
If the brazier is designed with niches and a work area, you will additionally need stone tabletop. As a masonry mortar, a mixture of clay and sand is usually taken, at least for the firebox.
The cement mortar will quickly collapse and crack when exposed to high temperatures (can reach 1000 ° C in the furnace) and temperature changes. Clay must be preliminarily soak for a few days. Clay and building mixtures with it are offered in hardware stores.
Reference: refractory material is required for laying out a firebox that is in direct contact with fire. In order to save money, for the construction of the base and elements that are not exposed to open flames and high temperatures, you can take an ordinary brick - incl. remaining from the dismantling of any structures, cleaned of the remnants of the solution.
A simple do-it-yourself brick brazier: step by step instructions
As an example, step by step, in the do-it-yourself format, we will analyze how to build a brazier with your own hands from brick, the easiest option. The only complication that our simple brick brazier will have (photo of the proposed option below) is a pipe. We consider pipe laying necessary in Russian conditions. Building! Below is the building diagram.

Foundation for barbecue
The first stage of construction is pouring the foundation. A hole is dug deep for him. 30 cm and the size that 20-30 cm exceeds the size of the future structure. The walls and bottom are leveled, rammed. A pillow of sand and gravel is laid out at the bottom. Layers are laid alternately, each subsequent must be moistened and compacted. Cushion thickness - 15 cm.
Before pouring, a formwork is installed that protrudes above the ground by 10 cm. Placed at the bottom of the pit reinforcing mesh and poured cement mortar. At the final stage, the foundation should be leveled with level. Complete hardening of concrete occurs 3-4 weeks, i.e. wait before proceeding with construction 28 days. For uniform setting in hot, dry weather, the surface of the concrete should be moistened periodically.
Clay is diluted with sand in the ratio 1:1 . The consistency of the solution should be like that of thick sour cream. It should be easy to take with your hands, without spreading. If a small amount of clay solution with sand easily rolls into a bundle with a diameter 1 cm, without cracking, spreading and without losing shape, then the quality of the solution is good.
While the foundation is solidifying, clay mortar should be taken care of in advance. G line soaked in water for a week and stir occasionally, adding water if necessary. Clay and clay masonry mortar are sold in hardware stores. We supply electricity while filling, before laying out the brazier of bricks. With our own hands we derive contacts for connection.
Waterproofing is laid on a completely hardened foundation - polyethylene folded several times, a layer of roofing material or other bituminous material. Country barbecues are built in compliance with standard rules brickwork. The brick is recommended to be poured with water the day before laying or lowered into it for 20-30 seconds immediately before laying. Then it will not take moisture from the clay, and the grip will be better.
Ordering: how to fold a brick brazier
Despite the fact that we are dismantling a brick street brazier that is easy to build, the brick laying order (scheme) is drawn up in advance, taking into account the selected dimensions and configuration. It is most convenient to do this on a sheet in a cage.
How to lay a brick? The easiest way to install - with an offset of each row by half a brick in relation to the previous one. The first two rows are laid out solid. The very first row is made up of solid bricks, without halves.
The lower part of the brazier is the plinth. Masonry scheme - from the corners to the center along pre-planned lines. Every 3 rows it is necessary to check the correct laying level and plumb, lay out the mesh for reinforcement.
The height of the plinth depends on the project. It may have one or more niches where firewood, coal and other utensils are stored. It is laid out in a continuous masonry.
The central part of the structure is the firebox. The base for the brazier in advance cast from concrete with reinforcement or laid out of brick. If arches for the firebox and niches are constructed according to the project, the circled. To evenly distribute the bricks, chips are inserted between them.
The gaps are about the same. 1 cm. Only after the arch is fully laid out, the space between the bricks is wetted and filled with mortar. The laid out arch is left to harden with a circle on day or two.
If the brazier will also be used as a barbecue, you should in advance take care of the opportunity lattice installations. A small protrusion is left for her, or several ledges so that the grid can be placed at different levels. Install it on the reinforcement bars embedded in the walls of the brazier.
Advice: if you leave small gaps between the bricks when laying the firebox, when using the brazier in the future, thanks to the air penetrating into the cracks, combustion will be better.
The brazier is laid on metal corners, which are attached to the masonry with pins. Keep this in mind when assembling a country brazier made of bricks with your own hands (photo of a correctly folded firebox below).
Important! It is unacceptable to get atmospheric precipitation on unfinished brickwork. If it starts to rain, it must be carefully covered with polyethylene.
The last stage is the construction of the chimney. Its presence allows you to keep the heat in the grill longer and remove the smoke. For the chimney, the masonry continues to be laid out, gradually narrowing it upwards. This is done by shifting bricks in rows. The shift is made no more than a third of a brick Otherwise, the structure may become unstable.
Peculiarity: the pipe is the heavy part and requires support columns to install it.
If laying out a brick pipe seems too complicated, you can install a metal one. At the end of the masonry, it is necessary to fire the walls of the firebox. To do this, kindle firewood in the hearth and increase the heat to the maximum.
The construction of the brazier, the installation of a cauldron or pallet are carried out on final stage. After that, decoration is carried out. If there is a countertop, it can be decorated with a slab of porcelain stoneware. The brazier itself is veneered plaster, decorative stone , facing tiles, etc.
We looked at how to make a brick brazier ourselves. A separate issue is the protection of the structure from washing out of the solution. The problem is solved by processing with special compounds. It could be heat-resistant varnish, oil impregnating composition for ovens and fireplace mantels, silicone water repellent, in addition, protecting from the appearance of microorganisms in the masonry.
To ensure fire safety, the brazier for a summer residence is surrounded paving slabs. In addition to protecting against fire, it will create a flat, comfortable area. There should be no flammable objects in the immediate vicinity of the barbecue. For decoration, only non-combustible, heat-resistant materials are chosen.
Do-it-yourself brick brazier: photo, video, drawings
From this article you can find out what features a brick brazier has, get acquainted with popular types of structures, recommendations for their construction and placement. The text contains practical advice that will help you choose for your summer cottage best option outdoor stove, barbecue or barbecue and make it yourself, guided by diagrams, photos and descriptions.
The construction of a brazier requires careful preparation, taking into account many nuances and observing technological features.
Brick brazier: features and types of structures
Barbecues made of metal are usually used for barbecue. However, the sudden onset of rain and wind can be a source of problems for recreation. In such cases, it is much more convenient to use a barbecue grill made of bricks or a brazier located under a canopy.
To start building your own brick barbecue, you need to choose the "right" place
What is a brick brazier: photo and device
The brazier, made of brick, is a permanently located structure. At the same time, the product can have various dimensions, design and additional equipment. On the network you can see in the photo brick barbecues with the simplest device, consisting of only a few rows of bricks and a brazier, as well as more complex designs.
Barbecues with a complex configuration look like a massive building. There are even whole complexes of multi-purpose buildings. Despite the differences in design, most of the brick outdoor stoves and barbecues shown in the photo have a similar layout and structure.
Such structures consist of the following elements:
- plinth;
- foundation base;
- lower side walls;
- braziers;
- upper side walls;
- chimney pipe.
Convenient brick barbecue with a roof and an additional table
To increase the comfort of operation and expand the capabilities of the barbecue, it is supplemented with extensions in the form of:
- furnaces;
- smokehouses;
- sinks;
- countertops for convenient cutting of products;
- cauldron;
- niche for storing dishes.
To make a barbecue oven with your own hands, you should use a brick with refractory properties, for example, fireclay. This material has a yellowish-sand hue, as well as a well-defined granular structure. Fireclay blocks are resistant not only to fire, but also to chemical influences, in particular, they are not affected by ash and soot.
Note! Fireclay bricks are practically impossible to cut, so manufacturers produce ready blocks with various sizes and configurations. This feature must be taken into account when choosing a building material and calculating its quantity.
Brick brazier is available in various variations
Advantages and features of brick barbecues
Brick barbecues differ from traditional stoves primarily in their purpose. These designs are designed to create comfortable conditions for cooking outdoors. They are quite simple in execution and undemanding in terms of materials. Dimensions, as well as the barbecue device, can be chosen arbitrarily, taking into account your own needs and wishes.
Each owner can build a simple outdoor stove and a barbecue made of bricks on his site, which cannot be said about the structures that are installed in the house. Thanks to all these features, as well as the presence of a foundation, masonry work is greatly simplified.
Benefits of brick barbecue grills:
- versatility - designs are suitable for cooking any products and dishes based on them;
- the presence of a large brazier - thanks to this, the heat inside the structure is distributed evenly, as a result, roasting is ideal;
- the design provides a sufficient amount of space for the use of barbecue skewers and grills;
The main advantage of a brick barbecue is its high heat capacity, this material, unlike metal, retains heat very well.
- complex structures are equipped with a smoke collector, due to which the operation of the barbecue becomes more comfortable;
- high reliability and durability;
- no special care required;
- the ability to equip the structure with additional features by installing a smokehouse or a cauldron.
There are not many disadvantages, but they are still present. Firstly, the structure is stationary, so it cannot be moved to another place if necessary. Secondly, designs open type do not allow cooking when it rains. An exception is brick barbecues in the gazebo or under a canopy.
How to make a brick brazier with your own hands: drawings and photos, design and calculations
When choosing the type of construction and design of the brazier, it is necessary to take into account the landscape features of the site. The construction should not stand out from the general style, but on the contrary, it must emphasize it. The process of developing a brazier project is not limited to the aesthetic side of the issue. There are certain rules that must be followed in order to secure operation and make it more comfortable.

Brick brazier drawing
For the construction of a site located in front of an open fire, it is imperative to use refractory materials suitable for this purpose:
You should also take into account the wind rose. You should not start construction if there is a possibility that smoke will enter the windows of a residential building. It is forbidden to place a brazier next to the plots of neighbors. Having a barbecue or oven can be uncomfortable.
Note! If there are blocks with a lighter shade in the batch of fireclay bricks, it means that the technology was violated during the manufacturing process of the material, and this casts doubt on the strength characteristics of the product.
First of all, it is necessary to carefully consider the placement of a brick barbecue - after all, it will be impossible to move it to another place later
In the construction of a brazier made of bricks with your own hands, the drawing plays an important role. To make your work easier, it is advisable to make a sketch of a summer cottage. Such a sketch will allow you to assess the features of the territory on a scale and choose the right place for building. The area located within a radius of 5 m around an open fire must be free from trees. The presence of plantings is allowed on the side where the structure is fenced with a wall, but not closer than at a distance of 0.5 m.
It is necessary to provide free access to the street barbecue made of bricks, as well as supply water in case of a fire.
Fire hazardous objects should not be placed nearby:
- compost heaps;
- sanitary and technical facilities;
- garbage containers.
If you follow the basic rules of fire safety and install a brazier away from the fence and the street, you can avoid conflict situations with neighbors.
Brick laying scheme: 1. bonder row; 2-6. spoon rows; 7, 8. dressing in half a brick
How to choose the best brick brazier project
Having decided to build a barbecue or an outdoor oven on your own in your summer cottage, it is not at all necessary to design the structure from scratch. On the network you can find drawings, photos and diagrams for building a brazier with your own hands, which will meet any wishes. Moreover, there is no need to try to pick up a project in finished form. In the drawing of the future design, you can combine any elements you like, which will allow you to achieve maximum compliance with personal requirements.
At the initial stage, it is necessary to make a detailed drawing of a brick brazier, indicating on it the exact configuration of the structure and all the data regarding its appearance.
The drawn up scheme should take into account the following nuances:
- construction design;
- the nature of the placement of the main and additional components, namely: the combustion chamber, brazier, chimney, loading door, etc.;
- dimensions of all structural elements.

At the beginning of the construction process of the brazier, it is important to decide on its design and design.
You should also consider the presence of a roof. There are options with an open and closed type of brazier. In the second case, the construction of a brick barbecue oven looks like a fireplace. The advantages of such a project are obvious, since in case of rain, the hearth will be protected from precipitation. In order for this design to function properly, you will definitely have to equip the chimney.
At the design stage, the presence of additional structures is also considered. Near the barbecue, you can equip a platform that will be used to prepare products. In this zone, a countertop is installed, and a sink with water is also connected. The projects of brick barbecues with a stove for a cauldron, in which you can cook pilaf and other dishes on an open fire, look quite attractive.
Important! If water is supplied to an outdoor stove or barbecue, in the fall it will be necessary to free the system from liquid, since pipes will be destroyed during frost.

Brick brazier scheme
How to calculate the size of the structure for the construction of a brick brazier with your own hands
When the configuration of the brazier and all components are determined, the dimensional parameters of the structure should be entered into the drawing. There are no exact recommendations regarding this, but do not forget the general standards.
The optimal depth of the brazier in a brick brazier is 12-17 cm. This is quite enough to place coals. In this case, the products will not be located too close to the heat.
The brazier itself should be placed at a height of about 1 m from the ground level. If this parameter is calculated individually, you can use a simple and convenient measurement method. To do this, measure the distance from the elbow of a standing person to the ground. The resulting value will be the ideal height indicator.
Most often, the width of the barbecue does not exceed 1 m, based on 10 skewers
The standard width of the brazier for a brick cottage is 1 m. If you increase this figure, the process of frying kebabs will not be so convenient, since you will have to constantly move between skewers. A width of 1 m allows you to monitor the condition of the products, being in one place.
As for the depth of the structure (from the back to the front), the minimum allowable figure is 0.5 m. Ideally, the skewers should be stable on the edges of the broiler. To do this, the depth must correspond to their length, minus the tip and handle. Taking into account the fact that the construction of a brick brazier in the country will ultimately have an impressive weight, it will be necessary to equip a massive and solid foundation. The dimensions of this structure should not exceed the dimensions of the base. It is better if the area of \u200b\u200bthe foundation is a little larger.
Do-it-yourself calculation of the amount of materials for building a foundation for an outdoor stove
For the construction of a capital foundation, you will need to dig a small pit. The bottom of this recess in the ground is leveled, after which a sand cushion is arranged. Then a formwork structure is installed on it, which is subsequently poured with a concrete mixture.
Slab foundation for barbecue made of bricks
To build a formwork to create a base for a brick oven with your own hands, you can use the following materials:
- used boards;
- slate sheets;
- wooden shields;
- metal sheets, etc.
Important! When choosing a material, it is necessary to take into account the strength characteristics, and you should also check it for integrity, otherwise the formwork simply cannot withstand the pressure of concrete.
For the construction of a brick oven-brazier with your own hands, you can use it as strip foundation, and the base of the tiled type. Despite the difference in configuration, these elements have the same shape in the form of a rectangle. The calculation of the amount of concrete is carried out according to the formula: V \u003d AxBxC, where A and B are the length and width of the base, C is its depth (without a sand cushion), and V is the amount of mortar required for pouring.
It is impossible to guarantee a long service life of the brazier without a strong foundation, so the foundation for a stationary structure is a must.
Interesting projects for creating a brazier, oven or brick barbecue
Before you build a brick-based barbecue or barbecue, it is very important to purchase quality material. It depends on how durable and strong the structure will turn out.
The main criteria for choosing a quality brick:
- Full body and density - if used as a production raw material quartz sand, then the optimal indicator is 1800-1950 kg / m3, if clay is 1800-2000 kg / m?.
- Strength level - high-quality fireclay bricks have a strength index of 22 N / mm?.
- Heat resistance - for the construction of a brazier in a brick cottage, it is better to use fireclay blocks that can withstand the influence of 1650-1750 ° C. Ceramic bricks with a temperature exposure limit of up to 1200°C can be used to form external walls, lower levels and a smoke box.
- The level of thermal conductivity - for high-quality fireclay blocks, this indicator is 0.6, for ceramic bricks - 0.8 units.
The brick used to create the barbecue must meet certain requirements
In addition, the building material must be resistant to alkalis, acids and salts.
Note! If, when struck with a hammer, a brick makes a ringing loud sound, it means that high-quality raw materials were used for its manufacture, and the process itself proceeded without violations of technology.
How to build a base for a simple brick brazier with your own hands
The design of the simplest brazier has brick walls with ledges. They are formed due to the fact that some rows of bricks are stacked on the edge. The presence of such protrusions allows you to install skewers with barbecue, barbecue grills or heat-resistant sheets made of metal.
The construction of a simple brick brazier begins with the arrangement of the base:
- the fertile soil layer is removed;
- a foundation pit is formed under the foundation with a depth of 20-25 cm. The width of this site should exceed the size of the barbecue by 0.5 m on each side;
- the bottom is leveled, a crushed stone cushion 15 cm thick is formed. For this, it is desirable to use material with an average fraction size;

Brick brazier - the construction is quite heavy, therefore, on weak ground, it needs a solid foundation
- crushed stone pillow is carefully compacted. For these purposes, a vibrating plate is suitable. In the absence of such a tool, a wooden or metal rammer can be used.
Further actions depend on what type of base is chosen for the installation of the brazier. To install paving slabs or paving stones, it is enough to pour a small layer of fine-grained sand, after which the coating is laid according to the technology.
The tiled base needs additional reinforcement. For these purposes, a rod with a diameter of 1 cm is suitable. It is laid in increments of 0.2 m across and along the foundation. The intersection zones of the bars are connected using a special wire or plastic clamps. A mesh made of thick wire can be used as a reinforcing material.
Then you need to expose the formwork structure along the edges of the pit and fill it with concrete mortar. It is advisable to use M250 grade material for this. Do-it-yourself further work on the manufacture of a brazier in a country house made of bricks can be started only after the concrete has completely hardened. If the average temperature during the day does not fall below + 20 ° C, then this will take a week. At a temperature of + 17 ° C, concrete will harden for at least two weeks.
Lay out the first row of bricks on a previously cleaned foundation at a distance of 10-20 cm from its edge
How to build a brick brazier with the simplest design
For work, it is preferable to use a full-bodied ceramic brick of the M200 brand or stove. The latter will cost more. It is not recommended to take fireclay blocks for these purposes, since this material is not very suitable for making an open brick barbecue with your own hands.
For bonding bricks, it is necessary to use a clay-sand mixture. To increase the strength characteristics of this material, a little cement can be added to its composition.
Helpful advice! Beginners can use the ready-made version of the mixture for stoves, the main thing is that it is not heat-resistant and does not contain fireclay in its composition. The mixing process is carried out according to the instructions.
The optimal thickness of the seam between the rows is 3-5 mm. In the process of work, it is necessary to strictly maintain this size, and also constantly monitor the placement of the brick horizontally and vertically, otherwise the design will be crooked. The material is laid in accordance with the selected scheme.
You need to lay out the rows in accordance with the project, from time to time checking the horizontals and verticals using the level
Each odd row begins with the installation of a whole element, and the even row begins with a half brick. The sixth and tenth rows have ledges. In this area, the material is laid sideways, and so that the bricks are turned across in relation to the main rows. If you want to make a brick brazier with your own hands with the possibility of installing a grate, on the 6th and 10th row, the protrusions are formed not only on the sides, but also on the back wall. To maintain the thickness of the masonry in these areas, the material is set in two rows.
Starting from the 7th row, brick laying is carried out only on one of the halves: either on the right or on the left. On one side there will be a heat-resistant chamber, on the other - a table for pre-training products.
Brick is hygroscopic, so special protection will be required to extend its service life. To minimize masonry contact with moisture, a waterproofing material is laid under the first row. For these purposes, a roll-type roofing material or hydroisol is suitable. The material is laid in two layers, after which the edges around the perimeter are processed using hydrophobic impregnation. It will not be superfluous to have waterproofing between the first and second rows of masonry. It takes 4-5 days to dry the structure.

Brick brazier technology
This is not the only option for creating a brick brazier with your own hands; photos of similar structures that can be found on the net clearly show how diverse the design of such structures can be.
How to fold a brick barbecue: photo and description of the process
This scheme is a little more complicated than the previous version, but a person with no experience can also master it. In this case, the combustion chamber has a direct vault, which, in contrast to the vaulted structure, is much easier to perform. The height of the frying chamber is 0.9 m, while the total height of the barbecue is 217.5 cm.
Before you make a brick barbecue, you will need to build a foundation with a monolithic reinforced base. In this case, the metal bar is laid in increments of 15 cm over the crushed stone pillow. A waterproofing material is laid on the dried base in two layers. After that, you can start laying bricks.
Note! If the design is arranged in a gazebo, then the first row of material is laid directly on the floor. If the foundation lies below this level, it will be necessary to lay additional rows of bricks to level the base. Only after that you can start assembling a barbecue or barbecue in the gazebo with your own hands according to the proposed scheme.

The easiest way to lay brick for a barbecue grill - each row shifts half a brick in one direction or the other
The first 9 rows are laid in accordance with the scheme. In this case, halves of bricks can be used, if indicated in the drawing. In the process of work, it is imperative to check the verticality of the walls and the horizontality of the rows. In addition, the thickness of the solution should be controlled. In this case optimum thickness equal to 8-10 mm.
To create the basis for laying a solid 6th row, after forming the 5th, you need to put 3 metal strips 4 cm wide, 0.5 cm thick. Its length should be slightly less than the stove span - about 145 cm. Next, the brick is laid according to the scheme up to the 12th row, where sawn blocks are placed along the structure. As a result, the 12-13th rows form an interesting decorative belt around the barbecue.
The combustion chamber is formed by 20-25 rows. On the 22nd row, the arch overlaps, after which the structure begins to gradually narrow. The arch is formed up to the 30th row, when the design goes into chimney. Then it is necessary to alternate the 30th and 31st rows until the required height is reached.

The thickness of the seam between the bricks must be at least 1 cm and not more than 1.5 cm
How to make a brazier from bricks in the gazebo: the initial stage
The above design options will not work if the brazier is installed in the gazebo, since the smoke from the fire will collect under the roof. In this case, it is advisable to use a project involving the construction of an exhaust pipe. Before you make a brick brazier with your own hands, you need to decide on the location, as well as make a foundation. A concrete slab can be used as a base, which is laid on top of a sand cushion under the entire area of \u200b\u200bthe structure. The gazebo itself is installed on the logs.
For the construction of the brazier, it is desirable to use oven bricks, since it is resistant to high temperatures. As a bonding material, you can use a mixture consisting of clay and sand.
The list of tools necessary for work:
- trowel for applying a clay-sand mixture;
- a shovel for forming a foundation pit;
- measuring tape;
Brick barbecue drawing in the gazebo
- plumb and building level of bubble type;
- wooden jointing, which will allow you to get the same seams;
- bucket and trough.
The installation location of the brazier is selected taking into account its design. If the pipe version is used, then the structure is located on the edge of the gazebo or in the middle of it. With a central placement, free access will be provided to the structure from any side. In this case, a bench can be installed behind the barbecue. A heated wall will create comfortable conditions for seated people.
Helpful advice! If you equip the brazier with a chamber for storing firewood, then during operation it will warm up, drawing out excess moisture from the wood. Thanks to this, the fuel material will be easier to ignite.
If the brazier is installed on the side, then it will be possible to release extra bed. Designs with a stove, oven, work area or smokehouse cannot be placed in the center. This installation option is not suitable for barbecues that do not have a pipe.
The main advantages of the barbecue in the gazebo is cooking in any weather.
Preparing the base for the barbecue in a brick gazebo with your own hands
To equip the foundation for the barbecue, you should dig a foundation pit required size and form a crushed stone pillow at the bottom. Then the bonding solution is prepared. To do this, mix sand and cement in a ratio of 3: 1, respectively. The pit is filled with this solution in layers. The mixture alternates with a reinforcing mesh, which will prevent the destruction of the base. In this case, it is very important to ensure that the first layer of reinforcing material is placed directly into the solution, and not at the bottom of the pit.
After filling the pit, roofing material is laid. The foundation needs at least 2 weeks to dry out. If the weather is hot outside, the base should be moistened with water. Brick laying can only be started after the foundation has completely hardened.
The bonding solution is prepared in advance. To do this, the clay is soaked in water for a week. The solution should be periodically stirred and, if necessary, topped up with water. At the last stage of preparation, sand is added. The material is poured in small portions until the consistency of the solution becomes thick. To check this, you need to dip a wooden stick into the mixture, and then take it out. If the solution covers it with a thin uniform layer, then the density of the mixture is optimal.

A concrete slab on a sand cushion is required only at the location of the barbecue
How to build a brick gazebo with barbecue: photo and description of the workflow
The foundation for the gazebo is arranged separately. To do this, in the corners of the future structure, it is necessary to dig 4 holes, fill them up to one level with concrete and wait for complete drying. Next, roofing material is laid, lags are installed. The space above them is decorated with paving stones or stones.
Helpful advice! Before proceeding with the installation of the coating, it is advisable to lay the film. It will prevent the germination of grass between the paving stones.
To install supports, pits are dug, they are placed in strictly vertical position racks and filled with concrete mortar. After that, the installation of the upper lag is carried out, as well as truss system. Anchor bolts are used to fasten these elements.
Between the rafters, the installation of the crate structure for laying is carried out roofing material. At will, walls can be made in the gazebo. The project may not include them. If, nevertheless, the building will have walls, then boards should be nailed to the racks. They are arranged horizontally, vertically or diagonally.
Foundation for a gazebo with barbecue
How to make a brazier with your own hands from a brick: construction assembly
Brick laying is carried out only after the foundation has completely hardened. Before starting work, you need to mark the base in the area where the brazier will be installed. At the first stage of construction, the plinth is made. In accordance with the markings, the first row of bricks is laid, and in this case it is necessary to move from the corner zones to the center. Starting from the second row, the material is placed with a shift of half a brick. This is done first in one direction, and then in the other.
A reinforcing mesh is installed every three rows. It will prevent the collapse of the structure and the appearance of cracks. The reinforcing material can cause distortion, therefore, during its installation, the brazier is checked using a plumb line and a building level. When the construction of the base is completed, you can begin to manufacture the firebox. This element can be made of brick or a concrete base, which is pre-cast.
If the design will have an arch-type firebox, a circle is suitable for its manufacture. To leave a gap of 10 mm between the bricks, you can use wood chips. With the help of the solution, the resulting empty space is filled. The device must be allowed to dry for 2 days.

Brick can be laid only after the foundation has completely hardened.
Important! The circle must be removed very carefully so as not to damage the structure.
A reinforced concrete beam should pass over the firebox. It can be replaced with a reinforced corner, on which one row of bricks is laid. It does not matter if the structure has small gaps: they will provide oxygen access, which will contribute to the combustion process. If the brazier is equipped with a place for a barbecue, then for mounting the grate it will be necessary to form protrusions.
At the final stage, a chimney with a pipe is made, as well as walls that close from the wind. To prevent precipitation from entering the structure, a metal visor can be installed on top.
How to build a stone brazier with your own hands at their summer cottage
Along with brick structures, stone barbecues are popular with summer residents. These structures are no less practical and durable, while they have an interesting textured finish, which perfectly emphasizes the beauty of nature and the surrounding landscape.
Subject to careful planning and accuracy construction works, the stone brazier will be strong, reliable and will last for decades
For the construction of a stone brazier, you can use the following materials:
The stone can have a different shape, for example, in the form of flagstone, torn rubble or thallus.
Do-it-yourself technology for building a brazier from stones
Since the construction of the stone brazier is of considerable weight, a massive base will be required. For these purposes, a concrete slab is suitable. Its upper part should rise about 10-15 cm above the ground. Marking is applied to the foundation for the construction of the basement. In order for the structure to retain its shape during masonry, a frame should be used.
Scheme of a brazier from a stone
The assembly of a stone-based fireplace is carried out according to the same principle as the construction of a brick structure. All joints must be thoroughly lubricated with a solution. In this case, it is necessary to ensure that the masonry is as dense as possible. To increase the strength of the structure, it is necessary to lay a metal rod in the seams.
The stone is laid in accordance with the chosen scheme. As you progress, a brazier and additional work surfaces are equipped, if they are provided for by the project. To fix the masonry, it is desirable to use wooden spacers. By embedding metal jumpers, the strength of the structure can be increased. These elements greatly simplify the work in the manufacture of horizontal surfaces.
In the area where the coals will be located, a frame and a metal grate, preferably made of cast iron, should be placed. If you hammer staples between the stones, you can install a grill in the fireplace. In this case, it is very important that these elements are on the same level, otherwise it will be skewed. top working area, which will be used for the preliminary preparation of products, it is recommended to tile or equip with a countertop.
The simple design of the brazier made of stone allows you to build it yourself, without the help of specialists and additional equipment.
When the fireplace is ready, the excess mortar is removed, the dirt is cleaned and the finish is done. The frame part of the structure can be made of brick, on top of which cladding is made using natural or artificial stone. In this case, flat elements should be used.
If you adhere to the technology and strictly follow the pattern of laying stone or brick, any summer resident can handle the construction of a homemade barbecue. The choice of quality materials is the key to strength and durability, and a careful approach to the development of the project will allow you to get a comfortable design that will satisfy all needs.
Read in the article
Types of barbecues
Experts divide all barbecues into three categories:
1. Mobile.
Compact folding brazier
2. Portable.

Convenient mobile brazier with wheels
3. Stationary.

Stationary brazier made of bricks
To understand why it is worth stopping at brick version, you need to know its competitors "by sight". Let's start with mobile models. These types of barbecues are better known to the townsfolk as folding. Ideal solution for travel lovers. When folded, the product is very compact. It is characterized by a small weight, so the brazier can be easily placed in the trunk of a car.

Folding brazier is ideal for travel
Moreover, it can be transported even on a bicycle, because the assembled brazier looks like a suitcase. Light weight is a relative advantage. What is good in transportation is not very desirable in operation. A small mass indicates the thin walls of the brazier, so they will burn through at an enviable speed. Giving preference to mobile barbecues, be prepared for their frequent change.

Folding braziers are made of thin metal
A portable grill is a more popular model. Products are strong and quite reliable. If necessary, such a brazier can be moved to any corner of the garden. Two people can easily handle the task. These options are quite durable.

Mobile brazier can be installed in any convenient place
The unit of measurement of their life cycle is not times, but seasons. For the manufacture of portable braziers, high-quality iron of large thickness is used. The disadvantages of the category include a not too elegant look.

Mobile barbecue
If you want to have a really exquisitely arranged barbecue area, then you should stop at a stationary brick grill, which can be assembled by yourself. This type of brazier belongs to engineering and construction structures, in which a chimney must certainly appear.

Brick brazier with a chimney
Equipping a stationary picnic area will naturally cost more than using portable and mobile braziers, but it will pay off both morally and aesthetically. A bulky structure can be made an accent composition in the design of the site. An indisputable advantage of a brick brazier will be its large heat capacity. By reheating it once, you can cook several batches of meat without worrying that there is not enough heat for it and the dish will remain raw.

Brick brazier has a greater heat capacity
In our market there is also such an offer as an electric grill, but it has not gained much popularity, since the meat in it is cooked on skewers rotating around a hot spiral and does not have such a pleasant aroma as barbecue made on natural wood or coals. A similar variant of a shish kebab may be convenient when preparing a dish in a home kitchen, but not in nature.

Electric barbecue
Barbecue
The design is built in the same sequence as the previous attributes for frying meat. Its peculiarity is that it uses a special grid on which dishes are prepared..
The difference between such a structure is that it combines two objects for cooking: a barbecue and a barbecue. The brazier is a rectangular bowl with holes in the bottom. Barbecue is considered one of the most convenient and functional devices for cooking. meat products and vegetables.

Barbecue
Such devices for cooking can be built as mobile, that is, portable, as well as stationary. Each of them has its own advantages. Portable barbecue grills are convenient because they can be placed in any convenient place. positive quality stationary brick structures are considered to be more durable and can be used for many years. Most often, they provide for the presence of dampers with which you can regulate the ingress of air. The type of product must be selected at the beginning, when the overall design and drawings are being prepared.
Such a structure can be used in all weather conditions, since the design provides protection from the wind.
A properly equipped area where a barbecue grill is located can become an adornment of the entire interior of a country house.
Most often, the barbecue area includes not only the oven, but also other attributes. For this zone, it is recommended to equip a special platform with a canopy or a gazebo. Here you can install furniture for a comfortable stay in the air.

Such a structure can be used in all weather conditions.
Thus, the independent construction of structures for country house will give you the opportunity to spend time with family and friends in a cozy atmosphere. At the same time, structures that are made by the hands of the owners of the house will cause a special sense of pride. Also, as an option, products can be built not only for your site, but also as a gift to your loved ones.
Brazier with stove
Walkthrough
7
Total Score
Brazier made of bricks - relaxing with family
Everyone dreams of spending more time with their family. Why not spend it outdoors? With the help of the grill, you can make it tastier and even more pleasant. After reviewing the information, please leave your assessments with arguments in the comments. They will be helpful to other readers.
Your opinion is very important to us. Thank you for your participation
We appreciate your feedback and your time.
Relevance of information
Availability of application
Topic disclosure
Reliability of information
- The product can be made exactly as you want, as it is more convenient
- Construction quality
- The ability to make the appearance unique
- Time with family
- Good option for a gift
- The process takes a lot of time and effort.
- Cost
- Not everyone can do it themselves
Add your review |
Bricklaying
The ordering of the brick barbecue is shown in the following figure. If you want to draw the order yourself, then it is most convenient to do this on a piece of paper in a cage.

This is what the order of the barbecue looks like
The easiest way to lay brick for a brazier is to move each row half a brick in one direction or the other. Start laying the basement should be from the corners to the center along pre-marked lines. Every 3 rows, do a level and plumb check, and also lay a reinforcing mesh.
The first row of masonry, like the second, is made continuous. The plinth can have different heights, depending on the project, and several compartments in which it is convenient to store firewood, charcoal, some utensils, etc.
For the brazier, you can use a pre-cast concrete base with reinforcement or lay it out of brick.

If the firebox is planned to be arched, then a circle is used. A gap of 1 cm is left between the bricks. It is best to use wood chips for this. So you can evenly distribute the bricks. Only after that the space is sprayed with water and filled with a solution. Kruzhalo is left for 1-2 days.

From above, the firebox is covered with a reinforced concrete beam or an iron corner. 1 more row of bricks is laid out on top of the jumper.
If a brick brazier is planned to be used as a barbecue, then you need to think in advance about the installation site of the grill. For this, small protrusions are made. The lattice itself is placed on the reinforcement rods embedded in the walls of the building. You can make several ledges to be able to place the grate at different levels.
Next, wind walls are laid and a smoke box is made. The pipe is attached to the support columns and gradually narrows. This is the most simple design. And to protect it from precipitation, a metal visor is installed above it.
In simple schemes of brick barbecues, the pipe may be absent altogether, as well as wind walls.
Do-it-yourself brick barbecue step by step construction with real photos
Consider another option, more complicated - how to make a brick barbecue with your own hands, which includes two lower compartments for firewood, dishes and other small things, a combustion chamber, a countertop and a chimney at the top.
For the construction of the structure itself, in this case, facing bricks were used, and refractory for the inside of the furnace.
 Initial construction stage
We start laying in the same way as described above. The lower part will be in the form of the letter "Ш", only the branches are different in width. What will be wider for firewood, above it there will be a firebox and a chimney. The second is for dishes and other accessories, there will be a countertop at the top.
 We make even seams between rows
So that everywhere between the bricks there is the same and even seam, here, when laying, a metal bar is used, in the section of which there is a square with a side of 12 mm. But we advise you to take thinner - 5-10 mm will be enough. You also need to constantly control the level of verticality and horizontal masonry.
 Brick laying process
The bar is placed on the edge, as shown in photo 4, then carefully smeared with mortar. On the side where they put the bar, we put the mixture on a par with it, on the other a little more, a slide. We lay a brick, from the side of the plank we hold it with our hand, and on the other, lightly tapping with a hammer, we align it to the level. When the solution dries a little, remove the bar.
In order for the masonry process to progress faster, there should be several planks, as they are needed for each row.
 Lay out the bottom part - the first 10 rows
According to this principle, 10 rows are laid out.
 We prepare the basis for the firebox and countertops
Next will be the firebox and countertop. On the 10th row we put reinforcement with a diameter of 12 mm. The distance between the rods is 70 mm. Formwork is placed between the reinforcement so that the mixture does not fall down when the seams between the bricks are filled.
Professional advice: it is better to take metal corners, as there is a possibility that the reinforcement will bend under the weight.
 We lay out the brick and fill it with mortar
At the same distance from each other, bricks are laid out over the entire area. Those that fall on previously erected walls are placed on the mortar, the rest are simply on the formwork. Then the gaps between the bricks and the surface are filled with mortar.
 We form the combustion chamber and the vault
After drying, a firebox is erected - 8 rows are laid out vertically. Further, the back part, which is located near the wall, is also erected, and the remaining three sides taper up by half a brick. So 9 more rows are laid out.
 Building a chimney
The next step is the chimney. In this case, 20 rows are made of bricks, and at the top there is a stainless chimney. A high pipe is needed so that the smoke does not interfere with either you or your neighbors, and the draft is better.
 The last stage of construction - we finish the countertop and firebox
And the finishing touches - the countertop is laid out with tiles, and inner part furnaces - refractory bricks.
 Final result
After a few days to dry completely, the barbecue is ready to use.
Below in the gallery you can see more photos of barbecues and barbecues for summer cottages made of bricks with your own hands, and choose the one that suits your site in terms of style, functionality and location.

 In the gazebo
  On the terrace
  With hob
  Outdoors Built-in smoker
 There is no fundamental difference between barbecues and barbecues, except that on the first one, food is cooked on skewers, and the second on the grill. Both can be done on the same structure, the construction of which will be discussed.
Often a country barbecue is a simple street building open air. A brick barbecue is a more complex device that can be located in a summer kitchen, gazebo or outdoors, but it already has a chimney and in most cases a cover to protect it from rain and snow.
Brick brazier in the gazebo
If you are going to install a brick barbecue in a gazebo, the options proposed above will not work - the smoke will be all under the roof, which will not add joy to you. For gazebos you need a brazier with an exhaust pipe. This construction is more complex, but you can also do this option yourself. It is also not very difficult to fold the order of the barbecue made of bricks for a gazebo with your own hands below. It also, like the first, has an even arch, which is much easier to do in the absence of experience.
Dimensions and materials
This brick brazier / barbecue is of medium size:
- width 150 cm;
- depth 75 cm;
- total height to the beginning of the flue pipe 217.5 cm.

Appearance and sections of the brazier made of bricks. It can be done independently in the gazebo
For masonry, you can use ceramic solid bricks. For the area where the fire will burn, you can (but not necessarily) use fireclay bricks. In the figure, it is indicated in light yellow.
The laying of the "cold" belt - up to the 11th row inclusive - can be done on a cement-sand mortar (1: 3). Next, you need to use clay-sand. The thickness of the seam in any case is 5-7 mm. Hold it for sure.
Structurally, this brazier consists of three “cold” compartments in which firewood can be stored and used for household items. The "hot" zone starts from the 12th row. Here they make a fire, install a barbecue grill or barbecue racks.
An example of building a gazebo made of wood is described here, and one of options summer kitchen - in this article.
Order and explanation
The ordering of this brick brazier is a little more complicated, so explanations are needed. The first row is laid out on the same level with the floor of the gazebo. If your foundation turned out to be low, you can also raise it with bricks laid on cement mortar.

Arrangement of a brazier from a brick for an arbor
The next four rows are laid with dressing. This will be a firewood shed - an area where it is convenient to stack firewood. On the fifth row, three strips of metal 3 mm thick and 50 mm wide are laid on top. They will serve as a support for the bricks of the next row. Lay the sixth and seventh rows according to the scheme.
In the 8th row, the formation of two chambers for household items begins. Look carefully at the location of the seams. This is fundamental: none should coincide with the seam of the bottom row. Only in this way will the brick wall be strong enough. Where required according to the scheme, the bricks are cut: halves and even quarters are used.
In the 11th row, the middle wall is no longer placed, but metal strips are again placed on top: the next row, which covers the utility compartment, will rest on them. The 12th row is slightly larger in size than all those located below: everything goes smoothly along the back wall, and the bricks protrude about 3 cm in front.
The 13th row is also laid out solid. A brazier will be installed on it. In size, it is still slightly larger than the previous one.

The middle part of the order: we form the focus zone
The next rows form a "hot" zone - a fire will burn here. This zone is smaller in size than all the underlying rows. To make it more resistant to fire, it is lined with fireclay bricks placed on the narrow side. In size, it does not match the ceramic and the height of the rows and the seams will be different. Ignore it by laying it out regardless of ceramic. Just follow the alternation, as indicated in the diagrams.
In the 21st row, a steel corner is laid. It can be used from black or stainless steel with a thickness of 3-4 mm. Corner dimensions 40*40 mm or 50*50 mm. Length - from the middle of the brick on the right to the middle of what is on the left. The front wall of the chimney will rest on this corner.

Formation of a pipe for removing smoke from the barbecue
In the 22nd row, there is also fireclay brick, and the front wall of the chimney appears, resting on the corner. In size, this row is larger than the previous ones: in front, the bricks hang over the corner by 3 cm. The next row becomes even wider, and then there is a gradual decrease. Row by row the smoke channel becomes narrower. By the 30th row, a pipe is formed. It rises above the roof of the gazebo by at least 50 cm. During its construction, alternately alternate the 30th and 31st rows. ON this do-it-yourself brick brazier can be considered built. Now you need to dry it without fire for 5-7 days, and then gradually heat it for several days, evaporating the water from the masonry.
The easiest way is to make a brazier from a gas cylinder. How, read the article "
Foundation for barbecue
The first stage of construction is pouring the foundation. A hole is dug deep for him. 30 cm and the size that 20-30 cm exceeds the size of the future structure. The walls and bottom are leveled, rammed. A pillow of sand and gravel is laid out at the bottom. Layers are laid alternately, each subsequent must be moistened and compacted. Cushion thickness - 15 cm.
Before pouring, a formwork is installed that protrudes above the ground by 10 cm. Placed at the bottom of the pit reinforcing mesh and filled with cement mortar. At the final stage, the foundation should be leveled with level. Complete hardening of concrete occurs 3-4 weeks, i.e. wait before proceeding with construction 28 days. For uniform setting in hot, dry weather, the surface of the concrete should be moistened periodically.
Clay is diluted with sand in the ratio 1:1 . The consistency of the solution should be like that of thick sour cream. It should be easy to take with your hands, without spreading. If a small amount of clay solution with sand easily rolls into a bundle with a diameter 1 cm, without cracking, spreading and without losing shape, then the quality of the solution is good.
While the foundation is solidifying, clay mortar should be taken care of in advance. G line soaked in water for a week and stir occasionally, adding water if necessary. Clay and clay masonry mortar are sold in hardware stores. We supply electricity while filling, before laying out the brazier of bricks. With our own hands we derive contacts for connection.
Waterproofing is laid on a completely hardened foundation - polyethylene folded several times, a layer of roofing material or other bituminous material. Country barbecues are built in compliance with the standard rules of brickwork. The brick is recommended to be poured with water the day before laying or lowered into it for 20-30 seconds immediately before laying. Then it will not take moisture from the clay, and the grip will be better.
Barbecue made of bricks with an ordering pipe
This barbecue option is a little more difficult, but also not the most difficult. The most important thing is that the combustion chamber here has a direct vault, and it is much easier to make it vaulted. The brick frying chamber is raised to a height of 90 cm, the total height - to the beginning of the pipe - 217.5 cm.

Brick BBQ masonry scheme
It all starts with the preparation of the foundation. For this barbecue oven, only a monolithic reinforced base (reinforcement step 15 cm) on a compacted crushed stone base is suitable. On a dried foundation, waterproofing is spread in two layers, then laying begins. If barbecue is done in the gazebo, the first row of masonry should begin at floor level. If the foundation turned out to be lower, lay out an additional row (or two) of bricks, and then begin laying according to the above scheme.

Brick barbecue drawings
The first 9 rows do not require special explanations. They lay exactly according to the scheme, observing the order, using halves and cut bricks, if indicated on the plan. Be sure to check the verticality of the resulting walls, as well as control the thickness of the mortar - 8-10 mm and the horizontal laying of each brick.
To control the thickness of the seam, you can use a rebar of the appropriate diameter. It is placed on the edge, the surface of the row is filled with mortar, the excess just above the bar is cut off with a trowel. After laying and tapping the bricks, an even seam is obtained - the bar prevents the brick from sinking lower than necessary. The bar is then taken out and shifted higher.
To be able to lay the 6th row (solid), after laying the 5th, lay a strip of metal 4-5 mm thick, 40 mm wide. Length - slightly less than the span of the furnace - 1450 mm. 3 strips are needed - one at the edge, two approximately in the middle of each row of bricks or as indicated below (11th row).

Formation of two economic chambers
The layout of the laying of the next rows of barbecue is clear
Only in the 12th row, pay attention - you need bricks sawn along. It is also worth mentioning that the 12th and 13th rows are larger than the lower ones - forming a decorative "belt"

The formation of the combustion chamber begins
Fireclay bricks (ША-8) are indicated in light color in these rows. They put it on the same composition of clay and sand (it is possible to add a small proportion of cement). It is better not to use mixtures based on fireclay: they need very high temperatures for sintering, which are unattainable in outdoor barbecues. As a result, this solution may subsequently simply crumble.

Formation of the vault of the combustion chamber
At this part of the order, everything is also clear: we begin to mold the vault of the firebox. It overlaps on the 22nd row, in which a gradual narrowing begins.
Transition of the vault into a pipe
The formation of the vault continues, which in the 30th row passes into the chimney. Then the 30th and 31st rows alternate until the required height is reached.
Idea development
Before proceeding to installation work you should consider brick barbecues of different designs. Drawings for each model may differ dramatically. Suitable for beginners the simplest option, consisting of supports from a pallet for coals
Advanced craftsmen should pay attention to combined furnace complexes.
Design Options
From the whole variety of grill structures built from such material, separate groups of products can be distinguished. The most affordable in terms of cost and construction method is a simple brick brazier. It consists of supports and a grate with a tray for coals. Some products do not even have protective top walls. For the convenience of cooking, you can attach a work surface. Here they store furnace materials, skewers and dishes.
More difficult option- multifunctional oven-brazier made of bricks. Not everyone can do it with their own hands. Such complexes are complemented by a covered firebox, hob, smokehouse, sink and other objects necessary for cooking.

Combined brazier with additional work surfaces
Concerning decorative design, here you can experiment with finishing materials, brick laying methods, brazier forms and other elements.
Choosing a place for construction
An equally important issue is the choice of location. Before building a stationary brick brazier with your own hands, it is recommended to carefully consider the issues of ease of placement, use, etc. The best option- Creation of a complex recreation area. A backyard yard, terrace, or gazebo with a table are great options.
Tip: It is imperative to consider the issues of removing smoke from residential premises and fire safety.

Great idea - gazebo with barbecue
If there is no suitable place, make a small free-standing brick outdoor grill. It can be placed in the garden or in the far corner of the yard. To prevent the formation of puddles and dirt after rain, equip a platform or platform near it. Try to avoid proximity to shrubs, outbuildings and other flammable objects. Also make sure that the smoke from the grill will not disturb your neighbors.
Dimensions and drawings
Next stage preparatory work- determination of the dimensions of the future product and drawing up a project plan. When designing brick barbecues with your own hands, the drawings must be drawn with the designation of the dimensions of each individual element and its exact location.
Read also about the construction of a brick smokehouse in addition to this article.
Usually the structure is divided into two horizontal parts. At the bottom there is a place for storing firewood and coals, and at the top there is directly a grill with a brazier. If auxiliary surfaces are provided, it must be taken into account that it should be convenient and safe to work on them.
When designing brick barbecues with your own hands, the drawings must also be completed with a projection of the finished product in compliance with the exact proportions. This will allow you to visually evaluate its appearance and ergonomics.

Approximate scheme for a simple barbecue
The standard height of the grill is 90 cm. Since this is an individual project, you can adjust the data to suit your height. As for the width of the brazier, it makes no sense to make it less than 50 cm. The work surface should also be wide enough so that you can cut food on it, put dishes and ready meals.
Please note: when calculating, you also need to take into account the dimensions of the materials used.
Necessary materials
In order for the built brick brazier to serve you for many years, it is important to choose quality materials. Often, when arranging grill complexes, several types of bricks are used.
For laying out the brazier, it is imperative to purchase refractory red brick. Work surfaces that are resistant to high temperatures can be made from cheaper materials.
In addition to bricks, for work you will need:
- cement-clay mortar;
- concrete;
- reinforcing bars;
- metal corners;
- level;
- fittings, preferably cast iron.
Read also the article about on our website.

It is necessary to take care of the selection of high-quality fittings and service equipment
From the accessories you will need a grate for cooking, skewers and supports for them, a grill tray for coals. The main part of the accessories is removable, which simplifies the use of the grill. barbecue ovens are also often equipped with a hood.
Simple brick brazier
Any building made of brick requires a foundation. And even such a small brazier, as presented below, is very undesirable to put directly on the ground. The foundation will have to be poured. You can make it tape or slab. The stove is more reliable: in winter it will not lead and the masonry will not fall apart.

Even a beginner can fold this simple brick brazier with their own hands
The dimensions of the foundation for a barbecue made of bricks are 10-15 cm larger than its dimensions. First, the vegetation layer is removed, if necessary, the pit is deepened by 10-15 cm. Its bottom is leveled and rammed. A layer of crushed stone 10 cm is poured and rammed again. It is advisable to use a vibrating plate in this case: you do not compact the soil sufficiently with a manual rammer. The height of the tape is 20-30 cm, the thickness of the slab foundation is 10 cm.
Depending on the type of foundation chosen, an appropriate formwork is constructed. For greater strength, reinforcement is made with a bar of 10-12 mm in diameter. For a tape - two threads are laid around the perimeter, a “cage” is made for the slab: bars are laid along and across in increments of 20 cm. Everything is poured with concrete of a grade of at least M200.
If the temperature during construction stays around +20°C, work can continue after about a week: the concrete has gained more than half its strength. Two rows of waterproofing are laid on it (roofing material, roofing felt, modern roll waterproofing), smear bituminous mastic or other liquid waterproofing solution. After that, you can start laying.
Dimensions and materials
You can fold this small brick brazier with your own hands without even having any experience. It is a building in the form of the letter "P". There are two parts: the brazier itself and a table next to it. The design is simple and easy to modify. You can add another section next to it, make it wider or narrower, deeper or smaller. You can make two ledges under the grills - this is if a large number of kebabs will be cooked.
The basic dimensions are:
- width 180 cm;
- depth 90 cm;
- brazier height 100 cm.
For laying this garden barbecue, you can take a full-bodied ceramic brick, you can also use fireclay SHA-8. For the order given below, 202 bricks were used.
For the lower part - up to the 5th row - the mortar is used cement-sand 1: 3 or with the addition of one part of lime to it. Further, where heating will already take place, a clay-sand mortar is used. Its proportions are selected based on the qualities of clay (oily, normal, skinny). By density - it should not be too liquid, but not too thick. About like a good thick sour cream.
Order and order of work
This country brazier is made up of bricks laid "on the bed". Two protruding rows (bricks are laid across) serve as a support for the brazier sheet and the grill grid. Here you can put it on a spoon (put it on the narrow part), then the sheet will rise a little higher. In the lower part, you can stack firewood or use it for other household needs.
The rows are placed in a dressing - with an offset, for this you need halves of bricks. They can be cut with a grinder. The first six rows form the brazier and table on the right. Starting from the 7th row, the masonry goes only in the part where the brazier itself will be located.
Seam thickness 5-8 mm. It must be the same.

Ordering a small country brazier made of bricks
In order not to disturb the geometry during construction, you can stretch the cords and level all rows along them. But each brick and each row is controlled by the level to horizontal. Constantly need to check the verticality of the walls and corners. To do this, use a construction plumb line (a cord with a weight at the end). You can also check the verticality with a level, but it has an error, especially if it is not a professional, but an amateur instrument. So with such a check, there is a solid probability of getting a brazier with oblique, littered walls.
The ordering of this brick barbecue is simple, and does not require additional explanation. There may be questions about drying. If the weather is dry, leave the brazier to dry for three to four days. Then you can gradually build a fire. For a couple of days, heat in a gentle mode, using thin firewood and little by little. Then you can fry the first batch of kebabs.

One of the options for a simple brazier made of bricks. From basic version differs in that there are two rows of protruding bricks. Another difference is that the table is smaller.
If rains are expected, and there is no canopy over the barbecue, cover it with oilcloth. After about a week, you can start slow drying: make a small fire and not for long. Drying will also take 2-3 days. Then a brazier made of bricks, folded with your own hands, can be tested.
Rotisserie and other devices
In order to provide maximum functionality to your brick barbecue, it should be equipped with as many fixtures as possible. A banal device for cooking barbecue is not worth it to start a grandiose project on the scale of a country house.

In the process of laying the hearth for picnics, it would be nice to also provide for a spit on which you can cook a whole small lamb. It will also be useful to have a device on which you can hang a cauldron. In other words, the barbecue oven should be your summer kitchen, only much more functional.

In the process of laying the side walls of the portal, somewhere at the level of the fourth or fifth brick, it is necessary to make recesses in the bricks on both sides opposite each other.

In order for them not to move relative to each other, a pipe is threaded into the recesses, which must be there until the end of all work. Today, many people have beautiful stoves in the country, but not many have one in which you can take and roast a wild boar on a spit.
How to make a brazier with your own hands from brick, and what you need for this
First you need to determine the place where the future brazier will stand. The place must have a place to relax. For such purposes, a gazebo is perfect, which will protect guests from rain, snow and wind.
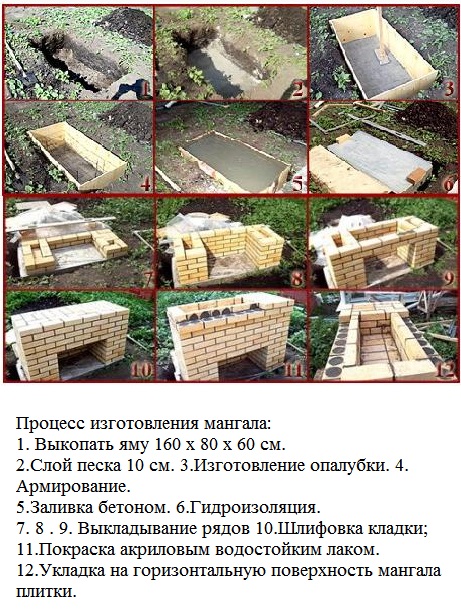
The most successful and popular design at the moment is considered to be a brick oven with dimensions of 1.6 m (height), 1.6 m (width), 0.8 m (depth) with a strip foundation.
You can bring communications to the barbecue, as well as additional add-ons that will fit perfectly into the interior of the complex, performing a practical role (you can store various kitchen utensils).
Near the barbecue you can place a table and benches. The choice of material from which they will be made depends on you.
In order to build a brazier with your own hands from a brick, you need:
- - gravel, sand and cement;
- - special oven stone;
- - concrete mixer and construction tools;
- - fittings and reinforcing mesh;
- - crate;
- - various sizes of bolts, screws and metal corners.
When building a brazier made of bricks, you need to take into account their weight and lay the foundation at least 50-60 centimeters deep, one brick wide. First of all, we mark out a place for the foundation, dig to a depth of 50-60 centimeters and lay the reinforcement.

After we dug a hole for the foundation and laid the reinforcement, we pour it with concrete, the concrete grade of 150-200 is enough for strength, I made concrete with the calculation:
- 1 bucket of cement
- 3 buckets of sand
- 5 buckets of rubble
- 1-2 buckets of water depending on the moisture content of the sand
We level the surface of the fill with a level (this will greatly facilitate the laying of bricks) and cover waterproofing material, I used roofing material. As a waterproofing material, you can use a plastic film, or simply generously lubricate with building mastic (this is done so that moisture from the foundation does not penetrate into the brick and does not destroy it).
After finishing work with the foundation, you need to wait a few days for the foundation to finally harden.
Mangal brick laying
Furnace brick - is an ideal option for the construction of barbecue. This building material perfectly withstands high temperatures. One drawback - during severe frost it becomes very fragile.
Important: in no case should you build a brazier from silicate hollow bricks. . The first row of bricks should be laid out dry, without the use of mortar.
This is done so that in the future you do not have to use parts of the brick and adjust it to size.
The first row of bricks should be laid out dry, without the use of mortar. This is done so that in the future you do not have to use parts of the brick and adjust it to size.

The masonry must be marked and observed throughout the construction.
Brick absorbs water like a sponge. For this reason, a few days before the start of laying, it is necessary to wet the bricks with a garden hose. This procedure will prevent the brick from absorbing water from the mortar. For laying bricks, it is necessary to prepare a cement mortar in the ratio given below.
The composition of the mortar for masonry barbecue:
- 1 part cement
- 1 part slaked lime
- 3 parts sand
Water is added to the composition in the required amount and brought to a state of thick mass.
After laying the first row of bricks, the subsequent rows are laid with an offset of half a brick relative to each other (this offset of the seams is done for better dressing).
The laying of each level starts from the corners. It is necessary to periodically check the level of masonry horizontally and vertically. The dimensions of the brickwork must correspond to the developed drawing of the brazier.
The most important element of the brazier - a brazier, is laid on metal corners, which are fixed on the masonry with metal pins. The firebox must be lined with thick metal sheets from the inside. This will prevent premature destruction of the brick from high temperatures.
For good traction, it is enough to leave small gaps unfilled with cement mortar. To install the grill grate, you need to put several bricks inside the brazier inside with the same protrusion.
When developing a brazier drawing, you can lay a variety of structures designed for storing firewood, for a canopy, and installing a decorative exhaust pipe. The whole complex can be turned into summer kitchen where you can receive guests at any time of the year.
Brazier made of bricks with a stove under the cauldron. Brick ordering
Another version of the brazier that you can put at home is the brazier, which has an oven for a cauldron added.
It means that next to the brazier a traditional oven is installed under the cauldron. Both of these designs are separate, but for aesthetics and to give the appearance of a single whole, a connecting seam is made between them.


The order of construction of such a brazier is the same as in the previous version. Just add the installation of the furnace under the cauldron.
We start the whole process by laying the first row without using a clay-sand mortar. To do this, first lay out all the corner bricks, which should form a rectangle. We stretch the string between these bricks. Next, we lay the bricks of the first row and check the correctness of the masonry. For this purpose, we measure the diagonals of the formed rectangle, if they are equal, then lay out the bricks on the mortar. If not, then we make adjustments to the masonry. We lay out the bricks of the first row on the mortar, the thickness of the seams should be equal to 3-4 mm.
Well, further laying is carried out according to the chosen order. Below are a few examples of this ordering that you can use for your construction.


Installing the oven under the cauldron includes the following steps.
Laying the 1st row.
We lay completely red brick. We start with a whole brick. Next, we apply this method to each odd row.
Masonry 2nd row.
A red brick is laid around the perimeter, and fireclay in the middle. The row starts with a half brick. The same is done with all other paired rows. The second row will be the bottom of the firebox. In the first two rows, we leave a place for the ash pan, where we build the door of this ash pan into the masonry.
3rd row masonry.
It is made solid, with the exception of the space above the ash pan. Here the grate is installed. To do this, we cut grooves in the brick of the third row. In addition, we block and fix the ash pan door in the same row.
Masonry 4 and 5 rows.
The brick is laid in such a way that holes are made for the firebox door and for the chimney. We divide the oven into two parts. One will become the outer wall of the stove, and the second will be its central part. We make a small space between them. The central part is made in the form of a square with a circle in the middle, which is a firebox.
The central part is laid out of fireclay bricks. We fix the firebox door.
Masonry of the 6th row.
We do everything in the same way as when laying the previous row. The only thing is to block the outer hole for the chimney. The brick should bandage the seams of the previous row.
Masonry 7-11 rows.
The 7th row covers the firebox door. In the 9th row, holes must be made through which flue gases will exit. In the 11th row we make a circulation hole in the front of the crucible. Next, we put the 12th row and fasten plates with a hole for the cauldron on it.
Simple brick brazier
This design is very simple, easily modified to suit any needs and desires. It consists of brick walls, in which ledges are arranged (the brick is placed on the edge). Heat-resistant sheets (metal, etc.), gratings, and skewers are laid on these ledges. It is convenient, especially if there is some kind of roof over your head in case of rain, but it is built separately and at will.

Project and photo of the finished brazier / barbecue made of bricks
Any brick building requires a foundation, or at least a prepared foundation. Not even this little brick brazier. Since there are few bricks - a half-brick wall, then a rammed platform lined with some kind of hard surface is suitable for this design.
Foundation preparation
Remove the fertile layer, if necessary, deepen the pit. The depth should be about 20-25 cm. The dimensions of the foundation or platform are 50 cm larger than the dimensions of the furnace in all directions. The bottom is leveled, crushed stone of the middle fraction is poured onto it. The thickness of the crushed stone layer is 15 cm. It is well rammed. It is desirable - with a vibrating plate, if it is not available, with a metal or wooden rammer.
The next steps depend on the selected base. If this is one of the coatings - paving stones, paving slabs and similar materials, then a layer of fine-grained sand is poured into which the coating is laid according to the level.
If a slab foundation is chosen as the basis, it is reinforced with a bar 10 mm in diameter. It is laid along and across the foundation in increments of 20 cm, tied at the intersection. If you don’t know how to knit with a special wire, you can tighten it with plastic clamps. Reinforcement with a ready-made thick wire mesh is allowed for this model. The formwork is exposed along the edges and everything is poured with concrete of the M250 brand. Work can be started in a week if the average daily temperature was not lower than +20°C, and in two if it was +17°C.
For this brick brazier, a full-bodied ceramic brick M200 is used. You can take a stove, but it is more expensive, you should not put fireclay: the temperatures are wrong and he loves moisture too much to feel normal in an open barbecue.
The laying is carried out on a clay-sand mixture, to which a little cement is added for greater strength. For beginners, it is better to take a ready-made mixture for stoves, but not heat-resistant, without fireclay. Knead according to the instructions, the thickness of the seam is 3-5 mm, withstand strictly. Constantly control the verticality of the walls and the horizontality of the masonry
This is important for the normal operation of the oven.

Brick brazier ordering (masonry drawings)
As you can see, everything is really very simple. Each odd row starts with a whole brick, odd - with a half. In the 6th and 10th row, the bricks are placed on spoons - sideways, and unfolded across the main masonry. If you are doing a barbecue - under the grate - in the same rows, the back wall is laid out of brick, also placed on spoons, and to maintain the thickness of the masonry, they are placed in two rows, as well as the rest - with dressing - offset seams. If you are going to use a brazier - for skewers - on the back wall, put a brick on the spoons too, making a ledge in this area as well. Ahead, as a support for skewers, use a profile metal pipe small sections, cut to size. In it, under the skewers, you can make recesses.
Starting from the 7th row, laying is carried out only on the half - right or left - as you wish, but this layout is given under the frying chamber on the left - it is wider, and there is a table on the left. If it is more convenient for you on the contrary, do a mirror image of this ordering.
Brick is a hygroscopic material, in order to reduce the amount of moisture that it will “pull” from the base and extend its service life, waterproofing is needed under the first row. Can be applied in two layers roll material(such as roofing material or hydroisol), walk around the perimeter with hydrophobic impregnation. A layer of waterproofing will not interfere between the first and second rows.

This is how one of the variations of a brick barbecue without a table looks like (if you don’t need it, just ignore this part)
After the brick brazier is folded, it is left to dry in warm weather for 1-2 days, in cooler weather - for 3-5. Then you can do a test run. Approximate "equipment" is shown in the photo of the finished barbecue. In this version, three rows of protrusions are made: the upper one is for products, the middle one is for coals, the lower one is for collecting burnt coals and ash.
In order for the folded brazier to serve more or less for a long time, it is desirable to cover it with a composition that reduces hygroscopicity. For this case, KO-85 varnish is best suited. And it would also be nice to provide some kind of cover: close it in case of rain and for the winter.
ordering

Ordering a brick barbecue is the most difficult, since each row must be laid out exactly according to the scheme. In our case, the combustion chamber has a straight vault. In the diagrams, the brick brazier is raised to a height of 90 cm, but you can lower it if necessary. To do this, the ordering scheme will have to be slightly changed. The total height to the beginning of the chimney is 217.5 cm according to the drawing.
 Barbecue masonry scheme
A waterproofing layer is laid on the dried foundation. Then you can start laying bricks. If the construction of a barbecue is carried out in a gazebo, then the first row of the stove should be laid out at floor level. If the foundation for the barbecue turned out below the floor level in the gazebo, then lay out an additional row of bricks. After that, the laying is carried out strictly according to the above scheme.
 Barbecue drawings
The first nine rows do not require special explanations. Laying is carried out according to the scheme
At the same time, it is important to check the vertical and horizontal walls, as well as to control the thickness of the solution (8-10 mm). To make the seam between the bricks perfectly even, you can use a rebar with a diameter of 8 or 10 mm
Lay it on the edge, fill the surface with mortar. You can remove the residue protruding beyond the bar using a trowel. The bar can be removed after laying and tapping the bricks, shifting it to the next row.
To lay the sixth continuous row, after laying the previous one, a strip of metal 40 mm wide and 4–5 mm thick should be laid. There should be 4 such stripes - two in the center of each row of bricks and 1 from two edges. Approximately it may look as shown in the diagram of the eleventh row.
 Formation of chambers
 Furnace formation
Fireclay bricks are laid on a composition of clay and sand, and a little cement can also be added here. Chamotte-based mixtures should not be used, as they require higher temperatures for sintering, which are unattainable in outdoor barbecues.
 combustion chamber
Now it is necessary to form the vault of the firebox. It begins to overlap from the 22nd row of the order, where, according to the scheme, the narrowing begins.
 Pipe forming
In the 30th row, the vault passes into the chimney. Then the shape of the pipe is laid out until the required height of the chimney is reached.
Construction of a brick oven
Fixture for
frying kebabs, which was created using bricks, looks like a capital structure. He has
a brazier equipped with rods necessary for fixing skewers, and an area where spare firewood can be located.
True, a brick brazier is a structure with a lot of weight, because it is being built on concrete base. design
devices for frying meat pieces in the open air must be supplemented with a pipe to remove puffs of smoke,
a canopy or a small roof, as well as countertops.
Pros and cons of barbecue from
brick
The owners of dachas who built a brick structure on a suburban area, on
which kebabs are prepared, found the following advantages:
- long service life and immunity to various factors that cause damage to the brazier, because properly made
the brazier does not rust and does not lose its appearance, as happens with a metal box for frying meat; - the brazier keeps inside the brazier the heat received by burning firewood, since the brick walls do not release
heated air, thereby contributing to the distribution of heat throughout the area where the barbecue is fried and does not burn; - economical consumption of firewood and coal, since the brick retains warm air, preventing the heat produced in the brazier
temperature to drop below; - little construction cost artificial stones correct shape - the material is inexpensive, and work
it is rather ingenuous with him, which cannot be said about metal; - the finished fixture becomes a good addition to the rest of the buildings in the summer cottage, and
decorates the yard.
A structure intended for the preparation of meat and built of bricks,
It also has some disadvantages:
- a brick brazier may seem huge, besides, unlike a metal fixture, it does not
it will be possible to move anywhere; - the brick brazier is large, so it is necessary to adapt an extensive
platform; - the device is not built from ordinary, but from special fireclay and ceramic bricks.
The brazier, which will always stand in the same place, should be erected
away from the dacha and other wooden buildings, after all, a device for frying barbecue is an object with an open
flame. It is more reasonable for a brick brazier to allocate a separate area in a special recreation area, for example, in a gazebo. There
he is not threatened with damage by rain or snow, besides, next to the barbecue made of bricks, sitting at the table, they can calmly
accommodate guests.
Brick barbecue options in the photo
 Oven-like brazier
  Original structure Simple version
 braziers
Step-by-step instructions for a brick barbecue
So, we decided to build a brick brazier. What do we need for this? Let's start with tools and materials. First of all, since we have a brick brazier, then we will need a brick. Since we are building a kind of oven, therefore, we will need a special oven, or fireclay brick. It is a fire-resistant brick that can withstand large temperature fluctuations. The mortar for laying bricks is a mixture of clay and sand, pre-soaked. For the barbecue, since it is stationary, a foundation will be needed. For its manufacture, we need cement, sand, formwork boards, rebar, stones and crushed stone. To fasten additional elements, it is necessary to prepare metal corners, gratings, various valves and a sheet of iron.
As for tools, a shovel, trowel, buckets, a trough for mortar will be needed here.
The number of bricks depends on the project that you draw yourself, or find one already finished. Below are several options for a brick brazier.


If you do not want to bother with complex schemes of your structure, but simply want to put up a fairly simple brazier, then the following scheme may be suitable.


We make the foundation
The foundation of the brazier must be even, for which you can use the building level. Also for waterproofing it will be necessary to use roofing material

Based on the size of the brazier in the project, we dig a hole. We lay out the bottom of this pit with a stone with rubble and install the formwork. After that, we fill the pit with a concrete mixture (if anyone does not remember its proportions of cement and sand are 1: 3), while laying a reinforcing mesh.
In the meantime, the concrete is curing, you can prepare a clay mortar for masonry. To do this, in a special container (tub, barrel) we soak the clay for a week. Stir occasionally and add water if necessary. After that, we pour sand. To check the quality of the solution, you need to mix a little clay with dry sand, then roll the mixture into a bundle with a diameter of 1 cm. If it does not lose its shape, does not crack or spread, then everything is fine.
After the concrete has completely hardened, you can start laying bricks.
Brickwork
We begin laying with the construction of three supporting walls - two side and one back. If you need a through design option, then the back wall can be omitted.
The figures below show the ordering of the bricks.
If necessary, in the brazier, you can make compartments, one for frying, and the other for dishes. To do this, we arrange cavities in the supporting part by placing another intermediate wall in half a brick.


After laying out all the walls, we block them with a concrete slab. For this purpose, we use an OSB board of a suitable size. We install it from below in such a way that after the concrete has hardened, it is possible to safely remove the formwork. On top we put a square frame of edged boards, the height of which is equal to the thickness of the slab to be poured.
We put dense polyethylene on the OSB and fill it with a solution with a layer thickness of 1-2 cm. After that, we lay four reinforcing bars with a diameter of 12-14 mm and fill the entire formwork with fine-grained concrete (crushed stone fraction 0.5-1 cm).
 As soon as this plate has frozen, we continue laying the brazier according to the same procedures.
The optimal height of the firebox is 10 rows of bricks, or about 0.7 m. The bottom of the firebox must be treated with sheet metal. At the top of the structure, it is necessary to make a concrete floor with 1 row of bricks.

In general, there are a lot of options for a simple barbecue. You don’t even have to bother with mortars, but simply stack bricks on top of each other, as in the figure below:

But if you want a design, then you can offer such models.


How to make a solution

Barbecue laying involves the use of clay mortar. And just the quality of this mixture will depend on the strength and durability of the entire structure. So, it is unacceptable for the clay solution to crumble and crack after drying. Therefore, it should be relatively plastic and relatively thick.
 Types of sand
Clay mortar is divided into 2 types:
- Skinny. A non-plastic mortar is implied, which does not shrink after firing. But it will crack and fall out of the seams. Therefore, it is not suitable for masonry.
- Fatty. This refers to the presence of plasticity in the solution. Due to this property, the solution is evenly distributed over the entire area of the brick. However, there is a precipitate during firing. As a result, it is not used for laying a barbecue and a brazier.
 Bad and good solution
To prepare a good clay solution, you will need the following list of materials:
- Water.
- River or fine mountain sand.
- Preferably oily clay.
- Cement.
- Salt.
- Planed board.
- bucket 10 l and bank 1 l.
- Sieve for screening with a mesh size of 1.5×1.5 mm.
- Sieve with wide cells 3×3 mm.
- Raw brick.
So, for the preparation of a high-quality mixture, it is recommended to take a raw brick. Thanks to him, a sufficient amount of clay and sand can be added to the solution. Plus, it blends perfectly with masonry bricks, as it has an almost similar structure. Considering that it can be difficult to find a raw brick, and the process of preparing a mortar from it is laborious, it is best to use clay and fine mountain sand as a basis.
 Clay mortar recipe
First, using a sieve (with cells 1.5 × 1.5 mm), clean the sand from gravel and other contaminants. Thanks to this cleaning, you can make a thin layer of seam when laying a barbecue. Based on the quality of the clay, the required amount of sand is added.
Note!
To the touch, a good solution should not have lumps, clots, it should be homogeneous. The mixture should slide off the shovel without spreading over it.
First rows
 First rows
To increase the strength of the resulting solution, table salt is added to the mixture. For a bucket of solution 200 g of salt or cement 3-4 kg also per bucket. If the salt dissolves in water, then the cement should be thickened in water to a state of sour cream. After that, such additives are added to the clay solution.
Barbecue is an overseas name for things close to the heart
The history of barbecue goes far back to the colonial era, when the inhabitants of the eastern countries came up with a way to simmer large pieces of meat on coals. This method quickly spread throughout the territory of modern America and firmly entrenched among the locals. But what about Russia? We have a "barbecue" was and always will be! Only its name is grilled barbecue, dishes on a Russian street oven, meat on a spit, etc. For the convenience of preparing all these dishes beloved by our citizens, a barbecue oven was invented.
What is an outdoor brick oven?
The barbecue complex is a capital structure with additional built-in compartments for firewood, a sink, cutting surfaces, braziers for meat, pilaf, pastries, etc. The foundation is an important part of the complex. Under the barbecue, a solid concrete foundation with reinforcement 50-70 cm deep is required.
The center of the structure is a brazier made of fireclay bricks with a metal box, a grate and a chimney. A woodpile is placed under the brazier. Additional departments are equipped on the sides of the barbecue - a Russian stove, a tandoor, a sink, a countertop and other functional extensions.
Where to build a barbecue oven?
A do-it-yourself brick outdoor barbecue oven can be placed anywhere in the garden, gazebo and summer outdoor terrace, provided that you provide a good hood with a high pipe. So the smoke will not disturb you or your neighbors.
The most profitable place for a barbecue is about brick wall. If you choose a project with a sink, then it is wise to build your brazier near the sewer and water supply.
We carefully prepared illustrations with step-by-step construction for you:
See the detailed project with all dimensions below.
How to make a brick brazier with your own hands drawings and photos, design and calculations
When choosing the type of construction and design of the brazier, it is necessary to take into account the landscape features of the site. The construction should not stand out from the general style, but on the contrary, it must emphasize it. The process of developing a brazier project is not limited to the aesthetic side of the issue. There are certain rules that must be followed in order to secure operation and make it more comfortable.

Brick brazier drawing
For the construction of a site located in front of an open fire, it is imperative to use refractory materials, for these purposes it is suitable:
- sand;
- stone;
- concrete slab;
- paving stones.
You should also take into account the wind rose. Do not start construction if there is a possibility that smoke will enter the windows of a residential building
It is forbidden to place a brazier next to the plots of neighbors. Having a barbecue or oven can be uncomfortable.
Note! If there are blocks with a lighter shade in the batch of fireclay bricks, it means that the technology was violated during the manufacturing process of the material, and this casts doubt on the strength characteristics of the product.

First of all, it is necessary to carefully consider the placement of a brick barbecue - after all, it will be impossible to move it to another place later
In the construction of a brazier made of bricks with your own hands, the drawing plays an important role. To make your work easier, it is advisable to make a sketch of a summer cottage. Such a sketch will allow you to assess the features of the territory on a scale and choose the right place for building. The area located within a radius of 5 m around an open fire must be free from trees. The presence of plantings is allowed on the side where the structure is fenced with a wall, but not closer than at a distance of 0.5 m.
It is necessary to provide free access to the street barbecue made of bricks, as well as supply water in case of a fire.
Fire hazardous objects should not be placed nearby:
- compost heaps;
- sanitary and technical facilities;
- garbage containers.
If you follow the basic rules of fire safety and install a brazier away from the fence and the street, you can avoid conflict situations with neighbors.

Brick laying scheme: 1. bonder row; 2-6. spoon rows; 7, 8. dressing in half a brick
How to choose the best brick brazier project
Having decided to build a barbecue or an outdoor oven on your own in your summer cottage, it is not at all necessary to design the structure from scratch. On the network you can find drawings, photos and diagrams for building a brazier with your own hands, which will meet any wishes. Moreover, there is no need to try to pick up a project in finished form. In the drawing of the future design, you can combine any elements you like, which will allow you to achieve maximum compliance with personal requirements.
At the initial stage, it is necessary to make a detailed drawing of a brick brazier, indicating on it the exact configuration of the structure and all the data regarding its appearance.
The drawn up scheme should take into account the following nuances:
- construction design;
- the nature of the placement of the main and additional components, namely: the combustion chamber, brazier, chimney, loading door, etc.;
- dimensions of all structural elements.

At the beginning of the construction process of the brazier, it is important to decide on its design and design.
You should also consider the presence of a roof. There are options with an open and closed type of brazier. In the second case, the construction of a brick barbecue oven looks like a fireplace. The advantages of such a project are obvious, since in case of rain, the hearth will be protected from precipitation. In order for this design to function properly, you will definitely have to equip the chimney.
At the design stage, the presence of additional structures is also considered. Near the barbecue, you can equip a platform that will be used to prepare products. In this zone, a countertop is installed, and a sink with water is also connected. The projects of brick barbecues with a stove for a cauldron, in which you can cook pilaf and other dishes on an open fire, look quite attractive.
Important! If water is supplied to an outdoor stove or barbecue, in the fall it will be necessary to free the system from liquid, since pipes will be destroyed during frost.

Brick brazier scheme
The process of cooking shish kebab on an ordinary iron grill is well known to everyone. But in windy weather or during sudden rain, frying meat becomes problematic, if not impossible. It is much more convenient to make a barbecue or barbecue on a stationary brick grill located under a canopy. In this case, the sudden vagaries of the weather will not spoil your plans. This material will tell you how to make a street grill out of bricks with your own hands.
Schemes of stationary braziers made of bricks
The differences between outdoor hearths and traditional brick ovens are as follows:
- a brazier or barbecue is built in order to create comfortable conditions for preparing various dishes in the open air;
- the design of the outdoor barbecue is much simpler, and the requirements for materials are not so high;
- a simple brick outdoor oven can be folded at home or in the country by almost every homeowner;
- the dimensions and arrangement of the brazier are chosen arbitrarily, depending on the wishes and capabilities of the owners of the house.

All these features, and even the arrangement of the foundation in the yard, somewhat simplify the work on laying barbecues, it is a little more difficult to build outdoor garden stoves. The latter are small oven complexes where you can not only fry shish kebab, but also cook a variety of food. But first, we will consider the simplest version of a stationary barbecue, which does not even require a solution.

The building shown in the photo is built in just half an hour on any flat area. To fold 4 supports, any brick will do, as long as it is even. The height of the supports is arbitrary, according to your height, so that it is convenient to cook. Then a slab is placed on top, preferably of a fire-resistant material, such as concrete or mineralite. Further, the bottom is laid out of red brick (it can be hollow), and then the walls are erected according to the usual technology with dressing.
This design is good because it does not require a solution, it is quickly erected and transferred from place to place. In addition, the height and dimensions of the barbecue are at your discretion, but within reasonable limits so that the structure is stable. Do not forget to install a metal brazier on the brick bottom, and make small slots in the masonry for air access.
A similar kind of small brazier can also be built on a solution by attaching a metal smoke box in the form of an umbrella on top. Thanks to this, the smoke during cooking will not disperse in different directions and get into your face. Below is a diagram of a brick brazier with a concrete slab and an exhaust hood:

The difficulty in the construction of this structure is one - pouring a concrete slab. But if available in household small scraps of plywood or OSB, and wooden bars, the issue is resolved quickly enough. Racks are made of bars, and formwork panels are made of plywood. So that milk does not flow out of the concrete, and the plywood does not get wet, before pouring, the inside of the formwork must be covered with plastic wrap. There it is also necessary to place a mesh of reinforcement with a diameter of 10-12 mm. The figure shows a diagram of the formwork device and the arrangement of the brazier:

The smoke collector is made of galvanized roofing steel and is mounted on top of the brazier. Kindling a fire directly on a concrete slab is not recommended; it is better to adapt a metal brazier for this purpose.

Outdoor oven complexes
The next option is a barbecue oven with a chimney and additional cabinets for kitchen utensils. The mouth of the firebox and the openings for the cabinets are conceived with arched vaults, the woodshed niche - with the usual ceiling of bricks laid on steel corners. Below are the drawings for a brick brazier and the order for its construction:

As can be seen from the orders, the inside of the firebox is laid out from fireclay bricks, which means it does not require a separate brazier. The height of the chimney is arbitrary, depending on the location of the furnace and the height of the canopy above it.

The last option that we want to present is a more complex outdoor stove for summer cottages. This will require some experience and knowledge of the furnace business. The oven is designed not only for cooking barbecue, but also for cooking, as it is equipped with a hob. In this case, the device of an outdoor stove provides for a smoke circulation and requires more materials and accessories:
- full-bodied ceramic brick - 450 pcs.;
- red hollow brick - 180 pcs.;
- fireclay bricks - 201 pcs.;
- cement brand 400 - 200 kg;
- chamotte clay - 40 kg;
- sand - 0.1 m3;
- corner 40 x 40 mm - 4 m;
- cast iron plate 710 x 410 mm;
- firebox door 410 x 410 mm - 1 pc.;
- valve - 1 pc.;
- door for cleaning 140 x 140 mm - 1 pc.

Here, too, the internal parts of the furnace exposed to an open flame or high temperature are lined with fireclay bricks. It is necessary to start preparing and building, having studied the drawing of a brick brazier, which shows the sections of the furnace and its order:

Necessary materials for construction
In our case, the main building material is a brick. When building simple barbecues, the requirements for it are low. The chamber where it is planned to place the brazier should be made of red ceramic brick, even hollow. As for the lower support part, here the choice of material is entirely at your discretion and possibilities. The task of this part is to support the structure, it is not exposed to high temperatures, which means that it can be made of any suitable material.
If a simple do-it-yourself brick outdoor grill has an unsightly appearance, then it can always be plastered or overlaid with inexpensive porcelain stoneware, but only after the masonry mortar has dried completely.
Another thing is brick street stoves. Here it is necessary to follow all the rules of kiln art and use high-quality material. For construction, you will need a solid red brick without cracks and damage, the same applies to fireclay stone. The solution should be used only sand-clay in proportions of 1: 1, and for refractory masonry - a solution of chamotte clay. Such building mixes in dry form are commercially available.
Advice. For laying simple barbecues, 20% M400 cement can be added to the sand-clay mortar for strength.

Any garden stove or barbecue is installed on a solid foundation, so you need to stock up on sand, cement and gravel for the foundation. Do not forget about the tools necessary for masonry work, and for arched vaults you will need special templates - circles. They can be cut from drywall.

Foundation laying
The foundation device is a rather complicated matter and requires geological exploration of the soil composition. But the construction of a hearth in the yard should be approached a little easier and at a lower cost. The universal recipe is reinforced concrete slab. Its filling is performed in the following sequence:
- dig a hole 30 cm deep and 10-20 cm larger than the future stationary barbecue;
- tamp the bottom and cover it with rubble by 15 cm;
- install a formwork protruding 10 cm above ground level;
- cover the pit along with the formwork with plastic wrap;
- tie a mesh of reinforcement with a diameter of 12-14 mm with cells 150 x 150 mm. Lay it on the bottom of the pit on top of the film, placing stands;
- prepare concrete in proportions of 1 part of cement / 3 parts of sand / 7 parts of crushed stone of medium or small size and lay it in the formwork;
- after setting, cover the slab with a film and wait 28 days until it hardens completely.

Before making a brazier, the surface of the foundation must be covered with 2 layers of roofing material, ensuring the waterproofing of the structure.

The simplest brick braziers for summer cottages are built in compliance with the usual rules for laying stones with dressing and alignment in terms of level and plumb. Here it is important to prepare a good solution of sifted sand and clay so that no pebbles come across in it. The thickness of the masonry seam on clay mortar is observed within 5 mm, on cement - up to 10 mm.
Advice. The lower supporting parts of the brazier can be laid on a cement-sand mortar with a small addition of clay for plasticity.
More stringent rules apply if it is necessary to build a brick brazier in the form of a courtyard stove complex:
- each brick is soaked for 2-3 minutes in a bucket of water;
- fireclay and ordinary masonry are not tied up with each other;
- bricks are adjusted and trimmed as a result of fitting. To do this, the row must first be laid out without mortar;
- the horizontal and vertical of the building is checked after laying each row of stones.
Advice. If you want to build a brick brazier with a decorative slit-like seam, you must not reach the mortar to the front side of the stone during masonry.
In order to better understand the sequence of actions, as an example, step-by-step instructions are offered for laying a brick barbecue grill with cabinets for kitchen utensils. IN previous section its orders are shown (Option 3), which must be followed. So, the order of masonry is as follows:
- from the 1st row to the 8th, the walls of cabinets and a wood-burning niche are being erected;
- 9th row: with the help of templates, the arches of red brick cabinets are laid out, steel corners are placed above the woodshed;
- 10th row: the overlap of a wood-burning niche is formed from refractory stones, cut to 18 cm and laid on edge;
- 11th and 12th rows: all niches overlap, while around the entire perimeter the bricks are released outward by a quarter;
- on the 15th row, a firebox made of fireclay bricks is laid out. A circle is cut out and installed to form a vault;
- on the 20th row, external walls and a firebox are being erected. An arched vault is laid out of fireclay stones, cut "under the wedge";
- from the 20th to the 24th row, the bricks are cut so as to gradually move to the section of the chimney;
- all the stones of the 24th row are released outward by a quarter, then the construction of the chimney follows.
As a result, we get such a nice structure:

Conclusion
If you choose barbecue grills for a summer residence or a house of a simple design, then their construction will not be difficult. As for outdoor stoves, here you will have to spend time and effort, but the result looks much better and more practical.
In our guide, we will tell you how to make a barbecue outdoor complex and a brick barbecue oven yourself. Step-by-step instructions with a photo of the construction process will help you understand the details of the self-laying of this structure.
As a result, you should get a barbecue grill as shown in the photo below.
So, you have decided on the type of barbecue, its size and location. Now you need to build a foundation for it.
Usually such buildings are made on the street, in a gazebo or on a terrace. If the foundation of the gazebo or terrace can withstand the weight of a brick oven, which is about 3 tons, then you can start building immediately. If you are going to build a brazier from scratch, then first of all fill in a suitable foundation under it: tape or tile.
Instructions for the construction of such foundations can be found in our section "".
The next step will be a waterproofing device for a brick barbecue. It is done to prevent the lower bricks from getting wet by capillary suction. It will be enough to lay a roll of roofing material or waterproofing. At the end of the construction, cut off the excess with a knife.
Do-it-yourself barbecue grill made of bricks. Step by step instructions with photos.
We proceed directly to the laying of the barbecue.
We recommend that you first lay out the first row of bricks without mortar and evaluate how your future structure fits into the foundation. Do not forget to leave 1 cm gaps between the bricks. Also check the diagonals, they must match.
After that, you can start laying barbecue. The front brick is placed on a cement-sand mortar (cement-sand ratio 1: 3). For the plasticity of the solution, lime or a special masonry plasticizer from the nearest hardware store is added. The seams are made in sizes of 8-10 mm, for this they use a metal rod, reinforcement, etc. In places where bricks adjoin without dressing, the masonry is reinforced with perforated tape, wire, etc.

We make laying with the displacement of each subsequent row by half a brick. For sawing bricks, you will need a grinder with a stone disc.
We continue to lay out the barbecue grill.

Do not forget to check the verticality of the masonry in the corners at least every 3 rows. And also, check the coincidence of the length of the diagonals of the brazier.
We continue laying.

After you make 8 rows of masonry, it's time to make jumpers for the barbecue and countertops. They should look like the photo below.

There are several ways to make such jumpers.
First, you can fasten the bricks with a metal stud and mortar.

Secondly, you can use metal corners.
In our case, we used the second method. We folded the corners with each other in the form of an inverted letter T and sawed off half of the shelf. Here's what happened.

Take a corner with a size of at least 45x45 mm. A smaller corner will sag. But do not take too big so that it does not protrude beyond the edges of the brick.
Make a slot in the brick with a good margin so that the metal does not tear the masonry when heated.
Such a shelf is not visible to the eye, reliable and beautiful.

We begin to lay out under (bottom) the brazier. We use refractory fireclay bricks for the firebox. We make laying on a ready-made refractory mixture from a building supermarket from clay and sand. Can be used mortar. We make the seams as thin as possible, about 3-4 mm.
We use corners to support the bottom of the brazier. Remember to leave at least 1 cm gap between the ends of the corners and the brick. So you save the masonry from cracking when expanding the corner.
On the first row of the bottom of the firebox we put the second row, overlapping all the seams of the first. This will prevent the seams from burning through and coal from getting on the firewood in the firewood from below. You can, of course, pour a concrete slab instead of the corners and the first row of the firebox. But in our case it was cheaper and faster to do so.
If you are pouring a concrete floor, then one row of refractory bricks is enough for the bottom of the firebox.
We continue to lay out the walls of the barbecue.

The laying of the front brick and the firebox can be done both in parallel and alternately. You can first make the walls of the firebox, and then overlay it with a face brick.
Important! We leave a gap of 1 cm between the facing and refractory bricks. The firebox and lining should not touch.
We put the next rows of barbecue ovens.

We approach the moment of construction of the furnace arch. We make a circle (an arc structure made of wood) and install a brazier in the portal. Then, we carry out the laying of the arch, cutting the bricks to the right sizes. In the middle of the upper point we put a brick castle. The arch is ready.

Note! The front brick arch is covered from the inside with a fireclay brick lintel. She puts on metal corner slightly above the top of the arch, so as not to be noticeable. It looks like this.

The arch is assembled, we continue to display the walls of the barbecue grill.
Do not forget to check the verticality of the masonry.

We are approaching the moment of construction of the smoke box.
We bring the top of the firebox and lining to the same level and begin to lay out the smoke box. We make masonry from solid bricks of a brand not lower than M150. We put on a cement-sand mortar. We put the first row flush with the inner wall of the firebox. The remaining rows are laid with an offset of about a third of the brick.
Don't move the bricks more than half way or they will fall into the firebox.

We carry out the laying of the smoke box until the moment when there is no hole for the chimney measuring 27x27 cm, taking into account the seams. Your chimney size may differ from ours. In this case, make a flue according to the dimensions of your chimney.
Some stove-setters cut off the inner edges of the bricks so that the inside of the smoke box is smooth. We did not notice any differences in operation between the smooth and ribbed inner surface of the smoke box. Of course, this is only true if you observed the correct proportions between the dimensions of the portal - the smoke box - the pipe (read about the proportions below).
This is what the smoke box looks like without cut bricks from the inside.

We continue laying pipes. Its dimensions depend on the size of your barbecue grill portal.
After finishing the laying of the chimney, we cover it with a cap to protect the firebox from precipitation.
We successfully built a brazier, which is also a barbecue oven made of bricks with our own hands! Wait until the solution dries and you can do a test run.
Here we will analyze the most frequently asked questions about laying a brick brazier (grill) with our own hands and the answers to them.
What size should the smoke box be?
The size of the smoke box depends on the size of the furnace portal. The optimal ratio should be at least 100-120%. So in our step by step instructions the height of the portal is 6 rows, and the height of the smoke box is 8 rows.
What is the height of the pipe?
The height of the pipe is proportional to the height of the smoke collector and is not less than 100-120% of its height.
What diameter should the chimney be?
The cross section of the chimney pipe depends on the area of the furnace portal. The optimal chimney area is 1/8 - 1/10 of the portal area. Extreme sizes from 1/6 to 1/13.
How to fill the gap between the firebox and the cladding?
In front, around the portal, you can fill the gap with basalt cardboard. The rest of the space does not make sense to fill. Therefore, it is left empty.
Do I need to paint the metal corner in the lintels?
Barbecue (grill) - do-it-yourself barbecue made of bricks. Step by step video instruction.