How to glue ceiling skirting boards on wallpaper and is it possible to do this? How to cut wallpaper for a ceiling plinth Finishing at the final stage
The joint between the wall and the ceiling is most often finished with a ceiling plinth. The main function of this interior element is decorative. There are many options for ceiling plinths made of foam, polyurethane, plastic. How to choose ceiling skirting boards for wallpaper and how to properly cut wallpaper from a ceiling skirting board will be discussed further.
Ceiling plinth - functional purpose
Ceiling plinths were common in the tsarist era. At that time they had amazing beautiful shapes and were quite large. For the manufacture of such skirting boards, European builders were invited. Installing a ceiling plinth has the following advantages:
- first of all, with the help of a plinth, it is possible to hide communication elements on the ceiling, it can be a cable from a TV or telephone, electrical wiring;

- Quite often, in the process of applying putty or wallpapering, defects are formed in the corners, to hide which it is used ceiling plinth;
- with the help of a plinth, it is possible to create a line between the ceiling and walls, visually increase or decrease the space of the room.
Wallpaper without a ceiling plinth looks ugly, and the room looks unfinished. Therefore, in any case, it is recommended to install even the thinnest skirting board.
Varieties of ceiling plinth for wallpaper
There are many options for ceiling plinths, we suggest that you familiarize yourself with their classification in relation to the materials from which they are made. Consider the main types of skirting boards for the ceiling:
1. Styrofoam plinth.
This option is distinguished primarily by its economic use. foam plinth is perhaps the cheapest option. In addition, the installation of such a plinth is particularly easy, since a clerical knife is enough to cut the material.
However, such skirting boards have disadvantages:
- low level fire safety- Styrofoam is flammable and highly resistant to ignition, so there is a danger of its installation in places where electrical wiring passes;
- low level of mechanical strength - foam plastic products are easy to damage, they are unstable to mechanical stress, therefore such skirting boards are used exclusively in the upper part of the walls, to decorate their joint with the ceiling.
2. Styrofoam plinth.
This material has a higher level of hardness than foam products. Among the advantages of baguettes made of expanded polystyrene, we note:
- high level fire safety - products do not tend to ignite and practically do not support fire;
- high level of strength - this material has a certain strength, so this plinth is not afraid of mechanical damage.
If we compare the price range of foam and polystyrene skirting boards, then the latter are a little more expensive, however, this difference is not too significant.
3. Wooden baguettes.
Considering wood as a material for the manufacture of skirting boards, its characteristics should be determined:
- wooden products are distinguished by elitism and aristocracy, a room decorated with such baguettes is distinguished by pomposity and chic, especially if the plinths are made of wood in the form of beech, oak, mahogany;
- the cost of wood products is quite high and is at the highest level compared to other types of skirting boards, however, the more wood carvings, the higher the cost of the product;
- to process a wooden baseboard, you need to have special equipment, since the process of fitting corners involves the use of a file, in addition, for puttying the joints of wooden skirting boards, you will need a special putty mixture;
- one of the advantages of using wood is its high level of environmental safety, in addition, wooden skirting boards go well with almost any interior, as wood always looks natural;
- however, wooden surfaces exposed to moisture, prone to deformation and rotting, so they need to be carefully processed before installation on the surface.
In addition, when choosing a ceiling plinth, special attention should be paid to the method of fixing the material. To install foam or polystyrene skirting boards, it is enough to glue them to the wall using universal glue or putty. In addition, since the material is light in weight, after installing the skirting board, it does not need additional holding.
To install a wooden plinth, you should use a puncher and special fasteners. Which fix the baguette every 50 cm.
Given the wallpaper under the ceiling plinth, you should select its width. The minimum value of skirting boards is about one centimeter, and the maximum value is more than twenty centimeters.
- if you need visual smoothing of the corners, we recommend paying attention to the wide version of the plinth, in which case the appearance of the room becomes a little semi-circular, in relation to the psychological aspect, being in a room with rounded corners is calming;
- if there are small defects on the wall or ceiling, with the help of a wide plinth it is possible to get rid of them, especially if there are small differences in height, which are most often seen in corner areas;
- if a false ceiling is installed in the room, then to hide the defects in its installation, it will also be necessary to install a wide plinth;
- however, take into account the fact that installing a skirting board that is too wide makes the room look lower and smaller, so when arranging a small room, it is better to stop at skirting boards that are small in width;
- installing a wide plinth in a room with low ceilings makes the room visually lower and cramped.

How to choose ceiling skirting boards for wallpaper
In the process of choosing a ceiling plinth, you should first of all dwell on the color of the product. We suggest that you familiarize yourself with the recommendations that will help you choose the color of the plinth in any room:
- if the ceiling is painted White color, then the most the best option it will be the installation of a white baseboard, in this case, it is possible to visually enlarge the room a little, therefore, for a room with low ceilings and a small area, it is best to stop at the white color of the baseboard and ceiling;
- if you need to reduce the area of \u200b\u200bthe ceiling, then you can stop at the plinth, matched to the color of the walls;
- it is advisable to choose a skirting board for the main colors of the room, and there should not be more than three in the room.
Particularly spectacular is the installation of a dark plinth in a room with light walls and the ceiling thus manages to divide the space. However, such a plinth should be combined with some other items in the interior, such as furniture.
Another criterion for choosing a skirting board for the ceiling is its shape. In the process of choosing a skirting board, you should compare it with the interior of the room. If the room has a sufficient number of bright elements, then the baseboard should be simple. Otherwise, it is better to give preference to a skirting board with a pattern or pattern.
In the baroque style, skirting boards should have a complex shape, the classics mean simpler shapes. At the same time, a simple plinth is suitable for almost any interior. Therefore, if you are confused when choosing a skirting board, give preference to simple forms. In this case, the plinth will merge with the wall or ceiling and will not attract too much attention to itself.

How to glue a ceiling plinth on wallpaper: technology and features
After choosing a ceiling plinth, the process of its installation follows. When answering the question that first wallpaper or ceiling plinth, one should proceed from the characteristics of the room. If the ceiling plinth is glued to the wallpaper, then in this case it is enough to use glue or putty. Please note that installing the skirting board with glue is only possible if it is made of plastic or polyurethane foam.
This method of installing the skirting board is simple and quick to perform, so it is widely used when performing finishing work.
If you plan to glue the ceiling plinth first, and then the wallpaper, then in this case, you will need to be patient. Installation of the skirting board in this way is carried out exclusively by professionals with experience in wallpapering and installing skirting boards. In this case, all the cracks in the baseboard are sealed first, and then the wallpaper is pasted.
In order to install the ceiling plinth, you will need:
- adhesive having a polymer base;
- adhesive moment mounting;
- putty, which is kneaded on an adhesive basis.
It is preferable to use the materials recommended by the manufacturer in the instructions for the skirting board during the installation of the skirting board. In this case, it will be possible to achieve maximum adhesion of the plinth to the surface of the ceiling and wall.

In the process of work, you will need to have:
- clerical knife;
- hacksaws;
- spatula;
- roulettes;
- brushes;
- pencils;
- adhesive composition;
- paints;
- sandpaper;
- sealant with a colorless base.
The following is the procedure for determining the number of skirting boards to install in the room. To do this, it is enough to determine the perimeter of the ceiling and, in relation to it, determine the number of skirting boards. Purchase material with a margin so that if damaged, replace the damaged area.
Preparation for the installation of skirting boards is as follows:
- take a paper sheet and a pen, draw the ceiling on a certain scale;
- install on the project first the installation sites of the whole skirting boards, then place the trimmed skirting boards;
- choose the side of the plinth laying, keep in mind that one side of the profile is always wider, weeks the other.
The wide side is used to hide defects from wallpapering, if any.
Skirting installation instructions:
1. Trim the corners of the skirting boards according to the markings. To do this, use a special tool in the form of a miter box. A plinth is installed in it, and the work is carried out with a hacksaw or a clerical knife. Cut the baseboard in relation to the angle marked earlier.
2. Please note that cutting the skirting board at an angle should be given special attention, since for protruding corners and for indoor corners, skirting boards are cut in different ways.
3. Glue is applied to the two longitudinal recesses of the plinth. Note that it must not extend beyond the surface of the outer edges. If there is glue on the outside of the baseboard, prepare a dry rag to remove it.
4. Install the plinth on the wall and hold for a certain time, specified in the instructions for it. Press the skirting board lightly as there is a risk of damaging it.
5. Glue all other parts of the plinth in the same way. To cover the gaps, use a sealant that matches the color of the baseboard.
6. After the sealant dries, the baseboard is painted in the desired color.
7. In order to avoid staining the wallpaper with paint, the skirting boards are painted even before wallpapering. Otherwise, all work should be carried out with extreme caution.

Installing a ceiling plinth with putty
Do-it-yourself skirting board installation instructions before wallpapering:
1. A special building level and a pencil will help to make markings for mounting the plinth.
2. Finishing putty is kneaded in accordance with the instructions from the manufacturer. After that, the installation sites of the plinth are covered with a putty mixture.
4. Putty is applied to the surface of the wall with a spatula. Next, the plinth is pressed tightly against the wall and held on it for several seconds.
5. Using a second spatula, remove excess putty mixture, if any.
6. Putty is also used to coat the gaps between the baseboard and the wall.
7. After the finishing solution dries, it is used to lubricate all the cracks and junctions of two skirting boards.

Instructions for installing the skirting board after wallpapering:
1. To perform the work, a special adhesive or white silicone-based sealant is used.
2. An adhesive solution is applied on the reverse side of the plinth, in the form of a continuous strip.
3. The plinth is pressed tightly against the wall and held for several minutes.
4. If gaps have formed between the wall and the plinth, then a sealant is used to seal them.
5. After the glue dries, the plinth is painted with water-based paint of the desired color.
Tip: In order not to stain the wallpaper during the work, stick masking tape on their surface.
Sticking ceiling plinths on wallpaper video:
Wallpaper must be glued after the ceiling plinth In order to make a choice how to be in this situation, you need to find out all the advantages and disadvantages of work processes. If you glue the skirting boards, then the joints will be easier to process with putty or paint, and gluing the wallpaper will not be so scary. But in this case, there is a problem with the selection of the edge of the wallpaper to the ceiling fillets. Looking from the other side, you can understand that if you paste the wallpaper first, there will be problems with installing the baseboard, because after gluing you will have to wait a certain period until the glue dries. So how to be?
Ceiling plinth for wallpaper, how to glue: selection of material
Top plinths are used to hide all visible borders of wallpaper and whitewashed ceiling finishes. In addition to this necessary function, they bring decorativeness to the ceiling, because fillets decorate the interior and give completeness to the general appearance.
There are several types of fillets for organizing work with the upper part of the room. Their main difference lies in the materials and method of manufacture. It is with these points that their physical properties are associated.

Ceiling plinth gives the overall look completeness
In order to make baguettes, the following 4 materials are used:
- wood. Wooden skirting boards can look great in any interior. It does not matter at all what style, folklore or classical. In order to make wood fillets, mahogany, oak, walnut or larch are mainly used.
- Stone. Sometimes in special outlets you can find ceiling plinths made of artificial stone. They fit perfectly into classic interior, and pair well with modern views finishes. The cost of such material is high, due to the fact that it is very difficult to extract the material.
- Gypsum fillets. Thanks to gypsum, you can create different types and shapes of skirting boards. They are much lighter than the previous material, and besides, much cheaper. However, before purchasing this material, you need to be sure of the perfect evenness of the surface of your walls, polystyrene foam, expanded polyvinyl chloride and other types of plastic.
- Plastic panels. For now modern manufacturers Increasingly, plastic products are preferred. Ceiling skirting boards are no exception. In special hardware stores you can buy panels made of polyethylene.
If we talk about soft and flexible materials, then they include plastic and some wooden baguettes. Already, based on this, we can answer what is glued first. If the product is flexible and belongs to the budget, then you can try to mount the ceiling plinths on the wallpaper, but keep in mind that there are no perfectly even walls, this does not apply to baguettes, therefore, you cannot avoid work with putty. If the fillets are soft and can adapt to the curvature of the walls, then putty may not be needed.
Is it possible to glue the ceiling plinth on the wallpaper
If speak about this method, at first glance it may seem quite simple. However, only experienced specialists use it, because they immediately process all the cracks and irregularities with putty, and the wallpaper undergoes a leveling process. It is enough to spend a little practice, and you will be able to do the work no worse.
Skirting boards for the ceiling can create the impression of a complete lack of unevenness on the walls, but in order to do this, you need to carry out a competent installation.
Based on this, you can understand what exactly is done in the first place, installing a baseboard or sticking wallpaper.

Ceiling plinth can be glued with your own hands, without the help of specialists
In any case, prepare the following materials and tools for work:
- Polymer glue;
- Mounting adhesive;
- putty;
- PVA glue;
- Construction knife;
- Hacksaw;
- Miter box;
- Putty knife;
- ruler;
- Pencil;
- Sandpaper;
- Colorless sealant;
- Paint (if necessary).
Despite the fact that at the moment you can purchase any material for mounting, it is better to use the adhesive that the manufacturer recommends.
How to glue a ceiling plinth on wallpaper
After you decide on exactly how you will mount the baguettes on the ceiling, the question remains, what kind of material can be used to glue the baguette to the wallpaper.
For this purpose, most often used:
- Mounting adhesive;
- Polymer glue;
- Putty, which includes PVA.
There is no significant difference in the use of the adhesive solution, the main thing is that its drying speed is maximum.

You can glue the ceiling plinth on the wallpaper with glue or putty
You can proceed to the process of pasting skirting boards only when all preparatory work were finished. Namely, the elimination of dirt and dust, as well as trimming.
In order to glue the prepared skirting boards, you need to turn them over to the back side and apply a small amount of glue, it is desirable that the strip is even and does not go beyond the contours. After the solution has been applied, the fillet is set aside to allow the adhesive to settle.
If you see that the glue has come out of the edge, remove it with a dry soft cloth. After that, the first baguette leans against the right place on the ceiling and is pressed against it without strong pressure. Hands should not be removed for about a minute so that the baguette sticks well to the base.
Basic rules: how to cut wallpaper under the ceiling plinth
In order to get a good and high-quality result, all procedures must be performed competently and with the right approach. There are no trifles in this installation, and the owner who disdains cutting wallpaper at the edges of the walls will become irresponsible.
In fact, not even every master knows how to properly cut or paste wallpaper on skirting boards.

In order for the result to please, it is necessary to carry out all procedures very competently.
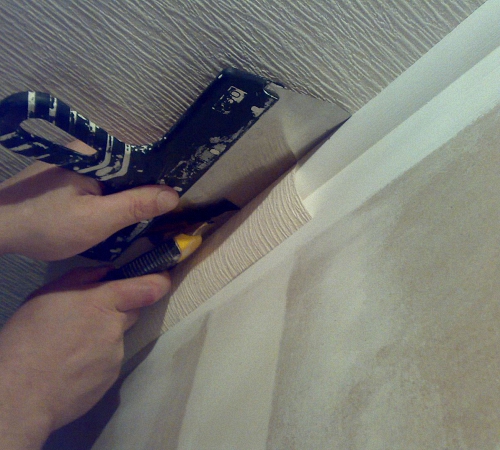
Virtually every homeowner has skirting boards under their ceilings. You need to know that each layer of coating on the wall must be glued in such a way that the edges protrude onto the fillet. After that, a small spatula is taken and carried out along the lower edges of the contact between the panels and wallpaper. The result should be a fold.
After carrying out these actions, press the fold with a spatula and carefully remove the outgoing edges of the paper with a sharp construction knife. The trimming process is complete. If you notice that the adhesive has come out, it can be removed with a damp cloth or sponge. As a result, you will get a neatly decorated room with smooth edges.
How to glue the ceiling plinth (video)
Based on our article described above, we can conclude that it is possible to glue ceiling plinths both before and after wallpapering, the main thing is to approach this issue responsibly and correctly. All the main steps have been described above, after reading them, you will not only easily make a choice, but also carry out the installation quickly, accurately and in the right way.
What to glue first: ceiling plinth or wallpaper? This question is asked by both the novice specialist and the owner of the living space. decorative trim indoors, it gives comfort to the interior and creates a certain style, and a correctly chosen baguette for the ceiling can both narrow and expand the room, make it emphatically official or homely. The article will tell you how to glue the ceiling plinth on the wallpaper and on the wall.
Types and features of baguettes
(frieze, fillets, baguette) is used for interior decoration houses and apartments. However, it combines well with various types wallpaper, ceiling tiles and regular painting.
Tip: When decorating a room in a high-tech style, you should not use a frieze.
When purchasing a baguette, it is necessary to take into account the height of the ceiling and the size of the room. The larger they are, the larger the plinth should be.
By installing a baguette, you can:
- Hide defects that occur when puttying or wallpapering between the ceiling and the wall;
- Hide uneven cutting wallpaper;
- Decorate the room;
- Emphasize its outline;

- Give the finish a finished look.
A fairly diverse range of these products, when deciding to use them in the decor of the homeowner, allows you to choose the best option for the interior. Fillets differ in size, shape and material of manufacture.
Baguettes can be made from different material, but we will only touch on the most popular options:

- Foam, decorative. Such skirting boards for ceilings are used most often, which is explained by:
- low cost;
- beautiful appearance;
- small weight;
- ease of installation of elements;
- they do not absorb moisture;
- do not rot;
- easy to cut with a regular sharp knife;
The disadvantages include:
- low fire resistance;
- great fragility;
- sloppy joints due to the graininess of the material.

- . Such fillets can only be worked with even walls and ceilings, since the material is not flexible. They allow you to turn a modest room into a real palace. Products are fireproof, but, like all gypsum products, they are quite hygroscopic.
Material disadvantages:
- big weight;
- installation complexity.

- . It has all the advantages of foam plastic and more accurate joints, which is associated with an increased density of the material. But the price is slightly higher.

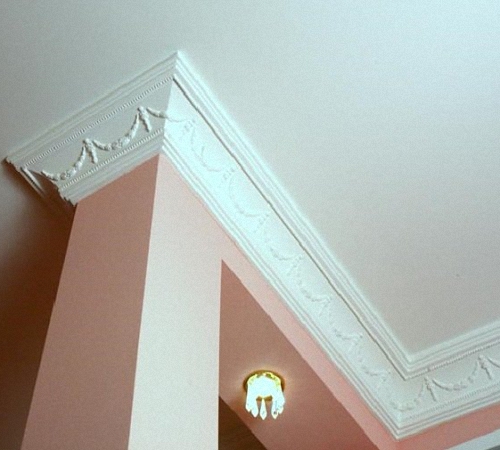
- . These products are used for rooms made in classical style. Because of the rich appearance, which can be seen in the photo below, and of great value, they belong to elite baguettes. They are made from expensive hardwoods:
- oak;
- ash;
- mahogany.
Lack of material - absorbs moisture, which may cause deformation and even mold over time.

The most popular are baguettes made of polystyrene foam and modern polystyrene foam.
The procedure for the repair of the premises
So, what to glue first, ceiling plinth or wallpaper? The quality of doing the work with your own hands depends on this.
However, in any case, the instructions for the preparatory work are as follows:

- All dismantling works are carried out in the premises;
- Garbage is taken out;
- Windows, radiators, all joinery are being replaced;
- If necessary, change the electrical wiring;
- Slopes are made;
- The walls are leveled.

And then the finishing begins. Let's say right away that you can glue the ceiling plinth on the wallpaper. Moreover, many people do this to save time on trimming the wallpaper, which must be done when pasting exactly on the baseboard. However, this solution has several disadvantages:

- It's no secret that the walls in our apartments are often far from smooth. When gluing a skirting board on such a wall without wallpaper, it is always possible to seal all the cracks that form with gypsum putty or sealant. The result is neat connections, and the skirting board holds much better. When sticking on wallpaper, such a focus cannot be turned.
- Further. If you glued the plinth to the wallpaper, then when finishing it, you run a great risk of staining the walls - you can smear glue with an awkward movement or drip paint when whitewashing.
- Well, and the last nuance - if you want to replace the wallpaper with new ones, you will have to cut through the old ones with a knife so as not to tear off the baguettes.
How is the ceiling plinth glued
Now let's take a closer look at the work itself.
To complete the work you will need:

- A carpenter's miter box and a hacksaw with a small tooth;

- Stationery knife;

- Roulette and pencil;

- For wooden and other hard skirting boards (except gypsum), it is better to purchase a miter saw.
Tip: Before gluing the ceiling plinth to the wallpaper, you should accurately calculate its quantity and purchase one extra piece in case of marriage when cutting.
Preparatory work - we determine the installation scheme
First you need to make a simple drawing. To do this, take a piece of paper and a pencil. The scale can be taken as 1 m = 1 cm. Thus, one plank of the ceiling plinth in the drawing will take 2 cm. Draw the perimeter of the room on the sheet. After that, place the plinth on the diagram so that you get the minimum amount of waste, that is, so that you have to cut the elements to a minimum.
Since the profile is not symmetrical, it is necessary to decide which side to glue it. It is often recommended to fasten the wide side of the fillet so as to cover surface flaws as much as possible. That is, if you glue the plinth over the wallpaper, then it is better to glue the wide side on the wall. If the ceiling surface is uneven and has some flaws in the corners, then the wide side is mounted to the ceiling.
How to fix a baguette over wallpaper
The order of operations is as follows:
- Marking is made on the ceiling and walls. In this case, a chopping thread or a long rule is used to align the baguette.
- For trimming the plinth, when joining the material in the corners, a miter box is used.

- A baguette is glued: first into the corners, then around the entire perimeter, but if there is a markup, the sequence of work does not matter. Liquid nails are used as glue. This glue is applied in a thin strip to the edge of the fillet with reverse side, after which she is pressed against the wall. Excess glue squeezed out quickly, before it has time to dry, is wiped off with a damp sponge or rag.
- The gaps formed between the wall and the plinth, the joints, especially at the corners, are very carefully smeared with silicone. It is necessary to ensure that the excess does not fall on the wallpaper and floor.

Even precisely fitted parts do not interfere with smearing at the joints first of all
Advice! There is a way to do this as cleanly as possible, with virtually no risk of staining the wallpaper. Before sticking the plinth along the intended line from below, masking tape is glued, which will need to be removed after all work is completed.
- The frieze is painted with two brushes - one larger for the main part, the other small for neat whitening of the edges.
The sequence of work on sticking the frieze to sticking the wallpaper is practically the same, except that the baguettes can be processed much more carefully, with grinding joints and other delights.
There are other benefits too:

It is very convenient to glue on putty, pay attention to this first of all
- As an adhesive, you can use finishing putty - this solution is more justified, since the plinth becomes almost monolithic with the wall.
- Walls do not need to be covered with masking tape before painting.
The density and properties of the materials from which the ceiling plinths are made affect the sequence of gluing them and wallpaper. Therefore, we can conclude: flexible and light friezes are glued to the wallpaper, heavy and hard ones are attached only to the wall.
What comes first, wallpaper or ceiling plinth? This question, we think, has been answered. The video attached to the article will reveal the topic in more detail.
Mounting the skirting board before wallpapering
In this case, the fillet is installed before finishing the walls with wallpaper. This method is used by professionals, as it allows you to seal all the cracks and joints even in the process of applying putty. The wallpaper is aligned under the already installed plinth. But in its complexity, this method is not much different from the previous one. It takes a little practice and even an amateur will do it no worse than a professional.
Ceiling plinths allow you to smooth the transition from walls to ceiling, in addition, they hide irregularities. But for this you need to correctly install these elements. Taking into account the information on how to install the skirting board - before pasting the wallpaper and after, you can decide which option is more suitable for you.
Tsugunov Anton Valerievich
Reading time: 4 minutes
The final stage of finishing the room requires special care and accuracy from the master, since any error will be clearly visible. The junction of the wall and ceiling is a difficult area to work with, especially if there are irregularities. The use of fillets facilitates the task and makes the transition from plane to plane more aesthetic. Also, they are perfectly combined with wallpaper, complementing each other favorably. But what needs to be glued first: wallpaper or ceiling plinth?
When can a fillet be mounted on wallpaper?
The ceiling plinth performs decorative and masking functions: with its help, some irregularities of the ceiling are hidden. This opportunity is of great value for home master, after all, it is far from always possible to create a perfectly flat surface. A crooked ceiling can ruin the overall look of a room, even with perfectly aligned walls.
To understand whether it is possible to glue fillets on wallpaper, you need to study the varieties of manufactured products and some physical characteristics - weight, material of manufacture, width. To create such decorative elements are used:
- expanded polystyrene;
- Styrofoam;
- polyurethane;
- plastic;
- natural and artificial stone;
- tree;
- ceramics;
- gypsum.
You can glue skirting boards on wallpaper when the canvas is able to withstand their weight. long time. Therefore, it is better to immediately exclude massive products and consider only light options from all varieties. The easiest way to use baguettes made of expanded polystyrene and polyurethane.
Important! Most often, putty is used to mount skirting boards on the ceiling, but they need to be fixed to the wallpaper with a universal transparent glue that quickly sets and does not soak the canvas. Suitable "Liquid nails", "Dragon", "Moment".
The advantage of installing a fillet over the wallpaper is the additional fastening of the joints of the strips where they are most often peeled off - under the ceiling.
Of the minuses, a technical point can be distinguished: if decorative elements require painting, puttying or varnishing, then you need to consider protecting the pasted wallpaper from dirt.
Important! If it is decided to use large-relief wallpaper, then sticking a frieze on top of them should be immediately abandoned: the fastening will turn out to be unreliable, the plinth can go in waves, and gaps will be visible in the place of contact.
When is the frieze glued first?
Fastening heavy types of baguette requires high bearing qualities from the surface. Therefore, they must be glued directly to the wall and ceiling. For massive varieties (stone, ceramics, wood, gypsum), special metal fasteners are used, mechanically installed in the ceiling.
It should also be understood that heavy products are not able to bend under surface differences. To compensate for gaps and eliminate cracks, acrylic putty is used. Working with this material is a rather messy process, and if wallpaper is already pasted on the wall by this moment, it is quite difficult to save them from stains and scuffs. In addition, very often paint is applied to the frieze after installation, which is also fraught with damage to the coating.
Conclusion: if the choice fell on a massive ceiling plinth, then wallpapering should be done after its installation and finishing.
However, you need to be prepared for the fact that making a smooth wallpaper edge without noticeable gaps will be much more difficult than using a light frieze that masks errors. Therefore, you should first glue a couple of training cuts in an inconspicuous area.
How to evenly paste wallpaper under the ceiling molding?
To neatly and beautifully trim the wallpaper under the baguette, you need to do the following:
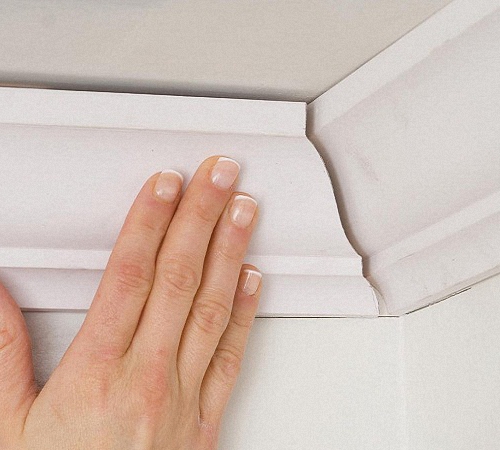
- Glue strips with a slight overlap on the frieze.
- Until the glue dries, take a wide spatula (30 cm) and gently press the canvas to the place of joining with the wall. You can also use an iron ruler for this purpose.
- Then with a knife, without loosening the clamp of the tool, carefully remove the excess. The incision site should run exactly along the edge of the spatula blade.
Important! Only a very sharp knife is used for work, which will not tear the material. When using painting tools with breakable blades, it is recommended to use one section per cut.
- Glue stains that have fallen on the baseboard are removed with a dry, clean rag.
Advice! To feel more confident, it is worth practicing to cut the wallpaper in an inconspicuous area. You can also glue a couple of unnecessary pieces from the roll, and having stuffed your hand on them, just remove them.
Baguette and stretch ceiling
The most logical option seems to be the one in which the stretch ceiling, and then a baguette and wallpaper. At the same time, there is no risk that the material on the walls will peel off or be soiled or damaged during the installation of the ceiling structure and skirting boards. The same procedure is followed for any kind suspended ceilings: plasterboard, rack, "Armstrong", PVC panels.
However, in this case, there are risks for the already stretched web, so care should be taken:
- The material may be stained with glue spots during the wallpapering process.
- The adhesive for a plastic baguette can corrode the film, and it will have to be changed.
- Mechanical damage to the ceiling during the installation of heavy baguette fasteners is not ruled out.
If the wallpaper is often re-glued in the room, then it is most advantageous to install a wide molding: the finish will be carried out at a considerable distance from the ceiling, which will prevent its accidental damage.
Installation of a ceiling plinth under a stretch fabric
When installing a frieze under an already stretched ceiling, it is recommended to refuse to stick it on the wallpaper. This will reduce the risk of damage to the film or canvas and greatly simplify the process when changing the wallpaper.
On the question of what to glue first: wallpaper or ceiling plinth, opinions differ. Fillets - - are needed in order to hide the gaps between the ceiling and wallpaper or other finishing materials on the wall. And yes, they look very impressive. But there are some nuances in their installation.
For gluing to the ceiling is usually used vinyl wallpapers and wallpaper for painting.
In order to decide how to be in this situation, it is necessary to consider the advantages and disadvantages of the options.
If you glue the fillets before the wallpaper, it will be easier to putty the joints of the plinth and paint it, and it will also not be scary to stain the wallpaper. But then it becomes difficult to fit the upper edge of the wallpaper to the ceiling plinth. This must be done very carefully so that there are no gaps.
On the other hand, if the wallpaper is already pasted, there will be difficulties with the installation of the skirting board. At least a day should pass after the wallpaper glue dries. Then the wallpaper will need to be sealed with masking tape and glued, and then the baseboard will be painted.
First, the ceiling plinth is glued

The cutting angles on both skirting boards, both right and left, must be the same, i.e. their profiles must be identical.
As with any type of repair, you first need to take measurements, calculate the number of strips needed. These bars are 2 meters long. The perimeter of the room is rounded up and divided by 2.
The width of the skirting boards is different, so the choice should depend on the size of the room. If the room is small, then you need to take narrow ones, since wide ones will look bulky.
Tools and materials for installation:
- ceiling plinth;
- liquid Nails;
- putty or sealant for filling joints;
- pencil;
- roulette;
- rubber spatula;
- miter box and stationery knife for trimming;
- glue gun.
To the wall with putty or liquid nails. If glued on putty, then it will fill the existing gaps and you will only need to remove its remnants.
Before gluing the fillets, it is necessary to carry out preparatory work, namely the walls in the place where the plinth will be glued, then putty it.

For gluing, a special glue is used, which is applied in a strip on the sides of the plinth adjacent to the wall and ceiling.
Now there is a wide variety of ceiling plinths, you can buy a narrow one, it is more flexible, repeats the relief of the walls. In the finished version, this will not be very noticeable, of course, if the wall defects are small.
Theoretically, the corners of the rooms should be 90 degrees, but in practice this is not always the case. Therefore, we cut the corners of the plinth first at 45 degrees using a miter box, and then we adjust it in place. The ceiling plinth, made of foam, is very well cut with a clerical knife. You can join one plinth to another on the spot and cut it off.
After you cut it off, you need, and then just glue it.
The joints must be sanded with a fine-grained sandpaper. The glued baseboard can be left as is, or it can be painted water-based paint in the same shade as the ceiling.
Back to index
How to paste wallpaper
When pasting walls with wallpaper, as with any other undertaking, certain skills are required. As a rule, professionals are not involved in this process, but they manage on their own. The final result depends on how the walls are prepared for pasting, what wallpaper is chosen, what glue will be used - how the walls will look.
Wallpapering tools:

For gluing, you can use two ladders that will be connected by a board with a width of at least 40-50 cm, or tables lined up in a row of the same height.
- pencil;
- scissors;
- roulette;
- spatula and painting knife;
- roller for joints and fleecy;
- bath for glue;
- a bucket for diluting glue;
- soft cloth;
- plumb line with thread;
- table, stool or stepladder.
Please read this manual carefully before starting work, as different types wallpapers have their own rules.
The first thing to do is to calculate the number of rolls. Now there are calculation tables, but they have large errors, so it is better to use the old method. An old roll of wallpaper is taken with the width with which it is planned to glue new wallpaper, and a tape measure. Then, along the perimeter from corner to corner, a measurement is made, for walls with door and window openings, similarly. From one roll 10.05 m long, 4 strips will be obtained with a wall height of up to 2.5 m. This calculation is applicable for wallpaper without joining the pattern, and with joining, 3 whole strips will come out, the rest will be used over doors and windows.

A sponge or soft cloth will help smooth out the wallpaper and expel air bubbles.
If necessary, the walls are leveled with putty, then a primer is applied. It is needed so that the glue is not absorbed by the walls and you can easily combine the pattern on the canvases by moving the stripes. Instead of a special primer, wallpaper glue diluted to a more liquid consistency can be used.
When cutting wallpaper, a small margin is made, they are carefully cut with a clerical knife on the floor. If you need to adjust the pattern, then you need to look at the instructions, where the offset step is indicated, but it happens when this step does not match. Therefore, you first need to test it on the floor.
Wallpaper glue is selected according to the type of wallpaper. For places near windows and doors, you can use a composition based on PVA. Dilute glue in a bucket with cold water according to the instructions, stirring quickly with a brush or stick. Let the glue set.

Excess wallpaper is pressed with a spatula and trimmed with a sharp knife.
When wallpapering, the windows must be closed, the sockets must be de-energized. Wallpaper pasted in a joint, you can start gluing from any wall. For training, it is better to start with the one that will be covered by furniture.
The vertical is marked when gluing the first strip with a rope with a load. This strip is glued from the corner to another wall 1.5-2 centimeters. After the strip is smeared with glue, it must be folded in half for impregnation. At this time, the wall is smeared with glue and a strip is attached to it. The collected air is dispersed with a clean cloth or rubber roller.
The ceiling plinth is not immediately glued to the glued wallpaper, as they need time to dry, they are easy to damage. Fillets are glued according to the technology described above.