Corrugated paper compositions. Do-it-yourself corrugated paper flowers: simple master classes. How to make a luxurious peony
Do-it-yourself bouquets are a good way to congratulate in an original way, give a gift, decorate a house and even save money. In addition, home-made sweets and flowers will delight the owner for a long time.
Whatever bouquet you have to make, you will need almost the same materials. They are quite affordable. Some can be purchased at florist shops, some at sewing shops, and some at points of sale of live bouquets.
You will need:
- Glue gun and sticks. This is a device that heats up solid glue. It flows in drops from the “nose” of the gun, which is very convenient when working with small parts.
- Tape tape- adhesive tape like scotch tape, but colored, and slightly stretchy. It is convenient to fasten parts with it and hide unnecessary cuts.
- corrugated paper- the main material for creating flower petals. It is strong enough, stretches well, keeps its shape.
- wooden skewers- play the role of flower stems.
- Wire- in florist shops, a special, green color is sold. It bends and holds its shape well.
- Organza- synthetic fabric with a characteristic sheen. It comes in rolls and strips. It drapes easily, it is convenient to attach paper to it with glue.
Decor details: beads, rhinestones, etc. are optional.
It is easy to make bouquets of sweets, flowers with your own hands, the main thing is to understand the intricacies.
- Creating bouquets is an activity for the leisurely. Hastily done work will not be successful. In addition, in a hurry, you can get burned with glue or prick with wire.
- You should not save on materials, otherwise the whole work will look cheap and may fall apart.
- You should work carefully, hiding extra "tails", pieces of thread, protruding wire. Such details give out a careless master, the work looks untidy.
- In the same time, no need to try to recreate an exact copy of flowers, leaves from paper and candy wrappers. Artificial bouquets made by hand do not claim to be an exact match with natural ones, but rather to successfully imitate them.
- Handmade gurus do not recommend using artificial leaves in a bouquet and other plastic items. This deprives the work of uniqueness, it takes on a noticeably cheap look.

You need to know the measure when decorating a bouquet. A generous scattering of rhinestones, for example, will divert attention from flowers, and due to too many petals, the flower will lose its grace, it will simply be unrecognizable.
Bouquet of sweets "Pineapple" for beginners
Bouquet "Pineapple" is made on the basis of a bottle of champagne. In this way, you can beautifully decorate (hide) inexpensive alcohol, and, at the same time, make an impression.
Materials:
- pyramid-shaped sweets in yellow-golden tones - about 60 pieces;
- a bottle of champagne or sparkling wine;
- glue gun and rod;
- double sided tape;
- organza;
- aspidistra;
- sisal fibre.
The more “pot-bellied” a bottle of champagne, the more similar to a pineapple the bouquet will turn out. Organza needs to be glued to the bottle with adhesive tape - so the candies stick more firmly. Wrap the sweets tightly in wrappers, glue the tails to the sweets so that they do not stick out in different directions.
This can be done with ordinary tape or double-sided, but without tearing off the protective tape. There is a temptation to “plant” the candy just on the tape without using a gun, but this way the bouquet will not last long. You need to stick sweets on hot glue - "butt", avoiding spaces in a checkerboard pattern.
You should not press down - you can crush the sweetness, because the chocolate will already melt a little from hot glue.

Fill the surface of the bottle up to the point where the container narrows and passes into the neck- about 3/4 of this height. If it is not completely possible to avoid gaps, you can use sisal fiber, or "spider line". Slightly wrinkle a few threads and glue with a gun between the sweets, filling all the joints or randomly.
The neck is decorated with "leaves" of pineapple. To do this, the aspidistra is cut into pieces of 13-15 cm, from one edge they are shaped with scissors into an elongated sheet. The tape itself will bend around the edges, but you can give additional roundness with scissors - in this case, you need to do this immediately, and not on the bottle when the “leaves” are glued.
The first segments must be glued to the cork itself, closing it completely. Next, glue the “leaves” overlapping so that the glass is not visible. If there is a gap between the layer of sweets and the aspidistra, you can close it with ordinary twine, carefully twisting it into a spiral.
Or tie a bow with a satin ribbon.

If desired, you can sprinkle with a brilliant varnish the entire composition. This will not affect its strength, but it will look more beautiful, especially if the wrappers are not very bright. You can also glue beads (white or transparent) on the “leaves” of pineapple - this will create an imitation of water drops. Enough 5-6 for the whole bouquet.
Bouquet of sweets and flowers from corrugated paper
Materials:
- small (up to 1.5 cm in diameter) round or semi-circular sweets - 15-20 pieces;
- corrugated paper - 3 rolls: green and any two that are combined with each other (better - different shades of the same color);
- wire, wooden skewers with a height of 20 cm or more - according to the number of colors;
- double sided tape;
- glue gun and rod;
- sewing thread to match the color of the paper;
- sisal fiber;
- container for a bouquet (cardboard round box, tin or glass jar);
- satin ribbon (from 1 m).
Caramels, milk candies or small truffles are ideal. It will be beautiful if the candy wrappers are transparent.

- Fold the tails of the wrapper together so that the round side of the candy is on top (if the candy is semi-circular). Using double-sided tape, attach to the wire, unwinding a piece of 20 cm. Attention! Stripes on corrugated paper indicate the length, that is, along the short edge (hereinafter - in width), the paper should stretch.
- Cut out rectangles 6 by 4 cm from corrugated paper. Make a wavy cut from one short edge with scissors. Twist this edge with a pencil and fasten it so that it bends inward.
- Wrap the attached candy with a petal, holding the paper at the base and stretching it a little. With 2 such petals, you need to completely wrap the candy, and fix it at the bottom with tape or thread. The button is ready. You need to make 5 of these. two different colors and 3 more green.
- Roses themselves begin to be made according to the same principle, only you need to attach the candy not to the wire, but to a wooden skewer, as an option - a sushi stick.
- After making the bud, cut pieces of paper, also cutting off the edge and twisting it, in size: 6:6, 6:5, 5:5 cm.
- Start wrapping with those that are smaller, stretching at the bottom, and fasten with tape, but they should bend outward.
- Tie the last petals with a thread, and cut off the lower edges of the finished flower and secure at the base with double-sided tape to the skewer.
- From such a quantity of petals you will get a lush blooming flower. If you do not use the last 2 and do not twist the edges so much, the rose will come out more elastic and dense - as if it had not fully blossomed.
- The sepals are made from pieces of green paper the same size as the extreme petals. Cut it in breadth into several strips of 3-5 mm, not reaching 1.5-2 cm to the edge. The strips are twisted into bundles with your fingers, and fastened in the same way as the petals. 1 strip - 1 flower, if not enough - you need a wider strip.
- Tie the design with a thread. Do the same for the buds.
Bouquets of sweets, do-it-yourself flowers of this type are attached to a round box.
Alternatively, you can use a glass jar., painted with acrylic paint or pasted over with organza, and also a tin can (if you pick up a beautiful pattern, you don’t even need to decorate it). It should be wrapped with wrapping paper, tied with a satin ribbon around the edge. The height of the flowers should be 1.5 times the height of the container - the buds should rise above the edges.
In the box you need to place fasteners for flowers. Styrofoam, foam or sponge will do.
You need to cut the material according to the shape of the container so so that it fits in it, but does not fall out. Outside the container, a composition is formed: roses are arranged evenly over the area, buds are between them. To balance the color and to fill the space, put a gossamer on the hot glue.

Take a couple of caramels out of the package and “plant” on the cobweb on top, also gluing. After that, the bouquet is placed in a box, having previously measured the height and cut the stems. The sisal fiber should extend slightly beyond the edges. The bouquet is ready.
tulips
Materials:
- sweets "Raffaello";
- corrugated paper - several rolls of different colors;
- double sided tape;
- satin ribbon;
- teip tape;
- wrapping paper;
- wire or wooden skewers;
- glue gun and stick.
Roll of corrugated paper unfold and cut into 8 equal strips along. Then divide each in half, bend slightly. At the place of the fold, scroll the strip by 180 0 and turn one tail by 90 0 - so that the 2 sides are parallel to each other. Bend them slightly with the right side of the paper outward.
You will need 6 such strips - these are the tulip petals.
Attach the Raffaello candy in the package to the end of the wire with double-sided tape. Attach the petals one at a time: with the fold up, hold the tails of the folded strip together and wrap around the wire, gluing it on adhesive tape, shape the petal itself into a hemisphere, wrapping the candy around it.
On the base - a strip of adhesive tape. And so - all 6 petals, under them the “Rafaelka” should be completely hidden. Wrap the place where the petals are attached with green teip tape. Tulip is ready. For leaves, divide the roll of paper in the same way along and in half across.

Cut off one side of each strip in the form of a leaf. If desired, they can be made in different lengths. Attach to the wire at 3, 5 and 7 cm from the bud: stick a thin strip of adhesive tape or teip tape on the flat edge of the leaf so that the adhesive edge protrudes by 5 mm, and wrap the wire in a circle.
When collecting a bouquet of such tulips, you need to fasten them one by one with double-sided tape in a checkerboard pattern. Having collected everything, wrap the attachment point with teip tape. Bouquets of sweets, do-it-yourself flowers look especially elegant in wicker baskets.
Before you put the bouquet there, you need to cut the stems.
poppies
Ferrero Rocher sweets are best suited for poppies. You can take any round large sweets, but then the tails will have to be twisted and hidden. A poppy bouquet with sweets consists of 3 types of poppies: a blossoming poppy, a bud and a dry box with seeds.
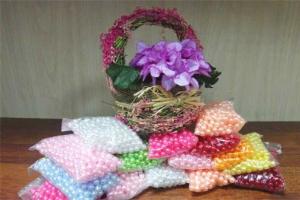
 Bouquets of sweets: handmade flowers with a sweet filling will be a nice gift at any celebration
 | poppy head type | materials | Manufacturing |
| blooming flower |
|
|
| Bud |
|
|
| Box with seeds |
|
|
Gather the poppy bouquet together (there should be more open flowers) and tie it with twine or a bundle of the same paper. Tie in a bow.
Roses
Materials:
- sweets "Truffles";
- red thick double-sided cardboard - 1 sheet per 1 rose;
- dry long twigs;
- glue gun and rod;
- twine or teip tape.
Cut out a circle from a sheet of cardboard. Cut it in a spiral, starting from the edge. Start twisting the resulting tape, starting from the edge, into a spiral in a circle. Having received a more or less dense bud, drop hot glue on the flat side of the candy (having previously attached a piece of cardboard to double-sided tape there).

Plant a flower on it, and roll it in the same way to the end. Fasten the edge in the same way. You will get a fairly abstract version of the rose, which does not require much addition. It is enough to attach the sharp edge of the candy to the twig and wrap it with teip tape in color.
you can wrap twine around candy and branches. She also tie several roses into a bouquet.
crocuses
Materials:
- round candies;
- corrugated paper;
- teip tape;
- double sided tape;
- wooden skewers or wire.
Corrugated paper of 2 colors cut into ribbons 3 cm wide, 15 cm long.
Video of a master class on making crocuses for decorating sweets:
Prepare the strips: mark the middle, turn 180 0 in this place. Fold in half and give the shape of a hemisphere, slightly stretching the ponytails in width. Tape the candy to the skewer with tape. Wrap the candy with petals overlapping in a circle, trying to cover the candy wrapper with them as much as possible. Fasten at the base with a thread, cut off excess paper, decorate with teip tape.
For leaves, cut into strips, twice as long as the finished flowers. Fold in half and fold in the same way as the petals.

Twist the lower part of the leaves into a bundle around the wire, bend it in a smooth wave. Leaves can not be attached to the stem, it is enough to tie together with flowers with a ribbon. Such flowers look good in a wicker basket or in a bottle, which was previously wrapped with thick twine in a spiral. The bouquet is ready.
Ship
Bouquets of sweets, flowers - you can do anything with your own hands, even a real frigate! Such a bouquet is suitable for a magnificent celebration.
Materials:
- sweets without "tails" on the wrappers;
- chocolate "medals";
- penoplex (styrex) - 1 sheet 5 cm thick;
- glue gun and rods;
- sandpaper bar;
- organza;
- wooden skewers;
- toothpicks;
- metallized tape;
- edging tourniquet;
- pins.
The first stage is the manufacture of the ship's hull. Patterns need to be made from paper: a triangle 14:14:14 cm (2 pcs. A1, A2) - the bow of the ship, a rectangle 14:21 cm - deck (B). The height of these parts depends on the height (thickness) of the styrex sheet, in this case the calculation is 5 cm. Rectangle 21:5:5 cm (2 pcs, the last digit is the thickness - C1, C2) - the walls, and back wall (C3).
From styrex (this is the material with which walls are insulated, you can find it in hardware stores) cut out according to templates.
You need to fold the structure in this way: glue 2 triangles with hot glue to the deck in front - the nose - A1, A2. On the deck from two sides - the walls of the ship C1 and C2. Behind - the back of the C3. If desired, smooth out sharp corners, especially the joint B and A1, A2 with sandpaper.
Cover with organza, draping the fabric with pins.

You can cut corrugated paper according to the same patterns and stick it on. Finish the sides with an edging tourniquet. For the sail, cut the organza with a trapezoid: 20:5:20:10 cm. Glue the edges with metalized tape on both sides, bend twice across to divide the flap into 3 parts, glue wooden toothpicks in place of the folds.
Insert wooden skewers (thin) along the center along them, stringing sails on them in the place of glued toothpicks. Pull them out to one side. Make 3 sails in this way. Stick double-sided tape on the sweets, on top - pieces of cardboard for better adhesion with organza.

Set two wooden skewers with sails on the deck, one on the stern. Glue the outer part with candy using hot glue. Candies in shiny golden foil, chocolate medals will look best.- they can be wrapped around the circle with an edging tourniquet.
Fill the deck of the ship with sweets, you can also hide a small gift there.
Bouquet of Raffaello sweets
Materials:
- sweets "Raffaello";
- pastel-colored matte wrapping paper;
- wooden skewers;
- double sided tape;
- glue gun and rod;
- organza to match wrapping paper.

Attach the candy to the wire with hot glue. Cut organza into 15:15 cm pieces, fold in four and thread through the free edge of the wire. Gather the fabric around the candy and tie a “tail” on top with a thread. Straighten the edges of the organza. Collect ready-made flowers in one bouquet, fasten with tape.
Wrap in wrapping paper so that its edges do not cover the flowers. Tuck the edge of the paper outward, with a collar and Secure with hot glue.
Bouquets of flowers with lollipops
In fact, any of the above methods is also suitable for lollipop candy. This will even make the task easier, because it will not be necessary to attach the candy to a wire or skewer. But there is another way, which has not yet been discussed.
Materials:
- chupa chups candy (or other candies on a stick - the larger, the better);
- corrugated paper (black, yellow),
- teip tape (green);
- wire;
- double sided tape.
Wrap the lollipop in a square of black corrugated paper, securing the edges with tape at the base of the candy.

Cut off from the entire roll across 10 cm of yellow paper. Cut the flap into strips of 1 cm, not reaching the edges of 3 cm. Twist them into flagella at the tips. Wrap the resulting tape around the lollipop, secure with tape, cut off the edges. Decorate at the bottom of the bud with green tape. For a bouquet, it is better to lengthen the candy stick with wire by taping it to the base with tape.
Wrap the stems together with a thin twine, leaving 3-4 cm at the bottom. Tie a bow.
christmas tree
With your own hands, you can create 2 main options for the base of the Christmas tree-bouquet: a cardboard cone and a bottle of champagne. Making a cone is simple: cut a semicircle out of thick cardboard, its radius will be the height of the finished spruce. Roll it into a cone, fix the edges with hot glue.
You can decorate the spruce with paper flowers, sweets and tinsel.

There are many variations, but the materials are basically the same:
- sweets in bright wrappers;
- glue gun and rod;
- threads of artificial beads;
- green tinsel;
- curly caramel for the top.
The bottle should be wrapped with organza for better grip, and a piece of paper should be glued to the place where the sweets are attached with double-sided tape.
- The easiest option is to take a bottle and candies in a green wrapper. Starting from the bottom, fasten them in a circle with hot glue. Place a caramel or a figure of Santa Claus on the top.
- Put sweets on a cone or bottle in the same way, alternating them with layers of green tinsel, which also needs to be put on glue. It should turn out like this: a circle of sweets - a circle of tinsel.
- In a chaotic manner, attach sweets to the cone. Wrap the tinsel in a spiral around the cone, slightly covering the sweets. Decorate with a thread of artificial beads. Place the Christmas tree on top of a decorative bucket, the opening of which will be a couple of cm wider than the base of the cone.
- Take jelly candies and free them from the wrapper. Make holes in the cone with an awl at a distance of one and a half diameters of the candy. Put the jellies on the toothpicks at one end, fasten the other on the cone. Do not use glue or tape.

According to the same scheme, you can make a Christmas tree from lollipops.
Candy wedding bouquet
For a do-it-yourself wedding bouquet, a bouquet of peonies is best suited. Volumetric flowers will emphasize a fluffy dress. In reserve, you can make 2 or 3 bouquets - in case one still falls apart. It is not advisable to use chocolates if the wedding is in hot weather - the chocolate may leak.

You should not make peonies from one-color paper, it is better to take several rolls of pastel shades and white, and alternate the petals - this will turn out more naturally.
Materials:
- sweets in a sealed wrapper (Raffaello, for example) or large candies;
- wooden skewers or wire;
- glue gun and rod;
- white mesh;
- teip tape white;
- satin ribbon;
- corrugated paper in pastel shades and white.
Wrap each candy in a piece of white mesh.
Attach a wooden skewer or wire so that it looks like a lollipop. Wrap the attachment point with double-sided tape or teip tape. Cut the corrugated sheet into strips with a width of: 3 by 2 cm, 3 by 3 cm, 3 by 5 cm. Then cut each tape across into 5 parts. On average, you should get 30-35 shreds from one roll.
On each rectangle, make incisions-notches on one side, slightly stretching the edges, cut off the other with a triangle 2-2.5 cm from the edge. Bend the petals with a question mark so that the sharp edge is at the bottom and remains even. Bend the notches inward with a pencil.
You need to fix the petals starting with the smallest ones. On the “leg” of the petal, drip hot glue, fasten it on a skewer, and so on in a circle slightly overlapping.

One layer will take a different number of petals, depending on the size of the candy. But for each next round you need to take 1 petal more than the previous one - this is how splendor is created. For the lower petals, cut off a 5 cm wide corrugated ribbon, divide it into 3-4 flaps. Trim in the shape of a heart.
Stretch each edge of the heart with your fingers and twist with a knitting needle. Give the petal the shape of a hemisphere. Fasten at the base of the bud so that the petal is bent outward. Decorate the place where the petals are attached with the same corrugated paper, green, or teip tape.
Gather the flowers together and tie with a satin ribbon bow to match the flowers.
Bouquets can be placed in small baskets and put on tables for guests, decorate a photo zone or an arch for a ceremony with them. Made in the same color range, such flowers will set the tone for the whole holiday, and the cost of materials and sweets is much lower than fresh flowers. Plus, handmade peonies are available all year round!
Article formatting: E. Chaikina
Useful video clip about candy bouquets
The plot about which sweets are best used when composing a bouquet, and how to get sweets while maintaining the composition:
Corrugation is a unique material from which you can create any flowers for an unfading bouquet. Often it is used for wedding compositions - understudies. Not every bride will want to part with her bouquet of fresh flowers, with which she spent her whole happy day, because there is a belief that it brings happiness to the young if it is placed in the house. Therefore, many decide to make a bouquet of corrugated paper with their own hands to throw it to their girlfriends.
Material
Corrugated paper is thick. To make different types of flowers, paper with a density of 120 to 180 grams is used, which stretches well and is suitable for making realistic compositions.
Folds on this material are called flutes, they are of three types:
- For packaging - A-flute (4.8 mm).
- To create large paper flowers - V-flute (3.2 mm).
- For small buds - E-flute (1.6 mm).
The palette is the most diverse - from delicate colors to metallic.
To create corrugated paper bouquets with your own hands, you will also need:
- wooden skewers (sticks) for stems;
- type tape used to decorate the base of the flower and stem;
- wire;
- scissors or a knife (clerical);
- candy or styrofoam balls to form the center of the flower;
- threads (usually metallized) for attaching petals and leaves;
- glue gun.
They can also come in handy: baskets, frames, ribbons and much more, which is enough for the author's imagination.

Principles and rules
Corrugated compositions can decorate any interior or act as an ideal gift. Here are a few general rules that will allow you to make a paper bouquet with your own hands:
- If the same petals are cut out, it is better to make several of them at once, folding the corrugation into several layers.
- Depending on the type of flower, the number of petals differs, for small roses - 2-3, for large roses - at least 4, for daisies - 2-3. The variety of sizes depends on their number.
- It is not necessary to make even and identical petals and leaves. They need to be made unique and different, as it happens in nature.
- Each petal wound on the stem must be smeared with glue at the base.
- When winding the petals onto the stem, it is necessary to knead the wrapped part well with your fingers and twist the paper in a spiral along the stem. The stronger the petal is pressed, the denser they will be to each other. By doing this procedure from the same petals, you can adjust their height and make them completely different in appearance.
To make a flower stem, you need to take a wire or a stick, which turns into a long thin strip cut out of green corrugation, or a type tape. The tape must be constantly glued and wound onto the base. There is an option to twist the paper, and fix its edge with a drop of glue. To make a composition of these flowers, it is worth leaving 1/3 of the stem from the bottom without finishing. Now it remains to learn how to make corrugated paper bouquets with your own hands, using step-by-step instructions.

Master classes
Below are the most interesting options for the manufacture of such compositions.
From sweets and roses
Using round candies, you can collect an elegant rosebud and make a beautiful bouquet that is suitable as a gift for a wedding, anniversary or other occasion.
It will require:
- scissors (large and small);
- round sweets;
- corrugated paper (pink for buds, green for leaves and stem);
- foil (in our case, gold);
- stem wire;
- container where the bouquet will be formed;
- foam or floral sponge;
- glue gun;
- thread (metallized in the color of the foil).
Making a rose
- We wrap the candy in foil and fix the base with a metallic thread.

- To form a bud, cut pink corrugated paper into squares. For our young rose, you need 2 squares. Fold them together, then in half and round off one corner.

- We put the prepared candy in golden foil on corrugated paper, fix the latter with a metallic thread.

- We make one square of green corrugation, cut out teeth from one edge, as shown in the photo below, wrap around the bud and fix with a glue gun.

- We form a stem. We wind a strip cut out of corrugated paper or type tape on the wire, fixing everything with glue. You need to leave the bottom of the stem empty.

- We insert the finished buds into a floristic sponge, pre-cut under the shape of the container. You can fill the voids with ribbons, beads on a wire, or simply corrugated cut into thin green strips.
A do-it-yourself bouquet of corrugated paper roses is ready and can decorate any interior or surprise your recipient.

wedding arrangement
Required:
- corrugation (2-3 colors);
- satin ribbon of different colors (thin and wide);
- stationery glue;
- cardboard roll (from under foil or cling film);
- CD;
- thin lace;
- Styrofoam;
- skewers.
We make a bridal bouquet from corrugated paper with our own hands:
- Cut off part of the cardboard roll to get the desired part for the composition handle. Cut off a white tape (length 1.5-2 meters) and use a glue gun to connect the tip to the CD, start wrapping it around. When the entire surface of the CD is covered, you need to cut off the excess part, fixing its edge with hot glue.
- To decorate the bouquet, you will need to cut lace and a wide green satin ribbon. We glue them to the CD on one side - first one end, then the other, alternating the ribbon with lace. On the side, you can make a bow from the same elements or just leave hanging ribbons. The edges of the ribbon must be treated with fire, so that in the process of wearing the bouquet, they do not become ragged.
- We are preparing the leg of the composition. Hammer the foam into one end of the cardboard roll and glue the edges with a thin tape, then along the entire length, strengthening everything with a hot glue gun.
- Make roses. It is necessary to cut wide strips of corrugation, folding them in half, start twisting in a spiral. It is advisable to adjust the length of each layer so that they differ. The center is always made higher. The result is very beautiful flowers for a bouquet of corrugated paper with your own hands, as in the photo.

- We form the composition by preparing for this a hemisphere cut out of foam. It must be glued to the disk. Glue the first rose on the very top. In a circle, the rest of the roses are glued further, alternating them in color in a checkerboard pattern.

- Glue the stem of the bouquet. Taking a few skewers, you need to stick them into the center of the disk from the bottom so that they enter the hemisphere with roses. Apply hot glue to the skewers and thread the finished leg. Before this, it is necessary to correctly calculate the length of the sticks in order to remove the excess.
- It remains to decorate the junction of the legs with the disk with satin ribbons, you can add a beautiful brooch.

This option can be decorated with beads, which will give it romance and tenderness, or make any other types of flowers. If you do everything according to the instructions, the composition will be very strong.
A do-it-yourself wedding bouquet made of corrugated paper is often made by brides for their bridesmaids. This is a very economical option, despite the required amount.
Package
As a packaging for a do-it-yourself corrugated paper bouquet, the following options are ideal:
- wrapping paper from which horns and bags are made;
- net;
- corrugation;
- cardboard horns;
- "pot" of burlap;
- rice paper, etc.
To make a bouquet of flowers from corrugated paper with your own hands, you don’t need much, the most important thing is fantasy, and it’s very easy to realize an idea with such a versatile material.
MK Corrugated paper tulips: video
Evgenia Smirnova
To send light into the depths of the human heart - this is the purpose of the artist
Mar 30 2016
Content
Holidays challenge us to make the room beautiful. Do-it-yourself corrugated paper flowers can become a wonderful decoration of any front hall. In appearance, these crafts look difficult to perform, especially since from afar they are confused even with fresh flowers. How to make a flower using corrugations? In fact, the technology is simple, anyone can make a plant. The main thing is to understand the manufacturing sequence; have patience for a monotonous occupation, a supply of free time and the necessary material.
How to make DIY crepe paper flowers
There are many different techniques for making flowers with your own hands: quilling, origami, applications, volumetric modeling, although the most popular needlework due to its simplicity and accessibility is the creation of flowers using corrugations. DIY crafts and flowers made from corrugated paper are considered an exciting hobby, a promising occupation. Everyone can learn how to make original flower arrangements.
Large and voluminous
Unusual voluminous paper flowers are a great decoration for festive events. You can make corrugated flowers with your own hands in a few hours. Such products can be hung from the ceiling, attached to walls, placed on tables or placed along the edge of the carpet. The scheme for creating home-made large flowers is the same as for small flowers. The only difference is the size.

english rose
- We cut the corrugated paper into several strips 6 cm wide. Divide each strip into 10 cm segments, then form the petals. We round off two corners of the segments.
- The middle of the flower can be formed from foil or put candy inside. We fix the core with glue to the end of the stick.
- Take a segment, stretch in the middle. It should completely envelop the foil ball - you get the first petal.
- We wrap the stick under the ball with threads, while capturing the petal. It is necessary to wrap each petal tightly 3 times so that our flower does not crumble.
- We form the next petal, fix it on the opposite side from the first leaflet. Fasten with thread again.
- Next, we stretch the three petals in the middle and fasten them in turn to the bud at an equal distance from each other.
- We stretch four more petals a little and attach them to the bud.
- We form the last petals, like all the previous ones, while their edges must be wound onto a skewer.
- Distribute six petals evenly. All our fluffy bud is ready. At the end we fix the thread with glue.
- If desired, delicate corrugated roses can be supplemented with green leaves made of paper.

giant poppies
Flowers made of corrugated paper with your own hands are perfect for decorating any holiday. So, we take a whole roll of paper. We cut it into 6 parts. And then:
- We put the parts one on top of the other, fold them with an accordion 10 cm wide.
- We fix the bottom with thread or a stapler.
- We make rounded cuts along the top of the entire accordion.
- We unfold all the petals in a circle and, separating the layers from each other, we will add volume to the flower.
- Next, take any scraps and wrap them in black paper to end up with a ball.
- We wrap the base with tape - this is the middle of our poppy.
- As a stem, we take a thick wire or a wooden lath, wrap them in green paper and make leaves, if desired.
- For a support for flowers, take large vases or special platforms.

On cardboard, draw a sketch of the template with a pencil: a wavy round shape resembling a cloud. Further actions:
- Cut out the pattern along the outline.
- We apply a template to the corrugated paper, carefully outline its outline with a pencil.
- Cut out the resulting workpiece. We need at least 10 blanks for a flower.
- We stack all the blanks on top of each other.
- We make two holes in the center. Next, we draw a wire through one hole, bend its end and thread it through an adjacent puncture.
- Fix the tip of the wire, the result is a blank for the stem.
- Next, take the topmost workpiece and bend it to the center. We do the same action with other blanks.
- The result is a lush peony bud.
- Then we begin to decorate the stem. To do this, take a green strip of crepe paper. Carefully wrap it around the wire.
- We fix the tip of the strip of marks.
- Cut out some green leaves. They can be made in any way.
- We apply glue to the lower edge of the stem and fasten the leaf. We fix other leaves.

Simple and small
Simple small flowers made of do-it-yourself corrugated paper are often used in the design of beauty salons. These flowers are loved by brides, so they can be seen in different wedding bouquets. The living room can also be decorated with artificial original paper flowers. The simplest solution is to use them as a substitute for natural plants in pots and vases.
Tulip
- From corrugated red paper, cut out a rectangle 32 cm long and 3 cm wide.
- We fold the resulting segment in half, then again and do this until the width becomes 4 cm.
- You should get a paper fan, thanks to which the petals of the same shape will come out.
- From the folded accordion we cut out the petals - 8 pieces.
- We squeeze the narrow edge of the petal and turn it several times. It will be more convenient to collect them in a bud.
- We bend the wide edge of the petal, gently stretch the paper.
- We put together all the petals of the tulip to form a bud.
- We fasten the tip of the bud on a wire wrapped in a strip of corrugated green paper.
- Randomly cut out the leaves for the tulip and bend them in half.
- If desired, it is easy to make the middle of the flower with sweets, for example, with Raffaello.

irises
- Cut out stencils. It should be one pointed small petal; one in the form of a drop and a large rounded one.
- Cut out 3 petals of each shape from purple, blue or blue paper, gently stretch their edges.
- So that the petals do not lose their shape, we glue a thin wire to each of them, while leaving the tails at the base.
- Apply glue to the center of the large three petals and pour fluff, finely chopped yellow thread on top.
- We collect the flower: first we connect the small petals to each other, add medium ones between them, and fasten the large ones below.
- We wrap the rod with green paper and connect it with the iris flower.

Bouquets and baskets
Do-it-yourself corrugated paper flowers will look great collected in a bouquet or flower panel. You can pleasantly surprise your relatives, loved ones, friends by presenting them with an original and beautiful basket of flowers and sweets. Their manufacturing technology is simple: the flowers are made of corrugated paper, and sweets are placed in the middle, everything else will depend only on your imagination. Paper bouquet, corrugated paper crafts - a gift for all occasions!
A basket with tulips is done like this:
- We take any corrugated paper and cut it into strips of 15 x2.5 cm. For leaves 3 x10 cm.
- We bend the strips in half and turn them over so that the front side looks in one direction.
- We straighten the segments to give the shape of a petal.
- Each flower has six petals.
- We collect all the petals around the skewer. First one petal, then the second.
- We shift 90 degrees and apply again one opposite the other.
- We straighten the leaves of the resulting flower, twist the base tightly with wire.
- Cut out the leaves in an oblong shape. They are screwed, stretched and straightened.
- We wrap the base of the flower with colored tape.
- We take a basket with filler (you can choose a special filler) and fill it with flowers in a circle. We put a package of truffles in the basket, you can even put a sweet cake or a decorative tree.

But a bouquet of roses is a little more complicated, to create a bouquet you need to take threads; red and white corrugated paper; beads, feathers, rhinestones, etc. So, we make roses from corrugated paper:
- Cut a flat rectangle 15 by 40 cm.
- We bend the edge of the long side of the segment so that we get a wave.
- We turn the flower and fix the end with a thread.
- We make such roses 9, 12 - your choice.
- We glue the buds to skewers or to a wire wrapped in green paper.
- We make a bouquet.
- If desired, you can add pearls, a doll, beads or feathers to the handmade composition.
You can learn from step-by-step video tutorials and photos.
Video master classes: how to make flowers from corrugated paper
Flowers have long been used to decorate houses, as well as decor when creating hairstyles. But living plants are short-lived, so people began to invent artificial bouquets. There are many options for crafts, the most popular, easy and quick is to create a bouquet of corrugated flowers. You can make a sweet bouquet by adding sweets, for example,. Such a flower arrangement or a wreath can be presented for a birthday to a child, mother, grandmother, there are New Year's options for bouquets. Even a novice florist can make and arrange a flower gift, the main thing is to clearly follow the step-by-step scheme for making the composition.
Even complex flowers can be made from corrugated paper: lilac, lily, hyacinth, crocus, spring twigs of sakura or cherry. On the Internet there are many different photos of creating crafts. But it's better to watch video tutorials on how to make a variety of flowers: field, decorative, etc. A paper composition, especially made with children, can be used as a gift, as well as an original decoration for a postcard or box. Making such crafts will not take much time, especially if you look at the free step-by-step instructions for making.
Making crafts from corrugated paper with your own hands is very fun and exciting. This beautiful and supple material has gained great popularity among needlewomen. In addition, corrugated paper is inexpensive and boasts a huge variety of colors.
We bring to your attention a few simple lessons on creating crafts from corrugated paper. They will help you explore this fascinating process in detail and suggest a lot of new ideas for creativity.
Bouquet of hyacinths from corrugated paper

We will need: corrugated paper of different colors, wooden skewers or sticks, glue and scissors.
Step one. Cut the paper into equal strips. We fold each strip into several layers and cut it into thin strips (not completely!), As shown in the photo.

Step two. We wind each strip of the resulting fringe onto a wooden skewer, which we then take out. As a result, we will get curls along the entire length of the paper tape, which we wind around the skewer to make a hyacinth inflorescence. Before that, we dip the tip of the skewer in glue. To make the inflorescence more magnificent, it is better to use two strips with curls.

Step three. We cut thin strips from green corrugated paper. We drip glue on the lower part of the inflorescence and from this place wrap the skewer with a green strip to the end of the stem, where we fix it with glue.

Step four. We cut out two green rectangles of different sizes, and from them - leaves, give them a convex shape. Next, glue the leaves to the stem.

Step five. In the same way we make the rest of the flowers. Inflorescences can be made from two multi-colored stripes. The more colors we use, the more interesting the composition will turn out.

A luxurious bouquet of hyacinths, made by yourself, is ready!

Topiary "Heart" from corrugated paper

We will need:
- pink corrugated paper
- trimming pencil
- pot for a tree
- cardboard, foam, glue and scissors
- tree trunk - any suitable size stick
- elements for decoration
Step one. We cut the pink corrugated paper into identical squares and cut out a big heart from the foam. Next, we make out the heart with the help of a volumetric application using the facing technique. To do this, press the pink square to the blunt tip of the pencil and crush it, as shown in the photo. We got a tube-end.

Step two. We apply glue to the tip of each trimming tube and glue the element on the heart. We continue to attach the formed pieces of paper elements until we cover the entire surface of the heart in this way. We try to place the trimming tubes very close to each other.

Step three. We cut the finished heart with scissors so that it looks even and neat. Pour any filler into a pot for a tree. Next, we cut out a circle from cardboard along the diameter of the container for the topiary with a hole for the barrel, decorate it using the technique of trimming with green corrugated paper and place it in a pot. We also glue the trunk with a green paper strip, fix it in a pot, and glue the other end to the heart.

Step four. We decorate the tree with birds and satin ribbons. We decorate at our discretion and a flower pot. Such a wonderful souvenir can be made with your own hands and presented to relatives or friends on Valentine's Day.

Easter egg stand

We will need: corrugated paper, cardboard for the base, scissors, decorative elements and glue.
Operating procedure:
- We make the base for the stand from cardboard.
- We cut out a fairly wide strip of corrugated paper and glue it on a round cardboard base.
- We fill the inside of the stand with pieces of organza, lace or soft wire. We complement our creation with bright elements. You can use paper flowers, beads, pebbles and other decorations. The handmade egg stand is ready.
Corrugated paper pineapple

We will need: green and yellow corrugated paper, a low bottle with a low neck, gold foil, scissors, glue.
Operating procedure:
- From green paper we cut out leaves 2 cm wide and 8 cm long, and from yellow - pineapple scales 2-3 cm wide and 9 cm long. Then fold the scales in half and twist them in the fold.
- We close the bottle with a cork and wrap the top of the neck with golden foil. Next, we glue leaflets from top to bottom on the neck of the bottle, and scales on the rest of it. We arrange them in a checkerboard pattern.
- We make a bottom with leaves and color the pineapple with a felt-tip pen with brown strokes.
Corrugated Paper Butterflies

Such cute butterflies according to the simple scheme attached to us can be made in 15 minutes. For creativity, we need: corrugated paper, threads, scissors, glue and decorative elements.
Operating procedure:
- We cut out two pairs of wings of different sizes from multi-colored corrugated paper, put them on top of each other, and then tie them in the center with a thread and spread the wings. If the butterfly is to be used as a pendant, the thread does not need to be cut.
- Next, we make the body of a butterfly. To do this, cut out a narrow strip, bend it in half, make an incision, as shown in the diagram, and wrap it around the central part of the butterfly. We twist the antennae from the incised ends.
- We glue sparkles or sequins on the wings - and the fluttering beauty butterfly is ready.
More craft ideas
The most popular corrugated paper crafts are flowers. For their manufacture, there are many simple and detailed schemes. Here are just a few of them.


Corrugated paper pom-poms are a great decoration for a holiday or decor for a photo shoot.
Another interesting craft idea from this wonderful material is bright and elegant baskets.


As you can see, corrugated paper is an amazing material from which you can create real masterpieces. Create, experiment, involve your loved ones in creativity - and your life will be filled with new colors.
Greetings, dear readers and visitors! I have repeatedly written that I love decorating gifts in the most unexpected ways. And today I suggest you make paper flowers with your own hands. Already twenty-odd methods, by the way.
Now, unfortunately, I rarely get to mass gift wrapping. Moreover, every year there are more and more acquaintances and friends who should be congratulated along with relatives. It's very joyful! I love giving presents. But if I choose them very carefully, then lately I pack them in organza bags, since I decide on detailed packaging only for single holidays (like a birthday).
However, my passion for all sorts of packaging beauty is difficult to overcome, so today I will train with you to make beautiful flowers according to step-by-step schemes.
DIY paper flowers: simple and with a twist
There will be a lot of master classes, get ready. Good news for all rose lovers: there will be 4 of them.
Aster
Guys, honestly, I'm not very strong in the names of colors. So if you see a clear discrepancy for you - write in the comments.
So, the first in line is the aster. For her, cut out five circles: two large, two medium and one very small. Fold each circle in half three times, then draw the edge as in the 4th photo. After unfolding the design, squeeze each petal to add volume. Fold all the circles into each other and decorate the middle.
Almost calendula
This flower is much more like a packing bow. Prepare for it a square of paper of the desired length and cut the edges according to step 2. You will need several such blanks. Lay them one on top of the other and squeeze in the center, tightening with wire or thread.
Now the most important thing is to straighten the petals so that you get a beautiful likeness of a flower. Accordingly, the more layers, the more petals and the more magnificent the flower in the end.
Tip: make several of these flowers of different sizes and glue them on the packaging next to each other, then you get a beautiful semblance of a bouquet.

Calla
To create calla lilies, you can use both ordinary double-sided paper and foamed rubber (here I wrote what it is - in the section about the minion).
For calla lilies, take a stamen (you can crumple it out of paper or make it out of polymer clay) and a petal made in the shape of a heart. Insert the stamen into the petal, fold the edges of the petal over the stamen, gluing them together. It remains only to unscrew the edges to get the maximum resemblance to calla lilies.
Such flowers are well suited for postcards, packaging, and as an independent gift in the form of a bouquet.

Bell
The master class for the bell is quite simple and understandable. Cut out the blank according to the first photo. Glue the edges of it, and gently straighten the ends. To make everything look natural, make the middle of several oblong stamens that will need to be glued inside the flower.
Of these bells, by the way, it will be great to decorate the packaging for March 8 or just a spring birthday.
lilies of the valley
Well, or something similar. For one flower, take a long rectangle and bend the edge of it, as in the photo. Cut the wide part so that you get a lot of small strips. Using scissors, twist the strips (to do this, you just need to run the sharp side of the scissors along these strips, slightly pressing the blade against them).
To prevent the flower from falling apart, take a rod on which you wind a green strip. Then, from above, begin to gently twist the “flower” part, previously smeared with glue. Apply layers tightly so that greenery does not show through from under them.
But it’s not at all difficult to make green leaves - for them, just fold a rectangle of green paper with an accordion and cut the edges with a “triangle”. When unfolded, you will get a lot of green leaves ready to be glued to the base.

Poppy
Now let's use corrugated paper. Cut out about ten teardrop-shaped petals from it. Stretch the wide part so that the blanks resemble mushrooms.
Take a thin wire and wind some paper around it - this will be the core. Wind the petals onto this core so that each slightly overlaps the previous one. When everything is ready, the structure can be pulled down below so that it does not fall apart.
The master class shows how this flower can be attached to a festive cap, but believe me, a poppy will look great on a gift box.

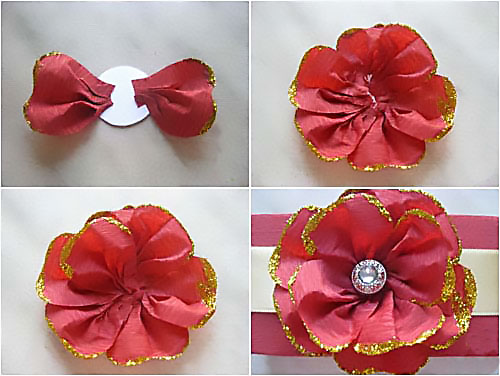
Red flower
What kind of species does he have? No associations came to mind. But this is not the point - to create it, you will need about ten petals (corrugated paper is used, by the way). Their shape is almost drop-shaped. but with a cut end.
Cut out a base circle from thick cardboard. Glue all the petals in layers to this circle, slightly crushing (doubting? God, how right: _D) the bases, thus forming folds - then the flower will be more voluminous and “fluffy”. Decorate the center with some button or bead.
Such a flower, by the way, will look great from soft felt - so it will gain durability. And if you attach the base for the brooch at the back, you get two in one - a gift decoration and a gift itself.
Extravaganza of color
There are only two flowers, but due to the bright combinations, a very unusual effect is obtained. Take the crepe paper again, cut out a circle and fold it into a chrysalis shape. Cut a “skirt” to it, which you wrap around the chrysalis. Attach the petals on top, gluing them in a circle. Glue two wide leaves at the base.
The second flower is quite simple - cut the fringe and twist it into several layers. Flowers are very simple, they can make a very interesting gift composition.
Unseen flower
To prepare the basis for this flower, I advise you to look here - here the basis for the second Christmas tree is created in the same way. But then the differences begin - each of the corners must be wrapped with a thick wire or knitting needle so that a spiral is obtained.
You can leave this design alone, but I suggest you connect several (say, three) pieces using the existing spirals - the wow effect is provided. Then you can also experiment - combine elements with spirals into unprecedented designs.
Tip: going to a Japanese-style party? Then make such a flower of a very large size and take it with you - it will serve as an excellent decoration for the chandelier.

Peony
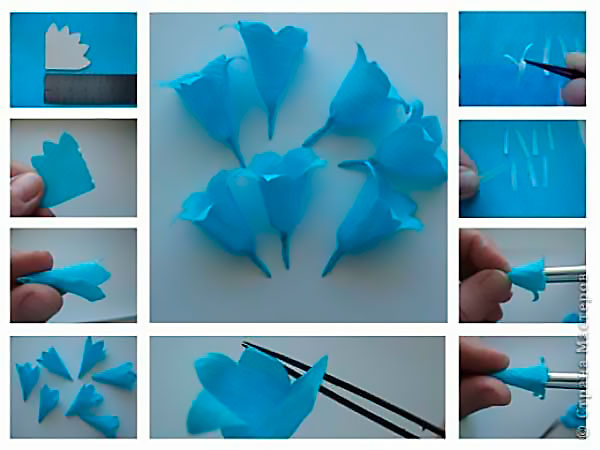
“Pio-, pio-, peonies are given by a new acquaintance ...” - the words from the song of the underground group “My Michelle” (I often listen to it lately, inspired). We will make crafts from corrugated paper. You will need five sizes of petals, approximately five copies of each (appearance as in the photo).
Stretch the petals so that you get a semblance of a wave (for both large and small ones). Then form a stamen from the same corrugated paper by folding the paper with further compaction. You can do this on a wire skewer, or you can do it without it.
Glue the petals onto the finished stamen, overlapping each subsequent previous one. Do not tighten the petal too much. At the end, it remains only to cut the green leaves and stick them around the peony.

4 in 1: dandelion, carnation, aster, chamomile
All these wonderful creations of nature are made according to the same principle - cutting the edge of the strip from which the flower will be made. The final shape of the flower also depends on the shape of the cut. Keep in mind that some require a core, while others do not.
Please note: despite the very simple design, the flowers are very realistic. If there is very little time for production, then this is an ideal option.
Experiment and discover your unprecedented plants - be sure to tell us what happened.

paper roses
Magic roses are one of my favorite flowers.
Rose with twisted edge
The main difficulty here is to carefully twist the edge of the corrugated paper, straightening the folds. Then make sure that the folds are even. Now twist the strip so that the layers fit snugly together. At the end, fasten with a thread, cut off the excess.

simple rosette
Need to make a plant in five minutes? Then this rose is for you! Just cut out a circle in which draw a spiral. Cut out a spiral like in the photo and twist the rose starting from the longest link of the spiral (the central part will serve as the base).

big rose
Even gigantic, if you follow just such dimensions. Heart petals are stretched and superimposed on each other in a circle with fixing with glue. Green petals are attached at the end. Of course, the flower does not have to be as big as in the photo - start from your preferences.
Twisted paper rose
Once I already described this way of creating a rose (here is the second one). The principle is exactly the same, but the dimensions of the triangles resulting from twisting must be the same along the entire length of the tape, otherwise there will be a not very neat flower.
Once she even made a Rosemary doll, which took part in the city exhibition. Her whole body was covered with roses, made just in this way (the roses were from ribbons, really).

Clover
I will only show you how to make the base for a four leaf clover. To do this, take a square of paper and fold it in half lengthwise and in half again. Bend the ends to the center. Cut out a heart from the resulting design. The result will be exactly what we wanted - a happy flower.

Nameless
As much as I puffed up, I could not give an intelligible name. As a result, Tovariz remained just a beautiful flower, reminiscent of kanzashi motifs (Japanese art of making jewelry from satin ribbons).
The beginning here is the same as in clover. But after bending the edges, it will be necessary to bend the ends so that the length of the bent part is equal to the length of the visible side in the middle. Then these parts are straightened and their edges are already bent so that the sides are even. They are again bent and glued so that three stamens are obtained. There should be three such petals.
Most of all, such a flower is suitable for decorating a gift in the Japanese style.

And again aster
This time, you already need to glue the petals around the edge until you reach the desired volume. Decorate the center as you wish, or simply fill it with as many petals as possible.

On this large flower review, I declare it closed. I hope you have found exactly the option that will help you decorate the best gift. See you soon, subscribe and share with your friends!
Sincerely, Anastasia Skoreva