A simple and reliable thermostat for an incubator. Do-it-yourself thermostat: a diagram and step-by-step instructions for making a home-made device Do-it-yourself electronic water temperature controller
To automatically maintain the temperature regime, you can create a thermostat with your own hands. A high-quality homemade product will perform its functions no worse than a factory counterpart. After a thorough study of the assembly process, upgrades and repairs will not cause difficulties.
The concept of temperature controllers
- cellar heating;
- soldering station heating;
- boiler circulation pump.
From the examples given, the basic requirements for accuracy that a suitable thermostat circuit must provide are clear. In some situations it is necessary to maintain the set level not lower than ±1C°. Operational indication is needed to control operating parameters. Load capacities are of great importance.
The listed features explain the purpose of typical functional units:
- the temperature value is fixed by a specialized sensor (resistor, thermocouple);
- readings are analyzed by a microcontroller or other device;
- the actuating signal is fed to the electronic (mechanical) switch.
For your information. In addition to the considered parts, the thermal relay circuit may contain additional components for supplying power to the electric heater, another powerful load.
Principle of operation
Any thermostat circuit operates on the same principles. The temperature information is compared with the set value. Crossing a certain level activates the actuator to correct the controlled parameter as needed.
Kinds
In the simplest version (refrigerator relay), a mechanical switch is used. For more precise adjustment (engine speed), not only microelectronics are used, but also specialized software.
Thermostat on three elements
To make a simple do-it-yourself thermostat, a circuit for a personal computer power supply is better than other options.

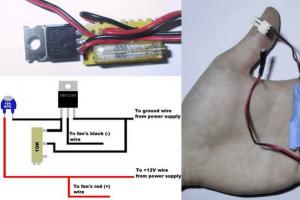
Thermistor measures the temperature at the control point. The potentiometer sets the optimal value for turning on the fan. This scheme is not capable of changing the speed. Connects an inductive MOSFET load. It is acceptable to use an analogue with suitable power characteristics.
Temperature controllers for heating boilers
A do-it-yourself temperature controller can be made as part of an old boiler modernization project. The type of fuel does not matter, although it is easier to ensure a good result using gas equipment.

Digital thermostat
In this example, the developers created a temperature maintenance device in a fruit (vegetable) store. To analyze the incoming data, a microcircuit with the following blocks was selected:
- timers;
- generator;
- two comparators;
- exchange, comparison and data transmission modules.
When the switches are in the appropriate position, the LED matrix shows the actual temperature value or the reference level. Buttons in step-by-step mode set the desired threshold.

Homemade temperature controller
Creating a functional thermostat with your own hands is not too difficult. However, one must be realistic about one's own capabilities. The following instructions will help you make the right decision.
The simplest circuit
To eliminate unnecessary difficulties, a circuit with a power supply without a transformer is used. To rectify the supply voltage, a conventional diode bridge is used. The required level of the constant component is supported by a zener diode. Capacitor eliminates surges.
A typical divider is suitable for voltage control. A resistor is installed in one arm, which reacts to temperature changes. A relay is suitable for controlling the actuator.
Indoor device
This device can be used to maintain the temperature in a mini-greenhouse, another limited space. The main element is the operational amplifier chip, which is turned on in the voltage comparison mode. Fine and coarse adjustment of the threshold is performed using resistors R5 and R4, respectively.

On the LM 311 chip
This option is designed to connect electric underfloor heating, other powerful loads. Attention should be paid to the increased reliability of the product, which is provided by galvanic isolation of circuits with low and high currents.

Necessary materials and tools
In some situations, you will need the skills to manufacture a complex printed circuit board. The simplest circuits are assembled in a few minutes using a soldering iron and surface mounting technology. Before performing work operations, you must purchase:
- accessories;
- Consumables;
- measuring equipment.
The shopping list is compiled on the basis of the selected electrical circuit. To protect the device from adverse external influences and improve the appearance, an appropriate case is created.
Advantages and disadvantages
The pros and cons of individual schemes are evaluated taking into account real operating conditions. Sometimes it is beneficial to spend time and money at the stage of implementation of the idea in order to extend the life of the finished product. It makes no sense to create a homemade product if the factory counterpart with official guarantees is cheaper.
How to properly install
To extend the life of the thermostat, use the following recommendations:
- do not install electronics without additional protection in the open air, in rooms with a high level of humidity;
- if necessary, a control sensor is taken out into an unfavorable environment;
- exclude the location of the regulator opposite the heat guns, other "generators" of cold or heat;
- to improve accuracy, choose a place without active convection currents.
How to repair
It is not difficult to restore a home-made temperature sensor with your own hands, since the verification (setting) technology is known. Repair instructions for factory products can be found on the official website of the manufacturer.
Video
Among the numerous range of useful devices that bring comfort to our lives, there are a large number of those that can be made by hand. This number can also include a thermostat, which turns on or off heating and refrigeration equipment in accordance with a certain temperature at which it is set. Such a device is perfect for a period of cold weather, for example, for a basement where you need to store vegetables. So how to make a thermostat with your own hands, and what parts are needed for this?
Do-it-yourself thermostat: diagram
About the design of the thermostat, we can say that it is not particularly complicated, it is for this reason that most radio amateurs begin their training with this device, and it is also on it that they hone their skills and craftsmanship. You can find a very large number of device circuits, but the most common is a circuit using the so-called comparator.

This element has several inputs and outputs:
- One input corresponds to the supply of a reference voltage that corresponds to the required temperature;
- The second receives voltage from the temperature sensor.
The comparator itself takes all incoming readings and compares them. If it generates an output signal, it will turn on the relay, which will supply current to the heating or refrigeration unit.
What parts are needed: do-it-yourself thermostat
For a temperature sensor, a thermistor is most often used, this is an element that regulates electrical resistance depending on the temperature indicator.
Semiconductor parts are also often used:
- Diodes;
- Transistors.
The temperature should have the same effect on their characteristics. That is, when heated, the transistor current should increase and at the same time it should stop working, despite the incoming signal. It should be noted that such details have a big drawback. It is too difficult to calibrate, to be more precise, it will be difficult to link these parts to some temperature sensors.
However, at the moment the industry does not stand still, and you can see devices from the 300 series, this is the LM335, which is increasingly recommended by experts and the LM358n. Despite the very low cost, this part occupies the first position in the markings and focuses on combination with household appliances. It is worth mentioning that modifications of this part LM 235 and 135 are successfully used in the military and industry. Including about 16 transistors in its design, the sensor is able to work as a stabilizer, and its voltage will completely depend on the temperature indicator.
The dependency is as follows:
- For each degree, there will be about 0.01 V, if you focus on Celsius, then for an indicator of 273 the output result will be 2.73V.
- The operating range is limited in terms of -40 to +100 degrees. Thanks to such indicators, the user completely gets rid of the adjustments by trial and error, and the required temperature will be provided in any case.
Also, in addition to the temperature sensor, you will need a comparator, it is best to purchase an LM 311, which is produced by the same manufacturer, a potentiometer in order to form a reference voltage and an output setting to turn on the relay. Do not forget to purchase a power supply and special indicators.
DIY temperature controller: power and load
As for the connection of the LM 335, it must be consistent. All resistances must be selected so that the total amount of current that passes through the temperature sensor corresponds to indicators from 0.45 mA to 5 mA. Exceeding the mark should not be allowed, as the sensor will overheat and show distorted data.

The thermostat can be powered up in several ways:
- Using a power supply with a focus on 12 V;
- Using any other device, the power of which does not exceed the above figure, but the current flowing through the coil must not exceed 100 mA.
Let us remind you once again that the current in the sensor circuit should not exceed 5 mA, for this reason you will have to use a high power transistor. KT 814 is best. Of course, if you want to avoid using a transistor, you can use a relay with a lower current level. It can run on 220V.
Homemade thermostat: step by step instructions
If you have purchased all the necessary components for assembly, it remains to consider the detailed instructions. We will consider the example of a temperature sensor designed for 12V.
A homemade temperature controller is assembled according to the following principle:
- We prepare the body. You can use old shells from the counter, for example, from the Granit-1 installation.
- You select the scheme that you like best, but you can also orient yourself on the board from the meter. A forward stroke marked “+” is required to connect a potentiometer, an inverted input marked “–” will be used to connect a temperature sensor. If it so happens that the voltage at the direct input is higher than required, a high mark will be set at the output and the transistor will begin to supply power to the relay, and it, in turn, to the heating element. As soon as the output voltage exceeds the allowable mark, the relay will turn off.
- In order for the thermostat to work on time and to ensure temperature differences, it will be necessary to make a negative type connection using a resistor, which is formed between the direct input and the output on the comparator.
- As for the transformer and its power supply, an induction coil from an old electric meter may be needed here. In order for the voltage to correspond to 12 volts, you will need to make 540 turns. It will be possible to fit them only if the diameter of the wire is no more than 0.4 mm.
That's all. All the work on creating a thermostat with your own hands lies in these small actions. It may not be possible to do it right away without certain skills, however, based on photo and video instructions, you can test all your skills.
Thanks to its simple design, the self-made thermocontroller can be used anywhere.
For example:
- For a warm floor;
- For the cellar;
- Can adjust the air temperature;
- For the oven;
- For an aquarium where it will control the temperature of the water;
- In order to control the temperature value of the electric boiler pump (turn it on and off);
- And even for a car.
It is not necessary to use a digital, electronic or mechanical commercial thermal switch. Having bought an inexpensive thermal relay, make power adjustments on the triac and thermocouple and your home-made device will work no worse than the purchased one.
How to make a thermostat with your own hands (video)
In our article on the independent creation of a thermostat, all the main points were indicated, from the necessary details for the design to step-by-step instructions. Do not rush to immediately start creating, study the literature and the advice of experienced craftsmen. Only with the right approach will you be able to get the perfect result on the first try.
Temperature controllers are widely used for various purposes: in cars, heating systems of various types, refrigerators and ovens. Their job is to turn off or turn on appliances after reaching a certain temperature. It is not difficult to make a simple mechanical thermostat with your own hands. Modern designs have a more complex scheme, but with some experience, you can make analogues of such devices.
- return spring;
- two levers;
- two aluminum tubes;
- adjusting unit (looks like a crane box);
- a chain that connects two parts (thermostat and door).
- threshold scheme;
- indicator device;
- temperature sensor.
- thermistors;
- semiconductor elements;
- resistance thermometers;
- bimetallic relays;
- thermocouples.
- power transistor;
- potentiometer;
- thermistor, which will act as a temperature sensor.
- 1. Data is taken directly from the coolant. In everyday life, it is not very popular, since its effectiveness is insufficient. The principle of operation lies in a submersible sensor or other similar device. Although there are problems with efficiency, it belongs to the expensive segment of such devices on the market.
- 2. Internal air waves. This option is the most popular because it is considered reliable and economical. It takes data not from the temperature of the coolant, but directly from the air. This allows for higher accuracy. What degree will be set in the control unit, this will be the air temperature. Connects to the heating system with a cable. Such models are constantly being improved by manufacturers, which makes them more convenient and functional.
- 3. External air waves. Operates on the basis of a street sensor. It works with any changes in weather conditions, and immediately reacts by changing the settings of the heating equipment.
Show all
Mechanical thermostat

 Today, the newest models of thermostats are controlled using touch buttons, older models are mechanical. Most of these devices have a digital panel that displays the temperature of the coolant in real time, as well as the required maximum degree.
The production of such devices is not complete without programming them, so their price is very high. They allow you to adjust the temperature regime according to various parameters, for example, by hours or days of the week. The temperature will then change automatically.
If we talk about temperature controllers for industrial steel furnaces, then it will be difficult to make them yourself, since they have a complex design and require the attention of more than one specialist. These are mostly made in factories. But making a simple do-it-yourself temperature controller for an autonomous heating system, incubators, etc. is not a difficult task. The main thing is to adhere to all drawings and recommendations for production.
In order to understand how the thermostat works, you can disassemble a simple mechanical design. It works on the principle of opening and closing the door (damper) of the boiler, which reduces or increases the access of air to the combustion chamber. The sensor reacts, of course, to the temperature.
To produce such a device you will need the following accessories:
All components must be assembled and mounted on the boiler.
The device works due to the property of aluminum to expand under the influence of temperature. As a result, the damper closes. If the temperature decreases, the aluminum pipe cools down and shrinks, so the damper opens slightly.
But such a scheme also has its significant drawbacks. The problem is that it is difficult to determine in this way when the damper will open. In order to approximately set up the mechanism, accurate calculations are needed. It is impossible to determine exactly how much the aluminum pipe will expand. Therefore, in most cases, devices with electronic sensors are now preferred.
Homemade mechanical thermostat for a mine boiler


Simple electronic device
For more accurate operation of the automatic temperature controller, electronic components are indispensable. The simplest thermostats operate according to a relay-based scheme.


The main elements of such a device are:
The homemade thermostat circuit must respond to an increase (decrease) in temperature and turn on the actuator or suspend its operation. To implement the simplest circuit, bipolar transistors should be used. The thermal relay is made according to the type of Schmidt trigger. The thermistor will act as a temperature sensor. It will change the resistance depending on the temperature, which is configured in the common control unit.
But in addition to the thermistor, the temperature sensor can be:
When using diagrams and drawings from unknown sources, it should be borne in mind that they often do not correspond to the attached description. In this regard, it is necessary to carefully study all the material before proceeding with the manufacture of the device.
Before starting work, you need to decide on the temperature range of the device, as well as its power. It should be borne in mind that some components will be used for the refrigerator, and others for heating equipment.


Three piece device

 A simple do-it-yourself electronic thermostat can be assembled for use on fans and personal computers. Thus, you can understand the principle of its work. The breadboard is used as the basis.
Of the tools you will need a soldering iron, but if you don’t have one or don’t have enough work experience, you can also use a solderless board.
The scheme consists of three elements:
The temperature sensor (thermistor) reacts to an increase in degrees, in connection with this the fan will turn on.
To adjust the device, you must first set the data for the fan in the off position. After that, you need to turn on the computer and wait until it warms up to a certain temperature in order to fix the moment the fan turns on. The setting is made several times. This will ensure the efficiency of the work.
Today, modern manufacturers of various elements and microcircuits can offer a large selection of spare parts. All of them differ in technical characteristics and appearance.
Do-it-yourself thermostat


Temperature controllers for heating systems
When manufacturing and installing a thermostat with a do-it-yourself air temperature sensor for heating systems, it is necessary to accurately calibrate the upper and lower lines. This will avoid overheating of the equipment, which can lead to the failure of the entire system at best. At worst, overheating of the equipment can cause it to explode and possibly be fatal.


For these purposes, you will need a device to measure the current strength. With the help of drawings and diagrams, you can make outdoor equipment for adjusting the temperature of a solid fuel boiler. For work, you can use the K561LA7 scheme. The principle of operation lies in the same ability of the thermistor to reduce or increase resistance under certain temperature conditions. The desired indicators can be set using an AC resistor. First, the voltage is applied to the inverter, and then transferred to the capacitors, which are connected to the flip-flops and control their operation.
The principle of operation is simple. As the degrees decrease, the voltage in the relay increases. If the value is less than the lower limit values, the fan will automatically turn off.
It is better to solder the elements on a mole rat. As a power supply, you can use a device that operates within 3-15 V.
Any homemade device installed on the heating system can lead to its failure. In addition, such actions may be prohibited by state control services. For example, if a gas boiler is installed in the house, then such additional equipment may be seized by the gas service. In some cases, fines are even issued.
Do-it-yourself thermostat for heating elements: diagram and instructions
Digital equipment

 For the manufacture of a modern device with precise adjustment of the required degrees, digital components are indispensable.
PIC16F628A is used as the main chip. Using such a circuit, you can control various electronic devices.
The principle of operation is also not very complicated. The three-character indicator with a common cathode is supplied with the values of the set (required) temperature and the current one.
To set the desired temperature, the microcircuit has two elements sb1 and sb2, to which mechanical buttons are subsequently soldered. The first element serves to decrease the temperature, and the second to increase.
Setting the hysteresis value is performed while pressing the sb3 button when setting.
When making devices yourself, it is important not only to solder and make the circuit correctly, but also to place the device on the equipment in the right place. The board itself must be protected from moisture and dust, in order to avoid the occurrence of a short circuit, and, accordingly, the failure of the device. The isolation of all contacts also plays a very important role.
Temperature controllers
Variety of devices on the market
Today, companies that produce such equipment offer the buyer 3 main types of devices. All of them work on different internal signals. It is their function that is to control the temperature and equalize it, depending on the settings of the device (upper and lower lines).


There are three types of internal signals:
Such devices can be either electric or electronic. Temperature controllers can receive a signal in automatic or semi-automatic mode. Operation and temperature changes can occur by monitoring the temperature of radiators and line branches or by recording changes in boiler power.
Today the market has many popular models from top manufacturers who have already consolidated their position. First of all, these include E 51.716 and IWarm 710. The body itself is small in size and made of plastic polymer that does not burn. Despite this, it has many useful features. The display, as for such small razers, is quite large. It displays all existing data. Such devices cost between 2500-3000 rubles.

 The functional features of the first model include the possibility of mounting it into a wall in any position, the temperature is controlled simultaneously from the floor itself, as well as the presence of a cable 3 m long. When installing, you need to think about whether there will be free access to the device for unhindered control of it.
To the above pluses, there are some minuses. These include a small set of functions that are available in analogues of these devices. When using it, it sometimes causes discomfort. In addition, these models do not have an automatic heating function. But if you want, you can finish it yourself.
Thus, it will not be difficult to make a thermostat on your own or to purchase and install a finished model if you strictly follow all the diagrams, drawings and instructions for manufacturing and installation. This equipment will save the owners time on manual temperature control of certain appliances.
Temperature controllers are widely used for various purposes: in cars, heating systems of various types, refrigerators and ovens. Their job is to turn off or turn on appliances after reaching a certain temperature. It is not difficult to make a simple mechanical thermostat with your own hands. Modern designs have a more complex scheme, but with some experience, you can make analogues of such devices.
- return spring;
- two levers;
- two aluminum tubes;
- adjusting unit (looks like a crane box);
- a chain that connects two parts (thermostat and door).
- threshold scheme;
- indicator device;
- temperature sensor.
- thermistors;
- semiconductor elements;
- resistance thermometers;
- bimetallic relays;
- thermocouples.
- power transistor;
- potentiometer;
- thermistor, which will act as a temperature sensor.
- 1. Data is taken directly from the coolant. In everyday life, it is not very popular, since its effectiveness is insufficient. The principle of operation lies in a submersible sensor or other similar device. Although there are problems with efficiency, it belongs to the expensive segment of such devices on the market.
- 2. Internal air waves. This option is the most popular because it is considered reliable and economical. It takes data not from the temperature of the coolant, but directly from the air. This allows for higher accuracy. What degree will be set in the control unit, this will be the air temperature. Connects to the heating system with a cable. Such models are constantly being improved by manufacturers, which makes them more convenient and functional.
- 3. External air waves. Operates on the basis of a street sensor. It works with any changes in weather conditions, and immediately reacts by changing the settings of the heating equipment.
Show all
Mechanical thermostat
Today, the newest models of thermostats are controlled using touch buttons, older models are mechanical. Most of these devices have a digital panel that displays the temperature of the coolant in real time, as well as the required maximum degree.
The production of such devices is not complete without programming them, so their price is very high. They allow you to adjust the temperature regime according to various parameters, for example, by hours or days of the week. The temperature will then change automatically.
If we talk about temperature controllers for industrial steel furnaces, then it will be difficult to make them yourself, since they have a complex design and require the attention of more than one specialist. These are mostly made in factories. But making a simple do-it-yourself temperature controller for an autonomous heating system, incubators, etc. is not a difficult task. The main thing is to adhere to all drawings and recommendations for production.
In order to understand how the thermostat works, you can disassemble a simple mechanical design. It works on the principle of opening and closing the door (damper) of the boiler, which reduces or increases the access of air to the combustion chamber. The sensor reacts, of course, to the temperature.
To produce such a device you will need the following accessories:
All components must be assembled and mounted on the boiler.
The device works due to the property of aluminum to expand under the influence of temperature. As a result, the damper closes. If the temperature decreases, the aluminum pipe cools down and shrinks, so the damper opens slightly.
But such a scheme also has its significant drawbacks. The problem is that it is difficult to determine in this way when the damper will open. In order to approximately set up the mechanism, accurate calculations are needed. It is impossible to determine exactly how much the aluminum pipe will expand. Therefore, in most cases, devices with electronic sensors are now preferred.
Homemade mechanical thermostat for a mine boiler
Simple electronic device
For more accurate operation of the automatic temperature controller, electronic components are indispensable. The simplest thermostats operate according to a relay-based scheme.
The main elements of such a device are:
The homemade thermostat circuit must respond to an increase (decrease) in temperature and turn on the actuator or suspend its operation. To implement the simplest circuit, bipolar transistors should be used. The thermal relay is made according to the type of Schmidt trigger. The thermistor will act as a temperature sensor. It will change the resistance depending on the temperature, which is configured in the common control unit.
But in addition to the thermistor, the temperature sensor can be:
When using diagrams and drawings from unknown sources, it should be borne in mind that they often do not correspond to the attached description. In this regard, it is necessary to carefully study all the material before proceeding with the manufacture of the device.
Before starting work, you need to decide on the temperature range of the device, as well as its power. It should be borne in mind that some components will be used for the refrigerator, and others for heating equipment.
Three piece device
A simple do-it-yourself electronic thermostat can be assembled for use on fans and personal computers. Thus, you can understand the principle of its work. The breadboard is used as the basis.
Of the tools you will need a soldering iron, but if you don’t have one or don’t have enough work experience, you can also use a solderless board.
The scheme consists of three elements:
The temperature sensor (thermistor) reacts to an increase in degrees, in connection with this the fan will turn on.
To adjust the device, you must first set the data for the fan in the off position. After that, you need to turn on the computer and wait until it warms up to a certain temperature in order to fix the moment the fan turns on. The setting is made several times. This will ensure the efficiency of the work.
Today, modern manufacturers of various elements and microcircuits can offer a large selection of spare parts. All of them differ in technical characteristics and appearance.
Do-it-yourself thermostat
Temperature controllers for heating systems
When manufacturing and installing a thermostat with a do-it-yourself air temperature sensor for heating systems, it is necessary to accurately calibrate the upper and lower lines. This will avoid overheating of the equipment, which can lead to the failure of the entire system at best. At worst, overheating of the equipment can cause it to explode and possibly be fatal.
For these purposes, you will need a device to measure the current strength. With the help of drawings and diagrams, you can make outdoor equipment for adjusting the temperature of a solid fuel boiler. For work, you can use the K561LA7 scheme. The principle of operation lies in the same ability of the thermistor to reduce or increase resistance under certain temperature conditions. The desired indicators can be set using an AC resistor. First, the voltage is applied to the inverter, and then transferred to the capacitors, which are connected to the flip-flops and control their operation.
The principle of operation is simple. As the degrees decrease, the voltage in the relay increases. If the value is less than the lower limit values, the fan will automatically turn off.
It is better to solder the elements on a mole rat. As a power supply, you can use a device that operates within 3-15 V.
Any homemade device installed on the heating system can lead to its failure. In addition, such actions may be prohibited by state control services. For example, if a gas boiler is installed in the house, then such additional equipment may be seized by the gas service. In some cases, fines are even issued.
Do-it-yourself thermostat for heating elements: diagram and instructions
Digital equipment
For the manufacture of a modern device with precise adjustment of the required degrees, digital components are indispensable.
PIC16F628A is used as the main chip. Using such a circuit, you can control various electronic devices.
The principle of operation is also not very complicated. The three-character indicator with a common cathode is supplied with the values of the set (required) temperature and the current one.
To set the desired temperature, the microcircuit has two elements sb1 and sb2, to which mechanical buttons are subsequently soldered. The first element serves to decrease the temperature, and the second to increase.
Setting the hysteresis value is performed while pressing the sb3 button when setting.
When making devices yourself, it is important not only to solder and make the circuit correctly, but also to place the device on the equipment in the right place. The board itself must be protected from moisture and dust, in order to avoid the occurrence of a short circuit, and, accordingly, the failure of the device. The isolation of all contacts also plays a very important role.
Temperature controllers
Variety of devices on the market
Today, companies that produce such equipment offer the buyer 3 main types of devices. All of them work on different internal signals. It is their function that is to control the temperature and equalize it, depending on the settings of the device (upper and lower lines).
There are three types of internal signals:
Such devices can be either electric or electronic. Temperature controllers can receive a signal in automatic or semi-automatic mode. Operation and temperature changes can occur by monitoring the temperature of radiators and line branches or by recording changes in boiler power.
Today the market has many popular models from top manufacturers who have already consolidated their position. First of all, these include E 51.716 and IWarm 710. The body itself is small in size and made of plastic polymer that does not burn. Despite this, it has many useful features. The display, as for such small razers, is quite large. It displays all existing data. Such devices cost between 2500-3000 rubles.
The functional features of the first model include the possibility of mounting it into a wall in any position, the temperature is controlled simultaneously from the floor itself, as well as the presence of a cable 3 m long. When installing, you need to think about whether there will be free access to the device for unhindered control of it.
To the above pluses, there are some minuses. These include a small set of functions that are available in analogues of these devices. When using it, it sometimes causes discomfort. In addition, these models do not have an automatic heating function. But if you want, you can finish it yourself.
Thus, it will not be difficult to make a thermostat on your own or to purchase and install a finished model if you strictly follow all the diagrams, drawings and instructions for manufacturing and installation. This equipment will save the owners time on manual temperature control of certain appliances.
Compliance with the temperature regime is a very important technological condition not only in production, but also in everyday life. Having such a great importance, this parameter must be regulated and controlled by something. A huge number of such devices are produced, having many features and parameters. But making a thermostat with your own hands is sometimes much more profitable than buying a ready-made factory analogue.
Create your own thermostat
General concept of temperature controllers
Devices that fix and simultaneously regulate the set temperature value are more common in production. But they also found their place in everyday life. To maintain the necessary microclimate in the house, thermostats for water are often used. With their own hands they make such devices for drying vegetables or heating an incubator. Such a system can find its place anywhere.
In this video, we will learn what a temperature controller is:
In fact, most thermostats are only part of the overall scheme, which consists of the following components:
- A temperature sensor that measures and fixes, as well as transmits the information received to the controller. This happens due to the conversion of thermal energy into electrical signals that are recognized by the device. A resistance thermometer or a thermocouple can act as a sensor, which in their design have a metal that reacts to temperature changes and changes its resistance under its influence.
- The analytical block is the regulator itself. It receives electronic signals and reacts depending on its functions, after which it transmits a signal to the actuator.
- An actuator is a kind of mechanical or electronic device that, when receiving a signal from the unit, behaves in a certain way. For example, when the set temperature is reached, the valve will shut off the coolant supply. Conversely, as soon as the readings fall below the set values, the analytical unit will give a command to open the valve.
These are the three main parts of the system for maintaining the set temperature parameters. Although, in addition to them, other parts, such as an intermediate relay, may participate in the circuit. But they perform only an additional function.
Principle of operation
The principle by which all regulators work is the removal of a physical quantity (temperature), the transfer of data to the control unit circuit, which decides what needs to be done in a particular case.
If you make a thermal relay, then the simplest option will have a mechanical control circuit. Here, with the help of a resistor, a certain threshold is set, upon reaching which a signal will be given to the actuator.
To get additional functionality and the ability to work with a wider temperature range, you will have to embed a controller. This will also help increase the life of the device.
In this video you can see how to make a thermostat for electric heating yourself:
Homemade temperature controller
There are actually a lot of schemes for making a thermostat yourself. It all depends on the area in which such a product will be used. Of course, creating something too complex and multifunctional is extremely difficult. But a thermostat that can be used to heat an aquarium or dry vegetables for the winter can be created with a minimum of knowledge.
The simplest circuit
The simplest do-it-yourself thermal relay circuit has a transformerless power supply, which consists of a diode bridge with a zener diode connected in parallel, which stabilizes the voltage within 14 volts, and a quenching capacitor. You can also add a 12 volt stabilizer here if you wish.
 Creating a thermostat does not require much effort and money investments
 The whole circuit will be based on a TL431 zener diode, which is controlled by a divider consisting of a 47 kΩ resistor, a 10 kΩ resistance and a 10 kΩ thermistor acting as a temperature sensor. Its resistance decreases with increasing temperature. It is better to select a resistor and resistance in order to achieve the best operation accuracy.
The process itself is as follows: when a voltage of more than 2.5 volts is formed on the control contact of the microcircuit, it will make an opening, which will turn on the relay, applying a load to the actuator.
How to make a thermostat for an incubator with your own hands, you can see in the video below:
Conversely, when the voltage becomes lower, the microcircuit will close and the relay will turn off.
To avoid rattling of the relay contacts, it is necessary to select it with a minimum holding current. And in parallel with the inputs, you need to solder a 470 × 25 V capacitor.
When using an NTC thermistor and microcircuits that have already been in use, you should first check their performance and accuracy.
Thus, turns out to be the simplest device temperature control. But with the right components, it performs excellently in a wide range of applications.
Indoor device
Such thermostats with a do-it-yourself air temperature sensor are optimally suited for maintaining the specified microclimate parameters in rooms and containers. It is fully capable of automating the process and controlling any heat emitter from hot water to heating elements. At the same time, the thermal switch has excellent operational data. And the sensor can be both built-in and remote.
Here, the thermistor, indicated in the diagram R1, acts as a temperature sensor. The voltage divider includes R1, R2, R3 and R6, the signal from which is fed to the fourth pin of the operational amplifier microcircuit. The fifth pin DA1 receives a signal from the divider R3, R4, R7 and R8.
The resistance of the resistors must be selected in such a way that at the lowest possible temperature of the measured medium, when the resistance of the thermistor is maximum, the comparator is positively saturated.
The output voltage of the comparator is 11.5 volts. At this time, the transistor VT1 is in the open position, and the relay K1 turns on the actuator or intermediate mechanism, as a result of which heating begins. The ambient temperature rises as a result, which lowers the resistance of the sensor. At input 4 of the microcircuit, the voltage begins to rise and, as a result, exceeds the voltage at pin 5. As a result, the comparator enters a negative saturation phase. At the tenth output of the microcircuit, the voltage becomes approximately 0.7 Volts, which is a logical zero. As a result, the transistor VT1 closes, and the relay turns off and turns off the actuator.
On the LM 311 chip
Such a do-it-yourself thermocontroller is designed to work with heating elements and is able to maintain the set temperature parameters within 20-100 degrees. This is the safest and most reliable option, since its operation uses galvanic isolation of the temperature sensor and control circuits, and this completely eliminates the possibility of electric shock.
Like most similar circuits, it is based on a DC bridge, in one arm of which a comparator is connected, and in the other - a temperature sensor. The comparator monitors the circuit mismatch and reacts to the state of the bridge when it passes the balance point. At the same time, he also tries to balance the bridge with the help of a thermistor, changing its temperature. And thermal stabilization can occur only at a certain value.
Resistor R6 sets the point at which a balance should be formed. And depending on the temperature of the environment, the thermistor R8 can enter into this balance, which allows you to adjust the temperature.
In the video you can see an analysis of a simple thermostat circuit:
If the temperature set by R6 is lower than required, then the resistance on R8 is too high, which reduces the current on the comparator. This will cause current to flow and open the semistor VS1 which will turn on the heating element. This will be indicated by an LED.
As the temperature rises, the resistance R8 will decrease. The bridge will tend to the point of balance. On the comparator, the potential of the inverse input smoothly decreases, and on the direct input it increases. At some point, the situation changes, and the process occurs in the opposite direction. Thus, the do-it-yourself thermocontroller will turn on or off the actuator, depending on the resistance R8.
If there is no LM311 available, then it can be replaced with a domestic chip KR554CA301. It turns out a simple do-it-yourself thermostat with minimal cost, high accuracy and reliability.
Necessary materials and tools
By itself, the assembly of any circuit of the electric temperature controller does not take much time and effort. But to make a thermostat, you need minimal knowledge in electronics, a set of parts according to the diagram and a tool:
- Pulse soldering iron. You can use the usual, but with a thin sting.
- Solder and flux.
- Printed circuit board.
- Acid to etch the tracks.
Advantages and disadvantages
Even a simple do-it-yourself thermostat has a lot of advantages and positive aspects. It is not necessary to talk about factory multifunctional devices at all.
Temperature controllers allow:
- Maintain a comfortable temperature.
- Save energy resources.
- Do not involve a person in the process.
- Follow the technological process, improving the quality.
Among the shortcomings can be called the high cost of factory models. Of course, this does not apply to homemade devices. But the production ones, which are required when working with liquid, gaseous, alkaline and other similar media, have a high cost. Especially if the device must have many functions and capabilities.