Roof penetration for chimneys. Installation of a chimney from a sandwich pipe through the roof: step-by-step instructions for installing a chimney from a sandwich pipe through rooms, ceilings and the roof
In buildings with stove heating, such as a private house, bath and others, construction is required chimney and organization of its output to the outside. When arranging the passage of the pipe through the roof, certain norms must be observed in order to ensure safety and maintain protective properties roofs.
Chimney passage through the roof
The flue is intended for an output of products of combustion of fuel (coal, gas, firewood, peat) and formation of furnace draft. The way the pipe exits through the roof is determined at the design stage. The main condition for this is to ensure the fire safety of the roof, especially at its junction with the pipe, as well as the protection of the junction from the ingress of atmospheric moisture into it and the accumulation of condensate. The height of the pipe is assigned by the norms of SNiP and depends on the distance at which it is located from the roof ridge:
- if the distance from the center of the pipe to the ridge is not more than 1500 mm, then the height of the pipe above the ridge must be at least 500 mm;
- with a distance between the center of the chimney and the roof ridge from 1500 to 3000 mm, the height of the pipe coincides with the height of the ridge;
- if the distance exceeds 3000 mm, the height of the chimney must not be lower than the line drawn from the ridge at an angle of 10°.
The height of the chimney pipe is determined by the norms of SNiP and depends on the distance to the roof ridge
The smaller the distance from the pipe to the ridge, the greater the height of the pipe should be.
Chimney passage assembly
This element can be located in different places on the roof. One of the options preferred by roofers is the passage of the chimney directly through the ridge. This method is distinguished by the easiest installation and avoids the accumulation of snow above the pipe wall. The disadvantage of this arrangement is a decrease in strength truss system, in which the ridge beam is either missing or sawn and fixed with two supports on the sides of the pipe exit, which is not always possible to implement.
The outlet of the chimney through the ridge is simple to install, but may compromise the strength of the truss system
Most often, the pipe is located near the ridge. So the chimney is least of all exposed to the action of cold, and therefore to the accumulation of condensate inside. The disadvantage of this arrangement will be that the closer the pipe is to the ridge, the greater its height, which means that the construction will require additional funds.
The outlet of the chimney at a short distance from the ridge is the most common and convenient option
It is not recommended to run the chimney through the valley, as snow can accumulate in these places, which will lead to a violation of the waterproofing and the occurrence of leaks. In addition, it is difficult to organize a chimney box at the junction of the slopes. Do not place the chimney in the lower part of the slope - it can be damaged by snow falling from the roof.
The material from which the pipe is made also affects the organization of its output system. Typically, pipes are made of metal, asbestos cement or refractory bricks, but sometimes ceramic ones are also found. The methods of their waterproofing will be different. In addition, each type of fuel has a certain combustion temperature, and this must also be taken into account when constructing a chimney.
Depending on the shape of the chimney, the outlet can be square, round, oval or rectangular. To protect the roof covering from the action of elevated temperatures and protect it from fire, a box is arranged around the chimney. It happens like this:
- Additional rafters are installed to the right and left of the pipe.
- Horizontal beams are laid at the bottom and top at the same distance and of a similar section. The distance between the box beams and the pipe walls is determined by SNiP and is 140–250 mm.
- Inside the box is filled with non-combustible insulating material, for example, stone or basalt wool. Fiberglass is not recommended because of its easy flammability.
The space of the box should not be filled with fiberglass - it can ignite under the influence of high temperatures
It must be taken into account that the construction of the box can disrupt the ventilation of the under-roof space, so you can install additional ventilation systems.
Video: installation features of the chimney passage assembly
Features of the output of the chimney through different types of roofs
When arranging the passage of the chimney, attention must be paid to protection against atmospheric precipitation, which will flow down the chimney and roof. To waterproof the connection between the pipe and the roof, a protective apron is arranged around the chimney. This technology is similar for roofs with different coatings.
Metal roofing
Metal tile is a popular roofing material, which is thin steel, aluminum or copper sheets coated with a protective layer.
Square or rectangular pipe outlet
If the pipe is made of brick and has a square or rectangular cross section, the materials included in the coated kit can be used to pass it through a metal roof. Since brick chimneys can have non-standard sizes, some of the coating sheets are removed or a larger hole is cut out before being removed.
For waterproofing the joint, special elastic tapes are used with an adhesive layer applied to one of the sides. One edge of the tape is glued to the base of the pipe, the other - to the roofing sheathing. From above, the edge is fixed with a metal bar, which is attached with heat-resistant dowels to the pipe wall. All joints are sealed with sealant.
To reduce the likelihood of water leaking along the chimney wall, you can make a groove under the bar - a strobe
An apron for a square or rectangular pipe can be made with your own hands. It is made from a smooth metal sheet of the same color as the main coating. The upper edge of the apron is tucked under a row of metal tiles located above so that water flowing from above does not fall under it. If the pipe is located close to the ridge, the edge of the apron can be tucked under the ridge or folded over to the other side. To protect the through hole from precipitation, a tie is installed under the apron.
The outlet of the chimney is best organized before laying the metal tile coating.
Conducting a round pipe
When a round chimney or a sandwich pipe is led through a metal roof, roof penetrations are most often used, connected to a cap through which the pipe is passed. A neat round hole is cut in the coating to fit the chimney, a universal glass or master flush is put on the pipe, the joints are sealed.
To seal the junction of a round pipe and a roof, special penetrations are used.
Video: sealing the passage of a brick pipe through a metal roof
Roofing from corrugated board
Profiled sheet is one of the most common roofing materials. But a leak can also occur in it if the chimney outlet is not properly arranged. The chimney with this type of coating is best placed vertically. A hole in the roof is cut with a grinder, while it is necessary to ensure that the cut edge of the corrugated board is without notches.
Conducting a rectangular pipe
If it is necessary to organize a passage for a rectangular or square pipe, the apron can be made from galvanized sheet.
- 4 strips are cut out of metal, which will be placed in front, behind and on the sides of the pipe.
- A sheet of galvanized steel is laid from the lower edge of the chimney to the eaves. This element is called a tie and is subsequently covered with roofing material.
- The planks are tightly attached to the pipe, their lower part is fixed to the crate, and the upper part is put on the chimney.
- A groove is made in the wall of the pipe, into which the bent edge of the bar is inserted. First, the lower bar is installed, then both side and upper. Sheets are folded one under the other.
- Before laying the corrugated board, the passage of the chimney must be waterproofed. You can use a conventional waterproofing film, which is cut into an “envelope” and glued to the pipe, but it is better to use a self-adhesive waterproofing tape.
The upper junction bar to the pipe is filled with sealant
Round pipe outlet
When outputting a pipe of circular cross section through a corrugated board coating, a roll is used bituminous waterproofing or foil bitumen tape. A roof penetration is put on the chimney, which is glued to the crate and sealed with a heat-resistant sealant. If the passage is made of rubber, it can melt from the heating of the pipe, so a clamp with a heat-resistant gasket must be fixed under it.
If you use a roof passage made of heat-resistant rubber, you can avoid melting it.
Video: running a pipe through a corrugated roof
Ondulin roofing
Ondulin is also called "Euroslate". The peculiarity of such a coating is that it is combustible, and does not have great strength. Therefore, for the passage of the chimney, it will be necessary to make a hole in the roof of a large size and fill it with fire-resistant material that will prevent moisture from entering.
To waterproof the junction of the chimney and the roof, a metal roof cutting with an apron is installed, the edges of which are brought under the ondulin sheets or the Onduflash elastic tape is used. Such a coating requires an additional ventilation device.
In the ondulin roof, you will need to make a hole for the outlet of a larger diameter pipe and fill it with fire-resistant material
Video: sealing the chimney on the roof of ondulin
How to bring a pipe through a soft roof
Soft roofing is also a combustible material, so a gap of 13–25 mm must be left between the coating and the chimney. The waterproofing of the pipe is carried out in the same way as with other coatings, only instead of an elastic tape, a valley carpet is used or the coating itself is placed on the pipe - shingles or roofing.
When waterproofing the junction of a pipe and a soft roof, the coating itself can be used instead of an elastic tape
Stages of work on the removal of the chimney through the roof
To lead the chimney through the finished roof, the following steps are necessary:
- The place of passage in the roof between the rafters and the transverse beam is selected.
- A box is mounted: rafters are constructed from the bars, parallel to the rafter legs, and beams. The cross section of the beams for the box is taken equal to the cross section of the rafter beams. The width of the sides of the box will be 0.5 m greater than the diameter of the pipe.
- A hole is cut in the roof slope. To do this, in the four corners of the box from the inside, at the junction of the rafters and beams, through holes are drilled. After that, the layers of the roofing cake are cut along the inner perimeter of the box and diagonally.
After installing the flange, the required shape can be given with a hammer
Video: do-it-yourself chimney box
The output of the chimney pipe through the roof is a responsible matter, in which strict adherence to the installation technology is mandatory so that there is no danger of leakage and destruction of the pipe. Carrying out work on the removal of the pipe includes many nuances, taking into account the roofing, material and shape of the pipe, waterproofing methods. Therefore, you should study all the stages of work in advance and consult with a specialist.
Passage through the roof of a round pipe
The node of the passage through the roof of round pipes can be either metal or soft - made of rubber or silicone. Metal penetrations of the roof are made of galvanized iron, sometimes a protective coating is applied to them, similar in color and composition to the metal tile coating.
Often, metal tile manufacturers offer special penetrations: this is the same sheet of roofing material to which an elastic rubber cap is attached, which serves as an excellent insulator.
For other roofing materials, flexible penetrations can be used as a roof penetration. There are many of them on the market today. Different colors, compositions, at different angles of inclination of the roof, straight penetrations, with different types fasteners (for self-tapping screws, with applied adhesive composition etc.).
Among all flexible penetrations Master Flash (Master Flash) has the most good recommendations. It is quite easy to distinguish it: in addition to the applied company name, there are additional corrugated grooves on the back of the roof penetration, which increase the degree of adhesion to any roofing material. From the outside, the base along the edge has a metallized coating, with which it is easy to achieve any desired relief.
Roof penetrations for round pipes
To install a flexible penetration, cut off part of the outer cap - the diameter of the resulting hole must be less than the diameter of the pipe. The penetration is pulled onto the pipe with force. To reduce the resistance, you can smear the surface of the pipe with soapy water. After the penetration is tensioned, the lower flange is given the desired configuration. On the back side, it is smeared with sealant, then pressed against the roof and fixed with self-tapping screws. This method of sealing a round pipe is not very laborious, but reliable enough.
Silicone and rubber penetrations are used at pipe temperatures up to 100 ° C. If the temperature of the chimney is higher, you will either have to make an additional layer of insulation between the penetration and the pipe, or, more likely, use a metal skirt and a glass. How they look and how to fix them is shown in the following video. Everything is done there not quite correctly, then the principle of installation is clear.
Fighting joint leaks
In order to create the maximum possible tightness of the abutment of the roofing material to the pipe at the points of contact, using the lower strips, an internal apron is made.
Installation of a chimney passage through the roof.
To make an inner apron, you need the following tools:
- marker;
- long metal ruler;
- grinder with a disc 2 mm thick;
- pliers;
- hammer.
In order to do this, the bar is applied to the walls of the chimney pipe, making marks on the top of the bar. The next step along the previously marked line is a strobe.
Installation of the inner apron should start from the bottom wall. The edge of the apron is wound into a strobe, after which it is installed on the remaining walls. The overlap should be 15 cm. Then the edge of the film inserted into the strobe is sealed. Having cut the lower strips, they are installed, and then fixed with self-tapping screws.
After mounting the bottom apron, you can proceed to install the tie, which is a sheet waterproofing material wound under the elements of the inner apron from below. Main function tie - water drain.
After finishing work on the device of a tie and an apron that protect the joints, the roofing material is laid. Then the outer apron is mounted. To do this, use the upper junction bars.
The installation of the apron from the outside is carried out similarly to the device of the apron inside. The difference is the absence of a strobe and the upper edge is fixed directly to the chimney wall.
Important: today the building materials market offers products that are designed specifically for chimneys with a circular cross section. They are roof passages, which consist of a base (flat steel sheet) and an apron cap.
Inside the passage there is a round chimney.
The final stage of installation
The device of the unit is completed with the following steps:
- Remove the protective film from the sandwich pipes. It is highly undesirable to release parts from polyethylene earlier - they can be damaged during transportation or installation.
- Seal the joints properly. Ideally, the composition should withstand temperatures within 1000 degrees.
What areas need to be coated with sealant:
- seams at the junctions of the inner sandwich pipes - a plane located on the outer part from above;
- joints of external pipes - the entire area of \u200b\u200bthe outer surface;
- junctions of sandwich pipes with other components of the system - the entire area or diameter, if we are talking about round pipes.
Do not rush to immediately operate the new chimney, first check the correct operation of it:
- Turn on the heating device (boiler, stove or fireplace) at low power.
- Now inspect the device to see if it leaks smoke in the wrong places.
- Make sure that there is no excessive heating of the components of the complete system, especially in the area of the transition through the wall or roof.
What is the advantage of a sandwich chimney? It looks aesthetically pleasing and provides a fireplace modern style, even a beginner can assemble it. And also at correct installation will last a long time and will delight the owners with uninterrupted operation.
The passage of the pipe through the chimney without a factory outlet
It is possible to remove the chimney without a passage device. In this case, the edges of the hole in the ceiling are also sealed with a fire-resistant heat insulator, and metal strips are stuffed on top of it. A protective plate made of non-combustible material is put on the sandwich coming from the oven, in which a hole of a suitable diameter is cut, and holes for fasteners are drilled along the edges. Traditionally, this is a sheet of metal. Next, the sandwich is passed into the hole in the ceiling, fixed there with the help of any non-combustible guides. For example, you can use drywall profiles or something similar. The main thing is to securely fix the pipe and observe the basic rule of fire safety: there must be a distance of at least 36 cm from the edge of the pipe to combustible material.

Important! When installing and fixing the chimney, keep in mind that the pipe changes its dimensions due to thermal expansion. It must be fixed so that it can move relative to the roof
Then from below (from the ceiling) the pipe is hemmed with non-combustible material. From the side of the attic or the second floor, the voids formed in the cutting are filled with a heat insulator. The requirements for it are the same: tolerance to high temperatures. Expanded clay may be the most budgetary. Actually, this is the end of the chimney pipe through the ceiling.

You can make a passage through the ceiling with your own hands
Chimney passage through a flat roof
When installing a chimney on flat roof, it is important to remember that its height above the roof surface should be 500 mm in accordance with SNiP standards. A round pipe, a rectangular chimney box or a brick chimney can be led through a concrete floor slab
The round pipe passage assembly will be considered separately, and for other cases, two basic installation principles are used.
Features of the arrangement of the passage through the pitched roof
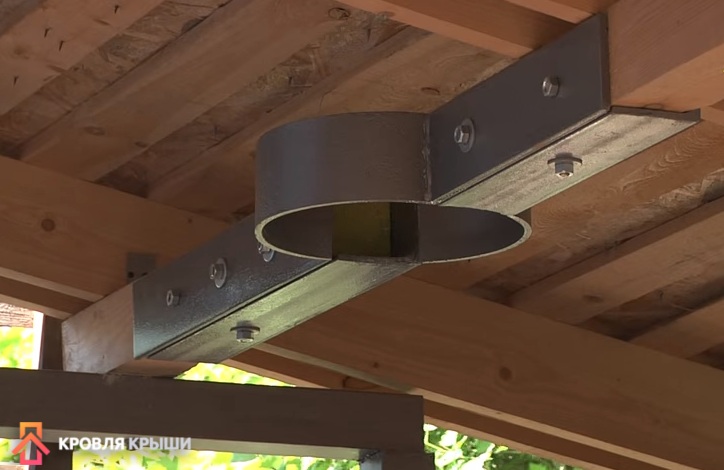
How to fix the chimney on the roof? On the chimney inside roof, it is required to mount a flange that is rigid enough to take the load from the crate - the chimney outlet forces the dismantling of part of the girders, and without installing the flange, the structure will remain in limbo.
The flange is usually a steel sheet with stiffeners welded to it. The thickness of the sheet should be at least 2-3 mm. A non-combustible heat insulator - basalt cardboard - should be laid on the flange. This will prevent the transfer of heat from the chimney to the crate. If the design of the chimney is not reliable enough to take on part of the load on the roof, a truss structure or additional racks are mounted around the perimeter of the hole so that the load is transferred to the attic floor.
Around the pipe, all layers of the roof must be cut to a gap corresponding to the standards specified in SNiP (depending on the type of pipe and the degree of its heating). The resulting gap must be filled with a non-combustible heat insulator - basalt or glass wool, basalt cardboard.
The principle of sealing the junction of the roofing material to the chimney depends on factors such as:
To prevent damage to the chimney through the pitched roof when snow melts, it is recommended to install snow retainers higher up the slope. With a chimney width (across the slope) of more than 800 mm, a special structure should be mounted on the slope above it to drain the water flow.
Conclusion through the roof of a pipe with a circular cross section
It is very difficult to perform waterproofing of the junction of the roof to the round pipe without the use of special roof penetrations. The construction market offers a wide selection of pipe assemblies that differ in diameter and material of manufacture.
A universal option is an aluminum flange equipped with a silicone or rubber corrugation. Several standard sizes of these elements are produced, thanks to which it is possible to choose a penetration for a chimney pipe of any popular diameter. The working surface of the flange is covered with a material similar to the material of the corrugation, and is provided with grooves for filling with sealant. The top of the corrugation cone is cut to the required diameter, after which the penetration must be pulled onto the chimney. The flange must be smeared with sealant and attached to the roof with self-tapping screws that are included in the kit. If the roofing is not made of metal, the flange is attached with dowels or long self-tapping screws directly to the crate.
For roofs with different slope slopes, penetrations are offered in which the corrugation is located at different angles to the flange. You can purchase a detachable design, which is used if it is not possible to pull the corrugation onto the pipe due to the presence of protruding parts or the high height of the mounted chimney. Such a penetration is equipped with clamps, thanks to which the corrugation is tightly pressed around the pipe.
Mounting the chimney on the roof can be done using penetrations in which a hinged segment is used instead of a corrugation. This is a universal option for roofs with any slope angle: the surfaces of the connecting elements are spherical in shape and can be fixed relative to each other at any angle.
It is not uncommon for manufacturers of roofing materials to offer prefabricated chimney penetrations with a flange preformed to match the appropriate roof covering. Such a penetration is attached to the roof lathing with the necessary overlap. To match the diameters, the apron cone is cut off. Penetrations from roofing manufacturers have several standard angles of inclination. To seal the joint, a second conical apron is mounted overlapping with the first.
Chimney box
To correctly lead the chimney through roofing cake, around the pipe you should equip your own truss system. It must be separated from the chimney at a distance specified in SNiP. The design consists of lateral rafter legs and horizontal transverse beams from below and above, which are made of a bar of the same section as the rafters.
To insulate the structure, it is necessary to use non-combustible thermal insulation materials, such as glass wool or stone wool - it is stuffed between the pipe and the wooden structural elements.

When passing the chimney through the roofing pie of the exploited roof, the vapor and waterproofing is cut crosswise, like an envelope, the edges should be tucked up and attached with nails or brackets to the rafter system.
Waterproofing the chimney on the roof requires special attention. When installing the chimney box pitched roof vapor barrier attachment and waterproofing membrane are carried out as follows: the edges of the films are tucked up and tightly fixed with staples to the box, in addition, the attachment points should be additionally sealed with sealing tape or some other adhesive material. From the outside on top roofing protective elements are mounted that do not allow moisture to pass into the joints of the box with the roofing pie.
It is important to consider that the installation of the box can adversely affect the air exchange in the under-roof space. To avoid deterioration of moisture removal, you can install additional ventilation systems, for example, ventilation tiles, roof aeration grilles, etc.
 If the width of the chimney exceeds 800 mm (perpendicular to the rafters, according to the outer dimension), then a slope should be performed higher up the slope.
Razuklonka is a small private roof that drains water and snow from the pipe. Its installation is quite complicated, since all layers of insulation are part of the ramp, in addition, it should be qualitatively combined with the main roof using curly elements. To avoid mounting a slope, it is worth making a smaller pipe.
Using ready-made kits
Standard modular chimneys ("sandwich") can greatly simplify the process of passing the pipe through the roof. A wide range of materials are used for the manufacture of structures, including :
The choice of a modular chimney depends on the fuel used, as they differ significantly in their technical characteristics. The advantage of such systems is the ability to install the pipe not at a right angle. This is especially true when installing a chimney in an existing building and allows you to choose almost any place for installing a fireplace, stove or automatic boiler.

A modular chimney passes directly through the roof, consisting of such parts as :
- deflector (a device that enhances draft in the chimney by using a stream of hot air);
- clamp for stretch marks (allows you to additionally fix a high pipe on the roof);
- skirt (an element that protects the exit point of the pipe through the roof);
- roof passage (element with a fixed apron, which is directly mounted in the roofing pie).
Modular chimneys have an attractive appearance.
Steel chimneys can be installed if the temperature of the exhaust gases is not more than 500 °C. Prohibited for installation on coal-fired stoves. For asbestos-cement pipes, this parameter is 300 degrees; for coal-fired ovens, such chimneys are also unsuitable.
If the chimney is made of concrete or brick, or a prefabricated passage is installed, the structure should not be rigidly attached to the roof system. Under the influence of external factors, the roof may be deformed, and these forces will be transferred to the chimney, which may lead to its destruction. When the chimney exits through the roof, all connections between the chimney and the roof are made using flexible elements.
Master flash
Such penetration can be applied to any type of roofing - slate, shingles, metal roofing, bitumen pouring or tiles.
Ideal for sealing chimneys in stoves and fireplaces.  Used for straight roofs and sloped roofs.
This type of product is an excellent combination of price and quality.
Master Flash is distinguished by high professional reliability, functionality - this is achieved through the use of high-quality materials for application.
The main feature of this penetration is the use of reinforced polymer rubber, which is able to withstand heavy loads (temperatures up to 138 degrees).
Polymer rubber does not soften with heat.
How to cover the roof with ondulin installation subtleties
A lot has already been written about how to cover the roof with ondulin.
There is nothing complicated here, it is only important to follow the rules, fasten according to the instructions and have a little skill in construction
But often after the roof there are problems associated with improper coverage. Understanding such issues, it can be noted that the problem lies in the incorrect fastening of additional elements and other nuances.
You should pay no less attention to the subtleties, because small mistakes can then result in big problems.
The passage of a ventilation or chimney through ondulin

Of course, in any house there is an elementary kitchen hood in the kitchen. Also, a private house is equipped with a ventilation system, which is removed through the roof on the roof.
“Cutting” holes for such pipes is laborious. Moreover, at the point of contact of the ventilation pipe with the ondulin, a gap will appear through which moisture will enter. In the future, this can lead to flooding of the room.
Ondulin manufacturers took care of their customers. They offer customers a special ready-made ventilation pipe. It is attached to the roof with nails and leakage will not occur.
Sometimes people, trying to save money, do not resort to such additional elements. They lead an ordinary ventilation pipe through the roof and leave it in such a state that it is strictly forbidden to do so.
In this case, it is necessary to use a covering apron. But fixing it is much more difficult than a finished ventilation pipe.
When there is a fireplace or stove in the house or bath, it also becomes necessary to bring the pipe to the roof through the ondulin. To do this, according to the usual technology, they lay out a brick pipe and cover the roof with the given roofing material.
In order to avoid leakage, it is necessary to use the same covering apron. It is attached to the ondulin with special nails.
Mounting and dimensions of an ondulin ridge

The ridge is an important detail in the roofing of the roof with ondulin. It is designed to decorate the edge of the roof, as well as to protect against the ingress of excess moisture.
Skates are purchased ready-made, among other additional elements. Before mounting, it is worth finding out from which side the winds prevail. Installation begins on the opposite side of the direction of such winds.
The skates are also overlapped with a width not exceeding 1.5 cm. The skate is nailed with special nails to the upper wave of the ondulin sheet lying under it. In this case, the nail must be of such length that it is fixed into the bars of the crate.
Covering apron for ondulin

Other additional elements that are necessary to cover the roof with ondulin include a covering apron. With its help, sealing of joints is achieved.
It is used at the point of contact of the sheets with the chimney, for aesthetic design, as well as protection from moisture of the junction between the ondulin sheet and the vertical wall.
In the case of a pipe, a covering apron is attached at the bottom and nailed to each wave of the ondulin sheet. Next, with the help of a sealed tape, the joint with the wall, the side joints and the upper part of the pipe are sealed.
To do this, the tape must be laid at least 10-15 cm higher to vertical surface. The covering apron and tape are attached with a metal bar.
In addition to sealing pipes and vertical walls covering apron must be applied for mounting ridge element. To do this, it is installed with an overlap of 4 cm on both slopes.
In this case, the upper edges of the apron should be at least 2 cm apart. This measure is necessary for better air outlet. Skates are mounted on top of the attached aprons.
How to seal pipes with protective aprons
In addition to rubber caps, aprons made from other materials are often used. When waterproofing pipes with round section, often use products made of galvanized steel. In this case, a steel clamp is installed at the place where the passage is adjacent to the roof, and the gap is covered with sealants and adhesive tape with metal reinforcement.

The pipe is sealed on the roof from corrugated board using an apron, which consists of several elements:
- The material of steam and waterproofing of the roof, remaining after the passage to the roof has been brought out, is fixed with construction tape to all sides of the apron.
- Using a machine, a strobe (small groove) is made around the perimeter of the pipe.
- The upper edge of the abutment bar is fixed in the groove with silicone sealant.
- The apron consists of 4 parts - for each side of the rectangle. The lower part is tightly attached to the passage, observing a 10-centimeter overlap, using self-tapping screws for working with a profiled sheet.
- A waterproofing element such as a tie is placed under the bottom apron, which prevents water from entering the house.
- Similarly, the top and side aprons are fixed and, as a result, a one-piece protection structure is equipped.
The process of waterproofing pipes on the roof of a household is not as complicated as it is important. It is necessary to properly seal the joints in order to create a quality roof.
Sandwich pipe design
Everything related to heating equipment is associated with the risk of fires, especially in wooden houses. Statistics say that more than half of fires happen because homeowners did their own chimney installation incorrectly. To facilitate this task and protect the house from fire, use a sandwich pipe for the chimney. At first glance, they look like ordinary stainless steel products, but in fact they have a three-layer structure:

Sandwich pipe construction
- Inner contour. Cylinder of round section made of high-strength stainless steel with a thickness of at least 1 mm with the addition of zinc or molybdenum. inner tube made from a sheet of metal, by welding, obtaining a sealed seam. Due to its high anti-corrosion properties, alloy steel is not damaged by interaction with water.
- insulating layer. Between internal and outer contour there is an insulating layer that performs two important functions: it “locks” the heat inside the pipe, preventing it from heating the surrounding materials and does not allow the smoke to cool down while passing through the pipe so that soot does not settle on its walls. As thermal insulation, fibrous materials with the highest fire resistance class with a working temperature of up to 700 degrees are used, for example, basalt-based mineral wool. The insulation layer between the contours is 40-60 mm, and the density of the insulation is 12o kg per cubic meter.
- External casing. The outer shell of a sandwich pipe made of stainless steel or another type of metal. The seam of the casing is performed using laser welding, which does not damage the galvanic layer of stainless steel, which protects it from corrosion. The cost of brass and copper pipes greatly increases the cost of laying a chimney, and the installation is justified by a spectacular appearance.
 Additional elements of a double-circuit chimney
Sandwich pipes consist of additional elements: straight sections, bends, tees. The diameter of the products depends on the manufacturer, so it is necessary to buy all parts of the chimney of the same company, ideally suited to each other.
Features of this design
Sandwich is a good option for a chimney with insulation. Insulation provides you with the following advantages:
- the possibility of the functionality of the chimney pipe when in the zone of low temperature conditions;
- endows the pipe with the necessary fireproof properties (inside the building).
Standard versions of such chimneys have an external galvanized coating. Stainless steel options are also available, as well as painted in any color that suits you.
Existing versions of sandwiches made of stainless steel are pasted over with a special protective film on the outside. The main thing - do not forget to remove it before using the chimney for its intended purpose. There are also special adapters on sale that you will need when connecting the boiler and pipe. Be careful when choosing elements for a sandwich chimney.
Scheme of the device of a sandwich pipe.
Necessary tools for work are:
How to assemble a chimney from sandwich pipes
 In order not to be interrupted during the installation process, it is necessary to prepare all the constituent components for subsequent assembly into a single device in advance. The advantage of the sandwich construction is that technology is used in its manufacture, which greatly facilitates the process of installing a complete unit. The edges of sandwich pipes are processed with a smaller diameter compared to the main component.
The narrowed part is brought to another pipe, the connection is secured by a clamp. Masters advise treating the seam area with a sealant that copes well with temperature loads.
Pipe exit through the roof
Before starting the installation of the chimney. prepare the tools:
The layout of the chimney relative to the roof ridge.
- drill;
- set of drills;
- Bulgarian;
- heat-resistant sealant;
- riveter;
- aluminum tape;
- clamps;
- corners for fixing the pipe.
When carrying out work on the removal of the pipe, it is necessary to solve the following issues:
- The passage through the roof must meet all fire safety requirements, given that the pipe crosses the ceiling and roof, which may have combustible properties.
- The interior space of the house must be protected from moisture and wind entering through the pipes.
Removing the pipe through the ridge has the following advantages:
- Ease of work associated with the adjoining of the pipe to the roofing.
- There are no snow pockets on the ridge, which reduces the risk of leaks.
The disadvantages of this method include:
- there is no load-bearing ridge beam in the roof frame;
- rupture of the bearing ridge beam at the point where the chimney pipe passes through the roof;
- required additional installation rafter supports, which is very inconvenient when planning an attic.
As a result of this, the chimney passage is usually led to a slope near the ridge, where a snow bag is also not collected. The execution scheme of such a node is also quite simple.
Scheme of the arrangement of permissible gaps during the installation of the chimney.
Advice: you should not make a chimney in the valley (the place where two roof slopes intersect from the inside at an angle), because this point is very difficult in the quality execution of the area where the pipe adjoins the roof. Rainwater will penetrate here, and in winter a snow pocket will form in the valley, which will eventually lead to constant leaks.
It is very important to observe the gap between the rafters and the roof. Ideally, it should be about 25-30 cm
If the roof is made of combustible material, for example, from standard roofing material, in order to avoid fire hazard situations, the minimum gap should be 13-25 cm.
In the case of a roof made of non-combustible materials, the distance can be reduced to a few centimeters. It is only required to remove the pipe from the crate.
When the roof looks like a roofing cake. which consists of heat, steam and waterproofing, during installation work on the arrangement of the chimney assembly through the roof, some difficulties arise due to the violation of the integrity of the insulation layers, which in turn leads to a decrease in the level of protection of the insulation layers.
The most acceptable way for this case is to isolate the space near the pipe from the roof. The method consists in the execution of a special box for the chimney, which can be made from rafters and beams. A gap of 13-15 cm should be left between the walls of the box and the pipe. The space around the chimney is filled with insulating non-combustible materials, for example, stone wool is suitable.
Chimney waterproofing scheme.
Steam and waterproofing is brought to the box in the usual way: the film is cut like an envelope. Then, leading to the transverse beams and rafters, they are fixed with staples or nails.
The waterproofing layer is pressed with crate bars, and the vapor barrier layer is pressed against the frame of the attic finishing material. After that, the joints of the box and the film are sealed with specially designed compounds or tapes that improve tightness.
18437 0 0
How to independently arrange the passage of a pipe through the roof in a private house or bath
In the process of building any house, there always comes a time when it is necessary to bring a chimney or ventilation pipes through the roof, there is no way without it. Some owners do not attach much importance to this process, however, mistakes made during the arrangement of the docking station can lead to serious negative consequences. In this article I will tell you how to independently bring pipes through the attic floor and different types roofs
What can a bad installation lead to?
In most cases, stove makers and ventilation equipment specialists are engaged exclusively in the installation of their sector. Pipe passages through the wall, interfloor overlap and roof do not touch them. People do not want to hire a professional and take on the job themselves. As a result, after a short period of time, a whole bunch of problems can “emerge”.
When you hire a specialist, it is better to immediately specify the moment of arranging transitions through structures.
Sometimes it’s easier to pay a little more to an experienced person than to puzzle over how it’s all right and beautiful to do with your own hands.

- The materials from which chimneys are made are quite hardy, they can easily withstand temperature changes, but these materials are often not designed for constant contact with moisture. For example, or an asbestos-cement pipe, having been saturated with moisture, will simply begin to crumble and after a couple of seasons it will look like it was eaten by mice;
- Again, due to high humidity, this sector from the inside will be intensively overgrown with soot. therefore, you will have to clean the chimney much more often;
- But this is not the worst. In most cases, the roof is now insulated with basalt or glass wool.. Once such a heater gets wet, it, firstly, becomes useless, and secondly, it sits down and is no longer restored. Drying cotton wool is pointless, it only needs to be changed;
- Do not forget that almost all roofs are made on the basis of wooden frame . Whatever you impregnate the wood with, but if the structures are constantly in a humid environment, then sooner or later they will begin to rot. Water sharpens a stone, what can we say about a tree;

- There is one more moment I will explain it with an example. One of my acquaintances finished building a house in the fall and, since the weather had already begun to noticeably deteriorate, he patched up the passage through the roof of the chimney at random, in the hope that everything would be fixed in the spring.
Imagine his surprise when on New Year's holidays the chimney through the ceiling of which was decorated in a pompous and very expensive Baroque style, covered with red wet spots and the stucco molding began to fall off. And all this happened because the joint of the roof was not tight enough.
After the furnace was flooded, the snow around the pipe melted, water flowed through the pipe and completely spoiled the luxurious interior, the cost of which was ten times higher than the services of the most expensive roofer.

Where is the best place to run pipes?
Of course, when the house was built a long time ago and you are only repairing the roof, nothing can be changed. But at the design stage, you have a choice optimal location to exit the pipe.
Any stove-maker will tell you that it is best to mount the pass-through node in the ridge. But this is a double-edged sword. On the one hand, snow or rain will never leak under the pipe, plus the chimney located above the ridge provides optimal traction. On the other hand, you will have to pretty tinker with the arrangement of the truss system, because breaking a horizontal ridge beam is a rather complicated matter.

The minimum distance from the chimney to the rafters or load-bearing beams according to SNiP 41-03-01-2003 should be 140 - 250 mm.
- It is usually recommended to slightly move the chimney to either side relative to the ridge. Moreover, if the pipe is located at a distance of up to one and a half meters from the ridge, then it should rise above it to a height of 50 cm;
- If the distance from the ridge to the passage node fluctuates around 1.5 - 3 m, then the height of the pipe can be made flush with the ridge;
- When the roof is shed or the distance from the ridge beam to the passage unit is more than 3 m, it is allowed to install the top point of the pipe along a line passing at an angle of 10º relative to the horizon along the ridge. To make it easier for you to understand, below is a diagram.

The most undesirable place for installing chimney and ventilation pipes is their location in the "valley". For those who do not know, an enodic angle is called an internal corner, which is formed by connecting two roof slopes. This does not threaten ordinary classical structures, such an arrangement can be found on multi-level roofs with a complex configuration.
If you are faced with a case where your chimney pipe passage through the roof is in the "valley", then it is better to try to make an extra knee and move the pipe half a meter to the side.
For the so-called sandwich structures, from which most of the chimneys for boilers and bath stoves are now made, this will not be difficult. Otherwise, water will constantly attack your connecting node from three sides and sooner or later a leak will occur.

Self-installation of passages through the roof or ceiling
If earlier the roofs were mostly covered with slate, now it is increasingly being replaced by metal tiles and other modern roofing materials. Plus, in addition to the passage through the roof, you also need to take care of the transitions through the ceiling.
Elastic transition block as the easiest way out
A good half of modern chimneys and almost all ventilation outlets are now made round. It is just under such designs that elastic adapters are produced.

Such an adapter is a multi-stage funnel with a square or round base. A heat-resistant, elastic polymer is used as the main material.
Each step on the funnel corresponds to one of the running diameters of the chimney. In order for the pipe to fit snugly, you only need to cut the adapter with scissors to the level you need.
Hermetic fixation of the soft polymer base (flange) to the roof itself is carried out with metal studs and bolts. Such a flange can take any shape, so it easily bends around the complex relief of roofing.

The price for such a product is quite acceptable, plus the installation instructions, in my opinion, are more than simple. As I said, first you need to cut the cone to the desired diameter. After that, it is necessary to lubricate the place where the adapter joins the pipe and the lower, contact part of the flange with a heat-resistant sealant. Then you just have to screw the flange with metal studs through the pre-drilled holes to the lower flange ring.

Insulated sandwich chimneys are distinguished by their mirror shine. If you do not like the elastic polymer adapter, then for such cases there are metal adapters made from the same stainless steel. They differ from the polymer counterpart in the large dimensions of the apron, a given angle of inclination of the roof and a well-defined chimney diameter.
Metal adapter.
The installation of such stainless steel adapters differs from the previous version only in that, in addition to a heat-resistant sealant, a metal clamp is additionally used for the hermetic connection of the adapter and the pipe.
Arrangement of a passage through a metal tile
I want to note right away that it’s quite difficult to correctly make the passage of a pipe through a metal tile without experience, therefore, after studying the instructions and viewing the thematic photos and videos in this article, you should think carefully about whether you are capable of such a labor feat.

The connecting unit consists of an internal main and an external decorative apron. Experienced roofers usually make the inner apron from tin or thin aluminum sheet. We have already mentioned round pipes, so further we will talk about sealing the junction of the roof with square or rectangular brick pipes.

The inner apron is installed directly on the crate even before laying the metal tile. The design consists of 4 parts, according to the number of pipe planes. Each of these parts should go under the metal tile layer by at least 250 - 300 mm. It enters the pipe by 150 - 250 mm, again from the metal tile layer.
Before installing the elements of the apron along the perimeter of the pipe at the same level, parallel to the roof, a grinder cuts a strobe with a depth of 10 - 15 mm. We will insert the upper cut of the apron into it.
Before inserting the elements of the apron into the strobe, it is cleaned, washed with water, dried and filled with a heat-resistant sealant. Only sealant should be filled right before installing the protective elements.

On the plates themselves, along the upper cut, the side is bent at 90º to the depth of the strobe. Personally, I made it easier, I immediately inserted the sheets into the strobe and, tapping with a hammer, bent them down parallel to the pipe.
We finish the installation of the apron by attaching it to the pipe with special heat-resistant dowels and soldering the joints between all four elements. But that's not all, from below on the roof substrate under the apron, the so-called tie is wound up and fastened. This is a sheet of the same tin or aluminum, the width of which must exceed the dimensions of the pipe by at least half a meter on each side.

It should go down the substrate to the edge of the roof. A tie is a kind of insurance, if somewhere decorative overlay will begin to leak, water will flow down the tie under the metal tile. As a result, the roofing cake will remain dry.
When the inner apron and tie are finally fixed to the pipe and roof sheathing, you can start laying the metal tile itself. At the end, a decorative apron is mounted. Each of the metal tile manufacturers produces its own additional elements and makes them to match the color of the roof.

Such aprons, as a rule, are corrugated aluminum or lead sheet, on the back of which a self-adhesive coating is applied. From above, such an apron is equipped with a decorative strip, which is fixed on the pipe with self-tapping screws. But before fixing, it is desirable to additionally coat the joint with a heat-resistant one.
The upper bar of the decorative apron is attached just above the border of the lower main apron, after fixing it, the apron itself is carefully tapped with a rubber hammer so that the corrugated sheet fits well and sticks to the complex surface of the metal tile.
Arrangement of transitions with soft modern roofing materials is performed in approximately the same way, with the only difference being that it often does without installing a tie.
The main mistake of amateurs is that they often neglect the installation of the main lower apron and tie, the decorative upper apron holds, of course, well, but the thin, soft aluminum corrugation barrier is not very reliable and can be easily damaged, for example, by a branch that has fallen from a tree .
How to protect a wooden base from a hot chimney
As you remember, according to the standards of SNiP 41-03-01-2003 minimum distance from the chimney to any wooden structures starts from 140 mm. Sandwich elements are considered the most “advanced” in this regard, but even there the insulation has a maximum thickness of only 100 mm.
We conclude that all chimneys must be protected when passing through wooden roof structures or wooden floors.

The passage of a pipe through the ceiling of the bath is the most striking illustration of this topic, since the baths in our great power are usually made of wood. In addition, it should be added that the temperature in sauna ovens often higher than normal.
It is believed that in order for dry wood to begin to char, it needs only 200ºС. And when the temperature reaches 300ºС, there is a real danger of self-ignition.
If we take into account that birch firewood gives temperatures up to 500ºС, and when using good coal or coke, the temperature can rise above 700ºС, then the extent of the danger becomes clear.
When arranging such transitions, you can go in two ways, buy a special transition block or do it yourself.
Now the industry produces a variety of ceiling passage units (PPU). In expensive designs of this kind, a special reinforced box is provided, which comes with insulation, filler and other fittings. But as far as I have come across, our man does not want to pay money for such amenities, and in this, I agree with him.

The fact is that the design itself is not particularly complicated and here, as is often the case with us, it is cheaper to buy everything separately. First, I will tell you what the classic instruction looks like for such an arrangement, and then I will tell you how I made the pipe pass through the ceiling of the bath with my own hands:
- In almost any construction market, you can now find special metal boxes with a hole already cut out for a certain diameter of the chimney;
- In the horizontal plate of such a box, which is also part of the ceiling, mounting holes for self-tapping screws are made around the perimeter. But immediately the design on the "naked" wooden ceiling cannot be attached. Its edges must first be overlaid with a non-combustible heat insulator. Most often, asbestos cloth is used for these purposes;
- The dimensions of the vertical walls of the box are selected in the same way so that an asbestos sheet can be fixed between them and the through hole;

- From the inside, the vertical walls of the box are supposed to be lined with foil basalt wool 30 - 50 mm thick, of course it costs more than usual, but this is the instruction;
- Absolutely clearly, without the slightest gap, it is almost impossible to select holes in the box for the chimney, even if there is a small gap, but it will still be. Here it is supposed to be covered with heat-resistant sealant;
- Further, the space between the foiled basalt wool and the chimney is filled with expanded clay or the same wool, only soft and uncoated. For non-residential attic floor this is enough, but if the bath attic type, and on the second floor there is a rest room, then the box on top must be covered with a mineralite slab (a heat-resistant and safer analogue of asbestos) or the same stainless steel plate.

Now, as I promised, I will tell you about my own experience in arranging such a transition. The bath was made a long time ago, and then these convenient devices simply did not exist. Sandwich designs at that time cost fabulous money, so an ownerless cast-iron pipe was installed as a chimney.
square hole in hardwood floor It was cut out with the same calculation so that in all directions there was at least 250 mm between the chimney and the wood. I immediately stuffed an asbestos sheet onto the vertical walls of the niche.
A three-millimeter sheet of stainless steel was hemmed from below. I wanted to hem a ten-millimeter asbestos-cement slab, but I was afraid that it would burst from the temperature, although my neighbor hemmed it and is still standing.

I wrapped the pipe in the box with an asbestos sheet and caulked the gap with clay on top of it. And from above, all this economy was covered with expanded clay of medium diameter. On the second floor of the bath, I decided to make a rest room, but at that time I did not have a second similar stainless steel sheet.
Then I mixed a cement-lime mortar based on expanded clay sand and poured a thirty-millimeter screed reinforced with wire rod. Only the screed was not poured close to the cast-iron pipe, but through a gasket made of asbestos cloth, otherwise it would simply crack with temperature fluctuations.
Conclusion
As you can see, you can make a passage through the roof of the chimney with your own hands. But still, if you decide to invest in a quality coating of metal tiles or other similar materials, I recommend that you first carefully study the available methods. If you have any questions, write them in the comments, I will try to answer.

If you want to express gratitude, add a clarification or objection, ask the author something - add a comment or say thanks!
The appearance of chimneys from sandwich pipes has raised many questions among inexperienced developers, especially the elderly. They constantly react with great apprehension to new technologies, give preference to traditional solutions and consider them only the most correct, time-tested and numerous users. But this is not always the case, new Construction Materials and technologies make it possible to significantly simplify the process of building a house, improve its performance, reduce costs, increase safety, etc. Such technologies also include chimneys made of sandwich pipes.
In order to better understand the installation technology, you need to get a little familiar with the operational parameters and technical specifications modern chimneys.

The chimney must meet two main requirements: to ensure the necessary draft and to be safe from a fire point of view. Installation of any chimney, including sandwich pipes, must necessarily meet these requirements, it is with their implementation that work should begin.
How to choose the diameter and location of the chimney
The amount of thrust depends on several factors.

These are the main regulatory requirements, but there is also fire regulations. All of them are based on the fact that wooden structures located next to pipes cannot be heated above +400°C. It is at this temperature that wood ignites. Specific distances are not regulated, it all depends on the temperature of the exhaust gases. The distance is affected by power and coefficient useful action boiler, the thickness of the thermal insulation layer, the height of the ceiling and the attic, the temperature outside, etc. The science that describes these dependencies is called heat engineering and belongs to one of the most complex sections of physics.
What to consider when choosing a chimney
As mentioned above, the task of the chimney is the safe heating of residential premises. Pipe parameters depend on many factors, they must be taken into account. Otherwise, no matter how the chimney is mounted, it will be impossible to use stove heating, you will have to buy new sandwich pipes and redo everything. What to look for when choosing a particular chimney?
| Parameter | Short description |
|---|---|
| High-quality sandwich pipes for chimneys should be made only from alloyed heat-resistant and stainless steel. The steel grade is selected taking into account the temperature of the gases, the higher it is, the more heat resistant the steel should be. For gas temperatures within + 1000 ° C, AISI 304 steel is used, for a wood-burning boiler (gas temperature up to + 600 ° C), AISI 321 steel is needed. practical advice. Never buy pipes made of AISI 409 or AISI 430 steel grades. Not only are they afraid of high temperatures, but they are also corroded very quickly by acids. And there's quite a lot in the smoke chemical elements, which, when combined with condensate, form sulfuric and hydrochloric acids. Such low-quality pipes are sold by counterfeit Chinese companies and some domestic ones. |
| Heating boilers can be wood, coal or gas. The temperature of the gases and the concentration of acids depend on the type of fuel. The coal-fired boiler produces the most acid, and it also has the highest gas temperature. For this boiler, you need to select a sandwich pipe from the highest quality alloy steel. Practical advice. Modern boilers have a high efficiency, which means that they give the maximum amount of thermal energy to the coolant. As a result, the gas temperature is relatively low; in all modern boilers it does not exceed +400–500°C. the main problem for pipes - acids. |
| Pressed material is used as thermal insulation. mineral wool. The thickness of the thermal insulation is within 2–5 cm, the thicker it is, the lower the heating temperature of the outer pipe. And this is of great importance during the arrangement of passages through the wooden structures of the house. |


A wide variety of manufactured pipes and additional elements for them allows you to create chimneys of various complexity. To increase traction, a deflector can be additionally mounted, fire safety provides a spark arrester, the outlet covers a thermo fungus, etc.

Each additional element of the device has its own purpose and performs a specific function, thereby increasing the reliability of using chimneys from sandwich pipes.
The piping on the roof is done with the help of cone elements and aprons, they support the chimneys in vertical position unloading platforms and metal brackets.

Various manufacturers may slightly expand or shorten the list of additional elements, change their appearance or design features, but the installation technology almost does not change from these differences.
For example, we will take the option of installing a chimney on the roof of the gazebo, the chimney is connected to a stationary barbecue. The technology for performing work on a residential building, gazebo, bathhouse or other outbuilding is no different. We specifically chose a gazebo, in this example it is possible to talk about all the nuances of installation. You can skip some operations on the house, it all depends on the specific architectural features of the building.
But they indicate only the minimum height, and there is also the concept of the speed of air flow. This parameter has a huge impact on the efficiency of boilers. If it is too large, then the thermal energy does not have time to be transferred to the heat exchanger, which significantly reduces the efficiency of the boiler. Another problem is that too much draft can completely extinguish the burners of gas boilers. Such unpleasant situations arise in large cottages when the boiler is installed in the basement technical room or on the ground floor, and the building itself has two or more floors.

In these cases, only a professional heating engineer can help, he will select the optimal chimney diameter depending on the specific conditions. The fact is that the parameters of SNiPs are outdated, they are used to brickwork, and there are completely different coefficients of resistance to air flow than ideally smooth stainless steel pipes.
Prices for sandwich chimneys
Step-by-step instructions for installing a chimney from a sandwich pipe
The gazebo does not have a ceiling, so we will not consider this operation. Installation is done in two stages: preparatory and installation. The roof of the gazebo is flat, covered with flexible tiles. The crate is solid from moisture resistant OSB.
Preparing for the installation of the chimney
Our brazier has two chimneys: one from the stove and the second directly from the brazier visor, it is technologically impossible to combine them into one, you will have to make two. Another problem is that the chimney from the stove is located exactly against the rafters, it needs to be sawn. In order for the roof structure not to lose its original stability, the sawn rafter should be connected metal corners, and weld a circle in the middle. The diameter of the circle should be several millimeters larger than the diameter of the outer pipe of the chimney sandwich.
If such a problem occurs during the installation of a chimney in a residential building, then rafter leg cutting is strictly prohibited. We need to try to move the boiler a little. If this is also impossible for some reason, then you will have to bend the chimney; for this, special additional elements are sold.
Step 1. Locate the center of the chimney on the roof. This will require a long building level or an ordinary plumb line. If it is not there, then tie a nut or bolt to the rope, it will be an elementary plumb line, the accuracy of such a tool for the measurements performed is quite enough. Attach a plumb line to the roof and move it until the weight is in the center of the chimney. You can control the position by eye. If in doubt, find the center of the chimney pipe by placing two sticks along the diameter at an angle of 90°. The point of intersection of the sticks will be the center of the pipe. Draw a dot on the roof with a pencil.

Step 2 Drill in the marked area through hole, make sure that the drill does not move during operation. The hole will indicate on the roof the center of the hole for the chimney pipe.
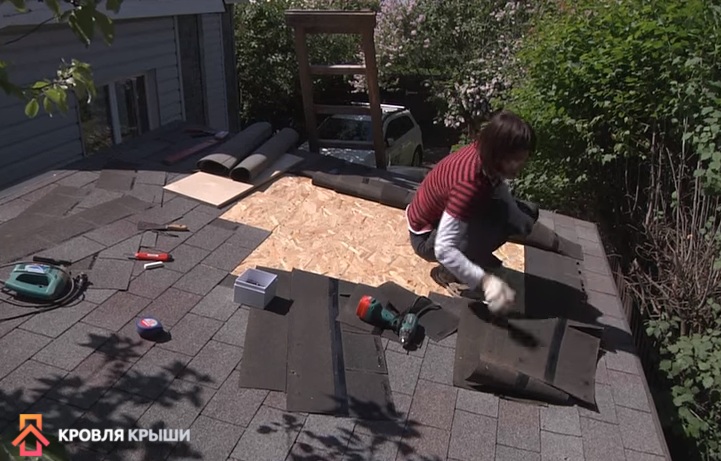
Step 3 Now you need to go to the roof of the building. Due to the fact that the soft tiles have already been laid, part of it will have to be dismantled. Using a thin metal spatula, gently pry up the shingles soft tiles.

By the way, you will immediately see that the bonding strength of the shingles is not as reliable as the manufacturers of mastics and shingles advertise.
Step 4 Raise the sheets of tiles a little and use a screwdriver to unscrew the self-tapping screw.

If the tiles are fixed with nails, then pulling them out is much easier with a special nail puller. Remove the first shingle. Using the same algorithm, remove all shingles from the section of the roof where the chimneys will exit.
On this preparatory work completed, you can begin to mount the chimney pipe.
Installation of a chimney on the roof
Prices for popular models of screwdrivers
Screwdrivers
A few words must be said about the fire distance between the pipe and the wooden elements of the roof. No one makes exact calculations in each specific case, it is very difficult and time consuming. Practitioners say that if the height of the attic is at least 1.5 meters and it is unheated, then the chimney sandwich pipe can not be additionally isolated from the crate or rafters. The outer surfaces of the chimney never heat up more than two hundred degrees, and this temperature is safe for wood. But for insurance and in order to avoid problems with firefighters, it is recommended to deviate from wooden structures at least 20 cm around the entire perimeter. This is not very difficult and will allow to exclude possible claims of the commission during the commissioning of the building.
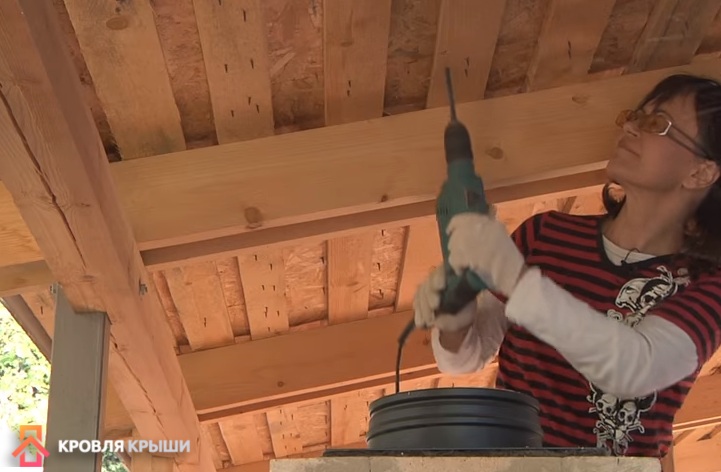
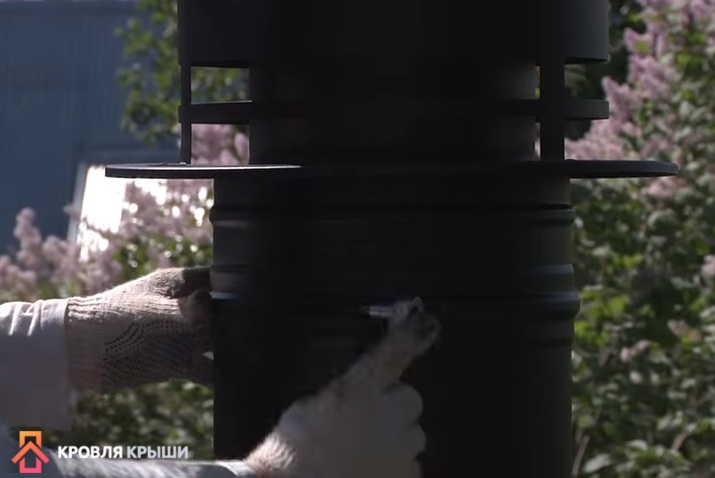
Step 1. Open the packing of the feedthrough. The passage element is made of polypropylene, modified heat-resistant rubber is used to seal the pipe.
Step 2 Cut a hole in the rubber to fit the diameter of the pipe. It has concentric rings indicating different diameters. Find the right one and remove the extra part. You can cut with an ordinary sharp knife, try to make the cut as even as possible. If you have large scissors, great, they are much easier and safer to work with.
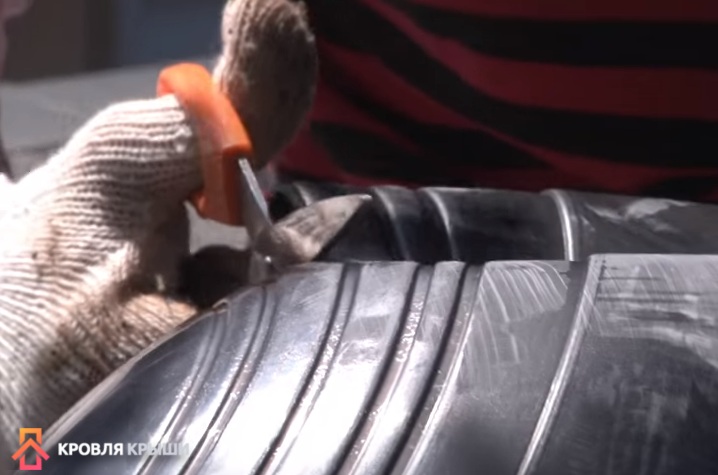

Step 3 On the penetration there are circles indicating the slope of the roof. This is done so that on any roof the chimney pipe is strictly vertical. It is necessary to cut off the circle that corresponds to the angle of inclination of the roof slope. The penetration is made of polypropylene, it cannot be cut with ordinary scissors, it is necessary to use special ones for metal or secateurs.

Secateurs cutting
Step 4. Locate the hole that was drilled from the inside of the gazebo, this hole indicates the location of the center of the chimney. Lay the penetration on a solid crate so that it is in the middle of the element. Circle the line with a pencil or felt-tip pen, you will get a circle for cutting. If you have several chimney outlets on the roof, then such actions must be done for each.
Step 5 Electric jigsaw cut a hole. To do this, first drill holes for the nail file with a drill, and only then insert the tool into it and work. Be careful that the saw does not fall on metal hardware, they should be pulled out or bypassed.


Step 6 Attach the passage element and fix it to the plate with self-tapping screws. If there is a desire, then for peace of mind, you can put the passage element on any sealant, the squeezed out excess must be carefully removed with your finger.

Step 7 Replace the chimney. Separate pipes can be additionally pulled together with clamps.


It is recommended that on soft combustible roofs, be sure to cover the pipe with a tip with a spark arrester. This is especially important for a wood-fired boiler. If the pommel has a deflector - excellent, with a side wind, the thrust will increase, which eliminates the formation of reverse thrust.

Step 8 Put the rubber sealing cover in place, it prevents rain from entering through the pipes under the roof. The casing has a special label indicating in which position to put it on. The label should look forward to the roof ridge.
Step 9 Firmly tighten the casing to the pipe with a clamp, the sealant is used as desired.
This completes the installation of the chimney, you can return the previously dismantled roof to its place.
Step 1. Install the underlayment strips. It is pushed around the perimeter into a special slot of the passage element.

Step 2 Start laying the previously dismantled shingles in place. At the junction with the passage element, cut the tiles so that it overlaps the contour of the element by 2–3 cm.
Laying soft tiles is done in the usual way using bituminous mastic to seal the joints.


Installing the master flash
Prices for roofing master flash
This device has an aluminum sheet edging around the perimeter, the edging is hermetically soldered into a rubber gasket. Due to this technological feature, the element copies the profile of the roofing with maximum accuracy, the likelihood of leakage is minimized.

How to properly install master flash?
Step 1. Coat the perimeter of the outer chimney pipe with soapy water. This is done in order to tightly put a rubber apron on the chimney.

But this can only be done if the diameter of the hole on the apron is 2–3 cm smaller than the diameter of the pipe. If the parameters differ more, then you will have to cut the rubber a little. For this, manufacturers made special rings on it with an indication of the diameters. No need to try to stretch the apron too much. rubber cannot long time be in such a tense state, over time it will certainly begin to tear. As a result, leaks will appear, and so strong that to eliminate them, you will have to completely change the master flash.
Step 2 Give the aluminum a roof top profile. You can do this with your hands, with a rubber mallet, or with a mallet. Start arching from the middle, and then move symmetrically to the edges. If you do the opposite, then the last waves will stretch, you will have to start all over again.

Step 3 Apply silicone or other sealant to the section of the roof that is located under the master flush. Do not spare the material, especially carefully coat the upper part of the element and those places where water drains.

Practical advice. If the house is located in the southern regions of our country, and the penetration is black, then you need to use special sealants. The fact is that on bright sunny days the surface of the master flush heats up to a temperature exceeding +100°C, while ordinary sealants can withstand no more than +80°C.
The lower part of the element can not be smeared with sealant, water will not flow upwards. But for a guarantee and personal peace of mind, it is recommended to apply a silent sealant.
Step 4 Screw the element to the roof. To do this, use special screws. Pay attention to the sealant protruding from under the aluminum plate around the entire perimeter. First, screw the screws into the lower waves, and only then into the upper ones. This fixation technology increases the tightness of the connection of the elements.

Step 5 Gently remove the exposed sealant with your finger. You do not need to leave a lot of it or spread it in a thin layer over a large surface of the roofing, this will not help to increase the service life of the connection. The fact is that after 3-4 years, a smeared thin layer of sealant will definitely peel off from the roof, water will begin to enter the gap. Only the material that is between the aluminum plate and the roof covering ensures the tightness of the connection.
It is important to know that the tightness does not depend on the thickness of the protruding material, only its quality and degree of adhesion affect the durability. With regard to resistance to ultraviolet rays, these are non-critical indicators, the sealant is protected by an aluminum sheet. It is more important to look at frost resistance.
Step 6 Apply sealant around the perimeter of the pipe between the wall and the rubber cap.

Application of sealant between the wall and the rubber cap
Replace the pipe cap and tighten the clamp.

If all work is done correctly and used quality materials, then there will be no problems with the chimney for many years of operation.
Video - Master Flash. Installation
The passage of the pipe through the roof is the most complex structural element with several problems associated with its construction. In this article, we will talk about performing work on the correct installation of the passage, as well as how to pass the pipe through the roof while maintaining all the protective properties of the roof pie.
The node of the passage of the pipe through the roof is the object of controversy of various specialists. So, professionals in the field of work on the equipment of fireplaces and boiler rooms believe that the passage of the pipe through the roof should be located at the ridge. This allows you to protect the main part of the pipe from the effects of cold, which reduces the likelihood of condensation inside the pipe. Roofers, in turn, say that the passage assembly must be equipped directly through the ridge, as this makes it possible to simplify the work associated with the installation of the passage element. This method, among other things, eliminates the formation of snow deposits above the chimney. But everything is further complicated by the fact that the outlet of the pipe through the roof can also be arranged on slopes at a certain distance from the ridge.
In order to protect the internal surfaces of the chimney from moisture getting there, its outlet is covered with a special umbrella. But if the chimney is connected to boiler equipment, then it is better not to install such a protective element, since due to the low temperature of the combustion products, they can accumulate under, which will create additional pressure in the pipe itself and ultimately reduce draft.

The most problematic place of this node is the passage of the pipe through the roof, since in this place it is necessary to take special measures to protect the roof and isolate it from high temperatures. In order to protect the "pie" of the roof from the chimney, use a separate box. At the same time, it is very important to adhere to the requirements of SNiP regarding the location of beams and rafters, and the interior of the box must be filled with non-combustible material. Well proven for these purposes, such material as stone wool.
The passage element can have a different shape depending on the cross section of the chimney itself and the roofing material used:
- oval;
- round;
- square;
- rectangular.

Removing the pipe through the roof
When equipping the passage of a pipe through the roof, care must be taken to ensure that two conditions are met:
- passages through the roofing pie must be fireproof;
- the under-roof space should be protected from moisture penetration as much as possible.

The conclusion of the chimney through the ridge allows you to carry out all the work quite simply. Due to the fact that the formation of snow pockets on the ridge is impossible, it is possible to achieve better protection against leaks. But at the same time, this installation method implies that the ridge beam will not have load-bearing functions in the design of the truss system. And this requires additional strengthening of the rafters themselves. In the presence of an attic, the installation of additional truss supports may be undesirable or simply impossible.
That is why developers prefer to install a chimney passage on a slope, directly at the ridge. In this place, a snow pocket also does not form, and besides, the truss system does not need additional reinforcement. But besides this, the location of the heating equipment also affects the choice of the place for the passage of the roof chimney. It should be remembered that the horizontal sections of the chimney should not have a length of more than 1 meter. In some cases, it is the location of the boiler that becomes the reason for choosing the method of passing the chimney through the ridge.
Professionals recommend avoiding the equipment of the passage element in the valley (the place where two slopes converge with an internal angle), since it is especially difficult to install at this point. As a result of rains and snowfalls, the junction may not be able to cope with moisture and, as a result, the roof will leak.

It is important to keep the distance between the rafters and the roof in the range of 25-30 cm. If the roof is made of combustible materials ( different kinds roofing material, soft roof), then a gap of 13-25 cm must be observed between the material and the wall of the chimney. If the material is resistant to high temperatures, then this gap can be left minimal, and removed only from the crate.
If the roof is a “pie” consisting of hydro, steam and thermal insulation, then during the installation of the passage element, some difficulties may arise associated with a violation of the integrity of this layer. As a result of an error, the protective properties of the roof can be significantly reduced. In this case, the chimney can be installed in a separate box, which will isolate the roofing materials from the hot walls. The distance between the inner wall of the box and the chimney should be about 15 cm, while the free space is filled with non-combustible heat-insulating material. It is recommended to use mineral or basalt wool, as it is resistant to moisture.
Hydro and vapor barrier is brought to the box according to the standard method: the “pie” is cut in the shape of an envelope. The sheet of films is brought to the rafters and cross beams, where they are fixed with nails or staples. Then the waterproofing layer is pressed on top with bars, and the vapor barrier - with a base frame under Decoration Materials attic or loft. After that, the joints of the films and the box are treated with a sealant and glued with a special tape.
How to bring a pipe through the roof
To organize a hermetic junction of the roof to the chimney, an internal apron is created at this point. To create it, use the lower junction bars. The strips are applied to the walls of the chimney, where its upper part is marked. On this line, a grinder makes a strobe. Then dust is carefully removed from the formed border. This is done so that small particles of sand and cement do not get on the surface of the waterproofing or roofing. In some cases, fine grains of sand will turn into an abrasive over time, which can seriously damage the roofing material.
The lower apron begins to be installed from the bottom wall, while only one part of the apron is inserted into the strobe. Similarly, this element is attached around the entire perimeter of the chimney. Separate elements must be overlapped with an overlap of 15 cm. The joints are sealed.

For chimneys with a circular cross section, you can purchase special passage elements in hardware stores, consisting of a steel sheet and an apron cap. Their use allows you to significantly speed up the work on the equipment for the passage of the chimney pipe through the roof. A purchased or manufactured apron should be securely fixed to the roof. At the same time, it is not rigidly fixed with the chimney, since the expansion of the material or the shrinkage of the truss system can cause damage to the chimney with an apron (be sure to read: "").
The passage of the chimney pipe through the roof, detailed video instruction:
At the junction of the pipe and the apron, a skirt is installed - a steel clamp, which is fixed using a heat-resistant gasket. This approach allows you to significantly improve the waterproofing of the roof in this place. Upon completion of the installation of the apron, it is necessary to apply sealant to all junctions of the element and the chimney. This contributes to obtaining a reliable connection that does not leak.