Do-it-yourself house for a well. Do-it-yourself house on the well. How to determine the best location for a well
Many owners of personal plots equip private wells for water intake for domestic and household needs. Often, such a device has a nondescript design, equipped with simple gate on vertical stands.
Why is a well cover needed?
The house on the well is an important functional device that is designed to solve key problems:
- protect the water source from the ingress of biological and chemical pollutants, debris and insects;
- prevent the harmful effects of ultraviolet radiation on the organoleptic characteristics of water;
- protect against freezing of water in winter at low temperatures;
- prevent free access of children and animals to the well shaft;
- to give attractiveness and aesthetics to the hydraulic structure.
Many craftsmen are able to create amazing functional devices equipped with decorative elements made from natural materials - wood, stone, porcelain stoneware and mosaics.
If desired, a well house on suburban area can be easily arranged in the form of an original tower, tent, log house or palace.
Types of houses and materials for their manufacture
The houses may have various options structures that differ in shape and materials from which they are made.
The shape of the house for the well can be:
- roof. This design is practical, economical and easy to use. As a rule, it is represented by the classical gable roof with three corners. There are more complex devices - quadrangular or round log roofs. The shelter provides reliable protection of the hydraulic structure from clogging and damage.
- Canopy. This is the most popular type of shelter. The canopy over the well can be combined with a triangular roof for more effective protection from the negative effects of precipitation.
- Arbor. An open version of the shelter for the well, mounted on wooden or metal racks. The door is mounted on the base of the structure, which can have a different shape - round, square or octagonal.
- Log cabin. Such structures can be represented by symmetrical or asymmetrical roofs with two slopes, pyramids or cones.
The dimensions of the house must match the dimensions of the hydraulic structure itself - a well made of timber or concrete rings. A small shelter will not provide sufficient protection against moisture and debris entering the casing, and a large device will make the operation of the well difficult.
To independently make a house for a well or a well, simple and affordable materials are used:
- tree;
- Cink Steel;
- tiles or metal tiles;
- slate;
- ondulin.
The most popular and demanded material is wood. It is distinguished by aesthetics, environmental friendliness and durability. Such devices are well combined with any type of buildings. For the manufacture of the base and roof, edged boards, timber and logs are used.
An equally practical material is galvanized steel. The roof for a steel well acquires the required strength, durability and practicality, but requires additional insulation.
Decorative roof finishing natural materials- stone, tile, wood and brick.
To make a house with your own hands, you first need to understand the drawings and diagrams. Below are some of them.
First of all, a frame of various geometric shapes is prepared, which is installed on a hydraulic structure.
The final stage of arranging the house with your own hands is the installation of the roof and the sheathing of the base.
Preparation of working tools and materials
For construction and installation work it is necessary to prepare the main building materials and working tools:
- beam;
- edged boards;
- fasteners (studs with small caps and self-tapping screws);
- roofing material - steel, slate or tiles;
- log and metal rods;
- antiseptic compositions, varnishes and impregnations;
- hinged hinges, a latch (latch) and a door handle;
- metal chain with a container (bucket);
- materials for self-manufacturing doors;
- plane;
- jigsaw;
- screwdriver
- hacksaw;
- level;
- roulette;
- pencil.
All functional and decorative elements made of wood are carefully cleaned, treated with antiseptic compounds against decay and covered with protective impregnations. This will increase the life of the wood.
Building a wooden frame
For the construction of the frame, a board and a bar are used. To get a practical and durable design, it is better to choose a beam with a section of 80 × 100 mm, and a board with a thickness of 40 mm.
- First, the head on the well is measured - diameter and width, in order to determine the optimal distance between the racks of the frame. In the manufacture of racks, it is important to observe the dimensions of all individual parts. A wooden base is mounted from a beam, to which vertical racks up to 8 cm wide are fixed, their length is determined by the height of the house. The top of the racks is connected by a beam, forming a ridge of the finished structure.
- At the corners, the racks are connected by truss elements made of bars measuring 50 × 50 mm. For ease of installation in the end parts of the rack are cut off, forming an angle of 45 degrees.
- From the fixing side of the door, a board intended for storing a bucket is horizontally nailed to the base. It is recommended to choose a durable and wide board capable of withstanding big weight buckets of water.
- Boards are nailed on three sides to increase the strength of the finished frame. The assembled frame is fixed to the hydraulic structure.
Important! Compliance with geometry during assembly wooden frame ensures the durability and safety of operation of the structure. In addition, this will avoid possible distortions and displacements under mechanical loads exerted on finished device. To strengthen the connecting joints between individual elements, you can use special metal corners.
Installation of a well gate with a handle
Let's figure out how to make a simple and durable lifting device - a wooden gate for a well. Such a device is designed to draw water using a container fixed on a metal chain.
To do this, you need a log of a suitable size - a diameter of up to 25 cm and a length of up to 95 cm, a rod for the handle and vertical racks for fixing.
Important! The length of the finished gate should be 5 cm shorter than the distance between the two installed posts.
All work is carried out in the following order:
- The log is thoroughly cleaned, leveled with a planer and polished.
- To keep the shape of the gate, the edges of the log are pulled together with metal clamps.
- Holes up to 22 mm in diameter and up to 50 mm deep are made in the end and central parts.
- Washers with holes of the same size are installed in the upper part. This will provide additional protection against damage and drying out of the wood.
- In vertical racks, similar holes are made at the required height. Metal bushings are inserted into the finished holes to fix the log.
- Rods are inserted into the prepared holes inside the log: on the left side - straight 22 cm, on the right side - L-shaped for the handle.
- The finished gate is hung on racks with fixation on rods. A metal chain with a connected container is wound around the device.
Production and installation of doors
The roof of the well can be equipped with a simple hinged door. For its manufacture, boards up to 21 cm wide and 86 cm long will be required.
- A chute (frame) for a door of three bars is fixed to the base. Given the size of the frame, the door leaf is assembled and adjusted. Next, the boards are connected at the top and bottom with bars.
- In the diagonal position, an additional bar is fixed, which ensures the strength of the finished structure.
- Hinges are installed on the frame and door, after which the door leaf is hung on the base.
- At the end, the handle and the valve are fixed, the operability of the structure is checked. When opening/closing, the door must not touch the frame.
Photo of a homemade wooden door for a well house, which you can install yourself.
Decorative cladding of the house
A well with a house in the country is practically equipped, so the final stage is decorative cladding.
How to finish the shelter outside quickly and efficiently? For this it is better to use wooden lining, block house or edged board. These materials are practical, durable and environmentally friendly.
On the slopes of a large area, it is first recommended to install the crate, fixing the individual elements in increments of 18 cm. The selected material is mounted on the finished crate. If the area of \u200b\u200bthe slopes is small, the boards can be installed on the finished frame.
Next up is the roof. For this, slopes from wooden planks sheathe with the chosen roofing material- siding, metal tiles, slate, roofing material, ondulin or steel. The material must meet the basic requirements - to be strong, durable and resistant to the negative effects of precipitation.
To improve the rest of the structural elements, you can use stains, primers and paints designed for wood.
The finished house is checked for strength and serviceability of all working mechanisms.
Interesting design options for the house are shown in the photo.
After completion of drilling and arrangement of the hydraulic structure, the next important step is the construction of a protective shelter. How to make a house for a well in order to get a functional and durable design? The answer is simple - prepare everything you need for work and follow the step-by-step instructions. After all, even a person with minimal practical skills can easily cope with the task.
The only source drinking water V country house often there is a well. A house for a well helps to keep the purity of life-giving moisture and give the building an attractive appearance. A template copy can be purchased ready-made, but it is much cheaper and more interesting to build a house for a well with your own hands. The design differs in size, configuration and finishing material. The proposed drawings will help you choose suitable option for making your own.
The purpose of the house
The main function of the well house is practical. The quality of water from the well is affected Negative influence many factors:
- direct rays of the sun;
- precipitation;
- excess heat;
- animals and insects;
- wind blown debris
- chemicals sprayed on nearby plants.
A properly equipped house prevents foreign substances from getting inside. In addition, a competent design will prevent freezing of water during severe frosts. Throughout the year, the structure creates protection from curious children, preserving their life and health. In addition to the practical purpose, a house for a well made with a soul with your own hands will be an excellent decorative ornament site.
Water is supplied from the well in two ways - with the help of a gate and a bucket fixed on it or with a pump. When choosing a house design, this factor must be taken into account.
One of the options for a professional drawing with dimensions is presented below:
Structure variations
The protective structure can be open or closed. In the first case, the probability of water freezing in severe frosts increases significantly. The insulation of the well ring with a polystyrene foam coat will help to save the situation, followed by decorative trim. Greater practicality, in terms of protection against frost, has a closed design. The air gap itself retains heat, and in combination with heat-insulating material will cope perfectly with the functions assigned to it.
The choice of materials in the manufacture of a house for a well is based on the general architectural concept suburban area. If the main building is wooden frame, it would be logical to use logs to finish the well ring and roof boards. If the exterior of the house contains elements of brick or stone, the appropriate material is used when assembling structures for the well with your own hands. The top is sheathed with a material identical to the roofing of the main structure. The proposed design is not an unshakable postulate and is relevant if the house is located within sight of the main building. A distant well at a distance allows you to expand the boundaries of the choice of finishing the house.
Comment! A wooden house, especially with carving elements, is incredibly attractive, but requires regular maintenance. Otherwise appearance will quickly lose its former gloss. Siding fixed on a metal profile frame is much easier to maintain.
Another example of a drawing with dimensions will help you navigate the choice of configuration:

Simple open house design
It is quite easy to arrange a structure for a well with your own hands open type. Main structural elements:
- 2 racks;
- canopy;
- gate.

Since the racks are dug into the ground next to the well, the installation of supports for the canopy is carried out after decorative design well ring.
The basic steps for making a canopy for a well:

The order of work may change. In some cases, supports are first dug in, then fixed truss system followed by the installation of the roof. It is more difficult to assemble the truss system of an open house directly on fixed supports. Sometimes the entire structure is first assembled together, and then dug over the well. The severity of the structure and personal experience will tell you how to make it more convenient with your own hands.


The procedure for manufacturing a closed house
An open house does not give the well 100% protection from adverse factors. It is much more efficient to assemble a closed-type structure with your own hands. A detailed drawing with dimensions and a diagram in the assembled version is shown in the photo:
Frame design
For the manufacture of the frame will require timber and boards. As in the case of an open canopy, it is important for the structure to choose the right dimensions for the main elements. Excessively thin parts will lead to deformation or breakage of the structure above the well as a result of wind loads. A large margin of safety will also be redundant, so the structure above the well will turn out to be cumbersome.
The photo shows a detailed drawing of the roof of the house:

It is optimal for work to choose the material of the following sizes:
- Board thickness - 4 cm, width varies from 120 to 150 mm.
- The cross section of the beam is 80x100 mm, with a heavy roofing it is better to take 100x100 mm.
- For work, you will need 4 supports from a bar and 4 boards for holding the lower and upper strapping.
The boards are sawn in advance, taking into account the dimensions of the well, after which they are nailed to the support posts. 100 mm nails are used as fasteners. The algorithm of actions for making the frame of a house for a well includes the following steps:
- the first pair of supports is fastened with boards at the top and bottom;
- the second pair of riser is connected in a similar way;
- blanks are placed around the well;
- The elements of the frame of the house are connected by strapping.
The photo shows an example of a finished house above the well:

Roof installation
The design of the roof of the house over the well begins with the assembly of roof trusses. They represent a rigid structure, on which the crate is subsequently attached. For rafter legs boards are taken with a thickness of at least 3 cm. The length is selected individually, depending on how high the house above the well you want to get. The next elements of the truss system are crossbars and jibs, board thickness from 2.5 to 3.0 cm will be enough. The set of elements of the truss system of the house above the well includes:
- jib - 8 pcs.;
- crossbars - 3 pcs.;
- rafter legs - 6 pcs.
The parts are cut at an angle, the upper ends are interconnected using self-tapping screws. The crossbars perform the function of additional fixation, their installation is carried out 0.3 m below the point of the upper connection of the rafter legs. The rafters are fastened to the frame with nails 120 mm long.
In order for the house for the well to have sufficient strength, the truss system is reinforced with jibs. When the structure is assembled, the crate is carried out. The fixing step of the boards is 15 cm. First, the crate is covered with roofing material, then the finishing roofing. Corner joints are usually covered with boards.
Gate installation
Do-it-yourself decoration over the well of the house necessarily affects the installation of the gate. For its manufacture, a round log with a diameter of more than 200 mm is required.
Comment! The larger the diameter of the gate, the easier it is to lift the bucket of water.
The size of the gate depends on the distance between the two supports on which it is attached. It is optimal to choose a length 4-5 cm shorter. The approximate dimensions of the gate for the house above the well are shown in the drawing:
The main stages of manufacturing a gate for a house over a well:
- cut off desired length gates.
- After removing the bark from the log, it is carefully cleaned and polished.
- The edges are covered with steel wire, this measure will preserve the geometry of the log.
- Holes are drilled in the center of the ends to a depth of 50 mm. The diameter is 20 mm.
- On top of the holes, metal plates are mounted, on which the corresponding holes have already been prepared. This element will protect the wood from destruction.
- Similar holes are prepared in the supports, at the points where it is planned to fix the gate.
- The sections are covered with metal plates with holes.
- Metal bushings are inserted into the holes on the supports.
- The ends of the logs are equipped with metal rods. For the left side, a length of 200 mm is sufficient, the right element is represented by the letter "G".
- At the end, the gate is hung on racks.
The finished gate before fixing in the house for the well in the photo:

Arrangement of the door of the house for the well
So that over time the door does not lead as a result of deformation of the structure, the boards for the house must be chosen dry. The sequence of work on the manufacture of the door includes the following steps:
- As a door loot, 3 bars are fixed on the frame.
- Based on the parameters of the frame, the door is assembled on the ground. Its dimensions should be slightly smaller than the internal outlines of the frame. cropped up right size boards are connected at the bottom and at the top with bars. For rigidity, another bar is nailed diagonally.
- Carry out installation metal hinges on the door and frame.
- After hanging the door on the frame, a latch and a handle are fixed on the structure.
- Finally, the quality of the work performed is checked. The door should not touch the frame during opening or closing and jam.
The photo shows the finished door on the well structure:

Finishing
Usually the lower part of the well house is sheathed with wood. The choice of the master, who constructs the structure with his own hands, is presented:
- Block house imitating rounded logs. In this case, the well will resemble a log cabin.
- The wooden lining looks spectacular.
- An ordinary board is the most budget option for decorating a house for a well.
Attention! Preserving the integrity of the wooden structure for a long period will help the processing of the material with protective compounds. This includes antiseptic impregnation that prevents decay, means of protection against damage by pests. Lacquer is suitable as a finishing coat for a house for a well.
Neat and beautiful wooden structure for the well is shown in the photo:

There are many options for finishing the roof of a house for a well. As in the case of an open-type house, it is important to foresee the weight of the roofing in advance so that the entire structure does not deform under the weight of the material.
For larger slopes, the installation of a crate will be required. The boards are fastened in increments of 15-20 cm. The main material of the roof is stuffed onto the crate. Thus make out slopes and gables. If the well is of small diameter and the roof of the house has a compact area, the boards are mounted directly on the frame.
Advice! To protect the walls of the house from moisture, the slope boards go beyond the dimensions of the main structure by 10 cm.
In addition to the classic board, as a roofing use:
- euroruberoid;
- siding;
- corrugated board;
- metal tile;
- bituminous tiles.
Installation of roofing material is carried out exclusively on the slopes, the gables are sewn up with wood treated with protective agents.

Conclusion
A competent drawing, taking into account the dimensions of the well, is the basis for the correct design of the house. It is important to correctly calculate the weight of the structure so that the frame can withstand the load and not deform. Appearance is largely determined by the material chosen for the finish.


Many summer residents and gardeners, and not only, always have one important problem, especially on a hot summer day. This is watering your crops and plants.
Someone, if possible, tries to have access to a centralized water supply, while someone thinks about their own well on their site. At the same time, many do not even have any idea how and where to dig a hole for a well.

In this case, it is necessary to adhere to certain rules and a clear plan, it is also necessary to rationally plan the entire process of work. Then you can dig a well yourself.

But, before you start work, you need to make a well diagram for yourself. All stages of work must be carried out strictly according to the drawing of the well, which is considered the main project.
What features you need to know in the process of digging a hole
Digging a deep hole for a well is half the battle, it is important what water will be in the well. And it should be clean and transparent, without sharp and unpleasant odors, without foreign tastes, but this does not always happen.

Therefore, the most important place is for digging a hole, and it is advisable to dig where there are deposits of groundwater. It is worth noting that ground water can have different depths of flow underground, in addition, the quality of water at different depths will be different.

Also of no small importance for many owners of private houses is the location of the well itself in relation to the house, and therefore people try to dig a well as close to the building as possible, which is highly undesirable.

It is necessary to dig a well strictly in compliance with all safety rules and regulations, or you can turn to the services of professional specialists in this field who have everything you need to carry out this kind of work.

As a rule, digging a hole for a well can be performed by only 3-4 qualified specialists.

It should be noted that groundwater can have different levels of deposits - from a minimum level of 15 meters to a maximum of 50 meters. At the same time, you may encounter a very important problem, the fact is that in the process of digging a hole, you can stumble upon a thick layer of earth made of clay, which is very difficult to dig, and stones also add particular difficulty to this process. They are quite difficult to extract from the ground and transport to the surface.

However, it happens that the earth becomes very hard, and it is very difficult to extract stones from them to the surface, then sometimes the question is raised about stopping further work on building a well with your own hands.

Of course, in this case, you can use special equipment that will facilitate the work of extracting the soil, but you still have to manually dig until water appears in the well, while it is necessary to trim the walls for mounting round concrete rings that go down into the pit.

However, it often happens that in hard-to-reach places it is not always possible to drive special equipment to facilitate the work process.

How to determine the best location for a well
As a rule, to determine groundwater, the presence of wells in the immediate vicinity of neighbors is taken as the basis, they can always clarify the depth of the well, however, at a distance of only 1 km, groundwater can have different depths.
In exceptional cases, it is necessary to drill an exploration well for the presence of groundwater, however this method determination of water is very complicated, but this method is considered the most effective in determining the presence of groundwater.

How to choose the right time to dig a hole
Determining the time required to dig a hole for a well is also not an unimportant detail, because the availability of palatability water. So, for example, it is not advisable to dig frozen ground during the cold and frost seasons, but at the same time, water in lower layers does not arrive.
Note!


It is not recommended to dig a hole during the thawing of the snow cover, as well as during the flood, this is due to the fact that in the lower layers the soil is still well frozen, while its upper layers are in an excess of moisture.

Most best option according to the time when it is necessary to dig a hole for a well, this is the end of winter and the beginning of spring, since it is during this period that groundwater is at its lowest point.

Thus, you can find the most necessary depth for your site.

Well construction safety
Important importance must be given to safety when creating a well. And it is not necessary to strictly follow all the rules, because there is a high risk of getting some kind of serious injury or damage in the process.
Note!


- it is necessary to work in personal protective equipment, and this is a helmet, gloves and overalls.
- you need to make sure that the inventory tool with which you have to work is working.
- be careful and careful, do not rush.
- when removing the soil, use a strong bucket, which must be hooked onto a carabiner with a rope, in no case tie the bucket with soil to a regular knot, since there is a high probability of the bucket breaking and falling to the bottom.
- you can’t go down to the bottom of the pit without a safety rope, this is necessary in case the digger below gets any serious damage or methane poisoning, then an urgent and quick evacuation of the victim will be needed.
Mine digging work
Almost every well pit, without exception, is dug vertically down in a section of about two meters no more. dimensions pits are set along the circumference of concrete rings with a small margin.

The process of creating a well can be performed by a team of no more than 4 people, where you can change in turn during the work.

Of no small importance is the pit for installing the very first concrete ring, while in the pit the walls should be even and slightly rounded, and the bottom itself should have a flat surface.

After installing the first ring, they dig further under it, after which they put the second ring on it and under their weight they will sag. And so it is done until the first water appears, and then the dirty water itself must be removed from the pit.

Note!

As soon as the water begins to rapidly fill the pit, you must immediately stop work and leave the well pit.
The connection of concrete rings occurs as follows. As part of each ring there are special steel rods, as well as loops, which are interconnected by connecting bolts.

In the process of water arrival at the bottom of the pit, it is recommended to tightly lay small stones of medium size, after which, to level the floor of the mine, it is covered with fine gravel or crushed stone. At the same time, they can play a kind of role of a cleaning filter, so that when rising to the surface of a bucket of water, soil particles do not come across.


Not the least importance must be given to the removal or removal of the soil raised to the surface. After that, you can proceed to the manufacture of the head, which can be done in any form.

At the same time, recently it has been considered very popular to have a beautiful and unique headband that can decorate your patio as a decorative element.

Therefore, if you are planning to make a well in the country with your own hands, you will have to put in a lot of time and effort, but the end result is worth it.

If for some reason you have any difficulties, then in this case you can seek the help of professionals. Also in this article there are many illustrated bright photos of the well, perhaps something will be to your liking.

DIY well photo


(20
ratings, average: 4,23
out of 5)
 An important and necessary thing on the site is a well. Concrete rings protruding above the ground cannot please the eye, but how to draw water out - just with a bucket by a rope? We offer you to learn how to make a house for a well or improve it.
The well house will decorate the gate for the well. It is not easy to make it with your own hands, but you can, you need to choose the right log.
There are houses for sale and fences for a well, a roof, a gate - everything can be bought, but very expensive. There are cheaper ones, but nothing to look at. This is the main reason why people start making their own well house. You can dream up and do everything as you want yourself.
What are the houses
Main purpose of the house above the well - to prevent leaves, dirt, dust and any other contaminants from entering the water from the external environment. First of all, you need to install a tight-fitting cover on the well.
It is possible not to close the well only in one case, when water is used as technical water for irrigation. It is undesirable to drink such water, even if you are going to just wash the dishes, the well must be closed. The well must close tightly.
It is necessary to protect the well from any atmospheric precipitation: rain, snow, melt water. To protect from precipitation, a canopy is built over the well. In most cases, this is gable roof, it makes it easier to remove precipitation.
well house performs another function- protects from foreign penetration, well, at least it closes from children. Embed or hang a padlock, install a latch.
For easy lifting of water, install lifting gate on two stands. The simplest option is a log with a handle, a chain is attached to it.
open or closed
 At the very beginning, you need to decide which house is right for you, open or closed. The open version is cheaper. and will be easier to manufacture.
It will take a minimum of funds and materials. One has only to take into account one nuance: a shallow well in good frosts can freeze, but if there are no plans to use the well in cold weather, no worries.
Now, if there are such plans and it is necessary to use a well all year round need to insulate the house. The insulated well can also be open.
- If desired, you can use polystyrene foam plates for insulation. Available for sale required dimensions. We glue the rings, and decorate the outside of the plate with trim.
- The cover and overlap of the well are made of two to three layers of boards. Lay them perpendicular to each other, so there will be no gaps.
Closed house for a well
The closed version of the house is more difficult to make. Its dimensions are slightly larger than the well ring itself. The air cushion is already a good protection and insulation from the cold. If desired, or for a guarantee, you can improve the thermal insulation: by lining it with foam from the inside.
Material for manufacturing
 The well should look beautiful, but for this it makes no sense to fence something unimaginable. Enough arrange it in the style of the house, good in the same color, and even better - from the same materials.
If it is impossible to decorate the same with the house, or the house is not nearby, choose the finish in the style of the site or the environment. There is a great opportunity to show creativity, do as you want.
The vital question remains, from what material to construct the structure, wood or metal?
Naturally, the tree always looks beautiful, but the tree requires constant care and processing. Without proper attention, the tree loses its appearance and beauty, becomes faded, gray and ugly.
It is necessary to take into account the regular impregnation and processing of wood. At least once a year, you need to peel off the paint and apply a new one. If all this does not scare you - great, make it out of wood.
If this is not the case, take the iron. Can be satisfied metal frame or assemble the entire metal structure, this will be the choice of the owner. Consider a Good Option: Galvanized metal profile for the frame, and outside we sheathe siding. If the house is in this style, everything is very decent.
You understand how many materials there are - so many options for sheathing the house.
- We first make a choice of the type of well overlap - leave it open or close it.
- The next step is to choose the material for finishing and select to taste.
- We decide on the design of the house.
- We are going to buy material and make a house for the well with our own hands.
The most ordinary house on the well
 Roof structure above the well is quite simple. It has two racks located along the diameter of the well. They are supports for the canopy, they are also attached to the gate for lifting the bucket from the well. You can familiarize yourself with the scheme and feel free to use it.
Note that the racks were dug in after finishing the rings, this changes the order of work near the well, but does not change the design of the house.
Canopy racks can also be placed inside the ring, only the principle of fastening will change - it is more difficult to attach racks to concrete, you need a special tool.
We make a canopy of an open house
Collecting gable canopy over well. Initially, we make two side triangles of a given size. You will have to make the drawing yourself, the reason is banal: different rings - different sizes, they make home-made rings and even square ones, you won’t please everyone. It is necessary to take as a basis: the top point has 90º or 100º of an equilateral triangle, although the sides may be different.
You can make a design using the following materials:
- Galvanized profile;
- Metal profile pipe;
- Wooden bar.
If you make a roof and install it on a well without racks, the angle of the top point will have to be reduced to 75º. It will be necessary to install doors and make holes for the gate in the side walls.
For guaranteed protection of the well shaft from precipitation, the size of the overlap must be at least 20 cm larger than the circumference of the ring.
In a situation where the racks are already attached to the rings, you will have to change the order of work on the canopy. First, a frame is assembled that encloses the ring. This can be done from a 30mm board. Racks, it is quite possible to make from the same material. You will have to take into account the weight of the canopy structure, if it is large, it is recommended that the racks be made of 50 mm timber.
Everything is ready, we install the previously assembled roof rafters. Of course, it was possible to attach triangles to the racks, then fasten rafters and shalyovka. It is much easier to do this on the ground, and only then, ready-made, put it in place.
Last in line is the finish. We sheathe with a shalyovka or clapboard, and cover it with roofing material. Here, the boards are not the most suitable material for overlapping. If you cover it with damp boards, they will dry out over time and cracks will form - precipitation will fall into the well. Cover with dry boards, then they will swell from moisture and warp the roof, which is also fraught with water leakage.
To ensure the use of clean water, without impurities, build a house with doors, more likely to keep clean water in the source.
With our own hands we completely close the well with the house
A well shelter with a door is already a worthy house, and if put a lid on the neck, then even dust from the street will not get in. The simplest shelter with a door is started to be made from the frame. The finished frame is put on the ring and secured with anchors.
This is what the frame looks like. To make it, you will need approximately the same dimensions of the tree, without length, it will depend on the size of the ring.
- Two side racks from 100*200 mm;
- Two fastening bars, from the remains of racks 100 * 200 mm;
- fixing beam 30*60 mm
- triangular beam
The frame is assembled, the design is simple. We fasten the fastening bars to the ring and start to collect the pallet. We take floorboard, it is with a pin and is very suitable for flooring, there will be no gaps. Outside, we sheathe the frame with clapboard or plywood, any other sheet material will do.
For the normal operation of the doors, it is worth strengthening the support bars. Making one or two wings is at the request of the owner, one is always harder and it is always difficult for a child to open it, and it is difficult for women, although it all depends on the material.
We make a closed frame for the house
 Many simply hide the entire well in the house. In this case, the gate is taken out of the house and installed after complete assembly house. Racks are placed separately, and then the frame is assembled in place. Dimensions are selected so that the structure is easily installed above the well.
Height is selected individually: upper edge doorway, when leaning behind the bucket, should not touch the head. The gap should be approximately 20 cm, this will allow you to safely bend over.
You can make a frame using a galvanized drywall profile, sheathe it with metal tiles, and close the lower part with siding.
A galvanized profile is best taken from thick-walled metal. We collect two frames - the bottom and the upper level of the ring. We connect them with a profile for racks and get an approximate cube, with vertically embroidered sides.
Assembling the frame.
- We cut the guide profile sides, the “back” remains intact, later we will make a triangle.
- We cut off the rack of the required height, and fasten it in the center. You can move the central racks by 20 cm and get two unequal slopes. We install doors in a steeper slope, or in a gentle one.
- We take the incised two profiles and attach to B-pillar, we get the truss system. On the other hand, everything is exactly the same.
- We connect the top of both with a triangle with a transverse profile.
Preparing the doorway.
From the side selected for the doorway, two racks should be added. It will be good if inside each, insert a wooden block, attaching it with self-tapping screws. This will give a significant boost.
Starting to install the roof.
It will be very nice to sheathe plywood from the inside, and already outside, a profiled sheet or soft tiles. In general, everything is here. The lower part, as well as the sides of the roof, can be completely closed different material fit:

How to decorate well rings
With the canopy open, the top of the well looks good, and what to do with the lower part, how to decorate or hide, this concrete ring.
Can be stoned
The easiest and most popular way to decorate a concrete ring is with stones, pebbles or rubble. Well, everything is clear with the material, we know where to get it, but how to fix it and with what? Here are a couple of examples:
- It is necessary to purchase glue with which tiles and natural stone are glued. Bag 50 kg dry mix 300. All components are mixed in a dry state, diluted with water to a paste or thick sour cream.
- Fill the raw material with water and let it soak. We apply a thin strip of mortar around the circle of the ring, select stones and sink them, one by one, into the applied strip of mortar. Without waiting for the composition to harden, it is necessary to clean the stones from the remnants of the solution and wipe the seams.
- We buy cement M500 - 1/3 and 2/3 of sifted medium-grained sand. You will also need PVA glue, a third of the weight of cement, and water.
Desirable temperature environment+20°C, stock up on thick rubber gloves, this mixture corrodes the skin on the hands. It is worth immediately kneading a little, for the skill. Knead as much as you can work out before the solution begins to set.
The pasting process is the same as in the past: the stones are soaked, but the ring is already wetted, we apply the solution and press the stones. We quickly wipe and seal the seams.
Log cabin for a well
 You can build a log house on a well from logs. A house for a well, made of logs, will look very dignified. However, building a well with your own hands, without the necessary knowledge, is not easy to do.
It is easier to replace a log with a beam, and make a log house from a beam. The essence does not change, but it is easier to fold the castle, no special knowledge is needed, no special tool needed, and the bar itself is easier to buy.
If there is a well, you can get the first experience by arranging a log house around it. If everything works out with the well, you can proceed to the well.
Paying tribute to traditions or simply decorating the local area, the owners of suburban real estate decorate wells wooden houses of various shapes: from a simple extension roof with a door to a very solid log house resembling a gazebo. Dozens of companies offer luxurious products with carved elements in the form of animals and openwork ornaments, but it is much more pleasant to build an original house for a well with your own hands near the dacha. Walls made of timber or a wide roof also have a practical focus: they protect the water in the well shaft from debris that is carried by the wind. From a safety point of view, the house is also important: it serves as a barrier for children and animals.
Consider several projects of buildings made of wood - a natural, beautiful material that is very easy and pleasant to work with.
Whatever the project, the tool is always the same - the one that is needed for wood processing. So, before starting work, you should prepare:
- a circular saw, an electric planer (ideally, a woodworking machine, on which you can quickly and easily prepare all the details);
- hacksaw and jigsaw;
- hammer;
- Phillips screwdriver;
- nail puller;
- level, pencil, tape measure (at least 3 m).

For the construction of a well house, any tool for woodworking is suitable
Having previously made drawings of a house for and having made simple calculations, you can prepare material for construction in advance.
To build a wooden structure you will need:
- timber (rounded, glued);
- edged board;
- fasteners (self-tapping screws, nails);
- material for covering the roof (roofing material, flexible tiles, slate);
- hinges, handle and latch (if there is a door).
All wooden details should be adjusted to size, sanded, treated with protective compounds. Wood impregnated with antiseptics and varnished looks better and lasts longer.
Project No. 1 - a house with a gable roof
So, we are building a roof house for a well or a well, from which water is supplied to the house using pumping station. This is a small room to protect the head of the well rings, and a door is needed to control the operation of the pump, as well as to clean and disinfect.

House for a well with a door, built in the form of a large roof
Frame construction
The main material for the frame device is timber and edged board. Too voluminous parts will make the structure bulky, too thin - fragile, so you should stop at medium parameters: the beam section is 80 mm x 100 mm, the board thickness is 40 mm. It is necessary to prepare four racks with a width of 8 cm and four edged boards suitable for the lower and upper strapping, with a width of 12 cm. The boards are sawn to size in advance, then the strapping parts are alternately nailed to the racks so that the result is an even and reliable frame. You should pay attention to the fasteners: the length of the nails should be such that they firmly connect the two parts - about 10 cm.

The frame diagram clearly shows the attachment points of the upper and lower trim to the racks
The frame is easiest to assemble in the following sequence: first, connect the two racks with boards from above and below, then fasten the remaining two racks in the same way, place both structures around the well shaft and finally connect them to each other with strapping.
According to this project, you can build everything quickly and from improvised materials, since almost any of them - boards, beams - remain in the country during the construction of a house or bath.
Roof and cladding
The construction of the roof should begin with the installation of roof trusses - a rigid structure on which the crate will be attached. Better choose enough durable boards(at least 3 cm thick), the length of which is 180 cm - the height of the building will depend on the length of these boards. For the installation of the crossbar and jib, you will need a board of smaller thickness - 2.5 cm. There should be 8 pieces of jib, 6 pieces of rafters, 3 pieces of crossbars, each 30 cm long.

The distance between the elements of the crate should be the same
Work sequence:
- Having cut the rafters at an angle, their upper ends are connected to each other. Self-tapping screws are used as fasteners. Additionally, a crossbar attached 30 cm below the top point will help fix the location of the rafters. It is better to perform all actions by putting the parts on the ground.
- A cutout is made on the rafters in the place where they will be connected to the top trim boards. Connect the frame and rafters with nails (12 cm long).

Scheme of connecting rafters with the upper trim of the frame
- The installation of rafters is reinforced by installing jibs. Rafter trusses are connected using a kind of ridge - two boards, to which the crate is subsequently attached. The interval between the elements of the crate is 13-15 cm. The protrusions above both walls of the building are 10 cm.
- The constructed roof is covered with roofing material.
- Slate is mounted on the roofing material with special fasteners. Places of corner joints are covered with wind boards.
Door installation
The door to the house is a kind of plank shield, which is made in a simple way. Cut boards 85 cm long and 15-20 cm wide, fold one to one and fasten together wooden blocks with a section of 2.5 cm x 3 cm. Two bars are enough - one from below, the other from above. Self-tapping screws are used as fasteners, 4 pieces for each board. So that the door retains its shape during movement, and the boards do not “walk”, another bar is nailed diagonally - for rigidity.

The base and frame of the house are practically hidden under the roof, and the door is located above the base, above ground level.
After sheathing the gables, a handle and a latch are nailed, then the door is hung on the piano hinges. The final stage is the processing of boards from the outside with protective agents against mold and fungus, painting with varnish or special paint for wood to match the neighboring buildings.
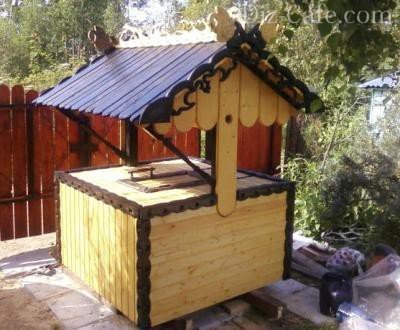
Project No. 2 - log house
The next creation is a house for a well made of timber, made in a classic style. rustic style. This design of the well can be seen in Russian villages. Rounded logs are folded in the form of a small log house - according to the size of the well, a wide roof is erected on top of two massive racks and a gate is installed to raise a bucket of water. The edges of the roof extend beyond the frame to prevent rainwater from entering the well. For stability, the racks are equipped with small props, which also play a decorative role.

This building has three main parts: a base-log house, a gate and a wide roof.
The protruding ends of the logs have figured cutouts, which also serve as a decoration for the structure. The roof is covered with waterproofing material of bright color.
To build you need:
- rounded log for a log house, racks and gates (dimensions are selected according to the diameter of the well);
- edged board for supports and roofs;
- roofing (slate, tile, roofing felt);
- material for a gate with a handle.

Gate scheme for a well with dimensions (they can be changed, but at your own peril and risk)
Project No. 3 - a hexagonal log house
This house is a variant of the previous building with some features. It differs in that the frame is not traditionally quadrangular, but hexagonal. The roof slopes vary in length, so it has an asymmetric appearance. The well is small in size, but its compactness allows the use of the structure with a shortage of space. practical and at the same time decorative element serves as a wooden wheel.

A decorative element - a wooden wheel - for convenience, can be replaced with a handle
This house can be used to decorate a mine with a pump or just to decorate the local area.
Building characteristic:
- height - 220 cm;
- base diameter - 120 cm;
- for construction, a rounded timber with a diameter of 100 mm is required;
- gable roof covered with edged board;
- the tree is treated with a moisture-protective composition on all sides.
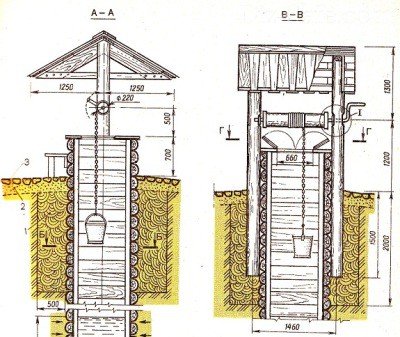
Drawing of a well with an equipped cap and a house
Examples of decorating well houses
You can decorate the building in several ways. The traditional way of decorating wooden buildings is carving. A neat carved house for decorating a well in the classic Russian style is suitable for all summer cottages where wood was used in the construction of the main house.
The base and roof of the well house are decorated with carved elements painted in a contrasting color.
Decoration also occurs by staining wood in various colors. Using impregnations or varnishes of different shades, you can give the structure absolutely opposite shades - from sunny yellow or bleached to dark brown, deliberately aged.
A selection of 6 would also be useful unusual ideas to design a well in the country:

Carved house for a well, decorated with a wooden figure of a bear
Sometimes an additional decoration is installed on the log house - a wooden or ceramic figurine of an animal.

House for a well with a decorative element - a wheel for a gate in a "marine" style
Of course, any country building- this is not just a decor, but also the embodiment of the views and taste of a person, so every owner knows how to make a house for a well so that it is both practically useful and reflects the individuality of the owner.