There are no suitable options in the store? Let's make a computer desk with drawers with our own hands. How to make a computer desk with your own hands quickly and at no cost Material for a computer desk
Computer desk not only hides massive computer parts (processor, subwoofer, etc.) and numerous wires, but at the same time provides enough space for disks, books and other small things.
There are enough desks for a computer in the store roads. Independent making a table will save a lot monetary funds and will not take much time.
Types of computer tables
Options designs a lot of tables for the computer. straight and angled, compact tables and entire ensembles, including, in addition to the computer desk itself, all kinds of lockers, nightstands, shelves.
There are several types special tables, destined to install on them. laptop, ultrabook, netbook.
Very relevant for small apartments Options for transforming computer tables too varied: table-cabinet, table-cabinet.
Yes, narrow closet does not take up much space, and, if necessary, turns into full-fledged computer desk and all constituents computers are in place, and you do not have to clean them every time.
![]()
Computer desk- pedestal

wall computer tables for laptop(netbook, ultrabook)

Mobile computer tables for laptop(netbook, ultrabook)

What can you make a table for a computer
 Great option - computer from wood. You can also use other traditional furniture to create materials:
- laminated sheets
- MDF;
- plastic;
- metal;
- glass.
Note! Metal computer desk with glass top optimal solution for high-tech interiors.
Calculation of the size of a computer desk
Difficulty in sizing corner computer desk, so first consider just this option.
Corner table dimensions
Factors that affect the size of the table:
- Tabletop width. The minimum width of the worktop is 50 cm (500 mm). Optimal size- 60 cm (600 mm).
- Section width(which are the table supports). Each table has a different section width. If it is a processor tray, 20–25 cm (200–250 mm). If the tray with drawers or door is 45–60 cm (450–600 mm).
- corner depth(where the person is located). The minimum size is 50 cm (500 mm), the optimal one is 60 cm (600 mm).

Are common table dimensions are calculated based on the above sizes.
Side overlaps - 5 cm (50 mm).
Minimum table size
- table top width 50 cm;
- corner depth - 50 cm;
- section width - 20 cm and 45 cm;
- 5 cm + 20 cm + 35.4 cm + 50 cm = 110.4 cm - length of one wing table;
- 5 cm + 45 cm + 35.4 cm + 50 cm = 135.4 cm - the length of the second wing.
Optimal table size
- table top width 60 cm;
- corner depth - 60 cm;
- section width - 25 cm and 50 cm;
- 5 cm + 25 cm + 42.4 cm + 60 cm = 132.4 cm - length of one wing table;
- 5 cm + 50 cm + 42.4 cm + 60 cm = 157.4 cm is the length of the second wing.
Straight table dimensions
 Dimensions direct computer desk calculated similarly. To do this, you need to know the width tray(or trays), working width places(50–60 cm) and overlaps(5 cm on each side).
Minimum table size
- with one tray:
5 cm + 5 cm + 20 cm + 50 cm = 80 cm; - with two trays:
5 cm + 5 cm + 20 cm + 45 cm + 50 cm = 125 cm.
Optimal table size
- with one tray: 5 cm + 5 cm + 25 cm + 60 cm = 95 cm;
- with two trays: 5 cm + 5 cm + 25 cm + 50 cm + 60 cm = 145 cm.
Height table varies from 70 to 76 cm.
Note! It is not recommended to make a table above or below the prescribed dimensions, as this will lead to an incorrect body position when working at a computer, the development and exacerbation of diseases of the back and spine.
Drawing of a computer desk with dimensions 
Materials and tools
 On one's own do computer desk is not difficult. To do this, stock up materials and tools that will be needed in the manufacturing process and assemblies.
In addition to the base material (chipboard, MDF) you will need:
- glue PVA;
- pair guides for a sliding shelf (length - 30 cm);
- self-tapping screws or confirmations(furniture screws);
- dowels for furniture - 4 or 6 pcs.
 You will also need the following to work. tools:
- pencils square;
- jigsaw;
- drill;
- screwdriver;
- hexagon;
- roulette;
- sandpaper;
- drill for confirmation.
Important! When cutting table parts made of laminated chipboard, be especially careful to cut rounded parts with an electric jigsaw so that there are no chips.
Straight computer desk
 Consider the manufacture of simple models.
Step 1. We cut and process wooden parts for the future table:
- side racks 735 x 465 mm - 2 pcs.;
- central rack 735 x 380 mm - 1 pc.;
- back wall 1090 x 290 mm - 1 pc.;
- countertop 1200 x 580 mm - 1 pc.;
- domestic shelves 450 x 250 mm - 2 pcs.;
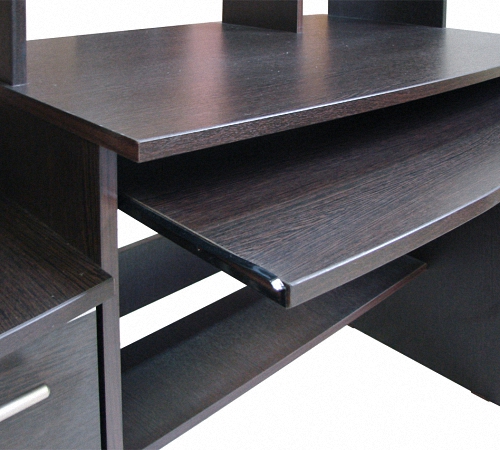
- retractable shelf 830 x 380 mm - 1 pc.
Step 2 in the side and central on the rack we make holes for confirmations: 4 for each shelf. We strengthen bottom shelf.

Step 3 Fasten in the same way top shelf.
Step 4 We fasten back wall.

Step 5 We fasten the second sidewall with the help of two confirmations. From the front it will look like this:

Step 6 Marking a place for guides and proceed to fix them. When choosing or making sliding shelves, you should remember about thickness guides (1 cm on each side).

Step 7 Fasten guides to shelf.

Step 8 Drilling small holes in lateral racks (under the dowels of the tabletop). Similar holes drilled into the table top. You do not need to drill through the countertop, but the depth should be not less than 25 mm.
Step 9 Lubricated dowels glue PVA, insert them into the ends frame table.

Step 10 We put the tabletop on top and insert the dowels into grooves.

On the surface of the table, also on the dowels, you can install shelves with drawers for small things, notebooks and disks.
Corner computer desk
Corner tables for the computer also come with superstructures and without add-ons.
Length wings:
- minimum - 110/135 cm;
- optimal - 132/157 cm;
- maximum - 166/200 cm.
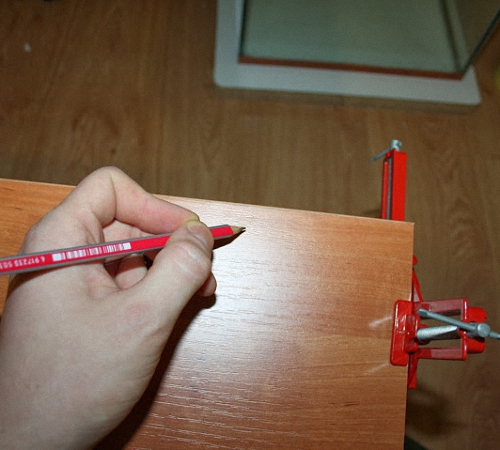
Step 1. Draw and cut everything details future table. If for the manufacture of the table are used not laminated materials, antiseptic.

Step 2 Cut out countertop. We collect side racks with shelves (confirmations). Right section (which is larger) can be with retractable drawers or with one door.

If a section is made with boxes, then on internal side of the side walls are pre-attached guides. Boxes are collected, which are also fasten guides.
Step 3 With the help of confirmations, he gathers angular table support.

Step 4 Attached to it is a rectangular frame with guides and a retractable shelf for keyboards.
Step 5 in the tabletop, lateral racks and corner support holes are made under dowels(2 pcs on each side and 1 pc on each side of the corner of the corner support).
Step 6 Dowels pre-lubricated PVA, are inserted into the side posts and corner support.
Step 7 Installed countertop.

The sections at the back are closed with walls made of Fiberboard. We cover the finished table varnish or paint.
Computer table decoration
 If in the manufacture of the table are used laminated wood sheets, then any special finishes not required. Process only visible ends details.
For this, a special edge ribbon. It is made from different materials and there are different colors.
The edge gives the product a finished and aesthetic appearance, and also prevents the release of harmful to humans from chipboard formaldehyde. On the ends of the parts, the tape is glued with iron.
How to make a computer desk with your own hands, see video:
The computer is firmly established in life modern man. It breaks news, provides relevant information, connects with business partners, entertains, educates, provides and gets the job done. A vast group of people has emerged who spend most of their time at the computer. Actively involved are remote workers who do not need a physical presence in the office, who have every opportunity to do their work without leaving their homes. For them, the workplace is a computer desk. The importance of a properly organized and equipped workplace is undeniable, but not everyone has the opportunity to create it. The reason lies in the lack of a suitable table that allows you to place all the accessories necessary for work in a convenient order. Often, users are not satisfied with the size or configuration that does not fit into the interior of the room. Long searches take a lot of time and effort, not guaranteeing positive result. People who know how to handle tools and materials, in such cases, begin to think about how to make a computer desk with their own hands, to create the best option for themselves. The procedure is not the most difficult, but some knowledge and skills will be required to implement it. Let's consider the question in order.
What is a computer desk
A computer is a complex of several elements, each of which must be placed in a certain order or in its place. We need our own platforms for the system unit, monitor, work plane for the keyboard and mouse.
There are more compact types of computers - a laptop, a monoblock - but they also need a work plane.

A computer desk is a combination of a desk, desktop with additional elements, the number and composition of which may be different. Depending on the needs and possibilities of the premises, small planes with two or three additional platforms can be used, or large sets that combine racks for working materials, hanging shelves and other useful and user-friendly elements. Also usually present drawers and closed cabinets, which combines computer tables with writing desks. The configuration of the computer desk is aimed at providing maximum ease of use, the ability to have access to any point in the workspace without unnecessary movements or movements that distract from classes.
What are the requirements for the design of a computer desk
A computer desk should provide convenience and comfort for the user. Design requirements:
- The most convenient configuration that provides the placement of a computer and peripherals and the ability to use it for its intended purpose without any preparation.
- The dimensions of the table should be user-friendly and optimally fit into the interior of the room.
- The overall design should also match the decor of the room, not stand out and not create unpleasant sensations.
- The composition of the elements that make up the table is designed for the most successful performance of work, classes or other actions with the computer.
The listed requirements are general, relating to all types and structural types of tables. For people of various professions, carrying out activities of one kind or another, some additional elements or functions may be required. For example, special planes may be required for the installation of instruments, equipment, placement of diagrams, drawings, etc.

Therefore, planning independent production computer desk, you should carefully consider its configuration and composition of work surfaces, the number of containers and shelves, drawers and planes. To provide your own requirements means to create the most suitable table for yourself, which cannot be found in finished form.
Types of computer tables
There are many types of computer tables:
- Classic (straight).
- Corner.
- Baby.
- Mobile (on wheels).
- With shelving.
- With open shelves.
- With closed drawers and cabinets.
In addition, there are different types table designs:
- Modular. The elements of the same type are used, allowing them to be compiled in an arbitrary order and receive various options designs.
- Prefabricated. A design that allows, if necessary, disassembly and subsequent assembly (for example, for moving, during repairs, etc.).
- Embedded. Such tables are parts of large furniture or structural arrays, performing their functions in their composition.
There are a lot of options, moreover, they can combine the features of two or three of these groups. There are no restrictions other than personal preferences and opportunities. People with developed artistic or creative abilities create exclusive, unique samples of tables made on the basis of various mechanisms, devices, objects.

Many use non-standard methods of painting or pasting surfaces, apply different variants structures, etc. Such specimens are created for an amateur, but many of them are very attractive in appearance and are able to decorate a room.
What are computer tables made of?
The most commonly used material for a computer desk is laminated chipboard. This material is most convenient for the manufacture of hull structures; it is not for nothing that it is called “furniture in rolls”. Chipboard is easy to process, for connecting or fastening various elements, all the necessary spare parts and accessories are sold. In addition, there is a huge selection of color options, allowing you to choose the option that best suits the rest of the interior of the room or the wishes of the user.
 Alternatively, you can use laminated MDF. It is close in its properties to laminated chipboard, but has a smaller filler fraction, due to which it is less fragile and not so prone to delamination when screwing fasteners. The principles of processing and assembly of these materials are almost the same.
Some craftsmen prefer stiffer, more durable designs. They use metal parts that can withstand significant loads. At the same time, only the frame of the table is most often made of metal, work surfaces are made of sheet materials(LDSP, LMDF, countertop for kitchen sets, plywood, etc.).
 In order to make a computer table with your own hands from metal, you need to have some skill in working with the material, the appropriate tools. Used as a frame steel pipes round or rectangular section, chrome-plated or raw (needing painting).
The most time-consuming option is a do-it-yourself computer desk made of wood. Working with wood is easier than with metal, but creating a finished product requires a large number of tools, materials, and consumables.
 Requires cutting, grinding, planing and Finishing work and other intermediate operations. You can perform these operations at home, but for family members, such actions can be quite a serious test. In addition, finishing work involves the use of paints and varnishes that emit a considerable amount of volatile components with a pungent odor that are harmful to health. A computer desk made of solid wood will be quite expensive, since you will need to purchase a lot of expensive materials, tools, and consumables. If all the work is done at the proper level, then the result more than justifies all the efforts made, the money spent.
Things to Consider When Designing a Computer Desk
Before starting work, you should create a working drawing, a table project. This is necessary in order to fully imagine the assembly order, calculate the amount of materials, accessories, and finally work out the design and configuration of the table. It is necessary to start the development of the project with general parameters - decide on the style, decide what size or shape of the table will suit the existing interior or room size, choose the optimal color, material, and other characteristics. Then you need to resolve the issue with the countertop - size, shape, material, one or more. This point is important because the countertop is not always made of the same material as the walls of the cabinets and other vertical planes. When planning to make a computer desk with your own hands, drawings, photos, diagrams, other information is easy to find on the Internet. Acquainted with existing options, samples are useful for implementing your own ideas.
Important! In the absence of experience or skills, you can use one of the design programs, such as Basis Furniture Maker or the like. The programs are simple, they guarantee against errors in the calculation of dimensions or fittings, determine marking points, and other important nodes. Upon completion of work finished drawing you can print it, get it in paper form.
What tools and materials might come in handy
The set of tools is determined by the material that is selected to create the table. At the same time, there is a certain mandatory list that is needed in any case:
- Roulette, ruler, square.
- Pliers, hammer, awl, screwdriver (under a straight or cross-shaped slot).
- Electric drill, jigsaw, grinder.
To make a table from chipboard or LMDF you will need:
- Iron (for gluing edging material).
- Forstner drill with a diameter of 35 mm for door hinges.
- Screwdriver with a set of bits.
For metal frame table must be used:
- Bulgarian with a cutting disc.
- Electric drill with a set of drills.
- File, sandpaper for processing edges.
You will also need materials:
- Fittings for assembling the body and hinged doors.
- Slider kits for drawers or keyboard surfaces.
- Edge material.
- Legs, support elements.
- Handles for doors, drawers.
Except the most necessary materials others may come in handy, not so important, but able to revive the product, give it an elegant, winning appearance. There are many options for how to decorate a computer desk with your own hands, in the absence interesting ideas look for photos online. samples, worthy of emulation, there is a great variety, something suitable will be found for sure.
How to assemble a computer desk
Assembly is carried out according to the working drawing. According to its specification, components are manufactured in the required quantity, processed in the necessary way, after which the table is assembled and installed in the allotted place. Takova general scheme making a computer desk. More specifically, table assembly can only be considered in relation to a particular material.
Making a table from chipboard or LMDF
Chipboard has sufficient strength and rigidity, so a table frame is not needed. For manufacturing you will need:
- Cut the component parts, guided by the specification of the assembly drawing.
- Glue the edges of the parts with edging material. A thin edge with a pre-applied adhesive layer or a thick vinyl edge is used, worn on the edge of the canvas.
- Drill at all the necessary points for the possibility of assembly, installation of fittings and door hinges. This item is the most responsible, requires accuracy, accuracy. It is recommended that you take the time to make a template in advance that ensures the accuracy of installing elements and drilling holes.
- Assemble a computer desk. Are used different ways assembly, with the use of confirmation, eccentric ties, screws, corners, etc.
- Install drawer slides or keyboard pads.
- Install handles, plugs, additional elements.
- Drill holes for wires (if necessary).
- Set the table in place, start using.
Making a metal table
Fully metal tables usually they don’t, they use only a metal frame. Alternatively, a base is created from metal legs and rectangular metal tubes. Work surfaces are most often made of laminated chipboard; recently, countertops from kitchen sets have become popular.
Assembly is done in two stages:
- Cutting and assembling a metal frame.
- Facing with horizontal surfaces (walls), installation of work surfaces.
The first stage can be done in an apartment, or in a workshop. If welding work is used, then it should be carried out in a specially prepared room or on outdoors. In the absence of a welding machine, bolted connections can be used, but this option is less accurate, does not provide sufficient compactness of the connections. Depending on the project, either a table frame or a complete table frame, shelving is assembled. If a chrome-plated tube is used, then welding is not used, assembly is carried out only on bolted joints or on special corner connecting elements.

The finished frame is installed in place, work surfaces, shelves, walls, and other cladding elements are attached to it. Usually structures of this kind do not have a large number closed cabinets, drawers, other additional elements. It is an openwork, light-looking design, free from unnecessary planes, that is used. This type of table looks good in a Hi Tech style interior.
Assembling a wooden table
Working with wood requires a large number of machines and equipment. The processing of wooden parts is noisy, very dusty, so it is recommended that only final assembly or finishing be done at home. All major operations are best performed in a specialized workshop, so you can achieve the best results.
It is quite difficult to make a completely wooden computer desk. It will take a lot of machine operations, tenon-groove joints, gluing and other actions that require the use of machines.
 Most often, combined tables are made when a wooden table top and external planes are created, and the frame and other load-bearing elements are made of rectangular metal tubes. In this version, the table looks like it is completely assembled from solid wood, but from the point of view of construction it is a metal frame, sheathed wooden shields. The assembly of such a product is no different from the already considered assembly of a metal frame, so there is no point in dwelling on it separately.
Finishing of wood is made by means of wood stains and varnishes. Given the specifics of the product, it is recommended to use matte varnishes that are not afraid of small scratches or scuffs that stand out on a glossy surface. In addition, matte varnish can be simply applied by spraying, while glossy coatings have to be sanded, polished, which takes time and skills. The varnish must be durable, resistant to mechanical stress. It is recommended to use a two-component parquet varnish, a polyurethane one-component varnish also showed itself well.
Self-manufacturing of a computer desk is made if necessary to obtain a certain shape, size or configuration. Take on the creation conventional models irrational, since it is easier to buy a ready-made sample without wasting time. Manufacturing does not require special training, it is enough to have basic skills. The main key to success is accuracy, thoroughness in detail, thoughtfulness of each step. Significant help in creating a project, in technical matters, can be obtained on the Internet, where there are a lot of images or drawings of finished products that are useful for understanding your own project.
It is difficult to imagine the life of a modern person without a computer, which requires a specially designated place in one of the rooms. A laptop or monoblock can be placed on any convenient plane, while stationary “smart” devices require computer tables. Due to the high cost in the retail network and structural simplicity, many are wondering - how to assemble a computer desk? And there is nothing complicated in this, if you build intelligently and in stages.
Types of computer tables
A computer desk is a multifunctional kind of cabinet furniture. People who constantly work at a computer at home cannot do without it. Without a convenient table, there is nowhere to place in one place:
- system unit and monitor;
- mouse and keyboard;
- speakers and router;
- folders and documents;
- printer and copier paper;
- stationery and discs for the accumulation of information.

All this is important to consider when thinking about how to assemble a computer desk with your own hands. An approximate diagram of a classic computer desk:
Designers and technologists have developed many types of cabinet furniture, including multi-seat computer tables. Even if the PC is used occasionally, you need a simple table where everything is at hand - with a place for a "system unit" and a sliding shelf for the keyboard. Or you will have to allocate a niche in the rack with shelves, providing a folding working plane. The choice of the shape of the tabletop depends on how you work for the PC:
- "riveted" look to the monitor;
- a lot of typing or playing games;
- often print documents;
- refer to a laptop or tablet standing on the side.
Look at examples and drawings of computer tables, the shape of the tabletop varies:
- simple rectangular;
- with a rounded cutout centered above the keyboard;
- with an arbitrarily curved line;
- L-shaped;
- U-shaped;
- U-shaped.
- curly.

It is not necessary to use wood, plywood or chipboard. Sometimes it’s enough to limit yourself to a high-tech frame structure - this is a tube frame plus a fixed table top made of any suitable material:
- plastic;
- thick plywood;
- laminated chipboard;
- thick display glass;
- veneered chipboard or thick plywood;
- finished worktop made of solid wood (natural wood).
You can also use parts old furniture, decorated in the form of tabletops on a computer desk with their own hands. But these are not all varieties of a table for a PC, since they are conditionally classified into subgroups according to their configuration:
1. A rectangular computer desk with a cabinet for a system unit is a classic version that came in the form of a desk transformation. But ordinary desk not very convenient for working at the keyboard, so the roll-out shelf turns it into a convenient functional place for working with a PC. When there is no need to use powerful speakers and various office equipment, this option is enough without an additional cabinet.
2. Corner computer desk, small, compact, takes up minimal space, very functional and ergonomic. One free corner in the room is enough to install a small product with great benefits of a work surface. It’s even convenient to have lunch here if you can’t leave your computer. It can be equipped in height with various hanging shelves along the entire height of the corner. Angle design makes it possible to use both wall planes and the corner for placement:
- auxiliary devices and office equipment;
- paper and stationery;
- collectible items;
- indoor plants.
For example, computer tables - photo:
3. Modular computer desk is a great invention for those who like to re-arrange the workspace. The set should have a basic set of modular elements:
- tabletop and sliding keyboard;
- pedestal under the "system unit";
- additional blocks;
- hanging shelves;
- corner sectors.
4. If there is no way to select permanent place for a stationary PC or laptop, it makes sense to opt for a compact mobile version. This folding table-transformer, where there is no table in the traditional sense, but there is a portable table top. This option has minimal dimensions and weight, but all planes are easily laid out. This workplace easy to carry and transport so you can keep working:
- in the country;
- on a picnic;
- on the beach in the shade, etc.
5. Table-rack in the form of a rack with a folding top and multi-tiered shelves. Very handy when the room is very small but there is plenty of vertical space along the wall. In this design, it is recommended to fold everything after work, completing it with a folding chair. At the bottom, it is convenient to install a turntable under the system unit in order to deploy it after work to the place where the feet are usually. A monitor is placed on the main stationary shelf of the rack, and a keyboard and mouse are placed on a folding tabletop. Shelves up to the ceiling - for the rest of the equipment.

6. A multi-seat computer desk is convenient in a family where there are several PC users and office equipment. Behind a common tabletop, 2-4 people can sit behind 1-2 monitors. If there is no suitable table for sale, it is difficult to find, ask how to make a computer table for several people. To do this, it is important to consider where the main units and PC users will be located.
Selecting the color of the table surfaces
The advantage of self-assembly of a computer table is the absence of restrictions when choosing:
- model and countertop configurations;
- dimensions (the dimensions of the computer desk are limited by the space of the room);
- complete with additional shelves and cabinets;
- countertop material and color.
Ideally, a computer desk should be in harmony with other furniture in the interior and match the style. The classic table has a lining under natural wood, regardless of the base, but can be monophonic, matching one of the leading shades of the room.
1. If the room is decorated in a modern style, there is a lot of equipment around, then a black lacquered computer desk is suitable, in harmony with a large plasma monitor.
2. A small table should match in color with other cabinet furniture.
3. for a dark room on the northern stolon, it is better to choose light surfaces of MDF, laminated chipboard or other wood-like finishes.
4. White or other plain type of surface should be in harmony with other items in the interior.
5. It will also be original if you choose any unusual color of the tabletop, cover the base with fabric, make an original print and varnish the image.

Computer desk made of prefabricated parts
Due to the fact that prices for computer tables are increasing all the time, it is advisable to make them yourself. A table that is bought in a store without assembly and delivery will be much cheaper than a finished one. It is sold in the form of separate packages for each block, but there is an instruction on any computer table that shows the assembly steps. It is not difficult to assemble it, but it is tedious to be careful not to confuse the structural and fasteners. For assembly you will need:
- trays for sorting accessories and small parts;
- a set of screwdrivers (flat, Phillips) or a screwdriver with different nozzles;
- assembly diagram (instruction) and a drawing of the finished table.
Self-assembly according to the scheme is a simple matter, but unhurried and painstaking, and requires attention and perseverance. When buying a table, it is worth clarifying who you can call back if clarification is needed.
Attention: Large furniture companies engaged in wholesale and retail trade have specialized consulting centers that work with consumers. It is beneficial for them to deal with buyers who decide to self-assembly. When buying from the manufacturer, you can also ask the managers whose phone numbers are listed on the official website - how to assemble a computer desk? Help and advice can be obtained at any stage.

Stages of assembling a computer desk for individual modules
Stage number 1. Lay out in a conspicuous place:
- tool;
- assembly details and accessories;
- scheme (instruction);
- the main structural details according to the marking packages.
Stage number 2. wooden details(or chipboard) are laid out with the inside towards themselves so that there are visible holes for assembly. Next to each block lay out the corresponding parts for fastening. Check the completeness - if there are enough parts, you can assemble each block separately. The tabletop is fixed last, if there are no reservations in the instructions, diagram or drawing. After the general assembly, all the screws are firmly tightened or the fasteners are screwed deeper and closed with plugs.
Stage number 3. The greatest care is shown when assembling the rotary modules and the sliding shelf for the keyboard. The guides must be strictly parallel and horizontal to the floor, the shelf movement limiters are placed behind. The assembly sequence is carried out strictly according to the instructions so that there are no defects. When the pull-out unit is ready, the side racks are assembled to prepare the base for the countertop.
Stage number 4. Connect all the blocks according to the scheme with a working surface (table top), put a sliding shelf with rollers on the guides. Install decorative caps. Fasten the back plywood on the back wall. Check again if the table is wobbly. If everything is fine - put in place and put all the parts of the desktop computer in their places, connect and work.

Worth considering:
1. Most models of computer desks are shipped unassembled from the warehouse, and you should ask about this when buying. It is important to immediately check the complete set, fittings and assembly scheme.
2. Materials that may delaminate during assembly are collected carefully, especially when using universal power tool because it is difficult to adjust the pressing force or drilling speed. Be especially careful that the nozzle does not make a through hole if there should not be one.
3. The easiest way is to assemble a cabinet, so it’s worth starting with it in order to master the process. It is more difficult to mount moving parts and guides for their movement.
4. The rear wall of the cabinet must be fixed - it serves as an additional component of reliable fastening. Handles and other fittings are fixed last, as they can interfere with assembly.
5. Table supports - pedestal, sidewall or metal pipe. The stability of the computer desk depends on the reliability of their fastening to the tabletop.
6. Some parts of modular structures can be stacked on top of each other or hung on the wall. However, modules cannot be stacked on top of each other without being secured with pins - one awkward movement, and parts of the case will fall along with office equipment.

Features of making a table for a computer with your own hands
If there is no desire to buy a ready-made computer desk, but you want to make it yourself, according to some special needs, then you will have to do all the details yourself. If we return to the beginning of the description, drawings of computer tables were outlined there, which are recommended to be used as an example. As a rule, in such drawings you have to make your own adjustments. With a creative approach, it is possible to borrow ideas and the best design details from each variety. For example, combine the advantages of a rack, a transformer and a corner computer desk.
After the final version is selected, sketches and drawings are made, it's time to move on to translating the meta into reality. In a building supermarket, we select material for the manufacture of our table and specify whether they provide services for cutting materials. Please note that you cannot do without precise cutting by a machine, especially when it is not an array, but pressed materials:
- finished worktop with trimming;
- MDF board;
- veneered plywood;
- laminated chipboard, etc.

When the store does not provide such services, cutting can be entrusted to any carpentry shop where there are special machines. Without drawings, no one will undertake to do according to a photo or drawing. Sometimes experienced craftsmen can take over the development of a drawing, but for a fee. But a good sketch with detailed dimensions can also serve as a basis for them to realize your desires. Don't forget to remind them to prepare the holes for mounting, and at the same time check what kind of fasteners to buy in the store. It remains to assemble your universal computer desk at home with your own hands. The quality of the assembly directly depends on a good tool and accuracy, especially when trimming.
Century modern technologies characterized primarily by an abundance of functional technology, the task of which is to make life easier for a person. Not the last place is occupied by computers and laptops. Agree, today you rarely meet a person who does not have this technique. This, of course, is good. But after all, a computer or laptop needs to be put somewhere and it’s not always the purchase of finished furniture the best option. And expensive, and you will not always find what you want to see in your room. There is a great way to solve this problem - to make a computer desk with your own hands. This is what we will do in our article.
Where to start
Before you make a computer desk with your own hands, you need to clearly imagine what you want to get in the end. In other words, you need a project. And if you are determined and want to get furniture at the end of the work, which will become a real solution, you should think it through to the smallest detail.
First of all, pay attention to the functionality of the table. Estimate whether additional shelves, drawers, special stands will be needed. Maybe it would make sense to make sliding shelves.
Next, it is important to consider the height of the structure. It is recommended to make a standard ordinary table for a computer with your own hands within 750 mm. These dimensions include the tabletop. For a child, you can choose a lower height.
Do not lose sight of the estimated size of office equipment and the number of items. Before you cut the shelves and make boxes, you need to measure everything with a ruler or tape measure. Then you don't have to redo it in the future.
And finally, it is necessary to take into account the general parameters of the room and the place where it is planned to put the furniture. It should be comfortable, the lighting should be correct. Only then the person sitting at the table will not feel discomfort during work. The same parameters should be taken into account if you want to make a table for a laptop with your own hands.
DIY table video
Materials and tools that will be required during work
Making a computer desk with your own hands is a laborious process that requires patience and attention. After drawing up the project, it is necessary to decide on the materials that will be used. Most often, tables are made from:
- natural wood;
A table for a computer or laptop made of wood is preferable to others, but at a price it will cost much more and it will still have to be varnished. MDF and chipboard - materials are much cheaper and not much inferior to solid wood. In addition, they perfectly tolerate high humidity and are insensitive to damage.
Which material to choose is a matter of taste. But the tool with which the work will be performed must be available. Most often, the usual set is used, which every man has, even a not very experienced master:
- hacksaw, electric jigsaw;
- Grinder;
- drill;
- screwdriver;
- chisel;
- roulette;
- square.
Naturally, this list may be slightly different, since it all depends on the design of a do-it-yourself computer desk.
Several ways to make a table for office equipment
As mentioned above, it is not necessary to have special building skills in order to make a computer desk with your own hands. There will be enough initial knowledge, desire and patience. For a more complete picture of the upcoming scope of work, we present several ways to make a table for a computer with your own hands.
Method one: a simple rectangular MDF table

For work, we need an MDF board with a thickness of at least 16 mm, a set of tools from the list above, self-tapping screws, glue, and accessories. First of all, we measure the place where the furniture is planned to be installed: width, length and depth. Based on these parameters, making a computer desk with your own hands, drawings are drawn up. Only after completing these steps, you can cut the MDF into pieces and mount the table further:
- Using a screwdriver and self-tapping screws, we fasten the side parts with guides.
- The side modules are assembled using dowels. Greater strength can be achieved using special glue
- We use MDF 4 mm thick as the back wall, we assemble the table walls into a single whole.
- Using the drawing, we cut out the elements of the boxes and shelves, make a fitting and fix the boxes with clamps. We process the side surfaces with an edge tape.
- On the underside of the tabletop of the computer table, we mark with our own hands the attachment points of the supporting pedestals. Using a drill, drill blind holes.
- Using screws, we fasten the cabinets to the inverted tabletop.
- We turn over, fasten the hinges, hang the doors and put the drawers and shelves in place;
- We fix the monitor stand using round wooden bars, piping and glue.
- We cover the made table with a primer, paint it in the desired color and begin to use it for its intended purpose.
Tip: in this way you can make a computer table from chipboard with your own hands and take any other material.
Method two: corner table for a computer

Now let's look at how to make a corner computer desk with your own hands. This work will require a little more attention, but the result will please - the empty corner of the room will function, and there will not be less free space.
So, for work we need the following tools and materials:
- screwdriver or screwdriver;
- drill;
- clamps;
- wooden dowels;
- electric saw;
- a knife sharp enough;
- iron, edging tape, ruler, square and pencil;
- joiner's glue;
- self-tapping screws.
As a material, we take MDF sheets with a thickness of 16 mm, and for support elements - hardwood.
To begin with, we measure the space and make a drawing, according to which we perform the detailing of objects.
If you do not know how to work with drawings, look for ready-made material. Do-it-yourself corner computer desk drawings can be found on the Internet.
Having prepared all the details, we adjust everything in size and proceed to the assembly, which must be completed in stages.
1. We assemble the side parts of the table on the dowels, fasten the guides for the shelves inside and the drawers that will be pulled out. You can strengthen the fastening with glue.
2. We fix the rear walls with self-tapping screws.
3. We process the side edges of all structures with an edge tape, gluing it with paper and a hot iron. Cut off the excess with a knife.
4. On the inside of the tabletop, we mark the places for the support pedestals, drill blind sockets. We turn the tabletop over and in this position we fix the cabinets.
5. Next, return the table to its normal position, fix the side doors, install drawers and shelves.
6. We fasten the upper structure of the shelves with ties and put it on the table, install a stand for the monitor.
7. The table is ready. It remains only to paint it to match the overall interior. Thus, assembling a computer desk with your own hands is not as difficult as it seems.
If there is a laptop in the house
How to make a computer desk on our own, we dismantled. But what if there is a laptop instead of a computer in the house? It would seem that the thing is quite mobile and does not require additional supports. But, as practice shows, lying in bed or on the sofa with a laptop in hand is not always convenient. Therefore, now we will make a table for a laptop with our own hands.
The easiest and free option
First of all, consider a design that does not require special building skills and not a penny. financial investments. It is tempting to make such a table for a laptop with your own hands. You can use parts of old furniture, remnants of repairs and other scraps of any building material.
Only three parts are required: 2 side pieces and a tabletop. Its size will depend on the size of the equipment. We will make a table top 270x660 mm. it is easy to cut, the main thing is to measure exactly.
With the side planks it will be a little more difficult: they must have a beveled side, which is attached to the table top. The dimensions of the side walls are 270×205×255×280 mm. it turns out that the back of our table will be raised by 280 mm, and the front, lowered by 205 mm. Thus, a small do-it-yourself computer desk for a laptop will have a slope, which will make it very comfortable to work with.
The side parts are attached to the tabletop with self-tapping screws and additionally reinforced with small corners. This enhances the strength and reliability of the structure. It remains only to paint or finish it to your taste and preferences. There is nothing difficult in such a design, and if a person likes to work out or have fun reclining, then why not think about how to make a table for a laptop with your own hands.
Another way: a folding table for a laptop

The folding table design is a little more difficult to make, but if you often have to move from place to place, you should think about how to make a laptop table comfortable and mobile. You will need the following materials and accessories:
- countertop material;
- material for the side walls;
- screws or screws;
- 4 folding fastenings having a clamp.
As a material, you can use any that is available. We cut out the tabletop 600 × 400 mm, side legs - 400 × 310 mm. Using a ruler and pencil, mark with inside countertops of the mounting location for the legs. We make holes for the screws, we fasten everything securely and that's it - our do-it-yourself computer desk, the photo of which you see is ready.
Under no circumstances do not forget to fix the folding structure in the desired position. Be sure to remove the latch when folding the table.
As you can see, there are a lot of ways to make a table for a computer with your own hands. The article dealt only with the most accessible and simple. But there are craftsmen who are able to create such furniture that you will not find in any store.
Well, for clarity, watch the video on how to simply and quickly make a computer desk with your own hands, using the information of which you will cope with the problem easily and naturally.