Do-it-yourself foundation for a stone bath. Do-it-yourself foundation for a bath: we make our own strip foundation for a bath. Foundation for strip foundation
The construction of a bath begins with laying the foundation. From how well it was done, the entire period of its operation depends. An important role is also played by the choice of its type. It must not only withstand the main structure of the building, but also perform the functions of hydro and thermal insulation.
In order to lay the foundation for a bathhouse with your own hands, you will need to follow the technology and perform the work in the correct sequence.
Preparatory work
Before earthworks you should choose a place for the construction of a bath. Usually, a site is selected that is remote from outbuildings, closer to the reservoir, if any, the windows are displayed on the sunny side, and the doors are located in such a part of the building that what is happening in the bath is not visible from neighboring sites. At the same time, the soil must be dense in order to reduce the cost of concrete and reinforcement. The presence of groundwater close to the surface is undesirable, and construction on a peat bog or fine sand is generally excluded.
To find out the required depth of the base, you should contact surveyors who can give a qualified assessment of the terrain and layers of the earth. But many do otherwise - they themselves dig a hole and roughly estimate its bearing capacity.
Note! Under the bath, a hole will have to be dug 2/3 of the depth of the foundation for the house, taking into account the sand and gravel cushion.
- In the selected place, the surface is cleaned of debris and vegetation.
- Then the required area is marked with pegs, and only after that the foundation pit is dug. The geometry of the pit depends entirely on the type of foundation chosen, but is performed along the perimeter of the bath.
- Mark the site starting from one of the corners of the bath. A wooden peg is driven in, and then the length of the structure is counted from it in one direction and a second peg is driven in there. Then, at a right angle to the future wall, the required width of the object is measured from the starting point. At the end, measure the distance to the fourth corner.
- A rope is pulled over the pegs around the perimeter for the convenience of earthworks.
- After that, in accordance with the construction plan, a separate hole is dug in the proposed location of the furnace for pouring the base of the furnace.

Note! Two main types of foundations are installed under the bath: tape and columnar. Both of them are able to provide a long service life for a bath, but they have a significantly different consumption of building materials. To save finances, a columnar one is erected on dense soil, and a tape one is used on loose and loose soils, as well as in the construction of heavy structures.
The columnar foundation is a separately dug-in pillars around the perimeter of the bath, and, if necessary, inside the perimeter. Pole material can be selected according to its availability and cost in a particular region of residence. The most common are wooden, brick and monolithic pillars.
Wooden poles. They are the easiest to install, their installation will take a minimum amount of time. Although it will take some time to shrink.
A tree of dense species is suitable, which does not have knots, cracks and other defects, and is fairly even along the entire length. It is desirable that the outer surface of the logs is not cut, because, otherwise, the post will not have natural protection from external influences, and it will deteriorate much faster.
Note! Before using logs for construction, they should be properly dried and then treated with antiseptics and a waterproofing layer.
They are installed at intervals of 1.5–2.5 meters along the perimeter, depending on the size of their section. If this distance is exceeded at the bottom of the pits, additional fastenings will have to be constructed so that the strength of the structure is not lost. The optimal diameter is 50-60 cm.
If it is necessary to strengthen the supporting structure inside the allocated area, poles are also installed at a similar interval.
Note! The depth of the pits for the pillars should exceed the freezing depth by 30–50 cm.
The disadvantages include:
- significantly shorter service life compared to other materials,
- flammability
- susceptibility to rotting with increased dampness,
- susceptibility to damage by insects and rodents (which is why the poles should be impregnated with appropriate protective mixtures, qualitatively, in compliance with the instructions for use).
Monolithic pillars. They are the most durable and strong.

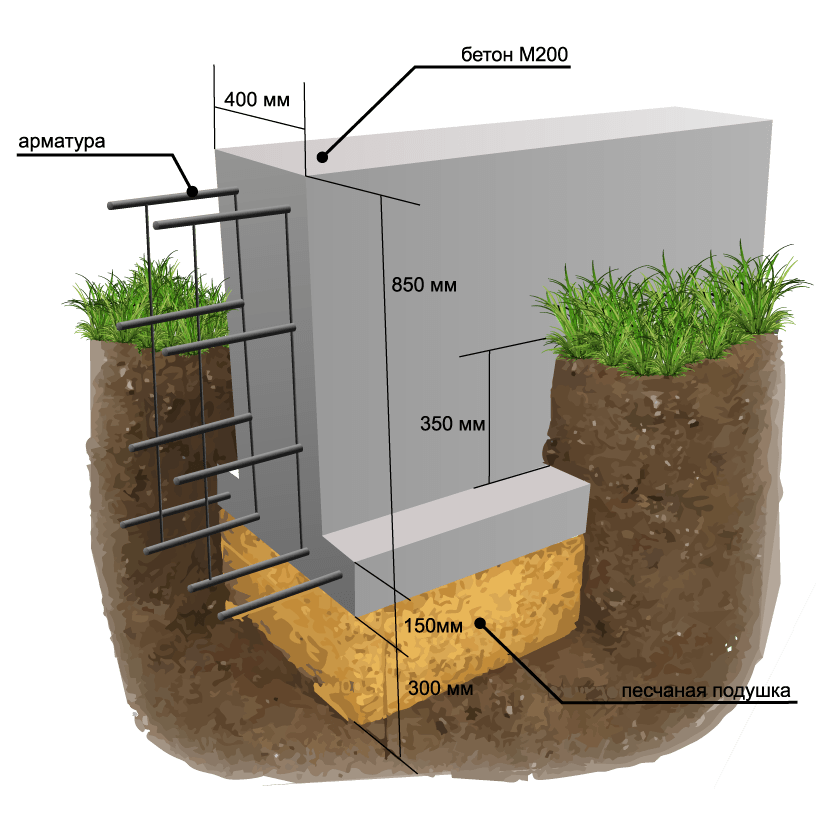
They are able to withstand significant loads, but are unstable to freezing of the soil, so they must be buried in the same way as wooden ones, and a pillow of sand and gravel should be laid on the bottom, with a thickness of each layer of 20 cm. Installation of high-quality waterproofing is required on the sides. As a mold for a monolith, you can use asbestos-cement pipes with a diameter of up to 25 cm, which will solve the problem of installing formwork and will perfectly cope with the waterproofing function.
Fill method:
- A pillow of sand is poured into the drilled well, and then of gravel.
- The pipe is lowered to the very bottom, after which the concrete solution is poured, and the column rises to a certain height, as a result, the solution partially leaves the pipe, and a fixation with the ground is created.
- After the concrete has begun to set, the pipe is no longer held, the solution is added from above in the volume of the poured out and reinforcement is inserted.
- Do the same with the rest of the columns. The curing time ranges from a few weeks to a month, depending on the conditions. environment.
The main disadvantages of this type are its high cost and the complexity of installation for people who do not have experience. concrete work, as well as the possibility of working only at temperatures above +5°C.

Brick. To install a brick column foundation, you will need to dig a pit in order to have access to the masonry. A sand and gravel cushion is installed at the bottom under each of the pillars. A small concrete layer is poured on top of it, which is carefully leveled horizontally using a level.

The brick should be laid out immediately after the mortar has set. Red hollow and silicate bricks are not suitable for these purposes. When laying, it is necessary to observe the evenness of the rows and the verticality of the masonry. Optimal size poles for a bath - in one brick with dressing. For masonry, reinforced concrete blocks with dimensions of 60 × 60 cm can be used. After laying out the pillars, they are coated with waterproofing mastic on the outside. This type is economical and durable.
Tape
The strip foundation is capital and suitable for the construction of a bath on most soils. The work on pouring is somewhat larger than during the construction of a columnar one. Material costs will also increase. But the strength of the structure will be significantly higher, and there will be no distortion of the bath or cracks in the walls, of course, subject to the construction technology.
Note! In some cases, special additives are used in the concrete solution to increase its resistance to high moisture and sudden changes in temperature.

Brick
The first brick option is the most successful both in terms of performance and cost. To install it, as in the case of the construction of a brick columnar foundation, you will need to dig a foundation pit with a similar depth. General order construction is as follows:
- Along the perimeter of the bath, a sandy, and then a crushed stone pillow with a thickness of up to 20 cm is covered.
- They ram it and lay it out brickwork, as well as in the case of building walls with ligation of subsequent layers.
- The laying is performed in this way:
- apply a thin layer on the surface of the brick cement mortar,
- another brick is placed on top, pressed tightly, and the remaining mortar is removed,
- on loose soils, a reinforcing metal bar is laid every 2-3 layers.
Note! The thickness should be 10 cm wider than the walls being built, so they put it in two bricks. Waterproofing is laid on both sides of the wall.
From reinforced concrete blocks
Laying the foundation for a bath of reinforced concrete blocks is not rational, since the blocks have high cost and significant weight, however, construction work can be carried out at any ambient temperature. Such a bath base is formed using special equipment, since the blocks have a significant weight.
- A trench breaks out under the blocks along the perimeter.
- A sand and gravel pillow is laid on its bottom, it is rammed.
- The blocks are carefully lowered to the bottom.
- Before installation, the blocks should be covered with waterproofing mastic.
- The seams formed between adjacent blocks are sealed with concrete mortar.
Note! Before continuing with the construction of the bath, you will have to wait a few weeks until shrinkage occurs.
Concrete
The foundation for a bathhouse made of concrete will require a significant waste of money and time. This is due to a significant increase in the complexity and number of ongoing work. With proper filling, it will last a long time. The depth of the pit should be below the freezing level of the soil.

Before pouring the concrete solution, you need to install a pillow at the bottom of the pit and prepare a formwork suitable for the thickness of the walls. Most simple option formwork will be knocking down unedged boards in an amount equal to the perimeter of the bath. However, this method has a significant drawback, which is expressed in the absorption of water by wood, resulting in a lack of moisture in concrete and loss of strength properties. If possible, it is better to build a metal formwork. It is laid along the perimeter of the bath, and then the concrete is poured.

Note! The solution should be poured in layers and evenly along the entire area in layers of 20-30 cm and leveled with a shovel to remove air spaces and ensure uniformity of the structure. On loose soils, each layer should be reinforced with a metal grating in increments of up to 10 cm and a bar thickness of up to 4 mm.

If you can rent a vibrator or have your own, then they should go through each layer to compact the solution. Each dive must be accompanied by a penetration into the previous layer and last at least several minutes. The distance between immersions should be small - up to 50 cm, while it is advisable not to touch the formwork. When all layers are filled, the surface is leveled using a level and a rule.
After a few days, the solution sets and the formwork is removed. The foundation will be ready for operation in a month. During hardening every 4 hours the surface should be moistened with water. To prevent moisture from evaporating quickly, or in the event of precipitation, the building should be covered with a film. It is also undesirable to get direct sunlight.

If work is carried out in autumn or spring, then concrete is protected from sudden changes in temperature. protective materials, cover.

In some cases, it may be necessary to build a slab foundation. Its construction is more expensive, therefore it is advisable to fill it in cases where the construction of columnar and tape types of foundation is impossible.
For oven
When building a bath with a brick oven, a separate foundation will be required, since the load per unit area will be significant. The technology of its laying is similar to the tape monolithic type. The depth must be at least 70 cm, taking into account the laying of the layers of the pillow. In terms of area, the pit should exceed the dimensions of the base of the furnace by 10 cm. This is done in order to prevent soil displacement.

Note! If you plan to install a metal furnace, then you do not need to make a separate foundation for it, since its weight is negligible for the entire structure. It will only be necessary to lay additional beams under it so that the floors do not sag.
When planning the construction of a bath, many factors and nuances should be taken into account and given due attention to them. At the heart of any bath is the foundation, and it largely depends on how long it can stand. On the other hand, there is a desire to save on building materials. Therefore, before making a base for a bath, you should evaluate the estimated weight of the structure and perform all the work in stages. A well-thought-out course of construction will guarantee that the constructed facility will last for decades at minimal cost.
Bath is a building that must be present on any personal plot. The foundation for a bath is the first thing construction begins with.
The main types of foundations for installing baths on them are tape, shallowly recessed, pile-screw and columnar. To give the building an original appearance, in some cases, trees can be used as pedestals, but this is more an exception than a rule.
Which better foundation under the bath to choose depends primarily on the type of soil on which construction is planned. If the area is marshy or has difficult terrain, the ideal option is to equip pile foundation for a bath, while the grillage should be located above ground level.
This design securely holds the frame of the bath. Another advantage of this type of foundation is its openness, due to which the air flows passing under the bath floor dry it well, thereby preventing it from being damaged by moisture. The disadvantage of the design is that in order for the floor in the washing or steam room to be warm, it must be additionally insulated.
For that area where the soil is slightly heaving, sandy, are popular shallow-depth strip and column foundations. Column Foundation under the bath is used to reduce construction costs, since the arrangement of the tape is much more expensive.
Advantage strip foundation- this is the minimum pressure on the soil, a closed underground space, as a result of which the floor in the bath will be much warmer. In order for the underground space to dry out, they make products. If desired, this space can be covered with loose insulation and made from the side of the floor, which will increase thermal characteristics baths.
Tape foundation for a bath it is worth choosing in the case when the bath is not made of wood, but brick or foam blocks, due to the fact that such a design will have a much greater weight compared to wooden frame. Since the bath is a small and not complicated building, you can make it on your own. Let's take a closer look at how to build a tape-type foundation for a 4x6 bath on our own.
Do-it-yourself ribbon shallow foundation for a 4x6 bath
The main stage in the construction of a foundation for a bath is the calculation of materials and strength characteristics of the structure. And if it is rather difficult to calculate the strength, such calculations are carried out by professionals, taking into account the density and moisture content of the soil, climatic and other conditions, then the amount necessary materials it is quite possible to calculate it yourself.
Calculation of the amount of materials
To do this, it is necessary to determine in advance the dimensions of the future structure, and then calculate the volume of the foundation using the formula from the school textbook.
When the volume is known, calculate the required amount of materials to produce the required amount concrete mix it will not be difficult, since there are many online calculators on the Internet that offer such services and with their help it is very easy to calculate a shallow strip foundation.
The next stage after the calculation is the preparation for the work.
Preparatory stage
At this stage, it is necessary to clear the site for construction and prepare the tool. To make a strip foundation for a bath with your own hands, you will need to have:
- Roulette, to measure the required distance;
- Building level, to control the installation of formwork and leveling the plane of the foundation;
- Chainsaw for sawing boards and making formwork;
- Screwdriver for mounting formwork;
- Shovels, for sampling the soil and preparing the batch;
- Concrete mixer electric or mechanical;
- The necessary materials - sand, cement, crushed stone and rubble stone, must also be prepared in advance.
Bath foundation marking
 Marking the location of the foundation is one of the important stages in the process of erecting the foundation for a bath. To carry it out, you will need to prepare a sufficient number of wooden pegs, which will indicate the corners of the building. After the pegs are prepared, you can proceed directly to the marking.
First you need to determine the position of the foundation relative to other buildings located on the site. Then the first side of the building is marked and pegs are set to mark its boundaries. Further, a distance equal to the second side is laid off from the pegs. This distance must be temporarily marked by setting the pegs by hand so that they can be easily removed and moved.
Now that we know the distance of both sides, we need to align the diagonals. To do this, the diagonals are alternately measured and the stakes are transferred. After the diagonals are aligned, you need to check the length of each side again.
Important: in no case should you neglect the equality of the diagonals, because, if this requirement is neglected, the foundation will have the shape of a rhombus, therefore, the corners of the building will not be 90 °. In the future, such structural irregularities will be reflected in the laying of the log house and the construction of the roof.
After the external marking is carried out, it is necessary to carry out the internal one. To do this, a distance equal to the width of the future foundation is measured from each side and the lace is pulled.
Soil sampling
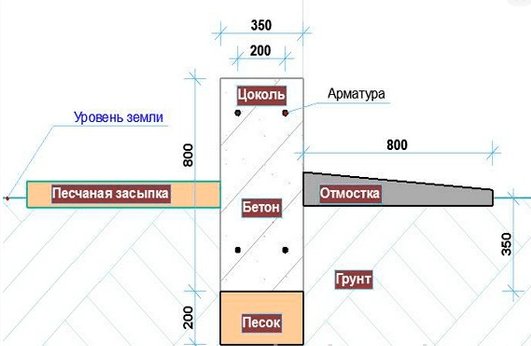
To organize a shallow foundation, it is not necessary to choose soil to a great depth. The planting depth is not critical, the main thing is to equip a sand cushion under it to compensate for swelling of the soil, and also arrange a warm one around the foundation.
The width of the blind area should be equal to the depth of freezing of the soil in the place where the construction is being carried out.
sand cushion
To make a pillow, sand is poured onto the bottom of the trench, after which it must be leveled and compacted. The layer of sand should be at least 15 cm. For better compaction, the sand in the trench should be poured with plenty of water and compacted again. 
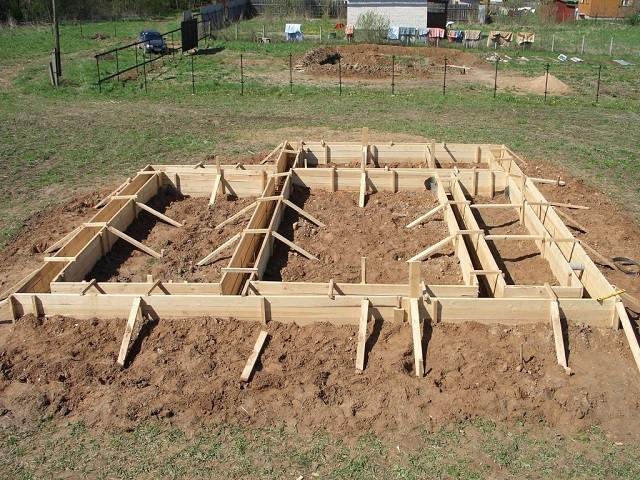
Formwork installation
Before pouring the foundation under the bath, it is necessary to set the formwork. For a shallow foundation, it can be made from edged tess. To do this, it is cut into segments of the required length, equal to the length of each side. Then, with the help of a hammer and nails, shields are knocked together from identical pieces of boards. As jumpers on shields, it is convenient to use short pieces of tesa.
It is necessary to prepare shields both on the outside and on the inside. Once they are ready, you can install the formwork according to the dimensions indicated by the stakes. First, the outer side is exposed and fixed with the help of wooden stakes and spacers, then the inner side. To fix the width, both sides of the formwork are fixed to each other at a certain distance using a transverse rail and self-tapping screws. This needs to be done in several places. 
The last stage of formwork preparation is installation of fittings inside it and marking with the help of laces, stretched over the entire length of the formwork, top level pouring concrete. Of course, many people ignore this process due to the fact that the load on the foundation is small. But the technology provides to reduce the load and increase the strength of the structure.
Concrete preparation and strip foundation pouring
As a rule, depending on the required strength of concrete, the proportion of the mixture of sand, crushed stone and cement can vary significantly. To select the strength and, accordingly, the brand of concrete, it is necessary to calculate the weight of the future building. Weight wooden bath small - concrete grade M100 is suitable (concrete marking means the weight that it can withstand per square centimeter in kilograms).
The proportion for the preparation of M100 concrete is as follows: 1 kg of cement, 5 kg of sand and 7 kg of crushed stone. For the convenience of preparing the solution, you can pre-weigh one shovel of each of the components and convert the proportion into the number of shovel. This will allow you to make batches much faster.
To prepare the mixture, it is desirable to use a concrete mixer and prepare the mixture according to the following algorithm.
Bath - a traditional building on the site. Most owners of suburban real estate are thinking about its construction. But before starting work, it is required to prepare a reliable foundation for the bath.
There are several design options. The choice between them depends on the following features:
- geological conditions (type of soil, location of groundwater);
- the climate of the area;
- the size and number of storeys of the building;
- the need to equip the pool;
- operating features.
These factors must be taken into account before the design begins.
Before you make a foundation for a bath, you should understand its important differences from the main house. Here it will not be about sizes and materials, but about the features of use, which include:
- frequency of heating;
- high humidity and the presence of washing.
Unlike a residential building, the bathhouse is heated only during direct use. Therefore, problems with foundations can arise not only in winter (the effect of frost heaving), but also in the off-season. In warm weather, the underground structures of the building remain unheated, and condensate can settle on them. Moisture leads to mold and mildew.
Proper insulation and waterproofing is the way to solve problems. To protect against the cold, it is better to use extruded polystyrene foam in conjunction with modern waterproofing materials(membranes, roll insulation, etc.). To build a foundation for a bath for many years, you need to provide the following steps of thermal insulation:
- floor of the first floor (on the ground or on the floor);
- outdoor vertical surface foundation;
- insulated blind area.

Foundation insulation
The presence of a washing room requires a competent organization of the drain. To do this, a foundation is made for a bath with a drain, water is collected and diverted to a septic tank, drain hole, drainage well, pit or on an open area of soil (ground filtration method). The choice of abduction method depends on several factors:
- intensity of use of the bath;
- type of soil on the site and the depth of freezing;
- the ability to connect to the sewer system of a residential building.
The easiest way to discharge wastewater is if a slab or tape type foundation is provided (with floors on the ground). More difficulties will arise when using columnar and pile structures. In this case, the diversion system is thought out during the construction of the grillage or floor slab of the first floor. There are two most common options:
- slab grillage in the washing room and steam room;
- fastening under the floor of a galvanized sheet with a drain of the sewerage system.
Read more about how to arrange a drain in a bath on stilts.
Important! In winter, the soil under the bath freezes completely (due to intermittent heating). In the underground grillage or columnar foundation sewer pipes needs to be insulated.

Drain organization.
Choosing the type of foundation
When making a decision, the following features of the structure and site should be taken as a basis:
- soil heaving, groundwater level;
- proximity to a reservoir;
- material of walls and ceilings;
- site landscape;
- the need for a swimming pool.
Before you make the foundation for the bath, you should read the table below.
| Peculiarities | Recommended type of foundations |
| Pool availability | Caisson monolithic slab, strip foundation (often buried) |
| High groundwater level, location on the shore of a natural or artificial reservoir, strong elevation changes on the site | Piles (metal screw, reinforced concrete bored). When using reinforced concrete, temporary dewatering may be required for the period of pouring piles. |
| Bath according to frame technology on non-rocky soils* | Pillar foundations |
| Bath on heaving soil* | Shallow-depth tape with measures to protect against frost heaving (insulation, waterproofing, drainage, cushioning and backfilling with non-foaming* material). |
*According to SP 22.13330.2011, heaving bases include clay soils, fine and silty sand, coarse rocks with small particles. Conditionally non-rocky soils include coarse or medium fraction sand, coarse clastic soils.
You can visually determine the type of soil on the site. To do this, you should familiarize yourself with GOST 25100-2001, which provides definitions for all types of bases.
slab foundation
The slab has a high bearing capacity, avoiding the need for flooring on the ground. This type of construction can be used when the GWL is located at a distance of more than 50 cm from the surface. To prevent frost heaving, the sole of the foundation is insulated and a warm blind area is used. The construction of a slab structure allows you to avoid the development and removal of soil, but it is worth considering the increased costs of materials: concrete and reinforcement.

- foundation marking;
- removal of the fertile soil layer (about 20 cm);
- backfilling of a pillow made of non-porous material (sand, crushed stone);
- sole insulation with extruded polystyrene foam (penoplex);
- waterproofing;
- formwork installation;
- laying reinforcement;
- pouring concrete;
- curing;
- removal of formwork (if necessary).
The tape base is perfect for baths made of brick or concrete blocks. The design can be shallow or deep. It is worth noting that the second option can be the most expensive of all the possible foundations for a bath. Construction features include:
- the need to carry out a full range of measures to combat frost heaving when the sole is supported at a depth less than the freezing depth;
- a large amount of earthworks;
- inability to use at high GWL (the distance from the water horizon to the base of the foundation must be at least 50 cm).
The strip foundation can be monolithic or prefabricated. For private construction, monolithic technology will become preferable, since prefabricated blocks can weigh up to several tons.

The order of work is as follows:
- breakdown of the foundation;
- soil development (digging trenches or pits);
- drainage device;
- backfilling of a cushion of sand or gravel with layer-by-layer compaction;
- formwork installation;
- reinforcing work;
- pouring concrete;
- concrete care and stripping works;
- insulation and waterproofing;
- backfilling;
- blind area device.
pile foundation
Easiest to use as supports screw piles. They are low cost and do not require dewatering measures. Usually use products with a diameter of 108 mm (suitable for wooden or frame bath). The advantages of piles include the possibility of using at high GWL, heaving and weak soils, and the absence of earthworks.

According to the cut of the piles, it is required to make a grillage. It is recommended to use a combined option: in the washing and steam room, a slab-type grillage, in other rooms - a beam. This will allow you to easily provide for the discharge of wastewater and avoid unreasonable financial costs for construction.
It is important to take into account the small bearing capacity of the pillars. A columnar foundation is cheap compared to a tape and a slab, but it is recommended for construction only if there are solid foundations on the site (medium or coarse sand, rocks). Pillars are made of brick, concrete blocks or monolithic technology.

Foundation for the furnace
A well-built foundation is not everything. When erecting, it is necessary to take into account the design of the furnace. If you plan to install a furnace, support can be performed on the main foundation. In the presence of tape, columnar or pile supports in the floor structure, additional beams are provided to avoid excessive deflection.

Under the brick oven, it will be necessary to provide a separate support made of monolithic reinforced concrete. Only in this case the made furnace will stand reliably. The small foundation should not be connected to the main one.
Before you properly make the supporting part of the bath, you will need to carefully study the features of the site and recommendations in each case. It is also important to take into account the economic component and avoid unreasonable cost overruns.
The foundation is the basis of any structure, and the bathhouse, with its high humidity and drainage features, requires special arrangement of such a foundation. How to lay the foundation with your own hands for a bath, so that it lasts as long as possible, delighting its owners, and will be discussed in the article below.
If you plan to build a bath from bricks or blocks, it is best to equip the base from a solid, solid tape or tape-column reinforced foundation. If the construction of the structure is lighter, that is, it will be made of timber, logs, or it will be frame, then the correct foundation for the bath in this case will be a columnar, pile or shallow tape.
In order for the foundation device for the bathhouse to be determined as correctly as possible with your own hands, it is advisable to create a project and do everything necessary calculations according to the required amount of materials, structural strength, take into account thermal and technical aspects, and so on. Find out in advance which foundation is best for a bath, and make your choice.
The main thing with all this is to follow the step-by-step instructions for the foundation of the bath with your own hands.
The device of the strip foundation for the bath
This type of foundation is used most often. It is not difficult to pour a strip foundation for a bath with your own hands, the main thing is not to forget to lay communications.

To complete the entire list of works, you will need to acquire the following:
- tools for earthworks;
- pegs, cord and measuring devices;
- formwork;
- steel fittings and knitting wire;
- ready-made cement mortar or everything for it self cooking: tools, containers, concrete mixer, ingredients for cement mortar;
- sewer pipes;
- a construction stapler or self-tapping screws and a tool for screwing them in;
- moisture-repellent material - mastic and roofing material.
Preparatory stage
First you need to decide where the bath will stand. You should study the landscape and choose the future type of sewerage. Eg, cesspool and the septic tank should be located away from water intakes, water sources and neighboring properties. If the bath drain is connected to a centralized sewer, the bath can be built in any area of the site. If there is a river, pond or pool nearby, then the distance from it should be about 30 meters.

Recommended for preparatory stage decide how you can hide the area around the bath from prying eyes. If a fence is installed, then you need to make preparatory markings. The same should be done if trees or shrubs are planted.
At this stage, you will additionally need to remove upper layer land and level the area. Most likely, this will require special equipment.
Marking work
The markup is carried out according to the existing bath project. It will consist in marking the external and internal lines of future walls.
To mark the outer parts of the walls, you need to get a construction square, cord, tape measure, pegs and a plumb line. Controlling the vertical level with a plumb line, we drive the starting stake into the point where one of the corners of the building will be located.
After that, according to the same principle, 4 more pegs are driven into the ground, while controlling the accuracy of the angles. We check the correctness of the diagonals of the perimeter of the building. If they are the same, you can proceed to markup internal parts walls, otherwise, we adjust the placement of the stakes, constantly rechecking the parameters of the sides, the correctness of the angles and diagonals.

Further, a cord is pulled from one stake to the next. Its horizontal level will indicate the height of the foundation. To check the stretched cord, you need to use a level, after which you can begin to mark the inner perimeter along with partitions.
To properly make the foundation for the bath house, you need to step back from the outer perimeter exactly the width of the tape base. We drive stakes into the ground and pull the cord again, while using a plumb line, tape measure and construction square. Also, the cord marks the places where the partitions will be installed.
Excavation
We have decided how to properly mark the foundation for the bath, now, in order not to damage this marking, you need to slowly dig trenches for the future foundation. Its depth will depend on the type of soil.
Further, in order to build a foundation for a bath with your own hands, you need to tamp the bottom of the moat, for this you can use a vibrating plate or a manual rammer, while you need to make sure that the base is even, for this you can use the hydraulic level.
After this operation, you can begin to fill our trench with sand.

The thickness of this layer varies and can be:
- up to 7 cm - in the case of using a shallow foundation;
- up to 15 cm - when using a deep foundation;
- up to 40 cm - in case of laying a floating foundation.
A layer of sand should also be placed horizontally, tamping and watering well. If it is planned to lay a large layer of sand, then these processes should be carried out in stages, dividing the total layer into smaller layers of 5-7 centimeters. It is allowed to continue work after 2-3 days, after the pillow is completely dry.
Formwork creation
Formwork can be made from boards, boards, slate, fiberboard and other similar materials. It is worth noting that plastic and steel panels can be rented, which to some extent will simplify the work of erecting formwork. The selected material is best wrapped in polyethylene so that it can be used again in the construction of other objects.
The formwork is mounted inside the trenches, outer part which are propped up with polymaterial and stakes. In the gaps between the walls of the formwork, transverse struts made of wood are inserted, and metal studs in increments of 50 centimeters. This is done so that, due to the mass of the solution that will be filled, the shields do not move apart. The shields need to be fastened to the ground, 20-centimeter nails are suitable for this, but they can be fastened together with self-tapping screws or a stapler.

Holes for sewer pipes and other communications in the shields must be done in advance, otherwise, after the concrete has hardened, it will need to be drilled, which will adversely affect the strength of the foundation.
It is worth noting that if you do not use a film to protect the wood formwork, use glassine by attaching it with a stapler. It will not allow moisture from liquid concrete to quickly soak into the wood, so the finished foundation will not crack.
Foundation reinforcement
The reinforcing structure is made of reinforcement, with a thickness of more than 12 mm - for longitudinal laying, and 6-8 mm - as a perpendicular and vertical laying. To make a reinforcing belt, you will need: a grinder, a welded wire, a welding machine and a tape measure.
The design consists of more than four longitudinal, perpendicular and vertical reinforcing rods. The complete structure should be supplemented with formwork, while the finished foundation should rise 5 cm above the ground. Additionally, the corners should be reinforced, and a rectangle or square should be obtained in the cut of the reinforcing belt.
The next step in the process of how the foundation of the bath is made is cutting the reinforcement of a certain length, after which the longitudinal and perpendicular rods are laid out on the ground and connected with wire at the points of contact. It is undesirable to weld the frame, because because of this there is a high probability that it will lose its integrity during the compaction of the poured solution or during the operation of the finished bath in the future.

Longitudinal reinforcement is laid with an overlap of 30 cm and connected.
The gaps between the perpendicular and vertical reinforcement should be equal to or less than 50 cm. If a strip foundation is laid, having a width of 120 cm, then it is desirable to make a frame that has not two, but three longitudinal reinforcing bars.
The same should be done if the foundation has a large height. In addition, in the upper part of the frame it is worth strengthening with U-shaped clamps, which serve to increase the strength characteristics of the belt and minimize the chance of cracking the strip foundation.
The frame in the corner parts must be supplemented with reinforcement placed at 45 degrees to the horizontal bars.

After the frame is completely ready, it is placed on plastic supports. In order to prevent the frame from moving at the time of pouring the mortar, plastic fasteners are additionally fixed between it and the formwork.
The process of pouring a strip foundation for a bath
The main rule that determines how to properly make a foundation for a bath is to fill the formwork in one day to obtain monolithic concrete. This means that if you do not have a concrete mixer, then it is better to purchase a ready-made cement mortar of the M200 or M400 brand. Be sure to make sure in advance that he can be driven directly to one of the sides of the foundation.
With your own hands, you can mix the cement mortar using the following material:
- 1 part of cement M400 or M500;
- 3 parts sand;
- 4-5 parts of pure gravel.

You need enough water to get the consistency of medium fluidity.
The solution is poured into the formwork in layers of 20 cm, each of which is leveled with shovels or trowels. At the same time, it is pierced with a reinforcing bar or compacted with a vibrating drill. This process is needed to eliminate voids and bubbles from the thickness of the solution. For this purpose, it is necessary to additionally tap the formwork walls.
If the pouring of the solution ended in the evening, then at night the foundation, as well as in the rain, must be covered with plastic wrap. In the daytime, it must be watered. After the concrete has hardened - after 2 weeks - the formwork can be removed. Next, leveling and grinding of the foundation surface is carried out. But for further construction work it will be possible to proceed only after a month after pouring.
The last step will be laying a moisture-proof layer of two layers of roofing material glued to bituminous mastic.
From the above material, you learned how to make a foundation for a bath with your own hands. If you approach the work correctly, the foundation will turn out to be strong, and the future bath will stand for a very, very long time.
The arrangement of the foundation is one of the first and most important stages of the construction work. Any building needs its own foundation, be it a light barn made of boards, compact bath, small frame house or a huge private mansion made of stone materials.
Among all the existing varieties of supporting structures, strip foundations have gained the most popularity: they are suitable for use in a wide variety of conditions, are relatively simple to arrange and, on the whole, conscientiously cope with all the tasks assigned to them.
File for download: SNiP 3.02.01-87 EARTH STRUCTURES, BASES AND FOUNDATIONS
After reading the information below, you will get a complete picture of the existing varieties of strip foundations and their areas of application, the requirements for such structures, study the theoretical aspects in relation to each key stage in the construction of such a support and step-by-step practical instructions with illustrations.
- construction of relatively light (frame, log) and heavy (cinder block, brick, concrete, stone, etc.) buildings;
- construction of buildings with a basement, an underground garage and other similar premises;
- construction of baths and houses with attic floors;
- performing construction work on sites with heterogeneous soil.
The base under consideration is almost completely universal - it will not be possible to equip a concrete tape except on a peat bog or subsidence soil. Be sure to take this moment into account when independently arranging the supporting structure and familiarize yourself with the key requirements for strip foundations.
Download file: SNiP 2.02.01-83. Foundations of buildings and structures
Basic requirements for strip foundations
The main characteristic of the strip foundation is the depth of its occurrence. When choosing a suitable value, firstly, the nature of the soil at the construction site is taken into account, and secondly, the type of building for the construction of which the concrete support is being equipped. Information regarding these points is given in the following table.
Table 1. Required depth of the strip foundation for a bath, cm
| Building under construction | rocky soil | Dense clay and loamy soils | Sandstones consisting of compacted dry sand | Silty soils, soft sandstones | Very soft sandstones, silty soils, sandy loam | Peat soils |
|---|---|---|---|---|---|---|
| Compact one-story bath | 20 | 30 | 40 | 45 | 65 | |
| House-bath with an attic | 30 | 35 | 60 | 65 | 85 | Strip foundation is not used |
The table shows average values. In general, it is better to specify the required depth of the strip foundation in individually, fully assessing the climate features at the construction site and the characteristics of the site itself (soil type, groundwater penetration depth, etc.).
Types of strip foundations
Currently, there are many varieties of strip foundations. They are used in various construction works and have a number of design differences, but are built in general according to a similar technology.
The simplest type of support under consideration is tape monolithic belt.

The design is mainly used in areas with high level groundwater during the construction of small light buildings. Well suited for a compact frame bath, for example, 3x3 or 4x4, which does not create a significant load on the base.
The second type is non-buried strip foundation. In fact, it is the same tape monolithic belt, only the concrete part of the structure itself is placed on edge here.

This type of foundation is characterized by increased high bending strength, which makes it possible to place buildings that are more serious in their characteristics, for example, from logs, on a support.
Important! No stone buildings can be placed on a monolithic belt and a shallow foundation.
The third type of supports under consideration - shallow strip foundation.

The design is used mainly in areas where the groundwater level passes at a depth of more than 1 m. Approximately half the height of the concrete part is buried in the ground. If groundwater passes above the mentioned mark, there will be no point in arranging a shallow-depth tape: in this case, drainage will have to be done, which is fraught with additional labor, financial and time costs.
The fourth type is .
The first tape here lies on its side, the second one stands on the edge. Such a bundle forms a very rigid structure. Stone houses can be placed on such a foundation. As a rule, there is no point in using a T-shaped foundation when building a small private bath. The recommended depth is from 1 m. An important condition for the arrangement of such a supporting structure is the absence ground water over the entire depth of the tape, because under the pressure of the liquid, the foundation is deformed and collapsed, which will make the operation of the structure installed on top impossible.
The fifth type of the basis under consideration - strip buried foundation.

The minimum depth is 1.5 m. specific meaning determined by the depth of soil freezing - the base of the concrete structure should be below the mentioned indicator.
| Regions | Depth of soil freezing, cm |
|---|---|
| Vorkuta, Surgut, Nizhnevartovsk, Salekhard | 240 |
| Omsk, Novosibirsk | 220 |
| Tobolsk, Petropavlovsk | 210 |
| Kurgan, Kustanay | 200 |
| Yekaterinburg, Chelyabinsk, Perm | 190 |
| Syktyvkar, Ufa, Aktyubinsk, Orenburg | 180 |
| Kirov, Izhevsk, Kazan, Ulyanovsk | 170 |
| Samara, Uralsk | 160 |
| Vologda, Kostroma, Penza, Saratov | 150 |
| Voronezh, Perm, Moscow, St. Petersburg, Novgorod, Ryazan, Tambov, Tula, Yaroslavl | 140 |
| Volgograd, Kursk, Smolensk | 120 |
| Pskov, Astrakhan | 110 |
| Belgorod, Kursk, Kaliningrad | 100 |
| Rostov | 90 |
| Krasnodar | 80 |
| Nalchik, Stavropol | 60 |
Video - Types of strip foundations
Theoretical aspects of independent arrangement of the strip foundation
Before considering step by step technology self-pouring the foundation for a bath, you are advised to study in detail the theoretical aspects, key requirements and related comments regarding the implementation of each stage of the forthcoming work.
After defining suitable parameters strip foundation in accordance with the conditions of a particular construction event (information on this matter was given in the table and on the diagrams of existing types of support), they begin marking the site, having previously cleared it of debris and, in general, everything that may interfere with further work.
In addition to debris, the upper ball of soil is removed to a depth of about 12-15 cm. Marking is generally carried out in the traditional way: wooden or metal pegs are driven into the corners of the future structure and a rope is pulled between them. The latter will make it easier
navigate when determining the direction of the foundation strip.
Very convenient option is to perform markup using a rundown. An example of markup using such devices is shown in the following image.

Markup begins with the notation outer contour grounds. In this example, the foundation for a bath with dimensions of 5x6 m is marked out. On all sides, the area for arranging the base should be at least 40-50 cm wider than the directly supporting structure.
Specifically, in this example, the dimensions of the marked area were 6.6x7.6 m. The calculation is carried out according to the Pythagorean theorem, according to which the square of the hypotenuse is equal to the sum squares of legs. The hypotenuse (AC) for this example is calculated as follows: √(5600²+6600²). The result is a value equal to 8656 mm.
We draw a base line equal to one of the sides of the future base. In the example under consideration, segment AD equal to 5600 mm is defined as the base segment. Most often, when performing this event, the most important side of the future building is marked first - it is made parallel to a certain direction, for example, the line of another building, a fence, etc. For example, we define as an important line AB, equipped in parallel
in relation to the house at a distance of 5 m from it. Corner point A is removed by 2 m from the fence. From t. A, set aside segment AD and drive into it extreme points pegs or fittings.
To determine point B, we need a couple of ropes. We make loops at the ends of each rope. We throw the first loop on the peg / rod, equipped at the location of point D. We use such ropes along the length so that after they are tensioned between the axes of the driven pegs, the values equal to the previously mentioned 6600 mm and 8656 mm are provided, in accordance with the above drawing.
After pulling the rope, we draw arcs on the ground. First we draw an arc with a radius of 6600 mm from point A, the second - 8656 mm from point D. At the intersection of the drawn arcs, point B is located. Here you need to drive in the second peg / rod.
To determine point C, we use the same technology. The only difference is that from t. A an arc is drawn along the length of the diagonal, from t. D - along the side of the rectangle. We measure the diagonals of the resulting rectangle. Ideally, they should be the same length. The maximum allowable deviation is 1-1.5 cm. We stretch the rope for marking, stepping up from the ground about 20-25 cm, successively bypassing each bar / rod. With such a tension height of the cord, it will not interfere with the installation of cast-offs.
To determine the remaining external nodal points, we simply measure the segments, or we use the above technology in accordance with the foundation drawing, guided by the ropes. Inner contour as well as anchor points bearing walls are marked after the arrangement of the cast-off.

Let's get started with the installation. It will provide a temporary indication of the axes outside the trench and will allow control zero level designs. In addition, the presence of a cast-off makes carrying out all preparatory activities easier and more convenient.
The installation of cast-offs is carried out around the entire perimeter around the supporting structure. Between each side of the perimeter and the installed castoffs, a distance of about 1-1.5 m is maintained so that there are no inconveniences in the process of excavation.
We find the highest corner point of our site, for example, A. The first cast-off will be installed here. We take three beams (10x10 cm are enough) and drive them into the ground in accordance with the drawing. It is important to ensure the most reliable fixation of the columns. Using a pencil or other suitable device, we mark the zero level of the future bath on the column. To do this, we step back from the ground 60 cm up and draw a line indicating the zero level.
Armed with a screwdriver and a level, we fix a pair of boards measuring 4x15 cm on the driven posts. It is important that the upper edges of the fixed boards strictly coincide with the previously applied zero level and are located in a single horizontal plane. In a similar order, we mount posts and boards in each corner and along the length of the perimeter. We transfer the zero level to each installed column, focusing on the zero level of the very first cast-off. In the end, we make sure that the upper faces of the fixed boards are located in a single horizontal plane. For this we use a level.
We proceed to the final markup. First, we alternately pull the ropes along the outer contour. To do this, we start the rope on the upper edges of the oppositely located cast-offs and pull it, orienting strictly along the rope of the lower contour. After the final alignment, we drive nails into the boards and tie the cords with high quality. In the same way, we mark the entire outer contour. As a result, the upper contour should coincide with the lower one. We make sure that our diagonals are equal. In the absence of deviations, we stretch the remaining ropes along the extreme edges of the walls of the erected support structure. We mark on the cast-offs the required thickness of the walls and the width of the gaps between them, drive in nails, pull and tie the ropes.


Markup of external and internal walls building. Scheme

At the same stage, you can mark the foundation for sauna stove. In accordance with the requirements of building technology, there should not be a rigid connection between the supports of the furnace and the main building. Having coped with the markup, proceed to earthworks.
trench digging
In accordance with the markup, a trench is dug to a predetermined depth - recommendations on this matter were given earlier.

trench digging

start digging from the lower corner of the supporting structure - this way you will achieve the same depth of the pit along its entire length;
try to keep the walls of the trench as vertical and even as possible. In places where the soil is crumbling, install temporary supports;
regularly check the depth of the pit and the indicators of the slope of its bottom for the absence of drops.
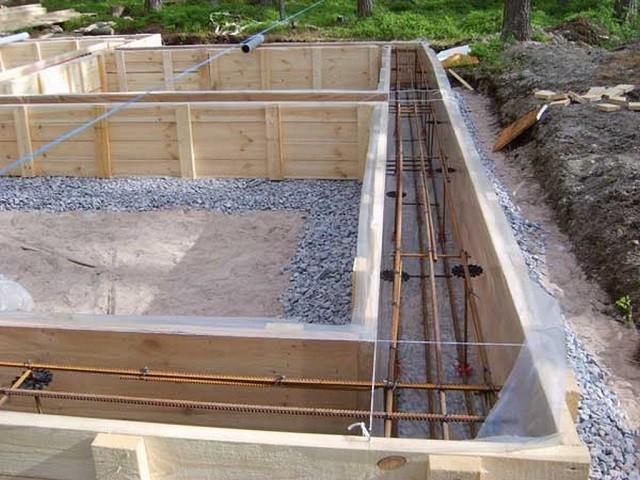
After digging the pit, proceed to the arrangement of the backfill. The thickness of the sand cushion is from 15-20 cm. The backfill is spilled with water and carefully compacted. Thanks to this structural element, the correct distribution of loads from the future structure to the supporting structure will be ensured. The view of the backfill as part of the structure is shown in the following image.

Important! Backfilling is done in several layers. The recommended thickness of each layer is 5 cm.
A layer of roofing material is laid on the finished sand cushion. The material will protect the backfill from erosion and prevent the concrete mixture from seeping into the sand during the pouring of the foundation.

In the photo - roofing material under reinforcement
Additionally, the roofing material will take over the functions of waterproofing the lower part of the supporting structure. For greater efficiency, the insulating material should be wrapped around the walls of the excavation by about 15-20 cm.
Prices for roofing material
ruberoid
Formwork installation is one of the most important stages of the work in question.
The structure can be collapsible (dismantled 3-10 days after pouring concrete) or fixed (remains part of the foundation, providing additional insulation).
For the manufacture of collapsible formwork are used wooden planks. Individual elements are screwed into shields the right sizes. Finished shields are vertically installed in the trench. The height of the above-ground base part directly depends on the height of the formwork protrusion above the soil surface. As a rule, adhere to an indicator of 35-40 cm.

The fastening of individual shields is carried out along their crossbars. From the outside, the elements are supported by pieces of wooden beams. Be sure to check that the upper part of the formwork is in a single horizontal plane, i.e. there were no differences in height, otherwise the foundation would also turn out to be uneven.
A dense polyethylene film is laid in the finished formwork, covering the structure from the inside. Attach polyethylene to the end sides of the formwork panels.
For Assembly fixed formwork polystyrene blocks are used. The elements are stacked on top of each other. The fastening of individual blocks is carried out by means of jagged cutouts and grooves. Blocks of different sizes are available for sale, which allows you to choose them for any foundation.
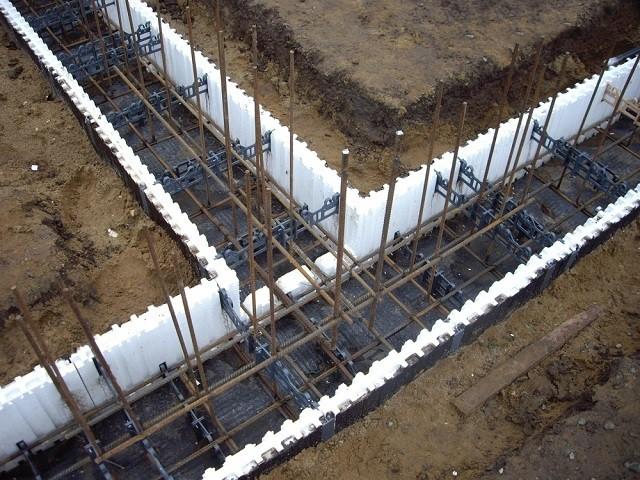
Blocks do not need additional fastening. Spacers are also not needed.
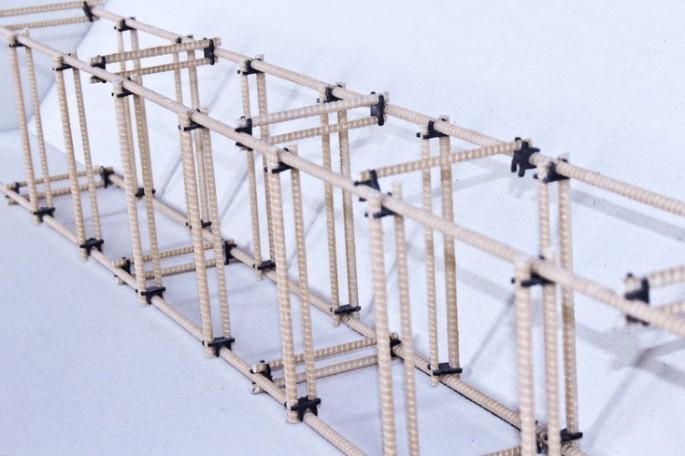
Reinforcement
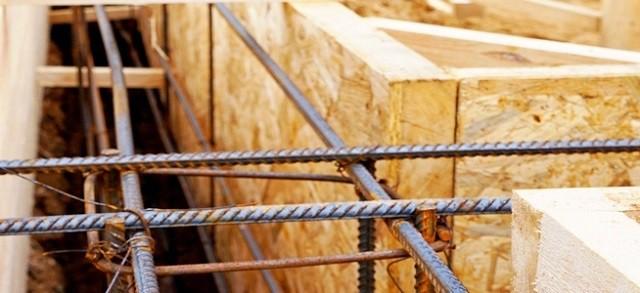
Reinforcement is carried out using steel bars with a diameter of 8-15 mm, depending on the expected load that will be created by the future bath, the dimensions of the foundation and the key characteristics of the soil.
The reinforcement is cut into rods along the length of the walls and tied into a mesh using a special wire. It is strongly not recommended to use welding for this - during the shrinkage of the structure, the reinforcing mesh may collapse.
At the request of the owner, the fastening of the bars can be done with special plastic clips (clamps) - this is a simpler and faster option.

fill
It is better if the concrete is poured in one go, however, in conditions of independent construction, it is often extremely problematic to prepare the required amount of the mixture at once.

In view of this, concrete will either have to be ordered ready-made, or look for other options for solving the problem by pouring the solution in layers. The standard scheme is as follows: on the first day, a horizontal layer of 15-20 cm thickness is poured and carefully compacted with a wooden beam. It is important that the thickness of the layer along the entire length of the formwork is the same, and the top of the pour is even. The next day, work is carried out in the same way. The process will be repeated until the formwork is completely filled with concrete.
The filled structure is covered with a plastic film - this will prevent it from drying out too quickly and cracking. Periodically, the polyethylene film is removed, the concrete is poured with water from a hose, after which it is again covered with insulating material. The base will dry for 4-5 weeks. The formwork is dismantled on average 5-7 days after pouring, sometimes after 10 days. In conclusion finished construction is waterproofed. This point will be discussed in more detail later.
In order for the finished foundation to be of the highest quality, perform the work on its arrangement in compliance with key building recommendations.
Firstly, in the case of self-preparation of the solution, use materials cleaned of clay, soil and other impurities for this.
Secondly, choose the right proportions of the solution specifically for your case. In general, crushed stone / gravel is always taken approximately 1.5-2 times more than fine aggregate, i.e. sand. Detailed information regarding the possible compositions of concrete will be given in the practical part.
Thirdly, add the optimal amount of water to the solution - about half the weight of the cement. Additionally, consider the moisture content of the raw materials. For example, if you are forced to use wet sand, the required amount of water will decrease accordingly.
Fourthly, do not forget to process the fill to remove excess air from it - important for thick solutions. It is enough to pierce the fill with a metal rod along the entire length.
Fifthly, after pouring concrete, the formwork must be tapped with a wooden hammer - this will also remove excess air.
Practical aspects, or step-by-step instructions for pouring the foundation
For example, consider the procedure for arranging a non-buried strip foundation - one of the most popular options, perfect for structures of a relatively small area. For example, your wooden bath size 4x4 or 6x6 (sometimes even more) will feel quite comfortable on this basis. If necessary, you can change the depth of the tape and its other parameters in accordance with the type of soil and the features of the building being erected - the procedure itself will remain the same.
The order of the event under consideration is given in the following table.
Table 2. The procedure for arranging a non-buried foundation
| Stage of work | Illustration and additional explanations |
|---|---|
| Cleansing platform for the future foundation from debris. |
|
| We dispose of the collected garbage. TO for example, it can be taken to a landfill or just burn it. |
|
| Let's start preparing the markings for the trench |
Marking is carried out in a standard way: a cord is pulled around the perimeter of the future structure, pegs are driven in the corners
With the help of a hydraulic level, we put points of a horizontal plane on the pegs. |
| We dig a trench in accordance with markup. The minimum allowable depth is 60 cm. |
We cover the bottom of the finished trench with geotextile, roofing felt or plastic film for waterproofing. |
| For this we use a sand-gravel mixture. The recommended layer thickness is 15-20 cm. Thoroughly spill the backfill with water and tamp it well
You can tamp by hand. Align the top of the finished backfill horizontally. |
|
The width of each should correspond to the height of the equipped foundation. In this example, a foundation is built with a width of 300 mm and a height of 400 mm. |
|
We start from the inside. To make it easier to dismantle the formwork in the future, we use screws to connect the elements. |
|
Thanks to the reinforcement, the necessary indicators of the rigidity of the finished foundation will be provided. Reinforcement bars are connected using a knitting wire. Hook for knitting, if desired, can be bent from the old screwdrivers. Nets are knitted first. After the finished grids are connected into boxes.
Cell sizes are usually maintained at the level of 10x10 or 15x15 cm. Ready-made boxes are installed at each wall of the formwork, and then they are connected into a single structure using already known technology. At the joints, additional reinforcing reinforcement is mounted.
|
|
|
|
| Pouring concrete | For this we use ready composition brands from M200, or we prepare the solution ourselves (proportions and are indicated in the table below). We fill the space in the formwork with a uniform horizontal layer of concrete and carefully tamp it down, you can do it manually.
In the image you can see that the walls of the foundation are at different levels - this option is very convenient in the case of building a bath from a log. This feature will allow you to lay the first crown in the future with the highest quality. Select the difference value in accordance with the dimensions of the logs used. When building a foundation from other materials, you can not make such a difference - there is no point in this. The technology for performing the work remains the same.
|
| In order for all the cement to react and the hardened concrete to be as strong as possible, periodically spill the filling with water, and then cover it with polyethylene or roofing material |
|
| The formwork is usually dismantled 5-7 days after pouring, but depending on the condition of the concrete, this period can increase up to 10 days. Further construction work can be started at least one month after the foundation has been poured. |
|


Table 3. Proportions of concrete
| Grade of cement | Concrete M300 (B 22.5) | Concrete M250 (B20) | M200 (B15) | M150 (B10) | M100 (B7.5) |
|---|---|---|---|---|---|
| 400 | 1:1,6:3,4 | 1:1,8:3,6 | 1:2,4:4,4 | 1:3:5,3 | 1:4:6,5 |
| 500 | 1:1,8:3,9 | 1:2:4 | 1:2,6:5 | 1:3,5:6 | 1:4,5:7,3 |
Video - How to fill the foundation under the bath
A foundation that has completely hardened and gained strength is subject to mandatory waterproofing. Most often, ruberoid is used for this. The material is laid on the upper part of the foundation, previously cleared of debris and, at the request of the owner, covered with an acrylic primer. After cleaning and priming (if planned), the top of the foundation is covered with mastic.

The first layer of roofing material is laid on top, pressed and at the same time smoothed out.

Prices for bituminous mastic
Video - Foundation waterproofing