Raised beds from boards. High beds in the country. Comparison of the cost of high beds made from different materials
Recently, high beds have become increasingly popular among gardeners and gardeners - an original technology that came to us from Canada. Although, in fairness, it should be noted that such structures used to be found everywhere. They were called dung beds and cucumbers were grown there.
Raised beds: what is it and what are they for?
A high, or raised, bed is a box-shaped structure with a height of 0.15–0.2 m to 0.5–0.6 m and a width of 0.5–1.2 m. Its length is limited only by the dimensions of the site. But these dimensions can vary in an arbitrary direction, depending on the desires and needs of the owner. A nutrient substrate is laid inside the box and plants are planted.
Do-it-yourself high beds can be a highlight of garden design
It is best to prepare the bed in advance in the fall, so that the soil has time to settle and compact. In addition, in the spring there is no need to spend precious time on this, and with the advent of heat, the soil warms up very quickly and sowing can be done 2-3 weeks earlier.
Video: why do we need high beds
How to make a high bed
The boards that hold the ground are made from the most different materials and improvised means:
- wood;
- metal;
- plastic;
- slate;
- brick or stone;
- concrete;
- plastic bottles etc.
Photo gallery: what you can make a raised bed from
To make a bed and horizontal logs very quickly A bed of vertical logs will require the application of great forces Such beds can also be made from wood high beds most often made of boards Gravel in a mesh frame looks very unusual Often high beds are made of cinder blocks The fence can be straw The mesh frame is filled with any decorative material Even mesh ones are used plastic containers A bed can be made from flat slate (OSB)
In some cases, high ridges may not have a side fence at all and are simply earthen hills.
Raised beds are also available without fencing.
Video: what high beds are made of
from wood
For the manufacture of frame structure from wood you will need support bars and boards for the walls.
A wooden box for high beds can be tinted in any color and covered with paint
Work is carried out as follows:

Video: making a garden bed
From stone
Stone structures are built to last for centuries, they look monumental, but it is extremely difficult to move them to another place.
A high bed made of stone or brick will successfully fit into the classic design
The technology of work consists of the following stages:
- Along the perimeter of the selected place, they dig a trench 0.3–0.4 m deep under the foundation.
- A layer of waterproofing (roofing material, polyethylene, etc.) is laid at the bottom of the trench.
- Pour a sand cushion to a third of the depth.
- A layer of stones is laid on top.
- Filled with concrete.
- A few days later lay out the masonry.
Difficult masonry work is best left to professionals.
A brick bed is built by analogy with a stone one.
Video: making a brick bed
From sheets of slate, metal or plastic panels
For the construction of a frame structure, any pieces of old slate or metal removed from the roof will go.
A bed, the walls of which are made of sheet metal, can have a very different shape.
The sequence of actions is as follows:
- The plates are cut to size.
Sheets of slate cut into the desired size
- Dig a narrow trench around the perimeter of the future beds.
First dig a trench
- Sheets of material are installed in the excavated ditch.
- At the corners, the plates are connected using metal corners.
Slate sheets are connected using ordinary wire
- The trench is covered and the soil is well tamped.
To give greater rigidity, stakes are driven in at the corners, to which a wooden frame of bars is attached.
One of my good friends makes the sides of the beds from plastic bottles with a volume of 1.5 liters. She digs them around the perimeter with their necks down, trying to press them closer to each other. Frames intended for different cultures are spray-painted in various colors. It turns out very lively and unusual.
A high bed can be built from empty plastic bottles
Video: we make a bed of sheet material
From branches
The branch structure is constructed as follows:
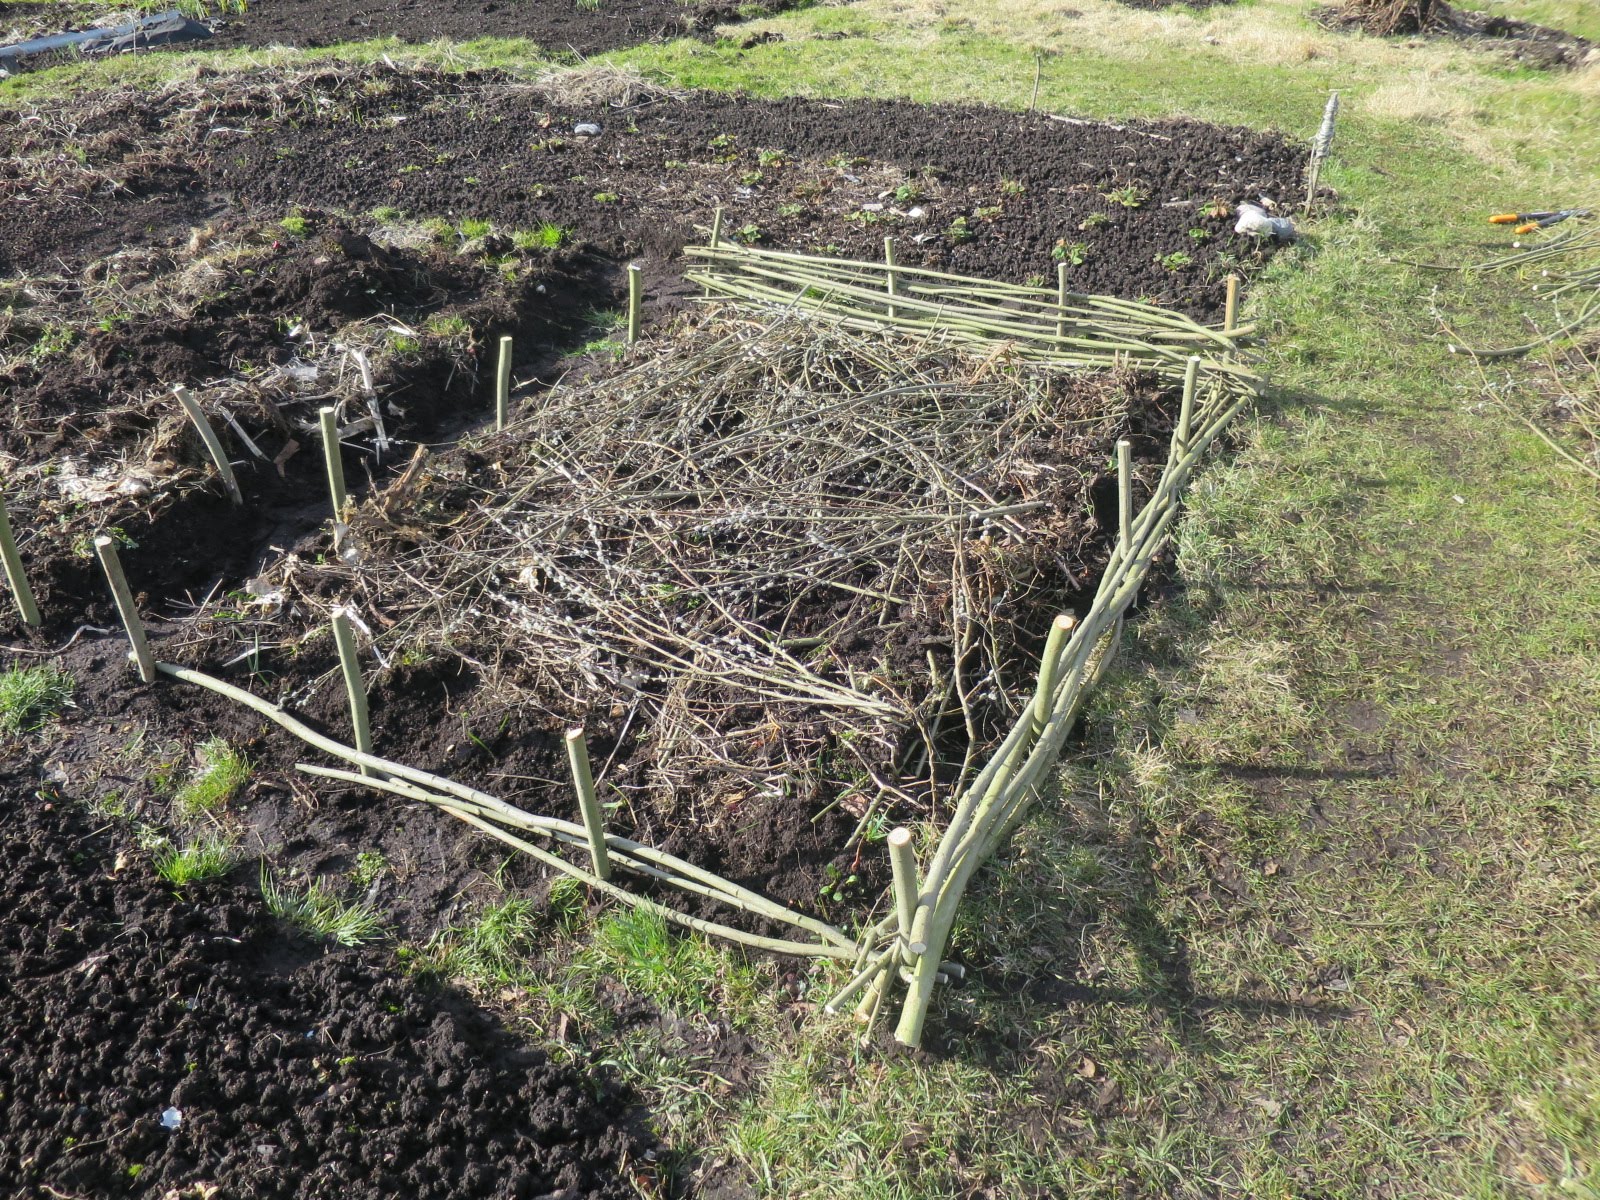
Plastic containers can be placed inside the wicker box
You can simply poke branches into the ground in several rows and fix them with wire.
Branches in the bed wall can be arranged vertically
Video: making a bed of twigs
High bed: how to fill it
After installing the frame, the bed must be properly filled:
- The bottom is lined with a fine-mesh metal mesh (from rodents).
Cardboard will not let weeds germinate
- Drainage is poured (especially if the area is wet) from stones, brickwork, shards, rubble, etc. In hot southern regions, large saw cuts, branches, lumber waste are placed, which, on the contrary, will retain moisture.
Then stack thick branches, chocks, branches, etc.
- Then smaller plant residues are laid:

- The last most top layer fertile soil is laid with the addition of humus and complex mineral fertilizers.
Video: filling the garden
Raised bed railings are commercially available. They are prefabricated modular structures, most often made of plastic. But it is not difficult to build such a box with your own hands.
One of the ways to get a bountiful harvest is to make a bed of vegetable boards with your own hands. This is a very convenient design, which is launched in late autumn and is already fully ready for use by spring. The presence of layers with compost ensures the safety of moisture and heat, while the drainage layer removes all excess moisture, reliably protecting the root system.
Advantages and disadvantages of wooden beds
Wooden garden beds have the following advantages:
- convenient, simple use;
- easy care, reduced time for weeding;
- the possibility of installation on unsuitable soils, for example, on stony;
- the design keeps its shape well, such beds do not crumble, they do not require additional protection against erosion during heavy rains;
- along the edges you can install arcs for greenhouses;
- installation is very simple, ordinary boards are required for work;
- the cost of a warm bed is small, while its effectiveness is high;
- the yield is high, but rotation of crops is recommended;
- service life up to 10 years or more.
But wooden beds for the garden have a number of disadvantages:
- the design is not the most durable, since the wood is prone to decay (special impregnations can be used, but not all are suitable);
- you cannot grow only one crop, alternation is required (it is enough to change crops every year, for example, grow greens in one year, vegetables in the second).
The choice of wood for boards
For a good bed, it is better to use boards that are resistant to moisture, decay, and can last more than one season. It should also be borne in mind that not all types of wood are suitable for the design, so the choice should be approached as carefully as possible.
The following types of wood are suitable for beds made of timber:
- Ash and oak boards with high level strength, resistant to decay and other external negative factors. But the cost of such a design will be quite high.
- The cheapest option is to use pine boards. But they require additional protection from moisture, rot and mold. In this case, not all impregnations can be used, since most of them are not environmentally friendly.
- An excellent option is to use conifers, among which larch and cedar stand out. They are well protected from negative external phenomena, while not having such a high price as oak boards.
- Among good options for arranging the beds is acacia. Solid and durable wood is able to serve several seasons, providing optimal conditions for growing a variety of crops.
It should be borne in mind that not only edged boards are suitable for arranging beds, but also lining, wooden panels. The choice is based on the requirements for the height of the structure, its wall thickness and other parameters. The simplest and most affordable option is the board, but in its absence, you can use other improvised means.
Wood processing and protection
How to process boards for beds? This question is one of the most important, since wood is subject to negative influence humidity, it can quickly begin to rot if the box is not protected. To do this, you can use the following options:
- Special impregnations. There are many products on the market, but it is recommended to choose only environmentally friendly solutions, without chemical and other components.
- The easiest option is to treat the tree with a solution of lime. Such a mixture will not have a negative impact on plants and human health, but the treatment should be repeated regularly.
- Coating with varnish or paint. On sale there are special coatings designed for external protection of wooden surfaces.
How to make a bed of boards with your own hands
Making a garden bed from an ordinary board is not as difficult as it might seem, but you must immediately calculate the dimensions of the structure. The length of the beds depends entirely on the size of the plot and the availability of free space for growing crops. There are no special requirements, but it should be convenient to take care of the bed.
The width of the structure is usually 60-120 cm, this is enough for convenient maintenance of the beds. It is not recommended to make the box too wide, as its central part will be very difficult to maintain, and this will negatively affect general condition plantings and yields.
The depth of the beds can be any, but 20-30 cm is enough, the rest will be above the ground. In some cases, the structure can be strongly raised, which improves the conditions for its maintenance. In some cases, fastenings for greenhouse arcs can be made on the sides of the structure, that is warm bed can be used year-round and will be multifunctional.
The height of the structure is also chosen arbitrarily, the optimal value is 20 cm, but 50-60 cm can also be made. Such high beds with their own hands reliably protect plantings from freezing in the coldest time.
Preparatory work
To make wooden beds with your own hands, you need to prepare the following tools and materials:
- shovel;
- boards from the selected type of wood;
- roulette;
- building level;
- screwdriver;
- self-tapping screws with galvanized coating;
- cement-sand mixture for pouring the base;
- metal mesh (can be replaced with geotextiles);
- expanded clay or drainage;
- soil of the required type;
- a mixture of straw, leaves, humus or compost;
- mulch (recommended from the crushed bark of deciduous trees).
Optimal dimensions
When arranging a bed from a board, one should not only select the height based on ease of maintenance, but also correctly determine whether the dimensions correspond to the crop being grown. The type of soil on the site also matters, for example, for fertile soils, a height of 15 cm is sufficient. But, if the soil for cultivation is unsuitable, then the bed can be raised to 30 cm and higher, providing optimal growth conditions.
When planning to grow potatoes, you should make a bed with a height of 40 cm or even higher. For compost beds, the height will be the same, less than it is not recommended.
The length of the beds can be any at the discretion of the owner of the site. The size is limited only by the area of \u200b\u200bthe territory, it is also necessary to take into account the aisle and features of caring for specific crops. Before starting the assembly of the structure, it is necessary to calculate with what step the plants will be planted, whether additional supports will be required.
Assembly
Assembling the beds from the usual wooden board quite simple, it includes the following steps:
- soil preparation for construction, layer removal fertile soil along the perimeter of the future beds;
- boards are placed on a prepared site, leveled and knocked out, which allows you to eliminate all the cracks;
- the structure is fastened with self-tapping screws, a layer of geotextile or mesh is laid on the bottom of the resulting box;
- a drainage layer is poured in the form of pebbles or expanded clay, medium-sized fragments of stones can be used;
- a layer of leaf mulch is poured onto the bottom, which will create optimal conditions for planting in winter time;
- the bottom is poured with a small layer of cement-sand mortar and left to dry completely.
Filling the beds can only begin after the cement base is completely dry.
Correct filling
The assembly of the structure is only a small part of the arrangement of the beds from the boards, it is recommended to pay great attention to the filling - the choice of soil and its layer-by-layer laying. At this stage, you should consider which crops you plan to grow - some require fatty soil, others require air and water permeability.
- A fine-mesh steel mesh or geotextile is laid at the bottom of the first. They will protect the structure from rodents and other pests, preventing damage to the root system. Of course, you can use ordinary cardboard, but it is short-lived and not as effective.
- The next layer is a mixture of branches, sawdust, bars, which will provide good drainage, but at the same time maintain the required level of humidity. The amount of wood depends on the climate zone, for drier areas a thicker layer is recommended.
- A layer of crushed bark and small branches, straw, corn stalks. Such material will not only retain moisture, but also accumulate nutrients will release heat when decomposed. When using straw, keep in mind that it rots quickly and the bed will sink a little.
- Layer in the form of thin cardboard and paper, burlap. Coated paper or newspapers should not be used, as lead paint will adversely affect the general condition of the plants. The thickness of this layer should be small, the cardboard can be pre-cut into separate pieces.
- Plant residues, grass, foliage. You can also use sawdust, but in small quantities, as they can greatly increase the acidity of fertile soil. If the amount of sawdust still turned out to be too large, it is necessary to use neutralization measures, for example, sprinkling a layer of ordinary ash.
- A layer of fertile soil into which mature compost can be added, which will speed up the readiness of a warm bed for use.
Care for warm beds
It will not be enough just to properly assemble the beds from the board, planting care is also of great importance. Only correctly performed planting actions give a significant chance to get a high yield, even if you start work not in spring, but in late autumn. Over the winter, inside the ground will start necessary processes and in the spring there will be an active growth of plants.
Do you know what an innovation is, how high beds came to our country from Canada. There, the land has been cultivated in this way for many years. Such planting options can be used not only for growing vegetable crops, but also to create original . Let's find out how to make beautiful and practical high beds in the country with your own hands. Photo, description technological processes and diagrams will help you with this.
Do-it-yourself high beds in the country: photos of designs and main characteristics
The rate of gas exchange, soil moisture and the presence of beneficial microorganisms depend on the size and shape of the beds. All these parameters affect the quality of the soil.
With the help of raised beds, you can grow a large crop of berries, vegetables and fruits. At the same time, you can get good performance even from a piece of land that is not fertile. A feature of high beds is that they warm up faster than low designs.

There are several types of vertical beds. They differ not only in material, but also in functionality. Some options are made from building materials, while others are simple .
Here are the types of beds available:
- trapezoidal structures;

- multi-tiered beds;

- triangular structures.

When creating isolated beds, factors such as illumination, soil composition, and also its structure can be taken into account. At what height such beds will be placed depends on the volume of the root system, soil characteristics and your own preferences. The minimum height is 15 cm, but to produce better insulation, you can raise them by 30-40 cm. Warm raised landings can be higher than 50 cm, since a layer is still laid on the bottom. Narrow beds can be up to half your height.

The length can be very varied. Most often it depends on the length of the garden. If the bed is too long, then it needs to further strengthen the sides. When arranging any garden, remember your own comfort and convenience. The best width is when you can reach the middle of the structure. The optimal value is 90-120 cm.

You can grow a variety of crops in raised beds. It is not recommended to use plants with tall stems, as it will be inconvenient to harvest fruits from them. Root crops, strawberries, peppers, herbs and cucumbers are often planted on bulk structures.

For your information! A special benefit is the filler for raised beds. It is made from organic ingredients. At the same time, the root system is located in the fertile layer, which contributes to the development and growth of plants.
Related article:
Let's find out how to make original beds and what materials they can be built from. Interesting ideas in our review will help you create a variety of designs.
Features of high beds: pros and cons
The main advantage of raised beds is that you can place a lot of vegetables and plants in a small area. High beds for strawberries, fragrant herbs and cucumbers are especially popular. Also, such structures have other advantages:
- bulk beds can be filled with specially prepared soil. In this case, the quality of the soil on the site does not matter much;
- it is possible to adjust the thickness of the soil layer for any plants;
- raised vegetable gardens are easier to weed and dig;
- raised beds can be set up anywhere, even with difficult terrain;
- seedlings can be planted on high embankments earlier, as the soil in them warms up faster;
- in raised gardens, the soil is looser, which contributes to better gas exchange;
- can be used for, which will hang from the edge of the fences for a high bed;
- depending on the material, you can create not only practical, but also beautiful designs. Some options can become a design masterpiece for your garden;
- high beds with sides are practically not subject to attack by weeds, and are also well protected from mold and fungi;
- the installation of the beds is not a difficult procedure, they can also be easily dismantled. The location of landings can be easily changed;
- inside such structures, you can create a comfortable one;
- soil on raised beds is maximally protected from freezing. During early frosts, such a landing can be covered with polyethylene;
- the erection of high landings is protected from erosion during heavy rains.

Such structures have certain disadvantages, but there are not so many of them. First of all, you need to feed mineral fertilizers. It is important to monitor the invasion of the bear.
For your information! Before starting work, treat the wood parts with an antiseptic and special impregnations. This will prevent the processes of decay and protect against the destruction of materials.
Creating vertical beds with your own hands: photo options
You can also create warm high beds or vertical structures. They are popular because appearance and space savings. In addition, this perfect solution to protect plantings from various pests. Vertical structures are great for growing flowers, strawberries and herbs. You can not only make such designs from improvised raw materials, but even purchase ready-made options. How to do warm designs you can see in the video:

Why buy a vertical bed for strawberries: prices
You can see different variants design of vertical beds, but their most important advantage is their miniature dimensions. Such structures can be built from any materials, even from plastic bottles.
Vertical products do not require special care. They are at the optimum height for easy handling.

You can see how to make a raised structure for strawberries in the video: To increase the rigidity of the pyramidal bed, you need to install an additional pole as a supporting element. In this case, the boards are mounted on a horizontal surface and attached to each other. A rail is installed in the base. The resulting side is fixed vertically, and then the second and third sides are attached to it. After installing the frame system, the length of the rails is measured. They are placed with an interval of 25-30 cm. To make the shelf raised, its ends should be cut at an angle of 30 degrees. After assembly, the structure is filled with soil, which is rammed.
The technology of arranging vertical beds for strawberries from plastic pipes
To grow strawberries, you can build a vertical garden bed. At the same time, you need to prepare plastic pipes, steel cable and a special cutting knife. The volumetric section allows you to place the required amount of soil inside. The incision should be made along the structure. To fix the bed in a horizontal position, you need to make a hole in each of the halves. Then a fishing line or cable is pulled through them. Then the parts are placed one above the other. In this case, you can make different levels of beds from pvc pipes with your own hands.

For your information! If you plan to place structures in a suspended state, then you need to consider that they can sway. Therefore, it is better to install them in places that are well protected from the wind.
Do-it-yourself erection of vertical beds using a building grid
A compact design can be built for crops such as strawberries, herbs, flowers or potatoes. A good solution would be a vertical bed. To do this, you need to prepare a metal mesh, straw, special soil and essential tool for material processing.

To create a bed, you need to bend the grid in the form of a pipe. In this case, the cross section should be 0.9 meters. The edges are fastened with wire. Straw is laid on the sides, and the free space is filled.
To plant potatoes, such beds should be placed at a height of 50 cm from the surface level. Spaces of 10 cm are left between the plants. Then the first layer should be shed, then the soil should be laid and the seedlings should be planted.
Features of arranging a vertical garden for strawberries with your own hands: using pots
Ordinary strawberries can also be used to grow strawberries. Such designs allow you to create an attractive external design. You can use both plastic and clay pots. Thus, you can create a multi-level composition.
Pots must be selected so that their diameters become smaller towards the top of the structure. In this case, the difference between pairs of pots should differ little.

The largest pot is set in the selected location and filled with soil. After that, a smaller pot is placed in it, etc. When the structure is ready, plants are planted in the soil and watered. The largest pot is installed at the base of the structure. A rod smaller than the diameter of the container is placed inside. The pot is filled with soil, and the rest of the products are alternately strung on rods. After filling with soil, plants are planted. Pots are mounted on a pole or high stump.
The nuances of creating vertical beds for strawberries with your own hands from tires: photos of products
Exist different ways growing cucumbers in open ground. In this case, you can build vertical beds. Also, this option is suitable for planting strawberries.
The tire structure is mounted on the same principle as pot structures. For this, tires of different sections are suitable. But at the same time, keep in mind that old products are not particularly environmentally friendly material.

Before mounting, the tires should be cleaned, dried and, if necessary, painted. The largest tire is placed down, and a part is cut off on the side. The hole is filled with soil and planted with plants. Thus, other elements fit in. Tires can be beautifully decorated with patterns or even unusual cuts.
Article
1. When caring for the beds, you do not strain your back, because it is enough to bend over slightly.
2. You don't have to kneel to work your garden. It is enough to put a small stool to take care of your garden.
3. Such arrangement of beds promotes the growth of plants. Your garden beds will have fewer weeds.
4. You do not need to trample down the soil, and the earth in the beds will receive additional humus.
5. Your summer cottage with high beds will look beautiful and well-groomed.
How to make high beds with your own hands?
1. After we have decided on a place for our future beds, we need to make a markup. The width of the beds that we recommend should be from 1 to 1.5 meters, and the length depends on the size of the plot. Also, it is important to consider. After all, we want our garden to be neat and beautiful. We mark the future designs of the beds with the help of sand of the size we need, as shown in the photo.
2. Assembly of high beds. high bed in our example will be made do it yourself from wood. It will consist of vertical posts with grooves and boards on all sides that we insert into the grooves. The design of a high bed may be different, but the principle of its manufacture remains unchanged. We need to create a strong, rectangular structure made of wood 20-30 cm high. The height of your garden bed can be any. Also, you can buy ready-made bed designs in a store or construction market and assemble them. do it yourself. For the manufacture of beds, we advise choosing material from hardwood, when using pine or spruce, the tree emits resin, and it affects the condition of the soil. Remember that build time, you need to check the level of the horizon using a level.

3. If you are using a ready-made design of high beds, then you can easily extend it from any side.

4. Another positive factor for choosing to use a high bed in your garden is rodent protection. Many gardeners encounter pests, such as moles, in their summer cottage. The fight against them is problematic, and using the construction of a high bed, you can 100% avoid and protect the garden so that you do not have to deal with pests later. We attach a strong metal mesh to the bottom of each section of our beds so that its edges protrude slightly beyond the edge of the structure. Cell selection is also important. The smaller its size, the better.

5. Our next step will be to protect the soil from washing out. To avoid this, we lay thick cardboard in two layers at the bottom of our high bed.

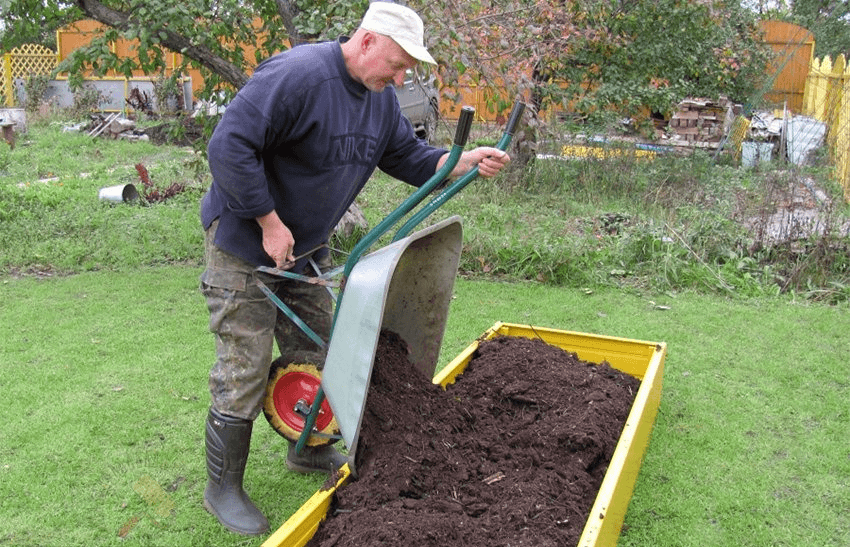
6. Land for high beds. Everything, our design is ready, before we fill it with earth, we advise you to process wooden structure antiseptics to avoid rotting wood. Then, we fill the ground, level the surface. After you have leveled the bed, you need to shed it with a hose to compact the soil. Do not forget to pour the earth as it shrinks in the garden.

7. High beds can be supplied with watering. To do this, we attach a watering hose along the perimeter of the bed structure as shown in the photo, using sprayers. To do this, we need sprayers for water at 90 and 180 degrees. How the irrigation system works, see our video.

Do-it-yourself watering system for high beds - video.
8. So that our vegetables - cucumbers, beans, peas, etc. grew comfortably, we install trellises with a grid. We attach them to the base of the beds with self-tapping screws.

Basic rules for using a high bed
We have done beds with their own hands, and now we will help you learn how to properly care for them and use them.
1. Always be aware of wind and heat. Therefore, be sure to protect the high beds! To do this, we create partial shade with the help of trellises, flower beds and tall shrubs.
2. It must be remembered that the long side of the beds should be located to the south. Thus, we create a comfortable and uniform lighting for plants, so that the higher ones do not obscure the lower ones.
3. Planting density should be doubled to control weeds. With this method of planting, plants will be able to independently fight weeds, and also, with the help of leaves, they will create the microclimate necessary for growth.
5. A high bed is a warm bed. Using this design allows the soil to warm up faster in the spring.
6. To reduce the pressure of the earth on the walls of the bed and avoid their bulging, it is necessary to divide the long part of the high bed with additional spacers.

Pros to make high beds in the country
Raised beds increase the usable area of your suburban area. A garden can be created even on poor soil. Planting density and yield are twice as high. Raised beds warm up much faster in the spring. By growing vegetables in such beds, you can get an earlier harvest. The use of such beds in dry areas saves water for irrigation.
What are high beds
There are many types of raised beds. We've got some ideas how to make a high bed at the dacha.

Usage example finished construction beds - photo.


Mini garden.

Several Yet useful tips: if you decide make a high bed with your own hands, then between the beds it is necessary to provide the necessary distance for the entrance of a garden wheelbarrow. Use of raised beds in the country.


High beds photo