How to lay nichrome wire in a frameless brush. Heated wipers are a great solution for cold weather. Heating element manufacturing
With the arrival of the first frosts and the first snow, drivers begin to have seasonal problems that concern not only a high degree of probability of an accident, but also constant problems with visibility, in particular with the windshield.
Constant problems with snow and icy glass are integral companions of winter operation. The world is constantly coming up with new ways to deal with low temperatures, including all kinds of extreme resistant low temperatures and much more. As for the ice on the glass, there are also a number of solutions that make life easier for "our brother". Among these solutions: an almost invisible mesh built into the glass, which, with the help of the on-board network, heats up and defrosts the windshield or rear window. There are also various scrapers and gels, with which the crust on the windshield is easily removed. Relatively recently, manufacturers of wiper blades have come up with another option to deal with limited visibility - the so-called heated brushes, which, when heated, warm the glass ten times faster than conventional wipers. Buy these wipers is not difficult, but it doesn’t suit everyone, someone can’t afford it, but someone like me - I just want to make a useful thing with my own hands. As you already know, today I will tell you how to make heated wipers with your own hands, using improvised materials and home tools.
Attention! The purpose of the article is not to force or convince someone to use factory heated brushes, the article is just an alternative (budget) option and a demonstration of the capabilities (or abilities) of a person in the field of car tuning. Passat B3 acted as a test subject.
Now about everything in order .... Heating the wipers with your own hands
In my experiments, I used a HORS windshield wiper tape, by the way, it allows you to achieve really good results. Main Feature of this brush is its hollow design as well as plastic profile in which it is anchored.
1. In order to make a heating element, I needed a nichrome wire Ф0.3 mm, its length should be twice the length of the wiper +200 mm. This wire is usually used for the manufacture of heating coils. Since the heating element runs along the entire length of the brush, it must follow its contour, otherwise, you may experience unpleasant moments in the form of a loose fit of the wiper to the glass surface.
2. In order to align the spiral, do the following: put the spiral on the awl and holding it with one hand, pull out a piece of the length you need, about 0.5 m, with pliers. Stretch the wire and set the flame of the gas burner so that the wire heats up red. Thus, you will get a workpiece of the required length.
3. After that, you need to measure a piece of wire equal in length to half the wiper +100 mm.
4. Bend the wire as shown in the picture.
5. Insert the long part of the end of the wire inside the hollow space of the elastic band, pierce the elastic band obliquely with the short end so that the wire does not close to the adapter mounted on the profile. How to pierce is shown in the photo with a pin.
6. In turn, gradually pull both ends of the wire until it is completely hidden in the rubber. Maximum attention should be paid to the last millimeters of the wire, make sure that it does not twist. This is critical because most often the wire burns out in places of twisting.
7. At the other end, make a loop, you need to put on insulation in the form of a cambric of the desired diameter. Thanks to this loop, the temperature deformation of rubber and nichrome wire will be compensated.
8. Inside the plastic profile, make two holes through which the heater wires will be brought out later.
9. Install the heater ends into the profile, then thread the rubber band.
10. Bend the ends and tin them using the ends of the heater and soldering acid.
11. Solder a wire with a cross section of 2x0.2 (I used a wire ShVP2x0.2) 2 m long.
12. At the exit point of the wires, it is necessary to glue a piece of the profile using dichloroethane, with it you will protect the soldering point from various kinds of damage.
14. On the other side of the wire, install the "mother" connector in order to connect power to it later.
15. The resistance of the heaters of a 45-centimeter janitor is about 8.8 ohms. A wiper 60 cm long has a resistance of 11 ohms.


With the advent of cold weather, many motorists are faced with such a problem as icing on the windows. Of course, when it is already warm enough in the car interior, the ice on the windows begins to gradually melt, however, when driving in severe frost, an ice crust may appear on the glass even when the interior is warm. It can be difficult to remove it with the help of wipers, and wipers sometimes freeze to the glass. What to do in this case? The way out of the situation will be the refinement of the wipers, namely, equipping them with a heating system. Now the wipers in the cold will always be warm enough not to freeze and effectively deal with snow and ice on the windshield.
The revision is quite simple and cheap, but very effective. Everything works on the basis of nichrome wire.

Materials and tools for homemade:
- nichrome wire Ф 0.3 mm;
- pin;
- wires for connecting the heating element;
- soldering iron with solder;
- female connectors for connecting wipers (optional);
- button for control.

The manufacturing process of heated wipers:
Step one. We prepare nichrome
First of all, it is important to properly prepare the heating element, in our case it is nichrome wire. Such wire is often used in the manufacture of various spirals and other things; it can be bought without problems on the market or in a specialized store. For homemade, the author chose a nichrome wire Ф 0.3 mm, in length it should be twice the length of the wipers, you also need to add 200 mm here.

Now that the desired piece of wire is selected, it needs to be aligned. The fact is that the wire will run along the entire length of the wiper, so if it is crooked, then the wipers may not fit snugly against the glass in some places. In total, it will be necessary to prepare a segment about 0.5 meters long. The author puts a spiral on an awl, and then pulls out a piece desired length. Further, to align the wire, it can be stretched and heated over the burner. After cooling, the accepted form will be fixed.
Step two. Installing a heating element in the wipers
At this stage, you need to measure a piece of wire equal to half the length of the wiper, adding 100 mm. The wire must be bent as seen in the photo. The long part of the end of the wire must be inserted into the hollow part of the wiper's rubber band, and the short end should be pierced through the rubber band so that it does not short-circuit the adapter located on the profile. First, the hole can be pierced with a pin, as shown in the photo.


Now you need to slowly pull both ends of the wire, while it is important to ensure that the wire does not twist, otherwise it often burns out in these places. As a result, all the wire should hide in rubber.
At the other end, you will need to make a loop, then a cambric is put on here. This loop is needed in order to compensate for the different degree of expansion when heated nichrome and rubber.


Step three. We display contacts
Two holes must be made in the plastic profile, through which it is then necessary to bring out two contacts from the heating element. After that, you can fill the rubber band.


To connect, the ends must be bent and tinned. Subsequently, wires are soldered to them.


Step four. Connecting a homemade product to the on-board network
To connect the heating element, you need a wire with a cross section of 2x0.2 and a length of about 2 m. To protect the place of soldering, the author glued a piece of profile to this place, dichloroethane was used as glue.


Next, you will need to solder a 2x0.35 wire 1.5 meters long to the 2x0.2 wire, the soldering points are insulated with heat shrink. On the other side of the wire, the author installed a female connector for easy connection.


If we talk about numbers, then the resistance of the heating element for a 45 cm long wiper should be approximately 8.8 ohms. For a 60 cm long wiper, the resistance is 11 ohms. Below is a diagram of how the elements can be arranged.
All motorists are well aware that a lot depends on the degree of purity and transparency. First of all, traffic safety. In the warm season, cleaning the windshield is very simple - just turn on the wipers, which will cope with the task in a fairly short time.
But what to do in winter, when this most important part vehicle can be covered with a sufficiently strong crust of ice? Running around with a hot kettle to at least slightly make the area in front of you visible? But now is not the twentieth century, so there are several ways to solve the problem:
- Apply special scrapers.
- Use various synthetic gels.
- Install a wiper zone heating system on your car.
The first and second options are no longer relevant enough today, since they do not solve two problems: saving time and physical strength. In the first case, you will have to spend your own energy on working with a scraper. In the second, stand and watch how the gel begins to destroy the ice crust on the windshield. It is much easier and more comfortable to sit in the car and watch the heated wipers do their job perfectly.
Unfortunately, you will have to pay for high-quality heated wipers. Sometimes, quite a lot. It doesn’t matter, since it is possible to make a do-it-yourself wiper zone heating system.
How to make heated wipers with your own hands?
For self-manufacturing heating wipers, you will need, whatever one may say, to purchase some consumables: tape for trademark HOST (recommended), nichrome wire with a diameter of 0.3 mm. Therefore, unfortunately, some expenses cannot be dispensed with even in this case.

After completing the purchase process, you can begin to manufacture heated car wipers. Initially, it is necessary to make heating elements for the wipers:
- The nichrome wire is cut in such a way that its length exceeds the dimensions of car wipers at least twice, and also has a margin of about 200 mm.
- The product must completely repeat all the bends of the cleaning system.
- To align the wire, its one edge is fixed by hand, the other is pulled out with ordinary pliers.
Next stage. Another piece of wire is measured - based on the length of the wiper plus 100 mm. Further - the product is bent so that its ends do not coincide a little. The longer end is inserted into the hollow space of the gum used, and the short one is pierced obliquely. Using the previously used pliers, the metal rod is completely immersed in the rubber. This job will take time and patience. The protruding ends are made in the form of loops, with mandatory insulation.

The next step in creating heated wipers:
- Two small holes are made in the plastic profile.
- The ends of the future wiper heating elements are inserted into the profile - into the finished holes.
- The outer parts of the wire are processed with a soldering iron - using soldering acid.
- Using the same tool, the wiring is soldered.
- The female connector is powered by the vehicle.
- To operate the heated wiper system, a button is installed that will allow you to control the resulting design.
It is recommended to combine the control button for the heating of the windshield zone with
August 26, 2017Motorists who operate their cars year-round are well aware of the problem of freezing and icing of the wipers. In order to restore elasticity and performance to the rubber elements, they have to be constantly cleared of ice along with the frozen glass area. If you often find yourself in a similar situation, the issue needs to be resolved radically - to organize electric heating of the wiper blades. Additional equipment is inexpensive and is installed on the car yourself.
Windshield wiper defrosting methods
Traditionally, the lower part of the glass is heated by blowing hot air supplied by a passenger compartment heater fan. The problem is that defrosting takes too long: the engine and coolant must first be warmed up to get warm air, then it will take another 15-20 minutes to melt the ice.
There are several alternative solutions to the issue:
- organize heating of the rest area of the brushes using an overhead heating element;
- purchase ready-made windshield wipers with a built-in heating system and connect them to the car's on-board network;
- independently make a heating element and install it on standard “wipers” with connection to the mains through a cigarette lighter or a separate button.
The first method will give excellent results when installing the heater on the rear window of the car.. The fact is that at the factory it undergoes heat treatment and is not afraid of temperature changes in different zones. The same cannot be said about the windshield, whose heating in frost of minus 15 ° C and below will provoke the appearance of cracks. This is a consequence of a sharp increase in temperature in one area, for which the three-layer construction of the "triplex" is not designed.
The heating of the lower zone of the glass is implemented quite simply: buy a film thermoelement and glue it to the surface (the product has an adhesive layer on one side). Then connect the wires connected to the cigarette lighter or a separate button to the contacts.

Note! When using the heater on the front glass, do not turn it on in frost of -15 °C and below. First, warm up the car in the traditional way.
Installation of heated wipers
Frameless wipers equipped with factory thermocouples are equipped with adapter modules for attaching to car windshield wipers different brands(quantity - from 5 to 9 pieces). There are several brands on sale whose products have been tested by drivers in practice: BREMAX, Burner and CHAMPION.
To make windshield heating using ready-made wipers, read the product instruction manual and install them in this order:
- Dismantle the standard brushes from the brackets, and remove the brushes from the new parts plastic lids adaptive modules.
- Select a suitable mount from the kit and fix it on the adapter, carefully pulling the wiring through a special hole.
- Install the brushes on the wipers, passing the wires inside the brackets. To prevent them from dangling, secure the current-carrying wires with thin plastic clamps.
- Using any technological hole in the partition, lay the wiring to the button or cigarette lighter socket.
Attention! In the places where the wipers are attached to the drive shafts, the wires cannot be pulled, otherwise the wires will quickly break.
To protect the car's electrical network, connect an additional 5 A fuse to the power supply circuit of the heaters. If it is necessary to use the switch on from the button, it is recommended to assemble a circuit with a relay that allows you to protect the key from high currents.
The practice of motorists using factory brushes shows that the heating and thawing of glasses under the rubber bands takes place literally in 2-4 minutes. The unheated area remains covered with ice, which has to be melted with hot air from the stove.

Assembly of homemade heating
To make heated "wipers", you need to figure out how factory-made products are arranged. The design is as follows: a film heating element is glued to the metal strip, which serves as the basis of the brush, the contacts of which are brought out approximately in the middle (where there is a mount with a latch). From above the heater is closed by a rubber screen wiper. Hence the conclusion: it is necessary to make the same flat elements and build them into standard brushes.
For work you will need the following materials:
- MGTF brand wire - 0.03 mm 2 in an amount of about 10 m for the heater;
- the same, brand MGShV or PV-3 (0.12 mm 2) for connection;
- heat shrink tubing for sealing soldering;
- aluminum foil.
Note. The resistance of the heating wire for one wiper must be at least 5 ohms. This will give thermal power about 35 W at a circuit current of 2.5 A.
To make a heating element with your own hands, the first step is to remove and disassemble the “wipers”. The goal is to accurately measure the length and width of the future film heater, focusing on the dimensions of the metal base. Then proceed like this:
- Drive 2 nails into the board at a distance equal to the length of the base of the brush.
- Cut a piece of wire at the resistance (indicated above) and wind it between the nails so that the ends are centered.
- Fasten the resulting train with tape, remove from the nails and wrap with foil.
- Solder the ends of the MGTF heating wire with the PV-3 connecting cable. Put an insulating heat shrink tube on the joint and heat it with a lighter.
 When finished, put a homemade heater inside the brush, pressing it with an elastic band and a plastic retainer. Further assembly and connection to the vehicle on-board network is performed according to the algorithm described in the previous section.
Advice. During operation, use home-made heating for a short time so as not to discharge the battery. Turn it on for 3-5 minutes, sufficient for defrosting the glasses.
Finishing silicone brushes
Many car owners install silicone wipers from the Khors brand instead of the usual “wipers” with rubber pads. Products have 3 features:
- Increased elasticity, not lost over time.
- A longitudinal hole is made inside the lining.
- Silicone is able to withstand heating up to 250 ° C.
In this case, the brushes are heated using a nichrome thread with a resistance of at least 8 ohms. If it is twisted into a spiral, then align the wire by heating with a small gas burner. Then thread the thread through the hole and bring the ends in the middle, making an inclined channel with an awl. To solder a copper wire to nichrome, treat it with a brush dipped in hydrochloric acid. Then work according to the previous scheme - assemble the windshield wipers and connect them to the mains.
If for various reasons you cannot make a heating element yourself, then take the advice of experienced drivers: before leaving the car in the parking lot, raise the “wipers” so that they do not freeze and freeze to the glass.
Noticing that the wipers do not clean the windshield as they should, many motorists decide to change the wipers immediately. In fact, there are several ways to fix the cleaning elements, thereby giving the windshield wipers a second life.
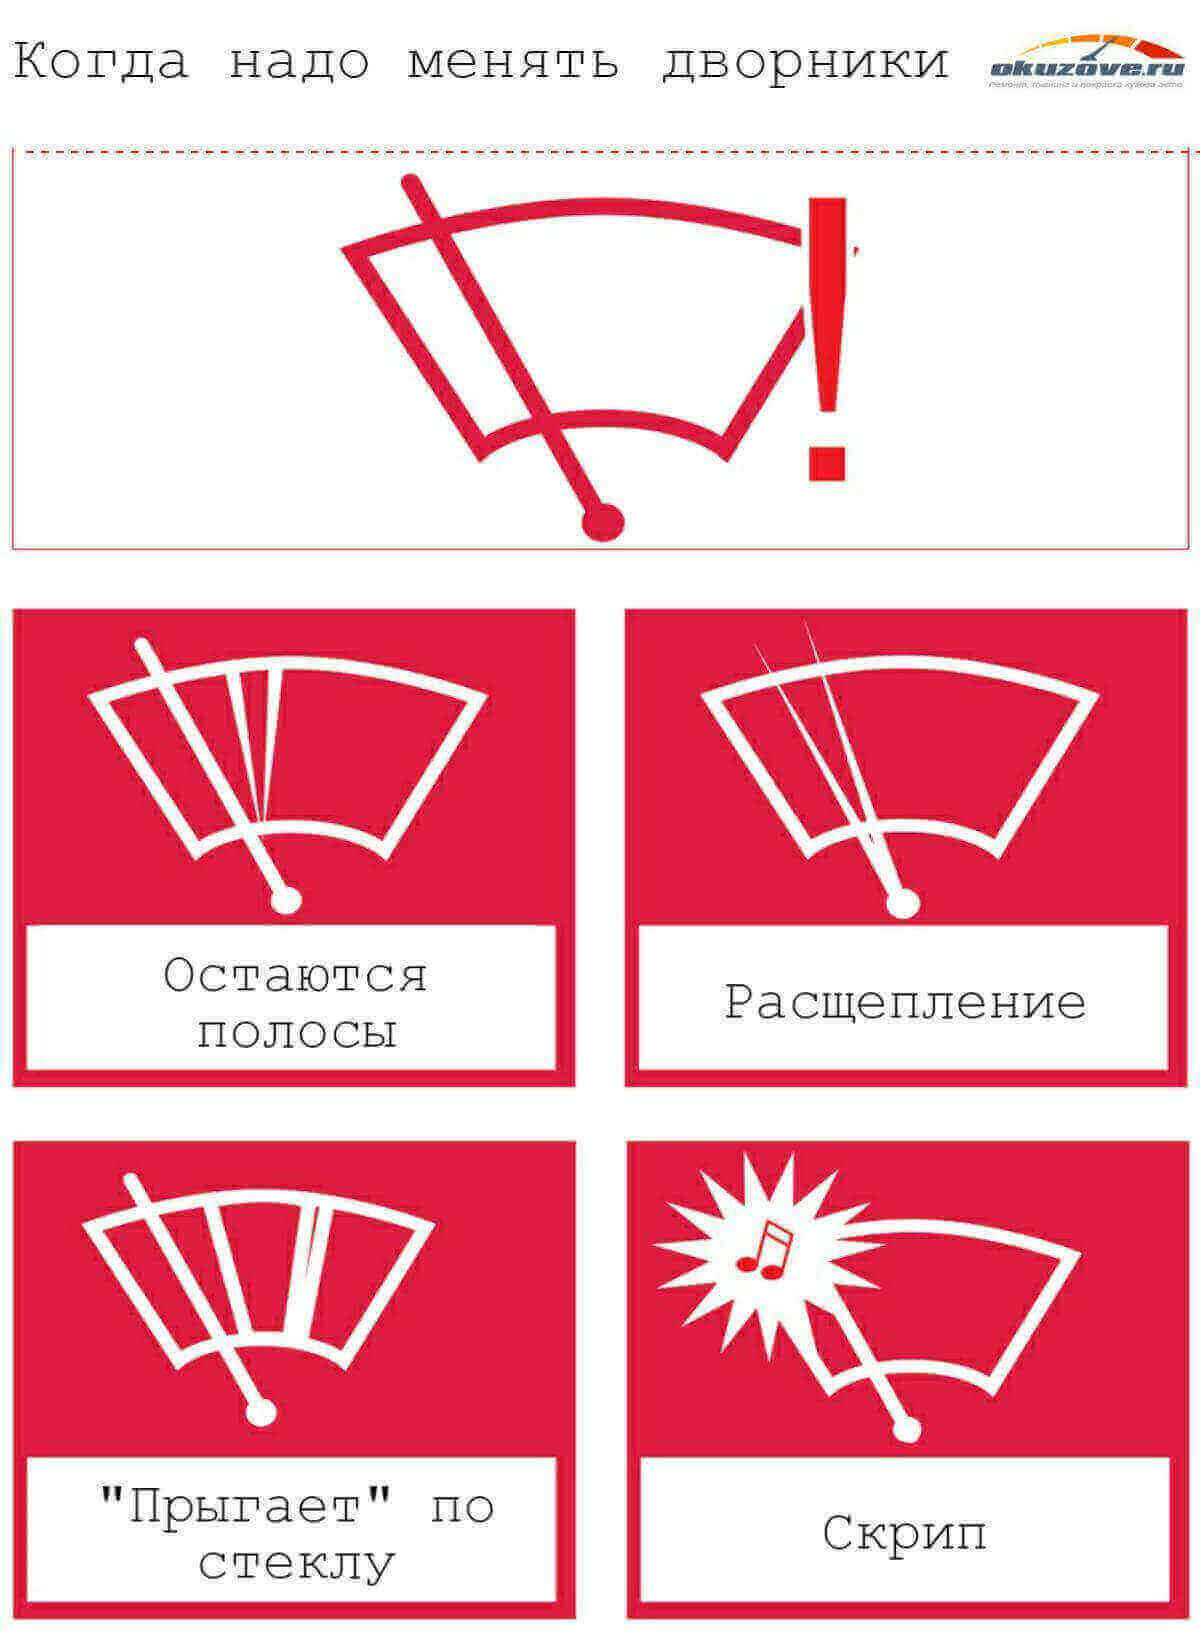 Reasons for replacing wipers
 Causes of poor brush performance
Before proceeding with the repair of car wipers, you need to figure out what is the reason for their poor performance:

How to repair wiper blades
The method of repairing car wiper blades must be chosen, given the reason for their poor performance:

How to change wiper blades
If the rubber band cannot be restored, and the wiper frame is still in excellent condition, then change it. Dismantling this tape is quite simple:
- first bend the tape holders with a screwdriver
- use small pliers to spread the tabs of the latch so that the tape can be easily pulled out
- as you took out the tape, pull out the elastic plates from it, if they are bent, then pay attention to which direction in order to correctly install the plates in the groove of the new tape.
- a new tape must be passed through the groove through the rocker locks, if any of the retainer supports does not provide easy movement, or if the tape is too loose in it, then expand the legs or vice versa, tighten them
- after you have tucked the tape into the legs of the rocker arms, then squeeze the latch with pliers and install the brush on the wiper.
By correctly identifying the cause of the poor performance of the brushes and properly repairing them, you will get rid of the need to change the wiper. So you save your money and ensure your safety. Through dirty windows, the driver does not see the whole road, which can lead to very sad consequences.
Moscow Automobile and Highway State University, Moscow. Level of education: Higher. Faculty: AT. Specialty: Engineer Cars and automotive industry. Experience in the automotive industry (master consultant…
12 commentsAnton says:
When it was time to change the wipers, it was not possible to tighten the rubber, as it simply did not fit. There were suggestions to cut it. But the possibilities turned out to be unpredictable hot water. Not only is this tool that is in every home, it does not require any financial investment. Or the same gasoline, always at hand, even if you need to clean up the wipers on the road.
Igor says:
Ever since his student years, the teacher advised jokingly soaking erasers in gasoline, so that they would better wipe the pencil on the drawing paper. So I tried it for the wipers. This turns out to be the best and most common method of extending the life of the wipers. Moreover, gasoline is such a tool that is always next to the driver.
Oleg says:
Tell me, which wiper blades are better - framed or frameless?
Valentine says:
Oleg, depending on what point of view to consider. From an aesthetic point of view, they are frameless, besides, they are better pressed against the glass, which means that they should be better cleaned of any dirt on the glass. In addition, it is almost impossible to find a replacement for a rubberized tape on them. And if you look at the replacement of frame wipers, then they are easy to use, even a girl can change a brush or tape. In addition, they are much cheaper than frameless ones and will last you longer.
Fedor says:
When asked which wipers are best for a car, keep in mind that you choose them not for yourself, but for the car. Therefore, they need to be considered and compared from a functional point of view. It is clear that they all have disadvantages. But from an objective point of view, frame wipers are better.
Mark says:
When it became a question of choosing wipers for a car, without the slightest hesitation, the choice fell on frameless ones. The main criterion was that they do not block the view on the road as much as frame ones. About the fact that they are expensive and difficult to find a replacement for them. Yes, they cost a lot, but it’s not a pity to give money for their versatility. You can find a replacement for absolutely any thing, and in skillful hands, it is possible to change both the brush and the rubberized part.
Gregory says:
Previously, the question often arose about which wiper blades are better. Tip - try both types in your work. This way you will know all their work from start to finish. The solution came right away - only frameless ones, as they are universal for any season and weather conditions. In winter, there are problems with frame wipers, sometimes they just break. And frameless, thanks to frost-resistant rubber and special liquids, will be able to clean the windshield from ice.


