How to lay laminate with your own hands - step by step instructions with a photo. ⚠ How to lay laminate with your own hands: step-by-step instructions and nuances of work Preparing a concrete base
Laminate floors are considered one of the most practical, cheap, beautiful and easy to install. And this is true - you can cope with the task of laying them yourself, without even resorting to the help of specialists. The main thing is to have a desire and set aside time for work. But how to lay laminate? Let's analyze this issue in practice.
Laminate - finishing flooring, although considered easy to install and maintain, is quite delicate. It is demanding on operating conditions, on the laying process. If you neglect some of the features and rules for working with it, then the coating will not last long.


In the photo - the process of laying the laminate
Therefore, before starting work, it is worthwhile to ensure the following conditions in the room:
- temperature range - 15-30 degrees above zero;
- air humidity - about 40-70%;
- smooth, cleared of debris and dried base;
- the room must be dry. If the humidity is high, then you will have to buy a more expensive moisture-resistant material;
- heaters and other heating devices cannot be switched on while working with laminate;
- windows should be closed to avoid drafts.

Attention! Laying laminate cannot be done on sagging floors, cracked screed. Otherwise, the material will not last long. The locks connecting the coating elements will break when the material deflects, due to which the integrity of the base will eventually be violated.

It is also important to remember that the laying of the laminate can only be done 2 days after the material was brought to the place of work. This time is necessary for him to "get used" to the new operating conditions - the laminate will gain the necessary humidity, adapt to the temperature, so that during operation it will not change its dimensions excessively. It reacts sharply to changes in conditions in the room - the effect of thermal expansion may appear.

It is necessary to leave the purchased laminate in the room where the installation of the floor is planned. This is necessary for acclimatization. This process takes about 48 hours.

Choosing a laminate, you should focus not only on the color, but also on the quality of the material. It is not worth buying low-grade products that are too thin or not suitable for the operating conditions. Such a coating will serve too little, quickly lose appearance. Laminate packages must be sealed, and before installation, it is important to inspect all boards for damage, chips. Damaged laying elements must not be used.

Prices for laminate "Tarkett"
tarkett laminate
The process of laying the material may differ depending on which type of lamella is used. For example, there are three installation methods, each using a different type of material: laminate with joints Click or lock, as well as the type of coating that is mounted using glue.


Installation of laminate flooring with a click-type lock
In the case of using the adhesive method, the laminate is glued to the rough base using special compounds. The technology resembles parquet laying. Also, glue can be applied to the joints between individual planks, which are then tightly joined to each other. But this method is now practically not used, with the exception of the design of rooms with very high traffic or high humidity. It is impossible to disassemble the laminate if necessary.
Installation of cover with type locks lock involves the connection of individual strips by the shock method. That is, during operation, the spike on one side of the lamella is driven into the groove on the other lamella. Such a coating is already losing popularity due to its shortcomings - the laboriousness of work and complex analysis if necessary.

Important! If material with this type of locks is used, then work should be done carefully - control the force of impact and use a special rubber or wooden block, placing it at the site of impact.

Now most often for laying this type of floor, a laminate with joints is used. Click. Here, docking occurs due to a spike and a groove, but of a special shape, in which the elements are securely joined and connected to each other without the use of shock technology. Panels are joined under certain angle, after which the lamella falls to the floor - at this moment, the snapping occurs. This connection allows, if necessary, to easily disassemble the finish and re-lay it.


Ways of locating lamellas
You can lay the laminate in different patterns, according to the schemes. Here you can choose any option that you like, the main thing at the same time is to follow the pattern. There are some of the most popular layout options. The material consumption will also depend on the choice of method.
Table. Laminate layout options.
| Layout option | Description |
|---|---|
| This is the most economical option, since the amount of scrap and waste here will be minimal. The first row is laid first, and the remaining trimmings of the last plank can be used to start the second. The main thing is that they are at least 30 cm long. The amount of waste in this case usually does not exceed 5% of the material. |
| If you look at the laminate laid in this way, then the joints will form a special pattern, reminiscent of chessboard. In this case, a new row always starts with a cut length so that the panel is offset 1/2 from the previously laid one. The amount of waste in this case increases to 15%. |
| Reminiscent of the classic version of laying, only performed at an angle of 45 degrees relative to the walls of the room. It looks impressive, but the amount of waste becomes even greater - more than 15%. |


![]()
To avoid possible mistakes during the creation of a drawing, it is better to design the entire work in advance by sketching a laying pattern on a piece of paper. And keep in mind that the minimum offset of the joints should be 20 cm relative to the lamellas laid in the previously mounted row.

Important! Regardless of which laminate is laid and according to which scheme, there should always be a compensation gap of about 1.5 cm between it and the wall. Otherwise, the material will deform. The area of 1 m 2 of laminate under the influence of humidity and temperature can increase by about 1.5 mm.
When installing a laminate floor, it is important to take light sources into account so that the gaps between the planks are less noticeable. That is, the laying is done so that they are perpendicular to the light source (for example, a window).

Also, pre-laying planning will make sure that the planks in the last row will have sufficient width (100 mm). If it turns out that they will be smaller, then it is better to narrow the first row a little.
Do you want to change the floor, but are afraid that it will be expensive? Installing laminate flooring on your own is quick and easy. It will help save time and money. The main thing is to follow the rules, be careful and prepare for the process.
Stages of work
 Installation of laminate boards is carried out in several stages, each of which affects the quality of work and the life of the new floor.
- preparation of the base for coating;
- laying the insulating layer;
- panel installation;
- installation of skirting boards and thresholds.
The laminate is equipped with special latches that fasten adjacent segments. Laying a laminate with your own hands with step-by-step instructions can be done by anyone. Special education and skills are not required for this.
What tools and materials will be needed
 Before laying the laminate, pre-prepare:
- level;
- jigsaw;
- hand saw or;
- mallet hammer;
- centimeter wedges;
- ruler / centimeter / square;
- laminate;
- skirting boards, thresholds;
- wedges;
- marker.
To ensure that the work is not done in vain, all the rules and sequence of actions should be strictly observed.
Foundation preparation
 Before laying the laminate correctly, prepare the lower level. If you do not level the bottom surface, the blocks will "walk". Installation consists of serial connection panels and latching with locks. When laying, no additional fixation of the floor is carried out either to the baseboards or to the bottom layer. Therefore, the preparation of the subfloor depends on how long the laminate flooring will last.
Regardless of the material of the subfloor, the surface is leveled, cracks and crevices are sealed. This can be done, like laying a laminate, with your own hands.
When leveling, a difference in the slope of the surface of more than 4 mm is not allowed. The optimum discrepancy in level is 2 mm.
If the slope exceeds 4 mm:
- tiled locks loosen, break over time;
- gaps appear between the panels;
- furniture warps;
- Cabinet doors start to open or won't close.
- floors creak when you walk.
After leveling the surface, the final steps are carried out:
- The concrete floor is poured with a finishing screed or polished.
- The cement-sand composition is coated with a primer. This prevents the appearance of cement dust and protects against unpleasant creaking when walking.
- align with grinder cutting off irregularities. The cracks are sealed with putty.
Linoleum does not require special preparation for laying laminate. If necessary, the linoleum surface is leveled.
insulating layer
 Before laying the laminate, laying material is laid on the concrete subfloor. It performs several functions:
- protects bottom layer laminate boards from direct contact with the cement-sand mixture;
- protects plates from moisture;
- serves as a sound insulator;
- levels off microslope;
- serves as a heater.
Wooden subfloors and old linoleum do not need to be covered with an insulating layer.
As a layer between the draft and the main floor are used:
- diffuse membrane;
- polyethylene film;
- roll/sheet XPS;
- special composite materials;
- bubble wrap.
The thickness of the lining layer depends on the thickness of the panels. The product passport indicates the thickness of the layer between the main and lower levels. For panels 9 mm thick use a 3 mm insulator. The insulator layer is not fixed.
What to look for before installation
 When laying laminate, cross-shaped seams are not allowed. There must be a gap between the butt joints. Professionals mount the panels, taking into account that the seams are at the level of the middle of adjacent panels. When doing work by amateurs, this rule is not observed, it is allowed to make seams at the level of 1/3 of the panel. This method saves material.
Installation of laminate on a wooden floor is carried out perpendicular to the location of the lower layer.
When calculating the amount of material, the consumption for trimming panels located near the walls is taken into account.
To prepare for installation, holes are cut around the pipes with a diameter of 1 cm larger than the diameter of the pipe. The junction with the pipe is closed with a special laminate overlay or the hole is sealed with glue / putty. The best option- putty first, overlay on top.
Before laying the laminate, the panels are trimmed correctly. For this, do not use a hacksaw. It breaks the protective layer of the plates. To cut pieces of panels, use a jigsaw or.
When choosing a laminate, take into account that its thickness does not affect the quality. Panels with a large thickness serve the same as thin ones, but are more expensive.
Manufacturers produce some boards with an insulating bottom layer. In such cases, the insulating layer is not placed on the floor, limited to a film to protect against moisture.
If installation is carried out in winter time, you can not use the laminate, immediately after purchase. The material is given time to lie down in the room so that its temperature becomes the same as in the house. For the warm season, this is not necessary.
It is better to immediately purchase the required amount of material, taking into account the stock for trimming. If in the course of work to acquire additional material, its appearance may differ from the main one.
When choosing panels, pay attention to the consumption for the area of the room. Some manufacturers indicate consumption per 2 m², some at 2.7 m².
Step by step instructions for laying laminate flooring
There is a straight and diagonal laying of panels. Installation in a straight line (parallel to the wall) is the easiest way to lay the floor. The diagonal method requires skills, more material consumption. The popularity of assembling plates diagonally is explained by the fact that with such a floor the room is visually perceived more.
Straight mounting
 Do-it-yourself straight-line laying of laminate with step-by-step instructions on the video:
Step by step:
- The surface of the subfloor is leveled, covered with a primer.
- After the primer has dried, an insulating layer is applied. There are 2 ways to work with insulation. It is placed immediately on the entire surface or in parts, as the laminate is laid. The second method is preferable, since in this case the coating is kept intact. The layer is placed with a slight approach to the wall, without fixation. If the room is on the first floor, a polyethylene base is placed under the insulation. It will protect the lower part of the coating from dampness coming from the basement. The film is overlapped.
- It is accepted that the seams between the individual fragments of the laminate should be parallel to the lighting. But this rule is not respected and the laying is carried out without focusing on lighting.
- Installation of panels begins after installing the wedges to the end wall.
- Cut off ½ of the whole part of the plate and install the first panel. Form the first row. The edge is cut to the required size.
- The second row is laid at the beginning without fixing with locks. Each plate must be installed taking into account the location of the butt joint. Cross-shaped seams are not allowed in joints. The edge plates are cut taking into account the connection at the level of ½ or 1/3 of the adjacent plate. After the second row is fully formed, the second row is carefully attached to the locks of the first row. Fix the connections with a smooth movement. Fragments are tapped with a mallet hammer using a special substrate.
- After mounting 2 rows, check the level. If necessary, the plates are leveled with a hammer.
- Gradually lay the entire floor.
- To connect with pipes, a hole is cut with a jigsaw, the diameter of which is 1 cm larger than the diameter of the pipe. The open surface is filled with glue or putty.
- The finish row is laid using wedges located against the wall. If necessary, cut the laminate panels not only across, but also along.
After laying the floor, skirting boards and thresholds are mounted. For this, special fasteners are used. Skirting boards are not fixed to the floor. Wooden skirting boards fit flawlessly flat walls. For surfaces with small defects, plastic skirting boards are used. Thresholds choose one or two levels.
Diagonal mounting
 Initial preparation is similar to that carried out with direct laying. Do-it-yourself diagonal laying of laminate on the video:
After preparation and coating with insulation, installation is carried out, starting from the corner.

Masters are advised to first lay all the whole fragments, and then install undercut segments that connect to the walls.
Self-laying a new floor is not difficult and, subject to the technique, will provide a good result. To lay the laminate with your own hands, it is enough to be patient and do the job efficiently at every stage.
Laying laminate and installing skirting boards - video
Laminate is thin sheets with a thickness of 6 to
11 mm, from one to one and a half meters long and about 20 cm wide. At the edges
panels are "locks", with which they are joined together.
top layer laminate is a durable film that has the function of protecting the panel from sun rays, moisture and also mechanical abrasion during its operation. The next layer is paper
the texture or coloring of various m
materials: wood, stone, sand, etc. Next comes the carrier layer of high-density fibreboard, which sets the strength of the future coating. And finally, the final layer of paper impregnated with various resins, which serves to protect the carrier layer from moisture.
Surface preparation

Once you have bought laminate flooring and brought it home, you need to keep it indoors for a few days so that it adapts to the humidity and temperature and takes the appropriate size.
So, the purchased laminate is already in the apartment and is waiting for its installation. First you need to evaluate the quality of the surface. If you have an old wooden floor, then you need to check its horizontal level with a building level. Over a length of about 2 meters, differences of a few millimeters are permissible. If the irregularities exceed the limit, then the irregularities will have to be leveled. grinder. It is also necessary to check its rigidity. If the boards sag even from human weight, then they must be replaced or strengthened.
When laying a laminate on concrete, it is necessary, as in the case of a wooden floor, to check its horizontalness. If any slight deviations are found, apply a self-leveling screed. Next, waterproofing from a polyethylene film must be laid on the surface perpendicular to the direction of laying the laminate. At the same time, the overlap of adjacent strips should be at least 20 cm. In order not to move individual strips during the laying of the laminate, MirSovetov recommends connecting them with self-adhesive tape in several places. To increase heat saving on the concrete surface, you can cover it with sheets of 10 mm plywood. Laminate flooring can also be laid directly on top of linoleum. To do this, it is only necessary to check the rigidity and evenness of the base under it. Waterproofing in this case can not be laid.
Cork can also be used as a substrate. This is a more environmentally friendly material, however, and more expensive.
Laminate laying.

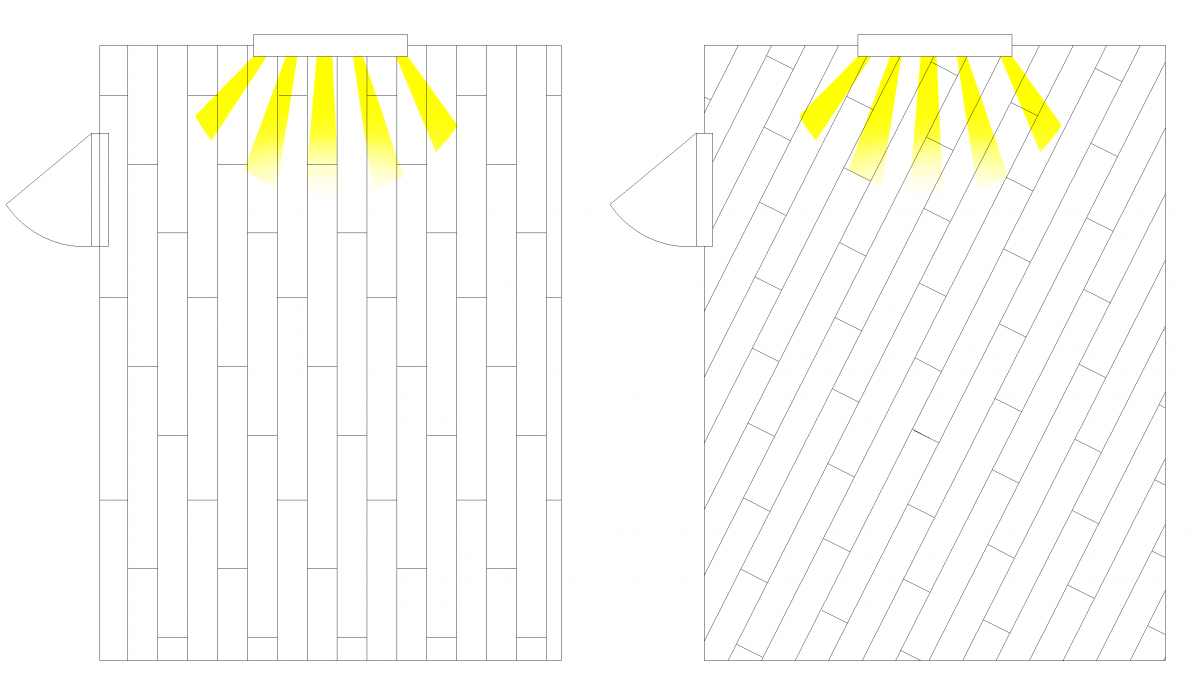
Next, you need to choose the direction of laying the laminate. If the windows are on the same wall of the room, then it is recommended to use a direct laying of the laminate along the direction of the sun's rays. This is due to the fact that when laid across the direction of the light source, the shadows from the panel joints will be more visible and may slightly spoil the appearance.
According to the method of connection, the laminate can be divided into adhesive and glueless (lock).
The lock laminate is divided, as a rule, into 2 types, depending on the snap-in system. The first type is collapsible locks, or "Click" locks. The second is a latch lock, or "Lock" locks. Also "click" locks are often referred to as a 45 degree lock or "double lock". The main difference in these locks is a feature in the installation of the coating. The main advantages of "Click" locks are, firstly, the low probability of damage to the panels during installation, and secondly, the high strength of the connection. "Lock"-locks are a more economical option. Typically, a laminate with this type of lock costs a little less, but the adhesion quality of the panels is also lower.
Laying of a castle laminate, "Click"-locks.

Let's consider the installation process of the coating with "Click"-locks. To begin with, using a tape measure, we measure the width of the room and calculate the width of the panels of the last in a row laid out along the wall. If the width is less than 5 cm, then it is necessary to cut the boards in the first and last rows so that their width is the same. In this case, it is necessary to take into account the gap from each wall, which should be about 10 mm.
Laying usually starts from the far left corner of the room in the direction of light along the wall surface with the long side of the laminate panel. At the same time, as already mentioned, expansion wedges about 10 mm thick are installed near the walls, which will serve as a future gap. After completion of work, the wedges are removed. The gaps are necessary so that as a result of thermal expansion, the laminate does not “stand on end”. MirSovetov would like to draw attention to the fact that in rooms with a length of more than 12 meters, the gap must be increased. Its size is calculated based on the ratio of 1.5 mm per meter of length.

So, we put the first board in the left corner of the wall. Further to it, from the end (shorter) side at an angle of about 30 degrees, the next panel is inserted with a groove and snapped into place by pressing the panel to the floor. So we continue to the end of the wall. The end seams of the next row must be shifted at least 30-40 cm relative to the previous row in order to achieve a checkerboard pattern. This is required to evenly distribute pressure across the panels.
There are options here. If you had to cut off a laminate panel at the end of a row desired length, then the remainder of this panel can be used as the first panel of the next stacked row. If a whole number of panels came out in a row, then in order to get a checkerboard pattern in laying, it is better to start with a laminate panel cut in two.
Starting with the cut panel, we also connect the second row to each other with the end shorter sides, not docking with the first row. Then we connect the rows together. To do this, we lift the already interconnected panels of the second row above the floor by a few centimeters, insert them into the crest of the first row (also at an angle of about 30 degrees) and snap them into place by pressing on the floor.

Also, the laying of the next row can be done by first connecting the long sides of the panels, and connecting the end parts by knocking the panels with a hammer. At the same time, in order not to damage the panel, it is necessary to attach a small bar to it.
One of these ways we lay the subsequent rows.
Laying of lock laminate, "Lock"-locks.

In the case of using "Lock" locks, the spike of one panel is inserted into the groove of the other. In this case, the panels must lie horizontally to each other. Next, with the help of a hammer and a bar, the panels are knocked together.
Now let's look at the process itself. Just as in the case of the "Click"-lock, we calculate the width of the last row of panels, taking into account the gap. With the width of the panels of the last row, we again saw the boards of the first and last rows so that they are equal in width.
We start laying the laminate from the far left corner. Laying the first panel. Further, from the end side, we bring the second panel strictly horizontally to it, insert it with a spike into the groove of the previous panel and knock it out with a hammer and a bar. Thus, we lay the whole row.
Starting the laying of the next row, do not forget that the joints of the panels in the row must also be shifted to obtain a checkerboard pattern, which will ensure uniform pressure on the entire surface of the floor to be laid.
The first panel of the second row, bringing it horizontally to the first row, we connect the spike into the groove. We also connect the second panel of the second row with the first row, while slightly retreating from the end seam of the first panel by a few centimeters. The end seams are connected by tucking the second panel to the first.
Laying the last row and latest panels in a row (laying against the wall) is carried out using a clamp. In this case, you will need to cut the panel exactly to fill the space left between the wall and the penultimate panel (including the gap for expansion wedges). In order to cut off the necessary part of the laminate panel, MirSovetov recommends the following method: put it on top of the penultimate panel so that their edges overlap each other one to one. On top of them we apply another, third panel, but already so that one of its edges is adjacent to the wall. On the opposite edge of the third panel from the wall, draw a line on the second panel - this will be the part we need for laying.
In this way, we lay the entire surface of the floor.
Laying adhesive laminate.
The main advantage of adhesive laminate is the reliable protection of the panel joint from moisture penetration, as a result of which the service life of the coating is extended. Cons - more complex installation and additional costs for glue. The operation of the floor can only be started 10 hours after laying. Due to the fact that the panels are rigidly attached to each other, the coating can no longer be disassembled and reused. In addition, adhesive laminate is not recommended for use on underfloor heating.

When laying the adhesive laminate, a special water-repellent adhesive is applied to the ends of the panels. Then the panels are connected according to the tongue-and-groove principle. Here it is important in no case to save on money, for example, by using ordinary PVA glue. It is water-based and its use will most likely cause the laminate surface to bulge, resulting in broken joints. You can buy a special water-repellent adhesive at a hardware store or ask your laminate flooring store for availability.
The amount of glue applied is selected according to the manufacturer's instructions. Best Option there will be glue applied along the entire length of the groove, both on the short and long sides of the panel. All recommendations for installation direction and gap setting are the same as for glueless laminate.
Let's get to the setup. First, we lay the first row of panels with an established gap. To do this, lay the first panel with a groove against the wall. After that, glue is evenly applied to the upper edge of the end groove of the second panel. MirSovetov recommends applying glue in excess to ensure a reliable connection. We insert the tongue of the next panel into this groove and carefully knock it out with a hammer and a bar, wipe the remaining glue that has come to the surface with a damp cloth. The process is repeated until the row is completely laid.
After the first row of laminate is laid, proceed to the second row. We cut the first panel of the second row in half, in order to offset the end seams. We coat the side of the groove of the panel of the second row with glue and fasten it to the panel of the first row. We knock out the panel with a bar and a hammer. Next, attach the next panel. We apply glue to the side and end groove and, having shifted slightly from the first panel of the second row, we knock this panel to the first row. And then we knock the second panel to the first. Excess glue is again removed with a cloth or a damp sponge. After laying the first 3 rows, it is recommended to wait 2 hours for the adhesive to dry. We continue the process until the surface is completely laid. When laying the last row, it is recommended to use a crowbar to connect the rows. They need to work carefully so as not to damage the laminate panel or wall.
If heating pipes pass through the floor, it is recommended to make a template from paper, which is transferred to the installed panel. Holes are cut with a jigsaw. At the junction of the panels with the door frame, also do not forget to leave a gap. After the laying of the laminate is completed, the expansion wedges are removed and the gap is closed by installing a skirting board. Important! The baseboard must be fixed to the wall, not to the floor.
That's all, good luck.
Laminate is a versatile floor covering a large number advantages, which include the possibility of self-laying. It is about laying this type of flooring, the nuances that may arise in the process, that will be discussed in the article.
Like any type of flooring, laminate flooring must be laid on a level surface, which can be a wooden or concrete base. However, even at the stage of choosing a certain trademark, collections, it is worth considering the appropriate class, which is determined by the parameters of the use of the room.
Today, manufacturers present a large number of laminate models on the market, differing in their strength, wear resistance of the upper protective layer, locking system, and decors. It is important to understand that the use of laminate, in rooms with increased level humidity, despite its merits, is not advisable.
In order for the coating to last as long as possible, it is necessary to adhere to the manufacturer's recommendations regarding its operation. That is, the room must be necessarily heated, with a constant air temperature, and it is also desirable to prevent frequent changes in the level of humidity in it. This is explained by the fact that the basis of the lamella is a wood board, which has the ability to absorb moisture. In the process of releasing excess moisture, there may be cases of complete or partial deformation of the surface.
Subfloor preparation
The main requirement for the process of mounting lamellas is a perfectly flat surface. In this case, it is necessary to pay attention to what type of base the coating will still be laid. Among the acceptable options are concrete, wood, linoleum. It is important to understand that it is strictly forbidden to install a laminate on an uneven, soft floor, this can lead to breakdowns of the locking system, and as a result, it will lead to a complete deformation of the base in the shortest possible time.
When laying laminate flooring on a concrete floor, make sure there are no cracks, holes, or other deformations. For this, experts use a rule 2 meters long. Putting it with an edge on the floor surface, you should draw a wide spatula between the rule and the base, thanks to which you will be able to find out the level of difference, if any. More accurate information can be obtained using a laser or hydro level. The maximum possible difference per 1 m² is no more than 2 mm, otherwise it is necessary to start leveling the base with special building mixtures and wait for them to dry completely.

When laying on a wooden floor, it is also important to pay attention to evenness. If differences are detected, they are eliminated by a grinder. It is also worth making sure that there are no squeaks, and check all the elements of the base for strength under weight human body. If during the inspection creaky places or weak boards are found, they should be replaced or strengthened. In modern practice, craftsmen often align the wooden base with fasteners. OSB boards plywood silt.
Required Tools
To know how to properly lay a laminate, and what is required for this, you should read the manufacturer's instructions and the recommendations of experienced craftsmen. If you still decide to do the styling yourself, you should take care of the availability of all necessary tools and materials.
The laying procedure itself is carried out quite quickly, provided that all necessary materials purchased in the required quantity:
- laminate - its required amount exceeds the total area of \u200b\u200bthe room within 3-10%, depending on the chosen method of laying lamellas on the base.
- waterproofing film - you can purchase a larger quantity, since its strips are overlapped.
- substrate - its quantity corresponds to the area of \u200b\u200bthe room. Today, the range of materials for the substrate is quite diverse. From the more expensive segment on the market there are wooden substrates based on cork, pine, as well as specialized substrates for the "warm floor" system. Cheap materials include fiberboard, foam film. The latter option is the most common due to significant savings, however, the life of the lamellas on such a substrate depends only on the correct use of the base.
- wedges, 0.8-1 cm wide, used to provide a technological gap between the wall and the lamellas.

If we talk about construction tools, then you should take care of the availability:
- jigsaw, saw, mobile machine with a saw blade;
- building corner;
- clerical knife;
- building level;
- roulettes;
- pencil
- hook for mounting lamellas;
- hammer.
The presence of all these tools, or their analogues, will allow you to accurately reproduce the entire installation procedure correctly, with the lowest cost of materials, and with high level accuracy . Many are interested in whether it is possible to use a saw instead of a jigsaw. The answer is definitely possible, but the procedure itself will require high costs time, strength, as well as accuracy from the performer.
How to lay a laminate with your own hands - instructions
Very often, craftsmen compare laying laminate with assembling a designer, because the principle of work is approximately the same. Based on this, you can understand that doing all the work yourself is quite realistic, the main thing is to strictly follow all the recommendations and rules regarding each of the four stages:
- elimination of base defects and its alignment;
- waterproofing film flooring, and substrates;
- laying laminate;
- plinth installation.
When using a cork or pine substrate on a sand-cement screed base, then it is worth taking care of the vapor barrier flooring, which can be a standard polyethylene film having a thickness of 100 microns. The film is covered with an overlap, which is approximately 20 cm; an adhesive tape is used to fasten the edge of the film and the strip.
Most often, specialists use a propylene substrate having a thickness of 2-3 mm. With its use, there is no need for flooring waterproofing material. Rolls of propylene film are rolled out over the entire area, and fastened end to end with construction tape. Butt-to-butt flooring allows you to avoid unnecessary level differences and prevent the effect of lamella squeaking.

Execution steps installation work:
- The collection of the starting row of boards, by combining the spikes and grooves of adjacent planks. To achieve the ideal level of entry of the lock, it is worth using a hammer. im with reverse side boards, using a damper bar that is substituted for the lock, you need to drive in a lamella to achieve a perfect joint.
- All panels in the first row are stacked with a spike against the wall, and in order for it not to interfere, it is carefully cut with a jigsaw. Wedges are mounted along the long part of the first row, as well as on the sides of the boards, providing the necessary gap between the wall and the coating. They are removed only after the last board is mounted.
- When starting to form the second row, it is worth taking care of shifting the dies by at least 20 cm. To do this, one lamella is sawn and a new row is started from it. The formation of the strip is carried out in the same way as in the case of the first row. To connect both rows, you need to use the help of an assistant. At a certain angle, the assembled strip is brought with a tongue to the groove of the first row, after which you can begin to gradually lower it down until a characteristic click, which will indicate that the spike has entered the groove. After carrying out this entire procedure, all the lamellas must also be knocked out with a mallet or hammer, and wedges should be inserted.
- Further formation of rows occurs in the same way. The last row deserves special attention, because more time and effort are spent on it. Here, the fitting of each lamella is carried out individually, after applying it with the wrong side to the overall assembled structure, appropriate marks are made, along which the cut is carried out. Such individual measuring will help to avoid undesirable situations that arise due to the unevenness of the walls. Also, do not forget about the indentation of 1 cm, which should be between the wall and the lamellas. Fastening the lamellas of the last row is difficult, so for this it is advisable to get a hook that ensures perfect docking and preparation of each die.
- After the last board has been laid, all the wedges can be removed. In the case when wedges were not used, deformation of the structure and its swelling can be expected, since the laminate is a floating floor that quickly responds to changes in the microclimate in the room.
The specifics of laying different locks
Each manufacturer provides an individual locking system with unique properties that contribute to ease of installation work. However, despite this, each lock is designed on two main systems - “lock”, “click”. At their core, they make up two types of tongue and groove, and differ in the principle of fixing the lamellas to each other.
Laminated boards with a click lock are initially connected at an angle, after which they are pressed against the base until the tenon fully enters the groove. For the best connection effect, after laying each board, the craftsmen finish it off with a rubberized hammer. When doing this, be very careful not to damage the side lock. The slats with the “lock” locking system are laid horizontally, and their complete fixation is achieved by driving in the slats.
We go around corners, bumps, pipes
The area of any room cannot be absolutely flat and without any obstacles. This situation is explained by the presence of communication and engineering networks (pipes, legs of bar counters), corners of complex geometric shapes, doorways. Of course, the presence of each of these factors complicates the installation process, especially if it is carried out by a person for the first time.

To avoid all these difficulties, it is enough to adhere to the standard rules:
- If there is a heating system pipe in the room, the lamella should be laid around the pipe. To do this, you need to attach the board to the pipe, and accurately mark all points of contact with the object. After that, the distance from the pipe to the wall is measured with a tape measure, and the data is also drawn on the back of the board. According to the intended layout, a hole is cut out, it should be slightly larger than the diameter of the riser, by about 3 mm.
- In the event that the pipe prevents the lock from snapping into place, you need to cut off the comb and lubricate the cut with an adhesive solution. In the future, the resulting gap is hidden by decorative plugs that match the color of the plinth fittings.
- In situations with a doorway, it is worth starting the board flush with the door frame. To carry out this manipulation, in the racks door frame a small cut is made, its height fully corresponds to the thickness of the floor covering. After that, they start trimming the dies, so that it is possible to partially or completely overlap the threshold, or place it under the box. The final fastening takes place with a clamp, and the ideal appearance, without any visible gaps and differences in height, allows you to achieve special stick-covering thresholds.
Subject to all the rules and recommendations listed above, the installation process will not take much time, and can be easily done on your own. If you have taken care in advance of the correctness of the miscalculations, the availability of all tools and materials, and also performed the technologies recommended by the manufacturer, such a floor covering will last for many years.
today it can be quite diverse - the range intended for this purpose is quite wide. However, as they say, the new is the well-forgotten old. Previously, parquet was an indicator that the apartment was good. Nowadays, of course, you will not find parquet laying, but there is. In today's article, we'll talk about how to lay a laminate with your own hands ( step-by-step instruction with photo examples will help in this), we will deal with the methods and nuances of the production of such works. We will also provide several step-by-step video instructions for laying laminate with your own hands.
Laminate is a material that requires a perfectly flat base. That is why before starting work on laying the floor is thoroughly prepared. Sometimes there are such "masters" who claim that irregularities are not at all terrible due to the laying of the substrate under the laminate. If you decide to use the help of a professional and you come across just such a one - drive him in the neck, there can be no question of any quality here. Let's figure out how to prepare the base before laying the laminate with your own hands.


Preparing a wood or concrete subfloor before laying laminate flooring
Let's start with the concrete base. Using a long rule, we check the evenness of the surface. If there are pits or bumps, then significant gaps will appear between the rule and the floor. In this case, the surface should be leveled. For this purpose, a self-leveling mixture has recently been successfully used, which must be poured over the floor and dispersed. It does not dry for long, but. Laminate can be laid after the surface has completely dried.

Wooden floors are also suitable for laying laminate flooring. The main task is to get rid of creaking boards. If the floors are old, the boards can go bumpy - in this case, you can not do without a grinder. Parquet, plywood - all this is a completely acceptable base, if there are no damage in the form of rotten places. The surface must be thoroughly dry before laying.
Can laminate flooring be laid on other surfaces?
In fact, the list of surfaces suitable for laying laminate flooring is unlimited. It can be parquet, linoleum,. The main condition is that the base must be even. Parquet should not have rotten planks, and tiles should not be chipped.

Related article:
Scope, characteristics, advantages and disadvantages of linoleum and laminate, comparison of coating parameters, expert opinion and reviews on the forums - read in the publication.
Laying laminate: methods depending on the location of the board
This material can be laid in several different ways, each of which has its own characteristics. The main types of laminate flooring are:
- along the room, parallel or perpendicular to the lighting from the window;
Helpful information! Using the second option, you should be prepared for the fact that material consumption will be higher due to more waste.
The diagonal arrangement of the panels looks more aesthetically pleasing, but there is much more waste with such installation:


Laying laminate: rules for the production of work when located along the room
How to lay laminate on the floor? If you plan to lay the coating along the room, one important detail should be taken into account. When the boards are perpendicular natural light, all joints will be clearly visible, while with parallel placement they are almost invisible. Otherwise, there are no differences, as well as restrictions - everyone does this work in the way that is convenient for him. The only thing to consider is the displacement of the boards relative to each other. The seams of each subsequent row should be shifted relative to the previous row by at least 40 cm. This will give strength to the hitch and prevent the boards from dispersing later.

Diagonal laying scheme: difficulties and features
Laying laminate in this way is a little more difficult. In this case, how to start work will depend on the skill of the worker. There are three options here:
- We start from any corner. It turns out that the first board will have the shape of a triangle.
- We step back a little from the corner, sawing off a board in the shape of a trapezoid, which, in fact, is practically an analogue of the first option.
- We start laying from the middle of the room - it is not recommended to choose a similar method without (at least the slightest) experience in such work.

Various insulating layers: options for laying laminate on a substrate
After preparing the base, an insulating layer is laid on it, and after that - a substrate, a special shock-absorbing material that protects the laminate locks from an external load that is detrimental to it. Let us analyze in detail what goals these materials pursue.
Insulation layer: why is it needed and is it necessary to use it
As an insulating layer, a special membrane or polyethylene is used, with a thickness of at least 0.5 mm. If it is not possible to lay the material in a whole piece, the strips overlap (10-15 cm) and the joints are glued with adhesive tape. This is done to prevent moisture from entering the bottom of the laminate and causing it to swell. Many people ignore this stage of laying, but experts recommend doing it.

Substrate for laminate: materials of manufacture
There are 4 main substrate materials:
- polyethylene foam is a short-lived material that quickly loses its shape. Only suitable for cheap laminate;
- polystyrene foam - the average price / quality ratio. Absorbs noise well;
- polyurethane on foil - recommended for arrangement;
- - this substrate is considered the best due to the high rates of and. However, when using it, high-quality is necessary - the “cork” does not like dampness.
Types of substrates for laminate during installation - they protect the locks from mechanical stress:


How to properly lay a laminate with your own hands and what you need for this: a complete instruction with photo and video reviews
Before starting the main work, you should prepare the necessary one - it’s not a matter of running after one or the other while laying. Here's what we'll need:
- With wooden block(you can use a block of dense rubber). Through it, blows will be made to the laminate to snap the lock;
- pencil, tape measure, miter box with a hacksaw. If there is no miter box, you can use a square and a jigsaw;
- gap wedges. They are used to level the required gap between the coating and the wall;
- a special bracket called a mount. It will help to snap the lock into place when installing the last board against the wall.

Calculations made before laying the laminate on the floor with your own hands
Before you buy material, you should calculate how much it will take per room. The calculation will depend on the installation method. To begin with, we take the area of \u200b\u200bthe room and divide it by the area of one panel. Next, add 10% for straight styling or 15% for diagonal. With this calculation, the material will definitely be enough.
Preparing and leveling the surface of the base
First of all, we sweep out all the garbage and check how even the base is. Permissible difference - 2 mm / m. If the base is concrete, cover all cracks, holes, let the surface dry thoroughly. wooden surface we level with a grinder (if necessary, with a planer) and close it with even material. It can be chipboard, OSB or plywood. At the same time, the sheets are stacked in a checkerboard pattern, fastened, and the seams are smeared with mastic.

Important! The more carefully the base is prepared, the longer the life of the laid laminate will be. Any irregularities will begin to have a detrimental effect on the coating in the first year of operation.
Insulating coating and underlay: laying materials under the laminate correctly
On the prepared dry surface we spread polyethylene or waterproofing (the strips overlap). We glue the seams of polyethylene with adhesive tape. The membrane does not require this - it has an adhesive layer along the edge. You just need to remove the protective film. The insulation layer should go on the wall by 10-15 cm.
We unwind and lay the substrate. Here overlap is not allowed, the layout is end-to-end, the seams are also glued. Small gaps between the stripes are allowed - it is unlikely that it will be possible to do without them. Before you figure out how to properly lay the laminate with your own hands, we suggest watching a video on laying the substrate.
How to lay a laminate with your own hands: step by step instructions for the process with photo examples
Consider in detail the entire process of laying flooring.
| Illustration | Action Description |
 | To begin with, as already mentioned, we are preparing all the tools that may be needed in the work, so that after it starts, nothing distracts us. As you probably noticed, there is no hammer with a finisher in the photo. The reason for this is the lock system, which allows it to be locked manually. |
 | The first strip is located in such a way that the protruding part (the spike of the lock) is towards the master. Otherwise, nothing but a waste of nerves, you will not succeed. |
 | We collect the first strip. To do this, we insert the next part of it into the lock, holding it at an angle. After we see that the connection is in the right place, we lower the board. A characteristic click should be heard, which will notify you that the lock has clicked into place. |
 | The last board is a little longer. We measure the part that needs to be cut off by unfolding the laminate (should be cut off from the side adjacent to the wall). If used, then you need to cut from the back, if a simple hacksaw, then from the front - so we will avoid chips. |
 | We break the cut off part and use it instead of the gap plates, which are necessary when laying the laminate. In addition to saving, with such pieces we achieve uniform pressure on the board when the subsequent locks are snapped into place, in contrast to the gap plate wedge. |
 | We continue: the second row is in line. There are no problems with the first board - the lock also snaps into place at an angle, as was done in the first row. |
 | Connecting subsequent strips, we snap the lock on the narrow side, and on the wide side, such a gap remains. It snaps into place with a sharp and not even too strong blow of the palm from the end of the strip. So we pass gradually the whole room. |
Thus, it is possible to lay the flooring for one person without an assistant. If the installation technology is not fully understood by the Dear Reader, we suggest watching a video on how to properly lay the laminate.
And now we suggest that you familiarize yourself with the finished works in order to know what result you need to achieve by laying the laminate.
Examples finished works- perfectly laid laminate. This is the result that should be achieved.
1 of 9