How to finish an unheated terrace. The better to sheathe the veranda. Finishing a veranda in a private house - photos of finishing materials and their purpose
Veranda is not just non-residential premises. This is the "face" of the house, where in the summer you can have breakfast, enjoying the morning coolness. And if the veranda is insulated, it can become a full-fledged recreation area even in winter. A full-fledged decoration of the veranda will help in this.
General requirements for materials
Quite strict requirements are put forward for the materials that are used for finishing work:
- Resistant to temperature fluctuations. Regardless of the type of veranda (open or closed), usually the temperature inside and outside is almost identical, provided that the building is not heated.
- Moisture resistance. High humidity is another problem that the finishing material must cope with. In particular, this applies to the open type of the veranda.
- Burnout resistance. Usually verandas are rooms where there is a lot of light, because of which the finish can fade in bright sunlight, losing aesthetic qualities.
- Safety.
- Price.
These qualities relate to materials that will be used both inside and outside the veranda.
In this video you will learn a few useful tips on the interior decoration of the veranda with their own hands:
Work outside
Choosing how to sheathe the veranda from the outside, you need to focus on appearance at home, otherwise the room will stand out from the overall picture. Versatile materials can be combined with almost anything. Universal is called:
- tree;
- plastic;
- stone and brick.
Wood
Wood is difficult to work with. This material deteriorates quickly without proper care. Its positive aspects cover the following features:
- Attractive appearance, which is achieved due to the variety of textures.
- Thanks to the tree, you can implement veranda projects in any style. From old Russian, decorating the corners of the room with carved pillars, to contemporary modern with little processed wooden surface. It looks great with glass, stone, brick, wood and wrought iron elements.
- Environmental friendliness.
The disadvantages include:
- High exposure to weather conditions. Various impregnations and coatings protect against influence environment, but do not guarantee complete protection of the veranda. In addition, tree protection procedures will have to be done regularly, which takes time and effort.
- Wood is a flammable material.
- financial component. Wood is expensive. Add to this the cost of regular maintenance of the boards and you get a pretty solid amount.
bricks and stones
Usually, not the entire veranda is made of stone or brick, but only the foundation and several pillars that support the roof of the structure.
Consider the positives:
Cons of the material:
- Stone and brick are expensive materials.
- Not compatible with wooden houses, which can be a problem if you are building a veranda in the country.
- The complexity of construction.
Plastic
Plastic is one of the most popular materials. Its advantages include:
- Low price.
- Ease of operation and installation of the casing.
- Wear resistance and weather resistance. High-quality plastic withstands extreme heat and frost.
- High sound absorption and excellent thermal insulation properties.
- The material is able to withstand high loads.
- Under the influence of the sun and temperature changes, the material loses its decorative properties over time.
- This is an artificial material.
Interior wall decoration
The interior decoration of the veranda is carried out with the following materials:
- lining;
- decorative plaster;
- PVC panels;
- MDF panels.
All of them have their own specific installation.
clapboard
The interior decoration of the veranda with clapboard is a classic design option.
For the veranda, a standard thin lining of 5-10mm is usually used. As a rule, this is a board made of wood, its products or plastic. There are differences depending on the profile. Distinguish:
- standard profile. The variant is distinguished by beveled edges, forming noticeable gaps between the panels.
- Calm. It features relatively soft transitions, due to the small angle of grinding edges.
- Europrofile. After the coating is assembled, it forms a certain pattern.
The boards are connected using a special system consisting of spikes and a groove. But keep in mind that working with lining is very difficult. Wooden panels shrink or swell, and plastic ones are not so whimsical.
The following tools are required for installation:
- screwdriver;
- kleimers (special metal latches).
The lining can be located horizontally or vertically. You can also try to install it at an angle. It depends on your skill, imagination and the characteristics of the room. And one more piece of advice - do not try to squeeze the spikes into the grooves all the way.
 Lining - one of the types of decoration of the veranda
 Decorative plaster
To finish the veranda from the inside, plaster is often used. This is a mixture that, after being applied to the wall, turns into a finished coating. There is a huge variety of different coatings:
- plaster, which includes colors to give the walls the desired color;
- plaster imitating stone;
- Venetian, which repeats the texture of marble.
The appearance of the veranda also depends on the technique of applying the material. A different result can be achieved by simply using a little more plaster or by making different types smears. In addition, with the help of plaster, you can create sgraffito - stucco paintings on the walls.
MDF and PVC panels
MDF panels (Medium Density Fibreboard) - wood fibers that were obtained in the process of processing solid wood bars. The chips are then pressed under high pressure and temperature. The veranda can be sheathed with slabs up to 10 millimeters thick. Finished block has the following qualities:
- has high sound absorption rates;
- tolerates high and low temperatures;
- convenient to work.
But the material also has a minus - it reacts badly to moisture (swells and disintegrates). If condensation often appears in the veranda, MDF panels will not work.
For the convenience of work, several formats of MDF panels are made:
- separate sheets;
- lining, etc.
It is enough to fix them to the wall with screws.
PVC panels - a material that is made of polyvinyl chloride. It is very comfortable. Because the panels are plastic, they can be bent to fit any room shape.
PVC panels have the following positive aspects:
- light weight;
- high stability in contact with water;
- resistance to high temperatures;
- low cost.
But there is also a minus - the material cracks in the cold. So if the winters are harsh and the temperature often reaches -15, it is better not to use PVC panels in an unheated veranda.
If you do all the work yourself, it is advisable to choose a material with pins and grooves for quick installation. The work process is as simple as with MDF.
For installation, special fasteners are involved. And you need to fasten the panels with a screwdriver. In order not to damage the material, do the operation on low power. If you bought a kit ready for installation, then here you can generally do without a screwdriver, managing only clamps and screws.
Ceiling improvement
The ceiling is the part of the structure that bears the greatest load. It is constantly exposed to moisture due to seasonal precipitation, and in winter it must also withstand the weight of snow. Pick up right stuff not easy. It should be at the same time: durable, lightweight, moisture resistant.
These parameters correspond to two materials:
- polycarbonate;
- weaving.
They are easy to install and do not require special care.
 The ceiling is one of the heavy elements
 Polycarbonate
Polycarbonate - transparent modern material. It is very similar to glass, but free from its shortcomings. In particular, polycarbonate is strong and very light.
It has several types:
- Monolithic. It is a solid material produced in the form of plates. It looks like glass. It steadfastly withstands loads, therefore it is better suited for the roof.
- Cellular. Inside, this polymer has a honeycomb division. It is less transparent, but has the same high light transmission. Such polycarbonate retains heat much better and is much lighter than a monolithic counterpart.
Polycarbonate can be transparent or colored. Attaching the material is easy. To do this, create a frame on which you want to install the sheets. They are fastened with galvanized self-tapping screws with thermal washers to prevent leakage.
Weaving
If you want an original ceiling on the veranda, then the cheapest alternative design solutions may become a braided version. Outwardly, it looks like the walls of a basket, but it looks stylish. Usually for weaving use:
- thin moisture resistant plywood;
- veneer.
The installation procedure in the house is quite simple:
- Saw the sheet into several even strips. To do this, you can use the machine so that the cuts are neat, otherwise the weaving may be fragile.
- Weave the fabric on a flat surface. Weave in a checkerboard pattern, knocking out the protruding edges with a rubber mallet.
- Hide the “tails” of the stripes from the wrong side of the weave.
- Since the structure is quite heavy, it is impossible for one person to lift it. To facilitate the work, use the ropes that are connected along the edges. It is better to lift from the side of the door.
- You can fasten the material with slate nails.
To hide the joints, install skirting boards. For greater aesthetics, varnish it.
Flooring
The final chord in the design of the veranda is the choice floor covering. Options may be as follows:
- terrace board;
- tile;
- rubber;
- linoleum;
- cement.
To finally make a choice, think about whether you will walk barefoot or in shoes on the veranda. In addition, a carpet or carpet can be laid on the floor in the veranda.
Terrace board
Terrace board is essentially processed lumber. This is a three-layer construction:
- Bottom layer. This cover has ventilation slots.
- middle layer. There are cavities that allow the wood to expand without deforming the overall structure.
- Upper. This is the front of the board, because it is smooth.
This material has many advantages:
- the board is easy to mount;
- the floor is not much different from the wooden one;
- The coating is durable and heat-resistant.
So that the floor does not deteriorate, it is better to give preference to boards that are varnished. Installation must be done on a frame with a lag pass. Moreover, the logs must be placed perpendicularly with an interval of 40-60 cm. After that, the board can be fixed. It is better to use nails or screws as a fixative.
Tile
The plate is a difficult material to install. But the difficulties justify themselves, since the tile has the following positive qualities:
- it is shockproof;
- easy to clean and withstands rain;
- has a variety of designs.
Installation of tiles is carried out according to the following steps:
- To begin with, the surface must be leveled.
- Next is the screed.
- Preparation of materials. You will need a special tile adhesive.
- Tiles are level. Between the corners you need to install special crosses to align the dimensions of the seams.
- Next, mask the joints with a special grout. If the grout gets on the tile, don't worry. It will wash off the surface, but will remain in the gaps.
But there is one difficulty - cutting. This must be done if the room has non-standard dimensions. This operation is almost impossible to do without a tile cutter, although you can try replacing it with a grinder.
Linoleum
If the classic wall decoration in the veranda is lining, then for the floor - linoleum. The coating is made of polyvinyl chloride in combination with polymers. The advantages of the material include:
- water resistance (but only if fixed in one piece);
- impact resistance and wear resistance;
- ease of installation and maintenance;
- huge assortment;
- low cost.
Installation of the material can be done even by a non-professional. The main thing is that the floor surface is fairly even. Next, you need to roll out the roll, align it and fix it near the plinth. If the linoleum is cut, individual sections can be fastened with a special strip. But due to the fact that the material passes the cold, you need to use heaters.
Rubber
Rubber flooring - rubber, which is covered with a floor. On the market, it is represented by slabs or monolithic blocks. From positive sides material can be distinguished:
- impact resistance;
- absolute water tightness;
- resistance to temperature changes;
- phenomenal wear resistance;
- a wide range of design solutions.
It is important that the floor is level here. To connect the plates together, you need polymer glue.
The installation procedure is similar to working with ordinary tiles. But in this case, crosses are not needed, because the plates fit more tightly. If rolled rubber is used, the joints are sealed with a soldering iron or a building hair dryer.
 Rubber has its own nuances
 cement mixtures
You can finish the floor in the veranda in the standard way using cement. Despite the banality, the option remains the most labor-intensive. At the same time, such a floor can even be laid on a monolithic foundation. The result is a coverage that is different:
- impact resistance;
- water resistance;
- resistance to temperature changes.
It does not require careful maintenance. Indeed, after cement mixture installed, it must be polished to a shine with a special machine.
There are many other versions finishing materials like OSB-plates or self-leveling floor, but all of them are in less demand among consumers.
Open verandas require a more careful approach to the choice of materials for finishing the ground. The decision from which to install the ceiling on an open veranda should take into account that when seasonal influences change, the effect of moisture on precipitation and other atmospheric influences will be subject to temperature fluctuations. With this in mind, it is necessary to choose a design and material that can withstand such harsh operating conditions.
The main problem will be the choice of the most suitable material.
The house has a veranda: expanding the usable space (more than 120 best projects)
It should be waterproof, strong and beautiful. At the same time, it is very important that the ceiling cover on the open veranda is well connected with the decoration of the outer walls of the house, which is part of this room. The choice of materials presented in stores that meet these requirements is not overwhelming:
- Plastic panels
- Both and boards
- Paving with plastic or metal
- drywall
- OSB panels
In the case of the last two materials, you will not only have to cut the ceiling, but also finish the surface.
plank
If you choose how to cut the ceiling on the verandas on outdoors, it is relatively inexpensive and fast, then the most convenient option there will be a plastic panel.
Coverage is simple and takes some time. The cost of such materials is also not too high, which will allow you to get a great upper limit with minimal costs.
There are only a few drawbacks to this resolution.
These include relatively low cold strength - the plastic becomes brittle and can be easily damaged. Also, the assembled surface is aesthetically far from perfect - the cheapest slabs don't look very nice, but they are very suitable for budget finishes.
Both and boards
One of the best options relationship of beauty and value.
For a small amount of money you can get very beautiful ceiling from natural wood. You can draw it in the color you want and repeat if necessary. Installation is not a problem - even an experienced person will have to deal with, and the time for all the work will be at least mandatory.
In addition, wood is completely compatible with any type of wall decoration. If you decide to cover the ceiling on the terrace, with a smaller renovation budget, you can stay at the base, but if they allow it, you can buy beautiful plates from different breeds tree.
The disadvantages of this possibility are the seasonal deformation of the material and the need for processing wooden parts special compounds that prevent rotting and damage by pests.
In addition, panels and substrates can warp due to temperature changes. In this case, the installation must be taken into account.
toilet
Material originally intended for decoration vertical surfaces, will perfectly perform the function of a decorative ceiling in this part of the house. The panels are made of durable plastic or metal and are ready for any challenge in outdoor use, so it is recommended to install the ceiling on the veranda.

There are virtually no downsides to this design, except that some grades of plastic parts may fade over time.
The cost of the cover is completely affordable and the installation is very simple, with special fasteners.
Drywall and OSB panel
Both materials can only be used if they are purchased waterproof. Their standard types combine one drawback - poor water resistance.
Therefore, when buying, pay attention to the marking of panels and sheets. Installation is not particularly difficult, depending on the size of the parts, it takes some time.

However, additional complications begin - GKL must be installed with a special plaster suitable for outdoor use, and after both types of wallpaper must be painted with weather-resistant paints.
Other things that are the same, when choosing what to overtake on an open veranda, it is better to give priority to the OSB panel. Unlike GCR, it does not require any additional output other than coloring.
Finishing the veranda inside and out

Veranda decoration: decoration in style
A veranda is usually called an extension adjacent to one of the walls of the house. This building belongs to the category of summer, unheated premises. By their design, verandas can be either open, that is, under a roof, but not glazed, or closed.
It is quite natural that the decoration inside the veranda is made depending on this fact. And yet, the configuration of the extension and its exterior finish should harmoniously fit into the exterior of the house.
Design features of the verandas
The veranda plays not only a decorative function, but is also necessary from a purely practical point of view.
A well-lit room, without cabinet furniture, decorated with a variety of indoor plants, is the best suited for a pleasant stay in summer time.

Covered veranda with lots of plants
- The veranda can be combined with the main entrance to the house. In some cases, the entrance to the veranda can be carried out from any room, that is, it does not have access to the street.
Such a veranda is shown in the photo above. But such an extension should be provided in the process of building a house.
- If there was no veranda in the project, then it can be attached to the house later. But in order not to have to punch doorway in the bearing wall, this is done on the main facade, in front of front door. You won’t have to carry out any engineering communications there, so you can build a veranda with your own hands.
- Naturally, the extension should correspond as much as possible to the design of the house.
The main thing is to correctly complete the foundation for the veranda. It is better to do this in the summer, otherwise, after thawing, the ground may subside, and your veranda will simply move away from the wall of the house.
Think carefully about what it will be built from and how it is finished on the outside so as not to spoil the appearance of the building.
- Usually, a columnar foundation is made under the veranda. This is quite enough to withstand the weight of the frame and its skin.
The brick pillars of the foundation are laid out in pits up to one meter deep, under each corner post. If the veranda is more than one and a half meters long, intermediate pillars are also made.

Scheme column foundation
- In the pits dug under the foundation, sand cushions are first arranged, about twenty centimeters high.
Small gravel is poured over the sand, and it is poured with a liquid solution. In order for the water from the solution not to go into the sand, it is better to lay a roofing material with a bend of 10 cm along the walls of the pit on it, before filling the rubble.
- The resulting concrete pad will be the support for the brick column. Before laying it out, concrete must be coated with liquid glass, or bitumen. Any other waterproofing composition will do. The height of the pillars must be calculated so that the floor mark of the veranda is 20-25 cm lower than in the house.
- After the masonry is completed, the inner cavity of the columnar foundation is filled with gravel, stone, broken brick - any material at hand.
The outer surface of the pillars is also coated with a waterproofing compound.
- The foundation pillars will be supported wooden beams(lags). Beams before laying must be treated with an antiseptic solution. This will not only protect them from saturation with moisture and decay, but also protect them from damage by insects and rodents.
This is just one of the options for building a foundation for a veranda. It may have a different design, depending on the size of the veranda under construction and its walls, if any.
In each case, you need instructions, and best of all, a project.
Veranda wall decoration
If the house to which the veranda is attached is log, made of timber or frame-panel, then the most organic option would be to make the walls of the extension made of wood. Although, you can make a frame from a metal profile, and then simply sheathe it with clapboard. Especially if the veranda is planned to be glazed.

Aluminum stained-glass windows in the veranda glazing
- Then for this purpose you can use aluminum stained-glass windows installed directly on the plinth of the veranda.
Their use solves two problems at once: the erection of walls and their decoration, or rather, its absence. Washed glass - that's the whole finish.
It remains only to decorate the plinth and intermediate racks: with facing bricks, or, for example, with stone.
- It is possible to solve such a problem as finishing verandas, combined with the construction of walls, with the help of glass blocks. This material is both constructive and decorative.
- In addition, the country's construction markets offer a truly huge range of blocks: with corrugated glass, colored, matte.
There are options for blocks, with decorative applications in the inner cavity - it's so beautiful!

Glass porch walls
- Various options for glass blocks can be combined as you like, make panels, make backlighting.
Of course, the price of such a veranda will be more expensive than the one whose walls are sheathed with plywood or plastic, but the beauty that you get in the end is worth it.
- In our example, the windows of the veranda are small, and are high from the floor. But thanks to the translucence of glass blocks, it is light on the veranda without additional lighting.
By the way, in this case, window openings could be performed on the roof, in the manner skylights.
In the construction of the walls of the veranda, you can combine both options mentioned above: make one wall from glass blocks, and the other two from aluminum stained-glass windows. The fourth wall is bearing wall Houses. It will be decorated in the process of interior decoration of the veranda.
Wood in the veranda
If the veranda is open, then the concepts of exterior and interior decoration are mixed. And most often, such verandas are made of wood: both structural and decorative elements.
- Of all the materials that can be used to build and decorate a veranda, it is wood that will create the most favorable environment for relaxation, saturating the air with its unique aroma.

Wood covered veranda
- Racks supporting the roof of the veranda can be made of rounded logs or timber with a section of 15 * 15 cm.
In the very simple version, as in the example above, the floor of the veranda is made of ordinary edged boards, not even painted. The ceiling is hemmed with a standard clapboard, and the parapet is made of ordinary bars used for mounting the battens.
- But many homeowners do not want to save on finishing the veranda, and prefer to decorate this corner for relaxation, solidly and soundly, as they say, for centuries. For such cases, manufacturers of wood finishing materials will always have the right offers.
- One of these options used today in exterior finishes is decking.
Ways to finish and insulate the ceiling on the veranda: choose materials
Otherwise, it is called a terrace board. This concept can also include garden parquet and deck boards.

Veranda floor lined with garden parquet
- It is made not from solid wood, but from a wood composite. That is, it contains polymer additives.
But in this case, this only improves the characteristics of products that are very durable and are not afraid of moisture. And this is very important both for an open space and for a closed, but not heated.

External decoration of the veranda, made by planken
- Expensive and high-quality wood for outdoor decoration is larch or ash planken.
This is the name of the facade planed board, obtained from a solid array of wood. Planken differs from the usual planed board in the shape of the section, which has beveled and rounded chamfers. The planken does not have connecting grooves, like a lining board, which allows it to be mounted with gaps, and not just end-to-end.

Mounting a planken with a gap
- In principle, a wooden veranda can be attached not only to a wooden house, but also to a brick or stone house.
The main thing that color scheme its finishing was harmoniously combined with the decoration of the facade. But a tree can not only be painted, but also carved in the design of its surface, and craftsmen in Rus' have always been enough.

Finishing outside: wooden veranda with carved elements
Here is a great example of carving in veranda design.
There are twisted pillars, and a beautiful carved parapet, painted in contrast to other structures, and hinged arched elements with a lace pattern. Take note!
Interior decoration of the glazed veranda
The interior design of a glazed veranda can, in principle, be considered as a loggia decoration.
But the veranda, as a rule, is more spacious, which means that it has more design opportunities. So:
- Although this room is considered summer, nothing prevents you from installing heaters on the veranda, as in our next example, and using the veranda all year round and not just in summer.
Then absolutely any finishing materials can be used.

Heated covered veranda
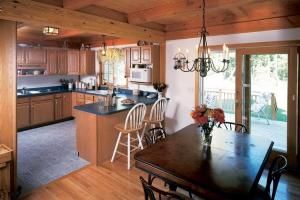
- And here is an example of the interior design of the veranda. In addition to the stained-glass windows, the roof of the room is also made of glass, thanks to which the room is simply flooded with light. To avoid direct sun rays, frosted acrylic glass was used in the glazing of the roof windows.
- An excellent addition to the interior of the veranda can be some unusual blinds or original curtains. The design of the ceiling, of course, will depend on what kind of roof is made. In addition to wood, you can use plastic and MDF in its decoration, hem it with drywall and paint it, line it with polystyrene tiles, make suspended ceiling- yes, anything.

Carpet on the floor of the glazed veranda
Yes, and the walls can be decorated in different ways, but almost always in bright colors.
The floor on such a veranda can be almost anything: from tiles to parquet. In the image above: the floor under the plinth is covered with carpet, around the entire perimeter of the room. Not to do on the veranda without upholstered furniture– well, what a vacation without a comfortable sofa!
Finishing the veranda inside and out with your own hands
Most often, speaking of a veranda, we mean an open or closed extension to one of the walls of the house, where it is convenient to spend time relaxing or having lunch. But the terrace, being one of the varieties of an extension to the house, differs from it, although their concepts are somewhat similar.
A terrace is a structure that has support on pillars, a roof, adjacent to the house on one side. On this side is the exit to the terrace from the house. The remaining sides are open, the effect of unity with nature, which gives the terrace, is very strong. Even heavy rain, which can be observed under the roof of the terrace, fully feel its dampness, humidity, hear all the sounds, will not soak someone who is on the platform open from three sides.
And a cup of tea before going to bed, in an armchair in the fresh air, is a luxury that not many people can afford.
As for the veranda, this building happens both on the first floor and on the second.
Interior decoration of the veranda in a private house photo
Cottages with such a structure on the second floor look quite stylish and impressive. Therefore, much attention is paid to the decoration of the closed veranda on the second floor - this indicates the status of the owner, his taste. This room also has a roof, which can be made in the traditional way, or glass, which will allow a large amount of daylight during the day to be in the room.

Finishing an open veranda in the country (from the photo you can see that it can be stylized for anything) requires a special creative mindset.
You can decorate it with evergreen cypress seedlings around the perimeter, then it will turn into a building in the Greek style. You can make the decoration of the veranda inside in the form of a winter garden or a stone palace.

A carefully thought-out interior will give this building a special look, make your own corner of creativity and fantasy out of an ordinary house.
Decorating the pillars of the veranda with wood carvings or decorating them with climbing ivy or creepers will add a charming look to the design of the terrace.
This design is built both on one side of the house (open or closed type) and around the house. If it is built in length along the perimeter of the house, the structure looks like a gallery, but if it is a rectangular extension, it looks like a pavilion.
For the summer period, the building is built without insulation and glazing. Wall decoration on the veranda can be done in different materials. And for the winter, the living space goes into one where the windows are equipped with double glazing. Finishing a closed veranda in a private house (see photo) even allows the installation of a fireplace (biofireplace or false fireplace) to create a cozy atmosphere that will be comfortable.

How to finish the veranda in the country, photos, ideas
There are verandas different types, depending on how the design of the house is conceived, choose an open (terrace) or closed (glazed) types.
Different cladding options will create a different impression when creating a design.
It is also important what the decoration of the veranda will be, because the main purpose of this extension is the comfort of those who spend their leisure time here.
Guided by your own taste in the process of finishing, you should not forget about some rules in order to get the desired result.

If the decoration of the veranda in a private house (pictured) suggests that it will be open, you need to make sure that the building materials that you will use for decoration are resistant to precipitation and dampness, withstand high humidity.

The tree in the decoration of the veranda inside with your own hands provides for mandatory pre-impregnation with an antiseptic, such a step will avoid not only premature deformation of the wooden elements, but also protect walls, floors, poles from rodents.
Finishing an open veranda in a private house, photo
If a private house, in which it is planned to build a terrace, located on the sea coast or on the shore of a reservoir, will be interesting solution make the decoration of the veranda with polycarbonate - transparent walls will protect you from dampness on cool evenings, but will not interfere with the wonderful views that open from there.
Usually summer premises do not need glazing, it is used only in the warm season, this seasonality does not provide for monolithic buildings or stationary cabinet furniture.
Light plastic models of chairs, tables, or transforming furniture are more suitable here. Wicker chairs, tables, rocking chairs, fresh flowers hung in flowerpots around the perimeter of the terrace perfectly create a themed interior.
Materials for the construction of the veranda
One of the fashionable solutions in construction today is the choice of a frame veranda.
For the construction of such a structure, laying the foundation, erecting the frame of the building will be required. Veranda finishing options are a matter of taste and possibilities, but the principle of creating a structure is almost identical.

Concrete pillars are required (to build the foundation), wooden beam to build a frame, a crate along the perimeter for its lower part and finishing materials for the interior decoration of the walls of the veranda (stone finish in the photo):
- wooden or plastic lining(pvc),
- polystyrene tiles,
- mdf panels,
- composites, stone, perforated sheet, metal, etc.
If you purchase brackets, corners, screws, anchors, tools, you can make a veranda with your own hands.
As a roof, wood, metal, profile sheet, metal tile, glass, etc. are used at will.
When finishing a closed veranda inside (in the photo there is a wooden roof), you need to take into account the degree natural light because the only communication needed here is electricity.

The floor will need waterproofing, and depending on the style chosen, the type of surface used, floor slabs or stone, beautiful quality linoleum can be laid.
You should not rely on the fact that the plank floor or laminate will be used, remaining as spectacular, beautiful - if the option is open, summer, interior decoration verandas in a private house (see photo) for the floor are also subject to dampness and humidity. Therefore, it is better to give preference to those materials that do not absorb moisture.

A perforated sheet for finishing the veranda inside will help divide the room into zones (for example, dinner Zone and a recreation area), having shown imagination, you can perfectly decorate the ceiling with it.
It is important in the interior decoration of the veranda to correctly calculate the lighting.
Wall decoration on the veranda inside
One of the popular ways to make a closed-type terrace not only beautiful, but also warm is to finish the veranda with plastic panels (you can see this option in the photo).

By itself, it is a lightweight structure, so the interior decoration of the veranda in the country (the photo illustrates one of the options), the ability to make windows without using a double-layer double-glazed window.
It will be much more effective to take care of the insulation of the floor and walls. Moisture-resistant gypsum boards are suitable as a finish inside the veranda in the country house; first, the walls of the structure should be hydrophobized on both sides: inside and out.
To insulate the walls, you can use mineral wool or extruded polystyrene foam. The interior decoration of the veranda (photo) is a gasket of insulation, which is carefully layered with a vapor barrier film, and sheets of MDF, drywall are applied on top, strengthened PVC panels or lining.

When choosing mineral wool as a heater, remember its moisture absorption, so that the insulation does not crumble into dust soon, provide waterproofing to the walls!
Wall panels for interior decoration for the veranda can be made of any material, even painted with decorative plaster. Wooden panels will look very impressive and respectable, but you need to remember that they need to be taken care of.
It is cheaper and more practical to finish the veranda with an imitation of timber (photo), even on open design this type is preferable due to its durability.

Lining - one of the simplest materials, characterized by wear resistance, good qualities for damp rooms, undemanding to leaving.
The advantages of finishing the veranda with clapboard include its following qualities:
- The lining is easy to install, allows you to create a smooth, even wall due to its own texture,
- It is an excellent soundproofing material,
- Differs in durability and convenience of replacement of the damaged sites in case of need.
Finishing the veranda with clapboard inside (photo) gives great prospects in terms of choice colors, neat and easy installation, but the lack of lining in fragility, especially in the cold season.

Winter veranda glazing
Today it is fashionable to use extraordinary solutions in glazing, one of the ways to make your home aristocratic and sophisticated is the French decoration of the veranda (photo).
It is an installation plastic windows in various shapes and large sizes. If possible, stained-glass windows built into the French finish look good in the interior.

The decoration of the veranda and the porch inside, the design of which involves the use of natural materials, looks beautiful in stone or wood.
Finishing the veranda outside
A beautiful appearance for the veranda is the image of the owner of the house.
Stone, wood - classic options, looks especially beautiful and impressive carved wood in finishing. Cheaper, more practical, easier to maintain, finishing the veranda with siding (the photo illustrates this option).

Among the advantages of vinyl siding are high performance, a wide range of colors, ease of installation, affordable price. Horizontal panels make the building very aesthetic.
How to hem the ceiling on the veranda?
Some rooms in the house need a special finish of the floors due to the fact that the operating conditions of the materials here are very different from the standard ones. For example, when choosing how to hem the ceiling on the veranda, you need to consider that this site is essentially located on the street and the conditions here are different from residential premises.

Basic requirements for materials
In order for the design to please you as long as possible and not cause trouble during operation, it is necessary to select coatings with the appropriate characteristics.
The main requirements that the ceiling sheathing on the veranda must meet are as follows:
- Moisture resistance
- Strength
- In cases self-assembly– ease of processing and installation
- Compliance with the appearance of the rest of the house
- Resistance to low temperatures in winter
- Affordable price for budget repairs
Particular attention should be paid to resistance to frost and moisture - even glazed rooms, as a rule, are not heated, and there is a lot of moisture in the street air, for example, during rain.
The remaining parameters are also important, but some assumptions are possible here, taking into account the personal preferences of the owners of the house.
Popular Options
If desired, finishing can be done in any way possible. However, the most suitable and popular options for what you can hem the ceiling on the veranda are:
Despite the fact that everyone is accustomed to seeing a stretch fabric exclusively in residential premises, it is also perfect for repairing open spaces, provided that textiles are selected, and not PVC film.
The film will not work, because it loses elasticity and cracks from frost.

Drywall, which is very popular in the design of residential spaces, is also better not to use.
Even its moisture-resistant variety will not be able to withstand the vagaries of the weather and will eventually absorb moisture.
What and how is the interior decoration of the veranda in a private house
This will affect the appearance of the surface in the most negative way - it will swell with bumps and become covered with ugly spots, after which, the structure will have to be completely dismantled.
Suspended panel solutions are very inexpensive and are in demand for repairs with a small budget. In addition, the installation of panels both on the frame and on a simple crate is very easy and quite within the power of even novice craftsmen.
Of the remaining materials, the most popular and suitable option for almost any design style is the usual lining.
It is affordable, easy to install and, after processing with special compounds, it will be able to withstand atmospheric phenomena.
Rare repair methods
If you want to pass for the original, then choosing how to sheathe the ceiling on your veranda, you can pay attention to one of the materials listed below.
They have not yet earned such popularity as the previous ones, but they look very original and are suitable for decorating this part of the house according to their characteristics.

In principle, there are a lot of finishing options. It is important to consider whether the room will be open or closed. For open verandas or areas with partial glazing, it is better to choose a finish with increased weather resistance and durability.
Completely closed areas can be decorated with less weatherproof materials.
Examples
If you do not see this or that finishing option with your own eyes, it is very difficult to decide on a specific type of design. Therefore, below are a few photo examples of what you can hem the ceiling on the veranda and how the coating will look like in the end.


Almost all of the options for finishing the veranda presented in this article can be done independently.
The exception will be stretch ceiling, but, if desired, even such a coating can be installed by hand. The choice of a specific type of design must be carried out taking into account the appearance of the whole house, the available budget and the personal aesthetic preferences of its owners.
A veranda is an extension adjacent to a certain side of the main structure of the house. Usually the veranda is used only in the warm season, as there are no heating devices in it. The design can be different - closed and open (veranda under the roof). There are both glazed and unglazed verandas. Finishing work directly depends on this factor.
When repairing the walls in the veranda with your own hands, please note that more stringent requirements are imposed on materials for exterior decoration. As for the exterior wall decoration, it should naturally fit into the overall exterior of the house. At the same time, it is important to consider that this room should perform not only decorative, but also practical functions. Well-lit veranda, where there is no extra furniture, but in abundance houseplants only contribute to the quality summer vacation.
The task of this room is not only decorative functions, the practical side of the matter is also here. A well-lit room, where there is no extra furniture, but there are plenty of indoor plants - all this best contributes to a pleasant summer vacation. That is why many are wondering - how to finish the veranda?
Do-it-yourself wall repair in the veranda: finishing options, photo, video
There are a lot of options for decorating the walls of the veranda - choose the one that turns out to be the most suitable. If in the future glazing of the veranda is meant, then the option with a metal profile will seem especially good.
Tips for finishing the veranda- If you are planning glazing, then stained-glass windows made of aluminum, which are placed directly on the plinth, are ideal for walls. The use of these elements allows you to simultaneously solve several problems - both the construction of walls and their further finishing. More precisely, finishing is not needed here - just from time to time you will have to wash the glass. Only you need to think about how to decorate the profile itself and the intermediate racks. For this, facing brick or stone is perfect.
- Glass blocks are another good option to finish the veranda, which can be done even at the stage of building walls. This material, first of all, is good because it is constructive and decorative.
- The modern building materials market offers an impressive range of various blocks: frosted, corrugated, colored glass. There are also varieties of blocks with decorative applications - they are made in the inner cavity. Those who have seen them know that they look really very beautiful.
- A variety of glass block options can be combined as you wish. If you wish, make some kind of panel. It would be nice to accompany this with effective lighting. Of course, the cost of such a veranda will increase significantly, compared with structures made of plywood or plastic walls, but the end result will pay off all investments.
- In the event that the wall consists of glass blocks, you will not worry about light transmission. In such a room it will always be light, despite the presence of small windows.
The fourth wall of the veranda is the load-bearing wall of the house. Its decor will be made when you start the interior decoration of the room.
Do-it-yourself wall repair in the veranda: using wood
If you have an open veranda, the concepts of exterior and interior decoration of the room are mixed here. Typically, such structures are made of wood: this also applies to structural and decorative elements.
Features of finishing the walls of the veranda with wood:
- Compared to other durable materials that can be used to build and decorate the walls of the veranda, the tree fits perfectly, creating a favorable atmosphere for a comfortable stay. As a result, the air in the room will always be saturated with a woody aroma.
- Elements supporting the roof may consist of logs or beams with a section of 150x150 mm.
- Many owners do not want to save on finishing the veranda, deciding to decorate this place solidly, with high quality, because there will be a place for the whole family to relax. For this situation, manufacturers offer a variety of solutions.
- Recently, decking is often used for facing the veranda. This material is known as deck board. It is customary to include garden parquet and deck boards, for the manufacture of which not wood is used, but a composite. That is, in addition to wood, the composition contains polymer additives. As a result, the product improves its characteristics - they acquire high strength and are not afraid of moisture. All this is perfect for both closed and open verandas. Even an unheated structure can be lined with this material.
- Planken made of ash or larch is also a high-quality, very expensive wood, with which you can easily finish the exterior. Planken is a planed facade board consisting of solid wood massifs. What is the difference between a planken and a regular planed board? The difference lies in the shape: the planken has beveled and rounded chamfers. There are no connecting grooves that are present in the lining, due to which the installation is carried out with gaps, and not end-to-end.
- A wooden veranda is, first of all, good because it is easy to attach to different designs- brick, stone, wood. The bottom line is that the facade decoration in this regard is fully consistent with the finishing of the veranda. Often a tree is not just painted, but the surface is decorated with carvings.
Arched hanging elements will also look good if they have a lace pattern. In general, there are many options, so show your imagination.
Glazed veranda interior
As for the decoration of such a veranda, almost any solution can be used here. Interior design is approximately the same task as the design of the loggia. However, usually the veranda is a more spacious room, providing great design opportunities.
Let's consider in more detail:- veranda - summer construction. But nothing can prevent you from installing heating here and operating the premises throughout the year, and not just in the summer. In this case, a variety of finishing materials are suitable here;
- a great option for organizing the design of the veranda - the roof is made of glass, stained-glass windows are installed. Due to this, the room will be constantly flooded with sun;
- a worthy addition to the decoration of the walls of the veranda - unusual blinds or curtains of the original color;
- in addition to wood, MDF, plastic, drywall can be used in the decoration of the veranda. A more budget option is coloring. Many prefer polystyrene tiles.
Watch a video on how to make repairs to the walls in the veranda, where finishing options will be considered. This material will be useful for both novice builders and experienced decorators who want to ennoble the veranda.
Decorating the walls on the veranda can be done by the most different ways, but in most cases, households prefer light colors.
Do-it-yourself wall repair on the veranda: materials, installation, photo, video
As noted above, the interior decoration of the veranda can be made from different finishing materials. The choice directly depends on the dimensions, purpose and microclimate of the room.
If heating is provided on the veranda, then this part of the building can be finished with drywall, and wallpapered on top. But in most cases, owners country houses, you have to choose materials that are suitable for an unheated veranda. Therefore, it is important that the material is not only attractive, but also harmoniously combined with the interior of a residential building, and also meets all the requirements. This is resistance and practicality to temperature extremes.
What materials can sheathe the veranda:
- MDF boards;
- lining made of wood;
- finishing PVC panels.
And below we will consider each of the materials separately, including their installation process.
- MDF panels.
MDF panels are a popular finishing material for walls. Length wide board or one slat from 2.5 to 3 m, width 15-30 cm. The hardware store offers a wide range of panels of various shades, you can buy finishing materials for every taste. The surface of the panels is different. It can imitate wood, stone and other materials.
The main advantages of this material:
- a huge selection of shades and a noble appearance;
- practicality, which is especially important for covering unheated rooms. In addition to resistance to changes in temperature and moisture, the panels are easy to clean, do not accumulate dirt and dust. It is enough to wipe the surface with a cloth or soft sponge moistened with soapy water;
- ease of installation is one of the main advantages of finishing material for walls. It is enough just to make a crate of slats, and then attach the panels;
- reasonable price - the cost of the panels is small, so everyone can afford to buy the most acceptable option.
The process of installing MDF panels
First you need to attach wooden slats to the walls (you can buy metal ones, but in this case, the sheathing will cost more). The rest is suitable for the frame construction material. Each owner will have in stock materials from which to make a frame. But at the same time, it is important to adhere to the following size: the width of the rail is 4 cm, the thickness is from 2 cm.
You can attach wooden slats to nails, thereby adjusting uneven walls. In this case, you do not have to bother with leveling the walls and buy expensive materials.For work, you will need a plumb line or a building level so that the wall after sheathing turns out to be perfectly flat.
Each of the panels has a groove or recess. The first panel must be installed only from the corner, fastened with screws, the next must be placed next to the first until it stops so that it goes into the recess and a click is heard. The process of finishing the walls will not take you much time, it is interesting and fast.
If you need to sheathe a door or window opening, you need to cut the panels. This is very easy to do using electric jigsaw or a regular saw.
Transitions on the ceiling and the field can be hidden with a plinth. At the same time, it is important to correctly choose the shade of the plinth, so that in general the veranda looks decent.
A rich selection of textures and shades of MDF panels allows you to translate into reality a variety of design ideas. The veranda, finished with panels of various shades, looks original, especially if you choose materials by color. At the same time, you can zone the space: a zone for eating, relaxing, a corner for work, etc.
- PVC panels.
Doing repairs on the walls of the veranda with your own hands, you can save money and make plastic paneling. Such a finishing material is well adapted to temperature changes and high humidity. PVC panels are a practical and inexpensive material. Their cost is small, and even a beginner can handle the installation process.
It should also be noted that it is easy to care for the panels: just wipe the surface with a slightly damp sponge. Due to the ease of installation and low cost, PVC panels can be updated every three to five years, thereby changing the appearance of the room. Let's say you like panels with imitation wood - an eco-style room is quite suitable.
If the wood-like wall decoration is tired, change the panels to new ones that imitate metal surfaces, fabric and even a natural stone. A huge selection of shades and textures, ease of installation plus low cost - these are the main advantages of this material. By the way, you can finish with PVC panels not only the walls themselves, but also the ceiling.
Features of the installation of PVC panels
You will need a wooden lath (30x20, 30x10 mm) for the frame. If there is no tree, then you can buy a special profile designed for attaching drywall. But here it is important to choose the material taking into account the type of veranda. In the event that the walls of the veranda protrude outward, it is better to use wooden slats, since the metal acts as a "cold bridge".
The panels are attached to the frame using fasteners (nails or screws), it is only important to leave a gap between the wall and the tile, thereby allowing the board to “breathe”. A gap of 2-3 cm will be enough.
It is worth noting some of the disadvantages of this material: the panels are fragile, which means that if you accidentally catch a wall, for example, when you bring furniture, you can break through them.
Attention! If you plan to use the veranda as a summer dining room, then the backs of the chairs do not deform plastic panels, at the level of the backrest on the wall, it is better to nail additional protection. A decorative wooden board with a certain pattern or a board covered with fabric looks beautiful. It turns out unusual and beautiful, and the veranda will become a favorite place to relax.- Clapboard.
Solid wood lining - durable and practical. The material is not afraid of changes in temperature and moisture, has excellent thermal insulation properties and is easy to clean.
Such lining has standard thickness 22 cm. The board can be attached independently. You can sheathe the veranda from the inside with a wooden clapboard (not only the walls, but also the ceiling).
Lining characteristics:
- the material is stable and durable. He is not afraid of any mechanical loads;
- practicality - you can sheathe the room once and do not return to this issue in the next 15-20 years;
- delicate woody aroma and beautiful appearance;
- walls finished with wooden planks, - beautiful and safe for health. Tree - natural material, but it can catch fire, even though it is impregnated with special compounds;
- a huge selection of shades and a long service life (more than 20 years).
In building stores, you can choose the material for repairing the walls of the veranda to your taste and estimated budget. Please note that the cost of a solid board will be higher compared to spliced boards. Such material is no different externally, but is only suitable for interior decoration.
That is, if your veranda does not have heating, then buy a lining made of solid wood. If you ignore such recommendations and finish the walls of the veranda with cheap material, then cracks may appear on the surface during operation and under conditions of humidity / temperature fluctuations. Of course, the appearance of this room will not be as attractive as upon completion of the repair. In addition, the very strength of the finishing material will suffer.
Experienced experts recommend using a solid board "A", "B" and "C" class for interior wall decoration. This material is great for interior wall decoration. The cost of this lining will cost less than the "extra-class" material, only small nuances are noticeable on the surface - knots and dents. Such boards are pre-impregnated with a special compound and are processed with putty, so that during the repair of the walls of the veranda with your own hands, these steps can be excluded. There is another marking of the lining - the "extra" class. The quality of this material is on top, as well as the cost.
All work on decorating the walls of the veranda can be done independently. You just need to first make a crate and attach the planks to the wall. The method of fastening may differ: on self-tapping screws (hidden), nails or using a stapler.
Upon completion of the installation of wood walls, it is better to treat it with a liquid with protection from ultraviolet rays or open it with varnish, thereby extending the life of the material.
The most important advantage country house in the age of urbanization, it becomes possible to breathe clean air full chest. Alas, in overpopulated megacities, many have simply forgotten not only what a real forest looks like, but also a clear sky. Particular envy among the owners of private cottages is caused by houses with open or closed verandas, where you can gather in the morning and evening with the whole family.
The aroma of summer or falling leaves in autumn cannot be compared with anything, and if you still have a cup of hot tea in your hands, then it seems that all wishes in this life have come true. It's nice, admit it, during the first thunderstorm of the year on the open veranda to feel the sweetness of ozone, and also to hear the rustle of green leaves under the rain.
All this is possible only under one condition - the interior of the veranda will not repel her, but rather attract. If you are lucky, and you have a closed version of such a room, you can place a dining room here, which, by the way, will be in the summer. However, in order to extend the impression of the view from the window, we need high-quality interior decoration of the veranda.

Choosing materials
Before answering the question - how to decorate the veranda inside, it should be said that they should carry not only an aesthetic, but also a practical orientation. It should be borne in mind that the veranda is usually not heated and has similar elements with a gazebo, which is attached to the main house.
In this situation, the corresponding requirements are imposed on the decor:
- beauty;
- resistance to high humidity;
- are not afraid of temperature changes.
Wood processing and insulation
Most often, in private houses, wood is used to build verandas; probably not a single building material can compare with it. But, because of its naturalness, it can cause a lot of trouble. Therefore, before finishing, it is necessary to treat the wood with antiseptic compounds.
If you have it with the conduct of thermal insulation work for the walls under the windows, as well as ceiling structures. Try not to rush and do everything carefully so that you can use the room until almost frost.

To insulate the ceiling, you can use those materials with which it is easiest for you to work, for example, with mineral wool, polystyrene foam or expanded polystyrene, professional teams be able to treat the surface with liquid polyurethane foam.
The price of the latter, taking into account the work, is high, it is best to take XPS boards and mats or mineral wool rolls.
- Secure the waterproofing to the walls and ceiling using a waterproof film.
- Glue the joints between the sheets with metallic tape.
- Install a wooden crate. The cross section of the beam must match the height of the insulation, the crate cell must correspond to the width of the heat insulator.
- Insert insulation between the bars.
Tip: before installing mineral wool, it must be wrapped in a waterproof material so that it does not get damp and deteriorate after a few years.
- Install a foil insulation over the insulation (foil inside the veranda). Seal the seams between the sheets with metallic adhesive tape.
- Insulate the ceiling in the same way.
Veranda decoration
The veranda is finished inside with their own hands only after the end of all preparatory work. There are two ways here - trust your feelings and invite a professional designer. Usually choose the first method, the benefit of the options is to transform inner part there are plenty of verandas today.
PVC panels
An inexpensive way to decorate, which will help turn an ordinary room into an interesting and cozy one. The material is not afraid of high humidity and does not deform with sudden changes in temperature.
Installation is easy and without any tricks. Thanks to the different color schemes of the panels and their texture, you can get quite a decent room that you are not ashamed to show to your friends.
Of the shortcomings, the fragility of the material should be noted, although today you can also buy “armored” types, the cost of which is 2 times more expensive than conventional options. Therefore, you should be careful when moving chairs or leaning on it.
Tip: a construction trick will help solve the problem - the 1st plank of the crate is installed at the level of the knee, the second - the pelvis, the 3rd - the shoulder.
The instructions below will tell you how to do everything at minimal cost:
- Prepare wooden slats for the frame with a section of 20x30 or 10x30 mm, you can also use a profile for drywall sheets. Wood material should be pre-treated with an antiseptic.

Tip: use wooden blocks battens on the wall facing the street. Thus, the formation of "cold bridges" can be avoided. For too uneven walls, it is better to use a profile on suspensions.
- Fasten the slats perpendicularly. For example, for vertically installed plastic, they should be placed horizontally in increments of up to 500 mm.
Tip: finish the panels with a pattern from left to right, plain - on either side.
- Attach a starting corner to the finished crate with self-tapping screws if you will finish the wall next to it with other material, or a mounting corner for joining the panels to each other. On the ceiling, install the fixing strip under the plinth.
- Insert the first panel into the guide profile, with the tongue in the installation direction. Screw it to the crate with a self-tapping screw with a press washer.

Tip: do not fasten the plastic tightly so that it does not deform from this.
- Insert the spike of the next panel tightly into the groove of the previous one, secure it and continue to install the rest on the wall and ceiling as well.
Tip: leave a thermal gap for the material at the bottom and top of the wall within 20-30 mm and close it with a plinth.
MDF
An alternative to plastic is MDF panels, which are also popular among DIY enthusiasts. You need to know that, although they are ahead of him in strength, they are very sensitive to moisture. Install them only on covered verandas.
The installation process resembles the previous one, only the fastening takes place with the help of clamps, special metal devices. They can be fixed with a construction stapler or small nails, doing this through a guide so as not to damage the edge of the material.
Wooden lining
The most traditional finishing option for the veranda is considered wooden lining. It is a sheathing board in which special grooves are cut to facilitate installation, the material thickness is up to 22 mm.
It is used for open and closed verandas. Treatment with antiseptic compounds increases the service life up to 20 years. So far, no artificial material can compare with natural wood.
How to choose
There are two types of lining - solid and spliced, when the best pieces are interconnected in a special way. Although the latter looks perfect, it cannot be used to decorate the veranda. An increase in humidity can cause cracks at the gluing points, which will greatly spoil the interior.
There are also 4 classes of material:
- "premium" - the most expensive, but almost always spliced;
- classes "A", "B" and "C" - from solid wood, differ in the number of knots per 1 running meter. and defects. Often they are treated with putty at the production stage.
Tip: When buying material in a pack, be sure to unpack it and inspect it so that you do not come across low-grade or defective planks.
Preparation and installation
Natural material must be adapted to the conditions in which it will be mounted. To do this, the lining must be left on the veranda for several days. After adaptation, be sure to treat it with antiseptics.

Work on preparing for the installation of the surface is similar to the previous options.
You can attach it in different ways:
- Drive a galvanized nail into the center of the board, then drown its head with a hammer.
- Self-tapping screws. Pre-drill a hole in the board from the side of the spike to a depth of about 10 mm, and select the diameter of the drill according to the diameter of the screw head. Screw the lining to the crate by inserting a self-tapping screw into the hole, close it with a dowel and sand it.
- Use a mechanical or pneumatic stapler to drive the mounting brackets into the board.
- Cleimer installation. Similar to MDF panels.

At the last stage of installation, close the joints and corners near windows and doors with a corner and treat the boards with stain or varnish. Start the process from the ceiling and end with the walls.
Conclusion
The work on finishing the veranda is not difficult, more like a creative one. Set aside time for yourself on the weekend, prepare the material in advance and update its interior so that everyone feels comfortable and comfortable in it. In the presented video in this article you will find Additional information on this topic.
It should be as comfortable and aesthetic as the whole building. It can be the main entrance, which gives the first impression of the interior, or an extension designed for recreation or household needs. One way or another, one of its main purposes is to serve as a decoration, without which the house would not look so elegant. It can be designed in the same style as the main building, or differ from it, creating an interesting composition with it and successfully complementing the facade. For walls and ceilings, a durable and fireproof finish will be required, so we will tell you how to sheathe unheated outside and inside.
How to sheathe an unheated veranda inside and out
Material requirements
One of the main tasks is to create a coating that does not allow heat to pass through and protects against drafts. At the same time, the walls must breathe, otherwise it will be stuffy and uncomfortable inside during the cold season, especially when it is turned on. The problem can be solved by a vent valve. Such devices are usually used in city apartments, where impenetrable plastic double-glazed windows are installed.
If the house is intended for living all year round, the coating will be required to have good thermal insulation properties. It is advisable to put a layer of thermal insulation under the finish, covering it with a film that does not allow moisture to pass through. Without such protective measures, water will penetrate into the voids and begin to break down the material, expanding when it freezes. There will be a smell of dampness in the room, and in the corners it can.
If the building is garden plot used only in summer, the outer finishing layer must still have good waterproofing properties and reliably protect brick, concrete or wood from getting wet.
One of the most important requirements is fire safety. For a log house or structure made of timber, relief can be allowed, but it is still worth making a choice in favor of a non-combustible coating. In case of fire, it will stop the flames and may save the lives of people in the building.
Non-toxicity is also important. The coating should not cause allergies. If it has a pronounced chemical smell, it should not be used in any case. Even in an open room, it will be impossible to get rid of such a "flavor". When burning, the material is likely to release toxic gas. Unscrupulous manufacturers try to sell their goods as quickly as possible. Usually it is sold in markets where no one monitors the quality, and it is very cheap, so it is better to make a purchase in hardware stores where the quality of the goods is beyond doubt. The price is one of the indicators of quality.
The cladding is required to maintain its properties despite frost, rain and exposure to ultraviolet radiation. If you plan to paint it, it is better to choose the most resistant compositions.
How to sheathe the veranda from the outside
clapboard
In the case of open verandas, protective measures are not required.
Most often used for sheathing. This is an environmentally friendly material. It is not expensive and has all the necessary features. To protect the boards from exposure to microorganisms, they are treated with an antiseptic. To protect against moisture, varnish and are used. It may contain antiseptic substances. Each board has a small protrusion from one edge that extends beyond the next. This is necessary to close the voids at the joints. The coating, if necessary, is cut off and attached to the crate with nails, kleimers, staples or self-tapping screws.
Wood looks great with any material. If, for example, the question arose - how to sheathe the pillars on the open veranda - it is better to choose a lining.

Siding
In second place in popularity is. It comes in four types:
- polymeric;
- metal;
- cement;
- wood.
It is more resistant to rain and frost, does not fade in the sun and does not need additional processing. Its service life is several times longer.
There are also disadvantages. Polymer products burn well, emitting acrid toxic smoke. Metal fireproof, but they are easy to spoil. If you bend one part or make a dent on it, it will no longer be possible to straighten it.
Installation is carried out on the crate using special fittings and a baguette.
Brick
It has the highest strength characteristics. He is not afraid of bumps and scratches. Rain and snow do not care for him. The service life of a brick is not limited.
Plaster
If the building is built reliably and the supporting structures do not “walk”, it outer part can be covered with plaster. There are decorative compositions, mixtures with improved technical characteristics. In the composition, you can enter a dye of any shade.
Polycarbonate
Walls and roofs can be made transparent with polycarbonate plates. They are monolithic and hollow. Products can have any color, flat or embossed surface. The material perfectly transmits light, has high strength. This allows it to withstand loads from more than a meter layer of snow. He weighs a little. For its installation, you do not have to assemble massive structures. Plates are attached to the frame or crate.
OSB
Oriented strand board (OSB) can be used for rough finishes. By technical specifications they are superior to natural wood finishes. On open terraces, not only enclosing structures are made of them, but also floors.
How to sheathe a cold veranda from the inside
WITH inside heat and waterproofing may also be needed. It is done in the same way as with the outside. The exception is open and semi-open structures.
How to cover the walls
Regardless of what the finish will be, it is better to protect the supporting structures with heat and water insulators. Used for insulation mineral wool, expanded polystyrene foam, polyurethane foam. To protect this layer, polyethylene-based waterproofing is laid on top. Polyurethane foam is applied by spraying with the help of special equipment. In other cases, the work can be done by hand. Porous slabs are laid on a wooden crate. The seams between them are filled mounting foam, the excess is cut off with a knife. From above, polyethylene is nailed to the crate. Joints are sealed with metal tape.
For a comfortable stay on the terrace in the cold season, additional insulation is not required if the walls are made of thick logs or aerated concrete blocks. The thickness of the masonry in this case should be at least 25 cm.
Most often, lining is used for decoration. This is the rare case when the building material has a pleasant natural smell that is good for health. If the terrace serves as the entrance to the dwelling, PVC panels are suitable as cladding. They are easy to wash and are not afraid of moisture. They do not look as elegant and colorful as natural wood, but unlike it, they keep their shape well with temperature changes in an unheated room.
MDF boards have proven themselves well. They look like a solid wood, while devoid of most of the shortcomings inherent in birch or pine. Vulnerable point are edges that must be closed during installation, having previously been treated with an antiseptic. Otherwise, they will crumble.
How to sheathe the ceiling on the veranda
In the first place in popularity again lining. She is not required to withstand serious loads, and nothing threatens her at the top.
PVC panels, MDF and OSB boards are also used for ceilings. Weave and bamboo surface will look good.
When choosing a plaster, it is better to dwell on the compositions for facades. They are not afraid of humidity and temperature changes.
Can be assembled transparent roof from polycarbonate. In this case, the ceiling is not required, however, even cellular coatings will not be able to create the necessary level of thermal insulation.
How to finish the floor
Floors are the most durable. A dye can be added to the solution, but the main advantage of this solution is its reliability.
If the coating requires strength and high decorative characteristics, best solution there will be tiles. There are a huge number of tiles that differ in price, properties and composition. The material is environmentally friendly and is not afraid of water. There are special coatings that are distinguished by increased strength and abrasion resistance.
At low humidity, you can lay linoleum, rubber, even, but it's better not to risk it. Too much condensate accumulates in an unheated room. It is better to use floor boards coated with varnish, paint and treated with antiseptics.
- Material prepared: Artem Filimonov