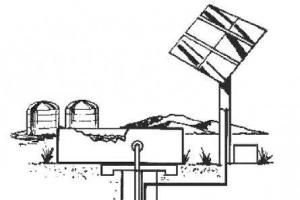
Installation of the roof of the veranda to the house. We create a transparent roof for the terrace, choose materials. Video "Installation of the roof for the terrace"
Extensions to the house, as a rule, are built in cases where it is necessary to expand the living space, equip a veranda or terrace for summer holidays, get additional space to accommodate a garage or any utility rooms in them. Of course, such an extension must have a reliable roof. And very often in such cases, the docking of the roof of the extension with the walls of the main building or with its roof raises questions. These areas are the most vulnerable in terms of the likelihood of leaks, which, alas, often happens with improper installation.
To figure out how to make a roof with high quality, it makes sense to analyze in detail some of the nuances various options its erection. Naturally, while paying special attention to the implementation of waterproofing work in the arrangement of lines of joints and junctions.
A few words about the basic structure of the roof
In order to make it easier to understand the terminology in the future, so to speak, “to speak the same language”, it makes sense to consider circuit diagram roof structures. The hip version is taken as an example, simply because it usually includes almost all the elements that make up any type of truss system.

So, the truss system consists of the following parts, each of which has a specific purpose:
- Mauerlat - this is a powerful beam, laid and fixed around the perimeter of the house on its bearing walls. It is designed for the most even weight distribution of the entire roof structure and external loads falling on it. Very often, it is on this structural element that the lower side is fixed. rafter legs.
- - it can be said that these are the main details of any system that form the slopes of the roof and serve as the basis for fastening the crate and roofing material. Rafters are made from a board that has the section necessary to ensure strength.
- Diagonal (sloping) rafters - these elements are part of the hip, half-hip and multi-gable rafter system. They are installed at the corners of the building and connect them to the ridge run (ridge).
- Narozhniki - it is also a rafter, but having a shorter length. They rest with their ends on the Mauerlat and the diagonal (hip) rafter. (with a multi-gable roof - on a ridge run and a diagonal rafter)
- Skate run - a longitudinal board or beam on which the rafters are fixed in their upper part.
- Puff - horizontal q timber or board, fastening together opposite rafter legs in a pair, in their lower or middle part. The lower puffs can also serve as beams at the same time attic floor. If they are installed in the middle part of the rafters, then a beam can additionally be included in the rafter system, which acts as a floor beam.
- Racks or headstock - structural reinforcement elements. They are installed on a puff (or on a bed installed on an internal main wall) and support the ridge run or go directly to the rafter leg, thereby reducing its span between the support points.
- Strut - a diagonally located reinforcement element, resting on one side against the rafter leg, and on the other, against a puff, lying or rack. This detail of the truss system serves to give it additional rigidity, and also helps to remove part of the load from the weight of the structure from the walls of the building.
- Sprengel - element, characteristic of hip truss systems. This is a bar constricting Mauerlat in the corners and serving as the basis for the racks supporting the diagonal rafters (which usually turn out to be the largest in length). Such a reinforcement part also helps to relieve the load from the walls of the house.
- Wind beam - an optional, but still quite often used element of strengthening the system. This is a diagonally located board, which is fixed on the rafter legs from the side of the attic and makes the structure more rigid. This element is necessary if the roof slopes have a steep slope. Usually placed on the windward side.
- Filly - a board or beam with which the rafter legs are built up in the lower part. They are usually designed to form the eaves of the roof slopes.
Prices for fasteners for rafters
fasteners for rafters
So, the main elements in any rafter system are the elements that form the roof slopes - these are the rafters and the ridge run. The remaining parts can be considered auxiliary, so only some of them can be used in various systems.
Extension roof types
What options are possible in principle
To begin with, it is worth figuring out what the roof of an extension to the house can be. It is quite obvious that its type will directly depend on the design of the main truss system and how the extension is located relative to the main building.

So, either the expansion of the residential building itself, or the addition of an auxiliary room separate from it, can be carried out from one, two or even three sides of the house. Therefore, the roof for it can have different types designs.
The most popular extension roof option is, since it has the most simple design and not particularly difficult to install. This option is usually used when an extension is made only on one side of the house, usually along its long side.
However, the roof of the extension can also have a gable, half-hip or hip design. There are even more complex configurations of rafter systems, which, in combination with the roof of the main building, form a multi-gable structure. But they are usually planned during the complete reconstruction of the house, thus even changing its architectural style.
Most often, the owners of average private houses do not particularly "bother" and choose a simple shed roof for an extension located along one of the walls of the building.
A spacious and cozy veranda, or, as it is fashionable to say today, a terrace, is a great place for both secluded relaxation and fun, stormy parties with friends in the warm season. A well-designed veranda with an original design can immediately become a real decoration of the facade of any private house. Of course, it is best to lay the construction of a veranda in the main house construction project. But do not be upset if you prudently did not do this, because this type of room can be attached at any time.
In this article, we will tell you how to attach a veranda to the house with your own hands, consider options for a polycarbonate veranda, as well as an open veranda, give photo and video instructions.
Location
As a rule, a veranda is placed in front of the main facade, but it is not forbidden to place it in front of the side facade, if necessary. It is important that the veranda is clearly visible from the gate (the main entrance to the courtyard) and has a passage to the rooms of the house.
The decisive role in calculating the length of the veranda is played by the length of the facade of the house along which it will be completed. With a width, everything is much simpler, usually it is about two and a half meters.
Before you start building, do not forget to prepare workplace, i.e. clear the area, dismantle the porch and the canopy over the entrance.
Foundation

For a frame or wooden veranda, a columnar foundation is well suited, i.e. foundation with pillars brickwork under the corner posts.
For a light veranda of small size, columns placed in the corners will suffice, and for a larger extension, intermediate racks with additional columns should be installed (in 50 cm increments).
The sequence of works on the construction of the foundation:
- First, holes are dug at least one meter deep.
- The bottom of each of the pits is covered in layers: first of all, 20 cm of sand are poured, and then 10 cm of gravel.
- Poured concrete base(approximately 15 cm) and allow some time for the concrete to set.
- Brick pillars are laid out. Their above-ground part is brought to the height of the main foundation or slightly lower. The height of the brick pillars of the foundation is made, as a rule, 30 cm below the finished floor level.
- Each finished post should be smeared with hot bitumen.
- The cavities of the pillars are filled with brick fragments or fine gravel.
- The gaps between the pillars and the ground are covered with sand.
frame

The frame of the veranda, as a rule, is made of wooden beams, the section size of which is 120x80 or 100x200. Logs (with a diameter of ≤ 12 cm) are sometimes used for the same purposes.
Start building wooden frame usually from the bottom strapping (preferably double). The connections of the bars should be carried out with a direct lock. At the level of the second log, logs and vertical posts with spikes (50x50) are cut into the harness. The entire structure is fastened with nails, and for greater reliability, staples are used.
The most correct distance between the bearing racks is 50 cm, but, as practice shows, this value is greater.
The roof truss system and the top trim are installed on racks. Racks can serve as one-piece wooden bars, and connected two boards (section 120x40) with a gasket between them. For fastening the rafters, a horizontal beam is used, passing under the slope of the roof of the house. The beam and posts should be fastened with anchor bolts. During the installation of the veranda frame, make sure that the roof of the veranda being erected fits well with the roof of the house.
Roof

Undoubtedly, the roof of the veranda should be a continuation of the roof of the house. It is recommended to perform it from the same roofing material, but other types are also allowed. Roofing material is attached to a wooden crate. The crate is mounted either at intervals or close (depending on the type of roof).
- The boards are fixed closely in the case of using rolled material. When attaching the flooring to the rafters, the nail heads should be sunk into wooden surface(they should never act). The rolled material is fastened along the edges with nails, and for additional fixation, slats are nailed to the coating. The protruding edges of the roll should be folded inward and fastened with nails.
- If steel roofing material is used for the roof, then it is attached to the crate with nails and joined with a “seam” seam.
- Asbestos cement sheets are overlapped. At the same time, the upper sheets overlap the lower ones by at least 14 cm. They are fixed in advance drilled holes nails or screws.
Floors and walls

Usually the floor is made of wood, taking as a material wooden planks pre-coated with an antiseptic.
The veranda can be left open, or you can build walls by building them from wooden shields or wagons. In the second option, do not forget to take care of the windows.
Do not over-insulate the walls of the veranda, because it is considered a summer relaxation room.

After the floor, frame and roof of the veranda have been made, you can proceed to sheathing the structure with polycarbonate. So, you will get a bright and light veranda, where you can have fun in the warm season.
Polycarbonate is a translucent material made on the basis of carbonic acid polyesters. It is produced in the form of honeycomb or monolithic panels. In cellular polycarbonate, there are cavities between stiffeners that connect two sheets together. They often replace glass when arranging verandas. Due to this near positive properties material.

Although polycarbonate appeared on the construction market not so long ago, it is very popular among consumers. Why? The reason for this is the unique properties of the material, which has no analogues on the market today:
- High strength. These figures for polycarbonate are 20 times higher than for glass. If polycarbonate is damaged, then it will not crumble into small fragments, like glass, but will break into fragments that do not have sharp corners. Thus, the injury risk of polycarbonate is minimal.
- High light transmission rates - up to 86%. Due to the fact that part of the light is scattered, polycarbonate creates protection from direct sun rays. Partially absorbs ultraviolet light.
- Polymer panels are flexible, making it possible to design curved shapes. Polycarbonate can be bent without special equipment, right at the installation site.
- The temperature range is from -40 to +120ºС. And this implies that polycarbonate is not afraid of either the scorching sun or severe frosts.

If you do not have much experience in construction, then do not worry. This technology is up to you to master and implement. Initially, you should make a foundation, fix the elements of the frame in it. After the concrete has completely hardened, you can begin to manufacture the frame. How to make a foundation and a frame made of wood has already been described in the article.
For the manufacture of metal frame in this case, a thin-walled galvanized sigma profile will be used. Frame installation features:
- No welding is required, as all connections will be made with bolts. For this you will need a wrench.
- The main fastening of the beams - anchors, laid in the foundation. If they have not been installed, then you will have to drill holes in the foundation and screw the check bolts into them, and then fix the beams.
- Sigma profiles are fastened with standard fittings.
If you made a frame from rolled steel, then it must be treated with a primer and then painted with paint for metal. Thus, you protect the frame from corrosion.

Now you need to cut the polycarbonate to fit it under required size. It can be done electric jigsaw. It is important to take into account that the sheets must be tightly pressed to the surface.
If you cut polycarbonate too quickly with a jigsaw, it will begin to melt, and if this work is done too slowly, the material will burst.
To create a temperature gap during the assembly of polycarbonate sheets, it is necessary to ensure that the screws are not clamped all the way. In addition, when installing polycarbonate under the washers, gaskets must be laid without fail. This will protect the material from damage and leakage. Holes in polycarbonate should be slightly larger than the diameter of the legs of the self-tapping screws. So, with temperature changes, polycarbonate will narrow and expand without deforming.

The installation of the roof is carried out according to the scheme already described in this article. If desired, you can also make it from polycarbonate. In this case, your building will be very light. Polycarbonate is laid on the roof according to the same principle as on the walls.

The open veranda is a frame building without walls, and the roof is installed on beams. This design has a number of advantages and disadvantages.

Of the indisputable advantages of an open veranda, it is worth noting the following:
- Ease of installation. Its construction takes a minimum of materials and time. It's easy to bring her up.
- Easy care. Such a veranda is more of a part of the street than a house. Therefore, to keep it clean, it is enough to sweep the floor regularly.
- An open veranda will allow you to enjoy the opening landscape and breathe clean air while on it.

Like all man-made things, construction open type also has disadvantages:
- Unsuitable for operation in the cold season.
- On the open veranda it is impossible to install upholstered furniture, since it will be impossible to look after her, which means that staying here will be deprived of a certain home comfort.
- It may be difficult to choose finishing materials because they will be subject to negative influence environment.
The open veranda is not glazed and no walls are erected on it. It is often used as a gazebo. Build it in a frame way.

For construction you will need:
- Concrete pillars for the foundation.
- Beam for the frame with a section of 150 × 150 mm.
- Cement and sand.
- Beam for strengthening the frame with a section of 120 × 120 mm.
- Bracket for beam connection.
- Sheathing for the lower part of the veranda. It can be OSB, forging or slats in the form of plates or balusters.
- Wood screws 100 mm and 25 mm for OSB fixings or wooden lining.
- Wooden lining.
- Beams for roof mounting 150×150 mm.
- Anchors 150–200 mm.
- Krokva 60×120 mm.
- Roofing material, for example, metal tiles or ondulin.
- Boards for the manufacture of roof lathing.
- Logs 100 × 100 mm.
- Wind board.
- Floor board 30–40 mm.
- Paints and varnishes for woodworking.
- Roll waterproofing for the foundation.
- Drill and saw.
- Level.
You have already familiarized yourself with the method of making the foundation, so we will miss this point in our description of the construction of an open type of building. And now let's move on to the features of the device floors.

To carry out a high-quality installation of the floor, you must first prepare the base. To do this, the earth is first leveled and rammed. Adjustable supports can serve as supports for the logs. Moreover, their number will directly depend on the planned loads on the floor. This idea is great for open verandas.
Then install the logs on adjustable supports and fasten them. Thanks to these supports, you can adjust the slope of the floor and level it. Installation of boards begins from the edge of the veranda parallel to the logs. Boards must be level and dry. They should be placed closely. Fastening boards to the logs is carried out with nails or wood screws.
The wooden floor is short-lived, as it does not withstand long-term exposure to an aggressive external environment. If you want to make a more durable floor on the veranda, then you can replace the boards with decking or, as it is also called, a terrace board.
The device of the frame and roof does not differ from the technology described in this article.

In order for the wooden elements of the open veranda to last longer, they should be impregnated with special antiseptics and coated with paints and varnishes. Among other things, these actions will highlight the structure of the tree and help make the extension more attractive.
The lower part of the veranda also needs finishing. To do this, you can use slats that are fixed at an angle of 45º, forged elements or balusters. If you use a wooden or plastic lining, then under it it will be necessary to make a frame of bars.
To finish the ceiling and the pediment, you need to use one material. It could be wooden lining or OSB boards. At this stage, it is important to run electrical cables for lighting the veranda and make appropriate holes in the ceiling sheathing.
High-tech veranda


A roof for any building, as well as for an extension, reliably protects it from snow, rain, heat or cold. At the same time, the roof carries an aesthetic component, which allows you to give the extension beauty and individuality.
Before proceeding with the choice of the type of roofs for an extension, it is necessary to determine exactly what its main functional purpose will be. In the event that the extension is planned to be "cold", it is best to opt for a shed roof. But when you need an insulated attic with full free space above your head, then the best thing would be a corner-type roof.
Important! View on our website.
How to make a roof for an extension of a house with a pitched roof

A shed roof for an extension will consist of a roof and a truss system, which is quite simply erected.
1. First of all, we determine a sufficient level of slope for our future roof. This will allow us to calculate the level difference between the back and front walls of the extension;
3. We install the truss system with a board installation step of 0.6-0.7 m.
4. We mount the roof directly.
Step-by-step instructions on how to properly make an extension roof
First of all, we make rafters for the roof. As a rule, during the construction of the veranda, they try to make a roof with one slope. Combining at the same time two truss trusses connected in series at once:
1. On the top of the short side of the extension, we lay the roll beams, the thickness of which should not be more than 100 mm, and the width is 50 mm. The installation step of the beams is approximately 0.6-0.7 m.
2. The beams should rest at one end directly on the top trim. To attach the beams to the extension wall, use nails.
3. On the walls of the house we start the second ends of the beams.
4. Proceeds to install the truss system. It is best to use beams with a size of 150x150 mm. We make the laying step 0.6-0.7 m, the same as for the beams of the upper floor. In this case, the floor beams are obtained under the rafter beams, that is, acting as a projection of the latter.
5. We fix the rafter beams together with the floor beams.
6. With the second end, we completely attach all the truss beams of the roof of the extension to the truss beams of the house itself. This process is carried out as follows. We make the same holes in the rafters of the house and in the rafters of the veranda, then we drive thin pins into these holes. After that, we connect them together with a metal wire. It is best to wrap at least two times around the built and rafter beams. We do the same procedure on the second edge of the rafter.
Stability and reliability

In order to give stability and reliability to the structure of the future roof, it is necessary between the beams, the ceiling and the rafter veranda, at a distance of about 30-50 cm, we place a part of the round log, starting from the top trim.
After that, with the help of reinforcement from above, we pierce through our rafter beam, and then we drive the reinforcement into a round log. In order for the log not to go to the side, we fix it with the help of two supports, which we place on both sides of it. It is best to choose pieces of timber nailed as a support. After that, we nail them to the floor beams.
Methods for installing a roof to any extension
The roof of the extension, depending on the architecture of the house itself, can be installed different methods. For example, when building an extension, from the gable side, it is best to arrange the roofs of the veranda so that both roofs, extensions and houses have one common slope. Thus, the roof trusses have the same slope, and, accordingly, there is no need to install additional valleys or split blocks. As practice has shown, they increase the risk of leaks at the interfaces.
Installation of a roof (roof) for a house veranda

As a rule, it is best to use the same roofing material for the extension that is used for the entire house. This approach will create a single aesthetic appearance of the building and emphasize the taste of the owner.
1. First of all, it is necessary to complete the roof lathing. To do this, we lay boards horizontally, the pitch of which will vary from the selected roofing material. For roofing material and all types soft roof solid plank flooring is best suited. We fix the boards directly to the rafters with nails, and we “recess” the nail heads themselves into the boards themselves.
2. As a rule, the roof of the extension has a small angle of inclination, which is why the roofing sheet material it is necessary to lay on the finished flooring from boards with a large overlap.
3. All roofing material that is laid on the slope of the extension must necessarily go under the lower edge of the material for the slope of the roof of the house by at least 5 cm. Otherwise, during heavy rains, water will begin to seep through all the joints between these slopes.

What is the best roofing material?
Given that our extension is not intended for housing, then it makes no sense to buy expensive material. Of course, if you have extra finances, then you can block shed roof and metal tiles. Today it is possible to choose any roofing material according to your design preferences and financial capabilities.
Previously, a simple slate was used for this, which is now presented in various modifications. This material remains the most accessible and practical. But if you settled on a metal tile, then you should take into account that the slope at the roof of the extension is short, and therefore the metal tile can be laid in one sheet, without joints along the length.


Today we will talk about such a building structure as a roof over a terrace. Currently, more and more often in private housing construction, terraces and open verandas are being introduced into house projects. The approach to the construction of the roof of this extension must meet certain requirements that relate to the house itself. There are several options here, so let's look at each. If you can understand how the types of terrace roof structures differ, it will be easy for you to control its construction.

The original roof over the open terrace Source modern.co.ua
What is a terrace
This is an extension to the main house of an open or closed type, which is covered with its own roof. Since the room is attached to the main building, then, accordingly, the roof will adjoin either the roof structure of the house, or the wall of the latter. So, the joint in this case is the most vulnerable spot. Builders pay special attention to it in terms of tightness.
Terrace roof
It should be noted that there are no special structures that cover the terraces. Standard models are used here, but more often: single-pitched (separate or common with the roof of the main house), gable (separate or common), hip.
Of course, you can approach the construction of the structure from a more complex side, choosing, for example, a multi-gable or multi-level option. But such extensions are rare, and they are erected near houses with the same roofs. That is, to preserve a single architectural content.
In this article, we will be interested in simpler roofs.

Complicated-shaped roof over an open veranda Source zelenj.ru
Shed
There are two options here:
separate;
shared with the main house.
Option number 1
It is used if the extension will be used only in summer time. That is, the roof is going without insulation. Although it is not very difficult to carry out thermal insulation. But it just so happened that this type of roofing structure is assembled in a cold version.
The main task of the work foreman is to competently fasten the rafter legs to the wall of the main house. It must be reliable and durable. Here are some ways:
Use special U-shaped brackets which are installed upside down against the wall. It is in the groove of the bracket that the end of the rafter leg is inserted (recessed), which is also fastened there with self-tapping screws. They roll on the side. The brackets themselves, firstly, are installed at the same horizontal level. Secondly, they are attached to the wall with anchors.

Roof rafters for a terrace, fixed to the wall of the house with brackets Source serviceyards.com
On our website you can get acquainted with the most - from construction companies presented at the exhibition of houses "Low-rise Country".
use load-bearing beam with a thickness of at least 50 mm, which is attached to the wall with anchors. It is on it that the rafter legs are laid. Between themselves, the elements (beam and legs) are fixed with steel corners on self-tapping screws.
Doing in the wall grooves for rafters and a depth within 10-15 cm. The ends of the rafter legs are inserted into these grooves. Mounting may not be done.
Sometimes an extension is made a full-fledged building, that is, from four walls. To create an angle of inclination, the wall of the terrace, erected near the wall of the main house, is built above the opposite wall. A Mauerlat is first mounted on both supporting structures, and rafters are already installed on it, and they are attached to it. You can not raise the wall of the veranda near the house high. Only for this you will have to make truss trusses in the form of triangles, thereby forming a slope. They are installed on the walls of the extension.

Installation of roof trusses for an attached veranda Source skb21.ru
Option number 2
This is a house with a veranda under one roof. It should be noted that such a roof structure can be assembled on a house under construction, in the project of which there is a terrace, or if a veranda is attached to the old building. But purely technologically, everything will depend on which side it is attached to. That is, it can be a continuation of the house, or it can become part of the side (length of the side).
So this roofing structure is used only if one of the roof slopes of the main house becomes the roof of the extension. Therefore, the common house truss system is built taking into account the dimensions of the terrace. In this case, the length of the rafter legs is increased, but they are laid with their upper ends on the ridge of the roof of the house.
At the same time, as practice shows, the length of the rafters is quite large, therefore, supports are installed under the feet, increasing the reliability of the structure. To get an idea of what I'm talking about, check out the photo below. It clearly shows how a common roof is being built.

Common roof over the veranda and the house Source mebel-go.ru
It should be noted that general design- the construction is not easy in terms of reliability. Therefore, it must be well calculated, taking into account the existing loads. This mainly concerns the section of the rafter legs and the step of their installation.
gable
The roof of the terrace to the house with two slopes is a complex structure in terms of its constructive content. Here, as in the previous case, there are two versions: a separate roof and a common one with the house.
On our site you can find contacts of construction companies that offer the service of installing extensions to existing houses. You can directly communicate with representatives by visiting the exhibition of houses "Low-Rise Country".
Option number 1
The assembly of the roof of the veranda of this type is carried out according to the full-fledged technology for the construction of gable roof structures. That is, they form a skate: laying a beam, under which support posts are installed. If the extension is small, then often at the end of the ridge, which rests against the wall of the main house, a support is not installed. It is attached by any means to the wall of the main building. It can be a groove, a bracket, and so on. Be sure to form a Mauerlat, install a truss system in two slopes.
For example, in the photo below you can clearly see how it is attached to wooden house open terrace with gable roof without a ceiling with the formation of a Mauerlat and a ridge.

Gable construction over an open veranda Source pikabu.ru
Option number 2
This design is complex in its construction. In fact, this is the roof of the house, which is extended by the length (or width) of the extension. Typically, such roofs are used only if there is a need to cover an open terrace.
If the project of the house includes a closed-type veranda covered with a common roof with the building, then this is no longer considered an extension. This is the part general structure, which is under construction general rules erection of buildings.
Open-type extensions are rarely covered with a common roof. The construction process itself is too complicated, requiring a large amount of building materials, which increases the construction budget. But such projects are found, for example, as in the photo below.

Gable roof for the terrace, common with the main house Source montos.ru
Other varieties
I would like to show that the roof on the terrace to the house is not only single and gable models. If you set a goal, then you can, in principle, build any configuration. For example, the photo below shows interesting option hip roof of the house, the cornice of which is extended further than the wall, simultaneously forming a roof structure for an open veranda.
Here it is necessary to indicate that there is no extension as such in this project. It's just that the roof forms a space that can be used for personal needs. Please note that the roof structure extended outside the house rests on the pillars. This correct solution designers who ensure the reliability of the roof as a whole.

Terrace under the common roof of a hip-type house Source oooarsenal.ru
In the next photo, a project of a house with an open terrace covered with a half-hip roof. Notice how it clearly emphasizes the continuation of the roof of the house.

Half hip roof construction for a terrace Source oooarsenal.ru
And one more original version clearly inscribed in the architecture of the building. Everything is thought out to the smallest detail, and the terrace itself, erected in the form of a gazebo, looks great against the backdrop of the house.

Hipped roof of an open veranda Source tr.skopelitissa.com
Construction nuances
If the option is chosen to cover terraced roofs with the same structure as the house, then there are practically no problems with the tightness of the structure. The main thing is to correctly carry out the entire installation process from installing the Mauerlat to covering with roofing material.
If the roof of the veranda is a structure separate from the roof of the house, then there is a line of adjunction to the wall in the structure. And this place is very vulnerable in terms of the formation of leaks. Therefore, this joint must be sealed or closed. More often, two processes are carried out at once for reliability. What they do:
Close the joint bituminous mastic with the laying of rolled bituminous material with access to the wall of the house and to the roof of the extension.
Mount the flashing- this is an element of galvanized sheet in the form of a corner, painted in the color of the roofing material. With one shelf it is attached to the wall with self-tapping screws on plastic dowels, the second to the roof with roofing screws.
Video description
And at the end, we suggest watching a video of how, according to one of the proposed options, the roof of a terraced extension is being built:
Video description
Examples of transparent polycarbonate roofs - in the following video:
Conclusion on the topic
Attaching a roof to the veranda, if the simple option is chosen, is not difficult. At small sizes the building itself, it takes one day. But, as practice shows, it is necessary to approach the construction from the standpoint of the basic laws of construction, where the dimensional parameters of all elements of the roof structure are necessarily taken into account. Therefore, even a small structure requires accurate calculation.
As a rule, multi-storey buildings are rarely equipped with pitched roofs, even though their design conforms to the newfangled high-tech style. Basically, roofs of this type are available in garages, small cottages, verandas, change houses: this implies the possibility of construction works with your own hands.
What is special about a shed roof
Before you build a shed roof, it is important to study its main features. The name of the shed roof speaks for itself. It consists of only one pitched plane, having an original truss system. Rafter legs at both ends are equipped with reliable support, which allows them to be classified as a layered type. Each of the parts of the structure is laid individually, since the installation walls have different heights: in this case, a Mauerlat is used to connect to them.
Shed roof truss system does not look like a standard wooden frame. It consists of two bars placed on top of a stone wall parallel to each other. In the same way, the installation of the logs of the log house and the opposite sides of the strapping of the frame house is carried out. To avoid confusion, the indicated Mauerlat element is designated as a ridge beam. At the same time, it is important to understand that it does not participate in the formation of a ridge fracture, but acts only as a support.
To perform the supporting function in the construction of a pitched roof with your own hands, use:
- Bearing structures made of brick, wood and foam concrete.
- Support posts that can later be sheathed or left open.
Although the design of shed structures is simple, there are a sufficient number of its varieties. Like others pitched roofs, they can warm up or stay cold. Shed roofs can also have attics, although not always. The hindrance in this case is fire regulations, according to which the attic should not be lower than 160 cm. Single-pitched structures are characterized by flatness, with a slope angle of 5-15 degrees. If you translate into percentages, you get 5-25%.
Given these proportions, the attic is arranged in the form of a residential semi-attic or technical room. For this, the gap between the roof and the ceiling is used.

A do-it-yourself shed roof is usually used in such cases:
- For decoration of various types of extensions such as terraces, garages, baths, entrance complexes, garages, verandas, sheds, etc.
- As a cover for individual buildings household and business purposes.
Among other structures, shed roofs stand out for their maximum convenience of technical characteristics, which minimizes the risk of snow bags. If the architectural situation requires it, they can be fully replaced by hip structures. These competitors have very nice shape, with more significant financial costs and complexity of implementation.
The difference in the height of the supporting walls allows precipitation to be removed from the pitched surfaces in a natural way. This allows you not to spend money on the arrangement of internal drains. Basically, the lower side of the shed structure is formed by a gutter, through which all water is discharged without problems outside the building. Even in the case of showers and melting snow, problems usually do not arise. To remove stale deposits, the technique of cleaning flat roofs is used.
How is the gutter on the roof with one slope
To ensure the necessary slope in this case, the following methods can be used:
- The difference in the height of the supporting walls or rows of special pillar-type supports.
- With the help of half farms, made independently, or purchased ready-made. They are mounted in cases where the supporting walls or pillars have the same height.
- Supports are attached to the walls of the house, raising the roof structure higher than the level of the parallel wall.
Shed roofs are most often covered roll materials, profiled sheet, roofing sheet, metal tile. It is important to understand that piece material can only be mounted in cases where the slope angle specified by the manufacturer in the accompanying documentation is provided. If this parameter is insignificant, then it is better not to use shingles, straw, reed and other similar material to cover a shed roof, as it can quickly rot.
Features of mounting a single-slope structure
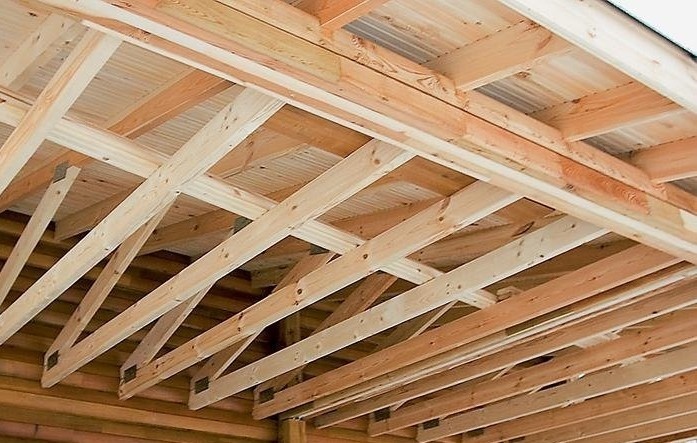
To learn in detail how to make a shed roof at home with your own hands, it is proposed to consider an example of a structure roof frame from wood. Lumber is the easiest and most affordable option to process. As you know, any work begins with the preparation of a project that takes into account all the individual features of this object.

To define the section of elements roof structure, if there will be no movement of people along them, the total weight of the roof and the snow cap should be taken into account. To calculate the roof of a detached building, all possible static and dynamic effects that the structure is exposed to during the year are taken into account. When calculating the rafter legs of a shed system, they can be correlated with conventional horizontal beams.
When creating a pitched roof project, there are some things to consider. general principles. For the construction of rafters for a shed roof with their own hands, wood is most often used, due to its environmental friendliness and low cost.
At the same time, it is important to remember the features of natural organic materials. For example, wood is prone to fluctuations in linear parameters, depending on climatic conditions. Very long wooden elements usually sag unless additional supports are provided under them.

This specificity of wood will require some complication of the design, which is affected by the parameters of the overlapped distance:
- If we are talking about the distance between the supporting elements up to 4.5 m, then when installing the rafters of a shed roof with your own hands, additional supports will not be needed.
- A distance of 4.5 to 6 m involves the use of rafter legs, which are called struts. Thus, additional rigidity is usually imparted to canopies with any length of rafters.
- If the distance between the supports is from 6 to 9 m, a pair of struts is installed to support the rafter leg on both sides.
- A distance of 9 to 12 m will require the use of a cantilever-running system to divide the span into two conditional segments. The composition of this design includes a solid wooden frame with a running beam on top. To support it, vertical racks are used. The struts supporting both parts of the long rafter are laid on structural supports.
- If we are talking about a distance of more than 12 m, sectoral zoning of the span with the help of purlins is used. As for the arrangement of the span within each zone, for this you can use any of the methods described above for installing a single-pitched truss system with your own hands.
The rafter legs are separated by a distance determined by the parameters of the box being constructed. To break down the supporting walls under the roof frame, it is easiest to use the same distances. At the same time, it is important to ensure that each of the edges of the structure has a separate rafter leg. To place ordinary legs between them, an even step is used.

Usually we are talking about certain restrictions on breakdown, which are affected by specifications selected material:
- If the rafter legs are made of logs, plates or timber, the step parameters are recommended within 1.5-2 m.
- To install plank rafters, a distance of 1-1.75 m is taken.
In addition, regardless of the calculations, the dimensions of the section are also limited. Even in the case of a small load, the log cannot be thinner than 12 cm, the plate - 7 cm, the board - 4 cm.
When constructing a shed roof with your own hands, it is important to take into account that if there are spans of more than 4.6 m, the rafter legs will be made not only from timber and boards. You will need to procure additional lumber for the struts. We are talking about a log 10 cm thick, a beam with a side of more than 8 cm and a paired board 25x150 mm.
For a Mauerlat beam, the minimum size is determined at the level of 100x200 mm, for the same log - a diameter of at least 180-200 mm. If the roof must cover a span of more than 12 m, girders and beds are used. For this, a timber with a size of 180x180 mm and a log with a section of at least 200 mm is used. To make cantilever racks for a large-span roof, you will need a beam with a side of more than 120 mm or a log with a diameter of at least 130 mm.
Do-it-yourself shed roof construction on a frame house
After the successful completion of the compilation project documentation builders receive detailed instructions on how to make a shed roof at home with their own hands. For greater clarity, you can make out an example of installing a shed roof on a garage with your own hands step by step.
In this case, the upper harness will be used as a support for the rafters. The calculation of the installation step for the rafter legs is not required, because in this case it is the same as the distance between the racks frame wall. They are usually made from boards 50x150 mm. We take 2.5 m for the height of the front wall, 2.2 m for the back wall.

We make a shed roof of the garage in this order:
- The board is cut into pieces of 265-270 cm. Their number must match the number of supports of the front wall.
- Racks on the back wall are made in the same way. Their length is taken 235-240 cm.
- When installing ready-made racks, fastening is used metal corners. For temporary fixation of the extreme elements, jibs are used.
- To check the correctness of the horizontal and vertical position racks will require a building level: the noticed irregularities should be corrected immediately. To beat off the horizon, a height of 250 cm is taken on the front elements, and 220 cm on the rear.
- The resulting marks are used to install the side board.
- In place, sawing off excess segments on racks protruding over the side boards is carried out.
- Installation of side boards over the end walls. Before this, a fitting is carried out by applying the board to the place of future fixation.
- For the manufacture of side wall racks, you will need exact dimensions. When installing them, the same step is used as on the front and back walls. As for the doorway, it can be left at this stage, or sawn out along with the windows after the shed rafters are made.
- After installing the strapping over the end posts, the side board is removed.
- Above the existing strapping, another one is made, with the obligatory dressing of the corners.
- The cutting of the rafters is carried out from boards 50x150 mm. Their length includes the parameters of two cornice overhangs, with a margin of 10-15 cm.
- The installation of a pair of rafter legs must be carried out strictly along the side walls. For their fixation, corners are used, with an installation frequency of 70-100 cm. A board of 50x100 mm is taken to mount the wind board.
- To build a solid crate, you will need sheets of moisture-resistant plywood. A gap of 2-3 mm is provided between them. From above the crate is equipped with waterproofing.
- Before laying the coating, you need to cut a hole for the chimney pipe. An additional waterproofing layer is laid around it and along the overhangs of the roof.
How to build a roof of a house with a veranda with your own hands
With the help of a shed roof, it is very convenient to arrange various architectural combinations. The most common situation is when the house and the veranda or terrace attached to it are covered in this way.
Step-by-step instructions on how to make a shed roof at home with a veranda:
- In the manufacture of rafters, a margin is provided for cornice overhangs.
- In the course of their laying, the distance between the racks of the frame structure is taken as the step distance.
- The length of the side boards is the same as the length of the wall, with the addition of two cornice overhangs.
- The extensions of the side cornices are also attached to the side elements.
- The ends of the extensions are equipped with a wind board.
- For the manufacture of support pillars of the veranda, a beam of 100x100 mm is used: they need to be made shorter by 50-70 cm than the pillars of a high wall. As for the step of the supports, it is chosen based on your own preferences.
- To connect the top of the racks, a strapping with a beam of 100x100 mm is used. For fastening in this case, screws or nails are taken.
- Stuffing on a high wall in a horizontal position is carried out with an indent from the interface line by 30-40 cm.
- When cutting veranda rafters, their length is oriented along one cornice overhang.
- Finished rafters are mounted on top of nailed boards and strapping. For this, corners and nails are used.
- A continuous crate is arranged on the slopes, for which moisture-resistant plywood is used. A layer of waterproofing is laid on top of it. Laying a suitable roofing material completes the description of the procedure for how to properly make a shed roof of a house with a veranda.
What are roof trusses for?
As the saying goes technical documentation, for laying single rafters of a pitched roof supporting walls must be of different heights. However, there are often situations when the height of these walls is the same: in such cases it is most convenient to use special construction trusses of a wooden or metal type. For example, you can take the construction of a roof with one slope with trusses on a veranda or porch attached to a summer house.

We build a shed roof in this case in this way:
- In the manufacture of component truss trusses, it is important to keep in mind that in this triangular structure, a short leg serves to attach to the wall of the house. In this case, the hypotenuse of the structure acts as a cornice overhang. For the manufacture of a long leg and hypotenuse, a board of 25x45 mm is required. A short leg is made from a board 120x45 mm.
- Perforated metal plates and anchors are used to fix the truss elements.
- To fasten the short leg to the wall, you will need dowels and screws. The long leg is fastened with nails to the harness.
- The ends are equipped with drain boards.
- On top of the roof trusses, a solid plank crate is equipped. We should not forget about the compensation gaps of 2-3 mm.
- In the area where the shed roof is connected to the wall, a corner plate is mounted.
- When sheathing the ceiling, a little cornice overhang must be left free for fresh air to enter. It is desirable to decorate this opening with a mosquito net so that insects do not climb into the room.
- After installation roofing the perimeter is equipped with a metal profile strip.
It is desirable to arrange the front end of the roof with a gutter, bringing its ebb out of the building.