Projects of baths with a rest room. Bath projects with a barbecue - a great opportunity to diversify your leisure time Projects of stone baths with a veranda
- functional area for complete relaxation. It can have a different size, be built of timber or brick. To your attention - various projects of such buildings with a photo.
When planning to equip their backyard with a place to relax, many owners dream of making it not only comfortable, but also versatile. After all, it should be to the liking of all family members. And after all, you also need to please the guests, fully providing them with both entertainment and complete relaxation on fresh air. The project of a bathhouse with a terrace and a barbecue, as well as a relaxation room - good option for such a case. It allows you to embody various ideas and combine them into your own country mini-complex.
Bath plan with a terrace
The advantages of such a 4 in 1 project are many:
- Territory saving. No need to waste space not only for the buildings themselves, but also for the paths connecting one building to another.
- Reducing construction costs. For example, a bath wall can also be a terrace wall. In addition, one roof will cost much less than several.
- Organization of complex recreation. You can take a steam bath, and then cook dinner using a barbecue - everything is nearby.
- Single style. Often, when erecting individual buildings, the owners forget that all buildings should be in harmony with each other. In a combined project, this design issue is solved very simply.
Types of bath projects with a relaxation area
In many ways, the choice of the project is due to the size of the land. For example, the classic version of a bath with a terrace measuring 6 x 9 m is suitable for owners of a large area. It will accommodate not only the whole family, but also a large group of friends. In this case, a common foundation is provided for the bath and terrace. If you make the building two-story, then you can place a steam room and a barbecue at the bottom, and equip a guest lounge on the second floor.
If you want to attach a sauna to the house, use the 6 x 6 project. Due to its proportions, it will fit perfectly into the design of any site. Thus, you will significantly expand the area of \u200b\u200bthe house and get a cozy open place to relax. It is ideal for enjoying fresh air directly from the cottage in any weather.
 Bath with a veranda
 Compact on the outside, but roomy on the inside, this is a corner bath with a terrace. Often such a project is used in cases where it is necessary to locate a recreation area in the immediate vicinity of the house. The terrace adjacent to the cottage may be in the shape of a square or rectangle. However, photos of finished baths confirm that it is the corner platform that allows you to give the entire structure a complete look, as well as effectively manage the territory. personal plot. Everything can be placed on the first floor.
Advice. Two-story buildings are optimal if you want to correctly plan the area of your land and are going to continue construction. For example, add another guest room over time.
Entire bath cottages with various outbuildings are now popular - the same terrace. On it you can equip a gazebo, a playground for children, a place for barbecue or dancing. It is convenient to receive and accommodate guests, organize holidays and just live in the fresh air here. And so that mosquitoes do not annoy in the summer, hang nets or decorative curtains.
Construction planning: timber or brick. What is the best foundation
To implement the project of a bathhouse with a terrace and a barbecue that you like, you need to think carefully about what material to build from. Perhaps one of the best is a bar. Its advantages are obvious:
- keeps heat well, so additional insulation is not required;
- creates an inimitable "bathing" atmosphere, because people have been bathing in wooden buildings for a long time;
- regulates the humidity in the room. This is possible due to the fact that the tree "breathes";
- allows to implement non-standard architectural solutions;
- environmental friendliness. It has been proven that the tree enhances the healing effect of the bath.
 Restroom
 Among the shortcomings, it is worth noting the susceptibility of the beam to mold, as well as its low reliability in terms of fire safety.
Attention! Glued beams and logs are different building materials. The first one is cheaper. Logs can be rounded, planed, etc.
Brick baths are less fire hazardous, but they warm up longer, consuming a large amount of fuel. In addition, high-quality ventilation is required in such buildings. Without it, condensation collects inside, which can cause fungus and mold. Speaking about the advantages of brick, it should be noted its environmental friendliness, long service life and the ability to build a building of almost any shape, which is proved by photos of already erected buildings. It is important that the cost brick baths lower than wooden ones, and they do not require external finishing.
Advice. For the construction of a bath, you can take other materials, for example, gas silicate blocks. Frame houses are also popular, which are inexpensive and are built quickly.
Depending on the project and the building material for its implementation, the basis of the bath is planned - the foundation. He can be:
- Screw. For it, special piles are used, on which the structure will stand. Suitable for almost all types of soil. Does not require preparatory earthworks. It is built quickly (in 1-3 days) and at any time of the year.
- Columnar. This is the simplest of all types of foundation, and also the most economical. It can be used to build a small bath with a terrace.
- Tape. Work on its construction is considered quite laborious, so it is advisable to resort to this option in such cases:
- if your site has difficult soil - for example, clay or sandy;
- the construction of a two-story bath is planned.
Attention! Since the bath is heavier than the terrace, different foundations are usually laid under them.
Tips for designing a recreation area with a sauna, a barbecue and a terrace
- When planning construction, consider the main direction of the winds. The bath should close the terrace from drafts. This is also necessary in order to properly position the barbecue - it is not very convenient when the smoke flies towards the vacationers.
- Decide what you need a terrace for. If in order to hide on a hot day from sun rays don't choose south. If you are going to sunbathe - design the location of the terrace on the sunny side.
 Bath with barbecue
 - The terrace in its classic view does not have a roof, however, for convenience and protection from bad weather, it can be covered, for example, with transparent polycarbonate.
- Regardless of what area the finished bath will have, it is necessary to provide for the location of 3 separate rooms in it: locker rooms, showers and steam rooms.
- For the construction of a barbecue, it is worth using refractory bricks. In addition, for better fire safety, you can lay out the area around it with ceramic or stone tiles. It is also necessary to make a separate chimney for barbecue.
- If you plan to use a sauna with a terrace for all year round take care of heating.
Bath with barbecue area: video
We advise you to plan the construction a few steps ahead - you decide to install a bathhouse, immediately think about a gazebo. Anyway, sooner or later it will have to be built. A bathhouse with a gazebo under one roof is a great option. The desired result is achieved much cheaper and faster.
It is necessary to make a few explanations of what a bathhouse with a gazebo under one roof is from the point of view of architects.
The gazebo is a free-standing light structure that does not have main walls, the supporting structures are vertical racks. It can have a different geometric shape, from a rectangle or square to a hexagon or circle. There are almost no restrictions on the size, the walls can be closed with decorative lattices or be completely open. Barbecues, barbecues or stoves are placed inside.

If such a gazebo is placed under the same roof as a bathhouse, then the structure should already be correctly called not a bathhouse with a gazebo, but a bathhouse with a terrace or veranda. But in colloquial speech you can find the name "bath with a gazebo under one roof." And we will use such a “popular” name in the article.

Despite the fact that there are many options for building a bathhouse with a gazebo under one roof, they all have common advantages.

Possibility to increase the therapeutic effect of the steam room by staying in the fresh air. For this, there is no need to move from one separate building to another; immediately after leaving the bathhouse, you can comfortably sit in the gazebo.

The laying of engineering communications is much simplified. Lighting is powered from one power cable, a common switchboard is installed on two buildings, energy consumers are connected to one RCD.

The area of the summer cottage is saved, issues are resolved with the choice of the most suitable place, taking into account the characteristics of the landscape and the physical indicators of the soil.
Significant financial savings. The construction of a bathhouse with a gazebo under one roof is 30% cheaper than both buildings with the same characteristics separately.

The construction of a separate complex will cost 30 percent more
Add to these advantages significant time savings, the ability to complete everything in one season construction works, put things in order on the site and you will have no doubts about how to build up a summer cottage.
Brief overview of projects
Project No. 1. Bathhouse with a gazebo and a covered walkway

Very beautiful and functional solution. The bathhouse and gazebo are built on a strip shallow-reinforced foundation - the integrity of the structure is guaranteed, the likelihood of problems in the roof valleys is excluded.

For all buildings, valleys are considered the most problematic places, and if at least a slight displacement of the elements of the truss system is observed in these places, then the risks of leaks increase significantly. The project is quite expensive and complex, the roof of the gazebo is multi-level with a large number of slopes of various shapes and angles of inclination. The dimensions of the bath are 4 × 5 meters, the transition is 1.5 × 2 meters, the gazebo is hexagonal with a diagonal size of 2.5 meters. Next to the gazebo there is a storage room for firewood.
Project number 2. Bathhouse with a hexagonal gazebo

Bathhouse with a hexagonal gazebo
It has a warm sanitary unit, a washing room, a steam room and a rest room. Dimensions 5 × 9.38 meters. Bath material - foam blocks, external wall decoration - cement-sand plaster.


The interiors are lined with natural clapboard. A brazier is attached near the wall, half of the roof of the gazebo is gable, the second half with hexagonal slopes. There is no separate transition - the consumption of building materials is reduced.
Project number 3. Bathhouse with a gazebo under an elongated gable roof

Construction material - rounded logs, rafter system single, made according to universal sizes. The roof of the gazebo stands on separate vertical posts.


In the gazebo there is a stone stove for cooking, which allows you to use it as a kitchen in the summer. Below we will talk in more detail about the methods of building a combined roof, in our opinion, many developers can choose this version of the project. In the meantime, check out a few more interesting projects baths with gazebos under one roof.

Project number 4. Sauna with a gazebo and barbecue

Quite an expensive project, but very functional and beautiful, can serve as a decoration for everything suburban area. The second floor of the bath is attic, with a terrace from the end. There is a barbecue built on the same platform with a gazebo, there is a woodcutter. This version of the bath can be used as a residential country house.
Project number 5. Bathhouse with a gazebo under one slope

One of the simplest projects from an architectural point of view, the price refers to the "budget" option. Arbor with dimensions of 2.6 × 6.0 meters, which allows you to place a barbecue, barbecue or summer Russian oven for cooking in it.


Video - Successful bath projects with a gazebo
We will talk about the third project, tell you how to properly build a truss system, according to what criteria to select building materials and the type of foundation.
How to build a bath truss system with a gazebo under an elongated gable roof (project No. 3)
The dimensions of the gazebo are 4 × 4.1 meters, the roof is gable, the vertical supports are made of timber 150 × 150 mm, the foundations for the vertical racks are columnar. During the construction of a bathhouse with a gazebo under one roof, pay special attention to the quality of the foundations. A strip reinforced foundation was built under the bathhouse, and a column foundation under the gazebo. They are not connected in a single design, each works separately.

General gable roof has a fairly large size, the length of the roof over the gazebo is 4 meters. This is a significant departure over the bath, a change vertical position the truss system near one wall by only 1 centimeter causes a horizontal change over the end of the gazebo by 3 ÷ 4 centimeters, which is a lot for any roof. During the construction of foundations, every effort must be made to completely eliminate its seasonal fluctuations. It is desirable to make the depth of the foundation (strip and column) below the level of soil freezing in winter period time.


If you choose shallow foundations, then follow exactly building codes. The depth of the tape can not be lower than 80 cm, the thickness of the sand cushion is not less than 20 cm.

To reinforce the tape, it is necessary to take construction reinforcement of a periodic profile Ø 10 mm or more.

Fittings and reinforcement according to SNiP
Another important point. After erecting the foundations, give them time to stand for natural shrinkage. To control the amount of shrinkage, make vertical marks on the tape and columns. After a certain time, check their position using the water level, if they have shifted, make new marks. It is recommended to start construction only after the shrinkage of the foundations has completely stopped.

Column foundations must necessarily have anchors for fixing vertical racks, the width of the columns is at least 40 × 40 centimeters. If there are violations in the technology of building foundations, then during the operation of a bath with a gazebo under one roof, big troubles will appear.

Prices for asbestos-cement pipes
asbestos-cement pipes
And the last. wooden bath also shrinks, depending on the material of the insulation, the moisture content of the beam and the parameters of the building, shrinkage can be up to 0.7 centimeters per meter of height. The vertical roof racks above the gazebo, of course, do not have such shrinkage, the Mauerlats will bend with all very negative consequences. To prevent this from happening, you need to give time for the complete shrinkage of the log house, and this will take at least one year. By the way, while the log house sits down, the foundation will also “calm down”.

Stages of construction of the truss system over the bathhouse and gazebo
Step 1. Preparation of materials for the truss system. For the rafter system, you need to purchase a 150 × 150 mm beam for Mauerlats, 50 × 150 mm boards for rafters and 50 × 100 mm boards for crossbars and puffs.

In our case, we choose simple truss systems with crossbars and puffs. To increase the strength of the structure above the bath, you can put a ridge beam, headstock and struts. Such a design will not be superfluous, it will take on part of the load and will not allow deformation of the truss system above the gazebo.

Step 2 Taking measurements and calculating the number of rafters. According to the project, the width of the bathhouse and gazebo is 4 meters, the slope of the slopes is taken at 20 °, this figure is satisfactory for middle lane our country. If you live in regions with a lot of snow cover, then the slope of the ramps should be increased. The distance between the rafters is 80 centimeters, given the length of the bath with an attic of 9.5 meters, 12 pairs will be needed rafter legs. The length of each rafter, taking into account the overhang, is 4.5 meters, in total for the building, the creation of rafter legs will require (4.5 + 4.5) × 12 = 108 running meters boards 50 × 150 mm.


You need to buy with a margin, increase this amount by 5÷10%. The exact amount of materials depends on their quality and your skill. Keep in mind that the boards of the truss system must be at least the first grade, the presence of deep cracks, natural malformations and rotten knots is completely prohibited.

Important. When purchasing lumber, pay attention to the conditions and method of storage. Improperly stacked stacks can cause a significant curvature of the boards - such material is not suitable for the construction of the truss system. Inspect each board edge-on to make sure the surface is straight.
The standard length of the boards is 6 meters, which means that the boards will need to be cut. Sections 1.5 meters long will not go to waste, they can be connected and used for tightening.

Even ordinary connections withstand high tensile forces, and it is such forces that act on puffs. Calculate the rest of the lumber for the truss system in the same way.
As a roof covering, flexible tiles made of modified bitumen are used, for which a continuous crate is made of moisture-resistant plywood or OSB boards. For lathing, take the cheapest unedged boards, just remove the bark.


Prices for OSB boards
OSB boards
Step 3 Mauerlat installation. For the Mauerlat, it is necessary to use a beam 150 × 150 mm, it is attached to the upper crowns of the bath with metal dowels, the distance between the dowels is within one meter. The nagel must hold at least two log crowns.
Before installing the Mauerlat, be sure to check the height of all vertical supports around the gazebo. The ends must lie in a strictly horizontal position and one plane. To check, you need to use a hydraulic level or a laser level. If deviations are found, they must be eliminated.
The vertical supports are connected to columnar foundations anchors. For anchors, both reinforcing bars and pieces of wire rod are used. The anchor must be concreted into the foundation to a depth of at least 15 centimeters.

Mauerlats start laying from the side of the gazebo, the connection of the bars along the length can only be done above the bath. It is easier to connect with a gash in half a tree, the junction is fixed with self-tapping screws, nails, bolts or metal brackets. During work, constantly monitor the distance between the opposite Mauerlats and their position in the horizontal plane. The more accurately the Mauerlats are laid, the more reliable the truss system will be and the less time it will take to build it.
Video - An example of building a bath from a bar with a terrace (part 1)
Step 4

The roof of the bath with a gazebo does not have any fractures and changes in the angle of inclination, all the rafters are completely the same. This allows you to prepare elements according to a template. The template is made from ordinary boards, the knots are connected with nails. Work carefully and slowly, mistakes are too expensive.

Important. We strongly recommend that you check the template along the entire length of the bath. Raise it to the bath, put it in the right position and walk along the entire length of the building. Mark the places where you need to slightly increase or decrease the distance between the rafter legs, stop at the average value. The average value will give you the opportunity to make all the rafters the same size, and perform fine adjustment already during the fixation of the elements. On the template, make notch marks for connecting to the Mauerlat.
Step 5 Solve the issue with the construction of the truss system over the gazebo. Above the bath ceiling, builders can walk on it, materials are stored in the attic. The gazebo has no ceiling, respectively, before starting the construction of the truss system, you will have to install factory scaffolding or make them yourself. Both options are equivalent in terms of efficiency, if possible, it is better to borrow for the duration of the forest. If this is not possible, you will be forced to waste time on their manufacture. When working on scaffolding, observe safety regulations.

Scaffolding - photo
Step 6 Raise the prepared rafter legs to the roof of the bath. For the installation of rafters you will need Additional materials for installing puffs, special tools, fixtures and hardware for fixing rafter legs. In addition, we need pieces of boards for their temporary fixation.

Step 7, check their placement, fix in the desired position with temporary props. To increase the stability of the truss system, use metal corners on self-tapping screws. Pull the ropes between the extreme rafters and install all the remaining elements of the rafter system one by one along them. Do not forget to temporarily tie the rafters together with boards; after installing the crate, they will be removed. Nail the boards from below so that they do not interfere with making the crate under the roofing.
Step 8 horizontal puffs, it is more reliable to connect them with bolts. Drill holes in rafters and puffs, insert bolts desired length and tighten the nuts firmly. To increase the abutment area of the bolt head and nut, use large diameter washers.
You cannot do the rafter system yourself, you need to involve at least two assistants in the work. Try to find those who have personal experience in building a truss system (albeit as a helper) or, in extreme cases, have seen how real masters do it.
Check all dimensions, the spatial position of the elements and the reliability of the loaded critical nodes. Everything is fine - the rafter system is ready, you can proceed to the crate and roof covering.
Video - Construction of a gable roof
Installation of a crate under a soft tile

crate under soft roof- installation


Sheets of plywood or OSB are mounted on a crate of boards or battens. Distances between rails within 50 centimeters. Start nailing the lumber from the bottom, make templates to control the distances. If a lot of time has passed between the installation of the rafters and the installation of the crate, then their position should be checked. As always, for this use the stretched between the extreme rafters. Plywood is fastened to the crate with nails, fastening also starts from the bottom up. After finishing the work with a saw, trim the crate in one line from the side of the gables.

Prices for soft tiles
soft tiles
Video - Construction of a bath from a bar (part 2)
What to pay extra attention to
As can be seen from the project, the distance between the vertical supports of the gazebo is from two to four meters. Such remoteness makes them unstable, it is necessary to take a set of additional measures to increase the rigidity of the supporting structure of the truss system.
Connect the supports in the upper part of the gazebo with boards 50 × 100 mm. Before this, the lumber should be passed through a thickness gauge, sanded with a roughness sandpaper and coated with a weather-resistant varnish.
The connection of the vertical supports of the gazebo and the boards can be done with long wood bolts, choose galvanized hardware. It is better to drown the heads, seal the holes with putty to match the lumber.
If even after additional fastening of the supports, their stability is in doubt, place inclined corner supports. In the future, these supports can serve as a frame for the construction of decorative gazebo fences.

A visit to the bathhouse was considered in Russia not only as a way of taking water procedures but also as a form of leisure, beneficial to health. Therefore, the owners of suburban areas are always engaged in the construction of such a building, selecting projects of baths with a terrace and a barbecue. Photo, presented below, offer ways to organize backyard space for picnics after visiting the steam room.
Design tailored to the individual needs of the owners suburban buildings allows you to optimally equip the space in the country. If necessary, you can build an object in two floors. Outbuildings equipped with a recreation area can significantly improve the quality of life in a cottage and make it possible to organize leisure activities in comfortable conditions.
How to choose the right type?
Architectural bureaus offer ready-made developments with an extension, and can also create an individual plan. When choosing a suitable type of architectural appearance, one must proceed from the size of the dressing room, steam room, veranda, dining room, guest room and the number of people who should fit in them.
Optimal for summer holiday will become a covered space with a total area of 8 m 2. However, if you plan to invite a large number of guests, then you need a larger room.
When developing a project, a number of nuances should be taken into account:
- seasonality of use;
- the number of visitors;
- planning;
- material;
- construction cost;
- location of buildings on the site.
When choosing suitable type should take into account the intensity of operation of such buildings. If you plan to steam only in summer time, then you can save on insulation and on the dressing room.
If the steam room will be used in the winter, then it is necessary to provide for a convenient location for the entrance even at the stage of drawing development.

If you choose the right layout of the premises, you can reduce construction costs. By developing a roomy open structure for barbecues, you can save on a guest room.
 An example of a terraced structure
 Tip! If you already have a ready-made bathhouse outside the city, then you can build a terrace. To do this, consider its location. Installing a new building to an old building does not make sense. You can place a covered building for barbecue between the house and the bath.
Arrangement of unprotected space is chosen according to individual preferences and based on the architectural style of the entire suburban complex. The layout of the indoor facility is also important, in which it is necessary to take into account the correct location of the barbecue, summer stove or other cooking device. It must be remembered that the smoke from the stove should not go inside.
Tip! When choosing a stove, you need to proceed from the general style of the interior. This will create a single architectural ensemble.
Types of extensions
Usually as an extension are:
- terrace;
- veranda;
- alcove.

The choice depends on a number of factors, which include:
- the cost of construction work;
- individual preferences;
- architectural style;
- placement.
The terrace is usually made open. It requires the construction of a not very deep foundation. The construction of such an extension will be cheaper than the construction of a veranda or gazebo.
The veranda has its advantages. It is erected closed, so it can be well insulated and used throughout the year. Pergolas with a specially arranged grill area are more expensive, as they require the use of a large amount of decorative elements, building materials and special design drawings.

The owner of the cottage needs to choose the best development option for him, which will be used as a place for leisure.
Layout and location
Before you start building a gazebo, you should find a suitable location for it. Usually it is done along the entire facade of the building. This arrangement saves on materials and makes moving more comfortable for those leaving the steam room. In this type of construction, there is no need to talk about the lack of space for cooking and feasting. With this placement, the veranda or terrace can be partially open or partially closed. The use of external walls allows you to save on building materials. The choice of a suitable layout will ensure the construction of an object of architectural appearance, which is in the general style of the entire complex of buildings.
The option of building a structure along one of the walls is also used. This type of layout is suitable for those cases where there is a shortage of space. Creating optimal zoning, you need to provide places for eating and cooking, for entertainment. To do this, you should correctly determine the size of the object being built in the country.
Can be used corner option construction. In this case, the stove will be installed on the covered area itself. The corner model is used when there is a shortage of adjacent territory in the country.
In some cases, a covered barbecue area is built separately, close to the bath complex. Then there is a small transition between the steam room and the resting place. This option is suitable for summer use.
 pile foundation
 Individual projects
When developing individual projects, architects will be able to take into account all the preferences of the customer, the features of the layout of the country house and the size of the buildings. With the help of modern finishing materials specialists create original solutions for the entertainment area in the country. So, you can install French glass, and thereby partially turn it into a veranda.
Multi-level structures are used when the site is created from several floors. This option is good for small area. For a classic Russian-style steam room, a typical project is offered, which includes guest apartments, a place to relax, cook barbecue and a dressing room in which clothes are left before washing. Such a space can be used for household needs, at a time when the bath is not heated. It is possible to make the object two-story. In this case, the guest rooms are located on the top floor.

Common Mistakes
For friendly gatherings at the end of the working week, there is nothing better than a comfortable terrace or gazebo, where you can gather with friends after a steam room, drink fragrant tea, taste fresh, freshly cooked meat dishes on a nearby barbecue or grill. To receive guests or arrange fun family picnics with relatives, you need to properly build a sauna log house, in which there would be a place for a steam room, a relaxation room, a closed or open space for a barbecue.
When choosing a suitable project, cottage owners forget to take into account how often the object will be used. In the case of year-round use of the soap, you will have to take care of the heat capacity of the building and the comfort of visitors, who will need to undress and dress in warmth, and not in the cold.

Today, they often make an open structure with a low fence. Used for landscaping paving slabs or stone. When constructing such objects, the owners forget about the need to install the right pile foundation for a terrace, which would give the entire object greater stability and protect against swelling of the soil in winter time.
Important! In order for the paving slabs not to deteriorate after the first wintering, it is necessary to build a shallow slab foundation for such structures. Insulation is laid on the slabs, and only after that it is possible to carry out the installation of paving slabs.
The disadvantage of a simple pile foundation is the lack of a solid base and insulation that protect the structure from destruction.
Such a base is not suitable for intumescent soils and soils with a close occurrence of groundwater. Pile light foundation can only be done on dry sandy soils.

Stove installation
For rational use heat, it is required to install the stove in such a way that it can heat all the rooms adjacent to the steam room, including extensions, if they are of a closed type.
For the winter operation of the suburban steam room and adjacent premises, it is necessary to provide for the installation of heating for guest rooms, since the heat of one stove will not be enough in the cold season to keep the rooms in good condition. During off-season operation of the facility, a vestibule is installed, which protects the entire space from the cold and saves fuel consumption.
The stove in such a structure can be heated with wood, coal or gas. The choice of heating depends on the budget of the cottage owner and the designer's intent.

The hearth for cooking on the site must have open fire, as required by the preparation of kebabs and grills. With the help of a detailed plan, the issue of arranging the territory around the steam room outside the city is taken into account. If everything is provided for at the stage of developing technical documents, then you can reasonably invest in the improvement of your own suburban area and improve your living conditions on it.
Today, people prefer to choose a recreation complex with a steam room in Russian style, made of logs and modern building materials. Saunas are built less often, but wood is also chosen as a material for them. Wood has a lot of advantages, it is environmentally friendly, durable and fits into various architectural styles. Therefore, wooden building materials are used for the construction of such structures in summer cottages and country cottages.
Baths with a terrace are far from an innovation in Russian summer cottages. All more people choose projects that allow the most ergonomic arrangement of space and at the same time give real pleasure to those around them with their appearance.
Beautiful, graceful outdoor terrace will decorate not only the bath, but the entire site. It may well replace a rest room - therefore, the developer, wanting to save money, may consider plans completely small bath. In this case necessary premises there will be only a steam room, a washing room and a dressing room.
Pay attention to the bathhouse with an attic and a terrace - this is an opportunity to get two or more rest rooms at once, one of which will be heated. An interesting option- a corner bath with a cozy terrace, which in this case is located in the inner corner of the log house. The open extension will be protected on both sides from the wind by the walls of the log house, and in turn will protect the entrance to the bathhouse from the weather.
Wooden baths with a terrace

It is customary to call a terrace an extension to a residential building or a bathhouse, which can be either open or closed - for example, a canopy. Along the perimeter, the terrace is fenced symbolically, decoratively. The roof and foundation are shared with the bathhouses. This circumstance dictates the following rule: it is desirable to build a bathhouse and a terrace at the same time. Immediately choose the projects of baths with a terrace, the photos of which you liked. Thus, you will avoid uneven shrinkage of the log cabin of the bath and the foundation. However, if it becomes necessary to attach a terrace to an existing building, this can also be done.
Unlike the veranda, the functionality of which is very wide due to the walls closed from several (or even from all) sides, the terrace is used mainly as a place of rest. For example, for a barbecue, if the terrace is spacious enough, or for family evening tea parties. In winter, you can also have a great rest here, gathering friends for barbecue. Only care should be taken to protect yourself from wind and frost - install sliding structures plastic, for example. The terrace with pool is a wonderful place for good rest.
Bath projects with a large terrace (10-12 sq.m) make it possible to organize relaxation in an equipped place, in a pleasant environment. This is extremely convenient when it becomes necessary to invite guests. And, by the way, it saves money, since there is no need to build a gazebo that is mandatory today.
Construction of a bath with a terrace

The terrace, as a rule, has two entrances - one from the porch, the second from the rest room.
The material for its manufacture is mainly wood. The terrace is located along one of the walls of the bath and can be in the form of a square, rectangle, semicircle and even a triangle. Sometimes the terrace is planned as a "connecting bridge", a warm transition between residential building and bath.
When implementing a turnkey bath with a terrace, builders pay special attention to the connection of structures, avoiding “hard” adhesion. A minimum gap is left between the main building and the extension - about a centimeter. This will avoid in the future "distortions" of the log house.
In order for the bath with a terrace to make a pleasant impression and be an integral architectural ensemble, the same structure is used for the construction of both structures. construction material. As a rule, this is a rounded log, profiled timber, glued laminated timber.
The floor on the terrace is made of coniferous boards, as their resistance to decay is very high. In addition, wood must be treated with special protective compounds for better preservation of its structure and appearance, as well as resistance to external atmospheric influences.
The project of a one-story and two-story baths with a terrace is the more difficult to implement, the larger the terrace area, since the project developers (and then the builders) need to “link” both structures so that they look like a single complex.
- organization of a good rest - having taken a steam bath and relaxing after a bath, right on veranda, without leaving anywhere, you can cook barbecue or snacks on the fire
- joint construction helps to accurately maintain the overall architectural style for all buildings on the site
- if the bath in the country is planned to be used only during the season, then a spacious terrace with a barbecue can completely replace the rest room, which will help to significantly save on the construction of a bath
- no need to link standalone objects paths, which allows you to further save usable space and reduce costs
- grouping several objects under one roof will help to significantly reduce costs, because in this case, for example, the bath wall will act as a terrace wall
Material selection
The most popular and cost-effective material for building a bath with a terrace is wooden timber. On the one hand, it keeps heat well, so the bath does not require additional insulation. In addition, it is wood that is the traditional material of the Russian bath, it allows you to create a unique “bath” atmosphere. An additional plus is that wood, as a “breathing” material, independently regulates humidity, but at the same time it will require additional protection against mold and fire.
Brick baths are more reliable in terms of fire safety, but they warm up longer, requiring more fuel. Besides, brick baths require the mandatory installation of a ventilation system, otherwise condensate will begin to accumulate inside the bath, provoking the development of mold and bacteria.
Foundation laying
Despite the often common roof, a different foundation is laid under the terrace and the bath. The bath, of course, is heavier than the terrace, therefore, for large and multi-storey buildings, a tape monolithic foundation will be required, and for small baths, pile foundations can be dispensed with. If foam concrete or brick is used to build a bath, then it must be poured strip foundation- the other simply will not withstand the weight of the building.
For wooden terrace a pile foundation will suffice. In cases where the terrace will be located on difficult ground, prone to freezing or shedding, on slopes, it is better to lay screw piles. At the same time, for wooden buildings it is very important to properly organize the waterproofing between the tree and the foundation in order to avoid rotting of the wood.
Advice! Since the soil under a heavier bath will shrink faster than under a lighter terrace, the foundations of the terrace and bath must be separated by a layer of insulation.
Terrace and barbecue: we plan correctly
When planning a terrace, first of all, it is necessary to take into account which direction of the wind is the main one, so that the task of the bath covers the terrace. In addition, this will allow you to properly place the barbecue so that the wind carries the smoke and heat away from the vacationers. If the terrace will serve as a shelter from the sun's rays on a hot summer day, then you should not place it from the south. Or vice versa - a terrace with a sun lounger can be a great place for sunbathing - it all depends on the wishes and tastes of the owner. In addition, the choice of the location of the terrace is greatly influenced by the surrounding landscape - contemplation fence it is unlikely to add mood on vacation, where it is more pleasant to admire the forest, lake or landscaped landscape design.
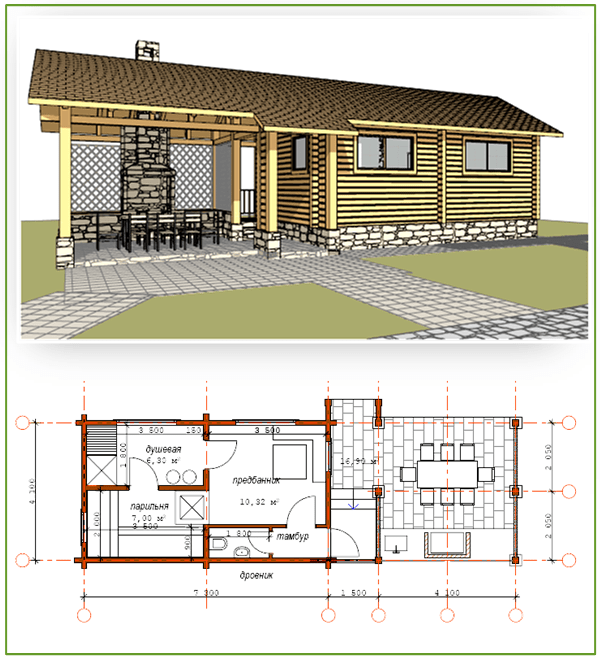
The terrace can be placed frontally (i.e. along the facade of the bathhouse, Fig. 1), sideways (near one of the walls), it can be angular (along two adjoining walls) or encircling (along three camps, sometimes completely around the bathhouse, area permitting).
Rice. 1. The project of a bath with a frontal terrace
If you do not plan to invite a lot of people, then taking into account the installation of a barbecue (brazier), the minimum recommended terrace area is 7-8 m2. But it’s better to start with 9-10 m2, then in addition to tables and chairs on the terrace, you can put a deck chair, a couple of chairs, while the person standing at the barbecue will have enough free space to work, and vacationers will not be bothered by the heat from the stove and smoke .
Although the terrace in the classical sense is an open area, for greater comfort it has a roof to protect it from rain and sun. This may be a continuation of the roof of the bath and be made of a similar roofing material, or you can cover the terrace with translucent polycarbonate. In addition, an opaque canopy will create twilight in the bath itself, so you will have to turn on the light earlier.
Advice! Polycarbonate coating is especially justified for large terraces - there is no need to build a massive base, lightweight metal structure will not clutter up the space, remaining almost invisible.
Ideal for patio flooring wooden plank or decking. Of course, you can put a sidewalk or ceramic tiles, but the tree will look cozier. Natural stone is used as a covering on a large terrace
To install a barbecue, it is necessary to lay the foundation separately, and for construction use a special refractory brick, while the base is made about 70 cm high from the floor level.
Advice! To improve fire safety, it is better to put a stone (tile) tile around the barbecue instead of a wooden covering - even if a spark falls on it, it will not cause a fire.
A rectangular niche is made in the front wall, in which it will be possible to store a small supply of firewood. To remove smoke for a barbecue, a separate chimney is made, which in height should ensure effective removal of smoke from the bath.
Designing a bath with a terrace and a barbecue oven
The design of the bath, regardless of the type (Russian, Turkish, Finnish) should provide for the presence of at least three rooms:
- dressing room - dressing room with a minimum size of 1.2 × 3 m, but it should be noted that according to the standards, 1.3 m2 should be per person
- shower room - minimum size 2x2m
- steam room - its size is a compromise between ease of placement and the need to maintain the required temperature at low fuel (electricity) costs. The minimum size of a steam room for 2-3 people will be 1.3 × 1.8 m.
If you have a spacious terrace for a seasonal bath, you can refuse a rest room. The planning of the rest of the premises, of course, depends on the desire and capabilities of the future owner.
Let's take a closer look at some projects.
corner bath with a terrace and a barbecue (Fig. 2) allows you to effectively use the area of \u200b\u200bthe site if you place it in one of the corners.

Rice. 2. Corner bath with terrace and barbecue
The space is used very functionally - in the spacious shower there is a font with cold water. A fairly spacious steam room - it will be quite comfortable to heat the stove in it, while it is shifted closer to the corner, away from front door- it's safer, because after the bright lighting of the shower room, the eyes need to get used to the muffled light of the steam room. If brick is chosen as the material for the bath, then the stove can be cut into the walls. If you make the steam room a little smaller, then with this arrangement of the stove, you can heat it from the shower. There are two entrances to the common vestibule - one directly from the street, the second - from the terrace.
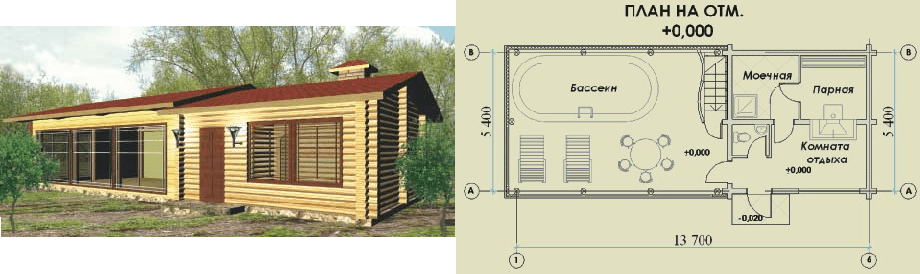
The project of a bath-guest house (Fig. 3) with a veranda and a barbecue, a fairly large area - 98 m2. Therefore, if it is intended to be used year-round, a heating system will be required. Inside there is a spacious lounge and a separate kitchen. The terrace is located on the side, in terms of area - it is actually half of the building. Entrance from two sides - from the street through the vestibule (winter entrance) and from the terrace.

Rice. 3 Banya - a guest house with a barbecue and a terrace
Figures 4 and 5 show two more projects of a bathhouse with a terrace and a barbecue, which can be used as a guest house.

Rice. 4. The project of a bath-guest house with a terrace and a barbecue

Rice. 5. Sauna with terrace and barbecue
On fig. 6 drawing of a bath with a terrace and a barbecue, on which you should pay attention to front door to the rest room - it is located at the maximum distance from the barbecue in order to completely eliminate the possibility of smoke entering the room.

Rice. 6. Drawing of a bath with a terrace and a barbecue
Sauna from a bar with a veranda and a barbecue in the traditional Russian style - watch the video presentation:


