Do-it-yourself drainage system around the house and summer cottage. How to make drainage around the house at an early stage with plastic pipes? Drainage under the house
To ensure organized water drainage on the site, drainage works are intended, the implementation of which is planned at the design stage.
As a result, ground flows, underground inflow of groundwater, falling or melted precipitation fall into a specially equipped channel and are directed outside the yard country house.
The annular drainage of the house, working together with waterproofing and concrete pavement, can protect the foundation of a deep foundation, basement and basement rooms, channels of supply communications from flooding.
Device principles
 Loamy soils do not pass water well, and it penetrates into the cavities around the pillars of the building
 To figure out how to properly drain around the house, they begin with studying the conditions for the location of the site and the results of its geological surveys.
You should not rely on the protective properties of waterproofing layers alone, since in the long term there are no ideal materials in which there are no weak points with a large number of exposure cycles.
Factors influencing the choice of design and combination of different types of drainage systems for a private house:
- location on the ground, the possibility of the formation of storm flows from areas located higher on the slope;
- seasonal fluctuations in groundwater level (at a high level, drainage around the house is necessary, including to prevent siltation of the sand and gravel cushion and, as a result, increase the heaving of the base);
- soil composition (clays and loams do not pass water well, and it is directed to looser cavities near the bearing supports of the building, filling such spaces with clay increases the heaving forces aimed at squeezing the foundation out of the soil);
- position relative to water bodies, flood water rise;
- the average annual and maximum amount of precipitation characteristic of the area;
- building density on the site, the depth of neighboring foundations;
- coatings that prevent water from seeping into the soil, collecting it in streams along the surface (asphalt, concrete paths, sheds and roofs);
- discharge from a drainage system installed in a private house must also be sent to the annular drainage system (storm drains).
The device of the drainage system of the house is the creation of a calculated engineering system that takes into account the possible combination of various factors in their maximum values.
Types of drainage
 Surface drainage consists of point receivers and an output system
 You can visualize what a drainage system around a house is with your own hands by analyzing the main types of such structures designed for specific drainage tasks.
They consist of a system of pipes (channels) for collecting water, located both on the surface and at the level of the foundation support.
- The surface (storm) drainage of the site combines linear (trays) and point (lattices) receivers of incoming water into a system.
- Surface execution is also used in cases of withdrawal of transit flows from adjacent territories beyond the boundaries of possessions.
- Wall (foundation) closed drainage for the house is needed to divert groundwater and seeping water from the supporting structural parts of buildings, foundations of courtyard structures.
Equip it after the completion of the main construction works on the site, in front of the device of lawns and hard surfaces.
 Water from the surrounding soil enters such a perforated pipe system and is removed through collection wells, a collector for accumulation, with subsequent discharge into a nearby natural reservoir or general sewerage system.
Drainage methods can be:
- An open type in the form of a ditch with a cross section of 0.5 × 0.5 m is chosen for large areas (significant flows) in places where they do not interfere with movement. The main advantage is the simplicity and speed of work at low cost. In landscape areas, such channels drain the topsoil.
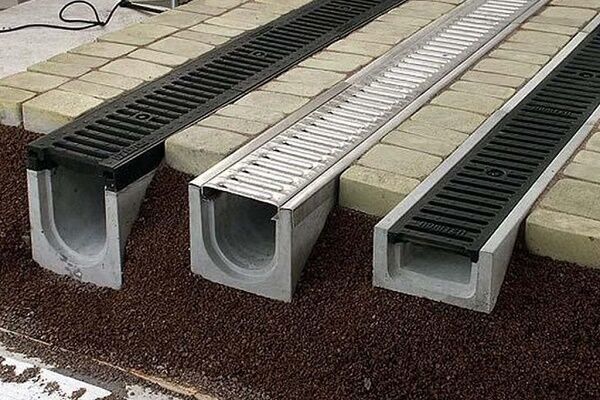
- The closed-type drainage around the site is covered with plastic or metal gratings, which reduce the throughput, therefore, the drainage tray is also taken with a smaller section. It is safe for pedestrians, the installation of drainage channels is carried out on a heavily used small part of the yard. An example of what a closed drainage system looks like is shown in the figure.
- Backfill drainage of the site is a channel filled with solid filler (fine stone). A laid perforated pipe can accelerate the removal of liquid from the bottom of a concrete tray. To prevent silting of the stone fraction, it is recommended to cover the bulk of the bulk material with geotextiles, leaving a small upper layer 5 - 10 cm to protect the web from mechanical damage. Periodically retained dirt is removed by washing the gravel.
- Deep drainage is used during construction on clay soils and areas with a high level of HW (in a lowland, next to a reservoir). The planned drainage depth around the house is 0.5 m below the base of the foundation. The beginning of drainage work coincides with the foundation - the drainage scheme around the house is taken into account in the marking of trenches / excavation, excavation of the required amount of soil.

Each type of drainage work is different in terms of labor intensity, but in terms of its characteristics, role in the protection of buildings, throughput, the types are not interchangeable.
Constituent elements
 Ditches must be dug at a slope
 Correct installation the drainage system around the house will require the presence of all components, the calculation of the drainage system and compliance with the installation rules.
Trenches are dug so that the annular drainage is obtained with the desired slope using a laser level (range finder).
The size of the slope may vary depending on the throughput of the pipe:

You can check the presence of a slope in the trench with the next heavy rain - streams of flowing water should be directed towards the well.
Geotextile
 Textile - a water filter that prevents large fractions from entering the drainage pipes
 The role of this material in the installation of drainage is to filter water from small impurities that clog pipe perforation holes and litter gravel.
Reducing gaps reduces the ability to quickly remove water from the area for which the ring drainage is designed.
The throughput of 1 layer of geotextile is given in technical specifications products, depends on the brand and is inversely proportional to strength:

It is laid under the pipes at the bottom of the trench and protects the entire bulk part so that the flow of water into the annular drainage is not reduced. In dry sandy soils, protection with drainage pipes can be omitted.
Pipe
 Corrugated pipes are the most popular
 It is possible to carry out a drainage system scheme from pipes that differ not only in Ø, but also in material.
For the installation of a drainage system, products that are not prone to corrosion are chosen, since their repair or replacement is rather difficult.
Pipes from the following range are selected for the drainage device around the site:
- ceramic (baked clay);
- asbestos-cement;
- porous;
- polymeric (corrugated).
The most durable of them include asbestos-cement pipes, in other cases polymer pipes are usually chosen for the device:

The perforation of drainage pipes is applied during manufacture at the factory or holes are made, cuts are made, performing the installation of the drainage of a private house with their own hands. The fraction of gravel should be larger than size holes.
Well
 Wells are installed at a distance of 12 m from each other
 Manholes for monitoring and cleaning the system must be included in the drainage calculation.
They are located along the drainage system with a step of about 12 m.
Structurally, the manufacture can be from stacking rings, the Ø of which allows you to clean silty deposits, or products industrial production presented in the table:

It is possible to collect the annular drainage of the foundation of a private house from pipes of various sizes with an increase in the Ø of the passage in the direction of movement of the collected flows. Several drainage pipes with a diameter of at least 100 mm can be connected to the well. To learn how a deep drainage well works, see this video:
Functionally, a well into which water enters from drainage pipes can be accumulative (with a sealed bottom) or absorbing (water gradually leaves the soil through a layer of rubble protected from silting by geotextiles).
Pricing
 The approach to prices of a specialized company and the scope of work for the construction of wall drainage is divided into categories "economy", "standard", "capital", the total amount depends on the footage of the system.
In large firms (for example, the United Company), services and prices for proper drainage around the house may have a wider range:
- verified;
- economical;
- rational;
- premium. For more information on how to equip drainage around the house, see this video:
Qualified calculation of the characteristics of all necessary elements, the ability to perform laying in compliance with specifications, in a short time frame the first time means not only rational use financial resources (with the provision of warranty obligations from the company for 24 months), but also the service life of the selected system up to 50 years.
The removal of ground and storm water from the foundation will significantly increase the service life of the capital building, and dacha building. A simple drainage system will protect underground concrete structures from gradual erosion, and basements from flooding. But it is extremely important to prevent the destruction of the very foundation of the structure, right?
A well-designed drainage scheme around the house will help to build an efficient system for collecting and discharging natural water. We invite you to familiarize yourself with carefully selected and verified information based on regulatory documents and real experience builders of low-rise buildings.
We will talk in detail about the types of drainage systems, the features of their device, the specifics of operation. We will give arguments in favor of choosing a particular type of drainage. The useful information offered to your attention is supplemented with photos, diagrams and video instructions.
When designing a drainage system, first of all, determine the goals that are planned to be achieved. They may consist in draining the entire site, in protecting the foundation and basement of the house from excess moisture.
From existing systems drainage can be divided into two main types - open and deep (closed). The first one can be used for needs Agriculture, for drainage from cultivated areas. Closed drainage is used to drain water in summer cottages and cottage areas, to protect buildings from the negative effects of high groundwater levels.
The organization of the drainage system is necessary when high mirror ground water which is especially pronounced during the flood period. Drainage to protect the concrete foundation from the aggression of underground water and reduce the hydraulic load
Combined drainage systems are also used. They are often supplemented with storm sewer branches intended for disposal. atmospheric water. Provided that they are properly designed, they can significantly save on the construction of each system separately.
Image Gallery
The first and main sign, according to which the owners of the site need to arrange drainage, is the stagnation of water during the snowmelt period. This means that the soils underlying the soil have a low filtration capacity, i.e. do not pass water well or do not pass it at all
Drainage is necessary in areas with pronounced signs of soil erosion: cracks that appear during the dry period. This is a manifestation of soil erosion by groundwater, which ultimately leads to destruction.
Collection and drainage of water is required if, during the period of snowmelt and heavy rainfall, groundwater rises to the level of laying communications
Drainage systems are built in areas with a characteristic slope. But in this case, they are needed for a balanced distribution of water and keeping it on elevated sites.
Flooding of the site during the snowmelt period
Erosion and erosion of the soil under the foundation
Water at the level of laying communications
Country plot with slope
#1: Open Drainage Device
Open drainage is the simplest and most economical way to drain water, which can be used under the following conditions:
- the underlying soil layer is clayey, poorly permeable to water, which is why the fertile layer, located 20–30 cm from the surface of the earth, is waterlogged;
- the site is located in a lowland, into which rainwater naturally flows during a period of heavy rainfall;
- there is no natural slope in the relief of the site, which ensures the movement of excess water towards the street.
Open drainage is arranged in areas with high GWL, the mark of which is most often due to the location of the land allotment in a lowland or the clay composition of soils that do not pass or very weakly pass water into the underlying layers.

The drainage system, designed to drain excess groundwater, works great in tandem with a storm drain, the work of which is to collect and remove precipitation (+)
Planning a drainage scheme is best done at the design stage of a house. This will allow you to tie the work and place the storm water inlet under the gutters to the blind area.
Open drainage is considered the simplest and does not require a diagram. It is a trench 0.5 m wide and 0.6-0.7 m deep. The sides of the trench are at an angle of 30 °. They encircle the territory along the perimeter and direct wastewater into a ditch or pit, into a storm sewer.
Areas with a slope towards the street are easier to drain. For this, a gutter ditch is dug in front of the house, across the slope, which will retain water from the garden. Then they dig a ditch, it will direct the runoff towards the street, into a ditch.
If the site has a slope in the opposite direction from the road, then a transverse gutter is dug in front of the fence facade and another longitudinal one is made to the end of the site.
The disadvantage of such drainage is its low aesthetics and the need for regular cleaning of the gutters from silt and dirt, which periodically accumulates in them. This type of drainage is not recommended for pavement, as it leads to subsidence of the soil and deformation of the web
The length of the lines for water flow, the number of wells and sand collectors depends on the area of the site, its topography, and the intensity of precipitation in a particular area.
Drainage ditches can be reinforced against erosion with reinforced concrete slabs, stone paving, turf with crushed bottom
If the site is considered to be more or less even, and its level of waterlogging is not too high, then the simplest drainage system can be dispensed with.
Along the foundation of the fence, at the lowest point of the site, they dig a ditch with a width of 0.5 m, a length of 2-3 m and a depth of 1 m. Such a drainage system, although it will protect against a high groundwater level, and cope with precipitation perfectly.
To prevent the edges of the ditch from collapsing, it is filled with rubble, broken glass and bricks. Having filled it, they dig the next one, it is also filled and compacted tightly. Excavated soil is used for filling low-lying places in the territory
Over time, this simple drainage system may become inoperable due to gradual siltation. To prevent this from happening, it can be protected with a geotextile. It is laid on the ground, after backfilling the ditch, the drainage layer is overlapped with it. From above, to hide the ditch, it is sprinkled with a layer of fertile soil.
#2: Building an Efficient Stormwater Drain
Storm sewerage is necessary for the accumulation and removal from the site of water that falls in the form of precipitation. It is equipped with point and linear catchment devices.
Image Gallery
Storm sewer systems are arranged to collect atmospheric water and prevent it from penetrating into the soil, and then into the underlying soil.
According to the type of water intake devices, storm sewer systems are divided into point and linear. The first are built in areas with organized drainage, the second - with unorganized
Linear water intakes have a much larger collection area than point ones. They are installed next to houses with unorganized drainage and on sites paved with a waterproof coating.
In linear stormwater, water is both collected and transported through a network of channels closed with a metal or plastic grate. In point systems, water is drained through a system of pipes laid in the ground.
Storm sewer with a point water inlet
Spot drainage channels
Water receivers of a linear variety
The structure of trays with gratings
The first type of water collectors is installed under the risers of an organized drainage system. The second type of water collectors is located under the slopes of roofs with unorganized drainage.
Water entering the sump moves through an open or closed pipeline. It is diverted either to a common well-water collector, or to a collector well, from which it moves to a centralized sewer network or gutter.
The storm water inlet is a container for collecting water, equipped with outlets for connecting pipes of a linear drainage system. Devices are made of durable plastic or cast iron (+)
The elements of the storm system with point water collectors are also drains, drains, dampers. Some manufacturers provide for the possibility of connecting storm water inlets with roof drains, as well as with underground drainage systems.
In addition, ready-made production models provide for the presence of sand traps and waste bins, which simplify the maintenance of the system.
A device with a decorative grille installed should be located 3-5 mm lower than the level of the track, the ground
This is a system of gutters made of plastic or concrete, which are installed on the site in those places where the accumulation of water is most likely, but highly undesirable.
For a drainage well, choose the most distant place from the house, well, cellar. If there is a natural or artificial reservoir nearby, then water can be drained into it
When designing with linear water intakes, the first thing they plan is the placement of a catchment or collector well. Next, determine the location of the rotary and revision wells. Their arrangement will depend on the placement of storm water inlets and closed sewer branches.
To prevent water from the street from entering the yard, gutters are installed along the gate line leading to the yard, garage doors, as well as in the gate area. When choosing system elements to be installed on the roadway, the future load on them is taken into account.
To prevent moisture from getting inside the building, the slope of the coating in the garage is made towards the water intake grate. So water, when washing a car or thawing snow on vehicle, will drain into the chute.
Drainage trays must be installed on the porch, around the pool. They are also installed along the blind area, garden paths laid out from facing material sites
To give the storm drain a neat look, special trays made of polymer concrete and plastic are used, which are closed with metal or plastic gratings. At the entrance to the house use a special pallet for cleaning shoes.
The grate for the gutter installed near the pool is chosen plastic, white color to avoid burns on a hot summer day.
For intensive use, drainage trays are mounted on concrete base. The higher the load class on the roadway, the greater the thickness of the concrete base should be (+)
Gutters and water intake points are connected to a drainage tank. At the junction of gutters and pipes, inspection wells are provided. They are designed to facilitate access to the system and clean it from possible clogging.
Revision wells are made mainly of plastic. In order to obtain the required depth, their design provides for the possibility of building with the help of special extension elements.
Placement, slope and length of storm sewer pipes - all these characteristics are very individual and depend on many conditions on the site
A wide range of system elements allows the most rational design, which will be optimal from a technical and financial point of view.
The main elements of linear drainage are gutters made of concrete, polymer concrete, plastic, point receivers, sand traps, grids (+)
#3: Building Indoor Drainage Options
Underground, closed drainage is used if the device of an open system takes up too much space on the land plot or it does not fit into the landscape picture of the territory at all. The conditions for its installation of a closed drainage system are similar to the prerequisites for organizing a network of open drainage ditches and ditches.
Closed drainage schemes are used to protect the foundation, basements from groundwater and increase their service life. By analogy with open ones, they are used to drain a suburban area from excess groundwater.
It is mandatory to organize underground drainage on the site if:
- it is located in a lowland, in a swampy area;
- there is a natural reservoir near the buildings;
Underground drainage can be divided into two types:
- wall drainage;
- trench (formation) drainage.
Both types of underground drainage are carried out at the stage of building construction. If it was decided to start the problem of drainage after the construction of the house, then a trench ring system is used. There are also limitations for the use of trench drainage. It can be used if the house does not have a basement.
The fact is that, after, backfilling the pit with sand or soil creates a looser environment between the bedrock and the foundation. As a result, perched water penetrates into this environment, and then even the presence of a clay castle does not protect the building from moisture.
Therefore, if the house has a basement, for effective drainage, it is best to do wall drainage. It is used to drain groundwater directly from the foundation of the building, to protect basements, cellars, basements from flooding.
You can not plant trees and shrubs near the drain. The distance to the planted tree can be at least two meters and to the bush at least one meter.
Wall-mounted limits the rise in water level, preventing it from rising above the line of drainage pipes - drains. It is believed that drainage pipe 1 m long is capable of draining an area of about 10-20 m 2.
When arranging wall drainage, the pipe is laid along the perimeter of the building. The depth of the laying of drains cannot be lower than the base of the foundation slab or the base of the foundation. If the foundation is very deep, then it is allowed to lay the pipe slightly above its base (+)
The distance from the drainage pipe to the foundation depends on the location. They are laid in each corner (or through one corner) of the building, as well as in places of turns and pipe connections.
Revision wells are also located in places with a large difference in the level of the site and with a large length of pipes - the distance between the wells should be no more than 40 meters.
In the revision well, the pipe cannot be solid, it breaks. This is done so that if the pipeline is clogged, it remains possible to flush it using a high-pressure hose.
The whole system closes on the last well. It should be located in the lowest place. Further, the water flows into a conventional sewer or open reservoir. If it is not possible to divert water from the house by gravity, then install pump equipment and it is forcibly removed.
To ensure gravity drainage of water, the pipes are laid to the side to the collection manifold. The slope should be two centimeters per meter of the drainage pipeline. The depth of the pipe should be greater than the depth of soil freezing.
The pipe is covered with drainage material - gravel, fine gravel or sand. The minimum layer that will ensure the flow of water into the drain is 0.2 m
To save on geocomposite materials and prevent them from mixing with the soil, geotextiles are used. It freely passes water to the drains and at the same time retains particles that lead to siltation. Before backfilling, the pipe itself must also be wrapped in protective material. Some drain models are produced with ready-made geotextile filters.
It is possible to increase the efficiency of wall drainage using a profiled polymer membrane, which can be two- or three-layer. One of its layers is a polyethylene film with formed protrusions, the second layer of the membrane is a geotextile fabric.
The three-layer membrane is equipped with an additional layer of smooth polyethylene film. The membrane helps filter water from the soil and at the same time serves as a waterproofing layer for the foundation of the building.
Closed trench-type drainage protects the building from flooding and moisture. It is a filter layer, which is poured into a trench at a distance of 1.5-3 m from the wall of the house.
It is better that the depth of the drain is 0.5 m deeper than the base of the foundation - so the water will not exert pressure on it from below. Between the trench with drainage and the foundation of the house, a layer of clay soil remains, which serves as the so-called clay castle.
As with the installation of a wall drainage system, drains are laid on a layer of gravel or fine gravel. Both pipes and gravel layer are protected by geotextiles from clogging.
#4: Building a Wall Drain Step by Step
In order to get a visual representation of the drainage process around a country house, consider an example. The site given in it required the installation of a groundwater drainage system, tk. under the soil-vegetative layer lie loams and sandy loams, which are extremely poorly permeable to water due to their low filtration capacity.
Image Gallery
For drainage, we develop a trench around the house. Since the work was carried out with a mini-excavator, they retreated 1.2 m from the walls so as not to damage the building. If you save manually, you can make closer. The bottom of the working is 20-30 cm below the foundation
The branches of the trench formed around the house should have a slope towards the common trench, intended for the pipe for draining the collected water to the collector well
We fill the bottom of the trench with sand. We ram it and form a slope of 2-3 cm per linear meter. We direct the slope towards the common trench, the bottom of which is also filled and rammed. In the case of crossing the trench with communications, we take into account that the drainage pipes must pass below them
We prepare drains, perforated polymer pipes, for laying in a trench. We wrap them with geotextile, which will prevent clogging of the system and filter groundwater
We cover the rammed bottom of the trench with a second layer of geotextile, pour gravel on it and put drains
The channels for draining water from storm sewers and the drainage system are laid in one trench. It is permissible to divert the water collected from them into one collector and use common manholes
Having wrapped the gravel backfill along with the drainage pipe with a second layer of geotextile, we fill the trench with quarry sand. We do not use the soil dumped during the development of the trench, the sand will better pass the water to collect the drain
The common trench, to which circular drainage is supplied, is brought to the installation site of the collector well
It is good to build a house on a hillock, where dry sandy soil lies under a fertile layer of soil. And if you got a land plot in a lowland, where wet clay or loam lies under a layer of plant soil? How to prevent undermining and subsidence of the foundation of the house, to prevent dampness and flooding of the basement? What to do with puddles that do not descend for a long time, how to make fruit and ornamental trees, to grow and preserve crops in the beds, to arrange a green lawn on waterlogged soil? Of course, there are special construction methods and agricultural techniques on wet soils, but they are ineffective if the land is not drained. Let's talk about drainage. What does it give, what happens, the calculation of the depth of drainage and its device.
Drainage, like any technical structure, costs money. And the price of a high-quality drainage system can be up to 5% of the cost of building a house and landscaping a site. Is it worth spending that kind of money? The answer depends on your priorities and specific site conditions.

Drainage is used to optimize soil and soil moisture on the land
Let us turn to the experience of European colleagues. The climatic features and the nature of the soils of the northern and central regions of Germany are quite similar to the conditions of the Central strip of Russia. Plains located not high above sea level, a relatively large amount of precipitation, clays and loams are widespread. Prudent Germans arrange drainage everywhere, even if, at first glance, there is no particular need for this. As a result, a guaranteed dry basement is obtained and the confidence that the foundation, without any displacement, will last the maximum period that its design can provide. Practical descendants of the Teutons rightly believe that saving on the reliability of the foundation of the building can cost more. They prefer to invest once and for a long time in the comfort of their home. The question “do I need drainage”, as a rule, is not worth it.

If you want to have a guaranteed dry basement - do not forget about drainage
For the domestic developer, drainage systems are still rather exotic than perceived need. The reason for this is not only the low level of income compared to economically developed countries. We are still guided by the principles of the Khrushchev era in design and construction: "now we will save, and then maybe ...". Well, prioritization is a personal matter for everyone.
Of course, drainage is not the most urgent task in areas with low rainfall. There is no special need for it on dry sandy soils. Even in a damp area with problematic soils and high GWL, you can live without drainage: do not build a basement, build a light frame house on pile foundation. Plan the slope of the relief of the site, diverting, if possible, storm and melt water beyond its limits. There is not much point in draining when building an inexpensive dacha from lightweight structures. But the more “capital” and more expensive the house, the higher the requirements for the quality of improvement, the higher the need for drainage.

Drainage in this area is definitely needed
Type of drainage depending on the depth of its location
Depending on the depth, there are three types of soil drainage:
Open
Open drainage is a ditches for drainage. Open drainage is cheap, but due to the low profile, it is only suitable for draining rain, melt and storm (from the roof) water from the ground surface. The depth of open drainage is 5-20 cm, with a higher profile height, unreinforced soil will collapse, and it will be difficult to clean the trays. The walls of open trenches have to be constantly restored or strengthened so that they do not crumble. You can use comfortable and aesthetic, but not cheap concrete or ceramic trays, and close them with gratings at the intersections with paths and paving. Open drainage is easy to maintain in working order.

U-shaped trays, closed from above with gratings - the best option for drainage from the paving surface and not only. Strong, durable, costly
Zasypnoy
Backfill drainage is an improved version of open drainage. The trenches are covered with well-permeable material. As a rule, crushed stone, gravel, rubble, broken brick are used. Backfill saves the site from inconvenient for movement and not always aesthetic open trenches. Also, such a solution makes it possible to increase the height of the trench profile, the depth of the backfill drainage is from 20 to 60 cm. This makes it possible to collect not only rainwater from the surface, but also to remove excess moisture from the upper soil layer that has accumulated after snow melting, heavy rains, from - for high GWL. So that the backfill is not clogged with soil particles, the porous material is limited by geotextiles. From above, you can arrange a lawn, lay turf. You can not sprinkle the trench with clay, loam. At a relatively low cost, backfill drainage has a significant drawback: the low throughput of the water flow does not allow to fully cope with heavy showers. Also, drains cannot be serviced without opening them.

The process of backfill drainage, designed to reduce soil moisture in the garden. The location of the drains takes into account the relief of the site
Closed
Closed drainage is a system of perforated pipes laid in the ground, placed in a layer of permeable backfill, limited by geotextiles. Drainage depth closed type technically not limited, it perfectly collects moisture from lower layers soil and soil. Rainwater from the surface enters underground drains through vertical wells, which must be protected from the ingress of dirt and debris. Soil moisture enters the pipes through the perforation, first soaking from the soil into the backfill. Closed drainage is the most efficient and versatile type of drainage and drainage. It is practically invisible on the surface, does not interfere with landscaping, and is aesthetically pleasing. A properly designed and built closed system needs easy maintenance, periodically (recommended in spring and autumn) remove debris from wells and, if necessary, flush pipes with a stream of water. The disadvantage of a closed system is only one - high price.

Closed drainage during installation
How deep to drain
The answer to the question at what depth to drain depends entirely on the purpose of the system.
- To collect rainwater from paths and lawns, it makes no sense to dig deep; shallow (10-15 cm) surface trenches and trays are enough for this purpose.
- If you need to drain the topsoil for better growth herbaceous plants and bushes, you should use a backfill or closed version, the drainage depth will be 40-60 cm.
- When the goal is to ensure normal growth fruit trees in an initially too wet area, the drainage is laid in such a way that excess moisture is removed from the main part of the root system. For dwarf rocks, it is enough to deepen the drains by 0.6-1.2 m, specific meaning depends on the characteristics of the tree variety and the agricultural technology used.
- Protecting the foundation and basement from moisture involves the use of only a closed drainage system. The depth of drainage is determined by the depth of the foundation. As a rule, for strip foundation perforated pipes should be located slightly (30-50 cm) below the base of the foundation.

Wall drainage should be buried below the base of the foundation by 30-50 cm
If the pipes are laid higher, moisture will penetrate into the lower part of the concrete structure. Place it noticeably below the sole - under certain conditions, it is possible to provoke undermining of the foundation. In some cases, taking into account the specifics of soils and the design of the foundation, other decisions can be made, but this is a topic for a separate discussion.

The depth of the drainage is determined by its purpose.
Closed drainage, located below the soil freezing depth (GDP), will function year-round. If meltwater is also discharged into a closed system buried below the gas storage facility, it will leave already with early spring. In the case when the pipes are buried above the GPG, you will have to wait until the soil freezes completely, put up with puddles in March-April.
It is also important to ensure a uniform drainage slope towards the drain. Recommended values: 2 cm per 1 m.p. for clay soils and 3 cm per 1 r.m. for sandy.
Features of the drainage device to protect the foundation of the building
We found out how deep to dig drainage around the house: 30-50 cm below the base of the foundation. Let's briefly talk about some of the features of underground drainage. There are two main types of drainage around a building that are most common:
ring drainage
The ring system is simpler and therefore cheaper. At a distance of 1.5-3 m from the foundation along the perimeter of the building, a flexible drainage pipe is laid in a layer of permeable backfill. They arrange it freely, in a ring, not much caring about maintaining equal distances from building structures. Since the ring does not have sharp turns, intermediate wells are not needed. The recommended depth of ring-type drainage is 0.5 m below the base of the foundation. The ring system has limited effectiveness and is recommended for buildings without basements, built on clay and loamy soils.

It makes sense to put flexible pipe ring drainage even before the start of the construction of the foundation
Wall drainage provides optimal removal of excess moisture from the foundation area and, with the right device, will ensure dryness in the basement, its long service life. The wall system will cost more than the ring system due to more complex installation and the need for expensive wells.

Drainage wells prevent clogging of pipes, serve for their maintenance, play the role of distribution manifolds
Drains are perforated pipes (it is more convenient to use rigid ones, but flexible ones can also be used) in a backfill layer limited by geotextiles. The same (0.5-1 m) distance from the edge of the foundation and the recommended drainage slope towards the drain (2-3 cm per 1 rn) should be observed. Minimum allowable slope for closed drainage: for a pipe 150 mm - 8 mm per 1 rn; for 200 mm - 7 mm per 1 r.m. The recommended drainage depth is at the highest point 30 cm below the base of the foundation, further down the slope. At each turn and after 20 m on straight sections, a well is installed for maintenance. The depth of the drainage well corresponds to the depth of the drain, its bottom is located 10-15 cm below the perforated pipe.

Combination of different types of drainage
To perform various tasks, several types of drainage can be located on the site: shallow surface and deep wall drainage, as well as a storm drain from the roof, led underground. Depending on the specific conditions of the site, it is possible and even necessary to combine Various types water disposal, combining them into a common system. Perhaps a rational option would be to reduce all water flows into one common drain, unless the terrain of the site dictates a different solution. However, combining drains into a common collector should not reduce drainage efficiency. So, it is not necessary to combine wall or ring drainage within the building contour with other systems. Often, developers lower the "rainfall" from the roof into drains in order to save on pipes. We consider this solution extremely unfortunate: drains designed to remove excess moisture from the soil are filled with storm water from the roof after rain, not having time to remove moisture from the soil. This not only does not contribute to the drainage of the foundation, but can also worsen its operating conditions. The optimal solution is a separate laying of drainage in a perforated pipe and "stormwater" in a sealed solid one. They should be combined closer to the place of discharge, away from home. If underground storm sewer not suitable for financial parameters, it is better to organize a storm drain in a superficial way, along trays or trenches.

Where to divert water from the drainage system
One of the important, and sometimes intractable tasks in the drainage system is where to dump water from the drainage system. The presence of a central storm drain along the street, to which you can connect, is a rarity and is not always available even to residents of prestigious villages. Well, if the features of the relief allow you to dump water into a nearby ditch, bring it to a slope, into a reservoir. If drainage outside the site is not possible, the GWL is low, and the soil is permeable, an absorbing well can be arranged. If the site is wet and located in a lowland, and groundwater is close to the surface, there is simply nowhere to divert water. You can try to dig a pond, excavated soil raising the ground level. But it is not a fact that this will justify itself and it is worth thinking ten times before starting construction on a problem area that cannot be drained.

Underground collector - one of the options for diverting water from the drainage system
We have only briefly talked about water disposal. If you decide to do drainage on your own site, we recommend starting with a project. You can try to do it yourself, having studied the topic more deeply. But it is more reliable, especially with a complex system, to turn to specialists.

Drainage device start with a project
Video: drainage rules
Every homeowner understands that drainage around the house is one of the main procedures. The drainage of the house forms a protection against flooding, which will prevent subsequent deformation of the base of the house (foundation). It also excludes the possibility of distortions of windows and doors, and any defects will not appear on the walls.
At first glance, the procedure for creating drainage around the house seems difficult, but it is possible to do it yourself. This article will answer the question: how to make drainage around the house?
What is drainage around the house? This is a design that removes excess moisture from the building. This design can be arranged in different ways. But most often the system is made of pipes. The water goes through the pipes.
According to many people, one blind area around the structure is enough to create an effective catchment. But this is wrong, because professionals strongly recommend creating an entire drainage system that will provide better protection from water.
In total, there are three ways to remove water (drainage):
- public method. In this case, open ditches are used, the depth and width of which is 50 centimeters. The drainage depth must be sufficient. This is the easiest system that you can create yourself. But the ditches make the appearance of the site unpleasant. Also, after a certain period of time, the trenches crumble and can no longer be used. Therefore, they must be further strengthened with the help of different trays.
- Sleeping method. Ditches that have been dug must be covered with rubble. You can also use broken brick instead of large gravel. Sod is covered from the top of the ditch. The main advantage of this design is its huge operational life. The period increases if you use geosynthetics during installation, namely geotextiles. But there are disadvantages, which are that the structure cannot be technically maintained during use, and the system also has low level bandwidth.
- private method. In this situation, the system consists of perforated pipes that are laid inside the ground. This is the best drainage around the house, but it is difficult to do it yourself, you will have to resort to the help of specialists.

The main types of drainage design
In total, there are several varieties of the drainage system. Let's consider each type separately.
wall construction
The system is created around the base of the structure (foundation). Wall drainage must be installed if the building has a basement or basement. It is necessary to carry out the installation of the wall structure during the arrangement of the foundation of the building, when the foundation pit has not yet been filled up. If the mounting is carried out later, then you will have to perform additional work, which you need to spend time, effort and money.

The laying of the system is carried out along the foundation. Pipes must be removed from the corners of the building to manholes. At the point of the system, which is the lowest, a well is created for the output. In this well, water will be diverted outside the boundaries of the site.
To make additional protection for the foundation of the house, it is necessary to equip clay castle, which should be at a distance of 90 centimeters from the building.
Ring or trench design
This design is installed at a distance of two or three meters from the base of the structure. This type of drainage system is used for buildings that do not have basements or basements. Or the building should be located on a clay soil layer.

Also, a clay castle is created between the base of the structure and the drainage structure for additional protection. It is necessary to lay drainage at a depth of 50 centimeters from the foundation point, which is the lowest. Drains should be laid on large gravel.
Preparatory work before installation
Before you start creating drainage around the house, you need to prepare the base of the building:
- First, it is necessary to treat the outer part of the foundation with a bitumen-kerosene primer.
- Next, you need to apply mastic from bitumen.
- Then the reinforced mesh is laid into the bitumen. The cells of the reinforced mesh should be 2 × 2 millimeters.
- As soon as bituminous mastic will dry. Its drying time is approximately 24 hours. To close the reinforced mesh, you need to apply an additional layer of coating.
Rules and nuances of creating a structure
The main elements of the system are specially designed drainage pipes. They are made of plastic, and their maximum diameter is one hundred millimeters. If your budget does not allow them to be purchased, then ordinary sewer pipes can be used as their replacement. It is only necessary to select pipes of the required diameter, making holes in them.
It is necessary to take into account the dimensions of the gravel in which the part will be laid. Its diameter should be larger than that of the holes made.
According to the experience of many people, the drainage system around the house can be done independently. To perform this procedure, you must follow the following rules and nuances:
- The pipe must be covered with gravel for 30 centimeters. In order to prevent the system from becoming clogged, elements are used that are wrapped in filtration material. Or, instead, geotextiles are laid.
- If deep drainage will be located under the road where cars move, then pipes made of metal should be used for the structure, which are connected by couplings to other elements.
- In order to freely clean and maintain the building during operation, manholes are installed at key points, as well as every ten meters.

Step-by-step instructions for installing drains
Even at the design stage of the site, it is necessary to consider the drainage system. Such a plan will help determine the exact location of perforated pipes, as well as calculate the right materials and components. Consider a step-by-step instruction:
- We carry out marking on the site according to the prepared plan. A drainage scheme around the house should be prepared. It is necessary to identify the highest and lowest point of the earth's surface. This must be known to cover the entire area.
- Next, you need to dig ditches of the required depth. The width of the ditch must be such that perforated or sewer pipes and large rubble.
- Then you need to organize the slope of the structure. Take measurements of the height differences, after which you should set the poles at the required points. At the bottom of the ditch, you need to carefully pour sand until the necessary slope is formed.
- The bottom of the ditch must be compacted. After that, it is necessary to fill in the crushed stone by ten centimeters, then the alignment is carried out again. Further, the bottom of the trench must be lined with geotextile, from the top of which a layer of gravel must be laid. You have to control the bias. Next, prepare the recess small size to lay perforated pipes.
- Perforated elements are laid on the prepared area, after which they should be tightly connected. Do not forget to check the selected slope of the pipeline. The check is carried out using a rope that is stretched along the moat.
- Then produced installation of manholes.
- If no filtration material is attached to the pipes, they must be wrapped with geotextile., and fastening is carried out using a polypropylene tape.
- The structure is backfilled with coarse gravel. The width of this layer should be 20 centimeters.
- Pipes must be brought to the manhole. From it, water will flow into the ditches.
- The filtration layer must be wrapped with geotextile. In this case, you need to make a small overlap.

The final stage of the procedure is backfilling the drainage system with river sand. To make everything look aesthetically pleasing, the sand also needs to be compacted.
Manholes
A well-made manhole is the key to an effective drainage system around your structure. A manhole is needed to maintain and clean the drainage structure. Without a well, the system will gradually become clogged and eventually become unusable.
It is possible to purchase a ready-made component on the construction market, or you can create it yourself using a piece of plastic pipe of the required diameter. The manhole should be wide enough so that a person's hand can go down there to clean the drainage system.
At the point of the drainage structure, which is the lowest, a catchment well must be installed. The most popular structures are made of reinforced concrete. The depth of the manhole should be such that the sand at the bottom should not interfere with the water flow. Only sometimes it needs to be cleaned.

Building materials and tools
As with any procedure, construction tools and materials will be needed to create a drainage system. The first construction tool is a shovel, with which ditches are dug. The next main component is plastic pipes that will drain water.
You will need manholes, a specially designed hacksaw for metal elements. We need transport that will carry out the transportation of large gravel, a heat insulator is also needed, namely geotextiles. On this insulation pipes are being laid. And you will need a small amount of sand.
Cost of work
The price depends on the materials that you will use for installation. If you need to equip the drainage system on suburban area, then you can use the available materials, for example, boards, slate, stones, remnants of bricks.
If your house is made of brick or wood, then in this case it is necessary to use materials that have a higher price, for example, plastic pipes, metal communications.
The total cost also includes thermal insulation, which must be taken care of. The best heat insulator for drainage is geotextile, if it is not available, then ordinary rags or humus can be used. Thanks to this, the structure will not freeze in the winter season.

Outcome
Well-prepared drainage around the house can provide protection for the building from groundwater, which has negative consequences. Drainage around the foundation becomes most necessary when it is necessary to protect the basement from the flood.
drainage system around the house with their own hands happens various kinds, so you have to choose suitable type, which is suitable for your conditions and soil cover. Prepare a plan for future installation.
Work should preferably be carried out at the stage of building the foundation of the building. During mounting, you must follow a clear algorithm of actions. Each type of drainage uses its own materials. So, for example, if the system is located under the road where vehicles move, metal elements will be needed for installation.
For the garden plot, you can use publicly available building tools and materials. As a heat insulator, it is best to use geosynthetics, namely geotextiles. If this is not possible, then you can use ordinary rags.
Specialists will perform the work without problems and with high quality, observing every rule and nuances, but if you try, you can do everything yourself. You will be satisfied with the result, your room will be comfortable and protected from negative influence groundwater. Now you know how to make drainage around the house with your own hands.
Drainage system around the houseEven the most reliable and high-quality foundation waterproofing cannot endlessly withstand ground moisture. Sooner or later, water will find its way through the opened capillaries, cracks and mechanical defects of the insulating layer. To prevent this from happening, and the foundation does not eventually become a capillary pump and a source of dampness in the premises, it is necessary to divert groundwater away from the foundation, or at least reduce the capillary pressure on the waterproofing surface.
The most reliable way to protect the foundation from getting wet is to divert water from it through the drain. Various drainage systems are described below and examples of their implementation are given.
What is drainage and how does it work
If waterproofing can be compared to a wall for water, then drainage is like a bilge pump. Waterproofing and drainage system around the house perfectly complement each other and provide the most complete protection of the foundation from ground moisture.
As known from school course physics, the liquid, according to the law of communicating vessels, always overflows into a lower place. Do not forget that in the soil moisture spreads through the capillaries rather slowly. Therefore, the rapid discharge of the collected water through the drainage pipes allows you to create a dry zone behind them. It is this effect that is used to protect the foundation of the house.
Laying drainage around the house with your own hands is easy. It is a system of perforated pipes that collect groundwater, which flows by gravity to a discharge point in a suitable place, such as a special well.
In any case, the drainage pipes are mounted at a slope. Ideally, if the soil around the house has a slight slope, and there is a ravine nearby, where water can be discharged. On a horizontal section located in a lowland, water has to be collected in a special storage tank - a drainage well, from where it is periodically pumped out as it is filled. The accumulated moisture can be used both for technical needs and for watering plants.
Ready-made drainage pipes can be replaced with homemade ones. A do-it-yourself drainage pipe is made from an orange water pipe (thick-walled pipe for outdoor installation). The effect is achieved by drilling many drainage holes in it.
Types of drainage for a private house
Do-it-yourself drainage of the foundation of a house is of two types: surface and deep. The first of them is necessary to drain water after melting snow and rain from the soil surface or blind area. Structurally, this is an ordinary storm drain. Water is collected in it along the blind area of the foundation, which has a slight slope from the wall of the house in the direction of the sewer. The size of the storm drain depends on the maximum rainfall in the area and the area of the roof that collects water.
To protect against groundwater, it is necessary to equip a deep drainage system. Moreover, it should be located as low as possible, ideally - below the sole of the foundation.
In order to save money and time, some inexperienced developers combine the sewer and drainage system by organizing the drain of the roof drains into the drainage pipe. This should not be done in any case, because during rain the drainage pipe does not have time to drain the drain water, and they actively penetrate the soil through the perforation, causing waterlogging around the drainage. If there is nowhere to drain rainwater, you can drain it directly into the drainage storage tank, but always through your own separate pipe.
The drainage device itself is highly dependent on the type of soil. So for sandy soil with a high clay horizon lying above the base of the foundation, drainage should take place at the junction of the clay and sand horizons. Heavy clay soil does not pass water well and to determine the depth of water penetration, it will be necessary to dig an exploration pit. On heavily waterlogged lands, it may be necessary to create a local watershed from a waterproof film or even a concrete partition in the ground.
Arrangement of deep drainage
The main element of underground drainage is a drainage perforated pipe that collects water from the ground and transports it by tilting. The greater the slope, the more efficiently the do-it-yourself home drainage works, and the more water is removed from the ground. But a strong slope leads to a sharp increase in the amount of work, especially with a large length of the drainage system.
On the other hand, a small slope of the pipes slows down the movement of water and leads to a gradual silting of the internal channels. A slope of at least 1 cm for each running meter pipes. The slope angle must remain constant throughout the drainage. Otherwise, sediment will begin to accumulate at the fracture sites, which will gradually lead to blockage of the pipes. This angle during the arrangement of the drainage must be controlled with a meter bubble level and a centimeter lining.
A drainage ditch is dug along the perimeter of the foundation no closer than 50 cm from it. If the blind area of the house is wider than half a meter, we dig a ditch along its edge. The minimum width of the ditch is also 50 cm. The wall closest to the foundation is made vertical. The opposite slope of the ditch is with a slight slope. Further actions depend on the type of soil and the level of waterlogging of the soil.
The device of the drainage system on light soils
If the soil does not suffer from high humidity and has light mechanical structure, drainage can be arranged according to a simplified scheme. A permeable geotextile is laid at the bottom of the ditch with an overlap on the edges. A layer of coarse sand and a few centimeters of medium and fine gravel are poured on it. A drainage pipe is laid on top of the rubble.
Then it is completely covered with rubble and all this is covered with the edges of agrofibre. Sand and gravel act as a filter, trapping solid particles that can clog drainage holes. The ditch with the pipe is covered with a thin layer of fine gravel, and then with soil.
How to make drainage around the house with a high level of waterlogging
For heavily waterlogged soil, the drainage described above will not be enough. To separate excess moisture, waterproofing is pre-equipped along the outer edge of the ditch. The easiest option to make such an artificial watershed is to lay outer wall ditches with a waterproof membrane or several layers of roofing material. The depth of the ditch in this case should exceed the level of the water-resistant clay horizon or be below the base of the foundation.
For complete protection, drainage must close the perimeter around the foundation. The drain point is equipped in the place of the greatest occurrence of pipes. As already mentioned, the storage tank can serve to collect both groundwater and precipitation. In this case, the joint use of drainage pipes and a drain is unacceptable, and the groundwater discharge point should be located below the connection point of the rain drain.
Outcome
The drainage device around the house provides enough high level protection against wetting of the foundation. Thanks to a properly equipped water drainage system, you will be relieved of many problems associated with increased dampness for many years.