How to properly insulate a country house from the inside. We make the country house warmer. Thermal insulation materials
Greetings. This time you will learn how to properly insulate country house. As an example, consider the popular methods of thermal insulation wooden dachas and building objects from concrete blocks. The types of buildings for the review were not chosen by chance, since most of the dachas were built from these materials.
I am sure that the methods proposed in the article will be of interest to owners of old country houses. However, if your cottage is new, but not warm enough, you will also find a lot of useful information for yourself.
Basic information about the insulation of country houses

Proper thermal insulation of a country house begins with an analysis of heat loss using special equipment - a thermal imager
Warming country house pursues the following goals:
- Ensuring the comfort of living;
- Reducing the costs associated with heating;
- Ensuring a long service life of the facility without the need for regular refurbishment.
From the above points, the following conclusion can be drawn - the dacha should be energy efficient.
What is an energy efficient home? This is a construction site where, thanks to high-quality thermal insulation, an optimal microclimate is combined with low energy consumption.
In accordance with SanPiN 2.1.2.100200, the following requirements are imposed on the microclimate of residential premises during the cold season:
- the average air temperature should be from 18 ° C to 24 ° C;
- relative air humidity - within 35-40%;
- air flow speed is not more than 0.15 m/s.
- the surface temperature of the walls is lower than the air temperature in the room by no more than 4 °C;
- the temperature of the floor surface is lower than the air temperature in the room by no more than 2 °C.
Do you think that the microclimate in the walls of your dacha meets the listed requirements? If it doesn't fit, then it's time to insulate country house.

Instructions for warming the cottage depends on the following factors:
- The nature of the operation of the facility (seasonal or all-weather);
- Materials used in construction;
- Type of glazing of the object;
- The presence of technological errors made during the design and / or construction;
- The type and efficiency of the heating system used;
- The budget of funds allocated for the implementation of the project.
thermal insulation building object may affect individual structural elements, for example, ceiling walls or foundations, or it can be performed in a complex way. Despite the fact that the price of complex insulation is significantly higher than the cost of separately performed work, it is the integrated approach that provides the best result.
Warming of a wooden house
Wooden dachas are insulated in such a way that the lumber retains the optimal degree of moisture, does not rot and does not collapse. Conventionally, the thermal insulation of a wooden cottage can be external and internal. Which of these varieties is more preferable?
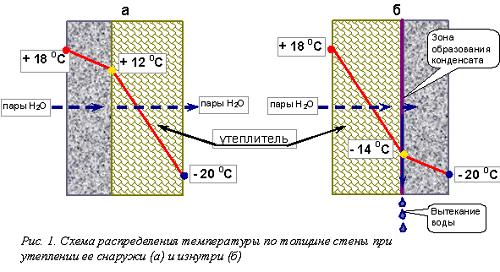
External (external) wall insulation prevents them from freezing. In addition, the dew point shifts towards the outer edge of the wall. In order to reduce the formation of condensate, a ventilated facade is installed. As a result, the wood remains dry and does not rot, which favorably affects the resource of the house.
thermal insulation bearing walls from the inside of the house reduces the useful area of \u200b\u200bthe room, which is especially noticeable if the cottage is small. In addition, by insulating the inner surface of the walls, you will provoke freezing of wood in winter and getting wet with the onset of the warm season. As a result, the wood will rot and break down intensively.
The conclusion can be drawn as follows − internal thermal insulation wooden building we only do it in combination with external insulation. In extreme cases, we are limited only to external insulation.
Thermal insulation of wooden walls
One of the most correct instructions insulation of wooden walls involves the installation of a ventilated facade with a thermal insulation material. The advantage of this solution is the absence of condensate and the possibility of using thick insulation materials.
For execution installation work you will need the following materials:
- Guide metal profiles 100×40 mm;
- vapor barrier film;
- Slabs of dense mineral wool (thickness similar to the width of a metal profile or will have to be laid in two layers);
- Double-sided tape;
- Windproof coating;
- Wooden blocks 50 × 20 mm;
- Vinyl siding.
The instructions for installing a ventilated facade with a heater are as follows:

- With the help of a plumb line and spirit level, the curvature of the walls was determined;
In our case, the attic bulges slightly forward relative to the first floor.

- At intervals of 60 cm from each other, leveling pads made of pieces of plywood were fixed on the surface of the walls in order to compensate for level differences;

- On the surface of the wall, vapor barrier strips were fixed with a stapler;
The vapor barrier has 2 sides - one smooth, the other rough. We direct the smooth side outward, and the rough side inward. We fix the vapor barrier horizontally, so that the upper strip protrudes onto the lower one and, thus, the condensate drain is ensured.

- Guide profiles were vertically fixed on top of the vapor barrier;
The profiles are mounted on leveling plywood pads, which are easy to feel under the vapor barrier layer. As a result, the guides should be spaced apart from each other by a distance of 60 cm.
- We insert mineral wool slabs into the gaps between the guides;

- On the outside of the guides we glue pieces of double-sided tape;
- We line the windproof coating, temporarily fixing it on double-sided tape;

- On top of the windproof coating, we stuff a crate of wooden slats;
We fix the crate in such a way that the rails are fixed on the metal rails that were used in the manufacture of the supporting frame.

- Vinyl siding was installed over the wooden battens.
Are there other ways to insulate wooden walls?

Due to the ease of implementation, polyurethane foam spraying is becoming increasingly popular. A two-component mixture under pressure is sprayed onto the wall, after which it polymerizes and forms a foam layer. Despite the obvious advantages, the method has a significant drawback - spraying equipment is expensive, and therefore such insulation cannot be done by hand.
Polyurethane foam is an airtight compound that will prevent the wood from breathing. Therefore, there is a possibility that the walls from the outside will rot and collapse.
Thermal insulation of the floor and ceilings in a wooden house
Floor insulation in wooden house can be done using various materials. For example, I recommend laying expanded clay backfill, mineral wool or crushed foam between the lag.
But the method of floor insulation you have chosen must meet the following requirements:
- Structural elements of the floor, including logs and boardwalk, must not rot;
- Filling the space between the lag should be unattractive to rodents;
- The thermal insulation layer must be fireproof and non-toxic.
As an example, I offer instructions for the correct installation of a heat-insulated floor pie.
The easiest way is to perform thermal insulation of the floor on the logs during the construction of the cottage. If the insulation is carried out in an already operated house, the flooring will have to be completely removed.
After access to the lags is open, you need to cover in several layers, with a break for drying each previous layer. wooden details antiseptic and fire retardant.
![]()
After the impregnation has completely dried, the space between the logs is lined with a windproof coating. Such a measure will eliminate the likelihood of the formation of cold bridges. Wind protection is necessarily attached to the logs with brackets from a construction stapler.
Insulating material is laid or poured into the prepared space between the lags.

Traditionally used as insulation mineral wool. But such material, over time, can become a haven for rodents. Therefore, I recommend using a dense expanded clay backfill with a core diameter of 3-5 mm. This backfill is produced by Knauf for the installation of dry screeds.

After the insulating material between the lag is laid out, it is lined upper layer vapor barrier. Vapor barrier strips, as well as wind protection, should be lined with an overlap so that there are no gaps. A boardwalk is mounted on top of the finished cake.

Floor insulation is performed similarly to floor insulation. But for these purposes, materials with low weight are used, mainly mineral wool or expanded polystyrene plates.

When arranging ceilings, a vapor barrier is placed at the bottom of the pie in order to prevent the penetration of moist warm air from the room.
The windshield is lined over the heat-insulating cake in order to serve as a barrier to cold air from the attic.
Insulation of a country house from aerated concrete or silicate blocks
Unlike wooden dachas, objects made of brick or lightweight concrete can be thermally insulated both from the outside and from the inside. And in this case, external insulation is an order of magnitude more effective than internal.
But the best results are guaranteed by complex insulation, during which the thermal conductivity of walls, blind areas, floors, ceilings and roofing systems is reduced.
Wall insulation
For thermal insulation of walls made of bricks, concrete blocks and similar building materials cellular polystyrene boards can be used; mineral wool, application of foamed polyurethane.

Affordable price is a good reason to buy styrofoam boards
Of the listed materials, I especially recommend expanded polystyrene plates. Using this type insulating materials, you can not only reduce the thermal conductivity of the load-bearing walls, but also subsequently plaster the building, giving the facade an attractive look.
Installation of expanded polystyrene plates with subsequent plastering is carried out in accordance with the following scheme.

For the thermal insulation device, the following materials will be required:
- Cellular polystyrene plates with a thickness of 150-200 mm (the thickness is selected depending on the climatic conditions of the region);

- Dish-shaped dowels (umbrellas) in the amount of 4-5 pieces for each plate;
- The initial bar is a profile for holding the plates of the first row in the required position;
- Alkali-resistant reinforcing glass mesh;
- Tile adhesive or special glue for polystyrene foam;
- Plaster mixture or tile adhesive for making a reinforcing layer;
- Plaster mixture for finishing.
Wall insulation instructions modern dacha from aerated concrete blocks or silicate bricks as follows:
- Scaffolding is being assembled, from which it is easier and safer to work than from a stepladder;
- With a chisel from the surface of the walls, the influx of masonry mortar is knocked off;

- The surface is primed in one layer with a penetrating primer to strengthen the porous base, and in one layer with a film-forming primer for better adhesion;
The primer can be applied with a roller or even with a brush. But, given the large surface area and application in two layers, I recommend using a spray gun to work with the primer.

- Indicative cords are fixed along the level, along the edges of the wall, along which the insulation slab will be laid;

- Using a laser level or a spirit level with a plumb line, the location of the upper part of the plates in the first row is determined and a corresponding mark is placed along the perimeter of the walls;

- We knead the adhesive solution in accordance with the manufacturer's instructions and, after preparation, hold for 5 minutes;
- We apply glue to the plate;

- We install the first plate from the corner, so that its edge protrudes beyond the corner by a distance equal to the thickness of the plate;

- The second slab is placed from the corner close to the lining edge of the first slab, as shown in the figure;
- In a similar way, the entire first row is laid out along the perimeter of the walls;
- When laying each row, we check the horizontal and vertical position plates;

- We begin to lay the second row also from the corner. The slabs must lie offset from each other as shown in the figure;
- The third row is laid with an offset relative to the second row, but so that it coincides with the plates in the first row;

- The next rows are installed in a similar way, so that as a result a jagged bundle is formed at the corner;

- We combine the plates with window openings, cutting the foam, as shown in the figure;

- If during installation there are gaps between some plates, we immediately fill them with mounting foam to prevent the appearance of cold bridges;
- After the foam dries, remove the excess with a sharp knife;

- Dish-shaped dowels are installed along the edges and in the center of the slab, so that their caps are recessed into the surface of the foam;

- Slopes are strengthened with reinforcing fiberglass and plaster mixture;
- The recesses for the dowels are filled with a mixture;

- Wall cladding is reinforced with fiberglass mesh and plaster mixture;

- Decorative plaster can be applied over the dried base layer.
Floor insulation

In the previous instructions, he talked about how the floor is insulated on wooden joists. This technique can also be applied in brick houses, where the floors are laid on logs. But what if the house has a ready-made concrete screed?
I offer the following options:
- Installation of microlags with subsequent laying of thermal insulation and plywood flooring;
- The device of a dry screed from GVL with expanded clay backfill;
- Laying an additional layer of expanded clay concrete;
- Laying an additional layer of polystyrene concrete;
- The device of underfloor heating systems for subsequent use as auxiliary system heating.

If the level of the subfloor allows you to raise the surface by 5-10 cm, I recommend laying a layer of expanded clay concrete over the lighthouses. The advantage of this solution is low thermal conductivity and high strength of the material. Again, laying expanded clay concrete is much easier and faster than working with ordinary concrete, if only because the ready-made mortar is much lighter.
For dachas, the problem of rodents is relevant, which gnaw holes in the insulation layer and feel comfortable in the underground. Expanded clay concrete, after gaining brand strength, is practically not inferior to heavy concrete in terms of hardness, and rodents will not settle in such a subfield.
Another option that I personally tested in my house is the device of the “Warm floor” system based on infrared film emitters. This option is preferable for cottages that are used seasonally. If you choose to live in country house, in winter it will be possible to quickly heat the floor, which means that comfortable conditions for temporary residence will be provided.

Film infrared flooring is a versatile solution that can be laid under tiles, under carpet or under laminate. The only important condition for the uninterrupted operation of a film heater is a perfectly even base without a pronounced microrelief.
Why do I not recommend underfloor heating based on hot water equipment and? Most dachas and country houses in the province do not have a stable connection to the water supply. Again, the wiring in an old house may not be able to handle the load of a water heater.
Conclusion
Now you know how external insulation of low-rise buildings is performed. I am sure that the proposed instructions and recommendations will come in handy when arranging your dacha.
If you have any questions, ask them in the comments to read - I will definitely answer everything. By the way, maybe you will find answers to your questions by watching the video in this article.
Insulation of a country house, as it is necessary, due to the fact that most buildings located outside the city are not heated from a central heating system or gas-fired boilers, but using solid fuel boilers or conventional heating stoves.
Such heating is effective, but laborious. In order for the resulting thermal energy to be used as rationally as possible, it is necessary to take care of the insulation of the walls of the country house. The best way to do this will be discussed in this article.
From this material you will learn where it is worth insulating the cottage - from the outside, or from the inside. An answer will also be given to the question: “Which insulation to choose?”. We will consider such materials for home insulation with our own hands as mineral wool, extruded polystyrene foam, penoizol and foil penofol.
1 Where is it better to insulate: inside or outside?
It’s worth mentioning right away that if you want to equip the most efficient insulation of a country house with, then the required result can only be obtained through its integrated insulation. Especially when it comes to warming a country house made of wood with your own hands.
There are a lot of ways to lose heat in a house with low thermal insulation. These are windows and attic floor, and doorways, and walls.
But there are often cases when the budget for a summer house thermal insulation project allows you to choose only insulation from the outside or from the inside of the house. Let's figure out which option in this case is better to give preference.
In order to be able to easily understand all of the following, you first need to understand the concept of thermal inertia. For example, a cottage built of brick, during the summer day, stands under the rays of the sun at an air temperature of +35 degrees.
During this time, the brick walls warm up so much that the warmth of the walls will be felt even 3-4 hours after sunset.
Based on this, brick is a material with high thermal conductivity, as well as - it long time absorbs Sun rays, by raising its temperature, and by decreasing the temperature environment also gives its heat back for a long time.
1.1 Insulation of the walls of the cottage exclusively from the inside of the house
In construction, there is one key rule, which is formulated as: "designing the external structure (walls) of the house, the layers of the wall should be arranged in order of decreasing their thermal insulation and increasing vapor barrier properties from the outside to the inside of the building." That is, the lowest thermal conductivity should have outer contour walls.
If a layer of heat-insulating material, contrary to these requirements, is located inside the house, then both points of this rule will be violated. Of course, the insulation of the walls from the inside will give quite a tangible result, but the microclimate inside the room will suffer significantly.
There is a great risk that the humidity and dampness of the air in the house will increase significantly, due to the unnaturally high vapor barrier, which is facilitated by most types of thermal insulation, especially foil, materials.
The internal insulation of the walls of the cottage, as a rule, is done by hand by installing heat-insulating material on the surface of the walls, and then lining it with drywall.
This technology is often performed incorrectly, as well as, since one of the key factors that must be followed so that internal insulation does not bring all of the above problems with one's own hands is the strongest adjoining of the heat insulator to the wall and the tight connection of the joints.

This is important due to the high thermal inertia brick wall. During 5-10 days of severe subzero temperatures, the outer surface of the walls of the house will cool down very much, and the brick will turn into a serious source of cold, working to cool the inside of the house, which has a higher temperature, and, as a result, provokes heat exchange.
If you insulate the wall inside the house with your own hands, then it is very important that the thermal insulation be made as tightly and monolithically as possible, since any gaps in the joints of the thermal insulation material with the wall and between themselves will contribute to the appearance of cold bridges.
A cold bridge is a place that has greater thermal conductivity than the main part of the house structure. Cold bridges are a serious reason for reducing the effectiveness of wall insulation, even if it is made using the highest quality thermal insulation materials.
If cold bridges have appeared, then the brick or wooden wall of the dacha will give off cold through the insulation (even if it is), as a result of which the drywall layer with which it is lined will cool.
When drywall is cooled below the dew point temperature, due to the temperature difference, moisture will condense on it, which will eventually turn into mold or fungus. Especially often this situation happens with the corners of the most poorly heated rooms.

In order for the internal insulation of a country house not to bring more disadvantages than advantages, it is necessary to strictly follow the following recommendations:
- The optimal insulation for insulating walls from the inside is a foil-type heat-insulating material like foam, it is best that the foiling is done on both sides. Double-sided foiling significantly reduces heat transfer between the cold wall and facing material, as a result of which condensate is either minimal or not formed at all;
- Arrangement of a thick facing layer with. If drywall is used, then it optimum thickness should be about 5 centimeters. Such a cladding, due to its size, will prevent intensive cooling of the air inside the room due to freezing of the walls in winter period, even if cold bridges are present.
1.2 Insulation of the walls of the cottage from the outside
External wall insulation is one of the most common and versatile options for partial thermal insulation of a country house with your own hands. And, in fact, the only correct option.
The low thermal conductivity of heaters helps to maintain the optimal internal temperature of brick, or wooden wall throughout the cold season.
The wall will not freeze due to the fact that the insulation prevents the penetration of cold from the outside, and from the inside the wall is heated by warm air.

For example, in practice, this plus, given our knowledge of the thermal inertia of the walls, results in the following. After opening the window to ventilate the house on a cold winter morning, you will instantly warm up the air that has got inside the house, as the heated walls will give off their heat inside the house.
As a result, even if the window is open for an hour, the temperature in the house will drop by a maximum of 2-3 degrees. Similar ventilation, when the insulation is located outside the walls of the house, is likely to provoke a decrease in the temperature of the house by 7-8 degrees.
An additional advantage of high-quality external thermal insulation, provided that the insulation is mounted as tightly as possible and covered with a layer of plaster and external cladding, is the complete absence of any air convection, cold bridges and drafts.
2 Types of heaters
Question: "Which insulation to choose?" it is very multifaceted, moreover, each individual case requires an individual choice, and it is impossible to say exactly which insulation is objectively the best. Let's look at the basic requirements that a really high-quality insulation must meet.

- thermal insulation properties. The higher the thermal insulation characteristics of the material, the thinner the lining layer will be, as a result of which both finances and free space will be saved.
- Hydrophobicity From how much the heat insulator absorbs moisture, the life span of the ego directly depends. Availability internal moisture contributes to the accelerated destruction of the insulation. It is important that the material has water-repellent properties.
- Fire resistance. High-quality insulation should not undergo combustion and be self-extinguishing.
- Lifetime. It is important that over time the insulation does not decompose, does not lose its thermal insulation properties, microorganisms, midges and rodents do not start in it.
- Safety. This factor acquires maximum significance when it comes to materials for thermal insulation of a country house from the inside. The heater must not provide any Negative influence on the human body;
- Soundproofing. High-quality heaters, as a rule, have good soundproofing properties. We are talking about foamed foam and mineral wool products.
- Price. How much insulation costs is often one of the leading factors when choosing a thermal insulation material. It is important that the cost of the insulation is optimally correlated with its functional characteristics.
Let's figure out which insulation is best used to insulate a country house with your own hands. The following materials meet the above requirements:
- Mineral (basalt) wool;
- Expanded polystyrene foam;
- Foil penofol;
- Liquid penoizol.

If you are not limited in funds, then mineral wool is the best option for warming the cottage with your own hands. In terms of thermal conductivity, this material is one of the the best heaters. It does not burn, does not rot, has excellent soundproofing properties and vapor permeability, which helps to maintain an optimal indoor climate.
Mineral wool can be used to insulate walls with your own hands, both inside and outside the house. Weak side mineral wool insulation is unsatisfactory moisture resistance.
Manufacturers are trying to solve this issue with the help of a variety of hydrophobic additives that impregnate mineral threads at the creation stage, however, in order to be completely sure that the insulation does not collapse due to moisture gain, it is necessary to equip a high-quality waterproofing layer.
If you do all the work yourself, then an important factor is the maximum simplicity of the insulation. The best option in this case, it is foil penofol, or expanded polystyrene foam.
These materials have good thermal insulation properties, and, at the same time, they are quite inexpensive. Penofol with double-sided foil is great for internal insulation walls of the house, while expanded polystyrene should be used for external wall insulation.
2.1 Features of warming a country house with foam plastic (video)
Many people prefer to spend time in the country, not only in summer, but also in winter.
And in order not to freeze, it is necessary to insulate correctly and on time country house, and then the cold weather will only please and not cause trouble.
During the construction of a country house, the floor and walls are usually insulated, but the heat still does not hold and it becomes cold during the first frosts.
To make the room warm and cozy, it is necessary to insulate more windows, ceiling, attic and doors. Walls must be equipped outside and inside.
Usually, country houses have a frame made of beams sheathed with clapboard, and the inner walls are upholstered with plywood or chipboard.
Naturally, there is no thermal insulation in such a room, so it will be impossible to stay there in winter.
It is best to deal with warming in the warm season, when there is nowhere to rush, and then you can finish the cottage efficiently and reliably.
If you deal with thermal insulation in winter time, then work on the insulation of the walls will have to be carried out inside. This method will only narrow the room.
How to insulate a cottage?

What insulation material to choose
There are many building materials with which you can insulate the cottage with your own hands. The most practical and inexpensive are mineral wool, foam plastic or polystyrene.
The most popular insulation is mineral wool. It is an inorganic fiber composed of porphyrite.
- The advantage of such insulation is durability, resistance to fires, protection from external sound.
- Of the minuses - does not tolerate a humid environment. Therefore, it must be fixed with a film.
When choosing any insulation, you must pay attention to the following criteria:
- it should be of low thermal conductivity;
- resistance to moisture, if necessary, can be overlaid with a sealed film so that water does not get there;
- fire resistant, usually there is information about what temperature they can withstand;
- durable and strong;
- environmentally friendly and safe. It should be borne in mind that small children may be in the country house.
Insulation of the floor in the country
The floor covering must be warm. Even if there is a high temperature in the house, if the floor is not insulated, your feet will still freeze.
It is better to insulate a wooden floor with a log device and a heater that needs to be laid between the boards, and you can put plywood on top.
It is worth remembering that if mineral wool is chosen, then it must be protected from moisture on both sides. Roll insulation is laid tightly, it should be close to the logs.
Therefore, there is a little trick: the distance between the bars should be 1-1.5 cm less than the width of the insulation. If the insulation is laid in the form of plates, then the cracks are treated with mounting foam.
Warming of country windows
The most plastic windows convenient option to protect your home from the cold. They keep the heat in the room well. But not everyone can afford them. Therefore, it is necessary to insulate the windows that are available.
Here are some tips:
- It is desirable that all windows have glass. In extreme cases, they can be hammered with boards or plywood. It is better not to save on windows, because the wind will blow into them.
- If there are cracks, then they are covered with putty, and a transparent tape is applied on top.
- Holes between wall and window frame filled with mounting foam.
- And the gaps between the glass and the frame are sealed. Window joints are insulated with foam rubber. Top can be sealed with tape or special tape. There should be no gaps.
Openings from the outside between the wall and the window frame are treated with mounting foam. Cement plaster is applied on top. When it dries, you can paint it with paint to give it a beautiful look.

Insulation of doors in the country
Usually the doors are wooden or metal. If there are gaps, then they are sealed or covered up so that air does not penetrate. Warming is usually carried out in two ways: first, a sealant is fixed to the door frame, it can be made of any material intended for these purposes. Then inner part upholstered with foam. Plywood can be nailed on top of it. Here you can show your imagination and decorate according to your own taste.
Some gardeners install double doors which is a great way to protect yourself from frost. When insulating, it is also worth considering the area of \u200b\u200bthe room.

Ceiling insulation
In country houses, the ceiling can be overlaid with any material at hand. Expanded clay, max, sawdust are suitable. Of modern means, mineral wool and polystyrene foam are more popular.
In terms of safety, mineral wool is considered the most effective.
The procedure goes like this:
- first, logs are made, a rolled vapor barrier film with an overlap is applied to them;
- then put the insulation in several layers;
- glue the vapor barrier;
- overlap the joints with any material (plywood, drywall).
It is not so difficult to insulate the ceiling on your own.

How to insulate a house in the country from the outside
To save space, you can insulate a country house from the outside. Often this is done if the house is built of bricks. For beauty, they make cladding with siding on the outside. You can choose any insulation from fiberglass, polystyrene foam.
How to fix the thermal insulation on the wall:
- Clean the wall from dirt and dust;
- Fix waterproofing;
- Fix the frame to put the insulation;
- Lay thermal insulation
- Sheathed with material.
In some cases, you can make thermal insulation indoors. And if time and finances do not allow, then at least in one room. The main thing is to sheathe outer wall, windows, doors and ceiling.

Now you know how to insulate a summer house and do it yourself is not so difficult. The main thing is to choose the right material, follow the instructions and observe safety precautions.
If the thermal insulation in the house is in order, then after self-insulation you can safely stay in the country in the winter.
In addition, this method is much more profitable and does not require large investments than to carry out overhaul. In such a house it will be pleasant to be with the whole family.
And you will learn about which heater is best to choose for a summer residence.
Most of the people have a rest and live in a country house only in summer time, but there are those who like to live in the country in the winter. If you consider yourself to be a fan of coming to the dacha in winter, then you need to prepare the house for winter living i.e. insulate the house.
How to properly insulate a cottage

Before insulating the cottage, you need to find out what needs to be insulated first.
The image shows how the heat comes out of the house as a percentage.

Often, walls are equipped with insulation even during construction or during repairs. And they try to insulate the walls from the outside, since the internal space is not lost, there is no need to re-paste the wallpaper and so on.
What affects the room temperature:
- Wind direction in your area;
- Average wind speed;
- The material from which the house was made;
- How windows are protected from winds and drafts;
- How is the heating system arranged?
- Does the house have thermal insulation?
If we can't control the wind (it can only be done by working hard for decades and growing tall trees).
But it is in our power and quite realistic to reduce heat loss simply by insulating some parts of the house (walls, ceiling, floor, windows, doors).
But before you start insulating these elements, you need to figure out what to insulate and what materials are suitable for your needs.
Insulate a country house materials

First of all, it is worth understanding the classification of insulating materials.
According to the composition, the materials are divided:
- Bulk;
- from wood;
- Styrofoam;
- Mineral wool.
By appearance should be divided into:
- Block;
- In the form of plates;
- Roll;
- in the form of mixtures.
What you need to pay attention to when buying a heater, because it happens that two completely identical rolls differ in quality and have different properties.
Main selection criteria:
- Thermal conductivity index. The smaller this parameter, the thinner the layer of insulation you can buy.
- Moisture absorption rate(you need to buy with a minimum value).
- fire resistance(usually they write at what temperature the material can ignite, choose the highest temperature).
- Durability(Choose with the longest service life).
- Environmental friendliness(if you insulate the interior, you need to select the appropriate insulation).
Consider two main heaters (there are, of course, a great many, but one of the two is usually used):
Styrofoam (polystyrene foam) insulation

If the foam is made from a foamed polymer, then the expanded polystyrene is made from styrene.
Styrofoam sheets can be found 2 to 10 cm thick (styrofoam sheets are usually 2 to 5 cm thick).
The density and price of the second slightly exceeds the foam.
Advantages:
- Light weight;
- Convenient size;
- Retains original dimensions for a long time;
- Relatively low cost;
- Easy and quick to install;
- Does not absorb moisture;
- Scope of operation up to 30 years.
Flaws:
- combustible material;
- Need pre-treatment for putty.
Installation
Method 1 - without a frame, the sheet is covered with glue, pressed to the surface. Then fix the sheet with screws with a wide cap. And in the end blow out construction foam joints.
Method 2 - with the installation of the frame. First, the frame is made. A heater is installed in it (in the cells between the bars). The frame is closed at the top. finishing material(lining, plastic, chipboard and so on).
Mineral heaters

Mineral wool is produced by melting basalt rocks at high temperature. It can be bought both in the form of a roll and in plates. The thickness varies from 2 to 20 cm. The width of the sheet is standard (1.2 meters) and the length is from 0.6 to 6 meters.
Advantages:
- Low moisture absorption;
- Low thermal conductivity;
- Service life up to 50 years;
- Does not burn (melts at temperatures above 1000 degrees).
Flaws:
- Sometimes the composition includes formaldehyde;
- Cotton wool can absorb water and lose some of its thermal insulation properties.
- Relatively high price.
Installation
Installation is carried out only with the help of a frame. The material is placed in the cells, and the top is covered with a finishing material.
Insulate the country house with your own hands

In general, insulation should consist of the following tasks:
- Insulate doors;
- Insulate windows;
- Insulate the walls (ideally both inside and outside, but you can only get by with external insulation).
The above are the main stages of insulation, but there is no limit to perfection, because even more of the heat leaves through the roof, floor.
Door insulation

Here the method of insulation depends on the material of the door (door made of wood or metal). However, the insulation goes through two stages - the insulation of the perimeter (a sealant is glued to the frame) and the insulation of the door itself with foam.
Window insulation

It is much easier to install Euro-windows that retain heat. But if your funds do not allow the purchase of such windows in the near future, then you can insulate an existing option.
Sequencing:
If there is no glass somewhere - or the hole is covered with a smaller piece of glass - glaze completely.
Then blow out mounting foam gaps between the wall and the window frame.
And the gaps between the glass and the window frame - sealant.
At the joints of windows or along the perimeter of the vents (where the windows open), we use insulation (most often it is foam rubber) and push it into the joints.
External insulation

Of course, external insulation will require a lot of finances, but the result will pay for itself, since after such insulation the house will become much warmer.
Usually, polystyrene foam and mineral wool are used as insulation.
Sequencing:
- First, we remove all drains, visors and everything that will interfere with our work on warming the house.
- Then we check the wall, if you find crumbling or flaking areas, you need to clean them.
- Then proceed to gluing the plates. Glue is applied in dots. Plates are glued from the bottom up and in a checkerboard pattern (do not forget about the building level).
- After gluing, the plates are additionally fixed with dowels with large caps (usually there are 5 such dowels per 1 plate). Or fix several plates with dowels (in the corners)
- After the final fixing of the plates, glue is applied over the expanded polystyrene with a spatula (you can use the one for the plates themselves) and a fiberglass mesh is glued on top.
- From above we cover the mesh with another 1 layer (2-3 mm layer) of glue and let it dry.
- When the glue dries, apply decorative plaster.
They try to produce internal insulation immediately after the construction of the house, because if you already have wallpaper ready, you will have to take it off to install a heater on top.
If you do not have much money to do all the stages of insulation, choose by importance - where does the main cold come from, and then subsequently insulate the rest of the parts.
A country house is a place for the soul where you can relax with your family on the weekend. I want the rest to bring only pleasant emotions, especially in winter and spring, when the sun does not provide enough heat. What to do to make the country house warm and cozy?
Today we will tell you how you can save on heating by insulating a country house, and what materials are better to use for this.
Stages of complex insulation of the house
The house can be insulated in several stages: make the thermal insulation of the facades, take care of the roof and do not forget about the basement if you are going to use it, for example, as a room for training on simulators.
Stage number 1: insulate the facade
There are three ways to make thermal insulation of the facade: from inside the house, outside and inside the wall. The first option is rarely used, since, first of all, this method eats square meters living space that you don't want to lose. In addition, moisture can accumulate between the insulation and the cold wall.
Most often, external insulation of facades is used. Moreover, there is an incredible amount of materials for the implementation of this task on the Russian market today. So there will be no difficulty in searching.
And the most popular today is the use of multilayer structures - intra-wall insulation, when the insulation is placed on the outside of the house, covered with siding or facing bricks.
Stage number 2: roof insulation
Not everyone immediately thinks that it is necessary to insulate not only the walls, but also the roof. A significant part of the heat escapes through it. And with the help of thermal insulation, you can turn the attic area into a full-fledged living space. As you can see, some pluses!
Fire resistance, strength, durability and stability - these requirements must be met by the thermal insulation of the roof. For pitched roofs more lenient requirements. The main thing here is that the so-called "cold bridges" that appear due to shrinkage of the material do not arise. Therefore, in order to insulate such roofs, fiberglass slabs and mats are used, the density of which is from 15 to 30 kg / m³. But if it comes to a flat roof, then special attention is paid to materials.
Mechanical strength is taken into account, in particular, in compression and separation of layers. Extruded polystyrene foam boards are ideal for this. A vapor barrier layer made of materials such as polypropylene or polyethylene will help prevent swelling of the roofing carpet and condensation.
Stage number 3: take care of the heat in the basement
If your basement is not heated, then with the help of insulation you can maintain a positive temperature in it for all year round. And if you have a heated basement, then its thermal insulation will save you money and reduce heat loss. For these purposes, external thermal insulation of all elements of the building that are in contact with the ground is most often used.
How to insulate a house?
Now that you know your approximate home insulation plan, you need to think about what materials you will use to implement it.
They can be classified according to combustibility, thermal conductivity, shape, appearance, rigidity and structure. Also, materials for insulation are divided into: inorganic - foam glass, cellular heat-insulating concrete, glass wool, etc .; organic - vermiculite, asbestos, perlite, glass, silica, etc.
The leaders among heat-insulating materials in Russia today are considered to be heaters created on the basis of stoneware and fiberglass. They are also called mineral fiber insulation.
Popular types of thermal insulation materials
Let us consider in more detail the types of heat-insulating materials that are most often used in the insulation of country houses.
Mineral wool
This material has a number of positive properties that distinguish it from all others: high sound insulation, thermal insulation, incombustibility, non-hygroscopicity, ease of installation, environmental friendliness, biological and chemical resistance, resistance to temperature deformations.
In addition to the listed qualities, mineral wool, in contact with metals, does not cause their corrosion. With the help of mineral wool insulation, you can create a good climate in your home. This is due to the fact that they repel water and do not allow moisture to penetrate inside the building.
Under the definition of "mineral wool" often fall - slag, basalt and glass wool. In the production of all these types, mineral raw materials are used.
For slag - these are blast-furnace slags - glass is made from limestone, soda and sand, and when creating basalt, gabbrobasalt mineral rocks are used.
Foam concrete and aerated concrete
These materials are often used for construction low-rise buildings and as heaters. They are not afraid of dampness and high temperatures, excellent soundproofing and easy to install. Such heaters are able to withstand up to 7 hours of unilateral exposure to fire. They are easy to handle and store - aerated concrete and foam blocks do not age or rot.
Its porous structure has closed, deaf pores, so the movement of air inside it is simply impossible. He has low temperature melting point and high smoke generating capacity.


