Attic insulation with mineral wool: technology for amateurs. Types, materials and methods of self-insulation of the attic Insulation of the attic floor in a private house
Proper insulation the attic of a private house will allow you to use this room as a dwelling. In addition, cold air will not enter the lower tiers through the ceiling, which will significantly reduce energy costs. Next, consider the main canons of this procedure.
Thermal insulation of the attic of a private house with the help of backfill materials is the most ancient method. Since ancient times, sawdust has been used as a heater, contributing to good preservation comfortable temperature in room. Until now, this technology finds its application, because it is implemented by hand without problems. We will talk about it and other options below.
Backfill insulation is used mainly for floors of interfloor ceilings. Of course, it is possible to use them for thermal insulation of the ceiling, but such a procedure will be difficult, because it will be necessary to build a frame. Therefore, it is better to use this category of materials for their intended purpose.
Before starting the main work, you will need to prepare the surface, namely:
- Remove old floors (if any).
- Clear everything from debris and dirt.
- Create a crate. To do this, you can use bars 4 × 4 in size. They should be placed in increments of no more than 50 cm for the floor, and within 1 m for other parts.
"Grandfather's method" - sawdust
Let's start with the most ancient insulation - sawdust. This material has a lot of disadvantages - low moisture resistance, poor thermal conductivity, etc. However, even today people insulate attics with it. The reason is simple - it's the cheapest (sometimes even free) option. This method can be safely recommended for residents of the southern regions, where there are no frosts. For such a climate, there is no need for high-quality insulation of floors.
Tip: sawdust can be taken for free (or for a symbolic price) at any large sawmill.
Thermal insulation with sawdust is carried out in the following sequence:
- We make a thorough revision of the floors for the presence of cracks and cracks. To prevent cold air from entering the main room through the attic, they must be sealed. Previously, clay was used for this, but today you can use more advanced compounds: sealant, cement-sand mortar, etc.
Important! If the gaps between the floors are more than 2 cm, it is required to re-lay the boards.
- Then we sprinkle the entire space with slaked lime with carbide. There are several functions of this layer, but one of the main ones is protection from mice. It's no secret that rodents appear in many private houses (especially in attics). However, this composition will effectively scare them away.
- Now we fill the niche with sawdust - they must be dry and without debris. The recommended layer thickness is 20 cm.
- Then it is necessary to process sawdust so that they cease to be combustible: we spill it with slag mining, or we process it with flame retardants.
- We close the logs of the attic with boards or plywood.

Linen
This is another insulation from the old days. However, now you can find improved analogues that have many advantages:
- Ecological cleanliness - only natural ingredients are used in its production. Working with your own hands, a person does not risk getting skin irritation (unlike using, for example, glass wool).
- High efficiency. Excellent technical characteristics make it possible to make the house as protected from the penetration of cold air as possible.
- Easy to use.
- Variety of forms - factors. Flax is not only loose, but also in the form of rolls or slabs. This allows you to use it to finish the house from all sides (floor, ceiling, walls).
The process of attic insulation with flax is practically no different from the use of sawdust. The only difference is that the prepared surface must be covered with kraft paper. Such a measure will increase performance and protect against the influence of natural factors (mold, fungus, etc.). If you do not intend to completely insulate the roof, then you will need to close the logs with a vapor barrier layer (for example, a membrane). For fastening, we use liquid nails glue or a construction stapler.

The most effective technique - expanded clay
Above were considered budget options that can be recommended only for residents of warm regions. To reliably protect the attic of a house in areas with a harsh Russian climate, it is necessary to use better and more effective methods. Among backfill materials, expanded clay is the best. This is a porous material that is obtained by firing clay (or its shale). It is lightweight and has an oval shape. Regarding the form of release, fractions are distinguished: 5-10 sand, 10-20 crushed stone, 20-40 gravel.
Important! Expanded clay implies the use of a screed, which promises a significant weighting of the structure. Therefore, this technology can be used only if the floors are strong enough.
Expanded clay is laid as follows:
- Align the rough base (if necessary). Height differences of more than 1 cm are not allowed.
- We lay the film, of any thickness, the main thing is that there are no holes.
- Pour a pillow (no more than 10 mm) of gravel.
- We scatter expanded clay over the entire area and level it. It is very important to achieve uniformity. For convenience, you can use a laser level.
- To avoid shifts of expanded clay to the side when pouring the mixture, first pour the liquid solution.
- If you are going to use the attic as a full-fledged living space in the house, it is necessary to provide additional strength to the screed using a reinforcing mesh. We lay it on a liquid solution.
- We install beacons to determine the evenness of the future coverage.
- Pour a thick solution and level it with a rule. Our coating will be ready for full operation in 7-10 days. Until this time, it is undesirable to bring any heavy objects into the room.
The described technique is the most effective in its class. However, it is characterized by impressive spending. In addition, a serious load is created on the floors ( wooden houses may not be able to handle it). Therefore, it should be used only if the attic is planned to be used as a living space.

We analyze roll and tile options
This type of material can be used to decorate the house from all sides. However, we will consider the roof (in our case, the ceiling) and walls. Preparation of the rough surface is the same as for the floor. That is, it is necessary to remove old materials, clean and create guides.
For lovers of environmental friendliness - ladders made of algae
This is a unique material, because it is the most environmentally friendly in its segment. Due to the presence of iodine, mice do not start in it. In addition, it is not subject to biological factors (mold, fungus, etc.) and does not rot. In terms of their performance, the ladders are not inferior to their synthetic "brothers" in anything. They are not afraid of water at all, so there is no need to create a moisture protective layer. Installation is carried out in the following sequence:
- We evaluate the ceiling and walls (if any) for the presence of cracks and close them up. If they are small, we use sealant or similar materials. In more serious cases, you will have to add corrugated board.
- We attach ladders and fix them on large building brackets. Even the smallest cracks should not be allowed to form, otherwise the ceiling will let cold air through.
- We close the attic structure with boards or plywood.

The most common material is stone wool
This is a more advanced analogue of mineral wool, with improved technical characteristics. Today it is most often used to protect houses from the cold. The installation method is practically the same as described above. However, there are some nuances:
- Cotton wool on both sides must be covered with a vapor barrier film. We fix it to the ceiling with brackets or glue. We fix the closing part on the logs.
- If during the preparatory operations you will fill the bars (acting as guides for the ceiling and walls), we recommend that you first purchase a heater and make the distance between them the same as the width of the roll.
- Laying must be done joint to joint or even with a slight excess. The malleability of stone wool allows this to be done.
To mount on the ceiling, you will need an assistant who will support the roll.

Modern and high-quality method - foamed polyurethane foam
This is a complex polymer that has excellent technical characteristics. With their own hands, such technology is implemented quite rarely, however, it needs lighting. In this case, a similar mounting foam is poured. The foamed substance sets quite quickly, as a result, a monolithic structure is created.
In addition to high thermal insulation characteristics, polyurethane foam gives high sound absorption, as a result, rain drops on the roof will not be heard.

For application, you will need a special spray installation (it is because of this that few decide to use polyurethane foam with their own hands). However, it can be rented. So, the work is done in the following sequence:
- We clean the ceiling and walls from dust and dirt. Otherwise, the sprayed substance will not adhere well.
- We cover all wooden elements first with an antiseptic (if possible, then on both sides), and then with a deep penetration primer (only for wood).
Important! When working with a sprayer, do not forget to use a respirator and gloves
- After waiting for the complete drying of the protective compounds, we spray the foamed substance with our own hands. We do this slowly from the bottom up.
- After waiting for complete drying, we cut off the excess with our own hands (if any) and close the ceiling and walls with any sheet material(plywood, drywall, etc.).
To achieve maximum protection from the cold at home, we recommend combining the methods described above.
August 27, 2016
Specialization: Capital construction works(laying the foundation, erecting walls, constructing the roof, etc.). Internal construction works (laying of internal communications, rough and fine finishing). Hobbies: mobile communication, high technologies, computer equipment, programming.
If you live in apartment building, then you hardly ever thought about attic insulation. Moreover, you hardly guessed about the presence of such a technical room in the building, unless, of course, you ran to the roof as a child.
However, in country house or a country cottage (which I am currently building for my son), the under-roof space plays a huge role. Often there is an open expansion tank heating system, ventilation pipes, chimneys. And sometimes they equip living quarters - attic.
Therefore, I will not talk for a long time about how important thermal insulation measures are for this room, but I will simply tell you how to insulate the attic of a private house using the example of my own son's country home.
I think the described technology will be useful to everyone who builds or is going to build a dwelling outside the city with their own hands.
Thermal insulation materials
Attics have been insulated for as long as I can remember. My great-grandfather and grandfather used hay and straw for this purpose, sawdust and shavings, and some in their village - and dry leaves from trees.
Dad was already a more “advanced” builder and cold - in a private house and in the country house he insulated the attic with expanded clay and old soldier's blankets. By the way, expanded clay granules are also used in modern construction.
I won't tell you now what better option of the above, as I can offer more technologically advanced and efficient thermal insulation materials for attic insulation.
However, before that, I’ll note what technical characteristics a heat insulator should have in order to be used for the described work:
- Light weight. The material after laying should not exert a large load on the attic floor, roof rafters and load-bearing walls.

Otherwise, even during construction, more durable building materials will have to be included in the project, which increases the amount of the final estimate.
- Safety. The material used for insulation should not harm human health.

Therefore, both the floor of a cold attic and the roof must be insulated with heat insulators that do not emit hazardous gases into the air. chemical compounds. Especially if you plan to equip a living room there in the future.
- Ease of installation. The less effort you need to spend on the installation of heat insulators, the better, right?

In addition, there is not much space in the under-roof space of some houses, so working there is not very convenient. I always try to buy materials that do not require the use of sophisticated equipment.
- Low thermal conductivity. The better this indicator is, the smaller the layer of heat-insulating material should be used. Accordingly, the interior space of the attic will not greatly decrease.

Again, I consider this important, since I plan to make an attic in my son's dacha in the attic. But I think it’s not very interesting for you to lay thermal insulation with a thickness of 20-30 cm.
- hydrophobic properties. In attics, the air often has high humidity, which reduces the effectiveness of the functioning of the heat-insulating layer.

I advise choosing materials that are either treated with water-repellent compounds, or those that do not change their technical characteristics when wet.
- Fire safety. The roof is where there is a risk of fire due to improper installation or blockage of the chimney.

Therefore, when choosing a material, I would give preference to those varieties that do not ignite under the action of open fire and do not support combustion.
Of course, I failed to choose the perfect insulation that 100% meets all the listed requirements. But still I will tell about those with whom I had to work.
So, I insulated attics:
- polyurethane foam;
- foam;
- mineral wool;
- expanded clay.
I'll tell you more about them.
polyurethane foam

The raw material for the manufacture of this heat insulator is plastic. Insulating the attic with polyurethane foam is a pleasure, but this requires special equipment. The fact is that the insulator is applied by spraying, for which compressors are used.
But you do not need to buy screws, adhesive mixtures, crates and so on. And the polyurethane foam itself is applied very tightly, leaving no gaps through which cold air can penetrate into the under-roof space.
After hardening, the insulation becomes rigid, therefore it additionally strengthens the structure. The material has antiseptic properties; mold, fungus and other microorganisms do not multiply on its surface.

If you need to insulate the ventilation pipe in the attic, you can also use polyurethane foam. Only not sprayed, but in the form of ready-made shells with a protective layer of aluminum foil. They simply need to be fixed to the pipelines with adhesive tape or plastic ties.
The biggest drawback of the material in question is the high price. However, if you consider the total cost of work, then you can save money, because in this case additional hydro and vapor barrier is not required.
Styrofoam

This heater, as well as similar to it technical specifications expanded polystyrene, are widely used for warming rooms under the roof. I personally prefer the expanded polystyrene obtained by extrusion. It is more durable, does not burn, has a low coefficient of thermal conductivity and is not damaged by rodents.
The cost of insulation is quite affordable, and anyone, even the most inexperienced summer resident, can lay it in the attic. Polystyrene is processed with hand construction tools and fastened with dowels.
Mineral wool

Fibrous heat insulators are a versatile material. Mineral fiber-based heaters are rolled, slab, in the form of a dry mix, and so on. They are great for insulating attic floors and roofs.
Basalt fiber, from which mineral wool is made, has a very high temperature melting. Therefore, this insulation can be used for installation on chimneys, the surface of which can become very hot.
There is one point here. The insulation is not waterproof and, when moistened, may lose its heat-shielding properties. To avoid this, when insulating, it is necessary to install hydro- and vapor barrier membranes. Or buy those varieties of mineral wool that are treated with special water-repellent compounds.
The bottleneck of some types of mineral insulation is environmental friendliness. In the manufacture of basalt mats, a certain amount of formaldehyde resins is used, which can be harmful to human health. Especially during the installation process.
Expanded clay

Granules of this material, as I already told you, were also used by my father, insulating his first dacha. Expanded clay has a low coefficient of thermal conductivity and weighs a little. However, it is loose, so it can only be used to insulate the floor of the under-roof space.
But the installation process itself does not require any tricks. You just need to pour it on the floor, and then properly protect it from moisture with a moisture-proof membrane. If you are going to equip the attic later, you can cover it with a screed on top, and then lay a decorative coating.
Independent insulation of the attic space
with the most popular thermal insulation materials it seems like they decided, now I’ll tell you how to properly insulate the under-roof space so that you can equip an attic there in the future.
Let's take up the question of how to lay the insulation under the crate, because this method will allow you to stuff the decorative material of your choice without any problems in the future.
In my son’s attic, I decided to use mineral wool, but I’ll tell you right away about foam plastic, since the work technologies are similar, and it’s easier to work with foam plastic if you are a beginner builder.
The whole process of warming consists of several stages:
- Preparation;
- waterproofing;
- laying a heat insulator;
- vapor barrier;
- arrangement of the crate and installation of decorative trim;
- insulation of engineering communications;
- floor insulation.
I will tell you about each stage in more detail.
Preparatory activities

Let's start, as usual, with preparation, because it is unlikely that your attic is already ready for construction work.
After all, in almost 100% of cases this room is used as a trash storage, where all unnecessary things are taken down (and sometimes they are taken from the apartment). In the attic of my son's dacha, it was clean, since the house is new, but in my home, when sorting out the rubble, I found old books, clothes, several family heirlooms (which my wife did not consider as such) and much more.
In addition, if you have tried to perform insulation before, then I advise you to get rid of any traces of this process. For example, remove sawdust, scraps of felt, construction debris, and so on from all slots. Believe me, I have insulated attics more than once and I know how important it is.
By the way. And drive all the spiders out of the attic, then clear the room of the cobwebs. After all, you will build an attic for yourself or your children, and not for any insects.

Last moment. Take it to the attic necessary tools and provide lighting. It is unlikely that you have sockets there, so you will have to stretch out an extension cord with a light bulb. Although these measures seem obvious to you, since I had to return to the city for electric, since not a single extension cord at the construction site reached from switchboard to the attic.
Waterproofing
![]()
A waterproofing membrane is needed in order to protect the thermal insulation layer itself and the room under the roof from excessive moisture. This is especially important if the roof has been laid for a long time (for example, you are insulating the attic of an old house) and roofing materials used not the most modern.
The moisture-proof film is installed directly on the roof structure. It must be stretched and overlapped so that after the end of the work an airtight layer is formed. You can fasten the material with a construction stapler with staples.
Insulation laying
The heat-insulating material, as I said, must be mounted on a pre-mounted crate. However, if you want to save a little, you do not need to design a separate frame. The roof truss system will perfectly play its role.
In the latter case, in order to press the material and be able to mount the decorative sheathing, it will only be necessary to equip a light counter-lattice at a certain distance from the surface of the heat insulator. Then you get a small ventilation gap that removes excess moisture from the insulation layer.
So, the scheme of work on laying insulation is as follows:
- Rolls of mineral wool must be cut so that their width corresponds to the distance between the rafter supports. After that, lay under the roof surface, gluing to the surface or temporarily attaching with wooden slats.

- To make installation easier, mineral mats can be used.. Their width should slightly exceed the distance between the rafters, so that after installation they suddenly fall into place and do not fall out.

- The foam must be cut as accurately as possible so that it comes close to the installation site.. The gaps between the insulation panels will greatly reduce the effectiveness of insulation measures, so they need to be blown out mounting foam.

vapor barrier
After laying the insulation, you need to install a vapor barrier membrane. It will protect the insulating material from the penetration of moisture into it, which is formed during the life of people.
For vapor barrier, special films are used that do not allow the heat insulator to be moistened, but do not prevent air infiltration through the building envelope. As a result, a microclimate comfortable for living will be formed in the attic, when viewed from the point of view of humidity.
![]()
So, after installing the insulation, it is necessary to attach a vapor barrier to the rafter supports (which act as a crate). This should be done with a stapler, gently pulling the film.
The edges of the material overlap each other to prevent the mineral wool from getting wet. To further insure yourself against surprises, I recommend gluing the seams with adhesive tape.
Vapor barrier films allow air to pass only in one direction. Therefore, before installation, make sure that you have unfolded the membrane to the desired surface.
Control grille
Having finished with the films, you can begin to complete the operations for finishing the walls (well, or the roof, that's how you look). I will use it for this, but in the same way you can fix OSB boards, drywall, lining, and so on.
Here, too, there is an opportunity to significantly save on the purchase of materials and reduce the time for all work. The fact is that the main details of the crate will be powerful rafter legs, and you will only have to make the crossbars, which will serve as additional stiffeners for the skin.

The material for the transverse frame can be a wooden rail or a galvanized profile. The essence of this will not change. The parts just need to be screwed from above to the rafters so that they are located at right angles to them. The step between adjacent elements depends on the decorative finish, I made 30 cm so that the skin does not sag under load.
Herself decorative trim also depends on your imagination. I'm going to glue the wallpaper on top for now to save money, and then I'll come up with something prettier. You can do the same.
Just before sticking the wallpaper, do not forget to putty the seams between the plywood sheets and perform other necessary operations (priming, and so on).
Warming of engineering communications
If you do not provide for the creation of an attic, it is imperative to insulate the ventilation ducts in the cold attic, as well as, if available, pipes for heating, water supply and smoke exhaust (which term I came up with).

Of course, you can use mineral wool for this, wrapping it around pipes, wrapping it with roofing material and fixing it with wire. But why complicate your life if you can buy ready-made shells for pipes of the desired diameter (made of polyethylene foam, polyurethane foam, polystyrene, and so on). They just need to be snapped onto the pipe and wrapped with adhesive tape to be sure.

The cost of such insulators is low, so you definitely will not go broke.
Attic floor insulation

The floor is a horizontal surface, so it can be easily insulated with bulk material. For example, expanded clay. But since I started working with mineral wool (styrofoam), I won’t buy expanded clay, I’ll limit myself to what I have at my disposal.
So, the attic insulation technology is as follows:
- First you need to clean the surface of dust, accumulated debris, foreign objects, and so on.
- Then install the support lags. I make them from wooden blocks with a section of 20 by 10 cm. You can select the height of the lags based on the thickness of the thermal insulation material you have.

- The entire surface is covered with a layer of waterproofing. Be sure to check the tightness so that the mineral wool does not get wet, as this may affect its technical characteristics.

- Cotton wool is laid on the waterproofing layer. Choose a material that is specifically designed for insulating horizontal surfaces. For example, Izover KT37.

- From above, the vapor barrier membrane is stretched again, on which it is stuffed facing material. I used plywood, which I plan to cover with linoleum.

If you do not plan to use the attic as a living space, then you can not insulate the roof, but only insulate the floor. In this case, you need to pay attention to some features:
- Wood for lags and sheathing must be treated with hydrophobic, fire-fighting and antiseptic compounds in order to maximize its service life.
- To enter, it is better to use an insulated hatch to the attic, since it is this structural element that is often the source of large heat losses.
Now we can say with confidence that the insulation of the floor (or the ceiling from the side of the cold attic) has been completed in full. And in order to achieve maximum efficiency thermal insulation measures, I still advise you to make an insulated hatch with a ladder, as described in the video in this article.
Conclusion
As you can see, there is nothing terrible and heavy here. If you liked the material or have any questions, you can ask them in the comments. I would also be grateful for stories about how you perform attic insulation in a private house with your own hands.
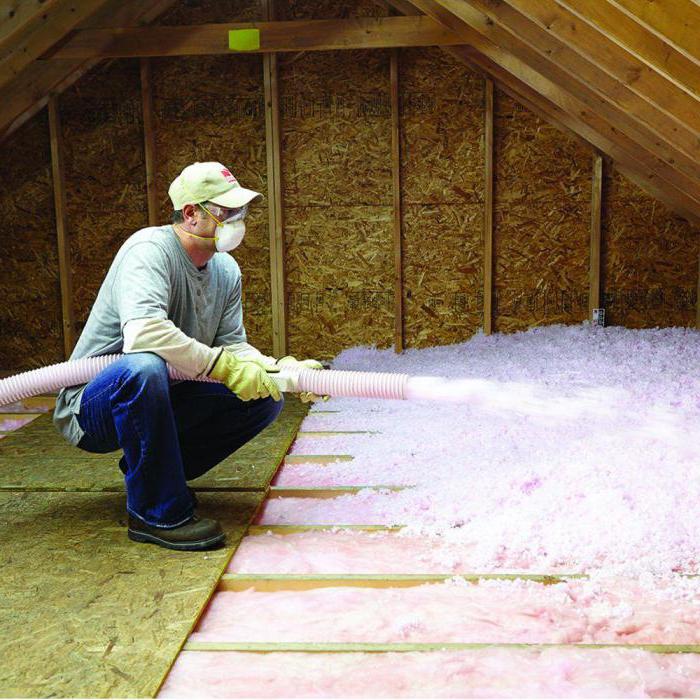
There are dozens of ways to insulate an attic floor, in which hundreds of models of insulation are used, but mineral wool is still the most popular material.
The only problem is that not all amateurs know how to properly insulate the attic with mineral wool in a private house. Therefore, further we will analyze the technology and important nuances process.
Preparatory part
This includes:
- choice cotton wool and related materials;
- calculation the required amount of material;
The choice of mineral wool
Stone or mineral wool is the name of the whole direction, in which there are dozens of different models. Based on the name, this includes all soft insulation made from rocks, the most famous option is basalt wool.
A number of sources also include glass wool and slag wool here. In the first case, glass is taken as the basis, and slag wool is made from blast furnace slag (a by-product of blast furnace production).
All materials are good, but which is better is a moot point. I must say right away that if you take material from a promoted brand, then there is not much difference in quality.

It is much more important to choose the type of material.
There are 2 types of such a heater:
- Soft mats, which are sold rolled up in rolls.
- Dense slabs.
Theoretically, ceiling insulation from the side of a cold attic can be carried out with both options, but from experience, it is better to give preference to dense slabs.
The price of the plates is somewhat higher, but this material does not shrink over time, plus, when wet, some models of plates can be dried without loss of volume and quality.
As for soft mats, here you buy a "pig in a poke", well-known manufacturers they make a good product, but it’s not a fact that you won’t buy a fake.
Such mats are inexpensive, but in the conditions of an attic they lose volume in a couple of years.

Related materials
This is the case with related materials. Any cotton wool is afraid of moisture, in order to protect it, a vapor barrier membrane is needed.
It is a canvas that allows steam to pass in only one direction, with reverse side no steam or moisture escapes.
Important! Steam moves from the room to the street or to the attic, so the membrane is laid with a vapor-permeable side to the room, i.e. down.

Material calculation
- With attic area It's simple - the length is multiplied by the width. Plus 5% for shrinkage and trimming.
- Material thickness depends on the climate zone. IN middle lane In Russia, for the insulation of the attic floor with mineral wool, the thickness of the plates is 100 mm, the mats are taken 150 mm. Accordingly, the further north, the thicker the layer.
Advice! If you plan to lay plates, for example, to a thickness of 100 mm, then it is better to take 2 plates with a thickness of 50 mm and lay them with a shift. So the joints overlap and there will be no cold bridges.

Attic insulation with mineral wool
In a private house, the floor can be concrete and wooden (along the beams). The technology of warming these options is similar, but there are still differences.
Attic insulation on beams
The instructions for insulating the beam ceiling are similar to arranging roofs with an inclined rafter system, so if you wish, you can completely insulate the attic using this technology.
Laying technology:
- The first layer is a vapor barrier membrane.(rough side down). The rolls are rolled across the beams and overlapped by 100 mm; with such an overlap, it is not necessary to glue the joint of the sheets with adhesive tape. The material is fixed with a stapler.

- A slab or a roll of mineral wool is cut out 20 mm wider than the distance between the beams. This tolerance will allow you to lay the material without gaps. As already mentioned, it is advisable to put the insulation in a run-up to cover the joints.
- When insulating with stone wool from the upper edge of the material a gap of 30–50 mm is left to the edge of the beam. It is necessary for the arrangement of ventilation ducts.
- The next layer is vapor barrier., it is placed in the same way as the bottom one (with a vapor-permeable layer down). If you confuse, then condensate will accumulate under the membrane and the insulation will get wet. The membrane is attached with a slight sag between the beams.
Photo of the arrangement of the ventilation duct under the vapor barrier

- A counter-rail is stuffed over the beams and the floor is mounted on it. Often the subfloor in the attic is stuffed directly onto the beams.
The video shows the process of insulation on the beams:
Attic insulation on floor slabs
Warming the attic floor over a concrete floor is somewhat similar to the previous version.
Only the choice of materials is slightly different:
- Liquid waterproofing. The concrete floor is cold and condensation may form here. So that the cotton wool does not draw moisture from the concrete, instead of a vapor barrier, the slab is covered with waterproofing.
- Logs. Further on the floor slab are attached wooden logs. You select the thickness of the timber according to the thickness of the insulation, plus the ventilation gap.
- Insulation. After that, a heater is laid between the lag, as well as along the beams.
- Vapor barrier. From above, cotton wool is covered with a vapor barrier - it is needed so that excess moisture can go up.
- Draft floor. Now you can lay a subfloor on the logs.

Conclusion
Mineral wool for insulation attic floors handmade fits perfectly. Both options presented above have been tested in practice. The main thing is to take into account all the nuances that were mentioned.
Even if the winter has dragged on, and the weather is not happy, the conversion of a cold attic into an attic should not be postponed until better times. But, given our difficult climate, insulation will have to be given maximum attention.
A cold attic is an untapped potential, a space that works at best as a repository of forgotten and unnecessary things. Attic - the potential realized as you need: a romantic bedroom, a cozy living room, a games room, a bathroom with a stunning view of the surroundings. There are other differences as well.
How to turn an attic into an attic?
A large-scale alteration of a private house or cottage is regarded by law as a reconstruction requiring approval. Reconstruction is considered to be such actions that change the parameters of the house as a whole - volume, number of storeys, height, appearance. Without agreeing and making changes to the documents, you can only insulate the roof, it is permissible to insulate the floor and ceilings of a cold attic. The installation of windows is also considered a reconstruction, as is the replacement of load-bearing structures.

An obligatory stage is a preliminary check of the possibilities of the house. Only project documentation and expertise construction company will make it possible to say with confidence that the foundation, walls and truss system will withstand the increased load.
Attention:
you can arrange a full-fledged residential attic if the height of the attic exceeds 1.8 meters. Otherwise, you will have to change the roof truss structure. A compromise option for a low attic that does not require restructuring is a children's playroom or a bathroom without a shower.
How to properly insulate cold attic?
If your intentions are serious, simply installing a battery in the attic will not help. You will have to start with a large-scale inspection of the entire roof and floors. Only complete and high-quality insulation and thermal insulation of a cold attic will turn an abandoned floor into a favorite attic.

A cold-type roof, conceived when building a house with a non-residential attic, differs in design from a warm one. In fact, it is a rafter system, on top of which waterproofing and the roof itself are laid. The air in the attic in this design plays the role of a buffer that reduces heat loss at home. When converting an attic into an attic, the roof must be brought into line with the changed requirements.
IN warm roof with full insulation of slopes there is a so-called " roofing cake» from layers:
External coating. Metal tile, slate, ondulin, corrugated board, ceramic, cement-sand, slate, bituminous, composite tiles. Sheet materials cost less and are easier to install, but they serve less, piece materials, like tiles, better insulate the house, serve for a long time, but at a higher cost.
Waterproofing. Protects the entire structure and the insulation layer from rain, snow, moisture.
Ventilation gap. Provides natural roof ventilation and removes moisture.
Thermal insulation. Retains heat, reduces heat loss.
Vapor barrier. Protects insulation and rafters from moisture from the room. Especially if you are planning a kitchen in the attic.
Interior decoration. Lining, timber, plywood, other materials.
Attention:
in order for the microclimate in the attic to be optimal in any weather, all surfaces are needed - the floor, ceiling, walls and slopes. This is also important from the point of view of sound insulation: the noise on the upper floor should not interfere with the inhabitants of the lower one, and the sound of drops on the roof should not wake those sleeping in the attic.
How to choose material?
All heaters are divided into several groups according to physical properties:
Monolithic or massive stacked on the ceiling in large blocks. Reliable option, fewer joints, but the removal of excess moisture from the air is blocked, condensation may appear.
Fibrous or porous. The spaces of the internal structure are filled with air bubbles that retain heat. A classic example is mineral wool, the most common insulation material for private homes.
Bulk insulation- for example, expanded clay and sawdust; create a dense heat-insulating layer, allowing surfaces to "breathe". But expanded clay is heavy, and it is difficult to work with sawdust.

Important parameters of all heaters that need to be taken into account are the cost and ease of installation, weight, which does not give a significant load on the supporting structures, resistance to moisture, fire and environmental friendliness. Let's compare the pros and cons of the most common heaters.
|
Material |
||
|
Lightweight, cheap, environmentally friendly. |
It rots and flammable. Used in ceilings. |
|
|
Expanded clay |
Does not burn, does not rot, perfectly retains heat. |
Very heavy. Applied in flat roofs and overlays. |
|
Expanded polystyrene, polyurethane foam |
Lightweight, retains heat, protects from noise, moisture resistant, does not shrink |
Expensive and difficult to install. It is applied in overlappings, facades and flat roofs. |
|
Mineral wool |
Inexpensive, easy to install. Resistant to fire, rodents and mold. Protects from noise and retains heat. Weighs little. |
Humidification leads to a decrease in thermal insulation qualities. It is used in walls, partitions, ceilings and pitched roofs. |
|
It retains heat well and protects against noise. Contains borax to kill mold. "Breathes" because it is made of eco-friendly cellulose. The thermal conductivity when moistened changes much more slowly than that of mineral wool. |
Moisture changes properties. combustible material. Used in walls and ceilings. |
Attention:
in most cases, in terms of price-quality ratio, mineral wool is the most reasonable option for insulation for a cold attic.
Insulation technologies
The method and sequence of actions depend on the selected insulation. For example, ecowool is laid in a “dry” way, directly on the floor surface, or “wet”, spraying a special adhesive mixture using equipment. Insulation of a cold attic with foam plastic involves mounting the material with glue or screws and strengthening it with a frame made of profiles. Sawdust is mixed with cement, poured into cells from antiseptic-treated beams and left to dry.

The general sequence of warming a cold attic:
- All major work goes along with the installation of insulation.
- Windows are placed after laying waterproofing and before installing insulation and vapor barrier.
- First, waterproofing is laid on the internal planes of the roof, walls and floor.
- Then close waterproofing material rafter system.
- Thermal insulation is mounted, fibrous materials are covered with vapor barrier.
- Then the attic windows are insulated, paying special attention to the space under the windowsill and slopes.
- Finally, it's time to finish the surfaces.
Attention:
the laying of communications takes place at the stage of rough insulation work. It is important to take into account two points: the fire hazard of the selected material and the importance of urgent access to communications. So, when choosing fire hazardous materials like polystyrene foam and ecowool, it is reasonable to make the wiring external. And if you have chosen short-lived sewer pipes, which you may have to change after some time, access to them will be easier if the attic is insulated with sheet and soft materials.
Heating and attic decoration
Laying thermal insulation is not enough if you plan to operate the attic all year round. Additional heating will be required, the installation of stairs from the lower floor and, of course, the installation of windows for constant access to natural light.
If the house has a heating system, you can connect to it while warming the attic. Do not forget to check how much power the boiler is designed for and whether it can withstand an increase in load, especially if a room is planned upstairs, such as a bathroom, laundry room or kitchen.
Electric batteries and infrared heaters do not require installation, they can be moved from place to place.
Heated floors warm the attic well over the entire area, unlike radiators and heaters. Electric floors consume electricity, but are easier to install. Water heated floors are more difficult to lay, but they are less expensive to operate. Both options are suitable for wooden houses with attic.

Do not forget to arrange a staircase that is comfortable for permanent use, allocating a sufficiently large area below, in the corridor or hall. The optimal slope of 30-40 degrees will provide a step depth of 20-25 and a height of about 15 centimeters. The height of the ceiling above the stairs must be at least two meters, the width of the stairs must be at least one meter.
What can go wrong?
Even if you have thought through the reconstruction, from legal aspects to careful selection of material, the process itself is always unpredictable. Keep your finger on the pulse of repairs, if not always, then at least at checkpoints.
Vapor barrier:
The vapor barrier membrane is laid differently depending on the design of the ceiling.
If the roof does not have a high-quality vapor barrier layer, or it is made carelessly, with breaks, any evaporation will inevitably completely or partially get into the thermal insulation layer of mineral wool and turn into water there. In winter, moisture will freeze, and then appear again in the form of leaks. Isolation will be required.
Insulation installation:
It is impossible to lay mineral wool without a vapor barrier; it is important to leave a gap to remove excess moisture between the thermal insulation and the roof, installing the crate;
The main errors when laying fibrous or monolithic insulation are usually associated with an incorrectly selected width or thickness of the material.
The gaps between the insulation and the beams will become "cold bridges". If the material is inflexible, like polystyrene, the joints are filled with mounting foam during the insulation of a cold attic.
Windows installation:
Roof windows require good qualifications of installers.
Windows need to be insulated: otherwise, all efforts for thermal insulation will be nullified.

Instructions for warming a cold attic
1. If insulation occurs with the installation of windows, the transfer of load-bearing structures, the alteration of the roof, it must be coordinated. Simple insulation of the attic does not need to be coordinated. If the height of the attic is less than 1.8 meters, its full use will be difficult.
2. Check if the house is ready for attic renovation. Will the foundation withstand the additional load? Is the heating boiler prepared for heating new rooms?
3. When choosing a heater, pay attention not only to its cost and ease of installation, but also to weight, environmental friendliness and durability. Maybe for you optimal solution there will be a combination different materials on the ceiling, floor and ceilings of a cold attic.
4. Don't forget to choose skylights and additional equipment for them, for example, the possibility of automatic closing in the rain.
5. Choose a way to heat the new attic and think in advance how the stairs to the attic floor will be installed.
6. Flaws in attic insulation can lead to drafts, leaks, high humidity in the room. Finding the source of problems is more difficult than preventing problems in advance at the stage of attic repair.
When insulating a house, be sure to pay attention to the laws of physics. According to them, the air heated in the rooms will rise to the ceiling. If the attic is not sufficiently insulated, then the heat will escape to the outside, and this whole process can be called heat loss.
In order not to heat the street and keep more heat in the house, it is necessary to carry out thermal insulation of the ceiling. If you still do not know whether it is worth doing these works, then you should take into account that through the roof and goes in the amount of 25 to 40%. This data is especially relevant for houses with a cold roof.
Thermal insulation of the floor will perform three functions at once, which are necessary to create a comfortable microclimate. The material will soundproof, which will keep the house quiet during wind and rain. IN winter period insulation will eliminate heat loss and through which the heated air freely escapes. Thermal insulation is also needed in the summer heat, because with its help you can create a barrier to the path of heated air. Even in the hottest weather, the interior of the house will remain cool.
Material selection
If you are planning to insulate the ceiling of a cold attic, then you need to understand the variety of materials. The type of insulation you choose must be able to withstand a wide temperature range from -30 to +30 °C. It should not freeze at low temperatures and release harmful substances when heated. It is important to purchase fire-resistant thermal insulation. This is true for wired.
It is better if the insulation is moisture resistant so that it does not lose its properties when wet. It should not quickly caking in order to fulfill its purpose for as long as possible. Insulation of the cold attic ceiling can be done with rolls, slabs or This is true for the floor of wooden beams. Whereas if you have to work with concrete slabs, then bulk or slab materials should be purchased.
As mats and plates today are produced:
- Styrofoam;
- seaweed;
- mineral wool;
- extruded polystyrene foam;
- straw.
As for roll insulation, they are offered for sale in the following varieties:
- stone wool;
- mineral wool;
- glass wool;
- algae ladders.
When choosing bulk materials for insulating a cold attic floor, you may prefer:
- expanded clay;
- reeds;
- straw;
- buckwheat tyrsa;
- ecowool;
- sawdust;
- slag;
- foam granules.
Features of mineral wool insulation

The use of basalt wool

Basalt insulation is made from gabbro-basalt rocks and acts as the best option for thermal insulation of the ceiling from the side of the attic. The fibers of this material are more plastic, therefore they are not so brittle. They are well pressed into mats with sufficient strength.
Deciding to insulate the ceiling of a cold attic with basalt wool, you get at your disposal a material that copes well with the influence of external factors, therefore it can be laid from the side of an unheated room. Insulation is sold in slabs or rolls, which can have different densities. Sometimes a foil layer is located on one side, which can enhance the insulating effect, because the heat will be reflected into the room.
About the dangers of mineral wool

Everyone has mineral wool there is one common drawback, which is expressed in a binder consisting of phenol-formaldehyde resins. During operation, they are constantly released into the air, which can be hazardous to human health. Therefore, it is impossible to consider this thermal insulation as completely environmentally safe. Basalt wool is laid on the same principle as mineral wool.
The use of extruded polystyrene foam

Expanded polystyrene, which is also called polystyrene foam, is not a very dense material. It can be used when the floor is made of beams and logs. Extruded polystyrene foam is stronger and denser than regular foam. Before laying the surface is leveled.
On the warm side of the floor, there is no need to cover the vapor barrier, because concrete slabs have almost no vapor permeability. Insulation of the concrete floor of a cold attic involves laying a vapor barrier film. The next layer is the insulation boards, which are staggered. Joints are filled with mounting foam. As soon as it dries and hardens, the canvases are poured with a concrete solution with a thickness of 6 cm. After the screed dries, it can be used as a floor. A floor covering can be laid on the surface.
The use of penoplex
If you insulate the attic, it will not only increase the duration of operation truss system, but also roofing, as well as increase the level of thermal protection of residential premises under the attic. Insulation of the ceiling of a cold attic with foam plastic has replaced other technologies that were used quite widely in construction. In this case, we are talking about the use of glass wool, expanded clay and sea grass.
Modern choice - "Penoplex-panel"
In rural areas, the floor of an unheated attic is still insulated with clay and wood shavings. For sale today is the "Penoplex-panel", which is specially designed for cold attics. If you neglect the work on the thermal insulation of the room above the living space, this can cause the insulation to get wet, which occurs due to condensation. Sometimes, under appropriate conditions, the roof structure even begins to collapse, which is especially important with constant dampness.
Is it worth it to use metal fasteners
When the attic floor is not insulated, icicles and frost are constantly formed. Large heat losses were mentioned above, they are caused by a weak level of thermal protection. When developing a scheme for insulating the ceiling of a cold attic using foam, you must take into account the features of how the floor nodes will join with thermal insulation. The manufacturer does not recommend the use of metal fasteners, because they contribute to the formation of cold bridges, which reduces the level of thermal protection.
To create a heat-insulating cake, a leveling screed is laid on the floors. Next, a vapor barrier in the form of polyethylene is covered. The next layer will be foam. Do not forget about the presence of a separating layer in the form of polyethylene. At the last stage, a cement-sand screed is poured.
Thermal insulation of a cold attic floor may involve working with sheet material in the form of plywood or OSB. In this case, a vapor barrier is laid on the surface, wooden beams and foam insulation. You can cover it with sheet material in the form of GVL or DSP.
Finally
Warming a cold attic allows you to create a border between cold and heat. Due to the formation of condensate in the attic floor area, appropriate conditions arise that can contribute to impressive heat losses. Proper floor insulation allows you to create a barrier with a low degree of thermal conductivity.