How to make gutters with your own hands: technical nuances and installation specifics. How to make a drain from sewer pipes with your own hands? Advantages of drains from sewer pipes
Atmospheric water is one of the main causes of early wear and destruction of building structures. If you do not protect the house from its destructive effects, the famous source of life will stubbornly "undermine" the foundation and the blind area.
Exclude Negative influence maybe a drainage system, the construction of which can be easily handled by a home master. Only first you need to figure out how to arrange a drain with your own hands so that it serves flawlessly.
Among the functions entrusted to roofing systems are drainage activities. The runoff of precipitation and melt water is facilitated by a slope inherent not only in slopes, but also. However, the inclined configuration is not able to perform the work of protecting the facades and the blind area with the foundation. Drainage is required to protect structures below the roof.
Classification by degree of organization
In order for the result of the invested efforts to become the cause of well-founded pride, you need to deal with the design subtleties and technological nuances drainage system.
According to the degree of organization, drainage systems are divided into two types, these are:
- Unorganized. According to the unorganized scheme, the runoff of precipitation and the results of snow melting is carried out freely. Over all the area of the slopes, water simply flows onto the blind area, the ground or a paved path, persistently causing damage to the property that is imperceptible at first.
- Organized. According to the organized scheme, all kinds atmospheric water, rushing down the slopes, are caught by water intake gutters or funnels. Then they are discharged through pipelines to points intended for the collection and disposal of storm water.
Note that the regulation SNiP 31-06-2009 allows the use of an unorganized option in private construction. The regulations allow not to use the gutter system when arranging the roofs of one- and two-story cottages. True, at the same time, eaves overhangs are narrower than full-fledged 60 cm, it is not supposed to be built, but entrance groups and balconies should be equipped with canopies without wrangling.

An organized option is required for buildings with a height of three meters, but diligent owners do not refuse it when equipping one-story houses and household buildings. It’s worthwhile if you put your own hands on it, it’s not too expensive, and the benefits from it are quite real and economically tangible.
Drainage systems of an organized variety, in turn, are divided into internal and external options. characteristic of flat roofs. External are universal, they are successfully involved in the arrangement of almost all types of roof structures. Here we will carefully study their device and installation technology.

Design specifics of gutters
All systems for external drainage of water from roofs of any type and steepness include two main components, these are:
- Water intake devices. These include gutters, trays and funnels designed for direct collection of water flowing from sloped planes.
- Water pipes. Vertical sections of the drain, designed to drain the collected water with its subsequent transfer to storm sewer or with the discharge of drains to the ground outside the blind area.
In the outdoor gutter family there is also a division into systems with wall-mounted, hanging and remote gutters, but they only differ in the layout of the water intake. The wall-mounted option we are studying is most in demand as the simplest and most practical.

Hook-shaped brackets are used to fasten drainage systems to rafters, lathing or frontal board of a roof being equipped. Clamps are used to fix horizontal sections of the drain. Together, a set of basic and fasteners makes it possible to quickly and easily, like a designer, assemble and install a drain.
The choice of fasteners for fixing the gutters depends on the type construction works(renovation underway or new construction):
- Long metal brackets are used when installing a drainage system before laying the coating. Attach them to the railings or rafters.
- Short metal brackets are used in the process of carrying out repair work. They are fixed on the frontal board.
- Plastic hooks are used during repairs or in new construction, if a plastic drainage system is being laid. The plastic parts are fastened to the frontal board.
The brackets are fixed with anti-corrosion fasteners with wide caps with a diameter of not more than 8 mm. Fastening is carried out with galvanized screws, self-tapping screws with press washers, ordinary roofing screws. The diameter of the working part of the fastener is at least 4.2 mm.

The hook installation step determines the material from which the drain is made. For metal systems, it varies from 60 cm to 90 cm, for strain-sensitive copper circuits from 30 to 60 cm. Hook-holders are installed under plastic gutters every 50-60 cm.
The gutter system kit can be purchased fully assembled and ready for installation. Its modular elements are produced so that from individual components it is possible to build a gutter for a roof of any size and configuration without any problems with your own hands. Using industrial prototypes as a template, you can make elements from available and improvised materials, for example, from plastic bottles, roofing sheet or polymer sewer pipes.
Downspouts and water intakes come in round, rectangular and combined sections. Rectangular and combined types have a higher throughput. This characteristic is not very interesting for private owners, because for the arrangement of cottages, the option with an oval gutter is often enough.

The size of the drainage system depends on the area of the roof being treated:
- If the roof area does not exceed 70 m², then the gutter must be Ø 100 mm, and the downpipes Ø 75 mm.
- If the roof area is between 70 m² and 120 m², then the gutter is needed Ø 125 mm, downpipes Ø 90 mm.
However, when choosing the shape and section of the system, it is not necessary to focus only on specifications, because gutter plays a significant role in exterior design.
Materials used in production
The specific operation of outdoor gutters limits the choice of materials suitable for the manufacture of systems. It is clear that they will have to endure all the hardships of direct contact with atmospheric phenomena. This means that the elements of the drains must be frost-resistant, "indifferent" to heavy rains, snow deposits and the scorching sun.

In the manufacture of downpipes, water intake funnels and gutters, the following materials are used:
- Roofing steel. In priority, galvanized options, sheet thickness 0.63 mm or 0.7 mm.
- Corrosion Resistant Roofing Steel. An analogue of the previous position, but with a protective and decorative polymer shell. In production, sheet metal products with a thickness of 0.6 mm to 0.7 mm are used.
- PVC. Light plastic gutters are produced from polyvinyl chloride with a wall thickness of 2.2 mm to 3.3 mm.
- Aluminum. Systems are made of light durable metal with a thickness of 0.8 mm. The decorative and protective functions of aluminum drains are performed by a polymer shell.
- Copper. An elite material that pleases with a service life of 150 - 200 years, but cools the dust at a solid price. Wall thickness 0.6 mm.
- Zinc-titanium. A new word in the production of gutters with excellent performance. The price tag is also merciless, but the promised 100 years of trouble-free service make you take a closer look at the indicated trading position with interest. The thickness of the material used in the manufacture is 0.7 - 0.8 mm.
The choice of a drainage system according to the type of material is focused not only on the personal preferences and financial capabilities of the future owner. To a large extent, it depends on the type roofing and architectural features of a private house.

Expensive copper and zinc-titanium options are appropriate on roofs with ceramic tiles, copper sheet roofing, slate tiles. Budget PVC is in perfect harmony with, the steel drain is perfectly combined with metal tiles and corrugated board.
For purely economic reasons, galvanized steel and PVC gutters are most in demand. The first will last 10 years, the second 25 - 35 years, depending on the assurances of the manufacturer. Difficult to single out best option in terms of resistance to atmospheric attacks, tk. their performance characteristics are very similar. However, metal is preferred in the northern regions, and plastic in the temperate climate zone.

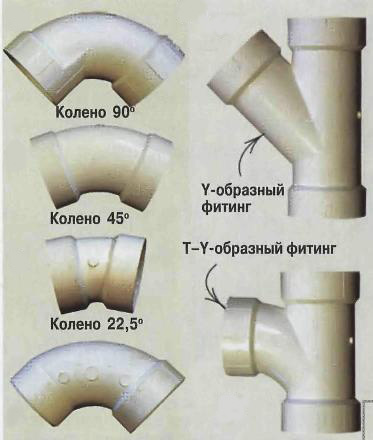
There are no special differences in the design and installation sequence of steel and polymer gutters. Practically identical gutters, pipes, funnels are complemented by bends, couplings, tees, and plugs specially produced for them.
It is only necessary to take into account the fact of linear expansion that occurs when the systems are heated. Polymeric ones are able to elongate 5 times more than metal ones, the linear shifts of which can be generally neglected.
DIY options
The elementary design of the gutter is unlikely to puzzle the home craftsman. Everything is extremely simple: after meticulously executed markings, sheet metal must be cut into strips and bent according to the preferred section configuration. Cutting and bending can be done by hand, but it would be wiser to do it on a bending machine.

Pipes will have to be tricky. They may consist of several links, depending on the height of the pipeline section and the dimensions of the sheet. The algorithm for hand-made production of downpipes looks like this:
- Open. It is carried out with special care and taking into account allowances for roller joints.
- Formation of longitudinal edges. Bends are made along the lines of allowances for rolling seams.
- Rolling blanks. Produced on roller machines or manually using a mandrel: a straight long pipe or bar.
- Roll seam connection. The rolled-out blanks are connected according to the markup and pressed on the previously used mandrel.
- Narrowing of one of the sides of the link. They are narrowed by 5 - 6 mm so that the upper link freely enters the lower element.
- Formation of stiffening rollers. They are formed along the upper and lower edges of the links by rolling the wire. Produced by hand or using a zigmachine.
- Gutter assembly.
Rolling out metal blanks will require the most effort if done manually. Each of the cut blanks is placed under the mandrel and, grabbing the edges, carefully bend in one place.
After making sure that a sufficiently curved plane is formed, the workpiece is moved by 20º - 30º relative to the mandrel used. Then bend again until it takes the required configuration.

It is much easier to make a drain from sewer polymer pipes. They are produced with a fairly extensive range of shaped parts suitable for the construction of complete systems. In fact, home master it will only be necessary to make a gutter by dissolving the whole pipe into two symmetrical parts.

Self-assembly and installation
In new construction, the installation of drainage systems is carried out on a fully prepared solid rough flooring, rafters or a firmly fixed crate. All work on the device of the base for laying the roof by the time of the construction of the drain must be completed.
When carrying out repair restoration of the roofing system, it is necessary to eliminate defects in advance or completely replace the frontal board.
Design and calculation rules
Before starting work, the drainpipe must be thoroughly thought out and a laying diagram drawn. Project preparation will help to correctly calculate the consumption of pipes, gutters, the number of funnels and fittings. It is better to try in advance on the drawing different variants and decide how you can make an impeccable gutter with your own hands so that your own efforts and funds are properly invested.

The configuration of the drainage system in terms of depends on the design of the roof:
- Gables are equipped with two gutters along each eaves. If the length of the slope is not more than 12 m, one funnel is mounted on the gutter in a corner convenient for installing the gutter riser. If more than 12 m, drainage funnels are installed at both corners and one compression funnel in the middle of the slope.
- Sheds are equipped with one gutter. The number of intake and compression funnels is calculated according to the standard rules for pitched planes, as in the previous paragraph.
- Four-pitched equip with gutters around the perimeter. All corners are equipped with water intake funnels. Long slopes are equipped with compression funnels, which are recommended to be placed symmetrically relative to each other.
Compression funnels are needed to provide a reserve for linear expansion when the drain is heated. At the same time, they will play the role of a stiffener and prevent the long gutter from sagging.

The calculation of the number of rotary elements and downpipes is purely individual. It all depends on the area of \u200b\u200bthe roof to be equipped, the height of the building and the length of the slopes. Eat general rules assembly and installation of gutters, which should be taken into account regardless of the type of construction, system material, configuration and dimensions of the roof:
- Installation of the drain is carried out according to the "top-down" scheme. First, the water intake part is assembled and mounted: gutters with funnels, then downpipes.
- Gutters must be installed with a slope in the direction of the water intake funnel. The slope is formed by lowering the system by 2-3 mm for each running meter.
- The overhang of the roof must cover the gutter by 1/3 of its width, so that during heavy rainfall, drops do not overflow through the water intake.
- The outer edge of the gutter should be 2 cm below the line that conditionally continues the slope.
- Between the outer side of the frontal board and the edge of the eaves should be 30 - 70 cm.
If it is not technically possible to install a gutter according to the specified distances, the roof must be equipped with snow protection.
When designing, it should be taken into account that the fastening of the clamps of the gutter riser to the wall sheathed with siding can only be done on the crate.
Installation of the polymer version
Do not forget that polymer elements have the ability to expand when heated. Therefore, we retreat 5–10 cm from the edge of the frontal board on both sides, if the system is linear in shape, and use compression parts on long slopes and corners.

Consider the simplest example installation of a drainage system on one slope with brackets attached to the frontal board. A gutter will be laid along the cornice overhang, ending in a convenient corner for collecting water with a water intake funnel with a riser attached to it.
The actions of an independent installer will take place according to the following scheme:
- Frontal board layout. We mark the attachment point of the extreme bracket under the gutter. Do not forget that it should be 3 × N mm higher than the opposite point where the funnel will be located (N is the distance between the attachment points in m). We mark the point of the central axis of the funnel according to the calculations.
- We install the extreme bracket and funnel according to the markings. It is better to buy a funnel already with a plug located on the required side of the water collector.
- Between installed extreme points systems we pull the twine. It will indicate the mounting line of the intermediate brackets. The bracket closest to the funnel must be removed from it at the distance specified by the manufacturer (5 - 10 cm). According to the markup, we install intermediate brackets.
- Installing the gutter. Its elements are wound into the far edge of the hooks and snapped into place. Factory-made parts have assembly direction marks, limit edges, and alignment marks. temperature regime, indicating in what position it is necessary to connect the parts at specific degrees. We work according to the manufacturer's instructions.
- We equip the edge of the gutter with a plug. If the funnel was bought without a plug, then it too.
The assembly of the gutter riser is usually carried out after laying the roofing. The process can be conditionally divided into three stages: the construction of the transition to the riser, the device of the riser itself and the connection of the outlet.

Final steps assemblies of the drainage system are made as follows:
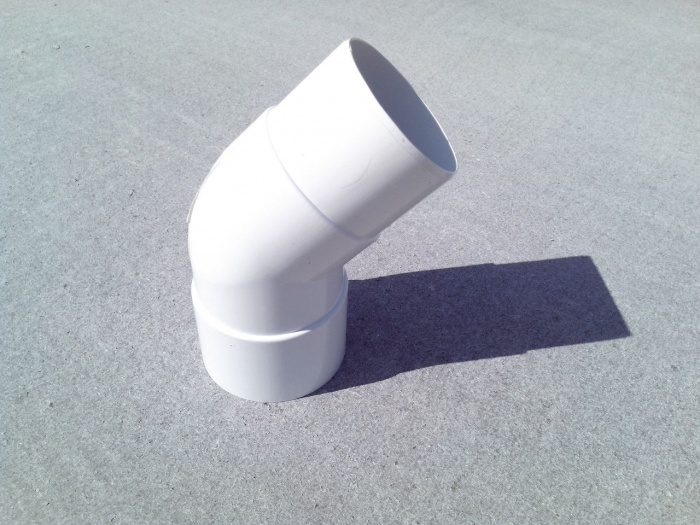
- We put a transition elbow on the funnel pipe. It should go all the way. To go to the drainpipe, two elbows with equal angle. Transitional elbows are released at 67º or 45º.
- We attach a second knee to the wall with an equivalent angle. We measure the distance between them and cut off the pipe of the resulting size. We cut with a hacksaw for metal, we clean the cut from burrs.
- We assemble the transition, fasten the lower knee with a clamp.
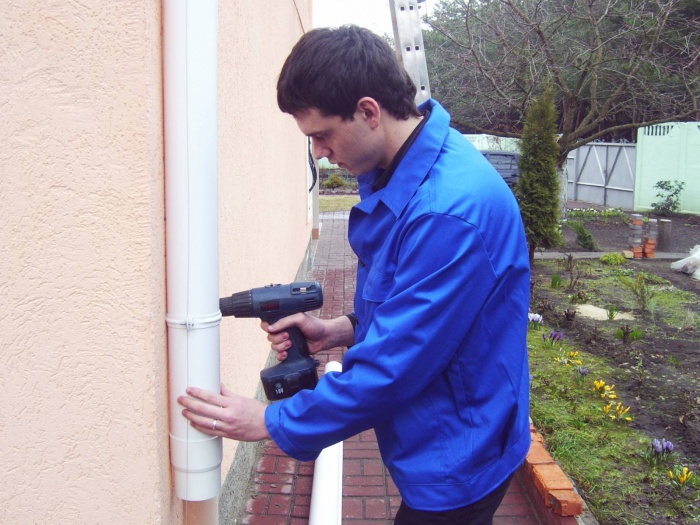
- On the facade, strictly under the funnel, we mark and fix the clamps for the gutter riser. Standard distance between clamps is 1.5 m, maximum 1.7. But it should turn out so that there is at least one clamp for each pipe segment.
- We mark the point for attaching the drain, the lower edge of which should be 25–40 cm above the ground.
- We fix the clamps, assemble the drainpipe. The clamps should not be tightened to the stop in order to leave the drainage system the ability to move slightly with linear expansion.
If couplings were used in the installation, the places of their fastening must be marked in order to fix additional clamps at the marked points. Do not forget that the gutter riser must be perfectly vertical, so we mark up the facade using a plumb line.

Upon completion of assembly and installation works, means of protecting it from clogging are installed. It is advisable to equip the gutter with a grate that prevents clogging from the penetration of debris and foliage. If the drainage system is too light or there was no suitable grate on sale, a net similar to an inverted basket is put on the funnel.
Video to help self-installers
Instructions for installing a plastic gutter system:
The specifics of the assembly and installation of a metal drain:
A detailed demonstration of the manufacture of a drain from sewer pipes:
You can handle the installation, assembly and even the manufacture of a drainage system with your own hands. The main thing is to follow the technological rules and follow the manufacturer's instructions.
Throughout the Russian climate, frequent precipitation is far from uncommon. And therefore, it is customary to arrange a drain in dwellings, which controls and diverts these precipitations away from the roof itself. If the house stands for a long time without a drainage system, its basement, facade and walls are destroyed. There are longer-term consequences as well: a flooded basement, washed-out ground around the house, and other problems. That's why there should always be a drain!
But if you have just purchased a house or cottage and you have a limited budget, you can temporarily make a drain from sewer pipes with your own hands: this is not difficult, and in practice such a system will be reliable. But such small buildings as a gazebo, children's house in the garden or carport, a homemade drain is quite suitable as the main one. And we will teach you how to do it right!
Do you like the idea, but are you worried about how the sewer pipes will be able to withstand the external atmosphere? After all, they are designed to drain water from the house, and mostly underground, and it is unlikely that the manufacturer will take care that such a plastic material tolerates ultraviolet rays well. But, in fact, many gardeners notice that gray and brown pipe trimmings feel great in the open sun for quite a few years.
Moreover, due to the relative cheapness of sewer pipes, you can build drains of the most complex shapes and for a variety of purposes from them:
Your homemade gutter will serve you faithfully no less than an industrial one if you choose the right material for it. Sewer pipes are completely different types, For different parts drainage. After all, you know that the drain is internal and external, and the first is used mainly only for flat roofs. He's just well hidden from sun rays, and therefore almost any sewer pipes are suitable for its device.
But for a gable or shed roof it is important for you to learn to understand the material.
White pipes - for internal drains
White pipes are used for the installation of sewerage systems indoors. Their material is designed mainly for high temperature water and has high level soundproofing.
It is possible to use white pipes as a drain only in those areas where the winter is warm and mild, because. such plastic will not withstand sudden changes in temperature. So for now, forget about this option.
Gray pipes - for warm winters
Gray pipes are the most common. They are also used inside the house, but their plastic is already stronger. It is designed for high temperatures, but does not tolerate frost and physical exertion.
Therefore, if you live in the southern regions of Russia, where the climate is quite mild and there are almost no frosts, it will not be a problem for you: how to make a drain from sewer pipes of this color and how long it will last you. Just do not forget to constantly clean them from snow and ice so that they do not crumble.
Brown pipes - for hard frosts
And here brown pipes are used when installing sewerage systems already outside. They are distinguished by a thick wall, which remarkably tolerates sub-zero temperatures and high pressure with a water mass.
The only thing such pipes are not adapted to is the hot water temperature. After all, it is calculated that the sewage runoff from the house, before it enters the brown pipes, after the white and gray ones, is already cooling down, plus the cooler air temperature outside will complete its job. Such pipes perfectly tolerate loads from snow and ice, are strong enough, but do not withstand direct sunlight for a long time and become brittle over time.
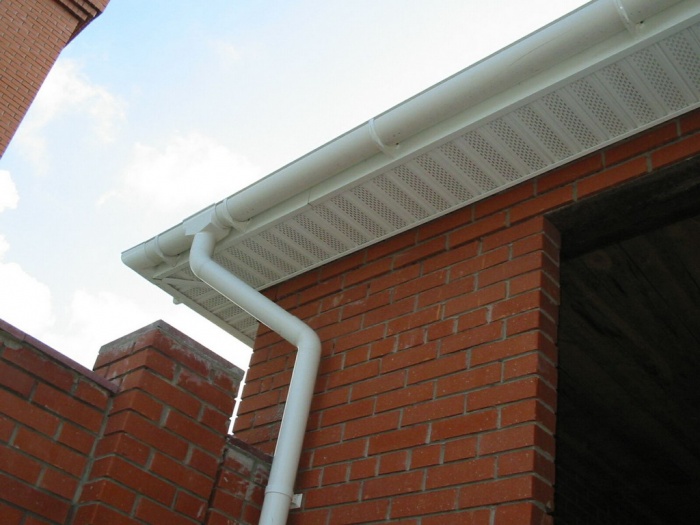
Here's what a pretty drain is obtained from a brown sewer pipe:
Home craftsmen are especially pleased with the fact that the price of one sewer pipe is less than that of a gutter of the same length. But from one pipe you get two whole gutters!
How to design a future drainage system?
In terms of terms, a gutter system is a complex of gutters and pipes that collects and removes water from the roof. A gutter system, or drain, is also often called a separate gutter or pipe. And now let's figure out how to make a good drain for your home from the pipes you purchased. First you will need to draw up a sketch and calculate the dimensions of all the details.
How to make a gutter for a pitched roof?
So, you will need a certain number of gutters, which are easy to calculate based on the parameters of the roof perimeter. You will install brackets for every 10 meters, 17 pieces. The outlet has exactly the same length as the sum of the drain pipes. You will also need funnels, pipes, 1 piece for every 10 meters, corner elements, a plug, couplings (exactly 2 times fewer pieces than gutters), elbows, the number of which will depend on the complexity of the eastern system itself.
For you most simple option it will be easy to draw a diagram of the future plumbing on a piece of paper. So, outlet pipes with funnels are usually installed every 12 meters. If the side of the house is smaller, place them in the corners, and only two of them will be enough. Take waste pipes with a diameter of 50 millimeters, and purchase an adapter tee 110 by 50 mm. The size of one plum can be 10 centimeters, which is quite enough for the roof of a private house. From one pipe you get two trays of the same size.
Next, you will need to muffle each end of the gutter. Take a revision plug or a regular one, cut into two parts. That's when you already have all the elements on the sheet - count the total number:
- With a roof slope area of up to 50 square meters you will need a pipe with a diameter of 80 millimeters.
- At 125 square meters, this is already 90 millimeters.
- With more than 125 square meters, you need to take a pipe of 100 millimeters.
You will choose funnels and adapters, having already decided on the diameter of the pipes. Therefore, at this stage, already draw up a sketch of the future water supply and mark out suitable places for locating drains and mounting gutters. Once you have the whole scheme ready, you can purchase the material.
How to make a gutter for a flat roof?
So let's figure out how to make and install a drain from sewer pipes for a flat roof. Yes it is possible! There is a big bonus here: the drain will be built into the wall, and it will not be outside. Therefore, sewer plastic is not afraid of either frost or destructive UV rays.
Your main task is to make sure that water flows easily from the roof to one place, in its center. That's where you just need to install a drainpipe, or even several. The only thing you have to take care of is to insulate such a pipe, or place it in special insulation so that condensate does not collect on it. And after installing the funnel, just cover it with a grate so that it does not clog.
How to make a mount for a homemade drain?
To secure a homemade drain, you will need brackets. You can purchase them ready-made or make them yourself. The only difference will be that many types of ready-made brackets are designed for the same ready-made downpipes.
See how their edges are folded over so that the bracket can easily snap onto them. But if you attach just a cut sewer pipe, it does not have such a rim on the side. And therefore, it is better to purchase one bracket for testing, and try on the pipe - will it hold? That is why, when making a homemade drain, many craftsmen make the brackets themselves - these are more suitable and often turn out to be even more reliable.
Ready-made brackets for drainage systems
Ready-made metal brackets must be bent using a special tool so as not to damage polymer coating. After all, if there are small microcracks, water will easily get into them and corrosion will begin. And this already at times reduces the reliability of the entire drainage system!
And here are the finished plastic hooks on a homemade drainage system:

This mount is well suited for organizing the drainage of gazebos:

Homemade fasteners: we select and manufacture
And the strong fasteners that come with the sewer pipes are also quite suitable for the drainpipe. Moreover, they are designed to withstand the weight of water, and therefore more durable, and go well with the color of the pipes themselves:

If you're going to make the mount yourself, you'd better get a special hook bender, or at least a small vise. Once you've hammered in one hook, bring it up to the overhang and check the angle of the hook. The chute mounted on it should then be located strictly perpendicular to the ground. It is important to bend the bracket so that the front edge of the gutters is only 2mm below the rear. Only in this way the water, if it overflows the gutter, will come out through the outer screens, and will not flow along the walls of the house.
Bending hooks with a regular vise is exhausting. The fact is that the clicks of the vise do not completely clamp the holder. Therefore, experienced craftsmen prefer to make a tool for bending metal gutter holders on their own. Here is the simplest instruction:
- Step 1. We take the usual metal corner with a wall thickness of at least 6 mm, or a channel of the same parameters.
- Step 2. In the channel grinder, a slot of such a length that it is equal to the width of the gutter holder.
- Step 3. We take a square pipe in which the inner walls are slightly larger than the width of the gutter holder.
- Step 4. Now on all the holders we mark the places of the fold. After that, we put the holder into the square pipe, take wooden block and forcefully insert it inside the pipe.
- Step 5. We set the required bend angle.
- Step 6. Now insert the holder into the slot and align it with the marked fold point.
- Step 7. Now we knock out the bar with another piece of wood from the opposite end of the pipe.
- Step 8. If there was already paint on the handle, it will also crack a little, but it can be corrected. But in the final result, the quality of the joke will be much higher than that of those curved with a vice.
By the way, here is a wonderful master class on how to make such hooks even faster and easier:
Another interesting option bend hook:
- Step 1. We make a grinder with a very small risk with a depth of 1 to 2 millimeters.
- Step 2. We nail one nail or one self-tapping screw through the hook into the rafter and bend the hook itself. It will bend exactly along the filed line, and will not break over time.
Once all the fasteners are ready, go around your house and see how you best fix it all.

Of course, it is desirable to install the gutter before you cover the roof. The following illustration will help you understand the installation of the mount:

Converting pipes into drains
Now let's prepare the sewer pipes themselves. You will need to cut them lengthwise. From one pipe you will get two excellent identical complaints. In practice, everything is quite simple! To make the cut smooth, follow these instructions:
- Step 1. Lay the pipe on the boards, and attach the wall at the bottom with a self-tapping screw at both ends.
- Step 2. Connect the screws with a thick thread and mark the place where you will cut the pipe with a permanent marker.
- Step 3. Remove the thread and cut the pipe with a grinder.
- Step 4 Now do the same on the other side. The only difference will be that now you will need two self-tapping screws.
Here is a great step by step master class:

Our advice: if you work with a grinder, be careful! The melted plastic is actually very hot, and can even burn your hands. Yes, and flying particles can hurt the eyes. Therefore, when cutting sewer pipes, be sure to wear gloves and goggles. As home craftsmen note, sewer pipes are also easily cut with a jigsaw or wood saw, and all the difficulty lies only in the correct marking of the longitudinal marks for cutting. But it is most convenient, of course, to make gutters from sewer pipes with a grinder with a thin circle for metal.
And connecting the finished elements is quite simple:

You will be interested to know that instead of ugly vertical pipes, you can use ... chains. This is quite a popular way! The principles of such a drain are quite simple: the chain must be firmly connected to the gutter and the base.
At the same time, it is pulled so that it cannot move to the side, and for this, most often it is buried in concrete base or in the ground. A small canopy protects the facade from water splashes. Looks amazing!

The advantage of such "drains" is that they are less visible against the background of the house and do not interfere with its exterior. In addition, they are usually complemented by spectacular decorative elements. Moreover, today it is fashionable not just to lower the chains down, but to create complex spatial forms from them, and even alternate with decorative bowls made of ceramics or plastic.
The only inconvenience is that modern manufacturers plastic gutters do not produce special elements for connecting the gutters to the chain. But, since you make your own drain, and you yourself are already acting as a manufacturer, then there is no limit to your imagination! And it's convenient: you will have to tinker with cutting and connecting only the horizontal elements of the drainage system, and lower the elements of beauty already down. Why not?
Stage # 2 - installation work
Now we will install our drain from the sewer pipes:
- Step 1. To begin with, the shortest and longest bracket must be fixed to the front board of the eaves.
- Step 2. After that, connect the gutters with a slope of 3 mm for every 50 cm so that rainwater arrives at the very center. Please note that the edge of the roof must necessarily fall in the middle of the gutter so that snow and ice do not damage the gutters in winter and the rainwater itself hits the target.
- Step 3. Once all horizontal gutters are ready, install pipes to drain water.
- Step 4. Fix such pipes to the wall, and leave a gap of 20 to 80 centimeters between them and complaints. Here there will be a tee and an elbow, which will provide the transition from the gutter to the pipe.
- Step 5. Now cut two pieces of pipe 5 centimeters each, which will serve as your connectors. Install each connector and secure with self-tapping screws. Lubricate silicone sealant attachment points to protect them from rainwater.
- Step 6 Fasten the vertical pipes to the wall using brackets with clamps. For each meter of such pipes, you will need only two fasteners, which is not at all a lot.
- Step 7. And at the very end of the pipe, below, install the elbow. This is necessary so that water does not get under the foundation. It should be located at least 30 cm from the wall.
- Step 8. And finally, close the end of the gutter with plugs, which you simply cut in half.
This is how the installation of a drain on plastic hooks looks like:

When installing the drain, do not clamp all the details too tightly: a little mobility is needed so that the whole structure changes slightly under the influence of temperatures.
Fasten all gutters to the brackets with self-tapping screws. And so that later the pipes do not twist under the influence of sunlight, fix them with antennae on the brackets, or install spacers.

At the stage of final work, you will need to think about how to connect your homemade gutter system to the storm sewer. To do this, an audit should be made on the downpipe - this is a segment with a hatch and gratings that will collect all the garbage from the gutters. After all, it is important that only rainwater then goes into the sewer, without all this goodness, and does not clog the subsequent more complex system.
There are also alternative options: connect additional drainage pipes, and those will already communicate with the sewer or with the storm water inlet. The advantage of the latter is that it has a valve that does not let in odors and collects large debris in a special removable basket.
Some subtleties and nuances that are important to know
When installing a homemade drainage system from sewer pipes, keep in mind that all PVC products change their physical parameters with temperature changes. Therefore, it is very important that the gutters can move freely in the brackets. And for this, try to leave at least 9 centimeters from the junction of the gutters to the bracket. Also, the ends of the gutters must be tightly joined.
To prevent your downpipes, made so carefully with your own hands, from getting dirty and clogged with foliage, install a regular plastic mesh on top. It will pass water, but leaves and branches will not:

The owner of a finished industrial drainage system usually does not think about it, believing that manufacturers always take everything into account themselves. But when you do something with your own hands, you always want to do it with high quality, and you won’t forget about such details.
Why it turns out in practice that often home-made drainage systems turn out to be both stronger and more durable. Moreover, some craftsmen also manage to be creative, for example, to get water into their garage with the help of a drain - catch a great idea:

If you live in a region with snowy winters, install an additional heating cable in the gutters. Do not worry about the material of the sewer pipes: they are just designed for temperatures above average, so the cable will not harm them in any way.
There is one more important rule: Do not install gutters when the temperature is below freezing. After all, when the air temperature rises higher with the onset of spring, the pipes will simply twist. In any case, even just in cool weather, it is important to calculate all expansion joints and gaps so that the system does not “play” later.
Usually this does not happen because industrial versions of drainage systems have special serifs inside the parts that help to correctly connect the elements at a specific air temperature. But in the case of sewer pipes, you have to do everything on a whim.
Issues of aesthetics and stylistic unity
There is such an interesting architectural element - gargoyles. These are the heads or bodies of fantastic animals with open mouths, which usually end in a gutter. In other words, these are "terribly cute animals" on your roof.
Of course, in a finished industrial gutter system, such decorative aspects are rarely implemented, there is more emphasis on practicality. But, if you make a drain yourself, why not design it more spectacular, agree?
What happens if there is no drain on the roof of the building? The walls of the building, the ground around, as well as the foundation will inevitably become waterlogged and will last much less than is possible with a drainage system. Manufacturers of such systems now offer a huge variety of products: light, durable and easy to install. Minus - such a "designer" can be quite expensive.
However, home craftsmen have found a way out, and now you can arrange a drain from sewer pipes with your own hands. The main thing is to calculate everything correctly and choose the right sewer pipes.
The principle and advantages of a drainage device from sewer elements
In the warm season, sometimes whole streams of water fall on the roof of the house. In winter, in many regions, the roof turns into a kind of snowdrift, which can melt quite quickly under the spring sun. But a residential building or a serious outbuilding should not turn into a kind of waterfall.

Roof gutters - optimal solution for removal of rain and/or thawed liquids. Organized streams can simply be sent to the drainage, sewer system, or collected and later used for garden / garden needs.
An excellent solution to the problem of draining wastewater from the roof of a private house is a drain for the roof from sewer pipes. The key advantage is savings. Polyvinyl chloride (well-known PVC) sewer pipes are inexpensive, and connecting and auxiliary elements(fittings) for such pipes can really easily be used in the construction of a drain.
A simple example: gutters from sewer pipes are pipes sawn into halves along, and from tees, after a little refinement, excellent drain funnels are obtained.
"Cutting" plastic pipes is easy, this is done not only with the help of a grinder, but even with an ordinary hand saw. Sewer pipes are light in weight, which facilitates transportation, moving elements, as well as installation work.
Do-it-yourself drainage system from sewer pipes is mounted very simply. We need the following set of tools and fixtures:
- self-tapping screws and a screwdriver (screwdriver),
- tape measure and level for the installation of the required slope of the gutters,
- hacksaw (for metal) or grinder for turning pipes into gutters,
- a file for cleaning the edges of homemade gutters and other elements.

To design and mark the slope of the drain, you need twine, and to climb to a height for installing gutters, you need a stepladder or something like scaffolding.
The strength of all elements completes the list of advantages of PVC pipes for installing a drain. PVC is resistant to low / high temperatures and mechanical stress, does not “suffer” from ultraviolet radiation, is durable, and with the careful execution of the entire system, it is also quite aesthetic.
Experienced home craftsmen are able to mount gutters with their own hands from sewer pipes so skillfully that it will be almost impossible to distinguish the design from the product from the original elements.
How to calculate the scheme and materials for the drain?
The best assistant in this difficult process is visibility. Ideally, you will need a large-scale sketch of all the facades of the house, and if the roof is complex, then in addition - its plan. Everywhere you need to specify the dimensions. In this way, it will be possible to most accurately represent the future drainage system.

Here are some tips for future calculations:
- Number of gutters = roof perimeter + small margin. Since it is planned to use a gutter from a sewer pipe, it is important to remember that one pipe is two gutters.
- Gutters are fastened with standard metal brackets. On straight sections, one gutter fixing per 0.5 m of the structure is sufficient. Plus additional fastenings at the turns of the gutters and at the points of vertical drains.
- Vertical drainpipes are placed approximately one for every 10 - 12 meters of the roof perimeter. With a house facade length of less than 12 meters, the pipes can simply be placed in the corners, some redundancy is not terrible here. The number of vertical downspouts is multiplied by the height from the gutter to the drain point (after all, it can be either an underground drain or a barrel of water). The final number will show exactly how many pipes are required for the verticals. The number of holders for vertical pipes is calculated last (usually one holder per 0.5 m of drain).
- Instead of funnels through which wastewater flow from the gutters into vertical pipes, fittings are required. They are being finalized by cutting off a part without a branch.
- Some standard drain elements - external and internal turning corners - will still be required if the roof has a complex structure. In many cases, gutters can be arranged in separate horizontals (gable roofs are usually an example).
- Particular attention in the calculations requires connecting elements and plugs. For greater accuracy, it is possible to outline all potential joints of gutters and other elements on the roof diagram, and only then make calculations. In standard use, PVC sewer pipes are connected in a socket way, but when installing a drain, aluminum clips or special glue will be required for fastening. A small margin must be added to the final number of connecting elements. The number of plugs for the gutters is equal to the number of dead ends.
- When mounting funnels from fittings, rubber gaskets will be required. Only they provide the necessary sealing of the junction of a homemade funnel and a vertical drainpipe.

The key point remains, which concerns the diameter of the sewer pipes. Traditionally, gutters are made of pipes with a diameter of 110 mm, and pipes with a diameter of 50 mm are used as verticals. Fittings are selected accordingly.
Installation of a drainage system
- At the first stage, gutters are prepared - pipes are sawn, their edges are polished.
- Then the marking of the place of attachment of the future drain begins. Brackets are mounted taking into account the required slope.
- On the prepared route, they begin laying and connecting the gutters, not forgetting to equip funnel-fittings in the right places.
- The installation of vertical drain pipes is completed with their fastening to the wall of the building.

An interesting point is the possibility of protecting the drain from sewer pipes from clogging (fallen leaves and other natural debris). For the device of such protection, any flexible mesh is suitable, which can be cut into strips of suitable size and then laid over funnel fittings.
If desired, such segments of the grid can be laid around the entire perimeter of the gutters, this will facilitate the removal of debris during the further operation of the drain.
Do-it-yourself roof drains from sewer pipes are perfect solution for private households. A properly designed, calculated and executed system will last for a long time, be easy to operate, and, if necessary, repair will not require serious costs.

Plastic pipes, having appeared on the modern market, immediately took their leading position. But the most important thing is that today they are used in many construction processes, if I may say so, not for their intended purpose. And the technical characteristics of the products are to blame for this. Namely:
- ease of assembly without the use of any tools, because they are connected according to the type of socket system;
- small specific gravity, which makes it easy to carry them or lift them to high platforms;
- cheapness, when compared with metal, glass, asbestos pipes, and so on;
- they are easy to process, they are perfectly cut both along and across with a grinder, a hacksaw and an ordinary saw;
- can be used in all systems where water flows;
- service life of more than 50 years.
God himself ordered the use of plastic pipes in the manufacture of such a system as a drain for a private house. Making a drain using plastic pipes is simple, cheap, and even, one might say, beautiful. By the way, the surface of plastic pipes is easy to paint, so make a drain out of them with your own hands that fits perfectly into the design of the house and the entire landscape. suburban area, it will be easy.
We buy materials for drainage
So, the first thing to do is to purchase the required number of plastic pipes, as well as additional elements for the drainage system, and these are fittings, clamps, brackets, and so on. Although, if the conversation is about how to make a drain with your own hands, then we will try not to buy anything but pipes and fittings, but to make everything from improvised materials.
It is necessary to make an approximate calculation of the number of pipes. They will be used for the manufacture of gutters installed under the eaves of the house, and the actual pipes for the risers of the drain. As for the gutters, their number is determined by the length of the eaves. And since each plastic pipe will be cut into two parts (the cut will be made along), the number of pipes for the gutters is halved. Of course, you will have to take into account not the length of the pipes itself, but the segment without sockets.
This means that it is necessary to measure the length of the eaves, divide this figure by two, and the total length of the gutters is obtained. This value must now be divided by the length of one pipe, which has a maximum size of 6 m.

As for the pipes of the downpipes, they do not need to be cut, they are installed into each other using a socket connection system, where a rubber cuff (seal) is used. Their number will depend on two indicators:
- the height of the walls of the house;
- number of drains.
The height will have to be measured with a tape measure from the ground surface to the eaves. It is necessary to subtract 25 cm from this value - this is the standard recommended distance from the drain to the ground. Now the result is multiplied by the number of risers. How to determine how many risers should be in the drainage system of the house. Here, first of all, the area of \u200b\u200bthe slopes of the roofing system is taken into account. The larger the area, the more water will flow into the drain. And this volume will have to be discharged by the number of risers. Minimum distance between them - 5 m. But if the house is small, then the installation is carried out at the corners of the building. For example, if this is a house with gable roof, then four risers will be enough.

Now with regard to the diameter of plastic pipes. There is a certain relationship between the diameter and area of the slopes. Look at the table.
As practice shows, the optimal decision of choice is the second position. Make no mistake.
So, the number of plastic pipes for the drain has been determined, their sizes have been selected, and purchases can be made. But before that, let's decide on the number of fittings. As for the knees (bends), much will depend on how the roof overhang is located, whether there is after it decorative elements. Therefore, there will be either two or four branches in this section. Let's add drain bends here, it is better to use with an angle of 45 °, they are also called half-bends. Do not forget about the knees in the tray system, they are usually installed at the corners of the building if it has a multi-pitched roof, for example, a hip roof.

As funnels, you can use expansion elements in this gutter structure, which are included in the category of fittings. They are usually called adapters, but it is better to purchase ready-made funnels for drains. They cost a penny, so you can go broke on them. Their number is equal to the number of pipe vertical risers.

How to make DIY fasteners
Now we turn to the mounting part of the drainage system of the house. There are two varieties of them:
- brackets for gutters;
- and brackets for pipes risers drain.
The first can be made from a metal strip with a thickness of 2-3 mm and a width of 20-30 mm or from a wire with a diameter of 4-5 mm. You just need to bend the metal profile under required size and form. Approximately the same as shown in the figure below. The shank of the bracket can be bent or be as shown in the photo, all this will depend on how it will be attached to the supporting element of the roof.

As for the brackets with a pipe clamp for the riser, it is more difficult to make it yourself, so the advice:
Advice! Buy clamps at a hardware store, they are cheaper than funnels. In addition, you can select them by color so that it matches the color of the pipes.
Do-it-yourself installation of a plastic drain
So, everything is ready, you can go directly to the installation process. It starts from the top, that is, with the installation of gutters. How to do it all right?
- A place is determined that will be exactly in the middle between the risers of the structure. This is the highest point in the drainage system.
- A self-tapping screw is screwed in here. Please note that the tray itself must be installed in such a way that the roof overhang, or rather, its lower edge, exactly falls into the middle of the axis of the folded gutters. A slight deviation in one direction or another is permissible.
- Now you need to determine the lowest point of the drain system. According to SNiP, the angle of inclination of the drain is set, which is 2-5 mm per linear meter of the length of the structure. It turns out that if the distance between the risers of plastic pipes is 10 m, then the lower point should be 2 cm lower than the upper one. This is if a difference of 2 mm is taken into account.
- At this point, the bracket is installed and secured.
- After that, a fishing line is pulled between the bracket and the self-tapping screw at the top point, this is the line for installing intermediate brackets, the distance between which should be within 50-60 cm.
- We fix the intermediate and upper fasteners.
- We turn to laying plastic gutters with our own hands. We start from the top point.

Attention! There is one point that will simplify the installation of plastic pipes and make the drain more durable.
To do this, it is necessary not to cut the pipe sockets along to the end. They are best left as a lock connection. By the way, this will use a rubber cuff located inside the socket, which will ensure the tightness of the connection.
Do-it-yourself drain from plastic pipes - assembly of risers
This process is no different if plastic pipes were used, for example, to assemble a sewer system. Everything is exactly the same, only in the vertical direction. You need to start from the bottom, stepping back from the surface of the earth by 25-35 cm.
- A plumb line is suspended from the funnel, showing the installation line of the risers.
- Clamps are installed along the line directly along the wall, which are attached to the supporting element of the house with self-tapping screws.
- The distance between the clamps is 1.8-2.0 m. If the drain, or rather, its riser, rises above 10 m, then it is better to reduce the distance between the fasteners to 1.5 m.
- The distance from the lower end of the plastic pipe installed first to the fastener is 25-30 cm.
Now the pipes are inserted into the clamps and fixed to them. The connection itself is made by inserting the edge of the upper pipe into the socket of the lower one. no sealants and adhesive composition, everything is hermetically connected with rubber gaskets.
As you can see, it is not very difficult to make a drain from plastic pipes with your own hands. The main thing is to accurately calculate, measure and install everything. If some element does not fit somewhere, then everything can be adjusted, because plastic pipes are easily cut.
During construction country house immediately before the installation of the roof, it is necessary to install a drainage system. Its main purpose is the collection and removal of rain and melt water. This prevents the destruction of the walls of the building and the foundation. To build a drainage system, or, as it is also called, a storm sewer, you can use ready-made structures that are sold in specialized companies. But if you want to save money, it is much cheaper to make a drain from sewer pipes with your own hands. But here you have to make a lot of efforts with preliminary calculations.
Manufacturing technology
Sewer polymer pipes may well serve as drains. For the manufacture of gutters, the pipe must be cut lengthwise in half with a grinder or a hacksaw. After their joining, an excellent tight connection is formed.
Note! Sewer pipes will serve as a drainage system for many years, because they are designed for aggressive drains.
So, to do the work yourself, you will need the following material:
- Gutters. They will be made of polypropylene sewer pipe Ø110 mm.
- Water pipes. To do this, you will need to purchase pipes Ø50 mm.
- Tees that will connect pipes into one system. On both sides, the tee will have Ø110 mm, and on one side Ø50 mm.
For successful work, it is important to clearly consider the design of the drainage system from sewer pipes. To make the right purchase, it is recommended to draw up a project. For this you need:
- Measure the perimeter of the roof. Based on this data, you can understand how many gutters will need to be mounted. Consider the fact that the purchased pipes will be sawn in half, so you need to buy half as many pipes as the measurement will show.
- Consider a drainage system. This will require pipes Ø50 mm. Their number will be determined by the height of the building, as well as by the number of downpipes.
Note! The distance between the gutter risers on average should be at least 5 meters!
Installation work
For successful installation of a drainage system from sewer pipes, it is necessary to perform all the work in the following sequence.
First of all, plastic pipes Ø110 mm are sawn lengthwise. To do this, you can use the grinder. To make the gutters the same size, wooden templates are pre-made.
The inlet pipes on the pipes should not be sawn, a distance of 15–20 cm must be left.
When the drains are ready, it is necessary to proceed with the installation of brackets. They are mounted on supporting rafters.
Can be used as brackets prefabricated structures which are made of durable sheet metal. Also, brackets can be made independently, but this will take more time.
Note! The bracket is mounted on each of the walls. It is important to maintain a clear slope angle, otherwise the water will stagnate. As a rule, the slope angle is 1 cm per 1 meter of pipe.
First, mount the extreme brackets, and then pull the thread between them, which will help maintain the correct slope.
Next, mounts for the downpipe are installed.Note! The drain pipe should extend from the wall by an average of 10 cm.
When all the fasteners are in place, you can assemble the drainage system into one. Gutters made from sewer pipes can be fastened together with aluminum clips or special glue for polypropylene. When using clips, each joint of the gutter must be treated with a sealant.
The assembly of the tee is carried out according to the same principle as the assembly of sewer pipes. For docking, also use sealant.
A plug is installed at the highest point of the drainage system.
You can assemble the entire structure on the ground or directly on the mounts. The choice is yours. Most importantly, follow all existing requirements regarding the assembly of a drainage system from sewer pipes.
Note! key point there will be a pipe outlet away from the building. Otherwise, water will enter the foundation and gradually destroy it.
According to this principle, the installation of a drainage system on the roof is carried out.
Gutter construction on a flat roof
What if your home has flat roof. Is it possible to use sewer pipes for the manufacture of a drainage system in this case as well? Yes! To do this, you must first embed the pipes in the masonry. In this case, external gutters and gutters will not be needed. The roof surface is initially made so that all the water is collected in one place. This is where the drain pipe will be installed. The only condition for using sewer pipes in this embodiment is to place them in insulation. This will prevent large amounts of condensation from forming.
Note! To protect the pipe from blockage, the funnel can be equipped with a protective grid.
Watch a helpful video and photo that will help you carry out the entire process.
Video
This video shows how to cut plastic pipe along: