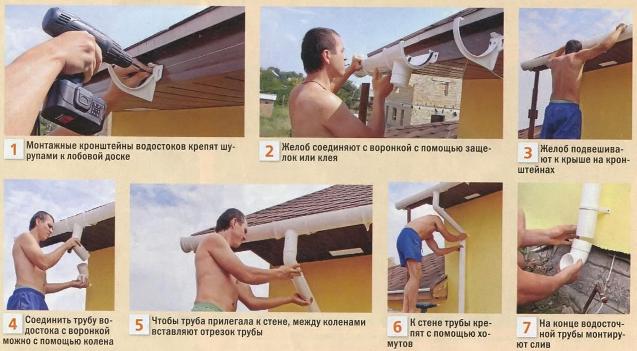
Gutter mounting options. Do-it-yourself installation of a drainage system. Types of drainage systems and features of materials
To organize the drainage of water from the roofs of houses, various drainage systems are used, which are a structurally articulated set of elements that protect the basement and external walls from waterlogging. In addition to performing a protective function, modern gutter systems allow you to decorate the house and diversify its design. In this article we will tell you how to fix the gutter to the roof and wall.
For reliable fastening to the structure of all parts of the drainage system, special fasteners are used.
Types of fasteners
The following types of fasteners are used for fastening gutters:
- Brackets. Allows you to fix the gutters. The size and shape of the brackets depends on the shape and overall dimensions used gutters.
- Clamps. They are attached to the walls and allow you to fix the drain pipe. For different types walls (wooden and brick) various clamps are used. The shape and size of the clamps depends on the type of drain pipes used. The most commonly used metal clamps are fastened with a single, and long, hardware. Clamps made of plastic have 2 attachment points.
Ways

Gutter fastening methods

To fix the gutters, brackets are used, which are mounted in the following ways:
- On the front board. This method used when the installation of the roof is fully completed. This is the only way to fix the brackets without additional dismantling of already installed roof elements.
- On rafter legs. In the absence of the so-called frontal board, the brackets are attached to the rafter legs.
- To the roof deck. In this case, special elongated clamps are used, which are fixed at two attachment points and allow the brackets to be securely fastened to the mounted roof lathing.

When mounting the brackets, self-tapping screws are used.
Methods for attaching drain pipes

To fix the drain pipes, clamps are used, during installation of which the following should be taken into account:
- To ensure a reliable connection, the fixation depth of the hardware must be more than 60 mm, while it must go into the wall, and not into the insulation.
- It is necessary to provide a certain distance from the facade wall to the drain pipe.
- After fixing the downpipe in the clamp, it should not over-compress it. This is especially important when using pvc pipes, changing their dimensions due to temperature fluctuations, which can lead to the appearance of cracks and destruction.
Installation

If you do not have the desire and the necessary skills to install the drainage system on your own, then in this case it is better to involve specialists. Given that this species installation is a fairly simple task, you can decide on self-installation roof drainage system. The presence of an assistant will greatly facilitate the installation process, but, in extreme cases, the work can be done alone.
For installation work in addition to the ladder, you will need a set of tools:
- building level;
- roulette;
- plumb;
- building cord;
- ruler-gon;
- hacksaw for metal.
Installation of gutters

The position of the drains relative to the roof overhang should be as follows:
- the overhang should protrude relative to the edge of the drain closest to the house by 25–65%;
- the far edge of the drain must be below the visual plane of the roof (for a wavy roof, the plane is determined by the lower wave).
For high-quality water drainage, it is required to ensure the slope of the gutter in the direction of the drain, with a value of 0.2–0.3%.
Installation sequence:
- Mark and attach the outermost two brackets (first and last), taking into account the required slope.
- Stretch the construction cord between the first and last bracket. This will make it easy to mark the installation locations of the remaining brackets.
- Install the remaining intermediate brackets (in increments recommended by the manufacturer).
- Fasten the drain funnel of the drain (along the line of the cord).
- Install gutters. Install plugs where necessary. If there are protective nets, install them in the drain funnels.
Installation of drain pipes

Produced in compliance with the following rules:
- Installation of pipes is carried out in the direction from the bottom up.
- Under the hardware on which the clamps will be mounted, it is necessary to drill holes of the appropriate diameter.
- The installation step of the clamps is 1.8 meters.
- Each pipe should be fastened with a separate clamp, with several clamps installed on long pipes (according to the recommended pitch).
- The lower pipe is led into the storm sewer, and in its absence, the lower elbow is mounted.
- The top pipe will connect to the funnel.
A properly selected and securely fixed drainage system will provide full protection for your home from waterlogging of the walls and basement, decorate and preserve appearance buildings for many years.
Video
Learn how to mount a gutter system using the example of installing a plastic gutter:
One of the important stages in the construction of a private house is the arrangement of a reliable drainage system, which is designed for the timely collection and removal of precipitation from pitched roof, additional protection of wall structures and foundations from the negative effects of moisture.
To ensure a long service life of the finished structure, the correct installation of the drainage system provides for compliance with the technology of work and a number of important recommendations, which will allow you to create a complete functional system to remove rainfall.
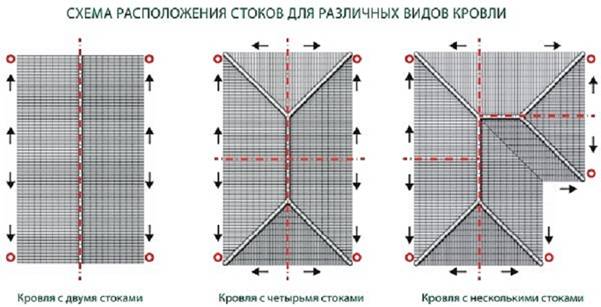
Types of drainage systems
Modern drainage systems for a private house or bath can be classified according to the following criteria: cross section, production method and material.
Gutters are factory and homemade:
- Factory models are produced in compliance with the established parameters, standards and requirements that apply to structures of this type. In addition, it is possible to assemble a finished system from structural elements of various manufacturers.
- Homemade models can be made with your own hands from available materials according to individual schemes. In addition to the availability of manufacturing, such systems are cheap and easy to install. Significant disadvantages include the difficulty of docking home-made and factory elements in the event that it is necessary to replace a worn part with a new one.
The main elements of drainage systems can have a different cross-sectional shape:
- Rectangular.
- Round.
- Square.
The cross section determines the efficiency of the system operation in certain climatic conditions. Round drains are classic, therefore they are suitable for operation in all regions with different levels of humidity and rainfall.
Plastic gutters
For the manufacture of plastic gutters are used durable and reliable polymer materials, resistant to the negative effects of precipitation, chemical substances, corrosion, ultraviolet radiation and decay.
Application modern technologies allows you to create durable gutters of various configurations and shapes.
The main difference between plastic and metal systems is the presence of longitudinal guides on the inner surface of the elements. They provide additional rigidity of the structure and quick drainage of wastewater. Cross guides on the outside help to increase the strength and wear resistance of each element of the system.
According to the installation method, the system can be glued (fixed with a special adhesive composition) and glueless (installation on seals).
The main advantages of a plastic drain include:
- Resistant to UV radiation, fading and corrosion.
- High strength and wear resistance.
- Light weight of structural elements.
- Wide operating temperature range: from -38 to +65 degrees.
- Simple and fast installation.
- Wide range of colors and variety of shapes.
- Affordable Maintenance and care.
- Low cost of the finished system.
Among the disadvantages of drainage, the following points can be distinguished:
- Susceptibility to mechanical damage and extreme loads. Such a system is designed only for low-rise buildings.
- Low maintainability. Destroyed or deformed elements cannot be repaired, therefore, they require a complete replacement.
- The glueless version of the system requires the timely replacement of worn seals, which entails the complete dismantling and reassembly of the entire drain structure.
- Propensity for significant linear expansion.
Metal gutters
Modern metal drainage systems are made of galvanized steel (with polymer coated and without), copper, titanium-zinc and aluminum alloy. The differences are in the cost of materials and components, as well as their service life.
Such systems have a number of significant advantages:
- High strength and reliability.
- Resistance to extreme mechanical, wind and snow loads, as well as the negative impact of other external factors.
- High fire safety.
- Wide temperature range: from -58 to +125 degrees.
- Standard sizes and configurations.
The main disadvantages of metal drainage systems include:
- A significant mass of structural elements.
- The complexity of the installation work.
- Minor color gamut.
- Susceptibility to corrosion on the damaged surface (with the exception of copper and titanium-zinc systems).
- A standard configuration for a structure that is not suitable for installation on a roof with right angles (90 degrees).
- The high cost of materials and components for the manufacture of the system.
Do-it-yourself gutter installation technology
Before proceeding with the installation work, it is necessary to calculate the throughput of the drainage system and the total number of its structural elements. To do this, a linear measurement of the roof perimeter, the depth of the removal of the eaves, the distance from the eaves overhang to the ground, the angle of the roof slope is performed.
To do self-assembly gutter for the roof, you need to prepare the following tools and materials:
- Drain elements.
- Water intake funnels with gratings.
- Gutter and downspouts.
- Fasteners for fixing on the roof or facade (brackets, clamps, seals, rings).
- Electric drill.
- Self-tapping screws.
- Glue.
- Roulette and level.
Installation instructions for gutters:
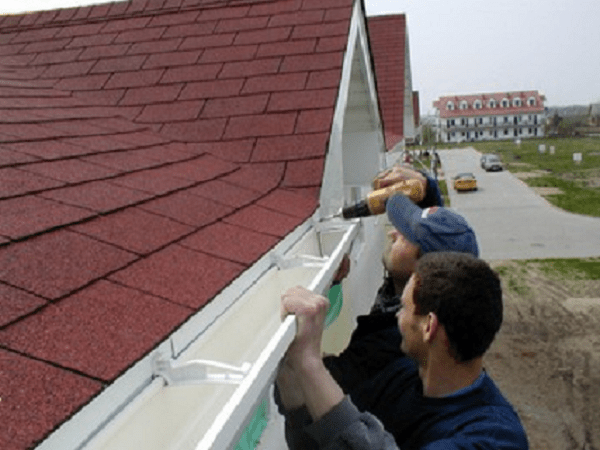
- Work begins with the installation of extreme brackets. They can be installed on roof rafters or frontal eaves.
- When mounting the brackets, it is important to observe the required angle of inclination - every 10 meters it should be 5-6 cm. So, the second bracket (hook) should be located 6 cm lower than the first one, and so on. All brackets must be fixed as rigidly as possible to avoid possible sagging of the gutters under the weight of snow or water. The optimal pitch between the hooks should be 50 cm.
- At the locations of the pipes, funnels-water collectors of round or rectangular cross section are mounted. Plastic funnels are mounted on adhesive composition, and metal - on the clamps.
- The gutter is equipped with special gratings to protect Wastewater from pollution - leaves, dirt and debris.
- The installed gutter is connected to the brackets. Plugs with rubber seals are fixed at both ends of the gutter.
- All gutters must be assembled together. Sealing elements and couplings are provided for the connection, which guarantee the necessary rigidity to the structure.
- Drainage elbows are mounted to the bottom of the funnels for the drain. They provide the correct drainage from the roof at an angle, and also connect other elements of the system. The minimum allowable distance from the pipe to the wall should be 3.5 cm. If necessary, it can be edited up to 6 cm.
- An additional elbow is installed under the funnel for the installation of downpipes in the elbow. The pipe in the knee is fixed with clamps. The length of the drain can be increased by using several pipes inserted into each other. The fixing clamps are a double arc that must be installed on the pipe from both sides. They can be attached to supporting structures with dowels or self-tapping screws.
- The final stage will be the fastening of the drain - a deployed knee, which will ensure the drainage of drains from the foundation and walls to a safe distance of up to 40 cm.
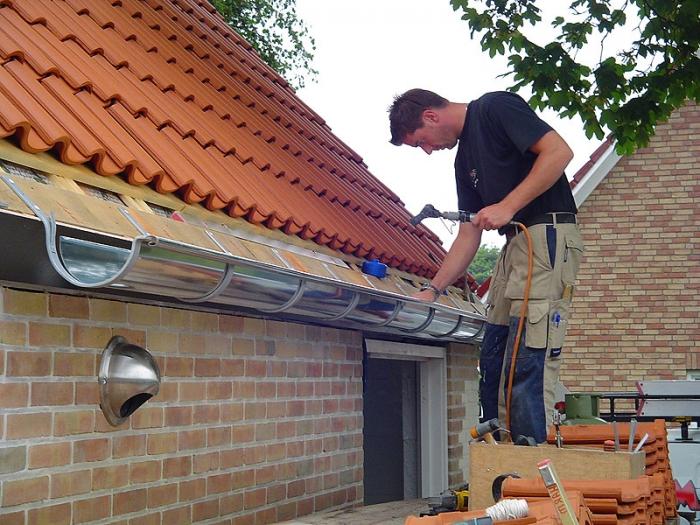
The installation of gutters provides for the mandatory preparation of surfaces - the treatment of wooden rafters with antiseptic compounds and varnishes.
Gutter heating options
The lack of an anti-icing system leads to the formation of leaks in the waste structures, the destruction of the facade and the foundation of the building. But the main danger lies in the hanging ice, which, when falling, can threaten the health and life of people.
To remove icing and possible damage to gutters and prevent leaks roofing material, installation is in progress reliable system heating.
A modern anti-icing system maintains the internal heating temperature of the structural elements of gutters and roofs above 0. It has a fairly simple and effective device, consisting of heating resistive and self-regulating cables.
- The cable is resistive. Standard a heating element, which consists of a metal conductive core and thermal insulation. It has constant resistance, constant heating temperature and standard power.
- The cable is self-regulating. An element for heating roofs and gutter systems is a heating matrix for adjusting temperature regime, thermal insulation (internal and external) and braid.
Heating of drains can be: external - the cable is installed in the lower part of the roof slope, internal - the cable is installed inside the gutter and pipe.
How to ensure a long service life of the drain?
In order for the installed drainage system to serve for more than a dozen years, it is recommended to follow the basic rules for its operation and maintenance.
- To increase the throughput of the drain, all structural elements of the system - gutters, pipes and funnels must be thoroughly cleaned of dirt and washed with water. The frequency of prevention is annually in the spring and autumn.
- For effective snowmelt and protection of the drain from the negative effects of snow cover, it is necessary to install special snow retainers on the roof.
- To prevent frost, you can use a high-quality heating system installed inside the gutters.
- To protect the structural elements of the drainage system from clogging with tree leaves, it is necessary to additionally install nets along the entire length of the gutters, as well as perforated baskets in the water intake funnels.
- When diverting wastewater to the sewer, each sewer must be equipped with a fine-mesh grate to retain large debris.
Common mistakes when installing gutters
- Wrong choice of system, material and inaccurate calculation of the dimensions of the structure are fraught with overflow of drains from the gutters.
- The absence of the necessary elements to protect the drain from pollution, icing and freezing.
- Minimal non-compliance allowable distance between the fixing brackets is fraught with sagging gutters.
- Over-fixation plastic pipes clamps violates the thermal expansion of the material in the vertical direction.
- Insufficient number of funnels and non-observance of the angle of inclination of the gutters are fraught with overflows in any part of the system.
- Fixing drainpipes close to the facade is fraught with flooding of the foundation and destruction of the structure.
- Installing pipes at the inside corners of a building can complicate the maintenance of the structure.
All these errors can lead to sad consequences - deformation of the elements of the system, flooding of the foundation and destruction of the walls.
Correctly chosen and installed drain It is able to provide reliable protection of the roof and facade of the house from the negative effects of precipitation. The arrangement of an effective and practical drainage system is the main task that any owner of a land plot and a private building has to solve.
Ensuring good drainage of liquid from the roof is a very important part of building a house. We propose to consider how correct installation do-it-yourself roof gutters, step by step instructions and installation diagrams, as well as the price of parts.
Information about drainage systems
Installation of a drain in a country house or at home should be carried out according to a special technology, it depends on the material from which the gutter is made. If plastic is used for the barillet material, then it must be cut with a special nozzle for the grinder, so you can do the job as accurately as possible. After cutting with a file, it is necessary to clean the processing areas. In the event that your drain consists of metal parts, it must be cut with special scissors, and at the end of the work, lubricate the metal with a primer and paint for outdoor work.
Photo - Drainage scheme
Self-installation of a drain includes the following stages:
- Project evaluation and planning. Before installing gutters, you need to carefully check the surface of the building. Inspect the panel and soffits for signs of rotted wood, chipped boards, rusty planks and panels. To ensure a thorough view, you must remove all decorative elements, crowns and protective grilles.
 Photo - Conclusion of the drain.
 - Its development. Draw a sketch and measure the house. The photo shows an approximate drainage system for a typical house with gable roof. Record the length of the system and mark where the downpipe will be installed. After that, you need to count the number of internal and external corners and caps (note whether they are right or left-ended). Measure the height of the downspouts and add 1 meter of gutter to install the junction at the ground. On residential buildings, three cubits at the barillet must be used. There are two types of elbows. Most installations only need the front elbows, but sometimes a side elbow needs to be worked out to make a gutter on a sloping roof.
Here some planning tips:
- Before starting work, you need to find a suitable gutter profile. It can be a circle, a semicircle or a rectangle. Experts advise using a semicircle for roof drains, and a circle for organizing water flow.
- Mark on the drawing where you will place the roof gutters. If the exterior is very important to you, then you can arrange built-in gutters on the roof. Tip: it is easiest to mount pipes in a hinged way.
- Calculate the slope of the drain, the norms depend on its material, especially if you are installing high drains.
Video: installation diagram of the drainage system
Step-by-step instruction
- Gutter manufacturing
Cut the barillet of the selected profile to reduce the length. Bend the gutters, cut out the bottom. It is much more convenient to assemble individual parts of the drainage system on the ground than with hanging fixtures. All knees need to be secured with sealant, the seam should be at least 5 centimeters, this will help minimize the likelihood of breaking the downpipe. In the photo you can see how to fix corner structures.
 Photo - Drain Elbows
 Many installers also coat the joints with a special compound that increases the corrosion resistance of the metal.
In places where the gutter ends, it must be shortened by approximately 2-5 centimeters, this is necessary to ensure maximum drain pressure. Then attach the end cap with rivets to the gutter and connect it from the inside to the drainage system using sealant.
 Photo - Components of the drain
 - Add Downspouts and Overlays (Gutters)
Mark the location of the center of the downpipe rosette at the bottom of the gutter. After that, cut a V-shaped section on the pipe, and use a flange to strengthen the hole, then install the socket. The same action must be done in each pipe where a socket is planned.
- The next step is to set the slope.
The number and size of the drain determines how quickly the gutters will drain water. If you do not equip the slope, then the water will stagnate in some areas, which will lead to corrosion. The slope is 0.7-0.9 mm for every 3 meters of the system. If the front boards of the house are on the same level, you can use them as the basis for sloped gutters. Check this by holding the level against the bottom edge. If they are not at the same level, then you will need to adjust the slope line until it matches the desired indicator.
 Photo - Drain funnel
 - Mount spotlights
To prevent water from flowing under the edges of the roof, you need to install spotlights. The cheapest protective devices are made of plastic and siding, the most durable and durable are made of aluminum.
- Add hidden brackets
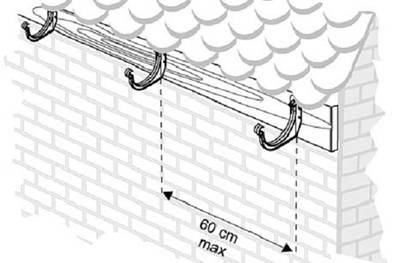
Install hangers every 60 centimeters to support the drain and reinforce the front edge of the structure. To do this, use a drill to make a hole, then use construction screws to fix the canopies. You may need swivel devices to mount track barillets.
- Attach gutter barillettes
Now the elbow is being installed to the outlet. On each side of the pipe, leave 5-7 centimeters for safety net. After installation, use a hacksaw to remove the unnecessary section of the pipe.
 Photo - Connection of gutters
 After completion of the installation work, with the help of plastic gratings, it is necessary to protect the open places of the pipes from leaves, dust and other contaminants. If you have hidden drains, then you can cover the installation sites with a soft shingles. The same technology is used for sidewalk drains.
In addition to the installation of gratings, the installation of heaters is carried out. They are necessary to protect gutters from damage due to temperature changes, and if water freezes in the pipe, the operation of the gutter deteriorates significantly. For heating, power cables are used, which are mounted over the entire area of \u200b\u200bthe drain. Such an anti-icing system is also used for organizing water supply, heating metal tiles and other roofing in winter.
 Photo - Drainage Protection
 Rules for installing metal gutters:
- Fasteners must be fastened to wooden rafters with a distance of 50 centimeters (10% error is allowed).
- We start laying the gutters from the funnel (the final parts of the drainage systems). They can be interconnected using glue, sealant, ventilation couplings;
- Water, when draining from the roof, should fall into the center of the gutters. This is the main secret of professional craftsmen;
- If you need to remove liquid from the under-roof space, then you will need to lay a drip. It is mounted on the rafters, covered with waterproofing.
The technology of installation and location of gutters on the roof depends entirely on the material used. Once every six months, clean the drains from dirt and leaves, wipe the attachment points anti-corrosion compound. Every year, a complete restoration of the system is carried out: painting, checking, if necessary, welding the seams.
 Photo - Polluted drains
 Price overview
Installing simple gutters with your own hands is quite easy, but if you do not have the proper experience, then it is better to seek help from specialists. We propose to consider what is the cost of installing gutters in different cities of the CIS (the price list is taken from the websites of the most popular companies in Russia):
 Photo - Gutter around the perimeter of the house
 The most popular brands of rectangular and round gutters for country houses: Devi, EKAROS P.V.M. AS, Flamingo, Murol. They are sold at dealerships and partner stores. The same brands are often installed for skylights. It is better to buy drainpipes in bulk, the delivery is carried out at the expense of the seller company.
Making a drain in your private house is not so difficult. After all, this is just an assembly of trays under the roof of the house and vertical pipes for draining water. True, there are some important points and rules that must be taken into account when installing a drainage system. And the most important point if there is a need to save money, it is to carry out an accurate calculation of the required materials.
Calculation of the necessary materials
Let's start with the fact that in any hardware store today you can buy a ready-made gutter system made of metal sheets or plastic. metal structure usually painted in a galvanized way, which guarantees a long service life in the open air in rather difficult conditions.
So, what elements of the drain will be needed.
- Trays or gutters with a standard length of 3 m.
- Pipes for vertical drainage of rain or melt water. Their length: 3 or 4 meters.
- knees.
- Funnels.
- Brackets for fastening trays.
- Pipe clamps.
- In addition, it is used silicone sealant, which process the joints of the elements of the roof gutters.

Of the tools for installing the gutter structure, you will need:
- Hacksaw for metal (cutting metal or plastic with other tools, especially electric ones, is not recommended).
- Roulette.
- Screwdriver.
- Plumb.
How to correctly determine the number of required trays. Let's look at this using the example of the simplest roof - a gable roof. The gutters are installed under the eaves, so you need to measure the length of one of them. We divide the size by the length of the tray, that is, by three meters. We get a number that is rounded up, usually up. Please note that the trays themselves are installed at an angle of 2-5% and are inserted with the edges into each other for the tightness of the tray structure. It turns out the overlap connection. The overlap indicator itself is in the range of 5-10 cm. And this must be taken into account when calculating the number of gutters. Now the resulting number is multiplied by two, because there are two slopes in the house.
You can correctly calculate pipes for vertical water drainage in the same way. But there is one small nuance that needs to be taken into account. Everything will depend on the area of the slope, and, accordingly, on the volume of water that will be collected on the slope. It is the volume of passing water that will affect the patency of the pipe, so the larger the volume, the larger the diameter of the pipe being installed. By the way, this also applies to trays. That's why:
- If the slope area does not exceed 50 m², then a pipe with a diameter of 75 mm can be installed in the drain, and trays with a width of 100 mm.
- Accordingly, the area is 50-100 m², the pipe is 87, the tray is 125.
- Above 100 m²: pipe - 100-120, tray - 190.

If the eaves of the house are long enough, then several outlet risers can be installed. In principle, there is no such calculation in the rules, but in order to unload the roof from precipitation, sometimes you have to approach this problem in this way.
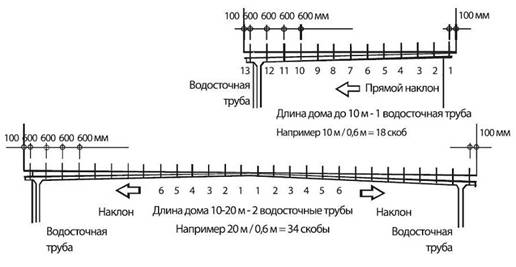
Now, as for the standard number of risers. They are usually installed in the corners of the building. And since gable roof four corners, then there will be four risers. Accordingly, there will be four funnels. But the number of pipes used, for example, 3 m long, will need to be calculated. Why is the height measured from the ground to the cornice, multiplied by four (four risers) and divided by 3 m.
Attention! The vertical gutter riser should not reach the surface of the blind area by 25 cm. Almost one meter is obtained for four risers. It will need to be subtracted from the resulting total length of the risers.

Now the required number of tray brackets. It's easier than ever, the brackets are installed every half a meter. The number of clamps is at each junction of two pipes. But the knees are a little more difficult. Look at the photo above, it shows how you can do the installation of the knees with different designs roofs. From here, an accurate calculation will be carried out.
Installation of roof gutters
So, the entire installation is done from top to bottom (see video). This strict rule which guarantees the quality of the final result. First of all, it is necessary to determine the angle of inclination of the tray structure. What is a 2% slope? This is a difference of one edge of the line in relation to the other by 2 mm, taking into account one meter of the length of this line. So in the drainage system, the edge of the line at the funnel will be the bottom. And if two risers are located at the edges of the roof, then the middle of the length of the cornice will be the highest point in the installation line of the trays.
Therefore, we select the middle of the cornice and mark on it the point where the first bracket will be mounted. It must be installed so that the upper edge of the tray laid on it does not reach the edge of the roofing material by 2.5-3.0 cm. This will ensure that water is drained without splashing and overflowing.
Now a self-tapping screw is screwed into this point, to which a fishing line or a strong thread is tied. Its free end will blend to the edge of the roof, where the drain pipe will be installed. We know the length of the thread, equal to half the length of the cornice. For example, it will be equal to 10 m. That is, the line difference should be: 10x2 \u003d 20 mm. This means that the thread of the pipe should be lower than that of the twisted self-tapping screw. Along this line, you will have to install the brackets. Trays are also laid on them.
Attention! Often one extreme tray does not fit in length. It is usually cut, for which only a hacksaw is used. The cut edge must be processed with a file so that there is no burr.
Installation of roof drain pipes
The easiest option is if the pipe from the tray is installed vertically without bends. Just the edge of the tray is inserted into the funnel (see photo below), which itself is installed in a bell-shaped way into the pipe. The most important thing in this process is the verticality of the structure, so a plumb line is required for setting.

But this possibility does not always occur. Something will definitely interfere, so knees are added to the riser design. As already shown in the photo, there may be several.
The installation of drainpipes itself is a simple process (see video). For their fastening, special clamps are used, which come with the drainage system. Manufacturers today offer many of their shapes and designs. There are clamps that are attached directly to the wall of the house, there are options with extension cords in case the riser is located a little further from the wall surface. But in any case, this is a reliable mount.

As mentioned above, the installation location of the clamps is next to the connecting joint of two pipes (see video). You can install a third element in the middle of each pipe. Typically, this option is used only if four-meter pipes made of metal are selected.
Attention! If a storm sewer was installed on the site where the house was built, then the lower edges of the drainpipes must be brought into the water intakes.

As you can see, making a gutter for the roof of your own house with your own hands is not so difficult. It is clear that not all points can be taken into account when performing installation, especially if the work is being done for the first time. Therefore, we suggest watching a video in which everything is laid out on the shelves.
When buying a ready-made drainage system, there is always a choice - fix the system with your own hands or entrust the installation to specialists. The latter option is simpler, but it is rare when a company that sells gutters agrees to install it for its own money, and such a service costs at least a third of the price of the entire drain. In addition, there is a certain lack of confidence in the quality of such services. It is easier and more reliable to fix the gutters and drain pipes with your own hands.
How to fix the gutter correctly and securely
The entire design of the external drain consists of three main components:
- A system of drainage gutters based on special hook brackets hidden under the roof;
- Water intake funnels that receive water from the gutter and redirect the flow into downpipes;
- Connecting knees and downpipes for draining rain and melt water to the ground or to storm sewers.
For your information! Majority modern systems plastic gutters does not require special tools, so the main problem is to properly fix the brackets - hooks and align the direction of the slope of the gutters.
The practice of installing drainage systems and drains
The first step is to properly plan and secure the gutter line. There are two main requirements - the angle of inclination and the exact positioning of the catchment line.
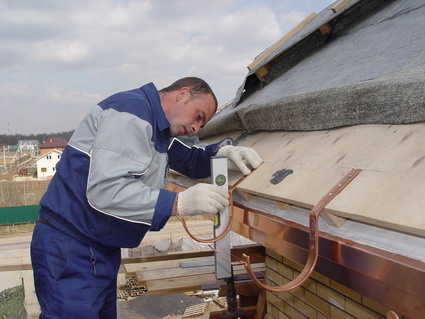
Installing a mount for hanging gutters on the roof
The center of the gutter section should be located strictly under the edge line of the roof overhang. This gives maximum capture of flowing melt water, even with strong gusts of wind. The main dimensional dependences of the gutter location marking relative to the roof edge are shown in the diagram.
Before attaching hooks or brackets, you should try on the position of the gutter relative to the edge of the roof "on the ground" and determine how to fix the support hooks themselves. Most often, hooks are attached to the wind board either to the bottom board of the roof batten, or directly to the rafter.
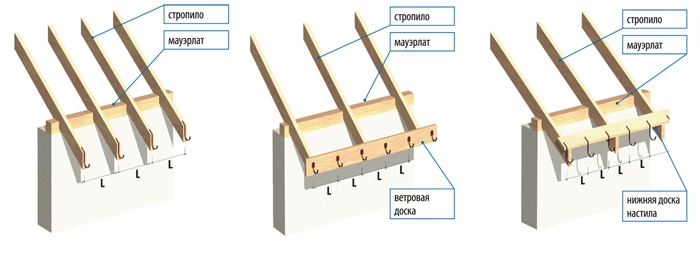
If for technical reasons it is impossible to fix the holders on the wooden elements of the roof, you can use an additional support board, which is sewn with dowels to the stone wall of the building.
This option of fastening the drain is simpler and more reliable. Any impact or vibration of the gutters from water or wind is then not transmitted to the wooden roof elements, but is dampened by the very hard masonry. The distance between the brackets is selected according to the recommendations of the manufacturer of the drainage system, but at your own discretion, you can add the number of support elements under the gutters with your own hands.
Often the brackets of plastic drainage systems do not require additional bolted or hinged connections. The latch at the end of the hook allows you to fasten or snap the fastener into the lock on the side of the gutter.
Important! Often, experts recommend gluing the joints of individual sections of the drain, plugs, articulation of the receiving part of the funnel and plastic profile. This method helps to fasten the drain more rigidly, with your own hands increasing its resistance to large static loads. But in the case of repair or replacement of any part of the drain, it will be extremely difficult to disassemble the structure with your own hands.
The second condition is to fix the gutter at the optimal angle of inclination
The correct slope of the entire line of gutters will ensure that the water flows normally to the catchment funnel. If you use a support board to secure the water collectors under the edge of the roof, the task is much easier. In this case, brackets or hooks are mounted on the board in one line, and the board itself should be fixed by setting the upper edge to the building level with the required degree of slope.
According to SNiP, the recommended angle of inclination of the water collector is usually in the range of 1-2 degrees, and this rule works quite well in practice for areas with moderate rainfall. In the case of more intense rains, the angle can be easily increased to 5 ° and, accordingly, the size of the funnel and the downpipe of a larger diameter can be provided.
In expensive metal gutters made of stainless steel or copper, electric heating of the main parts on the roof is very often used, so a special plastic hose must be brought to the gutters and fixed for electrical wiring.
Funnel and drain pipe installation
Most often, one funnel "works" to drain the flow from 10 meters of the water intake line of the gutters. The most common option is to install a double-sided water intake from two gutter systems. IN corner options installation, the funnel is equipped with an additional snail, which swirls the water flows in the receiving device, and thereby prevents them from overflowing. Most often, the funnel, like the drain pipe, is attached with a special loop bracket to the wall of the house or a support board.
The corner of the valley is considered the most insidious place in the drain, here two roof slopes converge at a certain internal angle. This can be a corner or front location of the gutter. It would be a big mistake to install a gutter plug in such places. It would be correct to install an additional funnel, because due to the wind, the valley can double the amount of water flowing into the gutter, and the flow will overflow over the edge of the plug.
In the standard version, the outlet of the funnel passes directly through a pair of elbows into a drainpipe. The complexity of connecting these two elements is that the optimal positions of the funnel and the drain pipe are very different. The funnel has to be fastened together with the gutters at the edge of the roof, while the downpipe is best hidden on the wall surface.

The problem is solved with the help of a knee system that allows you to “lead” the drain from the edge of the roof to any convenient section of the wall. As a rule, the design of the drain pipe requires it to be fixed directly above storm sewer or trench drainage. Like a funnel, the pipe is attached with loop brackets directly to brick wall at home with a gap of 30-35mm.
Features of working with various drainage options
Fixing a metal drain is no more difficult than a plastic one, with the difference that ready-made fasteners with a sealant are provided for the plastic one, and the steel ones must either be connected with a special crimping device or use adhesive sealant. It is more difficult to work with expensive imported drainage systems. They have a beautiful polished surface, on which scratches and scuffs easily appear. Therefore, masters prefer to close the polishing with a special impregnated wrapping paper, which is removed upon completion of work.
More expensive metal gutters, due to their large mass, can only be mounted on branded brackets. Most often they are treated with special coatings that prevent corrosion. Therefore, you should not take risks and try to fix the copper drainage system on steel or aluminum corners.
A mandatory attribute of an expensive and high-quality drainage system is a special protective mesh over the water intake line. Its presence must be taken into account when marking the location of the gutter system. Before fixing the grid in place, it is better to treat the anchor points with silicone grease. When cleaning or repairing, this will allow you to easily remove it and fix it back after service.