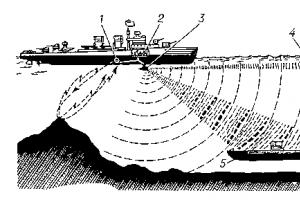
Homemade electric drive for sliding gates. We assemble our own drive for sliding gates. Making sliding gates with your own hands
An integral part of the protective structure suburban area are the gates. Today there are many varieties of them. Let's look at the process of manufacturing and installing sliding gates with your own hands.
Advantages and disadvantages of this design
Advantages:
- This design of the gate does not interfere with exit / entry vehicle in a small area. Cantilever doors are a great space saver.
- The presence of the lower fastening of the cantilever system allows you to equip the gate under any climatic conditions.
- Finishing can be made from different materials, for example, vertical lathing, corrugated board, forging and more.
- The ability to choose a design option, for example, from a sandwich panel or profiled sheet.
- Compared to other types of gates (for example, swing gates), there is no such thing as sagging hinges. The existing automation and the mechanism for closing / opening the gate provides for a long operational period.
- There is a possibility to choose different automation for the gate.
Flaws:
- Unlike other types of gates, for example, swing gates, the arrangement of sliding gates requires more financial costs, by approximately 10–20%.
- To fix the console part and the drive, it is necessary to make an additional foundation.
- Along the fence you will need to allocate sufficient space.

The design of the gate is divided into several types, each of which differs from each other:
- Suspended. Since Soviet times, this heavy, but at the same time, reliable design has gained immense popularity. In it, the canvas on roller trolleys is fixed to a beam, which is located above the driveway, up to 5 m high. As a result, this height is a limitation when high cars enter.
- Console. This type of gate is ideal for the climatic conditions of Russia. This design is not equipped with a beam above the driveway. Such gates will not be able to disable snow drifts, wind, dust and the like. So, the canvas is fixed to the beam using roller trolleys. In this case, the entire structure is fixed on a powerful foundation, which is poured on the side of the opening.
- On screw piles. To a depth of 1500 mm, metal piles are twisted into the ground, which will be the carriers of the entire structure. Their manufacture and installation will take up to 3 days.
- Mechanical. These gates are opened/closed manually. Mechanical ones are much cheaper in cost and easier to install. They are suitable for those cases, if the cottage or country house are rarely used.
- Automatic. Such gates are the exact opposite of mechanical ones. They are equipped with an electric drive and remote control. For regular use, the best option.
Regardless of the type of construction, sliding gates require free space along the fence on one side. Moreover, it should be equal in size to the opening. As for console systems, the space should be 120-200% more.
Gate Calculation Features

Design calculation is one of the most important and priority stages. You should not ignore this stage, since the construction of retractable ones is much more complicated than swing ones.
The calculation process includes the following steps:
- Determining the height and width of the opening. As a result, it will be possible to select the required type of gate for free movement.
- Estimation of the weight of the structure under construction.
- Making a sketch or drawing.
The calculation of the width and height of the structure should be based on the assortment of the market. So, if a profile or pipe can be easily welded, then it is very difficult to cut sheets of corrugated board in order to add it. Plus, the result will be unaesthetic.

Moreover, understanding how much the weight of the structure will ultimately be, appropriate mechanisms and moving parts are selected that can cope with the load.
If the canvas is supposed to be large, then be sure to consider and wind load. To the available wind strength prevailing in your area, add a small margin.
Although the easiest option for obtaining calculations is to contact a specialized company that will provide a folder with drawings and calculations, you can do it yourself. It should be noted right away that all the above calculations relate to sliding gates of the cantilever type. They are more difficult than all other types, so we will consider them in more detail.

The gate width (L) will be equal to:
- opening width;
- technological indents of opening/closing;
- minimum distance between the centers of the carriages.
Based on this, L will be larger than the opening.

When moving the sash must be balanced. This indicator is achieved by calculating the counterweight. Due to this, the specific gravity of the structure will be evenly distributed over the carriages. Accordingly, in order to have as little load as possible, the counterweight must be large.
But what if there is not enough space for the movement of the sash? In this case, it must be understood that the length of the counterweight should not be less than 40% of the leaf width. The ideal indicator is 50%. As a consequence, the width L has a counterweight in its design.
Having such calculations, you can determine how much space is needed for the gate to roll back along the fence.

This value is determined based on the weight of the material used:
- Decking ~ equal to 4 kg / m 2.
- Steel, 2 mm thick ~ 17 kg/m2.
Gates with a frame of 4 × 2 m will have an average weight of 200 kg. With such data, it is possible to determine the indicators of the guide beam. In this case, you can build on the established standard.
For a gate weighing 300 kg, a 9 × 5 cm beam with a thickness of at least 3.5 mm is sufficient. However, a safety margin of up to 40% is required. It will greatly simplify the operation of the gate and increase its operational life.

The gate will require rollers, catchers and a supporting rail. Modern products of such a plan allow you to choose the necessary design. We take as a basis the simplest estimate of the wind load, which is equal to 12 m/s to 90 kg/m 2 and is evenly distributed over the supporting zones of the canvas.
How to make sure that the design you made, even if strong wind will work without interruption? To do this, it is necessary to ensure that the strength of the fittings is greater than the calculated weight of the gate. A lateral moment of 100 kg/m is also taken into account, multiplied by 8 kg/m, which equals 800 kg/m. In principle, this is not much ~ 150–180 kg / m for each supporting element.
When buying a roller mechanism, make sure that it has a margin of up to 30% in relation to the weight of the gate. But this indicator does not affect the service life. This is directly affected by increasing the distance between the centers of the carriages.

In addition to all of the above, it is worth paying attention to other aspects. Pay attention to the rail for the gate, supports for roller carriages and the number of anchors. It is also important to correctly calculate the mortgages on the supporting pillars. In this case, it is necessary to build on 60% of the total mass of the gate, divided by the number of mortgages.
As for the calculation of the foundation, there are no special secrets here. But despite this, this component should not be overlooked, because often the cost of the foundation reaches 40% of the total cost of the project.

This type of gate has the following structural elements:
- Guide bar. Takes all their weight.
- Trolley or roller support. They need 2 pcs.
- Removable end roller. When closed, it serves as a support.
- Upper/lower catcher. The lower one, when the gate is closed, takes the load, and the upper one reduces the windage.
- Bracket. It is important to keep the sash from lateral swing.
- Stand. A support is installed on it, which organizes the movement of the sash.
Roller supports are installed on the foundation, which take on the load of the guide beam. The rollers are placed inside the carrier console.
Sash selection

High requirements are also placed on the gate leaf. Its design must be sufficiently rigid and stable. This is important so that the sash functions well in case of a strong gust of wind or ice. Moreover, it must be equipped with additional stiffeners so that it does not sag under its own weight. All this should be taken into account when creating drawings.

The presence of certain components directly depends on the height and width of the sash, as well as its weight. So, today on the market you can find a number of companies that provide quality equipment, namely:
- Combi Arialdo and Flatelli Comunello from Italy.
- Roltek and Doorhan from Russia.
- Alutech from Belarus.
For example, let's do some calculations. In the basic configuration, a carrier rail with a length of 6 m is necessarily installed. And in order to choose the right accessories for it, it is necessary to take into account the length of the sash and plus 40%. Also, the selection is carried out according to the length of the guide beam and possible loads. So, if the width of the opening is 3.8 m, then the length of the gate is 3.8 m + 40% = 5.32 m. In this case, you can purchase a ready-made set with a beam of 6 m.
If the width of the opening significantly exceeds 4 m, then the purchase of components should be guided by a load of 500 kg. In them, the guide beam has a wall thickness of 3.5 m, and a cross section of 71 × 65 mm. If the width is more than 6 m, then it is necessary to take a load of up to 600 kg from the calculation.
Installation work

The movement of the canvas must be carried out with inside plot, namely along the fence. Based on this, it is necessary to prepare a place for the gate so that absolutely nothing interferes with this process.
The installation process includes 4 steps:
- Electrical wiring.
- Installing a return post.
- Automation installation.

Stages of building a foundation:
- The markup is done first. Measure 500 mm from the fence (width of the foundation). Also measure from the edge of the gate a distance equal to the rollback (the length of the foundation). So, you will see the perimeter of the future foundation.
- It is often possible to use fence posts. If this is not possible, then a return post should be installed on the opposite side. It must be installed so that it is inside the site, and not in the opening itself. Otherwise, it will reduce the width of the opening.
- If the gate will work on automation, then be sure to organize a place for wiring. To do this, you can use a square metal or plastic pipe / box. The diameter of the pipes is not less than 25 mm.
- Now you can start digging a pit. The depth of the trench is up to 2 m, below the freezing level of the soil (it varies in each region).
- For the manufacture of the embedded element, you can use the channel 16. Its length must correspond to the length of the trench. Reinforcement Ø12 mm is laid in the foundation. The reinforcement must be welded to the channel and connected with cross braces.
- Thus, the resulting embedded element is placed with reinforcement down. When laying, make sure that the side of the channel is adjacent to the fence support post. Also, the channel must be set strictly in level and exactly parallel to the opening line of the gate.
The embedded element must be flush with the road surface. The minimum gap that is allowed between the lower edge of the gate and the road is 10 cm. This gap can be increased using the adjusting platform. But it will be impossible to reduce this gap without breaking the fasteners.

If for one reason or another a gap of 100 mm is not suitable, then carry out a deep installation of the embedded element.
Concerning concrete works, then they are carried out when the installation of the embedded element is completely completed. The level of concrete must be flush with the embedded element.
Installation

When the foundation has hardened, you can begin to install the gate. To do this, you first need to make markup. Along the line of the opening, not reaching the reciprocal column of 30 mm, pull the cord. This cord is the trajectory of the gate. The cord tension height is 200 mm. Further work is as follows:
- Determine the extreme position of the first and second roller bearings. Step back from the edge of the opening 15 cm along the plane of the embedded element and draw a line for the position of the first trolley. Calculate the line of the second cart as follows: measure the entire length of the gate with the cantilever part and subtract 10 cm from the edge of the counter post along the plane of the embedded element. As a result, you will determine the location of the second cart.
- Now insert the roller bearings into the carrier profile, placing them in the center.
After that, it is necessary to weld the second carriage of the adjustment platform. Then roll out the gate leaf into the opening and make the final position adjustment. Make small tacks by welding the second adjustment pad, as a result, the actions look like this:
- Remove the canvas from the roller cart.
- Next, remove the carts from the platforms.
- TO mortgage element weld sites.
- Attach roller carts to them.
- Slide the canvas onto the roller supports.
- Close the gate and wrench adjust their position.

Make holes inside the carrier profile, this is necessary in order to install the trolley correctly. To do this, loosen the top nuts securing the carts to the platforms. After that, roll the gate back and forth. If the sash moves freely, tighten the nuts. If there are some difficulties in moving the sash, then slightly loosen the fasteners and level out all the design flaws, for example, correct the skews of the cart.

- Now you need to install the end roller. It should be inserted into the carrier profile and tighten the bolts well. Also weld the end roller cover to the profile. This will allow the roller to play the role of the end stop in case of manual control of the gate. But in this case, welding fastening will be much better than a bolt.
- As for the end cap of the carrier profile, it is mounted on the inside of the door and welded in place. It is necessary so that the snow does not roll under the rollers.
- Now the upper retainer is mounted to the rollers. Therefore, loosen the fasteners of the rollers and install the brackets so that its side is directed towards the support post, and the rollers grab the top of the blade. With this in mind, press the bracket to the pole and fix it.
At the next stage of work, the sheathing of the gate frame is carried out. To do this, you can use profiled metal sheets. They need to be cut to size. Fastening is carried out with rivets or self-tapping screws. Each subsequent sheet is mounted with an overlap.

When the sheathing is completed, it is possible to install the lower / upper trap. The lower catcher plays the role of reducing the load on the roller carriages when closed. Therefore, they must be installed when the gate is loaded. Bring the lower catcher under the end roller with the gate completely closed so that the reference plane of the catcher is higher than the level of the end roller. As for the installation of the upper trap, this process takes place in the same way.

In conclusion, it remains to carry out the installation of automation. To do this, fix the gear rack, which implies a universal part with an electric drive. It is usually included in the fastener kit.

The choice of automation directly depends on the weight of the gate:
- For an opening of 4 m, a drive is used - 500–600 kg.
- For an opening of 4-6 m, a drive is used - 600-1300 kg
- For cases with intensive opening of the gate, a drive is used - 1200–1800 kg.
Coloring

All metal elements of the gate must be painted. Degrease the surface first. To do this, clean the surface and grind it with a grinding disc on a grinder. Some places, for example, protected, wipe with acetone. Now you can start priming. It applies evenly. Moreover, the primer should be applied so that there are no drops or streaks. Thanks to such preparatory work the paint will lay evenly. As a result, the entire structure of the gate will be completely protected from corrosion.
The paint should be applied in two layers and only after the first has completely dried.

To carry out all the work, you will need to have such a tool:
- Inverter welding material. Such a unit will not spoil the metal.
- Bulgarian.
- Air compressor for painting.
- Pliers.
- Drill.
- Roulette.
- Level.
- Riveter.

If you do not have sufficient experience in performing such work, then there is a high risk of making some mistakes:
- Not enough good preparation foundation.
- Incorrect installation and fastening of all components.
- Incorrectly selected weight of the gate under the carrier beam.
- If a creak is heard, then this is evidence of sand getting into the bearings.
- Do not allow paint to drip.
- Be sure to consider the depth of soil freezing. Otherwise, the posts may skew in one of the sides.
Video: gate manufacturing
Photo: ready-made sliding gate options


Scheme
On the diagrams you can find a lot of structural details for the manufacture of sliding gates:


A gate with a retractable or, as it is also called, a sliding system is an integral part of the design, designed to fence the dacha and adjacent areas.
To date, the range of such structures is extensive, but many craftsmen want to make their own gates of this type.
This is connected not only with the economic point of view, but also in connection with the application of creative energy. Therefore, many people ask how to make a sliding gate with your own hands and in a short time?
Types of sliding gates
Retractable produce in different types which have their own advantages and disadvantages.
Cantilever gate
Cantilever gate design allows not to limit the upper dimensions of the product, and also excludes contact with the lower rail passing close to the ground surface.
This is one of the most difficult designs to complete. The basis of such gates is a console or, as it is also called, a channel. These devices hold the structure leaf when opening and closing the gate.
In modern gates with this type of movement, there are no lower and upper guides, which provides the car with free movement on the territory of the yard. The canvas is suspended on a special beam, standing on rollers that move the surface of the product.
Roller blocks and guide beams are usually placed in the bottom section of the gate. Often there are similar retractable mechanisms with the strengthening of the rollers and beams in the upper or even in the middle part.
Such placement is justified when it comes to a wall with capital properties or a canvas with increased strength, which can withstand the bulky weight of the structure.
For home use, it is best to do the bottom movement so that you do not have to carry out additional work to strengthen the wall.
These gates last longer than others, because the sliding structure completely enters the guide grooves, which protect the product from the atmospheric effects of the external environment.
Cantilever gates are often equipped with an electric drive. It is attached between the roller carriages. The drive has a control unit and special devices to ensure the safety of movement.
Positive sides such gates are obvious:

On console systems there are shortcomings, but there are few of them:
- the design of such gates is difficult to make with your own hands;
- installation of the gate involves a free area for a gap, which is one and a half times larger than the opening itself. This is not always feasible;
- need for a strong foundation.
Hanging gate
 Sliding gates suspension systems are popular in warehouses, factories and garage docks. The principle of operation of such a mechanism is almost the same as that of conventional sliding gates, with only one difference - the guide beam is attached at the top of the opening.
When choosing elements for fastening the structure, you need to purchase only high-quality products.
The material suitable for this type of gate is recommended to be chosen from steel with additional galvanization and PVC coating for resistance to negative natural factors.
The gates open along the wall, so they do not need additional space from the inside and outside. If desired, this design can be equipped with an electric drive for ease of use.
Benefits of hanging sliding gates:
- Suspended designs significantly save space.
- The strength of the gate allows it to withstand wind loads.
- There is no need for additional cleaning of the entrance in front of the house from snow.
Roller structures
 Gates with roller mechanism are more popular for entering the yard than in the garage, because the width of the garage wall does not always allow you to place a solid sash and place the entire mechanism to the side when the structure is opened.
For the yard, this is an ideal option due to space saving and ease of use of the device. When the button is pressed, the roller mechanism works so that the fence moves to the side.
If you equip the device with automatic control, you can influence it using the remote control.
The gate structure consists of a guide profile attached to the lower part of the product, a bearing-based roller mechanism, a frame leaf and other elements that fasten and hold the structure.
rail gate
 The principle of operation of rail gates is to slide the protective cloth over the surface of a special rail located on the surface of the earth. The movement is due to the roller welded to the bottom of the product.
Of all types of gates with a sliding system rail mechanism is the simplest and most popular. It is often used at the entrance to private homes.
Such a mechanism has a number of advantages:
- the sash has a support, so it will never sag;
- the simplicity of the device allows it to be made by a master who does not have much experience;
- the sash does not take up much space and is equal to the width of the entrance opening.
Flaws such devices:
- the operation of the sash can be disturbed by debris or snow cover;
- the rail that guides the web must be cleaned regularly;
- the rail laid on top of the ground cover protrudes slightly, making it difficult for a vehicle to enter.
Sliding gates, consisting of two parts
 Sliding gates are sometimes made of two parts. This operating principle allows you to save space in the width of the wall, since the gate is divided into two parts.
The design can also be equipped with automation, and open with a remote control remote control. Drives on electric bases are installed in each gate leaf.
Construction and arrangement of gates with a sliding mechanism
One of the most popular gates are cantilever, the design of which consists of the following elements:

Making sliding gates with your own hands
Preparation for work start by checking the necessary tools:

All of these tools can be found in every home, with the exception of a welding machine. You can ask friends or neighbors for it. If funds allow, it is better to buy it, such a tool will never be superfluous.
You may be interested in how to make a fence gate from corrugated board.
Creating a drawing and diagram
If all necessary tools in stock, you can proceed to the calculation building materials, which must be purchased at the construction market and the metal depot.

The frame is being made by welding first pipes 60x40 millimeters, 6 meters long to the guide. Next, two vertical pipes 60x40 millimeters, 2 meters each, are attached, the first to the edge, the second - at a distance of 4.4 meters from the edge of the horizontal pipe.
A horizontal one, 4.4 meters long, is attached to the upper ends of these pipes. The free edge of the lower horizontal pipe and the edge of the upper one are connected at an angle by a pipe of 2.56 meters.
The frame fabric must be filled with vertical pipes 40x20 mm. Next, move on to the power frame.
The foundation for the future structure must be prepared by digging a U-shaped pit with a depth of at least one and a half meters.
A section with an opening of four meters should be equal to six meters. road clearance you need to draw at least seventy-five millimeters.
power frame is prepared from a channel (2.2 meters long and 20 centimeters wide) and reinforcement, the height of which is 1.5 meters, in mutually perpendicular directions.
This structure is concreted and a platform for the drive and a stand are welded to it. Next, the lower rollers are attached to the stand and the upper roller to the post. Upper and lower traps are attached to the column opposite to the moving gate.
last element circuit is automatic and gear rack.
Material selection
Having drawn a diagram of the proposed design, you need to carefully study the material for the frame and door leaf.
The frame is made of wood or profile pipes.
The inner part of the gate is created from:

When choosing a material from forged elements or wooden components, it is important to remember that such a design requires reinforced parts of components and additional fittings.
Screw piles are often used in sliding sliding gates, and such supports are made within three or four days. If you use a concrete base, such work is carried out in the warm and dry season.
It takes a month for the material to dry completely., and this significantly delays the installation of sliding gates.
 That's why screw piles are more practical and smarter when installing the gate yourself. Such piles can be moved to different places, and the concrete will remain poured in its original place.
Structures withstand vibrations due to their blades, and the cement base will loosen over time and break the entire propulsion system designs.
Foundation made using screw piles is durable, and the installed canvas serves for a long time and without failures. Piles can be installed in weak and water-saturated soil. They cut through the soil to the limit until they find reliable support underground.
Installation of screw piles
The main condition for the high-quality installation of screw piles in such a design is rigidity. This condition is due to the fact that the screw piles have an increased load. Material should not go into the ground even under its own weight.
When installing this design, you should use a profile pipe with selected parameters and a pipe crate. The frame is pre-coated with a primer.
Components for gates are selected taking into account the weight and height of the product. The canvas moves to the side along the guide, it is its quality that determines how long the structure will last.
It is important to know that the gate rollback must exceed the size of the opening. This distance is considered to be the measurement indicator of the console, which is equal to the width of the opening.
For the effective operation of the gates installed on screw piles, an appropriate section is required.

The choice of site must be approached thoroughly and with the expectation that the width of the gate must be multiplied by a factor of one point five, then the ideal distance will be obtained. This is important for convenient operation of the product..
Installation of piles produced in several stages:
- Foundation laying, which includes marking the territory and cleaning the pits from the soil. Installation of embedded materials and, if necessary, pouring concrete.
- If the master plans to install automatic control, electrical cabling.
- Sequential installation of poles and the entire gate system.
Estimated movement of the gate system fixed with lacing stretched along the line of the entire opening. The recommended fixation height is two hundred millimeters.
If the pit was filled with a concrete solution, it will take seven days to continue the work until the solution dries completely.
Frame preparation
Metal product for the frame treated with anti-corrosion coating and give it time for the solution to dry on the surface.

You can make the frame yourself, but most importantly, so that the welded elements are without holes in the joints. If there are such holes, dirt and snow will get into them.
The base of the frame consists of pipes measuring 60x40 mm, as shown in the photo with a sketch above. The ribs of the structure and the lintels inside can have a cross section of 20x40 millimeters.
The frame is assembled in the following order:
- Profile pipes are measured and cut according to the prepared drawing.
- The resulting parts to create a frame product are degreased, painted and treated with a special solvent.
- The prepared elements are laid out on a flat surface.
- The perimeter of the frame is assembled and tacked with a welding machine.
- The corners of the product are checked and, if everything converges, they are finally welded together.
- After welding, stiffeners and internal jumpers are installed to the product.
- The lower part of the product is connected to the carrier beam.
- The surface where welding work was carried out is covered with an anti-corrosion coating and an additional layer of paint.
The manufacture of sliding gates with a wicket gate significantly complicates the entire process of design and installation. Necessary take into account the location of the gate at the earliest stages of work.
Installation of corrugated board
For gate trim you will need, screws 19 mm long and a screwdriver.
If the owner does not want to carry out additional waste of material for the counterweight triangle, this can be abandoned, because it will not be noticeable from the street side.
Automatic gates will look even better if the pillars are sheathed with bricks. With basic knowledge of the masonry process, this is easy to do.
Required fittings
 The details necessary to create the gate are best purchased in specialized stores. It doesn't make sense to make them yourself. because it is not justified from an economic point of view.
Before buying a rail mechanism, you need to calculate the required length. It is calculated based on the width of the gate and multiplying the number by 1.5.
Hardware for sliding gates selected based on the weight of the structure. There are parts that can withstand loads of up to four hundred kilograms, and sometimes there are models for forged gates that can withstand up to eight hundred kilograms.
For gates with corrugated sheathing, parts that can withstand up to four hundred kilograms are suitable.
When choosing carriages with a roller mechanism, you need to decide what material they will be created from.
The building materials market offers a choice between metal and polymeric materials. It is best to choose a polymer coating, with proper operation, it will last a long time, and will create less noise than metal.
Fastening of flashings
 In a brick row, three embedded parts are made for the subsequent installation of a flashing. A reinforcing piece is welded to the pole. A corner is attached to the edge of the reinforcing product in such a way that one part of it is held on the brick, and the other sticks out.
Top and bottom inserts installed at the level of the third bricks, and the middle one is in the middle of the product.
A pipe is welded to the protruding corners - a flashing with dimensions of 60x30 millimeters.
guide rail
It is impossible to make a rail for moving the structure at home, so you have to spend cash to purchase such item.
When choosing a material, you must first pay attention to the presence of a mirror surface and the right angles. Manufacturers usually care about their reputation and polish products from rust.
Based on the weight and size of the structure, a suitable rail is selected.
Caring for the rails is simple: you need to regularly check its surface for dirt and excess debris.
Roller carriages
 Roller carriage movement allows you to move the gate system along the opening. Each carriage of the system consists of eight rollers made of metal or polymer coating.
The manufacturing process of the carriage is not difficult: holes are made in the marked metal plates to place the roller mechanism in them.
To create a caret you can use bearings from an old car, for example, from Zhiguli.
If the metal is not strong enough, then the plates are welded. When drilling, it is best to use oil to cool the surface.
Axes and holes measure and cut the surface to desired length. Washers are placed on the axis, then wheels, and the resulting structure is screwed for movement. Before welding the base bearings must be packed tightly with grease.
The process of making homemade rollers for sliding gates is shown in the video:
Catchers and plugs
 Metal plates curved in a special way are designed to catch the gate and their fixing after closing. With the right selection and quality of the metal used, it will not be difficult to make such products.
The plugs serve as protection for the guide from snow and mud masses. You can purchase ready-made protective elements made of rubber or plastic material. You can simply weld the ends of the beam material with a welding machine.
Self-manufacturing of fittings is allowed, but on the condition that the master already has experience in carrying out such work.
With a lack of experience, it is better to purchase additional elements in specialized stores from reliable manufacturers.
Frame and gate installation
 After completing the creation and preparation of parts and structural elements, it is necessary to assemble the frame and gate.
Carriages are placed on the channel installed in the foundation, while trying to push them apart when strengthening.
The sliding gate frame is attached to the carriages and is set taking into account the level indicators. After that, the platforms of the carriages are lightly welded to the channel system.
After the actions taken, control measurements are made and the platform of the carriages is finally welded.
It is important to monitor the level indicators, which will indicate the presence of distortions in the structure.
After that, the traps of the upper and lower sections are welded, and end rollers are also installed.
Important to remember that the end rollers must enter the lower catcher system so that they completely unload it when the system is closed.
Automatic system in sliding gates
 Automatic opening of sliding gates is carried out by a mechanism, equipped with an electric drive. Opening occurs with the help of a button on the remote control. To assemble such a mechanism, any materials from the garage are suitable, and the fastening will take no more than a day.
The signal is supplied by a roller or chain system using an asynchronous motor.
At the preliminary stage of work, you need to select the appropriate engine for the mechanism.
If a three-phase meter with a star-type winding is available, it is recommended to stop at this particular device.
With such a device, you can avoid problems with the movement of the system and improve gate efficiency.
If a three-phase meter is not available, you can use single-phase with a capacitor type. It is important to know that such a device is characterized by poor performance, especially at system startup.
If neither the first nor the second option was found, less expensive materials can be used. We must not forget about the reliable connection of the kinematics. The gear shaft is connected to the engine with a rigid type coupling.
The gearbox can be replaced by a belt drive. This method of assembly work has the difficulty of connecting in tripod elements and the additional involvement of an automobile tensioning mechanism.
The mechanism with an independent shaft is given special importance when using a belt mechanism. Extreme attention must be paid to the centering of the shaft because it has two transmissions.
Self-manufacturing of the electric drive
 The most elementary way to install automation of the sliding gate movement process is a chain or, as it is also called, rack and pinion.
Mounted on the gear shaft bicycle chain, and another one is installed on top of it, a special one with a diameter in links similar to that present in the asterisk.
The chain is installed in a horizontal plane. Sprocket rotation in one direction or another sets in motion the entire mechanism of the sliding gate.
Strengthening the engine and gearbox is carried out with bolts having special nuts. Support for them must be rigid. Elongated holes are made under the base to securely fix the motor mechanism.
The next step in the installation is attaching the chain to the gate. The chain is installed in the lower part of the beam, and cover as additional protection from rubber material.
In order to finally strengthen the chain, welding is used.
Gate automation installation
To put it all together, you need to perform several steps:
- Before installation, you need to choose a place for installation and proceed with the installation of the rail in such a way that so that it is on the surface of the gear.
- At the desired point, the drive is fixed with a welding machine.
- Next you need install gear rack. It is welded to the pipe and pulled over the surface of the canvas.
- All elements are checked and welded again.
- The next step is the installation of limit switches. They are either mechanical or magnetic.
- The system must be connected according to the instructions given by the manufacturer. Settings additional features carried out by remote control.
- Further install light fixtures capturing photo signals.
- Fastening of a signal type of a lamp that transmits data about approaching objects. This element can be excluded from the installation, but for the safety of the structure it is better to use it.
For installation, you need to make a hole in the pipe and pass the main power sources through it.
How to make a simple sliding gate with your own hands, see the video below:
Sliding gates on the site occupy a minimum of space, reliable and durable. They do not require too careful care either for the structure itself or for the adjacent territory. In addition, their mechanism is so simple that, if desired, it is quite easy to make sliding gates with your own hands.
All you need to make a sliding gate is a set of tools, materials, some free time and good instruction. Do-it-yourself sliding gates can be made in just a few days. At right choice materials and strict observance of the instructions, they will not differ in strength and reliability from purchased ones, but their cost will be much cheaper. In addition, since you are going to make the gate yourself, you can think over and implement any design, giving your gate an individuality.
How to make a do-it-yourself sliding gate leaf
Making a sliding gate leaf with your own hands is not difficult at all, it has a very simple design. All you need to get started - measure the size of the passageway and the part of the fence where the sash will move. For example, consider how cantilever sliding gates are made, the most convenient and common design.
Sash dimensions
For an example of manufacturing a sliding gate leaf, consider a standard opening:
- opening width - 4m;
- the height of the fence adjacent to the opening is 2 meters.
Important! The height of the canvas will be slightly less than the height of the fence, since it is necessary to provide a gap above the road. In our example, let's make the gap equal to 7.5 cm.
The design of sliding gates necessarily includes a counterweight in the amount of 1/2 of the width of the opening. In our case, the length of the counterweight is 2 meters. This part of the structure does not block the opening, but extends the canvas by the calculated amount. In order to have a good idea of \u200b\u200bthe future gate and correct the given dimensions for your own, it is better to first prepare the drawings of the sliding gate.
Important! The length of the adjacent fence in our case must be at least 6 meters so that the sliding gate leaf can fully open the opening.

Necessary materials
If the door leaf is filled with corrugated sheets or similar lightweight material, then the following materials will be required for the manufacture of the door leaf.
- Rectangular pipes 60x30:
- 1 PC. 6-meter;
- 1 PC. 4-meter;
- 1 PC. 2.7 m long;
- 2 pcs. 1.85 m.
- Rectangular pipes 40x20:
- 3 pcs. 4 meters;
- 4 things. 2 meters.
- Guide bar 6 m from the small or medium set.
- Profiled sheets for filling the frame.
- Self-tapping screws.
Frame manufacturing
The frame of the gate is made of pipes 60x30. For the entire length of the guide rail, we weld a 6-meter pipe with a wide side, leaving an indent of 3 cm from one edge. Then, from the side where the pipe reaches the edge of the tire, we grab a pipe 1.85 meters long, measure 4 meters from it along the tire and grab second pipe of the same size. It turns out 2 vertical racks. We connect them together with a 4-meter pipe.
Important! At this stage, it is necessary to clearly measure each side so that there are no distortions. You should get an even rectangle.
The free edge of the tire and the upper corner of the carcass are interconnected by a pipe of 2.7 meters. This is the counterweight in the form of a triangle, which will not be visible from the front side of the fence.

The inner part of the frame consists of pipes 20x40, forming 6 equal rectangles. To leave room for the profiled sheet, a pipe of a smaller section is used than for the frame. Pipes with a wide side are laid on gaskets 20 mm thick and welded.
After welding the gate, all seams must be cleaned and polished.
Painting
Painting will protect the gate from rust and give it a well-groomed appearance, so you need to choose a paint that is resistant, has good protective properties. Nitro enamel or car paint is best suited for this purpose. These materials are easy to apply and dry quickly, so you can paint the sliding gate leaf with your own hands, avoiding additional costs.
Painting steps:
- metal dust and scale are removed from the frame;
- the surface is wiped with a solvent;
- primer;
- painting.
Frame filling
TO inner pipes profiled sheets (or any other material), pre-fitted to size, are fastened with self-tapping screws. It is advisable to make preliminary markings where self-tapping screws will be screwed in or use sliding gate drawings so as not to spoil appearance sashes.

The counterweight triangle is not filled, as it does not perform a decorative or protective function.
Sliding gate installation
In order for the gate to serve for a long time, it is necessary to properly prepare the foundation for the sliding gate.
For this you need:

In order for the solution to dry properly, it must be left for a week, only after that it can be considered that the foundation for the sliding gate is ready.
On the other side of the opening, next to the fence, you need to install a pole to which the upper rollers and traps will be attached.

After the concrete has dried, it is necessary to install the gate itself. For this:
- we weld a stand with roller bearings and a platform for the drive to the power frame;
- install the sash guide beam on the rollers, check whether the gate is installed evenly using a level;
- to the pole, towards which the gate will open, we weld the frame of the upper rollers, once again we check the level of the installation of the canvas;
- on the opposite side, we install the traps on the pole so that the corners of the gate go into them;
- we clamp the roller installed inside the guide beam;
- turn on automation.


Do-it-yourself sliding gate drive
For convenience, they often hook up to the gate electric drives, which set the sash in motion with the help of a button. If you have already made sliding gates with your own hands, then it remains to install a drive and automation on them, which is not difficult to do with certain skills. Moreover, the simplest engines are installed on the cantilever sliding gates, which we use in the example.

The choice of motor depends only on the type of voltage available in the area:
- three-phase - more powerful;
- single-phase - less powerful, can lead to problems with starting torque.
To open the gate, you need a motor with the following characteristics:
- power - 1.5-2.5 kW, depending on the weight of the structure;
- speed - the lower, the better to reduce the load on the drive shaft.
A good choice would be a 6-pole drive at 1000 rpm or a 12-pole drive at 500 rpm. Any types of engines are sold in the store, but to reduce the cost of the mechanism, you can also use improvised means, for example, use an engine from an old one. washing machine. Naturally, to work with electricity, you must have a certain skill, so if you do not have it, it is better to seek help from a specialist. To connect such a motor to the system, it will be necessary to determine the ends of two pairs of windings. To do this, it is necessary to measure the resistance with a multimeter, which is much higher for the starting winding.

The next step will be the choice of gearbox, single-stage is best. The frequency of rotation of the drive wheel (output torque) should be 80-100 rpm, the rotational speed of the input torque must necessarily coincide with the engine speed.
A rigid or semi-rigid coupling is used to connect the motor and gearbox shafts.
The role of the gearbox can be played by a belt drive. To properly assemble the elements of the circuit, you can use an automobile timing belt tensioner. Particular attention must be paid to the correct alignment of the shaft.
Sliding gate control methods
The main convenience of sliding gates is their almost complete autonomy, especially if you use the remote control of sliding gates.
We will consider 3 common types of automation for sliding gates.
Keychain remote control
Cheap and handy device, very popular among the owners of sliding gates. In addition to the electric drive that sets the gate in motion, we need a control unit.
The remote control system consists of a control unit and a remote control. There is only one button on the control unit, which gives a signal to open or close the gate, depending on their initial state. There may be one or two buttons on key fobs, which, after installing the system, must be programmed. You can do it yourself with clear instructions.

Consider the instructions for one of the types of remote control on the remote control:
- we connect the receiver to the power supply, 12V power, observing the polarity;
- hold down the remote control buttons for a couple of seconds and wait for the indicator to flash;
- on the receiver, we also hold down the button until the signal starts flashing;
- when both signals begin to blink rapidly, hold down the gate control button and hold until the indicators light up constantly;
- release the button and press it again quickly 2 times.
Please note that the gate can be controlled simultaneously from the remote control and from stationary block control, but not by hand. The control unit securely fixes the gate, which provides additional protection against burglary; in this case, a conventional gate lock is not needed.

The receiver board has DIP switches that control its response to a signal:
- 1st position briefly closes the contact while the signal is on;
- 2nd position closes the contact until a new signal is given.
The duration of the pulses that are supplied to set the gate in motion is not large, but can be regulated. To start the engine using a device that supplies pulses with low voltage (12V), you will need to add additional relays to the electrical circuit.
GSM controller
Another way to control the gate is a GSM controller. Recently, it has been gaining momentum in popularity, since you can control the gate directly from mobile phone, i.e. You don't even need a separate remote control.
The only problem with using this method is a poor cellular signal. It is faced by residents of settlements remote from the towers. Therefore, before installing such a system, you need to make sure that the mobile signal in your home is constant, and its quality is not affected by weather conditions.

As automation for the gate, you can use a simple alarm controller "KSITAL". It has 3 groups of relays, the contacts of which are connected as follows:
- contact of the 2nd group parallel to the opening button;
- contact of the 3rd group parallel to the close button.
A circuit using such a controller includes limit switches.
The controller is controlled by template messages that are sent from the mobile phone. It receives a signal thanks to the SIM card installed in it, to which messages are sent. Upon receiving a signal, the controller sets the gate in motion, moving until it is fully open or closed.

The contact of the 1st group of the relay can be set to open the gate using a magnetic key. The system is programmed by setting the value "1" in the 39th cell of the telephone directory of the controller's SIM card. In this case, the gate is opened from the outside with a magnetic key, and closed from the inside with the button of the control unit. The control of the 1st relay in the system is set and removed only manually, i.e. voltage will be applied until the control is turned off. To avoid malfunctions, an independent power source must be connected to the controller.
RFID identification and Arduino
The Arduino board is a frameless, expensive device, compared to key fobs and a GSM system, but it has many interesting features. The purchase of such a board and its independent configuration and installation is still at least 3 times cheaper than ready-made gate automation.
We will need:
- Arduino Leonardo board;
- active RFID tag of the SHF or RTLS standard with a signal frequency of 2.4 GHz;
- reader device.
The RS-485 bus is used to connect the devices. After connecting the board, it will be necessary to place it in a sealed shell.

Using the board, you can set the gate to automatically open when a car approaches. To do this, a radio tag is installed in the car, catching the signal of which the device opens the gate and keeps it open until the signal is removed. In addition, the board can perform many other functions related to electronics: turn on the light, turn off the alarm, etc.
Types of sliding gates
Sliding gates have established themselves as a reliable, sturdy construction, which has been used for many years to protect the territories of organizations and private estates. Depending on the throughput of the gate, the size of the opening and some other factors, one of three types of sliding gates is used.
Suspended

Suspended sliding gates are a design that includes:
- vertical posts along the edges of the opening;
- a horizontal beam with a roller mechanism installed on it;
- door leaf moving on rollers on a beam.
- Benefits of hanging gates:
- wind resistance;
- burglary resistance;
- any size canvas.
For private use, small, light gates can be made, but it is precisely this design of sliding gates that can withstand a massive, heavy, canvas with the highest degree of strength. These gates are usually equipped with driveways of organizations that require a high degree of security.

Flaws:
- limiting the height of passing vehicles by the upper beam;
- metal consumption.
It is because of the limitation of transport in height that they try to make such gates as high as possible, which further increases the material costs for the manufacture of the structure.
Rail
Rail sliding gates are driven by the bottom rail. The rail is installed at the same level with the road and does not interfere with the movement of cars.

Advantages of the model:
- simple design;
- wind resistance;
- resistance to burglary and ramming due to the possibility of using a reinforced heavy frame and sheathing;
- the ability to close the opening up to 6 m.
Flaws:

To mitigate the disadvantage of rail gates, it is desirable that the adjacent pavement it was strong enough, did not collapse and did not crumble. It is also not recommended to install gates of this type in regions with frequent snowfalls or in places of constant formation of snow drifts.
Cantilever gate
The design of cantilever gates consists of a leaf with a counterweight, which moves along a guide beam, most often fixed at the bottom of the structure.

Advantages:
- closed beam protected from the weather;
- do not contact the ground;
- do not limit the opening in height;
- there is no gap between the gate and the adjoining fence.
Flaws:

This type of gate the best way combine ease of use, durability and low cost of their manufacture.
Benefits of sliding gates
The main advantage of sliding gates is their compactness and unpretentiousness:

In addition to saving space, sliding gates have a number of other advantages.
Reliability. Due to their design, they are less susceptible to damage from strong gusts of wind, impacts or burglary attempts. The mechanism by which the door leaf moves is simple and designed for long-term regular use.
Electric drive availability. For sliding gates, electric drive and automation models are simpler and cheaper compared to swing gate equipment.
The dimensions of the gate are practically unlimited, and are made individually according to the size of the passageway.

Sliding gate photo
Due to the simplicity of design, ease of use, stylish design and minimum space requirements, sliding gates are increasingly replacing simple swing structures.
There are many materials available to fill the frame of sliding gates, thanks to which the gate acquires its own style and personality.
Sandwich panels
Sandwich panels are one of the most affordable and popular materials. With their help, the gate is easy to give any style. The panels are made with any texture and pattern, so it is not difficult to choose exactly the option that is ideal for the style of the house, whether it be wood, paneling or corrugation.

Tree
Wood is an environmentally friendly and durable material, and if it is treated with a high-quality modern coating, then wooden gates will retain their appearance for a long time.
The budget of wooden gates is in a wide range, so, for example, you can upholster the frame with pine boards or fill it with carved details from oak or cherry. The latter will not only last much longer, but will also give status to the site, becoming a real decoration of the yard.

Strained glass
New interesting design solution steel sliding gate tempered glass. Fragile in appearance, they are able to withstand strong gusts of wind and impact. Glass can be tinted, but if from the side of the street on the site there are only decorative elements and plants, often the owners do not hide the beauty of their site from prying eyes. Great solution will be a combination of metal and glass.

Products from decorative forging are always appreciated, look expensive and presentable. Leafs made of this material, although heavy, are easily moved to the side when automatic sliding gate control is used. Forged gates do not deform, do not rust, are very durable, reliably protect the site from burglaries, while they themselves do not bend from blows or ramming.

profiled sheet
Profiled sheet - light facing material. It is easy to work with him even for a beginner in the construction issue, who decided to make sliding gates with his own hands. Gates made of profiled sheet are reliably protected from the adverse effects of the external environment. They are not subject to corrosion due to the fact that this material is a sheet of high quality galvanized steel, additionally coated polymer coated. In addition, the profiled sheet can be chosen in absolutely any color.

Sliding gates are very popular at the present time, although in the recent past, few could afford to install such a structure on the site, due to the high cost of fittings and mechanisms. Now their cost is much lower and availability is higher, and a person with welding skills can make them with their own hands. The absence of upper and lower guides in sliding gates gives an advantage to the passage of vehicles of almost any size.
Sliding gates - principle of operation and design
The principle of operation of the gate: the leaf moves on two roller carts mounted on a concreted channel. Top rollers are used to protect against falling and tilting. In the closed state, to relieve the load from the roller bearings, an end roller is installed on the guide, which drives into the lower catcher when the gate is closed. The upper catcher is installed for more reliable fixation of the gate in the closed state. The full size of the gate is 150% of the width of the opening, that is, if we have an opening of 4 m, then the total width of the gate leaf will be 6 m and, accordingly, the place for rollback should be at least 6 m. Perhaps this is the main drawback of this type of gate and if there is not enough places it is worth considering other options.
Design drawing and diagram
Before manufacturing the gate, it is necessary to determine the dimensions of the future gate, make a drawing indicating these dimensions. The gate consists of a power frame and a crate (internal frame). The frame is usually made from profile pipe rectangular section 60 * 30 mm and a thickness of 2 mm, and you can also use pipes 60 * 40 mm or 50 * 50 mm if right size not available. For the inner frame, a profile pipe 40 * 20 or 30 * 20 is suitable, depending on which one is available.
An example of a connection diagram for gate parts:
Selection and calculation of materials with fittings
Let's take the drawing above as an example. For the frame we will use profiled pipes of rectangular section 60 * 30 with a thickness of 2 mm. We calculate the total length of the pipe for the frame based on the dimensions in the drawing 4200 * 2 + 1800 + 1865 \u003d 12065 mm, we calculate the length of the hypotenuse of the triangular part using the formula c \u003d √b 2 + a 2 √1800 2 +1865 2 \u003d 2591 mm, 12065 + 2591 =14656 mm. The total turned out to be 14.66 meters in meters, this is with regard to the frame.
For the inner frame, we take a pipe 40 * 20 and now we calculate the total length 4200 * 3 + 1865 * 4 = 2060 mm or 20.6 m. All dimensions are taken with a small cape.
Fittings are complex and unprofitable in self-manufacturing and is usually bought in stores of the corresponding profile. When choosing fittings, you need to know the approximate weight of the future design for the competent selection of rollers that can easily withstand this weight.
Almost any material can be used for the internal lining of the gate, but most often a profile sheet is used for these purposes, popularly called "corrugated board". Decking can be ordered in any size and color, it is quite light and has an anti-corrosion coating. For the gate in our example, you need a sheet with dimensions of 7.833 m 2. To fasten the corrugated board, you will need self-tapping screws with a drill or rivets. For a mortgage, you need to purchase a section of a channel with a width of 16–20 cm and a length equal to half the opening of the gate, in our case at least 2 meters. The reinforcement for the foundation frame should be taken with a diameter of 12–16 mm and a length of 15. To mix concrete for the foundation, you will need cement, sand and crushed stone in a ratio of 1: 2.1: 3.9. For the foundation of the gate from the example, 0.5 m 3 of concrete is needed.
Required Tool
- Welding machine, preferably semi-automatic.
- Bulgarian with cutting and grinding discs.
- Screwdriver or riveter.
- Hammer, tape measure, white marker.
- Concrete mixer, bayonet and shovel.
- Protection for eyes and hands.
Do-it-yourself instructions for the manufacture and installation of sliding gates
First you need to cut the pipes according to the dimensions given in the drawing, using a grinder. Be sure to use protective equipment.
When finished cutting, lay the pipes on a horizontal surface or stands, as in the figure above, to form a frame according to the drawing. After making sure that the layout is correct, we weld all the corners of the frame at several points, then completely weld the joints. Now you need to grind the places of the welds. The inner surface of the frame, where the frame will be attached, must first be primed with an anti-corrosion primer, since later, when the frame rises, access will be impossible.
Using the same method, we weld the frame and also clean and prime it only from the outside.
Connecting the frame to the frame
First, let's decide how the gate leaf will be sewn up - only from the front or from both sides. If only from the front, the frame should be welded flush with the front side of the frame, when from two, then in the middle. Let's take both sides. We measure the distance and make marks inside the frame where the frame should be. Inside the frame, lying horizontally, we lay the finished frame in the middle of the frame, adjusting it according to the marks with substrates from pieces wooden block. Adjusted, checked, now you need to connect the frame to the frame with welding points around the perimeter in increments of about 45–60 cm so that the frame and frame do not lead. We weld in sections of 1 cm crosswise until the step between them is 15-16 cm, and only then we weld the joints completely. Now we will weld the guide rails from the hardware kit to the bottom of the frame. We will weld in the same way as the frame to the frame.
Painting
The next step is to prepare the frame for painting. First, we clean all the welds with a grinder to an acceptable look. Degrease the entire frame and prime with an anti-corrosion primer. After the primer layer has dried, you can start painting. For painting, it is better to use alkyd enamels, but they are also quite suitable. acrylic paints. You can paint with a spray gun, brush or small roller. Coloring is carried out in 2 layers, applying the next layer after the previous one has dried.
sheathing
You can start sewing the door leaf. We fix the profile sheet, cut to size, with self-tapping screws with a drill or rivets. First, we fix the sheet in the corners, and then fasten it around the perimeter and along the inner frame in increments of 15–20 cm.
Foundation
You can start pouring the foundation. We dig a hole with a length of at least half of the gate opening, in our case at least 2 m, a width of 0.5 m and a depth of 0.7–1 m. We start preparing the mortgage - there is nothing complicated here. Here's what the finished mortgage looks like:
We place the mortgage in the pit and check with a level that the channel is in a horizontal plane and on the same level with the yard area, so we will provide an even base for the carriages. We mix concrete with a concrete mixer in the proportion: 1 part of cement, 2.1 sand, 3.9 crushed stone. The resulting brand of concrete M250. We fill the hole completely, not forgetting to often pierce the concrete with a piece of reinforcement or a wooden lath for better penetration and filling voids. The foundation must stand for at least 10 days, and the total period of drying and curing of concrete is 28 days. The next day and the next 3-4 days, it is necessary to water the foundation with water to avoid cracking the concrete.
Installation
The foundation is ready - you can proceed with the installation. On the mortgage we place 2 carriages at the maximum distance from each other. We expose the gate on the carriages, inserting them into the guide rail. Now you need to adjust the carriages. The one closest to the opening is placed so that the gate, when fully opened, does not reach its edge 15-20 cm to the carriage. Another carriage is placed so that when the gate is fully closed, their edge does not reach the carriage by 5 cm. We check the installation with a level and tack it with welding. When we checked that the whole structure is right, we weld the joint of the carriage and the mortgage completely.
The next steps are to fasten the remaining parts. The upper protective rollers are attached to the mortgage in the post, if it is provided, when there is no mortgage, you must first fix the metal plate on the anchor bolts, it will act as a mortgage. The top rollers are usually welded to the mortgage.
It is possible to weld a pipe section 30*20 on top of a 60 * 30 pipe and weld the upper rollers to it. In this way, we will get a more reliable mount.
On the opposite post, we attach to the mortgages a section of a profile pipe 30 * 20 with a length equal to the height of the gate leaf, and directly to the pipe the upper and lower catchers. We fix the lower catcher 5 mm higher than the end roller is located, so that when hitting the catcher, the gate rises, thus partially removing the load from the carriages.
The upper catcher is attached to the pipe 5-7 cm below the top of the gate to protect it from fluctuations in the wind.
The guide is closed on one side and the other with rubber plugs that come with the fittings.
Automatic gate opening
For ease of use, you can make an automatic drive for opening the gate, nowadays the market offers a large selection of such drives, and choosing something for yourself with a good price-quality balance is not difficult. It is best to entrust the installation of the drive to a specialist in this matter, although you can figure it out yourself, since the drive goes detailed instructions for connecting the engine itself, sensors and mounting the gear rack.
The power of the purchased drive, depending on the weight of the sliding gate, can be found in the table:
Table: dependence of motor power on gate weight
But still it is better to buy a drive with a power reserve.
Automatic sliding gates:
Video: do-it-yourself sliding gates
It is no secret that sliding gates designed and assembled independently will cost much less than those ordered from a company for the production and installation of such gates. We control the quality of execution ourselves, so that everything can be adjusted to millimeters, thereby producing a quality product for our own use.
The versatility of sliding gates allows them to be used not only in industrial buildings, but also in residential buildings. If desired, they can be made by hand. After reading this article, you will receive recommendations on the preparation of the opening, the construction of the foundation, the frame, the drawings of the main structural elements are attached.
First you need to find out what resources will be needed to make the gate. Might be cheaper to order already finished structure than buying numerous tools. Although most of them are still useful in the economy. So, you need to prepare:
- shovel;
- welding machine;
- grinder;
- axe;
- building level;
- roulette;
- screwdriver;
- hammer.
Note! Almost all the tools from the list should be available in any home. The only exception is a welding machine, but you can take it from your neighbors or, in extreme cases, buy it - such a thing will certainly not be superfluous.

Having dealt with the equipment, you can begin to calculate the cost of building materials. In this case, we are talking about gates. standard sizes with an opening of 4 m. Everything you need can be bought at hardware stores and metal depots, as well as, if desired, replaced with something that is cheaper, more expedient, more durable, etc.

- The concrete mortar for fixing the "mortgage" is mixed from cement, crushed stone and sand in a ratio of 1: 3: 3.
- Roller carriages will be installed on the "mortgage" (channel ½ of the gate width). For greater strength, reinforcement no more than 1 m long is welded to the lower part of the channel. In total, seven to eight meter sections and three at an angle (17-18 m in total) are needed.
- The door leaf measuring 2x4 m on one side will be sheathed with corrugated board. For its manufacture, you need: 180-200 self-tapping screws, 10 m² of corrugated board, a package of electrodes, 5 m of 6x6 cm pipes, 20 m of 4x2 and 6x3 cm pipes, a can of primer, a can of paint, a solvent.
Note! If a gate of a different size is planned, then all calculations must be carried out independently. You can use the online calculators that are on the websites of many hardware stores.

The basis for the "mortgage"

The construction of sliding gates begins with the creation of the foundation for the "mortgage". As already mentioned, the length of the "mortgage" should be equal to ½ the width of the gate, in this case it is 2 m. 9-10 meter pieces of reinforcement ø1-1.4 cm are welded to this element and a hole is pulled out 1 m deep and 30 cm wide ( approximately the width of the shovel bayonet + 30 cm for the channel).
- cement, 100 kg;
- fine crushed stone, 300 kg;
- sand, 300 kg.
Ready concrete is poured in such a way that one level with the “mortgage” comes out, otherwise water will accumulate there. While the solution dries (this requires at least 7 days), all the necessary fittings are selected.

Mounting profile pipe
The upper rollers, as well as the catchers located above and below, are conveniently mounted using a 3x6 cm profile pipe. It is installed along the entire height of the column, as well as in the places where the fittings are attached. There are two ways to fix this pipe.

Fasteners are often additionally reinforced with anchors. At the same time, it is worth noting that over time, the anchors installed in the brick loosen.
Pipe concreting is more reliable, but this requires a lot of labor, which is not always advisable. The mount will look something like this: the lower rollers are installed, then the door leaf, and the upper rollers are welded on top. With regards to the lower catcher, it is already welded in fact, focusing on the line along which the canvas approaches the pole at the opposite end.
"Embedded" are welded to the pipe, while using small corner profiles. In the future, "mortgages" are painted in the color of the door leaf.
Note! Without assembling the "mortgages", extremely accurate removal of the reinforcing bars to the catcher and rollers will be required, which in itself is quite difficult. Or you will have to fix it with anchors, which, as mentioned earlier, is very unreliable.
Hardware selection
After preparing the foundation and the "mortgage", all the necessary components are selected. Accessories include:
- guide rail 5-7 m long;
- plugs;
- a pair of roller carriages;
- grips;
- end and top rollers.
Note! It is better to buy all these components, because for their independent production, special equipment and considerable knowledge in the field of technology are required. As a result, home-made fittings will cost more than store-bought.

First you need to determine the length of the rail. It should be 1.5 times the width of the opening. A product of 1.3 widths is taken in two cases:
- if the weight of the gate is insignificant (less than 250 kg);
- if there is not enough space to open.
All fittings are usually designed for a specific weight - approximately 500-800 kg. If the canvas is sheathed with corrugated board, then fittings should be selected for a weight of 350-400 kg. But if the material used for sheathing weighs a lot, then it is better to opt for 800 kg.
The canvas will "ride" on rollers, metal or plastic. With proper operation, both options will last a long time, but it is still preferable to choose plastic ones - they make less noise when opening / closing the gate.

When buying, you should pay attention to the presence of the upper grip and rubber plugs.
Note! If all the components are made carefully and are sold in original packaging, then the manufacturer is serious and uses only high-quality equipment. You should not buy parts that are sold in plastic bags or have uneven edges - this is a clear sign of "handicraft" production, and in case of any problems, there will simply be no one to make a claim.
Frame construction
Step 1. First you need to prepare a place for assembly. Its dimensions should be larger than the dimensions of the future design.
Step 2. Pipes are prepared (for the frame you need to take 5x5x0.2 cm), cleaned of scale or rust, after which they are treated with gasoline and coated with a primer. For priming, you can use a spray gun (the work will be done faster) or a regular brush (the primer layer will be thicker).
Step 3. After the pipes have dried, the frame is welded. It is important that there are no holes left at the joints where water could penetrate.

Step 4. An internal frame is being prepared, which is necessary for fixing the corrugated board. A smaller pipe 4x2x0.2 cm is placed on a larger one - 5x5x0.2 cm:
- in the middle, if two-sided sheathing is planned;
- closer to the edge, if only one surface is sheathed, there will be room for corrugated board.
Pipes are welded in a checkerboard pattern with a step of 40 cm - so they will not “lead” at high temperatures.

Step 5 Welding points are processed with a grinder and covered with a primer layer.


Step 7. After the paint has completely dried, the frame is sheathed. The corrugated board is fixed with self-tapping screws on the inner frame.

Video - Gate installation
Step 1. Roller carriages are installed on the "mortgage", and gates are already placed on them (the rollers are threaded into the guide). Further, using the building level, the verticality of the structure is checked and, if everything is fine, the carriages are welded to the channel.

Many use bolts for such fastening, since there are suitable holes in the carriages. But you don’t need to do this, because measuring and making holes in the “mortgage” will take a lot of time and effort. Moreover, if even a millimeter error is found, then you will have to cut off the bolts and repeat the procedure again.
Welding is more suitable, because it provides a field for maneuvers - if necessary, you can always cut it off and move the carriage. Welding is no less reliable than bolts - with it, the gate will stand for decades.
Step 2. Mortgages for other components are prepared from 6x3 cm pipes. In appropriate places, reinforcing bars are removed from the pillars, to which catchers with rollers must be fixed.
Step 3. The end of the guide is equipped with a roller with special clamps, after which it is closed on both sides with rubber plugs. The location of all elements is carefully measured, then roller carriages are welded.


Video - Sliding gates
Automation
Note! Automation can only be installed if the gate moves easily and without any jumps.

The installation technology for gate automation is described on the example of the Chinese model PS-IZ, which has proven itself very positively. The automation kit will consist of:
- electric drive;
- signal light;
- gear rack;
- remote control;
- photocells.
For installation you will need the following equipment:
- welding;
- drill;
- drills for metal.
The drive will be powered by a cable 0.2x0.2 cm, and for photocells 0.4x0.07 cm and 0.2x0.05 cm will be required. A cable with a cross section of 0.2x0.07 cm is connected to the signal light. The electric drive will be fixed on the same channel, as carriages.

Step 1. First, the installation location of the drive is selected. For this, a base is taken (it should be included), the drive itself is placed on it. The base is placed between the carriages and the working position is recreated - a gear rack is installed on the gear of the electric drive. The location of the channel is adjusted so that the rack is in the center of the gear and is fixed on the outer frame (but only on the profile pipe).

Step 2. The installation site is marked, after which the base is placed and scalded there.
Note! Quite often, the drive has to be raised by two to three centimeters. In this case, the remains of the profile pipe are welded to the "mortgage", and the base is already attached to them.
After that, the actuator is screwed to the base.

Step 4. Limit switches are screwed to the rail. They are mechanical and magnetic (the latter are more reliable).
Step 5. The drive is connected according to the manufacturer's instructions, after which it is tested. If everything is normal, the Photo-GND jumper is removed and photocells are installed.
Note! One element gives a light signal, and the other receives it. In the presence of a signal, the system functions normally, but if any obstacle arises in the path of the beam (a car, an animal, a child, etc.), then the canvas immediately begins to move back.
Step 6. A signal lamp is attached to the left side of the structure with self-tapping screws. This is optional, but for safety reasons, it is still better to put a lamp. To do this, you need a cable with a cross section of 0.2x0.07 cm. The cable is soldered to the Light and AC-N contacts on the board.

Actually, after thisdo-it-yourself sliding gate drawingsand instructions for the manufacture of which are given in this article, you can already use. For a more detailed acquaintance with the nuances of installation, watch the thematic video.
Video - Homemade sliding gates