Proper installation of a kitchen set is the key to a long service life of furniture. How to install a new kitchen yourself Do-it-yourself kitchen assembly step by step
Beautiful and original kitchen assembled by hand
You bought a new set for the kitchen and brought it home, but you don’t want to give ten percent of its value to the assemblers from the store? Installation kitchen set DIY is not such a difficult process. Do it yourself if you have the necessary skills and are not afraid of difficulties. Want to learn how to assemble a kitchen set? Take advantage of our advice.

Sealed kitchen set

Sketch of a corner modular kitchen
Give preference to modular furniture, as well as designs that provide for a simplified assembly of a kitchen set. Before buying, draw up a detailed plan of the room, on which you must indicate (preferably in millimeters):
- height, width and length of the room different parts kitchens - for sure they will differ;
- the location and dimensions of the door;
- the exact position of electrical wiring, sewerage, water and gas pipelines;
- the exact location of the ventilation;
- the height of the window sill and the distance from the window opening to the corners of the kitchen.

Detailed kitchen design project exact dimensions and arrangement of furniture and appliances
Now boldly go to the workshop or furniture store. Experienced specialists, using 3D modeling computer programs, will select the appropriate design and give advice on how to assemble a kitchen set. When choosing, follow the rules.
- The kitchen is divided into zones for cooking, cutting food with a sink and storing food with a refrigerator. The transition between them takes place along the shortest path - the "golden triangle".
- The sink, hob and refrigerator must be located at least half a meter apart from each other - water splashes can lead to cooking failure, and the refrigerator in the area high temperature will consume more electricity.
- Place the washing machine and dishwasher close to the water supply and sewerage.
The design of the headset depends on the size of the kitchen. Variants of the location of the elements of the headset with the letter G and P are used in small rooms. The island version is suitable for spacious rooms.

Possible kitchen layout options
What will you need

Necessary tools for working with kitchen furniture
Before assembling a kitchen set, find in your toolbox or purchase:
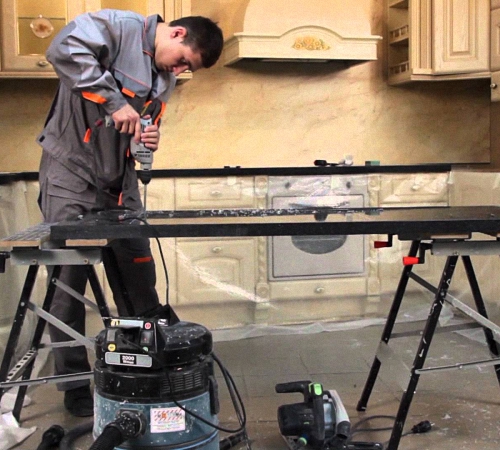
- drill or puncher with a set of drills;
- hammer and chipper - for marking holes on concrete;
- screwdriver - for fast tightening of self-tapping screws;
- electric jigsaw - for cutting holes;
- construction stapler.
- socket wrench for socket head screws.
During assembly, you may need the following materials:
- furniture nails;
- furniture corners and borders, edge tape;
- intersection screeds;
- mounting and wooden slats of the same thickness;
- self-tapping screws and dowels;
- silicone sealant or waterproofing film;
- wood glue;
- acetone or white spirit.

Accessories for kitchen furniture assembled by hand
IMPORTANT! Your main source of information is the assembly instructions for the kitchen set. Conscientious manufacturers include a printed copy in the delivery set and post it on their official websites on the Internet.


Step-by-step instruction for assembling kitchen cabinets
Hang straight
Start assembling a kitchen set with wall cabinets. Before that, carefully select the details for each element of the headset.

Piece-by-piece assembly of a hanging cabinet
Installation of fittings and fasteners
Make the installation door hinges, shelf supports, as well as guides for drawers.
Assembly of the supporting structure
For accuracy of assembly, holes for cotter pins are provided at the points of mating of parts. Connect the side and horizontal walls, make sure that the mating angle is 90 degrees.
FOR YOUR INFORMATION! To avoid damage, assemble them in a position where the holes are in a plane perpendicular to the surface of the assembly place.
Dock the second pair as well. Assemble the box from two halves and make sure there is no skew - measure the diagonals.
Box coupler
For this purpose, screws with a countersunk head with an internal hexagon or furniture corners can be used. Insert and loosely tighten all mounting screws. Make sure that there is no distortion and make the final screed.
Rear wall mounting
In the designs of wall cabinets, two methods of its installation are used. The first is to fasten fiberboard or hardboard from the outside with a construction stapler or small nails.
- Lay the box on the assembly surface face down and place the fiberboard on top so that the edges do not extend beyond it.
- Fix it at the corners first to avoid warping.
- Fasten around the perimeter, observing an interval of 10 cm.
In the second method, the sheet is inserted into the grooves machined along the rear edge of the uprights.
Hang your closet properly
“Well, it's quite simple! - you might think, - I attached the awnings, installed the dowels in the wall and screwed them with self-tapping screws. Take your time! The obvious solution is not always the best.
IMPORTANT! Decide how you will hang it - on mounting rails or using hanging eyes. How to prepare the back wall, read on.
Prepare the wall
Eliminate bumps, paint or wallpaper - you will not have such an opportunity after the installation is completed. Protect the space between the table and cabinets with an “apron” from splashes that occur during cooking and washing dishes. How to do this, read on.
Make an "apron" from panels

Installation of skinali for the kitchen
An important plus of such protection is quick installation and low cost. The panels are put on glue or mounted on a frame (if the kitchen is large or the surface is uneven). If you chose the first method, pay attention to the details:
- level and prime the wall;
- use "LIQUID NAILS";
- control the vertical skew with a building level.

Bright and juicy summer print for kitchen apron
Find a comfortable height and location

Ergonomics of a kitchen set or how to conveniently and functionally arrange furniture in the kitchen
The installation height of wall cabinets is determined in accordance with the requirements:
- The space between the table and their lower edge must be at least 0.50 m and provide a good overview.
- The bottom shelf should be at eye level, and you can reach the top one with your hand.
- If communications are laid along the wall, it is necessary to cut out cutouts in the back of the box.

It looks like a cabinet under the sink with communications and wires inside
Make the right markup
Use a building level (bubble or laser) to draw an accurate horizontal line for marking holes for fasteners.
Use "crabs" and mounting rails (rails)
Canopies-eyes are not the most successful way of fastening. Its disadvantages:
- rigid fixation - it is no longer possible to move the fasteners sideways or upwards after installation;
- inaccuracy - when drilling, deviations from the horizontal line are possible;
- walls should be perfectly even and thick;
- mounting directly on the fiberboard leads to its breaking and deformation.

Mounting rails for fixing kitchen furniture
Mounting rails and adjustable canopies (“crabs”) give you the freedom you need and the following benefits:
- load up to 100 kg does not destroy the back wall;
- easy installation on lining, drywall and wall panels;
- insensitivity to the unevenness of the wall;
- fine adjustment of the cabinet position in the horizontal plane;
- the possibility of its alignment when hanging on the "apron".
Fix the rail with dowels and self-tapping screws. Please note that the distance from the rail groove to the top wall must be at least 40 mm.

The use of a mounting plate allows you to achieve a tight and reliable fastening of the cabinet to the wall.
Install adjustable awnings on inner sides racks closer to the upper corners of the wall cabinet. In the back wall, pre-cut holes for hooks.
ATTENTION! The hook of the canopy should protrude from the housing by a length sufficient to hook into the rail groove.
After hanging the cabinet on the rail, fine-tune the awnings using the two screws located on the outer end. The top screw adjusts the height of the cabinet above the floor, and the bottom screw adjusts its tilt forward or backward relative to the wall.

Adjustment screws on the mounting plate make it possible to adjust the position of the kitchen cabinet
IMPORTANT! If the installation takes place on drywall or eurolining, install fasteners in places where the metal guide ribs of the supporting structure are located. The load is evenly distributed along the entire length of the rail.
We have previously described two ways of attaching the rear wall. In the first case, the mounting plate pushes the top of the cabinet forward and creates a skew that can lead to a fall. To eliminate it, fix a rail of the same thickness under the bottom edge (or use a tiled "apron"). The option with inserting the wall into the groove is more preferable, since it does not require a second bar.
Install intersection ties

Intersectional furniture tie for additional support and protection against sagging
The tie screw is screwed into the sleeve, and the heads with wide caps provide fixation. Installation consists of a few simple steps.
IMPORTANT! This technique creates additional points of support and prevents uneven sagging of the sections, and also prepares a flat surface for the final step.
Hang facade elements

We hang doors for kitchen furniture
Install doors and borders last - this will speed up the installation process and reduce the risk of breakage.
We descend from heaven to earth
After admiring the creation of your own hands, majestically hanging on the walls of the kitchen, proceed to assemble the floor elements of the headset.
We start dancing from the corner

We connect the lower cabinets - the corner one for the sink and the one next to it for the drawers
And there is a corner cabinet with a sink. Usually this is a construction with a bottom, consisting of two parts, a horizontal side, replacing the second back wall to provide access to plumbing, and two perpendicular to each other (large and small) under the table top. Assemble it according to the following plan:
- screw the composite bottom to the rear rack and secure the rear side with one of the ends;
- screw the side racks and pull them together with drawers;
- tighten them together with screws;
- mount the legs to the bottom of the cabinet according to the markup;
- hang and adjust the doors.
Insert sink

The sink is often sold separately from the headset. There are a few important things to keep in mind when installing.
- Sawing a hole for it is carried out before assembly from the substrate side.
- The edge of the sink has two perimeters. The outer one corresponds to its edge, and the inner one corresponds to special loops for fastening.
- When marking the hole, step back from the edge of the workpiece at least 10 cm. Outline the outer boundaries of the sink with a pencil.
- Measure the distance from the edge to the mounting loop with a ruler.
- Set aside this distance inside the outline of the label. Draw a line through them, limiting the inner perimeter.
- Drill a few through holes on it for a jigsaw;
- Stick several strips of adhesive tape on the backing side, overlapping the outlined area - this will prevent damage to the front surface when the piece being cut sags.
- Use a jigsaw to cut a hole for the sink.
- Apply sealant to the space between the inner and outer perimeters and wait for it to thicken.
- Insert and fix the sink with special clamps.
Assemble floor cabinets

We mount the legs for our floor cabinet
The assembly of floor cabinets follows the same principle. But first, adjustable legs are attached to the bottom of the cabinet according to the holes made in it. After assembling the housings, be sure to carefully align the top edge and the intersection tie.

The assembly sequence of the lower kitchen cabinets
Start the assembly of drawers by mounting the guides on the sidewalls. Fit them to the back wall, insert the bottom, install the front cover, check the diagonals for skew, pull off the fasteners, screw the handles.

Installing drawer rails for bottom cabinets
Install the countertop

Worktop for a kitchen set with a cutout for a sink
Most often it is made of laminated fiberboard. It is quickly mounted, has small weight and easily gives in to processing. Assembly consists of the following steps.
- Mark the fiberboard with an allowance of at least 1 cm in all directions, taking into account the gap of up to 5 mm of the “apron” and the thickness of the metal strip applied to the ends.
- Saw the workpiece with an electric jigsaw or a furniture hacksaw.
- Apply sealant to the ends, press the bar firmly with self-tapping screws, remove excess silicone with acetone.
- Install the countertop on the racks of the floor cabinets and secure with self-tapping screws.
- Fill the gap between the edges adjacent to the apron with sealant and close it with a furniture border.
IMPORTANT! Take the waterproofing of the ends and mating surfaces seriously and follow all manufacturer's requirements.
The corner tabletop consists of two or more parts, connected with special ties. Assemble it according to the following scheme:
- on the upper edge of the edge of the joint, apply the special glue that comes with the kit, which has high adhesive properties;
- thoroughly grease the rest of the joint with ordinary wood glue;
- insert the lamellas into a special slot sawn along both sides of the joint;
- install the ties from the substrate side into mirror-matching grooves made perpendicular to the joint surface, tighten with a wrench;
- remove the adhesive that has come out on the front surface with white spirit or acetone.
Congratulations! You managed and assembled and installed a kitchen set with your own hands, which will last for many years and will be your pride.

Ready-made kitchen, assembled with your own hands
Video: Kitchen assembly master class
After finishing the repair in the kitchen, most likely there will be a desire to purchase a new kitchen set. It will be shipped disassembled. A specialist from the store, of course, can assemble it for a fee. But why pay more? After all, this is not as difficult as it might seem at first glance.
What is needed for assembly?
Any work requires the use of some tools. In this case, to assemble a kitchen set with your own hands, you will need:
- Screwdriver or drill (there is no fundamental difference, the main thing is to simplify the process of screwing in the fasteners).
- A puncher complete with a drill with a diameter of 6 or 8 mm is needed to fix the cabinets on concrete or brick wall using dowels. For wooden wall a drill and large wood screws will suffice.
- Tape measure and square, screwdriver and hammer, a set of drill bits for wood, a level, a construction knife - essential tool when assembling a kitchen.
- Jigsaw or very good hacksaw needed to cut off the excess from the countertop.
- A key for hex furniture fasteners (screws) usually comes with fittings, but not all manufacturers put it in, so it’s better to stock up on your own in advance.

Before proceeding with the assembly and installation of the kitchen set, read some of the features and recommendations so that the work goes quickly, all the subtleties and details are taken into account, and there is no need to redo it.
- Wiring and all communication lines must be located in full accordance with the drawing of the kitchen. Do-it-yourself assembly of a modern headset will be successful only then. When all the elements will be located in their places.
- Sockets should be at a distance of 10 cm from the table surface.
- It is worth checking the slope of the floors. A slope of more than 5 mm will become critical, and correct installation will not be possible.
- In the event that assembling a kitchen with your own hands is the first such work, you should start by carefully studying the instructions from the manufacturer. It should describe in detail which fasteners, in which places, will be installed.
- Do not rush to fasten the doors, because, having used the fasteners for other purposes, then you will have to redo it. But with regard to cheap furniture made of chipboard, after such experiments there is a big risk of pulling out the mount with a “root”. So, it will be difficult to install the right mount normally, and appearance brand new headset will be damaged.
- Before starting work, distribute all the parts in their places, determining exactly where they should be located. Also count all fasteners individually, noting for themselves their destinations. For convenience, lay out in separate containers. Nothing should be lost in the process of assembling a kitchen with your own hands. A video on how to properly use cabinet furniture mounts will help you get the job done right.
- In the event that you need to screw in self-tapping screws (screws), but there is no ready hole for it, drill it with a wood drill. Its diameter should be slightly smaller than the diameter of the screw.

Kitchen Assembly Sequence
So, when everything is ready to start assembling the kitchen with your own hands, the drawings and assembly diagrams have been studied, proceed to the process itself.
1. The first thing to do is to attach the cross fasteners for the doors. You can screw them with two self-tapping screws into the previously prepared holes.
3. The next step is to install dowels (or wooden chopsticks). They serve for more reliable fastening. wooden parts, for better stability of the structure and the assembly of a more even frame. Use glue to fix the dowels. According to experts, ordinary PVA for working with wood is the most best option. But you can use any other mounting adhesive for wood. Insert the chopstick into through hole, fix it tightly and put another part on top, squeeze it tightly.
4. Evenly spaced parts on the dowels are twisted with a hex furniture screw. To hide the head of the self-tapping screw, put a cap on top to match the color of the furniture.

5. The next step in assembling the frame will be the installation of the legs. In more expensive furniture options, the leg is adjustable, and in cheap ones it is only a plastic “thrust”. It will not spoil the flooring and hold the furniture, but if the floor is curved - an unregulated base can be a serious problem for the entire system. Adjust the height of the legs so that the assembled headset frame is level.
6. Attach hangers to the wall cabinets. They are usually adjustable. Fix them in the upper corners of the sides.
You can see how the kitchen set is assembled with your own hands in the following video:
How to assemble drawers?
To assemble such a box, follow the same algorithm as with the locker. First, we twist the walls with the help of a dowel and screws. When the three walls have formed a single whole, insert the bottom of the fiberboard. Then you need to fix the facade. For this procedure, such a mount as an eccentric screed is provided.
To install this element, screw the screw into the facade and insert its head into the holes in the side walls. They are connected to a large round recess for the second fastening element - the sleeve. To fix, turn the sleeve, the screw head should be fixed in it.
When the box is assembled, it remains to screw the roller guides and insert them into place. This almost ends the assembly of the kitchen with your own hands. Step by step installation instructions below.

Before attaching the doors to the cabinets, you need to install the modules in their places.
- The first to be installed is the outer cabinet, in which the sink is usually placed. For pipes, it is necessary to prepare holes at the desired height.
- Next, we put all the floor cabinets in their places, adjust them in height.
- When all the elements of the lower part of the headset are located, they need to be fastened together. Use an intersection screed for this purpose - four pieces for the lower cabinets and two for the upper ones.
Important! To connect sections to each other, it is sometimes recommended to use ordinary self-tapping screws. However, it is risky to do this, the small fastening cap can eventually crash into the material and break out “with the root” under tension.

Washing
To install the sink, you will need to make a rounded hole in the countertop. While the countertop is not yet fixed, mark out the place for washing, carefully calculating the size and boundaries of the cut. You can not cut a hole equal in width to the sink.
When the markings are done, drill a small round hole in the tabletop in order to start sawing with a jigsaw.
Important! Have someone hold the part of the tabletop you are cutting out. Otherwise, it may fall off and tear out part of the coating. If the work is done on your own, as you saw through the countertop, glue the joint with tape. This will help secure the drop-down part.
Screw the sink onto special fasteners. After installation, seal the joint with sealant.
The built-in stove is installed according to the same principle, only the equipment is put in place a little later.

Countertop installation
Mark the future table cover clearly in size so that it is located close to the walls or with a small gap, and there is an allowance of about 3 cm along the front edge. Cut off the excess if necessary. Screw it to the cabinets from below with self-tapping screws. Another way: the tabletop is screwed to the modules of floor cabinets using corners that are exposed on the side walls. Thus, you can slightly adjust the level of the working surface.
Important! When sawing off the countertop, use a fine-toothed blade to keep the edge as even as possible.
The next step will be processing the edges and joints. When assembling corner kitchen with their own hands, a metal connecting bar is installed at the joints of the tabletop. A metal finishing panel is screwed along the edge of the tabletop. However, it can be replaced by an edge for furniture, which is fixed on a clean and even end of the tabletop with a building hair dryer, in places where there is no thermal effect.
All joints should be treated with sealant. This will help keep the wood from getting wet, thereby extending its life.
For good example how to assemble a kitchen stolplit with your own hands, watch the video at the end of the article.
Wall panel
There is a budget way to organize a work surface on the kitchen wall. If for some reason it was not possible to install a tile or glass as a kitchen backsplash, you can install a laminated wall panel. Standard size panels - 3 meters in length. It is fastened with ordinary dowels, the caps of which are hidden under the cabinets. It must be installed before the kitchen is assembled by hand. Photo wall panels prove that they look no worse than more expensive aprons. They are also convenient to use.
Hanging upper cabinets
The standard height of hanging cabinets above the countertop is 60 cm. Measure this distance and mark it. Next, measure the height of the cabinets and put this size up the wall as well. Draw a line using the building level. On it, install the bar (tire). Cabinets will be attached to it.
Adjust the hanger bolts so that the cabinets hang evenly and tightly against the wall. Fasten the elements with furniture ties.
Another way to hang wall cabinets is for less expensive kitchens. On the top line noted earlier, a hole is made for the cabinet fasteners, the fastening eyelet is put on the dowel nail. Then, holding the module, we level it and mark the place of the second fastening. Again we make a hole and insert the nail. We hang a locker. We repeat the same procedure with all elements.

Important! Mounted structures are designed for a small load. On average, it is from 15 to 30 kg. Therefore, try not to overload the hanging cabinets, check the quality of the fasteners, do not skew the structure, then your kitchen furniture will last a long time.
If all the previous steps are done correctly, the installation of cabinet doors will not cause problems.
On the facade of the doors there are small round recesses made by the manufacturer. In them, you need to fix the loop bowl on the screws. Now put the hinges on the cross-shaped fasteners on the side walls, fasten with bolts and adjust their position with screws.

Finishing work
When all the cabinets are installed, the doors fit and close well, it is necessary to attach the missing fittings to the cladding elements. At this stage, accuracy is important, since the appearance of the headset depends on small external details.
The gap between the wall and the countertop is closed with a special plinth. Using self-tapping screws or small dowels, inner part(guide) fastened to the wall. Then the top is latched decorative overlay. Tabs are mounted in the corners, the end is closed with a plug.
A metal bar is installed at the junction of the table top of the corner kitchen, the strength and evenness of the sink, doors, and fittings are checked.

The hood is mounted at a height of more than 70 cm from the hob (for gas stoves- at least 80 cm) and air duct. You should also connect plumbing and sewer pipes, faucet, sockets and household appliances.
Following the instructions, each owner himself is able to assemble a brand new kitchen set over the weekend and at the same time save a decent amount. After all, handmade warms the soul much more. The main thing is to adhere to the basic principle: measure seven times and only then cut off.
You can use the services of professionals, but at the same time pay them a good amount (the cost of assembly is 6-10% of the price of the product). The received figures enter into horror of customers. There is a free option - do it yourself. At the same time, there is a risk of damage to interior items, but if everything is done correctly, then it decreases to a meager percentage.
Installing a kitchen set is not an easy task, but you can do it yourself
When purchasing headsets, ask the manufacturer or retailer for instructions on how to mount certain items. If there are, then the assembly process will not bring labor and will not take much time.
You will not always find descriptions for the assembly of certain furniture, articles and videos from the Internet will only mislead, because the masters show their individual technique, which will seem incomprehensible to a beginner in this field. In this article, we will reveal the universal and simple rules assembly of kitchen furniture, we will tell about the main nuances during assembly and installation, we will advise how to avoid common mistakes.

What to do first
Key to a successful business - proper preparation. You start it during the alignment of the walls and floor, as well as the final finish. Before installing furniture, complete electrical work in the right places, test them for operability in order to troubleshoot before installation work. Check ventilation and drainage device. Take out construction debris.
No matter how many times you measured the room before, do it again after the repair is completed. In the store, ask again to calculate the dimensions of the headsets. If the brought headset does not “fit” into the room in terms of parameters, then the supplier will not change. Check if there are enough parts for assembly, if something is missing, then contact the seller.
 The kitchen set in the assembled state can be different from the picture, if you yourself do not know how to assemble, then invite the master
Remember that the file is designed to trim the countertop. Other parts must not be filed! This is your mistake or a factory defect!
Place the tabletop on top. If it consists of separate blocks, then use special connections.
 Laying countertops requires painstaking work
The sliding cabinet provides the following assembly method. You mount the drawers themselves earlier (connect the side parts, fasten the bottom with a stapler and handles to the facade). Then mark the side walls of the cabinet for the installation of metal guides, fasten the sliding elements.
Installation of tops is more difficult than the previous stage of work. It is very important beforehand on which you will mount the headset, because the convenience of working in the kitchen depends on it. GOST provides for a standard height of 50-60 centimeters.

The first step is to fix the mounting rails, it comes with the headset or is purchased separately. The first module of the device is attached to the cabinet, the second - to the wall. Before this, marking is done, make sure that the wall is even. The construction level will come to the rescue in this. The "hitch-bar" technique significantly increases the accuracy and speed of work, because you do not have to constantly hold it. Modern hinges have adjusting screws for adjusting the position of the headsets in the forward-backward and up-down directions. Therefore, an uneven surface of the room is no longer a problem!
Assemble the wall cabinet in the same way as the floor cabinet: mount the “box”, connect it to the bottom and top. A special process is the installation of facades. For mobility of the door, use special fasteners. Every detail should be in its place, do not allow them to shift and bevel.
 Assembly of the upper part is carried out at the very end of the process
We install furniture
This stage is no less painstaking than the previous ones. But if each element is in its place, then you will complete all the work within an hour. In this case, you do not even have to use the help of other people.
The following rules will help you install the kitchen set correctly:

- start installing furniture from the corner, because the water supply will be hidden behind it;
- arrange the rest of the cabinets in order, along one wall, and then the second (if L-shaped or U-shaped configuration);
- “tie” floor furniture together with self-tapping screws or a furniture screed (the latter option is stronger and more convenient, does not harm interior items);
- hang cabinets on the hanging bar, also start from the corner, and then install each wall in turn.
To check the quality of your work, try to open the bedside tables and drawers, use the outlet and the sink. If there are no problems, then you have done your job.
WATCH VIDEO
Assembly and installation of kitchen furniture is a laborious process, at first it will seem impossible to you, but step by step algorithm will help in this matter, and the long-awaited headset will be operated comfortably and properly.
You may have to go to several stores or visit a significant number of Internet sites to compare prices and offers for shipping, warranties, etc.
However, even if you have taken into account all these points, you can forget about the most important thing! Namely, that any room must be carefully prepared for the installation of new furniture in order to ensure the safe functioning of your future kitchen.
So you've found the kitchen of your dreams. We assessed the dimensions of a new set of furniture, chose the necessary modules or a complete set, “figured out” how the products would look in the kitchen area, the price suited you, and you decided to order this “perfect” kitchenette. Great! Now you should start preparing the room for installation.
Firstly, all aisles and corridors must be free so that movers can bring furniture into the house without damaging anything. To avoid damage floor covering or bringing construction debris into the house, the floor must also be covered with cardboard or film. Naturally, old kitchen, sink and sink must be dismantled.
Secondly, take care of the power supply of technical appliances, lighting elements, the correct placement of sockets, ventilation outlets, gas and water supply, and also prepare the walls for furniture installation.
About this in order.
1. Power supply (stove, hob, oven, washing machine, refrigerator, water heater, etc.)
Before installing furniture, decide what equipment you need to connect for its further work. How powerful this will be, what sockets and wires will be required.
Installing outlets is best:
behind the back walls of the cabinets: in this case, it is necessary to cut a hole to provide free access to the outlet (see Fig. No. 1);
rice. 1
directly below the headset. Sockets for a refrigerator or stove can be placed under the cabinets next to them (see Fig. No. 2);
rice. 2

in a cupboard, on an open wall (when installing a washing machine / dishwasher, sink). At the same time, it is important to cut off the possibility of water getting on them (see Fig. No. 3);
rice. 3

with a free wire outlet (about one meter long) - for a free separate hood, located at a height of about two meters. Slightly above the upper elements of the kitchen - for the built-in hood (see Fig. No. 4);
rice. 4

on the side wall of the kitchen - for the refrigerator. At the same time, the distance between the wall and the device must be sufficiently spacious (see Fig. No. 5);
Thus, sockets should be placed so that at any time you can easily connect appliances to them or turn them off if necessary.
rice. 5

It is necessary to make the callout of the sockets a little more than 30 mm above the upper part of the headset level and at least 40 mm above the level of the end of the table top plinth.
In no case do not place sockets next to the sink, stove or behind them! This will inevitably lead to a short circuit or fire. You can also not install them behind kitchen appliances.
rice. 6

2. Lighting
Another important point is a comprehensive lighting of the kitchen area. This includes lighting both the entire room with a lamp or chandelier on the ceiling, and the working area.
A very fashionable and stylish solution now is to install kitchen lighting with the help of special lamps.
Recall that the fixtures can be either fluorescent or halogen (or a combination of both). The former have their own switches, the latter do not. That is, the first need a direct connection to the network, the second - using a switch.
3. Ventilation
You should also consider how the kitchen elements will be located in relation to ventilation, and how the hood will be located.
Most often, the air duct is hidden behind a false ceiling, or installed above the upper cabinets of the kitchen (see Fig. No. 7).
rice. 7

Consider also how the duct should be connected to the ventilation shaft.
Remember about the built-in ventilation, which usually comes with appliances (for example, a refrigerator). You can not put the refrigerator close to the wall, otherwise you will not ensure sufficient ventilation.
4. Gas and water supply
Think about how the gas pipes will be positioned in relation to the furniture. The meter must be installed so that it is convenient to take readings from the device in time.
Now a little about water supply. What technique do you have future kitchen will have access to water? Surely you decide to complement the kitchen set with a dishwasher or washing machines. It is very important that these appliances are located next to the sink, so that the hoses do not have to be lengthened. Otherwise, the equipment will quickly become unusable, as the load on the pump will increase significantly (see Fig. No. 8).
rice. 8

5. Walls
Surely you yourself consider it right to align the walls before the direct installation of the kitchen. This one will really help to avoid many installation problems and firmly fix the upper modules on the walls. In the future, correctly placed furniture will not “lead”, there will be no gaps between the elements.
In addition, the walls must be strong enough and reliable, made of brick, concrete. In the case when the room is built of timber or using round logs, the walls should be lined with two or three gypsum fiber sheets (GVL), chipboard sheets or plywood with a thickness of more than 16 mm.
Concerning ceramic tiles, then you can veneer the wall both before buying and installing the kitchen, and after. However, it is best to do this after installing the kitchen set (see Fig. No. 9). This way you lay out the tiles more aesthetically and perfectly “fit” it to the furniture.
rice. 9

Experts also advise installing glass aprons after the kitchen itself. Otherwise (if the dimensions of the kitchen do not correspond to the dimensions stated in the drawings), you risk completely dismantling it, since the joining of the furniture elements and the apron will be inaccurate.
Thus, you see that when installing a new kitchen, you need to think through everything to the smallest detail! We hope that our recommendations will help you avoid unpleasant situations. Enjoy the shopping!
If you find an error, please highlight a piece of text
and press left Ctrl+Enter.
Russia, Moscow region, Moscow +79041000555
Do-it-yourself kitchen assembly: detailed instructions
It takes ~7 minutes to read
Usually, when buying furniture, the manufacturer or intermediary provides services for the installation and assembly of his headset. It always costs money, which is not superfluous. Assembling a kitchen is not a very difficult task if you understand all the intricacies well.
This article will talk about how to assemble the kitchen yourself, using different interior elements. Decision on independent work will be true if you do not want to spend a lot of money and are completely confident in your own abilities.

Save
Tools
To avoid problems with the lack of some tools and materials, carefully prepare everything you need in advance. Next will be full list tools that might come in handy. High-quality installation is possible with the following items:
- Screwdriver. To install a small kitchen set, you will need a universal screwdriver. This tool will not only make the installation process easier, but also speed it up.
- Perforator. It can be useful when installing wall cabinets for drilling deep holes in a concrete wall.
- Jigsaw or saw. To cut some wooden components kitchen or cut a hole for the kitchen sink, a jigsaw or saw will come in handy.
- Roulette. Needed for room measurements.
- Building level. Supervises the correct order of assembly of kitchen cabinets.
- Small tools that any man can find: a hammer, screwdrivers, pliers, a hacksaw.
- Jigsaw and drill.
- Square.
- Hexagon (usually attached to purchased furniture).
- Edge band in the color of the front.
- Sandpaper.
If the dimensions of the furniture exactly fit your kitchen, some of the tools from the list will not be needed.

Save
Assembly of kitchen cabinets
Let's talk about the collection of cabinets for the kitchen in the form of a sequence of actions.
- We attach cross-like fasteners for doors to the side walls. They are screwed with two self-tapping screws into pre-prepared holes.
- Rails for drawers are also inserted into pre-prepared holes. In the future, during assembly, it will be extremely inconvenient to do this.
- Further, we insert dowels made of wood into all through holes (they are also called chopiks or dowels). They reinforce the structure, creating a solid frame.
- We look to see if the cabinet is level, and after that we screw in a furniture screw with a hexagon. He pulls 2 parts together. From above we put on a cap that will be combined with the color of the furniture.
- We fasten the legs (if any) and set the desired height.
- We nail a sheet of fiberboard to the side wall using small nails included in the kit.
- On wall cabinets we fix fittings for fixing on the wall using adjustable canopies. They are attached from the inside to the side walls close to the upper corners.
Assembly of wall cabinets
Install the hinges first. We mark the place of attachment on the side and the door. We add these two elements on a flat surface (table, floor), combining the marks. We attach the loops that come with the kit, fasten. We put something under the door so that it is at the same level. We fasten the loop, then disassemble it, unscrewing the screw and putting the doors aside. Next we will work with the sidewalls.
We attach the top and bottom to the side panels on confirmations (complete with a hexagon). If there is an appropriate bit, we put it on the screwdriver. Otherwise, we work with the usual key.
We fold the top and side, install the fasteners, then the bottom, and then the second panel.
Turn the fiberboard sheet over with the outer side down (it is the back wall). We pierce the fiberboard with small carnations with a construction stapler.
Shelf holders come in different material, but are fixed according to the same principle - in wall holes. Sometimes chopsticks are used (hammered, followed by an emphasis on the shelf). But most metal stops are simply installed in the hole.
Assembling a cabinet with drawers
First of all, we assemble a frame of 3 panels, that is, we work in the same way as with ordinary cabinets. We insert the dowels into the holes and connect the boards. We tighten them with furniture screws together.
To make the bottom of the box, we insert a sheet of fiberboard into the grooves (in no case use MDF sheets!).
Now we fix the facade with ties. The screws are screwed into the facade panel, the opposite tips are placed in the holes in the sidewalls. The eccentric bushings are a means of fixation. They need to be put in a special place left by the manufacturer and rotated. Thus, they are fixed.
To the bottom at the back without fail we fasten the guides with rollers. Then we insert the boxes and check if the mechanism works well.
Features of the assembly of the corner cabinet
Only one feature can be noted here. The fact is that inexpensive kitchen sets have a two-piece bottom (this allows you to reduce the cost). If you plan to install a sink in the cabinet, then the back wall in this case is almost absent. Collets are responsible for the strength of the structure. In all other respects, the assembly of corner kitchen furniture coincides with the assembly of ordinary cabinets with two doors.
This completes the assembly instructions for the kitchen set. Now consider the installation technology in place.
How to hang cabinets in the kitchen
Even before assembling kitchen furniture, you should buy special canopies and intersectional furniture ties for attaching wall cabinets. We have already figured out how to properly assemble a kitchen set. Now it remains to install it in place. Hanging cabinets are attached to the wall with awnings. They are metal plates with holes. Galvanized steel is more expensive than regular steel.
simple awnings
The height of the furniture depends on the level of the ceilings and the size of the cabinet. The standard height between the worktop and the wall cabinet is from 50 to 60 cm. If the height of the kitchen owner is not high or the door opens up, then a height of ~ 45 cm is selected, but not less.
Fastening sequence:
- Step back from the countertop and mark it on the wall. Climb up to the height of the cabinet and mark the fastening line.
- Make holes and fasten the tire. Hang adjustable hangers on the tire. The most durable attachment is with anchors.
- Hang the furniture on the rail using the hooks. Tighten the 2 hanging bolts to ensure that the cabinet fits snugly against the wall.
- Installation starts from the corner. If the wall has an angle greater than 90 degrees, install a bezel to eliminate the unevenness.
- If required, fasten the structure with ties.
A big disadvantage of such a mount is the impossibility of regulation. If hung, then it will not be possible to move to the wall or move away from it. Another disadvantage is that a separate hook is required for each canopy.
Adjustable
This is a more complex and expensive design. The body is made of plastic, the canopy is made of metal. There is a regulatory system. This allows you to move furniture in 4 directions: up, down, left, right. Canopies are attached to the inner side of the cabinet. A small hole is made in the back wall. Together with the canopies, there is a rail or a mounting bar. They are mounted on the wall, hooked on the upper ledge of the hooks. This design is very convenient. The load capacity of one canopy is from 25 to 50 kg.
How to install a kitchen set
The layout of the kitchen assembly can be selected individually. It doesn't matter in what order the cabinets are installed. But what matters is where the installation will take place from. It's best to start from the corner. The harmony of the entire single structure and the speed of work will depend on how evenly and correctly you hang the first element.
As already mentioned, the mounting height depends on the height of the users of the headset. When hanging, a horizontal line is drawn with a bubble or water level. If you do not want to draw, you can build a plane at the desired height using a level or plane builder. They set the upper edge of the mounted strip or the alignment of standard canopies.
The task seems simple, but at the same time difficult - to place all the lockers so that the vertical lines are perpendicular to the floor, and the horizontal lines are parallel to the walls. If you did everything exactly like this, then there should be no problems during operation.
The kitchen consists of separate cabinets, but it should hang in a fastened form, since this is one set. There are 2 ways to do this. Hang the elements that were originally fastened or fasten the already hung ones. The first option is not very convenient, because it is difficult to hang even 2 fastened cabinets alone.
The elements of the headset are interlocked with each other with the help of intersection screeds. At least 2 ties are required per wall. They are placed just above or below the loops. The walls of the two cabinets are fastened with clamps, a through hole is made along the diameter of the screed, into which the fasteners are pulled and tightened with a screwdriver.
How to install a countertop on a kitchen set
To complete the installation of the kitchen set, you need to place the last element - the countertop.
Regardless of the material chosen (Fibreboard, MDF, fake diamond) the installation steps are the same.
- Based on the measurements taken, cut out the sheet. All excess is cut with a jigsaw or a hacksaw by hand.
- Next, we lubricate all the ends with a silicone-based sealant, put an aluminum bar on top and level it. We fix the bar with small screws.
- We decorate the closed edge of the surface with an edge tape. First you need to warm it up, then attach and cut off the excess. After gluing, the edges are polished.
- According to the construction level, we adjust the legs of the cabinets. If they cannot be adjusted, place plastic shims under them.
- We fill the rear upper edge with sealant from above. The back end is generously lubricated with silicone. We fix plastic or metal corners in the cabinet under the sink.
- Carefully lay out the countertop on the cabinets and press it against the wall, or leave a small indent (about 5mm).
- Will carry out directly fastening of a table-top to a kitchen set. To do this, we screw in self-tapping screws with a diameter of 30 and 16 mm (the latter are under the sink).
- Now we can place the baseboard on the sides and in the corner between the backsplash and the countertop. If corner fastening is made, then the connecting seam is masked aluminum profile. Custom kitchens usually have a common work surface for the lower cabinets. The factory ones have a separate top, so you need to connect the countertops. All the necessary cuts are made in the plane, the connection elements are inserted into the grooves and tightened.
- We cut a hole for the sink, if required by the layout.
The nuances of assembling a kitchen set
To get an even broader answer to the question of how to assemble a kitchen yourself from purchased material, let's look at the small intricacies of this process.
- Installation always starts from the corner of the room.
- Collect all the cabinets one by one so that there is no confusion in the details.
- The distance from the wall to the countertop leaves about half a centimeter.
- Hang boxes without doors, this will simplify the work.
- All drawer guides are attached to the inner side faces before the structure is assembled.
- If you can’t figure out the installation, look at the photos and videos on this topic. In extreme cases, you can contact the specialists of Moscow or your locality.
Video: kitchen assembly master class