Homemade drywall lifter made of wood. Drywall lift: design, capabilities, principle of operation and self-production. Prices for materials and lifts
Finishing plasterboard surfaces at a considerable height, such as ceilings, is quite difficult. Plasterboard sheets are of considerable size and hold them even together long time extremely inconvenient and tiring. Professionals have long found a solution to this problem using purchased lifting mechanisms. But what if you don't want to spend money on them? Possessing some skills, it is quite possible to make a drywall lift with your own hands.
Lift functions
The main purpose of the lift for drywall is to deliver and hold a drywall sheet at the desired height during installation. This allows not only to greatly facilitate the work, but also makes it possible to install drywall alone.
Naturally, craftsmen quickly adapted the lift to perform other related tasks:
- By attaching a laser level to the drywall lift, you can better mark up and avoid mistakes. The level is fixed with clamps, and then rises to the required height. Such a device provides an ideal marking of the ceiling and corners of the room.
- It is indispensable for hard-to-reach places. The device allows you to fix the profiles at the time of their fastening.
- The lift will greatly facilitate the installation of not only drywall, but also any massive suspended equipment: air conditioners, chandeliers or air ducts.
Varieties
According to the area of \u200b\u200buse, GCR lifts can be:
- wall;
- ceiling;
- universal.
They differ in the location of the plane of the table on which drywall is attached.
The most practical is a universal lift, the working surface of which can change the level of inclination.
The industry offers many types of these devices, but they are not cheap. Usually they are purchased by construction teams specializing in the installation of drywall structures. But they often prefer to make lifts on their own.
Do-it-yourself lift
Finished products do not always suit craftsmen, and extra costs do not add to their popularity. The device for fastening drywall "Premos" will cost about 15 thousand rubles. Therefore, many people prefer to make a drywall lift with their own hands, and they take drawings from various Internet resources or design the device themselves.
What should be remembered when making a lift yourself?
There are four constituent elements, the presence of which in the design is mandatory:
- A chassis or tripod that forms the base. Better on wheels equipped with a locking mechanism. This will make it easier to install the device in the desired location.
- Telescopic stand. It can be made from pipes or squares of various sections, nested into each other according to the principle of a nesting doll. The extension in this case is carried out due to the system of rollers and a special cable.
- Spacer table on which drywall or other lifted elements will be fixed.
It is better if the table has a rotation function: this will not only facilitate the loading of drywall, but also make the device universal.
- A winch, due to which the extension of the telescopic rack of the device will be carried out. May be manual or electric.
Important nuances
Some points to consider:
- Regardless of the material, whether it is metal or wood, racks and other parts that are under severe stress must be provided with “kerchiefs” or other elements that give rigidity and strength.
- The folding design of the lift is preferable: it is easier to transport it, and it will take up much less space during storage.
- In addition to the locking device available on the winch or rack and pinion, it is imperative to provide an additional device that securely fixes the work table in the raised position. Otherwise, there is a risk of the device collapsing under load, which could result in serious injury. What you definitely shouldn’t save on is your own safety.
Making a drywall lift with your own hands is much more profitable than buying or renting. The purchase will cost about 5 to 10 times more than the cost of the parts. If rented, then the next repair will need to be spent again on the lifting mechanism.
Self-production can take up to 5 days, but will save money and also reduce physical stress. The weight of one sheet of drywall reaches approximately 30 kilograms and requires the constant help of 1 or 2 people. With such gravity, the sheet needs to be fixed evenly and firmly, which takes a lot of time and effort. The hoist on average can withstand up to 50 kilograms of weight, securely fixes the sheet for the required time at the right angle, which is well reflected in the quality of work.
Types of lifts and methods of use
Lifts differ in purpose, materials, design and additional details. There are the following types:
There are many types of drywall lifters, but you can also make your own, it will take about five days.
- For walls - fastening on vertical surfaces is carried out.
- For ceilings - mounting is possible only on horizontal surfaces.
- Universal - supports a sheet of drywall at any given angle.
- With a mechanical drive - lifting is possible with the help of a winch that is wound on a drum.
- WITH electric drive– The lift is controlled by a remote control. The presence of this device makes the work of the master as comfortable as possible.
- A multi-purpose reliable lift is made of metal elements.
- Wooden is mainly used as a fixative, its functions are limited.
- Equipped with an additional platform for the master, which replaces the goats.
A drywall spacer is useful in the following cases:
- For the installation of drywall sheets: carrying, lifting and fixing. The design is convenient for working with materials of various dimensions.
- To mark the ceiling and corners using a laser level, which must be securely fixed to turntable. This method allows you to make the correct markup the first time.
- For installation of lighting, air conditioning and ventilation systems, profiles in hard-to-reach places.
The mechanism operates on the principle of a jack. First, a sheet of drywall with clamps is securely fixed on the surface of the spacer table. Then, using the lifting mechanism, the sheet is delivered to the selected height and set at the desired angle, provided that the lift is universal.
Mechanism and device
A drywall lift drawing will help you understand the components of the mechanism, decide on the choice of parts and fasteners. The store version of this device consists of:

The price of ready-made lifts in stores can be quite high, so many choose a little more hard way- build such a mechanism yourself.
- front and rear lower rack;
- front and rear top rack;
- front, middle, rear beams;
- upper spacer;
- tie-down cable;
- console heads;
- lanyard, staples, bolts.
Functional elements of the lift:
- Frame for fixing the sheet: a table in the form of "H", this form is considered the most stable.
- Retractable supports in the shape of the letter "T".
- Telescopic stand, consisting of three pipes: main, middle, small and two nodes, with which the height of the table is adjusted. The pipes are inserted into each other according to the “matryoshka” principle - first there is a pipe of 80 mm, then 60 mm, then 40 mm. Profiles round and square shape.
- Chassis for extension and fixing in the required position.
- A winch that connects to the drum and adjusts the lifting height. Usually bought in a store independent production very complex.
- The tripod consists of three sliding metal legs with wheels: two swivel, one welded. The wheels must have locks for fixing in one position. Swivel castors fold easily for transport.
What parts, tools and apparatus will be needed:
- Metal profile with a section of 80 mm, 60 mm and 40 mm, round or square; wheels, rollers, two beams, winch, chassis, bolts.
- Bulgarian, welding machine.
- Cables for electric motor.
- Nails and hammer for wooden construction.
It is easier and faster to make a wooden structure, but if you have auxiliary devices and skills to work with them, it is better to make a strong metal mechanism for lifting drywall.

You can make a lift yourself from wood and metal, the second option is considered more successful and durable.
Instructions for self-production
After you have carefully studied the drawings, purchased the necessary parts, prepared the tools, feel free to proceed to the assembly of the lifting mechanism. There are several homemade lift models:
- Making a wooden retainer - an alternative to a lift - using nails and a hammer:
- Fasten two wooden beams together with the letter "T" with nails. The length of the timber should be equal to the height of the room and reach the ceiling, the width of the structure is at least 90 centimeters.
- Between the horizontal and vertical parts there are reinforcing scarves, which are installed diagonally at an angle of 90?.
- If necessary, the horizontal surface can be expanded with additional beams.
- Such a simple latch can only hold the sheet in a horizontal position, it is not equipped with a lifting mechanism, so its height has to be additionally adjusted for different rooms.
- Making a metal universal lift from pipes using a welding machine:
- The base is made of a metal pipe 80 × 80 mm, the support for the pipe is welded from two corners.
- Legs with braces are welded to the pipe from four sides. Legs can be removed or folded for ease of transport.
- We turn to the manufacture of a telescopic tripod. It should consist of three pipes of different sections. The widest tube, 80 × 80 × 2 mm, is at the bottom, the middle one is 60 × 60 × 2 mm, and the thinnest part is at the top, its size is 40 × 40 × 2 mm. We insert the pipes one into the other, fix each segment with a plug on one side. At the end of the thinnest pipe we make a mount for the turntable.
- The spacer table will consist of pipes 40? 25? 2 and 30? 20? 2. We connect the pipes in the shape of the letter "H", welding them one to the other. There should be holes in the middle jumper for attaching supports.
- Next, you need to make two supports. Each of them is welded in the shape of the letter "T", with a long vertical leg, on which you need to drill a hole. Such supports are connected to the table with the help of bolts.
- We attach the rotary mechanism to the assembled structure.
We fix the drum and winch on the thickest pipe of the rack, and the rotary mechanism on the thinnest one.
- All components are bolted together, which allows, if necessary, to disassemble the lift and hide it until the next repair or transport it to a new location.
- Such a mechanism is multifunctional, which means it will bring significant benefits during various kinds works.
If the do-it-yourself gypsum board lift is made of good materials, correctly assembled, it will last a very long time, it will be convenient in storage and transportation. The master will be able to perform the fastening of drywall sheets to the walls and ceiling with better quality and with less physical effort.
Gypsum board is one of the most popular materials in ceiling and wall cladding. But at the same time, it is also one of the most inconvenient in a single installation. Each master knows that it is extremely difficult to attach hinged sheets on their own, without the help of 1-2 helpers, due to the significant weight of the material, which, when using solid panels, ranges from 18 to 35 kg (depending on the type of plasterboard) and its extensive surface.
Therefore, in such situations, it is best to use a drywall lift.
What is this article about
Why do you need a lift
This device is designed for comfortable transportation of GKL panels to a specific installation point, their lifting and fixing to the frame or directly to the plane of the ceiling and / or wall. The installer can only fasten the sheet with self-tapping screws, without making significant efforts for this, that is, without holding the sheet and without inviting assistants.
In general, a drywall lift helps:
- In sheathing frames with sheets of large dimensions;
- When equipped with a level, the ability to install panels, without additional control;
- In serving and supporting others building materials to hard-to-reach places, in particular, frame elements.
Types of lifts
Its practical application depends on the type of construction.
This is how they distinguish:
- Wall lifter with vertical table for mounting sheets on walls or partitions;
- Ceiling with a vertical bed, for working on ceiling sheathing;
- Universal - with a turntable for adapting to mounting on different planes.
Where applicable
The standard device can be used in different rooms:
- In an ordinary room;
- On balconies;
- In narrow corridors;
- On large facilities commercial, public or industrial purposes.

Where to get a lift
Getting a drywall lifter is easy. It can be:
- Buy - what is beneficial for professional craftsmen finishers who regularly perform similar work at the facilities;
- Rent - for those who make the ceiling one-time in a small area;
- Do it yourself - again, this is suitable for master finishers or those owners who decide to turn the GKL on their own on a surface with a significant area.
How to choose a mechanism
When choosing a device for carrying and mounting material in a store, some features and capabilities of the units should be taken into account.
- Lifting weight - which for regular installation should be at least 30-50 kg;
- The lifting height is at least 4-5 meters, which, as a rule, is enough for installation in ordinary houses and apartments, where the ceiling height rarely even reaches these parameters;
- Production material - it is advisable to ignore models with unreliable plastic elements;
- The shape of the platform of the lifting base - it is preferable that it be n-shaped, since such bases are considered the most stable;
- Two-functional lifting both on horizontal and vertical planes - if the master considers this factor necessary. You can buy a car only with a top lift;
- Possibility of convenient transportation of the model. Most of the units are equipped with rollers for easy movement, as well as a collapsible design;
- Management - can be carried out by jacking manually or by electric drive. Again, the choice here depends on working area and regularity of installation.

In the market of building / finishing materials and tools, a drywall hoist is not uncommon. It can be purchased at almost any specialized store. Making a choice in favor of a particular brand is very simple. After all, all branded models are exclusive and focused on the specific needs of installers.
The most popular devices from:
- Knauf Corporation. Among those sold out, the gypsum board lift is Plattenheber. The device allows the fixing of sheets, both in horizontal and in vertical position;
- Premos company. If you choose a professional drywall lifter, you should pay attention to this trademark. The company's models deliver material to a height of up to 4.5 meters, and also do an excellent job with a load of up to 100 kg, allowing you to work not only with drywall, but also with heavier panels;
- "Edma" - multifunctional models with all their mobility. So the GKL lift from this French brand is comfortable to use even in cramped conditions.
Do-it-yourself lift
If the purchase is impractical for some reason, you can make a lift with your own hands. The Internet has all the necessary drawings for this.
You also need to know the main elements that make up this device:
- A tripod is the base on which the entire structure rests. Often equipped with castor wheels with locking accessories;
- Telescopic tripod - made from segments profile pipe inserted into each other. Recommended sections - 8, 6, 4 cm;
- Turntable stand. Mounted on an H-shaped base;
- The winch is a portable beam, it is purchased separately, since it is problematic to assemble it yourself;
- As additional components, a platform for mounting and an electric drive can be installed on the mechanism.
When making a device on your own, you need to carefully consider its design, schematically depict it on a piece of paper.
A simple assembly step consists of several assembly steps:
- For the manufacture of a tripod element, it is necessary to create a base from a profile pipe 6 × 6 cm. The tripod consists of 3 elements, one of them must be welded, and the other two must have a swivel mechanism, they are mounted to the central rack element. All 3 legs of the tripod are equipped with strong roller wheels;
- Then, to the base you need to weld the legs with sawn-off grinder braces. If desired, they can be made folding or even removable type;
- The tripod is ready, you can start creating a retractable tripod;
- To do this, you need to cut profile pipes - 8 × 8 cm, 6 × 6 cm, 4 × 4 cm. They are inserted into each other, with padding in the form of plug elements. Such an element can be square or round. The telescopic tube is mounted on the central rack;
- A stand mount is mounted on the end of the top tube. It can also be of the removable type;
- Next, the table itself is made. For him, initially you need to create an H-shaped platform. Its middle jumper must be of a through type, for retractable supports necessary for voluminous, rigid support of sheets;
- The supports are boiled out in the shape of the letter "T" and fixed with the help of quick-clamping mechanisms;
- At the final stage, it is necessary to tightly fix the winch. As a rule, the mount is a remote beam with braces.
Mini lift
It’s far from always desirable and there is time to fiddle with the manufacture of a capital lift, so you can also make a mini-fixer.

It is made from a flat bar with dimensions of 40 × 20 cm, the height varies according to needs. The width must be at least 90 cm.
- You need 2 such beams. they are interconnected with the help of self-tapping screws about the shape of the letter "T";
- From the same timber, kerchief jumper elements are made, connecting the vertical and horizontal parts of the "T" in the likeness of a mop, at an angle of 90 degrees;
- Several such elements are made, and they are fixed to the base.
The mini fixer is ready. It is less convenient to use than a conventional lift, it is more of a supporting function, but it is easier to work with than to climb with sheets on the trestles every time a new panel is required.
Home crafters do not see the need to purchase a drywall lift, and some had no idea of its existence. This device is not necessary to have on hand if there is an assistant when working with drywall, but at the same time two people use a large amount of effort to attach sheets to ...
The use of a drywall lift and the creation of a structure with your own hands
Home crafters do not see the need to purchase a drywall lift, and some had no idea of its existence. This device is not necessary to have on hand if there is an assistant when working with drywall, but at the same time two people use a large amount of effort to attach the sheets to the ceiling.
 An example of fixing drywall with a special lift
 In a situation where there is no one to help, you cannot do without this device, you can buy it ready-made, or build a drywall lift with your own hands.
Why do you need a lift
This is a very convenient device, with the help of which the plasterboard sheets are mounted to the ceiling surface, markup is performed. It is produced like this:
- at the laser level, the height of the tripod is slightly more than a meter;
- the device is installed on the lift and fixed with clamps, setting it to the desired height.
If we take into account that the drywall spacer lifter can lift a sheet of material by 3-4 meters - this height is enough for marking in the highest rooms.
It looks like a lift spacer for attaching drywallThe main purpose of this device is to help install large sheets of drywall on the ceiling surface. With the help of a lift, you can perform work on the arrangement of a multi-level plasterboard ceiling alone without help.
The sheet canvas is tightly pressed against the attachment point with the help of a lift, while being effectively used as homemade options, and production.
This device has another purpose, for example:
- simplification of mounting a metal profile in a hard-to-reach place;
- a puncher can be mounted on a drywall lift for ease of use at a height;
- uplift roll materials under the ceiling;
- with this device, you can raise a massive chandelier to a plasterboard ceiling and connect it.
 The principle of operation of the drywall lift
 Types of lifts
The practical use of lifts depends on the type of construction, which are distinguished by several:
- The Premos wall lift with a table installed in a vertical position is intended for mounting drywall on walls and partitions.
- Ceiling-mounted with a vertical table that helps in placing the sheets on the ceiling.
- Universal Premos - has a turntable and can be used on any surface.
The most popular among professionals are universal designs.
Where applicable
The range of application of the standard Premos drywall lift is quite wide:

How to cut a drywall profile at home
Even if the repair is carried out by a team of specialists, it is very convenient to use this structure, especially if the ceiling height is more than three meters.
Make a lift for GKL with your own hands
Before you build a homemade drywall lift, you need to know what it consists of:
- A tripod is the basis for the entire structure, on which wheels equipped with a stopper are installed.
- Telescopic tripod - consists of several pipe sections different diameter e.g. 4 to 8 cm.
- Table-stand with a swivel mechanism, having an H-shape.
- Winch - you need to buy this element, since it is impossible to assemble it yourself.
It is possible to equip the mechanism with additional components, for example, an electric drive or a platform.
Blueprints
Before you start assembling the structure yourself, you need to draw an assembly diagram. This process is very important, as it will help to assemble the structure without errors.
Manufacturing process
Making a drywall lift is easy, just follow a few steps:
- The base is mounted from a profile pipe, 6x6 cm. The tripod is assembled from three elements, two of which are equipped with swivel mechanisms, and one of them is welded to the central element - the rack. It is advisable to equip the tripod with rollers to simplify the use of movement around the room;
- Slanted legs can be welded to the base, with cut edges at an angle of 45 degrees, they can be permanent or folding.
 Scheme with dimensions for self-manufacturing drywall lift
 Once the tripod is ready, you can start mounting the tripod:
- Three types of pipes are taken - 4x4, 6x6 and 8x8 cm. They need to be inserted into each other and knocked out with muffled elements. It is advisable to choose a round element, it is more practical. Install the telescopic tube on the stand;
- The top tube is equipped with a special mount on which the stand will be installed, you can equip a removable stand;
- An H-shaped platform is being made, in which the middle jumper is through, for the installation of retractable structures;
- The table is installed on the platform and fixed;
- For structural rigidity, side supports with quick-clamping mechanisms are mounted;
- The last stage of installation will be the installation of a winch, usually it is installed on an outrigger beam with braces.
 Finished construction homemade drywall lifter
 As you can see, there is nothing difficult in installing a drywall lift, it is enough to prepare the material in advance and be patient.
Industrial lifts
The acquisition of a factory production system will help lift sheets of plasterboard and others sheet materials large area up, on the walls, while you can change the angle of inclination of the material. Premos and fit factory lifts have a number of advantages:

Description of the gypsum board spacer lifter
For mounting sheets of drywall, a special spacer can be useful, which is a rod-lifter and telescopic pipes in the amount of two pieces. The design is equipped with plastic stops and ring clamps. There is a lever for easy release of the clamped stem. This spacer is used to hold sheets in a vertical position.
 Instructions for use of the lift-spacer for drywall sheets
 This device helps to install drywall board quickly and without help, and it has the following advantages:
- A swivel base that helps not only move the drywall sheet, but also move it in any direction to obtain even and high-quality joints between the material. It is also used for ceilings.
- This mechanism is lightweight and easy to use, its use will not be difficult even for a person who does not have professional skills.
- If the installation is carried out by one person, then at least three spacers must be used, then the arrangement of a wall or plasterboard partition will not be difficult.
Video review of the drywall lift.
Drywall Carrier
It is often necessary to move drywall boards by hand. It is worth noting that doing this alone is inconvenient, a drywall sheet has considerable weight and area. Sheets are usually carried by two workers, but even with such transportation to the floor, the sheet can be broken. There are special systems for carrying sheets of material, for example:

For the convenience of working with drywall, there are a large number of devices that you can buy at the store or build yourself to save money.
In the photo you can see how the drywall lift is used
Self-manufacturing of a drywall lift: drawings and instructions
Making a drywall lift with your own hands is much more profitable than buying or renting. The purchase will cost about 5 to 10 times more than the cost of the parts. If rented, then the next repair will need to be spent again on the lifting mechanism.
Self-production can take up to 5 days, but will save money and also reduce physical stress. The weight of one sheet of drywall reaches approximately 30 kilograms and requires the constant help of 1 or 2 people. With such gravity, the sheet needs to be fixed evenly and firmly, which takes a lot of time and effort. The hoist on average can withstand up to 50 kilograms of weight, securely fixes the sheet for the required time at the right angle, which is well reflected in the quality of work.
Lifts differ in purpose, materials, design and additional details. There are the following types:

There are many types of drywall lifters, but you can also make your own, it will take about five days.
- For walls - fastening on vertical surfaces is carried out.
- For ceilings - mounting is possible only on horizontal surfaces.
- Universal - supports a sheet of drywall at any given angle.
- With a mechanical drive - lifting is possible with the help of a winch that is wound on a drum.
- With an electric drive - the lift is controlled by a remote control. The presence of this device makes the work of the master as comfortable as possible.
- A multi-purpose reliable lift is made of metal elements.
- Wooden is mainly used as a fixative, its functions are limited.
- Equipped with an additional platform for the master, which replaces the goats.
A drywall spacer is useful in the following cases:
- For the installation of drywall sheets: carrying, lifting and fixing. The design is convenient for working with materials of various dimensions.
- For marking the ceiling and corners with a laser level, which must be securely fixed to the turntable. This method allows you to make the correct markup the first time.
- For installation of lighting, air conditioning and ventilation systems, profiles in hard-to-reach places.
The mechanism operates on the principle of a jack. First, a sheet of drywall with clamps is securely fixed on the surface of the spacer table. Then, using the lifting mechanism, the sheet is delivered to the selected height and set at the desired angle, provided that the lift is universal.
A drywall lift drawing will help you understand the components of the mechanism, decide on the choice of parts and fasteners. The store version of this device consists of:

The price of ready-made lifts in stores can be quite high, so many choose a slightly more difficult path - to build such a mechanism on their own.
- front and rear lower rack;
- front and rear top rack;
- front, middle, rear beams;
- upper spacer;
- tie-down cable;
- console heads;
- lanyard, staples, bolts.
Functional elements of the lift:
- Frame for fixing the sheet: a table in the form of "H", this form is considered the most stable.
- Retractable supports in the shape of the letter "T".
- Telescopic stand, consisting of three pipes: main, middle, small and two nodes, with which the height of the table is adjusted. The pipes are inserted into each other according to the “matryoshka” principle - first there is a pipe of 80 mm, then 60 mm, then 40 mm. Round and square profiles can be used.
- Chassis for extension and fixing in the required position.
- A winch that connects to the drum and adjusts the lifting height. Usually bought in a store, self-production is very difficult.
- The tripod consists of three sliding metal legs with wheels: two swivel, one welded. The wheels must have locks for fixing in one position. Swivel castors fold easily for transport.
A knife combined with a drywall tape measure, a lightweight and useful tool
What parts, tools and apparatus will be needed:
- Metal profile with a section of 80 mm, 60 mm and 40 mm, round or square; wheels, rollers, two beams, winch, chassis, bolts.
- Bulgarian, welding machine.
- Cables for electric motor.
- Nails and hammer for wooden construction.
It is easier and faster to make a wooden structure, but if you have auxiliary devices and skills to work with them, it is better to make a strong metal mechanism for lifting drywall.

You can make a lift yourself from wood and metal, the second option is considered more successful and durable.
Instructions for self-production
After you have carefully studied the drawings, purchased the necessary parts, prepared the tools, feel free to proceed to the assembly of the lifting mechanism. There are several homemade lift models:
- Making a wooden retainer - an alternative to a lift - using nails and a hammer:
- Fasten two wooden beams together with the letter "T" with nails. The length of the timber should be equal to the height of the room and reach the ceiling, the width of the structure is at least 90 centimeters.
- Between the horizontal and vertical parts there are reinforcing scarves, which are installed diagonally at an angle of 90?.
- If necessary, the horizontal surface can be expanded with additional beams.
- Such a simple latch can only hold the sheet in a horizontal position, it is not equipped with a lifting mechanism, so its height has to be additionally adjusted for different rooms.
- Making a metal universal lift from pipes using a welding machine:
- The base is made of a metal pipe 80 × 80 mm, the support for the pipe is welded from two corners.
- Legs with braces are welded to the pipe from four sides. Legs can be removed or folded for ease of transport.
- We turn to the manufacture of a telescopic tripod. It should consist of three pipes of different sections. The widest tube, 80 × 80 × 2 mm, is at the bottom, the middle one is 60 × 60 × 2 mm, and the thinnest part is at the top, its size is 40 × 40 × 2 mm. We insert the pipes one into the other, fix each segment with a plug on one side. At the end of the thinnest pipe we make a mount for the turntable.
- The spacer table will consist of pipes 40? 25? 2 and 30? 20? 2. We connect the pipes in the shape of the letter "H", welding them one to the other. There should be holes in the middle jumper for attaching supports.
- Next, you need to make two supports. Each of them is welded in the shape of the letter "T", with a long vertical leg, on which you need to drill a hole. Such supports are connected to the table with the help of bolts.
- We attach the rotary mechanism to the assembled structure.
We fix the drum and winch on the thickest pipe of the rack, and the rotary mechanism on the thinnest one.
- All components are bolted together, which allows, if necessary, to disassemble the lift and hide it until the next repair or transport it to a new location.
- Such a mechanism is multifunctional, which means it will bring significant benefits during various types of work.
If the do-it-yourself gypsum board lift is made of good materials, properly assembled, then it will last a very long time, it will be convenient in storage and transportation. The master will be able to perform the fastening of drywall sheets to the walls and ceiling with better quality and with less physical effort.
Finishing plasterboard surfaces at a considerable height, such as ceilings, is quite difficult. Plasterboard sheets have a considerable weight and size, holding them even together for a long time is extremely inconvenient and tiring. Professionals have long found a solution to this problem, using purchased lifting mechanisms. But what if you don't want to spend money on them? Possessing some skills, it is quite possible to make a drywall lift with your own hands.

Lift functions
The main purpose of the lift for drywall is to deliver and hold a drywall sheet at the desired height during installation. This allows not only to greatly facilitate the work, but also makes it possible to install drywall alone.
Naturally, craftsmen quickly adapted the lift to perform other related tasks:
- By attaching a laser level to the drywall lift, you can better mark up and avoid mistakes. The level is fixed with clamps, and then rises to the required height. Such a device provides an ideal marking of the ceiling and corners of the room.
- It is indispensable when assembling a frame for drywall from profiles in hard-to-reach places. The device allows you to fix the profiles at the time of their fastening.
- The lift will greatly facilitate the installation of not only drywall, but also any massive suspended equipment: air conditioners, chandeliers or air ducts.

Varieties
According to the area of \u200b\u200buse, GCR lifts can be:
- wall;

- ceiling;

- universal.

They differ in the location of the plane of the table on which drywall is attached.
The most practical is a universal lift, the working surface of which can change the level of inclination.
The industry offers many types of these devices, but they are not cheap. Usually they are purchased by construction teams specializing in the installation of drywall structures. But they often prefer to make lifts on their own.
HELPFUL INFORMATION: How to make a drywall wall with your own hands
Ready-made manual drywall sheet lifters
If there is no opportunity or desire to make the device yourself, then you can buy it. In terms of price-quality ratio, craftsmen prefer the Premos brand gypsum board lifter.
According to the device, it does not differ much from a conventional rack and pinion car jack, but it is this simplicity that ensures the reliability of its mechanisms. Together with a fairly affordable price, this allowed him to occupy a fairly solid niche in the lift market.
The Premos device allows lifting and fixing various building elements weighing up to 100 kg. The telescopic pole provides a lifting height of up to 3.3 m, while the retractable pole allows you to increase it to 4.5 m.
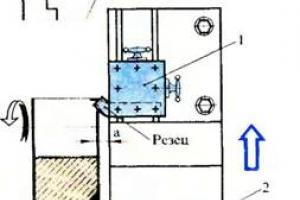
When working at a height of more than 3 m, the lifting operation is carried out as follows:
- By turning the handle, the telescopic rod is slightly extended.
- Then, with a rail, they rest against the sliding support, pushing it to the required height. For convenience, near the holes for fixing the retractable support, the final height of the table is indicated.
- Fixation is carried out by any hardware inserted into the hole, but many prefer to use a steel pin on the chain.
Do-it-yourself lift
Finished products do not always suit craftsmen, and extra costs do not add to their popularity. The device for fastening drywall "Premos" will cost about 15 thousand rubles. Therefore, many people prefer to make a drywall lift with their own hands, and they take drawings from various Internet resources or design the device themselves.
What should be remembered when making a lift yourself?

There are four constituent elements, the presence of which in the design is mandatory:
- A chassis or tripod that forms the base. Better on wheels equipped with a locking mechanism. This will make it easier to install the device in the desired location.
- Telescopic stand. It can be made from pipes or squares of various sections, nested into each other according to the principle of a nesting doll. The extension in this case is carried out due to the system of rollers and a special cable.
- Spacer table on which drywall or other lifted elements will be fixed.
It is better if the table has a rotation function: this will not only facilitate the loading of drywall, but also make the device universal.
- A winch, due to which the extension of the telescopic rack of the device will be carried out. May be manual or electric.
HELPFUL INFORMATION: Drywall arches in the kitchen (28 photos)
The most advanced masters even supply the lift with remote controls.

Important nuances
Some points to consider:
- Regardless of the material, whether it is metal or wood, racks and other parts that are under severe stress must be provided with “kerchiefs” or other elements that give rigidity and strength.
- The folding design of the lift is preferable: it is easier to transport it, and it will take up much less space during storage.
- In addition to the locking device available on the winch or rack and pinion, it is imperative to provide an additional device that securely fixes the work table in the raised position. Otherwise, there is a risk of the device collapsing under load, which could result in serious injury. What you definitely shouldn’t save on is your own safety.
A drywall lifter is a device that allows you to set the cardboard at a certain height and fix it in the desired position, while not making much effort. The main advantage of the device is its ease of use and significant time savings while working with this building material.
 Photo - work with a spacer
 What is a lift for?:
- For finished sheathing metal frame large sheets of drywall. The design of the device allows you to install materials of any size on it, it is very convenient even when working alone. You simply lay the sheet on the support frame and raise it to the desired height, fixing it at the frame itself;
- Marking the ceiling and corners. Very often masters independent work the markup is redone several times, because from different angles the visibility of the flow or angular plane changes somewhat. If you understand the lift with a laser level, it will be possible to ensure the perfect installation line of the frame from the first time;
- Installation of profiles in hard-to-reach areas. Simply, instead of drywall, profile guides are laid on the lift table, which rise to a pre-made markup.
There are several types of lifting devices, they are classified according to the area of \u200b\u200buse: wall, ceiling and universal. The main difference is the location of the desktop. At the wall it is installed vertically, at the ceiling - horizontally, and at the universal one it can change its angle depending on the type of work performed.
 Photo - homemade fixture
 Fixture design
The lift consists of a telescopic pole, which changes its length depending on the needs. It can be square or round. The next structural element is the chassis, due to which the device is moved and installed in a certain position. Often the chassis is represented by a pipe with a section of ¾ inch.
The most important detail is the spacer table, directly on which the drywall or profile is installed. It looks like a frame for a sheet, on the sides it is equipped with pipes of various sections (depending on the type of use and type). Also, any telescopic lift for mounting and drywall sheets is equipped with a winch that controls the rise of the rack. It is connected to the drum, it can be wound in two rows or in one. Many home craftsmen claim that if the winch is spinning in one row, then the telescopic rack is lifted faster.
A homemade drywall spacer lifter is no less effective than a professional fixture (for example, Premos or FIT). Plus, it can be made at home. Before starting work, you need to prepare drawings.
 Photo - drawing of the lift
 The support according to this scheme can be made of wood and metal profiles - this is very convenient, since no additional costs are required. It is necessary to take into account only the costs of fasteners and a winch. All parts are interconnected with bolts.
The lift can be made simple (disposable - for working in only one room) and reusable (it is suitable for different ceiling heights). It should be noted that the first option will be easier to convert to another room than to construct the second.
Step-by-step instruction how to make a lift for filing drywall on the frame:

If you have a professional welding inverter and a drawing of a metal telescopic drywall lifter on your farm, then you can make a more complex, but practical universal one. For work, you will need several pipes for the telescopic leg - square or round. In the diagrams below, they are represented by rolled metal with sections of 80 × 80 × 2, 60 × 60 × 2, 40 × 40 × 2 mm. Pipes 40×25×2 and 30×20×2 were used for the table.
 Photo - professional wall lift
 Instruction:

Video: visual use of the lift
Price overview
In some cases, it is easier to buy a ready-made drywall lift than to design a home-made one, especially since the price of the fixture is low.
| City | Price |
| Saint Petersburg | 4000 |
| Rostov-on-Don | 3500 |
| Moscow | 4000 |
| Kyiv | 4000 |
| Voronezh | 3200 |
lift prices different brands for drywall may vary depending on the city of your residence (for example, some models will be more expensive in Minsk, and not in Moscow, and vice versa).
Many home craftsmen are not yet convinced of the usefulness of such a device as a drywall lift, and some have not even heard of it. In principle, if the work of installing sheets on the ceiling is done together, then you can do without such a device as a drywall lift, but you will have to make great physical efforts.
Drywall lift
There are situations when there is no assistant nearby and installation must be carried out alone, and then a drywall lift is needed. You can buy ready-made, or you can make a drywall lift with your own hands.
What is it needed for?
Factory models are usually made of metal, they are collapsible, which makes it convenient to carry them in a special case, the most popular manufacturer of such devices is Premos. At home, most often a hoist-strut for drywall is created with your own hands.
 Using this device, you can not only install sheets on the ceiling, but also perform marking.
This is done as follows: they take a laser level (usually its tripod has a small height), fix it with clamps on a lift and raise it to the required height.
Considering that the lifting height of the sheets is 3-4 meters, this will be enough for marking work in almost any room.
It is only necessary to fix the laser level well so that it does not fall during operation, and you can mark the ceiling.
The main purpose of this device is to help in filing the ceiling with large sheets of drywall. With its help, this work can be successfully performed without an assistant.
You can firmly lean the sheet exactly where you need it, you can do this as a home-made device, or, for example, using the Premos lift.
To do the work, you must first tilt the frame, lay a sheet of plasterboard on it. Since it is necessary to lift low, one worker can cope with this. Then the frame is transferred to a horizontal position and using a rack and pinion mechanism, you can raise the sheet to the required height.
The presence of wheels on the support legs allows you to move the device with the sheet to the place you need.
 After you have installed the sheet in place and tightened it, it remains to take a screwdriver and secure it securely.
The Premos lift is the most popular, this is due to the fact that its price is small, and the operation scheme is simple, therefore reliable.
Another purpose of this device is to facilitate the installation of profiles in places that are difficult to reach.
Using this device, you can fix the perforator, the edge of the roll web when working on the ceiling, it is also convenient to mount massive chandeliers, air ducts, air conditioners, fan coil units and other equipment with it.
How to make a device yourself?
There are several options for manufacturing such a home-made device, it can be wall-mounted, in-line or universal, the Premos company produces the entire list of these products.
The main difference is the type of location of the desktop, in the wall device the table is located vertically, and in the ceiling device it lies in a horizontal plane.
If the lift is universal, then the table can change its angle of inclination and be used for mounting sheets, both on the wall and on the floor, with one of the best options is a Premos product.
It is not difficult to make such a device yourself, the drawing can be found on the Internet, while the price of the lift will be less than when buying a factory product.
The main elements of such a device are:
- chassis, which, due to the presence of wheels, ensures the installation of the device in the right place. It is possible to adjust the position of the sheet during installation;
- telescopic stand, which can change its length;
- spacer table;
- winch.
Once you have decided on the type of construction that you will do with your own hands, you can begin to work.
 Lift scheme
 For the manufacture of supports, you can use wooden bars or a metal profile, which are convenient and easy to work with, and they are inexpensive. Making a winch yourself is quite difficult, so it's easier to buy it in a store.
You can make a device that is designed to work only in a specific room, or you can make a universal lift.
It is clear that the first option is cheaper, and besides, it is easier to convert it to work in another room than to make a universal device. If you are not professionally engaged in the installation of drywall, then the first option will be enough for you.
Work order
Consider how to make the simplest construction step by step yourself:
- When choosing wooden beam, it must be borne in mind that its cross section should not be less than 50 mm, and the height should be equal to the distance from the ceiling to the floor. It will be necessary to have another beam 90-100 cm long. Between themselves, they are connected in the form of the letter "T".
- To ensure stability of the support, it is necessary to make scarves, they are also made of timber. It is necessary to control that the angle is straight, otherwise the device will turn out to be crooked, unstable and unreliable.
- If necessary, the horizontal surface can be expanded, the main thing is that all corners must be straight.

If you know how to work with a welding machine, then you can make a universal lift from metal pipes. To create such a design, you will need a square with a section of 80.60 and 40 mm with a wall thickness of 2 mm, they are inserted into each other like a nesting doll, the table is made of pipes 4x2.5 cm and 3x2 cm.
Racks are made, as in the variant described above, only from a metal square profile, kerchiefs are installed for reinforcement, right angles must be observed. Fastening is carried out using a welding machine. A drum is installed on the largest pipe and a winch is mounted.
 Finished lift
 Now it remains to weld the table, make movable legs and assemble the entire structure. It is best to fasten the individual elements to each other with bolts, which will allow you to disassemble the lift, this facilitates its transportation.
Prices for materials and lifts
Below is a table of the cost of materials that are needed to create a lift.
If you do not have the time, desire or ability to make such a device yourself, you can purchase ready-made models. In the table below you can see the prices of finished lifts.
In any case, you will purchase a ready-made hoist for drywall sheets or make it yourself, this will greatly facilitate and speed up the process of installing the plasterboard on the ceiling.