Homemade ruler for the router. Devices and capabilities of a manual milling cutter. Obtaining various curly edges
Router guide
The devices that will be discussed not only make it convenient work with a manual cutter, but turn it into a universal machine that both professionals and amateurs can only dream of. Many devices can work as part of your other tools, such as a circular saw or a jigsaw.
For more sophisticated professionals who are already well acquainted with the capabilities of manual routers, it would probably be more interesting to look at an example of the practical use of a manual router in a separate article devoted to.
Guide rails for hand router
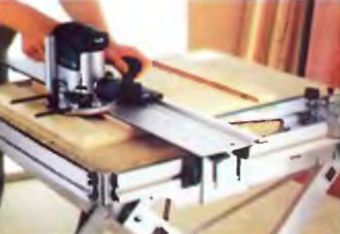
The guide rails not only make it easier to control the router, but also ensure precise machining. They are quite unique systems. As you can see from the large photo of this article, they can be used in combination with various hand-held power tools, are easily extended in length, complemented by other devices, and can even be specialized, for example, as a guide rail for milling holes in furniture manufacturing.

The guide rail gives high precision when processing furniture boards. It guides the milling machine easily and directly with its rip fence.
Guide bars and a number of other devices not only improve the quality of processing, but also make it simple and convenient. Dimensional accuracy and reproducibility on any number of machined parts is simply amazing even for experienced craftsmen. Regardless of its purpose, any of them has an elastic plastic protector from below, which prevents slipping on the treated surface and damaging it.

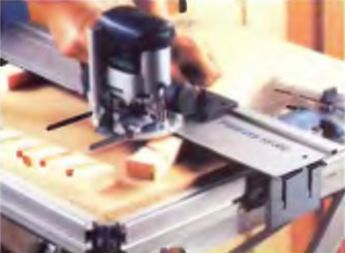
Milling is carried out at any angle to the edge of the workpiece. The guide bar makes this operation simple. Secured with a clamp, it will never slip even from the edge of the part.
In addition, the rails can be easily mounted directly on the workbench with an angle stop. In this case, guides of small length are used. Many guides are equipped with very practical equipment. So, the restrictive foot, installed on the tire, fixes the limits of the course of the manual router. Having installed it in a given position, you will easily reproduce grooves of identical size on various parts.

The limiter foot of the guide bar allows you to fix the boundaries of the grooves and reproduce them automatically on identical workpieces.
Of course, each master independently determines the priority of one or another device for his own machine, but they usually start with a guide rail and dust removal. The guide rail, as you will see later, also serves as the basic structure for installing many other devices on an electric wood router.
The protective protector of the guide bar prevents it from sliding on the material being processed and does not scratch its surface.
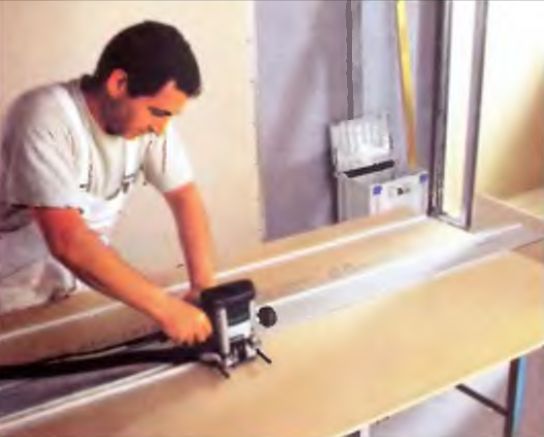
For cutting sheets of drywall in size, long guides are used.
Guides are easy to build up to the desired length. The cutter, cutting the sheets, simultaneously prepares their edges. Such cutting eliminates the laborious process of sealing joints: they turn out to be even and neat.
|
The guide rail is easily mounted on a modern workbench and provides new possibilities for processing. The result is profiles of any complexity with high accuracy. |
The milling work table is equipped with an angle stop. The guide rail mounted on it is adjustable in height. The table stand folds easily. |
The adjusting screws allow you to set the stop of the machine without clearance relative to the tire. The result is clean precision milling and no surface chipping. |

A high level of reproducibility of complex grooves is ensured by the guide bar. Crafting this classic carpentry joint that requires craftsmanship turns into fun.
Specialized guides for a manual router
Furniture connection on spikes does not lose its importance among furniture makers and joiners. It is unforgivable if it takes a long time to make one joint, and accuracy is not ensured. The tenon-cutting attachment brought to your attention is a whole template system.

The template system 500 mm long provides three types of connections for wooden parts: pin, dovetail and dowel.
For each type, their cutters are recommended. The template system is completed with three guide templates: 1 - "dovetail" (end tenon cutters), 2 - finger connection (groove cutters), 3 - dowel connection (drills for dowels). This is what a complete stud kit looks like.
The photos of the console show a set of templates themselves and the results of their application. In many countries, furniture boards are produced with ready-made rows of “32” holes, which allows anyone to easily and quickly produce (or rather, assemble) entire furniture walls, and even based solely on their own ideas.

Guide for incremental milling of furniture holes
according to the "32" system. It simplifies furniture assembly.
While our furniture board manufacturers have not yet mastered this rational system, we offer you to use the FS-LR 32 attachment for milling machines and carry out this modification of the boards yourself. As a rule, it is delivered already in a complete set.

The normally complex and time-consuming production of box connections is made simple by the template system. Three templates - three types of connections and speed in their manufacture.
A guide for cutting drywall with a milling machine is necessary for professionals involved in the construction of partitions. It is assembled from individual elements and can be extended to the required length. For drywall, you will also need an appropriate cutter.
A template and a copying ring allow you to make recessed grooves. Milling holes - for furniture handles becomes convenient. These devices show the best results when working with a milling machine with electronic speed control.
Devices for incremental drilling of holes. A specialized guide is mounted on it: 1 - a board for installing a milling machine on a guide; 2 - side stop with upper limiter; 3 - upper limiter.
Support-and-copy rings with the help of the proposed equipment can be easily changed and adjusted in height. All adjustments are made with a screwdriver.

Using a compass, you can easily mill along the radius. It allows you to work with a radius of 50 - 1300 mm. You can make such a device yourself. Don't forget the metric scale.
Devices for copying and replicating identical parts
An angle arm and a set of copy probes are required to produce a series of identical parts. There is a scale on the angle lever (scale division - 1/10 mm). This allows the thrust ring to be centered under the cutter. When copying, the shape of the part is accurately reproduced by the cutter on a new workpiece. The angle arm can be equipped with a support plate and a chip guard. This combination will provide perfect edge finishing.
But copying with a template and a copying ring allows you to professionally cut grooves into furniture or mill holes for handles in drawers.
A very simple and extremely necessary device for a milling machine is a compass. The most suitable material for it is transparent plexiglass. An exact metric scale is applied on its surface. Some models provide a circumference of up to 1.5 m. With such a device, any round tabletop is not a problem. By the way, it is easy to make it yourself.
Copying on the workpiece is provided by an angle lever with a precise adjustment scale and a set of copy probes. You have the opportunity to center the thrust ring exactly under the cutter. The angle arm, supplemented by a support plate, also enables efficient edge milling. Complete set of angle arm: set of copy probes, base plate, chip protection.
Dust extractors for router
To organize dust removal, professionals purchase a suction unit (technical vacuum cleaner), which is connected directly to the router with a flexible hose through an adapter. The hose does not interfere with the control of the machine, and the place where the part is processed and its marking will always be open for visual inspection.

Dust removal is a top priority when equipping any milling machine. And for this it is not at all necessary to buy an expensive dust extraction unit. Effective dust extraction can also be created using a conventional vacuum cleaner.
It is simply impossible to work with a milling machine without dust removal. For those who like to decide on such a purchase, it is burdensome in terms of money, and it is not always justified because of the rarely performed work. But there is a solution for them, how to eliminate dust with a powerful household vacuum cleaner. A hermetically sealed tank is connected between the vacuum cleaner and the tool, which will catch the bulk of the dust. It is equipped with an additional hose, and inside it is separated by a fine fabric mesh that traps dust in the tank. These tanks can be bought ready-made or made independently. We pay attention to the fundamental location of the hoses in it, separated by a grid. For an amateur, this option will allow localizing the bulk of the dust from milling. A homemade dust collector allows you to effectively collect not only wood dust, but also large construction debris with a household vacuum cleaner.
By the way, in one of the previous articles we already talked about how the most common power tool. It's hard to believe, but the drill can be adapted for pumping liquids and even mixing cement mortars.
And in the end, as always, a few videos about working with a manual wood router, clearly demonstrating the capabilities of the router, which were described in this article.
Any products made of natural wood are highly valued due to their environmental friendliness and uniqueness. To create real masterpieces from such a natural material with your own hands, you need to have a manual milling cutter and possess the necessary skills to use it.
In addition, additional devices for the milling cutter are also important, allowing you to produce parts of any complexity exactly as they were intended by the author. Home-made fixtures for such a wood tool are fairly simple designs, the execution of which does not require special skills or material resources, the main thing is to have a desire. But thanks to their use, the processing of various parts will become much easier.
Tool table
Milling table with stops
The very first necessary device that makes it possible to work comfortably with such a hand tool is a milling table.
The simplest design of the table consists of a tabletop, which can be a sheet of chipboard or other similar material with holes for installing tools, as well as a guide that is attached to the table with clamps.
Having made ordinary legs, we get the main fixture for our hand tool - a table on which any other fixtures can be installed.
Parallel stop
 A similar device for a manual wood milling machine often comes with equipment. But there is always the opportunity to do it yourself. What is it for? The fence itself makes it possible to cut the material in a straight line. But it often happens that the incision needs to be made not straight, but, for example, arcuate.
In this case, it is advisable to make a milling stop, one of the sides of which will be straight, and the other will repeat the shape of the part. In this case, it will be possible to cut wood in different ways. Each master creates templates for such stops with his own hands “for himself”, depending on the purpose of using the milling machine.
Router guides

One of the main components of a manual wood carving machine is its guides. You can make them yourself from ordinary bars.
In the case of using one guide, it must be tightly attached to the base on which all the necessary work will be carried out. To make the whole structure more reliable, at the same time eliminating the possibility of template displacement, it can be additionally fixed with side stops.
If you use such a device for a manual machine, which we made with our own hands, you can always make additional grooves in several products.
Homemade guides are:
- T-shaped;
- On hinges, can be folded like a book;
- L-shaped.
Quite convenient to use are guides that look like skis. You can use them with any type of manual router, making work with a wooden blank as accurate and clean as possible.
Devices for processing bodies of revolution
 If, when working with such a machine, you have to process certain bodies of rotation, for example, balusters, poles, and the like, then in this case the process of processing them with a manual milling cutter will become much easier when using another device. It consists of:
- corps;
- a movable carriage on which the tool itself is installed;
- disks with which you can set the desired angle of rotation;
- screws that securely fasten the workpieces.
Using such a device, the products will rotate slowly, which will make the processing process more convenient. Thus, you can make a device with your own hands that will become a complete replacement for a lathe.

Compasses for milling cutter
Such devices for a manual milling machine ensure its movement along the required circle. The design of a do-it-yourself compass is very simple, it consists of the main part - a rod, which is attached at one end to the base of the tool, and a secondary one - a screw that is inserted into the hole of the hand router.
A compass with two rods is distinguished by a higher efficiency in use. Having made it from some transparent material, for example, plexiglass, a metric scale can be applied to the surface of the device, which will make its use even more convenient.
Using an angular lever with a scale, copying is carried out on the workpiece being processed. In this case, it will be possible to center the ring on the cutter with your own hands in the process of work. Angle arm with support plate ensures accurate workpiece edges. The design of such a device for working with hand tools consists of a set of probes, a base plate, as well as chip protection.
Small extras
Usually, in the kit for the hand tool itself, there are some minor devices that make it easy and convenient to work with non-standard-shaped parts. You can always make such devices with your own hands or slightly improve the existing ones to suit your needs and requirements.
Copy rings. Such accessories are ordinary round plates that determine the movement of the device along the workpiece, which is installed on a table or other base. The diameter of such rings is selected depending on the diameter of the cutters.
The diameter of the template will also depend on the selected ring. They are selected in inverse proportion - if the diameter of the cutter is larger than the diameter of the ring, then the template is smaller than the finished product, and vice versa.
Devices for working with a manual machine on narrow surfaces will not allow the router to move to the sides, passing exactly in the center of the products.
Devices for creating spikes. Such accessories are most often used in the manufacture of furniture to create connecting spikes on the details.
How to make do-it-yourself tools for a wood router?
Device - parallel stop
This device, as a rule, is already sold with a router. Therefore, there is no need for its independent development and creation. For a reliable stop of the processed material, this element is used. With it, the movement of the cutter becomes rectilinear relative to the base surface, which can be a table guide, rails or straight edge detail .
Such a device makes it possible to quickly mill a variety of grooves and edge processing, holding the material firmly.
Guide bar
 If you need to make a straight cut with a router, then you can not do without this device. To make it, you need any flat board, for example, you can use a piece of chipboard .
First you need to find out the distance from the edge of the milling base to the center of rotation, and it is always the same. To do this, screw a guide to the unnecessary part of the material and make a test cut. Then you should measure the gap from the edge of the cut to the tire, to which the radius of the cutter is added. As a result, it will be possible to obtain the required value. For example, it is 59 mm, and the diameter of the groove cutter is 14 mm, that is , its radius is 7 mm .
Then you should draw a line under the cut, from which we retreat a distance of 52 mm (59-7), and draw another one. On it we fix the guide and carry out the cut.
Circle milling
For such purposes, use compasses. With their help, the milling cutter can move in a circle. The simplest of these is a device consisting of a rod, one end of which is equipped with a screw with a pin, and the other is fastened to the base of the tool. Of course, it is better to use a compass equipped with two rods.
In general, there are many branded and even home-made devices for cutting circles for a router, which differ from each other in ease of use and dimensions. Quite often, compasses have a mechanism changing the radius of the circle. As a rule, it is a screw with a pin at the end, moving along the groove of the router.
When it is necessary to mill a small circle, the pin should be located under the base of the tool. In these cases, other devices are also used, which are fixed down to the base of the device.
But for cutting circles, it is not necessary to buy a milling compass. Instead, you can use a parallel stop. To do this, the device is attached to the groove on the sole. A screw is screwed into it, which is recommended to be equipped with a sleeve so that its diameter matches the size of the hole. That's all the compass is made. The radius can be adjusted with a stop.
Devices for replication and copying
 To create a series of identical products use:
- Angle lever;
- Copy sticks.
There is a scale on the angle lever, the division value of which is 1/10 mm. It allows you to center the stop ring under the cutter, which helps to accurately reproduce the shape of the part on the workpiece during copying. It is often equipped with a chip guard and a support plate for the best edge finish.
Using copy templates and rings
Copy rings - a round plate with a protruding rim that slides along the base surface along the template. Such a device provides an accurate path for the movement of the cutter. Basically, this element is installed to the sole of the workbench. At the same time, there is several ways to mount it:
- Installation of special antennae in the holes on the sole;
- Screwing the ring into a threaded recess.
The use of a template also allows you to achieve more efficient and accurate work. It is attached directly to the workpiece with double-sided tape, and then both parts of the fixture are pressed to the machine with clamps. Moreover, experienced millers are advised to check how tightly the ring is pressed against the edge of the template.
In addition, with such a device, it is possible to process not the entire edge, but only the corners. Hence, pattern processing procedure- an excellent option for cutting grooves for the product.
Dust extractors
 Professional craftsmen, in order to ensure dust removal, specially buy a technical vacuum cleaner, which is connected via an adapter with a hose to the router. Moreover, it does not interfere with the control of the tool, and the marking and the place of processing of the product are always open for visual inspection.
It is very difficult to work without a suction unit. But not everyone decides on such a purchase, since it is too burdensome in terms of money, and besides, it is not always justified. True, there is another solution, you can get rid of dust with a household vacuum cleaner.
Between the milling machine and the vacuum cleaner are installed sealed tank. He will capture the bulk of the dust. It is equipped with an additional hose, and a fabric mesh is inserted inside. Moreover, these designs can be purchased ready-made or do it yourself. By the way, a home-made device will help to collect even large construction debris and wood dust with a household vacuum cleaner.
Slot milling device
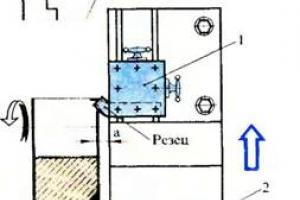
Such a device is used for processing longitudinal grooves on poles, balusters and other bodies of revolution. The principle of its work is the following. A baluster is installed in the body and fixed. With the help of a locking screw and a disk, the workpiece is fixed in a strictly defined position.
After that, the carriage is set in motion, and the milling a groove along the length of the product. Then the part is unlocked, rotated to the required angle, locked and the next groove is created.
Woodcarving instructions with a milling cutter
For novice craftsmen, working with a hand tool may seem difficult, since the process of controlling it seems difficult. That is why, before you start milling, you need to familiarize yourself with the principle of its operation.
Router Assembly
The first step is to check the place of attachment of the cutter in the machine, as a rule, a collet chuck is used for this. First you need to select the desired cutter that matches the size of the cartridge. If necessary, you can replace it.
But when deep machining is required, a version with an extended shank is used, which is inserted into the chuck hole and secured with a key. This must be done carefully without applying force, otherwise you will pinch, which is not the norm for the router to work correctly. Although it is worth trying to reach a good stop so that the cutter does not stagger. It remains only to clamp the spindle lock and you can proceed to work.
After that, the router turns on, you need to get used to the sound and feel the start. Often, it is because of surprise that many begin to make a marriage.
Depth Selection
 In addition, you will need to install a milling depth limiter. First, the machine is applied to the product from the edge, while the cutter should not come into contact with the material. It will have to be pressed until it reaches the required depth, after which position is fixed .
For a more accurate value, a stepwise limiter is used. You can find out its step in the manual for the router. In this case, the knob turns to the desired number of degrees.
First of all, the required speed is determined. This is done according to the table in the instructions, based on the diameter of the cutter and the material being processed.
If you have never worked with a router before, then it is better to try your hand at a draft version. In addition, it will help to set the desired parameters. directly in processing mode .
It is also desirable to compare the results after the tool has moved clockwise and counterclockwise, towards itself and away from itself. When milling a product around, the correct direction is counterclockwise, and on its flat side, on the contrary, away from you. Then you can already start carving the main workpiece.
Homemade fixtures for a manual milling cutter. Learn how to work with a hand router

Unforgivable Movie Mistakes You Probably Never Noticed There are probably very few people who don't like watching movies. However, even in the best cinema there are errors that the viewer can notice.

7 body parts you shouldn't touch Think of your body as a temple: you can use it, but there are some sacred places that you shouldn't touch with your hands. Display research.

Why do you need a tiny pocket on jeans? Everyone knows that there is a tiny pocket on jeans, but few have thought about why it might be needed. Interestingly, it was originally a place for Mt.

How to look younger: the best haircuts for those over 30, 40, 50, 60 Girls in their 20s don't worry about the shape and length of their hair. It seems that youth was created for experiments on appearance and bold curls. However, already

Top 10 Broken Stars It turns out that sometimes even the loudest glory ends in failure, as is the case with these celebrities.

What is it like to be a virgin at 30? What, I wonder, women who did not have sex until almost reaching middle age.
Milling fixtures
For full-fledged work with a manual router, in addition to the tool itself, the material and the corresponding set of cutters, you must have one more component - fixtures. In order for the cutter to shape the workpiece in accordance with the master's intent - cutting the material exactly where it is required - it must be in a strictly defined position relative to the workpiece at any given time. To ensure this, numerous devices for a manual milling cutter serve. Some of them - the most necessary ones - are included in the tool kit. Other milling devices are purchased or made by hand. At the same time, home-made devices are so simple that for their manufacture you can do without drawings, using only their drawings.
Parallel stop
The most used device, which comes with the kit for almost every router, is a parallel stop, which ensures the rectilinear movement of the cutter relative to the base surface. The latter can be a straight edge of a workpiece, a table or a guide rail. The parallel stop can be used both for milling various grooves located on the face of the workpiece, and for processing edges.

Parallel stop for a manual router: 1 - stop, 2 - rod, 3 - router base, 4 - rod stop screw, 5 - fine adjustment screw, 6 - movable carriage, 7 - movable carriage stop screw, 8 - pads, 9 - screw stop stop.

Edge milling with rip fence
To set the device in working position, it is necessary to push the rods 2 into the holes of the frame 3, providing the necessary distance between the support surface of the stop and the axis of the cutter, and fix them with the locking screw 4. For precise positioning of the cutter, you need to release the locking screw 9 and turn the fine adjustment screw 5 set the cutter to the desired position. For some models of the stop, the dimensions of the supporting surface can be changed by shifting or expanding the support pads 8.
If one simple part is added to the parallel stop, then with its help it is possible to mill not only straight, but also curved grooves, for example, to process a round workpiece. Moreover, the inner surface of the bar located between the stop and the workpiece does not have to have a rounded shape, repeating the edge of the workpiece. It can also be given a simpler form (figure "a"). In this case, the trajectory of the cutter will not change.

Stop for milling rounded surfaces
Of course, the usual parallel stop, thanks to the recess in the center, will allow you to orient the router along the rounded edge, however, the position of the router may not be stable enough.
Guide bar
The guide bar is similar in function to the rip fence. Like the latter, it provides a strictly rectilinear movement of the router. The main difference between them is that the bar can be set at any angle to the edge of the workpiece or table, thus providing any direction of movement of the router in the horizontal plane. In addition, the tire may have elements that simplify the performance of certain operations, for example, milling holes located at the same distance from each other (with a certain step), etc.
The guide rail is attached to the table or workpiece with clamps or special clamps. The tire can be equipped with an adapter (shoe), which is connected to the base of the router with two rods. Sliding along the profile of the tire, the adapter sets the rectilinear movement of the cutter.
Sometimes (if the distance of the tire from the router is too close), the bearing surfaces of the tire and the router may be in different planes in height. To align them, some routers are equipped with retractable support legs that change the position of the router in height.
Such a device is easy to do with your own hands. The simplest option is a long bar fixed to the workpiece with clamps. The design can be supplemented with side stops.
By placing a bar on two or more aligned blanks at once, they can be grooved in one pass.

Milling grooves on two workpieces at once
When using a bar as a stop, it is inconvenient to place the bar at a certain distance from the line of the future groove. This inconvenience is devoid of the following two devices. The first is made from boards and plywood fastened together. In this case, the distance from the edge of the stop (board) to the edge of the base (plywood) is equal to the distance from the cutter to the edge of the router base. But this condition is met only for a cutter of the same diameter.. Thanks to this, the device quickly aligns with the edge of the future groove.

The following fixture can be used with cutters of different diameters, plus when milling, the router rests with its entire sole, and not half, as in the previous fixture.

Slot Milling Attachment

The stop is aligned along the edge of the hinged board and the center line of the groove. After fixing the stop, the folding board leans back, making room for the router. The width of the folding board, together with the gap between it and the stop (if any), must be equal to the distance from the center of the cutter to the edge of the router base. If you focus on the edge of the cutter and the edge of the future groove, then the device will work with only one cutter diameter.
When milling grooves across the fibers, at the exit from the workpiece, when milling an open groove, cases of wood scuffing are not uncommon. The following devices will help minimize scuffing, which press the fibers at the exit of the cutter, preventing them from chipping off the workpiece.
Two boards, strictly perpendicular, are connected with screws. Different cutters are used on different sides of the stop so that the width of the groove in the fixture matches the width of the groove of the part to be milled.
Another open slot milling fixture can be pressed tighter against the workpiece to further minimize burrs, but it only fits a single diameter cutter. It consists of two L-shaped parts connected on the workpiece with clamps.

Slot Milling Attachment

Slot Milling Attachment
Copy rings and templates
A copy ring is a round plate with a protruding collar that slides along the template and provides the necessary trajectory for the cutter. The copy ring is attached to the sole of the router in various ways: it is screwed into a threaded hole (such rings are in the photo below), the antennae of the ring are inserted into special holes on the sole or screwed.

Installing the copy ring
The diameter of the copy ring should be as close to the diameter of the cutter as possible, but the ring should not touch the cutting parts of the cutter. If the ring diameter is larger than the cutter diameter, then the template must be smaller than the finished parts to compensate for the difference between the cutter diameter and the copy ring diameter.

Edge milling using a template and copy ring
The template is fixed on the workpiece with double-sided tape, then both parts are pressed with clamps to the workbench. When you have finished milling, check that the ring is pressed against the edge of the template during the entire operation.
You can make a template for processing not the entire edge, but only for rounding the corners. In this case, using the template shown below, it is possible to make roundings of four different radii.

First you need to cut the corner

In the figure above, a cutter with a bearing is used, but the template can also be used with a ring, only either the ring must exactly match the diameter of the cutter, or the stops should make it possible to move the template away from the edge by the difference in the radius of the cutter and the ring. This also applies to the simpler version shown below.

Corner template

Rounding a corner using a template
Templates are used not only for milling edges, but also for grooves on the plate.

Slot milling with a template
The pattern can be adjustable.
Do-it-yourself tools for the router, or buy ready-made ones?
We will try to answer this question in our article.
For those who make wooden products on their own, a milling cutter (especially a manual one) is an indispensable tool. By itself, a power tool, even equipped with an excellent set of cutters, is completely useless without additional devices. It is impossible to hold a working milling cutter within a given trajectory with your hands.
The rotating cutter will move randomly, reacting to tool vibrations and the structure of the material being processed. Even the owner of steel muscles and a hawk's eye will not be able to work with this tool without the use of guides and fixing devices.

This is what a wood cutter looks like
Elementary devices are usually included in the power tool kit, but with their help you can perform only simple tasks. More complex guides and templates have to be purchased for extra money, and many of them can be made by hand.
The main thing is to have an idea of how this device looks and works. There is no need to look for ready-made drawings and complex technical calculations. Any master himself knows better how to make this or that device. In this case, the efficiency and convenience of work will be higher, not to mention the savings.
Mechanical assistants for a manual router
The most common fixture that is included in the basic kit.
Parallel stop

Accessory - rip fence
The design is so simple that it is not difficult to make it yourself. Relative to the line of passage of the cutter, a guide plane is selected (in some cases it can be a flat edge of the workpiece itself), along which the cutter moves. As a stop, any even oblong object connected to the tool by a fixed bar can be used. For reliability, there can be two rods.
The surface of the guide must be smooth, for free sliding. The stop needs to be calibrated.
To do this, a control groove is cut in the workpiece, the distance to it is measured relative to the edge of the workpiece, and the zero mark is fixed. By moving the stop along the bar, you can set any distance with high accuracy.
IMPORTANT! When using two rods, it is necessary to ensure their simultaneous fixation.
The parallel stop is used for milling grooves and processing the edges of the product, including the selection of a quarter. It is also possible to cut blanks of the same width. Compared to an electric jigsaw, the cut obtained with a milling cutter is more even and of high quality. Only the cutter should be of small diameter, to save material.
The device can be used when processing rounded surfaces. To do this, a gasket with a cutout in the form of an obtuse angle is installed between the stop and the rounded end of the workpiece.
Guide bar
This device does not differ in its function from a parallel stop, and is designed to ensure directional movement of the cutter along a given path.

A useful assistant when working with a router - a guide bar
The main difference is the ability to choose the angle of movement of the router. To do this, the guide is fixed on the surface to be treated using clamps or suction cups. You can make such a device yourself from a profile or a corner of a suitable size. It is good to use an old curtain rod. The main thing is to ensure the free movement of the carriage along the guide. For a more stable fixation, it is better to use not one, but two rods. If the width of the workpiece being processed is greater than the length of the parallel stop bar, a guide bar is indispensable.
Using such a device, you can mill grooves along a broken line or cut the edge of a product along a complex path. To do this, the router stops at the break point, the guide is attached, which rotates at a given angle relative to the previous direction. In this case, the cutter remains in the workpiece, acting as the axis of rotation. The guide is then fixed again and milling continues in the new direction.
More advanced models have the ability to change the angle of inclination of the router relative to the vertical. This allows you to significantly expand the possibilities of using power tools.
Compasses for milling cutter
The purpose of this device is clear from the name. It is used for milling grooves in a circle or cutting circles.

Want to make a perfect circle? Need a compass for a milling cutter
The principle of operation is simple. As a leg of the compass, a guide rod with a groove or a plate with calibrated holes is used, which allows cutting circles of any diameter. In the center of the proposed circle, a hairpin is fixed, around which the entire structure moves. But the other end of the guide is a milling cutter.
Factory compasses for a milling cutter can have a variety of designs. Rod with support platform and hinge (double rod design is more stable), slotted plate or calibrated holes.

Template for cutting circles
The main thing is to ensure reliable fixation of the central stud, otherwise the structure may move due to vibration and the workpiece will be damaged.
You can make such a device yourself from any durable and even material, for example, textolite.

Homemade tool for cutting circles
A carriage with a fixing device moves in the propylene groove; holes are provided for fastening the router.
There are also more complex devices for forming ovals. It is based on the same design as in the compass, but instead of the axis of rotation, a support with a cross groove system is used. Moving along them, the virtual axis is constantly shifting, as a result of which a regular oval is formed.

Device for cutting oval holes with a router
With this tool, you can make oval cuts both around the nozzle and next to it. The possibilities for choosing the trajectory of the cutter are practically unlimited.
Copy sleeve
Sometimes it becomes necessary to mill a complex pattern or replicate the same cutouts. For convenience and increase the speed of work, pre-made templates are used. For example, a template is often used - a tenon cutter.

Copy sleeve or copy ring
Or it becomes necessary to cut several identical recesses for the door hinges.
To move the router along the contour of the template, copying rings are used. The sleeve rests on the template, and the cutter exactly copies its profile.
IMPORTANT! The diameter of the copy sleeve is larger than the working diameter of the cutter.
Therefore, when manufacturing a template, an allowance is made for the difference in radius ( Radius, not diameter!)
When the cutter moves inside the template, the cutout will be smaller. When moving outside the template - correspondingly more.
Standard copy rings are included with the router. However, it often becomes necessary to make such a fixture for a specific cutter diameter or original template. Such work does not present great difficulties. It is necessary to draw a drawing, and order the product to a turner. In this case, it is imperative to ensure the free passage of the cutter through the bushing.
IMPORTANT! When installing the copy sleeve on the supporting surface of the router, it must be centered. For this, special centering cones are used.

Installing the copy sleeve on the router
Router Templates
These fixtures are rarely made for milling a single part. The exception is the restoration of a rare product or the restoration of a complex structure, a replacement for which cannot be found. In most cases, templates for the router are used for mass work of the same type:
- cutting recesses for door locks and hinges
- production of paneled door surfaces
- production of figured architraves
- cutting studs for joining wooden products
- production of identical blanks in the production of furniture

Sample templates of various shapes
With repeated use, the template wears out quickly, and the accuracy of manufacturing parts decreases. Therefore, the template material must be durable and resistant to abrasion. Multilayer plywood and textolite have proven themselves well. More responsible templates are made of metal.
Self-made templates are used everywhere. The main thing is to accurately determine the difference in the dimensions of the template and the finished part after processing.
IMPORTANT! There are no universal templates. Each matrix is made for a specific router, copy sleeve and the cutter itself.
Wood nozzles
The processing of wooden surfaces and blanks gives the widest creative possibilities for using the router. Professional carpenters and joiners use stationary machines, but you can literally work wonders with a manual router. To do this, there are nozzles for wood, specially designed for high-quality processing of various types of material.

Various milling cutters (nozzles for wood) for wood processing
With the help of such nozzles, you can give any shape to the end surface of the workpiece, cut out an imitation of a panel on the door plane, make skirting boards, cornices, door frames, glazing beads and much more. Moreover, the same nozzle allows you to perform different curly cuts, depending on the angle of application.

An example of the different shapes that can be made with nozzles
An experienced craftsman often makes cutters for each type of work on his own. To do this, according to the template, it is necessary to sharpen each cutting edge of the cutter at the same angle. It is painstaking work, but you will get a completely exclusive tool that meets your requirements.
However, industrially made wood nozzles offer a fairly wide selection of shapes that satisfy the needs of most carpentry masters.
Special kits
Separately, there are kits for performing special work - for example, a device for tapping loops. The device is a custom-made or customized template for this type of milling, equipped with specially designed fasteners that fix the tool on the end of the door leaf.

Homemade device for tapping loops
As a rule, such templates are made independently. Any carpenter of a narrow specialization tries to have an individual set, especially if the work is done on the territory of the customer.
Hinge cutters
There are also standard fixtures for loops, in the form of special cutters. To work with them, a template is not required.

Door hinge cutter
When doing home repairs, you can get by with simpler ways of cutting niches for hinges or grooves for a lock. It is enough to install a second parallel stop on the bars and then the router will be securely fixed at the end of the door leaf. This method is less convenient and not suitable for mass production of doors, however, for one-time work, it will save money on purchasing a special set.
Set of cutters for binding

A set of cutters specifically for a specific type of work
There are also sets of cutters, each of which cannot be used separately. In such sets, the sharpening of the tips is synchronized, and each next cutter complements the work of the previous one. Let's take a binding set as an example.

Binding made with a set of cutters
It is when using all the cutters from the set that you can get a joint without gaps.
To increase the versatility of use, type-setting cutters are available.

Universal type-setting mill
Several complementary cutting attachments are attached to the axle, the arrangement of which can be combined. At the same time, one set can perform work that requires as many mono nozzles.
Thus, using a variety of devices for a manual router, you can do complex woodwork with your own hands without using stationary milling machines. This issue is especially relevant when living in an apartment, when it is impossible to find a place to place the machine. And with the help of a manual milling cutter with a good set of nozzles and accessories, you can organize a mini-workshop on the balcony. Only when working indoors, it is necessary to ensure the removal of dust and sawdust.
In order to ensure the normal operation of the milling machine, it is necessary not only to properly handle the device used, but also to correctly use, in other words, devices for this tool to be able to form the workpiece in accordance with the requirements of the master (that is, cutting off the edges and other places of the material where it is needed, and not where "it happened"). So, it is precisely to give the processed material a clear planned form in the economy that "adaptations" for a manual milling cutter are used.
The complexity of making homemade devices
Often, manufacturers themselves complete their products at the production stage, but, alas, not every company will be able to please consumers with a complete set of all the necessary tools. And why do this if at any time you can make a suitable tool with your own hands in a garage environment. You can do this even without a preliminary drawing: their design is so primitive that even a novice master can cope with such work. To make a parallel stop or any other detail, it is enough to have a drawing of this device and a minimum set of tools with you. But if you want to make a homemade table for a manual router, you definitely cannot do without a drawing. It is necessary to calculate everything correctly, designate the dimensions of the table, and then proceed to work.
How to work with a manual router?
Before performing wood milling work, you need to make sure of the following:
- Is the cutter clamped in the collet.
- Whether the additional device installed on the workbench corresponds to its power and speed.
- Whether the required milling depth is set (when working with plunging devices, this indicator is measured using a special immersion limiter).
- When working with, make sure that a guide ring or bearing is installed that provides the desired trajectory of the device (in this case, the thickness of the cutter should be no more than three millimeters).

We pay attention to the supports for parts when performing work
When considering the question "how to work with a hand router" it should also be noted that the part you are processing must always have some kind of support. For example, before turning on the engine, the edge of the sole or the bearing is pressed against the guide piece or template. Only then the master turns on the machine and starts milling.
Below we will consider what are the devices for the router, and why they are special.
Parallel stop
The rip fence is one of the few devices that comes with every router. Therefore, there is simply no need for their independent development and manufacture. With regard to functions, with the help of the mentioned element, it is possible to make a reliable stop for the material being processed, thereby ensuring a rectilinear movement of the cutter relative to the base surface. The latter can act as a straight edge of a part, a guide rail or a table.

With this attachment for a hand router, you can quickly edge and mill various grooves while holding the material almost in the “dead center” position.
Guide bar
This tool has similar functions to the previous one. Like the rip fence, the rail provides exceptionally smooth straight-line movement of the device. Working with a manual wood router using a guide rail can significantly reduce the time spent on processing a particular part. In addition, with the help of the specified equipment, it is possible to install the mechanism at almost any angle relative to the edge of the table.

In some cases, the design of the tools in question provides for the presence of special elements that facilitate certain operations (for example, it can be a function of cutting holes at the same distance opposite each other).
Copy rings and templates

Hand router fixtures such as copy rings are a round plate with a raised shoulder that can slide across the surface along the template, thereby providing an accurate path for the cutter. Often this element is attached to the sole of the workbench. There are several ways to install it:
- Screwing a ring into a threaded hole.
- Installation of special antennae of the device in the holes on the sole.
With a hand router attachment such as a template, you can also achieve more accurate and efficient work. The signified

element directly on the workpiece itself, after which both parts of the device are pressed against the machine using clamps. Upon completion of the work, experts recommend checking the condition of the ring - to see if it is securely pressed against the edge of the template or not.
Another feature of the tool under consideration is the possibility of processing not the entire edge, but only its corners. At the same time, some devices for a manual milling cutter allow you to make roundings of four different radii at once. Thus, the pattern-machining process is an excellent way to cut grooves for a part.
compasses
These home-made devices for a manual milling cutter are designed to move the entire machine along a certain circle. The design of this tool includes the main part (a compass, consisting of one rod), attached with its end to the base of the router, and a secondary one - a screw with a pin inserted into the hole of the machine. The value and is set directly by the displacement of the machine relative to the design of the device. Before starting work, it is necessary to carefully fix the tool to the base and make sure that the router is in good condition and functioning properly. It is worth noting that the most effective and easy to use is the compass, which has not one, but two rods at once.

Most often, this tool is made of transparent plexiglass. A small metric scale is additionally applied to its surface. It is worth noting that some models of compasses can have a circumference up to 150 centimeters long. With the help of such a device, you can easily make a round tabletop for several people.
However, back to the principle of operation. By means of the angular lever with an exact scale copying on preparation is carried out. Here you have the opportunity to center the ring directly under the cutter. The angle arm, which is complemented by a special support plate, also ensures precise edge milling.
The whole structure of this fixture consists of a base plate, a set of probes and a chip protection device.
Devices for copying identical devices and parts
This characteristic refers to a set of tools, consisting of an angle lever and special copy probes, which are needed to manufacture a batch of identical parts. Most often, such equipment is used in cases where there is a need to replicate small wooden devices. But before starting work with such a router, it is necessary to prepare in advance the scale of the angle lever (scale division - 1/10 mm).

After the scale is set, you will be 100 percent sure that the thrust ring is correctly centered under the cutter, the location of which depends on the values set on the angle arm. Also, this adjusting element can be equipped with a base plate and a special mechanism that protects the surface of the device from chips. The use of such parts will significantly speed up and secure the processing of the edges of products.
One of these devices is a parallel stop. This is a component of the basic set of any router, and the owner of the tool does not have to make the stop himself. It is needed for the direct following of the cutter along the surface of the base, which can be the smooth edge of the part or workbench.
The stop allows you to process edges and grooves, firmly fixing the part.
This useful addition to the milling tool consists of the following parts:
- rods included in the recesses on the milling cutter;
- screw fasteners tightening them in the desired position;
- adjusting screw for fine adjustment of the distance of the cutter axis from the edge;
- the supporting part that holds the structure on the base.
To bring the stop for the wood router to readiness, it is necessary that the rods take up position in the recesses on the tool body and are tightened with a stopper. By loosening the stopper, you can make small adjustments if necessary with the adjusting screw.
With a slight addition, the parallel stop allows you to make, in addition to straight cuts, more complex ones. Adding this is a wooden block with one even side. The other side has an angular or round notch. The bar is inserted between the supporting part and the edge of the material, which has a curved shape.
The bar is in contact with the support with its even edge. The side where the notch is in contact with the curved base. Manipulate the tool with such a device should be extremely careful, as the bar introduces an element of instability.
Guide bar
Having a similar purpose to the rip fence, the tire is responsible for the accurate running of the cutter in a straight line. The time spent on work is significantly reduced due to the use of the tire. It also allows you to guide the tool on the table at any angle to the edge.
Note! You can fix the tire on the countertop or material with clamps.
Some serial production tires have a separate component in the kit - a shoe. It is connected to the router with rods and, passing along the tire, moves the milling head along a given trajectory.
The tire is best combined with a tool whose base is on retractable legs. This eliminates the difference in height between the bar and the router.
It happens that the functionality of mass-produced tires does not suit the user. You can always create an individual version of the guides for the router with your own hands. The most elementary is a long, even bar, in other words, a ruler. The master only needs to provide it with fasteners, and the tire, in fact, is ready. For the manufacture of a simple fixture, a drawing is not even required.
Of course, such a homemade version will not be sustainable. A combination of a plywood base with a board nailed to it will turn out to be more stable in work. The edge of the milling base will rest against the board, and the edge of the base will indicate the processing area. This design is used in the case of using cutters of the same diameter.
Another option works when wood cutters can be of different sizes. Here, the board, acting as a ruler, is not nailed to the base, but is reinforced with clamps. Thanks to this, it can adjust the distance from the working area according to the diameter of the cutter.
Templates and copy sleeve
The copy ring is a circle with a ledge that slides on a pattern, guaranteeing the accuracy of processing. The ring can be screwed to the base of the router or secured with antennae. The diameter of the fixture is selected in such a way that it does not come into contact with the working part of the tool.
The ring template is fixed on the processed material, firmly adjoining to a table-top. Reliable clamping is provided with double-sided tape and clamps. After finishing the part, you need to make sure that the bushing fits snugly along the edge of the template when working.
A do-it-yourself template for a router will also be used for processing the corners of a part, when it is necessary that they be round. Depending on the location and dimensions of the template, the radius size of the rounding can be any.
The template design often includes bearings or rings. If this is a ring, then it should be selected according to the size of the cutter. With a difference in diameters, it is necessary to add stops to the design of the template, with which it will be possible to move the fixture from the edge of the part.
Among the auxiliary devices for the router, the most flexible templates, in addition to processing the edges of the material, also allow cutting complex grooves. The special arrangement of the accessory makes it possible to effectively create recesses for door hinges. With the help of a template, you can even carry out decorative work with a router, for example, cut out wooden patterns.
Compass
This auxiliary tool is designed to create round and oval cutouts. The basic compass scheme includes a rod with a pin fastening at the end. By inserting the fastener into the hole in the center of the circle along which the groove is made, you can change the size of the circle by simply moving the rod.
Note! The convenience and reliability of the design is enhanced by the addition of a second rod.
There are various auxiliary elements that work on the circular principle. They give the advantage of creating different radii of circular grooves. An obligatory component of such auxiliary devices is a pin with a screw for adjusting the length of the radius.
If a small hole is being cut, the circular design must be adapted to fit on the base of the router. The pin when machining the part is located directly under the tool.
A wood router, in addition to round ones, is also able to cut elliptical holes. The device for this can be assembled with your own hands from the following parts:
- base with fixation on the material of screws or suction cups;
- shoes moved on crossed guides - 2 pcs.;
- rods for mounting - 2 pcs.;
- bracket for connecting the structure to the tool.
The fastening bracket, thanks to the grooves intended for this, allows the frame of the structure to be in the same plane as the base of the router. Cutting round openings is done using one shoe. If you need an oval hole, both are used. This auxiliary design makes it possible to make holes more accurately and faster than other tools such as a band saw or a jigsaw.
For grooves on narrow surfaces
Recesses for locks or door hinges can also be made with a drill and a chisel, but a router is much better suited for this. You just need to equip the tool with a certain device. It consists of a flat plate that is attached to the base of the device. The shape of the plate can be round or rectangular. 2 pins are made on it, ensuring a smooth running of the tool during operation.
The main parameter that must be followed in the manufacture of such an element is that the axis of each pin must be on the same line as the center of the cutter. Subject to this parameter, the groove will be cut exactly in the middle of the workpiece, regardless of the thickness. If it is necessary to shift the groove to the right or left, a sleeve of the size required for the desired shift is put on the corresponding pin.
Using this design, the router is driven with the pins firmly pressed against both sides of the workpiece.
The same effect is achieved if two parallel stops are used with the router.
Even one stop may be enough. It is necessary to strengthen the workpiece between two surfaces, such as boards, so that all three elements are in the same plane. The problem of insufficient part width in this case is eliminated.
When you often have to work with narrow surfaces, a good solution would be to build a special table from two halves. By clamping the material between them, the master will easily achieve the effect of one plane.
Solids of revolution
When working with round blanks, such as poles or balusters, a structure is made up of a frame, inside which the part is placed, carriages for the milling cutter and a rotary disk. The part is inserted into the frame, securely fixed, after which the carriage with the tool is extended to the area for processing. The position of the part in the frame can be changed by means of a rotary disk.
The same frame with a milling cutter in the carriage can serve as a lathe. All you need to do is turn the disk while the router is moving along the guides. This can be done by an assistant master or a drill connected to the disk.
Tenoning devices
Such devices provide the creation of joints based on spikes. Requiring high precision of material processing, such profiles are easily performed by a milling cutter.
Using a manual router, the master brings it to the material freely. Therefore, the material needs to be securely fastened for error-free tenon cutting.
Such conditions can be created by a simple device made of the following parts:
- rigidly fixed guides, lower upper and side;
- a bar with one degree of freedom, which will limit the sample.
The parameters of the parts depend on the specific tool for which the device will be assembled. The assembly order is as follows.
Equal-sized vertical ribs with cutouts in the center are installed along the edges of the plywood base. Rails are attached to these ribs, on which the tool will move. For the safety of the movement of the router on the rails, they are locked with limiters, which can be simple wooden slats.
A movable part is attached to the plywood base - a regulator for sampling the edge of the part. The latch can be a wing screw or another fastener at the choice of the master.
Regardless of the manufacturer, a hand mill with the addition of such a structure is able to easily cut a simple tenon profile.
Another tool for the production of spikes is the jig. It consists of a base, stops and a movable part in the form of a sled. Already experienced users are starting to manufacture and use it for very small and precise work.
Hidden Features
The listed case of auxiliary tools may seem redundant when the master performs only the simplest operations with a router. But if you look at this tool from the angle of its potential, then a number of directions arise before the user.
Those works that the master did not even think that he could carry out turn out to be quite affordable - one has only to build a few auxiliary structures. As if this is not a simple manual milling cutter, but a CNC coordinate machine.
Making wooden products at home is a good business, but first you need to buy specialized materials and equipment. A milling machine is a power tool, without which it is difficult to process wood, especially if there is no set of milling cutters available that allow you to create diverse and multifunctional products. It is important to choose the right model, which will be equipped with all the fixtures.
There is nothing complicated in self-assembly of the cutter if you follow the step-by-step instructions. In addition, even a novice master will be able to provide the mechanism with all the necessary functions and auxiliary systems. For example, a holding system, without which it will be impossible to work. The movement of a rotating cutter is chaotic during the processing of wooden parts, which leads to the occurrence of strong vibration, which the master cannot compensate even with excellent physical fitness. Additional fixing and guiding devices are responsible for the firm installation of the device.
 When buying this equipment, all guides and fixing elements are included in its complex, but they perform only simple working movements, which are not enough for high-quality and beautiful processing of wooden products. Complex work processes require the purchase of additional holding templates, which cost a lot of money, but it is easy to make such wood router fixtures with your own hands.
Many experts prefer to use drawings when assembling the restraint system, but this is wrong. It is better to initially understand the design of the machine and carry out independent calculations that will satisfy all the necessary requirements. At the same time, the efficiency and reliability of such structures will be better, and this is not to mention the knowledge of the structure, which the master can repair on his own at any time.
There is a wide variety of devices that increase the functionality of the milling machine. Among them are:
- parallel stop;
- guide rail;
- compass;
- copy sleeve;
- templates;
- nozzles.
The design of the rip fence for the router table is the simplest of all types of holding systems. It will not be difficult to make it with your own hands, if you first understand the principle of its work.
 To begin with, they select an object that will serve as an emphasis. It can be an oblong product that will easily connect to a fixed rod. Next, a guide plane is selected along which the milling cutter constantly moves. In some cases, instead of a guide element, a flat side of the workpiece is chosen. This part must be smooth and even for free sliding along it.
For the normal movement of the cutter with the help of a guide workpiece, a control groove is first made in it and the distance from the edge to the zero mark is measured. As a result, the stop is easy to move along the bar, setting any acceptable distance, but it is important to remember that when working with two bars, they must be fixed at the same time.
The rip fence is a unique fixture that is great for edging, quartering or slotting. With its help, workpieces are cut according to the width set in the settings or rounded parts are processed. For processing products with a rounded surface, a special gasket with an obtuse angle is installed between the stop and the end face of the workpiece. Such a device is more useful than a jigsaw, which in the process creates many defects and defects. For example, a cut when sawing wooden blanks in width with an electric jigsaw turns out to be crooked.
The principle of operation of the guide bar is similar to the thrust conductor, but there are significant differences that make this mechanism more preferable for work. The rip fence only performs directional movements, unlike the bar, which allows you to choose the angle for processing wood products.
 To achieve the ability to choose the angle of movement of the cutter is obtained by installing a clamp or suction cups. It is easy to make such an option yourself, using the corners of a suitable size or profile. For example, an old curtain rod is perfect as a base. In this case, the main thing is to create conditions for the free movement of the carriage towards the guiding side and to fix it steadily by using two rods, not one. Sometimes the width of the workpieces exceeds the parameters of the rip fence and therefore the use of a guide bar is the best option.
When jobs that require broken line slotting or curved edge trimming are needed, the guide bar can handle this easily. For such work, it is necessary to stop the router at the break point, loosen the guide and turn the tire to the side at a given angle. The cutter in the process of changing the angle remains in place, representing the axis of rotation. Then the cutter is again fixed in a new predetermined position, and milling work continues.
There are also the most advanced models that can change direction vertically. This method of processing wooden parts greatly expands the functionality.
The purpose of the compass installed on the milling machine is known to many specialists in this field. With it, circles are easily cut from wooden blanks. The principle of its operation is similar to a simple compass, but there are some features.
The guide rod is one of the main elements that acts as the leg of a compass and has grooves or special plates with calibrated holes that allow you to reconfigure and set the desired diameter. The router guide is located at the other end of the stud. The whole structure moves around a fixed pin, which stands in the center.
 Factory models differ only in the device for reconfiguring the diameter. To do this, use a hinge with two rods to increase the stability of the craft, support platforms, plates or hole calibration.
It will be possible to assemble home-made equipment if you use any durable and even material. Many craftsmen use textolite for this. When assembling, you need to remember about the reliable fixation system, which helps to do the job with the highest quality. Cutting a circle is difficult and it is simply impossible to correct errors as a result. That is why the vibration of the structure must be minimized to prevent the equipment from moving during the circle cutting process. To mount the cutter on the device, special holes must be provided and grooves for moving the carriage with a fixation device must be sawn.
The compass on the cutter for cutting circles is the simplest model, the functionality of which can be easily expanded by using a support with a cross groove system. This option allows you to cut ovals by constantly moving grooves that form an even figure. This tool cuts ovals next to and around the nozzle, thanks to a wide choice of cutter paths.
 This element of the milling machine belongs to a new generation of systems that greatly simplify the work and expand the functionality of the equipment. A copy sleeve is needed in cases where it is necessary to cut a complex pattern on a workpiece or make the same cut on several products. In some cases, it is required to cut door hinges or similar parts in a piece of wood. For the convenience of performing such work, you need to know in advance how to make a template for a router and only then proceed to its production. One of the most common templates is the tenon cutter.
For precise movement of the cutter according to a given pattern, copy rings are used. The principle of operation is that the sleeve creates a support for the template, and the router exactly copies it during operation. When choosing the diameter of the copy sleeve, it is important to remember that it must be larger than the working diameter of the cutter. That is why masters in the manufacture of templates monitor the difference between their radii, and not diameters. This is due to the fact that the router will cut out a smaller pattern while moving inside the template, and working outside it, the figures will be larger.
Having learned how to use a copy sleeve for a router, the craftsmen get a good assistant in the processing of various wooden parts.
Template making
Many craftsmen use templates, especially when it comes to creating a series of wooden parts. It rarely happens when a template is used to cut out one part, but such cases also occur, for example, during restoration.
In most cases, such a device is used in production:

When making a template, it is important to initially select high-quality and durable material. Even taking into account the minimal contact between the milling cutter and the edge of the template, it is erased over time, and the drawings lose their original accuracy. Such problems can be easily avoided if durable materials are used initially:
- metal;
- textolite;
- multilayer plywood;
- some types of plastic.
Naturally, it will be difficult to prepare a metal template, but it will last for many years without deforming and retaining the original dimensions and strokes of the pattern. It is better not to experiment with such a device and make a template specifically for the necessary part of a wooden product. There are no high-quality universal devices.
Nozzles for woodworking
 The processing of wooden blanks gives a wide scope for the use of a milling cutter. Professional joiners and carpenters use automatic machines that perform the given functions accurately and quickly, but manual machines are also good at their job. Some, with the help of tenon-cutting parts or nozzles, allow you to work real miracles. In some cases, it even turns out to make carvings on the parts needed to assemble furniture.
Each nozzle is designed for a specific type of wood and is able to easily give the end part any shape. With their help, plinths, panels, cornices, balusters and much more are made. An experienced craftsman with one nozzle is able to perform various patterns on the surface of the workpiece using a different angle. In addition, experts often make such devices for a manual router with their own hands.
Special kits
In the woodworking industry, there are often kits designed for special jobs. These include, for example, the production of a tie-in for hinges. Such a set is a custom-made template that is immediately equipped with fasteners for milling.
 Most of these parts are made by craftsmen themselves. It is enough to install a second thrust jig on the rods and then a milling cutter will be securely attached to the end of the door leaf, which can easily cut holes for hinges or a door lock. This method is useful, but inconvenient, therefore it is more suitable for a one-time use.
Milling jobs are a great way to earn extra money by processing wooden blanks or just pass your free time. These works require minimal investment, and most of the devices, it turns out, can be done by hand.