Make metal gates with your own hands. How do you make metal gates with your own hands? How to sheathe swing gates
Swing. In this article we will tell you how to make swing gates with your own hands, consider the example of manufacturing metal and automatic gates, give explanatory photos, diagrams and drawings.
Regardless of the chosen design, you reserve the right to choose the method of opening them - inside the yard or outside. Making swing gates is not difficult. The classic form of swing gates has a number of distinctive features:
- Functionality.
- Ease of use.
- Compactness.
- Lack of beams and guide rollers.
- There are no size restrictions.
- Possibility to use different materials for the manufacture of.
- The ability to use all sorts of details for decoration.
Types of metal structures

Before proceeding with the manufacture of gates, it is important to determine their design. The choice depends on the frequency of their use. Several types of gates can be made from metal, we will consider each separately.

This type of construction is not so popular. They are one continuous sheet. In order for them to function well, the support pole should be securely strengthened, which will require a lot of money. If such gates are installed on a garage, then it is necessary to build a powerful metal frame and reinforced hinges. Moreover, the disadvantage is that it is necessary to organize enough space for opening single-leaf swing gates.

The most common and convenient type of swing gates. Without any effort, they can be made at home. Moreover, their design includes two identical canvases. Therefore, a frame is made of two frames, sheathed sheet material. Unlike the previous design, less free space is required to open.

For daily use, such gates are very convenient. Moreover, they are made according to the same principle as conventional double-leaf gates. The only difference is that in the right place on one of the wings you fix an additional beam and a support for installing the gate. If gates of such a plan are mounted on a garage, then a mortise type of gate is used. In this case, the desired hole is cut out in one of the gate leaves and the door is installed.
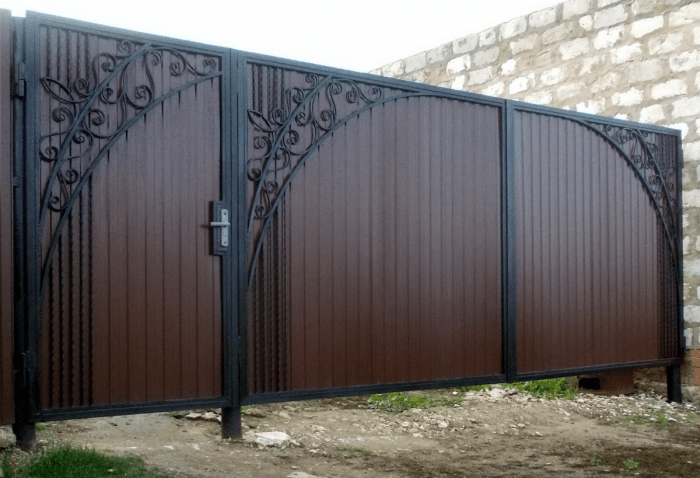
Forged swing gates are made more for aesthetic effect. If the structure is made in the form of closed elements, then the decorative forging, but an open type of gate is often used.
As for the garage, it is mainly used for their construction. closed type gate with separate elements of forging.
Regardless of the type of construction, garage doors can be insulated. Due to this, heat in the garage will be preserved. And your car, at the same time, will not corrode due to sudden temperature fluctuations.

By following the guide below, you will be able to make metal swing gates with your own hands. But for this it is important to closely adhere to the drawing / diagram of the design you have chosen. If it is difficult for you to design your own swing gate drawing, then at the end of the article, you will find many schemes that can be taken as a basis. The basis of the gate will be a metal frame, the fastening of which is carried out in the entrance opening. If you decide to make a gate in your yard, then you can immediately design a gate with a built-in gate. But for this you will need to install strong poles that can withstand the weight of additional doors. You also need to install supports, for this you will need:
- building level and tape measure;
- metal pipe 3 pcs. Ø 100 mm;
- shovel;
- facing brick (in case the supports are lined);
- cement, sand, gravel and water;
- plumb.
Installation of supports
The work on the manufacture of supports is as follows:
- Measure the entrance opening between the edges of the fence.
- Put marks for the installation of poles.
- In the chosen place, dig a hole for the installation of a support column.
- The thickness of the support pipes is selected based on the weight of the swing gate.
- Having installed the posts in the pit, adjust them according to the level. But first fill the bottom of the pit with rubble.
- The installed pillars should be poured with prepared concrete.
- In order for the pillars to initially stand securely, they should be lined with bricks in the hole itself, and at the same time adjust the vertical level.
- Thus, the installation and concreting of the supporting pillars is completed.
If the gate has a height of 2 m, then the depth of the pit should be about 1 m, and in diameter 100 mm wider than the diameter of the pipe.
Now is the time to start making the gate frame. For this you will need:
- metal sheet, 2–3 mm thick;
- metal profile, corner and pipe;
- measuring instruments (level, tape measure);
- metal loops;
- welding machine.
If you are making swing gates for a garage, then first of all you need to make a frame and install it in the opening. It is made from a metal corner of a rectangular or square shape, depending on the opening of the garage.
As for the manufacture of a frame for a garage, it is better to make them in duplicate. Fix one on the outside of the opening, and the second on the inside. Between themselves, they are connected by metal strips and welding.

The manufacturing process of gate leaves is as follows:
- Lay out corners or a profile pipe on a flat surface and weld the shape of the sash according to the drawing.
- To increase the strength of the structure, the resulting sashes are reinforced with diagonal beams.
- When the frame is ready, you can sheathe it.
- For sheathing the gate, use a sheet of metal 2 mm thick. It is not recommended to take sheets that are too thick, because in this case it will be necessary to strengthen the support posts.
- Next, you need to install the hinges. Weld one half of the hinge in the right place on the gate frame, and the other on the support post.
- Finally, it remains to install mortise lock and a gate made according to the same principle as the main frame.
- Painting swing gates is carried out on the ground or already in a suspended position. There is no particular difference. The only thing to consider is painting in limbo can cause streaks and sagging. Therefore, be careful when performing this work process.

Every person has a desire for comfort. And this applies even to the use of the gate. Modern technologies allowed to automate the process of opening swing gates. And this has many advantages. For example, when you are in a hurry, you should not waste time getting out of your car to open/close the shutters. If it's raining outside, you'll avoid getting wet by going outside again. Thinking about these positive aspects, we invite you to consider the manufacturing technology and some features of automatic gates.

First, let's highlight some of the features of such a structure:
- Strength.
- Versatility.
- Long service life.
- The mechanism is unpretentious and simple.
- The opening/closing speed is around 15 s.
For the sake of objectivity, consider the disadvantages:
- If during the opening / closing of the gate leaves there is an obstacle on the way, this will disable the automation, and the leaves will jam.
- It is necessary to regularly check the opening path of the gate, otherwise a breakdown is inevitable.
In addition, it is worth highlighting the frequent breakdowns of automation. Although manufacturers claim that this or that mechanism is extremely reliable, nothing is eternal. However, by carrying out preventive work, any troubles can be avoided.
If during operation the automation stops working, then you should not close the gate by force. It may be necessary to turn the process from opening to closing. When pressed again, the mechanism can work.
Although not in all cases this solves the problem. Often you have to contact specialists for automatic repair. Given all this, do not be afraid of such a design. As the saying goes: "to be afraid of a wolf - do not go into the forest." Do not give up the benefits of comfort.

It should be noted right away that the procedure for installing automatic gates is quite laborious. It requires some skill, precision and accuracy. Therefore, if you doubt your abilities, it is better to choose a company that will do everything efficiently and quickly. If you have experience in such work, then following the guide, you will be able to achieve the intended goal.
The manufacturing process of swing gates has been described above. Therefore, we will pay special attention to automation, which is equipped in accordance with certain standards.
So, when installing automation, you must consider the following indicators:
- the position of the wings relative to the support column;
- if the automation is used without the use of limit switches, then a leaf stop is used.
Not considering these important factors, the automation will fail, which will lead to a rupture of the bracket, a breakdown of the electric motor and other unpleasant consequences.

With a strong desire, automation for opening the gate can be done independently. Especially for amateurs - this business will become a real hobby. This is especially true for those people who want to save money.
In any case, the basis of such a drive will be a mechanism that is installed on the gate from a satellite dish. It, in turn, is equipped with a worm gear. As a result, it will completely replace a conventional electric drive.

The system for satellite television in its design has a rotary action mechanism (this applies to old-type systems). This mechanism is an electric motor that can be used for installation on swing gates. As for the worm gear, its principle of operation is similar to the drive. But as for the first option (worm gear), it is more profitable, since 36V is sufficient for its operation, conventional store drives require a voltage of 220V.
Speaking from the safety side, the use of such a step-down transformer plan is more profitable. Moreover, if the voltage increases, then the opening / closing of the gate leaves increases. However, with prolonged increased voltage, the mechanism may fail.

So, to assemble home-made automation, take 2 drives in working order from a satellite dish. Give advantages to those that have long stems.
This mechanism can be purchased at a relatively low price in a specialized company. Plus, you will need to buy a remote control and a transformer, a power of 36–40V.
The remote control will act as a signal to the electric drive to open / close the gate through the leaf. This system can also be installed on garage doors. The range of the remote control can reach up to 50 m. The entire drive is assembled within 6 hours. In order for all automation to work properly, supplement it with a current relay. It will prevent possible damage in case a stone or other object gets under the gate leaf. Automation will return the sashes back. If the relay is absent, then after several times the motor may burn out, and the door leaf may become unusable.
This is how you can independently make automation for swing gates. If you do not have the opportunity and desire to do all this, then you can buy the mechanism already ready.

First of all, you should consider the method of opening swing gates. For example, the flaps can open inwards or outwards. Based on this, you should choose the appropriate automation. Immediately before installation, prepare the following material and tools:
- hammer;
- insulating tape;
- roulette;
- screwdriver;
- pliers;
- drill.
An appropriate electric drive is also selected. It is of two types:
- Linear.
- Lever.
How to determine which one you need? If the internal distance between the support posts is up to 1.5 m, then a linear one is required. In this case, the automation will not have levers, and, accordingly, take up less space on the gate. If the distance is more than 1.5 m and reaches up to 3 m, then a lever mechanism should be purchased. This drive is also unpretentious, just designed for heavy loads. Among other things, you should select the necessary components. For this, the wind load must be taken into account.
During installation, make sure the doors open freely. It is very important to keep track of this, since after installing the electric drive it may be too late to configure anything.
If you find that the movement of the valves is difficult, then determine the problem and immediately fix it. One of the possible problems is the movement of the valves is not level. The reason for this is the inclined pillar of the support. As a consequence, this has a negative effect on automation. When all the shortcomings are eliminated, then you can proceed with the installation of automation on the gate.
If you bought the gate automation in a store, then closely follow the manufacturer's instructions when installing it. In this case, it will work properly for a long time.

It is believed that opening the gate into the courtyard is a standard scheme. Therefore, any drive will be suitable for this project. So, if the support posts are made of steel, then it is preferable to use a linear drive. It is a completely different matter if you have brick supports, and swing gates are located in the center of the column. In this case, the linear drive is not suitable. You will have to install and buy a lever electric drive. The automation itself is mounted on poles, and the levers will allow you to open swing gates, even if the distance from the pole to the leaf is 200 mm.

Compared to each other, both linear and lever are suitable for external opening of the gate. But starting from the price, preference, of course, falls on a linear electric drive. The only thing to consider is the method of attaching the drive to the pole when opening from the outside.
In most cases, the drive is attached to a brick, which can quickly crumble. Worse if the drive is mounted to an almost destroyed pole. Under such conditions, automation will disappear with part of the pillar.

Given this, such a pillar requires additional reinforcement. For example, you can weld around metal carcass. Further, the drive, opening outward, is set to manual mode, the mounting brackets are attached to the gate by welding. In the event that you use a linear drive, then after welding, open the gate completely and leave a free play of up to 1 m. After that, check the movement of the leaf and the correct operation of the drive. If everything works properly, then you can connect the automation and connect the engine.
All automation and remote control is configured according to the attached instructions. If one of the wings opens in the wrong direction, then it is enough to shift the wire in the connection. But if you follow the connection diagram, then no problems should arise.

So, it is important to make the right choice of the necessary automation, considering which way the swing gate leaves will open. From this article, you learned that it is possible to make automation yourself. An easier option is to purchase a ready-made kit. But one thing is known, regardless of the choice you make, having automatic gates will make your life easier. Therefore, when building a gate in a country house, think about which method will be used from opening - automatic or manual. If you have your own experience in arranging automatic gates, then write comments on this article.
Video
In the provided video material, it is described in more detail about the manufacture of swing gates:
Photo
The photographs show possible options swing gates:


Schemes and drawings
The diagrams will help you design your own model of swing gates:


In order to choose one of the gate options, you need to learn about each of their varieties separately. The most popular among the population are swing and sliding structures. Each of these types has its positive and negative sides during construction and further use.
Swing design
Swing gates (book) - the most common type of fencing, which can be seen mainly on the territory of private houses and suburban buildings. It is popular, because for the construction of this structure, you can choose the most affordable materials, and besides, even beginners can install it with their own hands.
The scheme of the gate-book is a simple frame in the form of two or three pillars, on which the wings are fixed with the help of loops. Depending on which side of the supports they are attached to, it is determined whether the gate will open inward or outward.
The sashes are usually made of profile pipe and externally look like a frame structure, which can be sheathed with various materials, such as wood or metal sheets. When making the frame and installing the sheathing, it is important to consider that their total weight should not be too large, as the support posts may bend and the gate itself will not function properly.
The main disadvantage in using a swing structure is the presence of free space for opening the valves. It is especially inconvenient to use it during winter period when it becomes necessary to clear the snow in order to drive in or leave the yard for vehicles.
Varieties of sliding structures
Sliding gates, which can be made independently, are divided into several subspecies: cantilever, sliding and suspended. The last of these are rarely used as part of the fence, since their design has an important distinguishing feature– the sashes are hung from above, which significantly limits the height of cars that can drive into the yard.
Any new type of construction should be taken seriously and with special care, and the construction of the simplest type of gate - swing - too.
For the manufacture of such gates, you will first need to decide on their design, and then prepare a drawing with exact dimensions, which can be used to calculate the amount required material. Basically, timber or a metal profile is used for supports, and boards and corrugated boards are used as sheathing.
Regardless of the material chosen for construction, before using it, it must be carefully examined for flaws and processed. If it is wood, it is impregnated with several layers of an antiseptic solution, and in the case of metal, all corrosive formations are cleaned with sandpaper. Then the material is cut into pieces in accordance with the dimensions indicated on the drawing. After that, you can proceed directly to the construction of the structure.
Pole installation
The installation of swing gates should begin with the construction of supporting pillars. To do this, it is necessary to put markings, in accordance with the distances in the drawing, and dig 2 or 3 wells, depending on the presence of a gate in the structure. Their depth, as a rule, is no more than 1 meter.
For reference! In some projects, a gate is provided in one of the gate leaves, so a separate post is not required for it. However, this design is not entirely successful, as additional weight can affect the level of the carcass and its possible deviation.
The bottom of the wells is covered with sand or gravel to a thickness of about 0.1 m and carefully compacted. After that, supports are installed in them strictly in a vertical position, the bottom of which is sometimes tied with a metal frame to ensure a more secure fixation.
Then the supports are poured with a concrete mixture to the edges of the pits and wait for it to completely solidify. As a rule, the cement hardening process takes several weeks.
Frame fabrication and construction
While the foundation under the supports is solidifying, you can start making the gate frame. To do this, they take pre-prepared blanks, which are most often made of a steel profile, and weld them together to form a frame. Also, certain crossbars are attached to the frame, on which the gate trim will be fixed.
The skin can be fixed before the frame is hung, or after it is installed. The material is attached to the sashes with self-tapping screws or rivets, and the frame itself is fastened to powerful hinges pre-welded to the supporting pillars.
After the structure is installed, proceed to its external decoration. It must be degreased if it is made of metal, primed and painted. Then, after the paint has dried, closing devices, as well as decorative elements, are hung on the gate.
Performing all the above steps in order, it will be quite simple to make swing iron gates even with your own hands. In addition, the construction of this type of structure is considered the least expensive, since materials for this can be used not only the cheapest, but also not new.
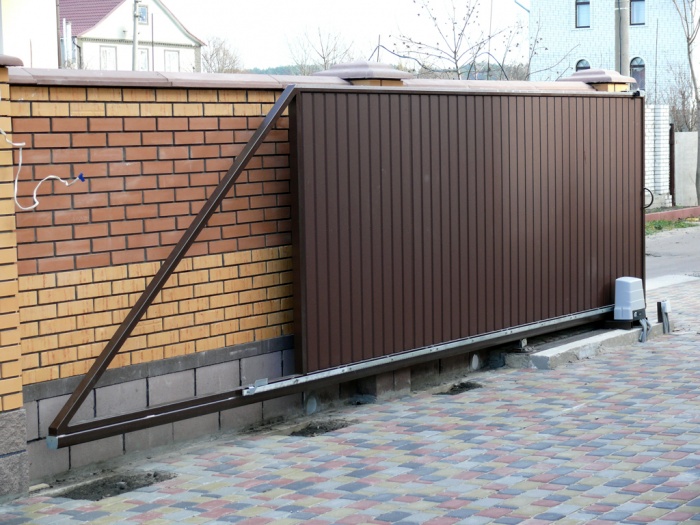
Features of installing sliding gates
Sliding gates are most common in areas that are not subject to heavy snowfalls and a strong decrease in air temperature in winter time. Their design is carried out in such a way that when opening and closing the sash moves along a channel mounted in a concrete foundation.
For reference! This type of gate is controlled mainly by an automatic mechanism, which allows you to control them remotely.
As in the case of swing doors, start building sliding gate follows from the development of a sketch and drawing up a design drawing indicating all dimensions. The width of the opening in this case is usually no more than 4 meters, and the height should be equal to the main fence.
In addition, it is necessary to prepare in advance components, materials and tools for work. The most optimal canvases for this are metal profiles and sheets of corrugated board, however, some owners of personal plots use structures as cladding wooden beam or forged iron elements.
Foundation laying
For installation retractable design, it is necessary to dig a trench according to the dimensions previously indicated in the drawing. She digs from the side of the gate where the main load falls, that is, where the sash will be fixed.
Further, the bottom of the trench is covered with layers of rubble and sand, which must be compacted. After that, formwork is installed in it, on top of which it is laid waterproofing material and frame made of reinforcing steel bars.
Then the trench is poured with a concrete mixture, and the channel is placed in it with the shelves down until they are completely immersed. It will be possible to continue the process of installing the gate only a few weeks after laying the foundation, waiting for the cement to dry completely.
Supports in sliding gates, as a rule, are brick or concrete pillars, which are installed in the usual way after the foundation has hardened.
Frame connection and cladding fastening
The frame of sliding gates is most often made of a profile pipe with a section of 60x40 or 60x30 mm. To install jumpers, steel bars with a smaller cross section will be required. All material should be treated in advance with a solvent, cut with a grinder into blanks of the required size and painted.
Parts of a professional pipe with a large cross section are welded together along the perimeter, forming a frame structure. After that, jumpers are installed on its inner part in the middle and diagonally, and a carrier beam is welded to the lower part.
Attention! All welding points should be sanded so that there are no rough sags, coated with an anti-corrosion primer and paint.
Sheathing can be installed immediately, before the frame is fixed to the poles. To do this, the corrugated board is cut into sheets and fixed to the frame with self-tapping screws or special rivets so that the second and subsequent sheets overlap the previous one a little.
At the same time, the distance between the attachment points should not be too large, approximately 1 m 2 of the web comes out with 6 clamps.
Gate installation
To install the finished structure, you first need to assemble the retractable mechanism. To do this, the carriages are mounted on the mounting plate and welded to the channel at the marked distance. Rollers and traps are installed on them and on the sash with the help of bolts and welding, the operation of which must be immediately checked.
To make an entrance gate with automatic control, you must first select the appropriate automation kit, taking into account the size and weight of the entire structure. It is best not to install it yourself, but to entrust the installation to specialists.
No matter how difficult it may seem at first glance, the installation of metal or various designs, you can still do all the work for this with your own hands. At the same time, self-made fencing will not only save on attracting specialists, but will also bring invaluable experience that can be useful in the future, and will also bring pleasure from the process itself.
2018-04-25Acquaintance with the house begins with the gate. In fact, this is the business card of the owners. Therefore, their appearance should by definition be solid and beautiful. But, at the same time, their main purpose is to ensure the safety and security of private country houses and dachas.
How to connect these two destinations together? How to make swing gates for summer cottages beautiful, reliable and functional. What types of swing gates are there and which is better to choose. How to make and install. All this in detail step-by-step instruction in our article.
Before proceeding to the description of the gate device process, we will focus on their pros and cons.
Benefits of swing gates:
- simple design;
- relatively low price;
- undemanding in maintenance;
- long service life;
- strength;
- ease of operation;
- unlimited choice of design solutions and shapes;
- no need for concreting the site. For example, under videos for;
- the ability to install automation.
Flaws:
- the need to provide quite a lot of space for opening and closing;
- the need to take into account the wind load in the region.
Simple arithmetic shows that swing gates have much more advantages. And the shortcomings are eliminated or not critical. The long history of their existence only confirms the reliability of the system.
Swing gate design
Whatever materials appear, no matter how the fashion for finishing the gate changes, the basic principle of their arrangement remains unchanged. Structural device:
- poles (racks). In fact, they are not gates, but they are supports for their fastening;
- swing gate frame. In its manufacture, wood or metal can be used. The latter is more popular because gives the frame greater rigidity;
- finishing (facing) material for sheathing;
- loops;
- latches and locks.
So, we have decided what a swing gate is and what features they differ in.
Manufacturing of swing gates - tools and materials
After making sure that we can make them with our own hands, we will begin construction.
The required tool for the manufacture of swing gates and consumables for it.
Tool
Mandatory for the manufacture of the frame and the arrangement of racks:
- Bulgarian. Designed for cutting and grinding metal blanks;
- cutting discs;
- grinding discs;
- welding machine;
- electrodes;
- roulette;
- building level;
- corner;
- hammer;
- shovel;
- Master OK.
Auxiliary:
- compressor, spray gun or brushes for painting racks and / or gates;
- drill. If necessary for fastening the gate trim;
- riveter, as well as rivets to it.
Material
- pipe for making a frame. It is preferable to use a profile pipe 60x40x1.5. Suitable and 40x20x1.5. The final choice depends on the finishing material and taking into account the wind load;
- pipe for the manufacture of racks. Here you should also be guided by the weight of the finished gate.
- gate weight within 150 kg. and below. Suitable pipe 80x80x4;
- gate weight from 150 kg to 300 kg. Pipe - 10x100x5;
- gate weight exceeds 300 kg. Pipe -140x104x5.
Tip: Racks can be brick, concrete, or even wood. In any case, correlate the properties of the material with the expected load.
- hinges for swing gates. They can be adjustable or unregulated. Must be made from quality material and have the ability to withstand a significant load;
- locks. They can be mechanical or electromechanical. The choice is up to you;
- dye. Needed for painting racks and / or sheathing;
- sheathing. There is also complete freedom of choice. The main thing is that it is to your liking and affordable;
- swing gate automation. To be able to make automatic gates. You can not install at all or install later. But, if its installation is supposed, albeit in the distant future, it is better to make the swing gate frame more durable.
How to make swing gates with your own hands
Do not think that homemade is a synonym for the words "ugly" and "unreliable". Quite the opposite - self-made swing gates - mean creativity, individuality and concern for one's own safety.
The sequence of work.
- stage - installation of racks for hanging gates.
- stage - the manufacture of swing gates.
Stages, of course, can be changed. But the installed racks (pillars for swing gates) must withstand at least a week. In order not to prolong the pleasure, the waiting time can be taken by welding the gate.
Stage 1 - installation of swing gate pillars
As a rack can be used:
- profile pipe. The choice of pipe section is justified above in the "materials" section;
- concrete pillar - purchased or poured on site;
- brick or a natural stone. The latter is used more for cladding due to its non-standard dimensions;
- wooden beam (100x100).
Ways to install poles / racks:

The pipe can be hammered to a depth of about one and a half meters
This method of installation is the fastest, most profitable (no costs for concrete), it is possible to replace the rack. The main thing when arranging pillars with this method is to maintain the level. This will prevent the gate from tilting.
The material was prepared for the site www.site
 Strengthen the support post with concrete (concrete), i.e. to make, a kind of foundation for the foundation of the gate.
We will describe the second one, because the first requires brute force and suitable soil.
Gate post installation
Execution sequence:
- Dig or drill a pit with an earthen drill at least 1 meter deep. The diameter of the drill should be at least 200 mm, with a pipe section of 100x100.
The depth depends on the depth of soil freezing in the installation area. The width of the sides is determined by the quality of the soil and the dimensions of the supports (pipe, wood, concrete).
- We arrange a sand-gravel pillow under concrete. Its height is 150-200 mm. The purpose is to prevent the post from deepening and to create a foundation for concreting.
- We install the pillar and level it using the building level.
- Preparing the concrete and pouring the rack.
Concrete pillars must withstand within 7 days, no less. The concrete must be well cured. During the hardening of the concrete, periodically moisten it with water. Of course, cracks in such a small area are not as dangerous as, for example, cracks in the foundation of a house. But it's better to avoid them.
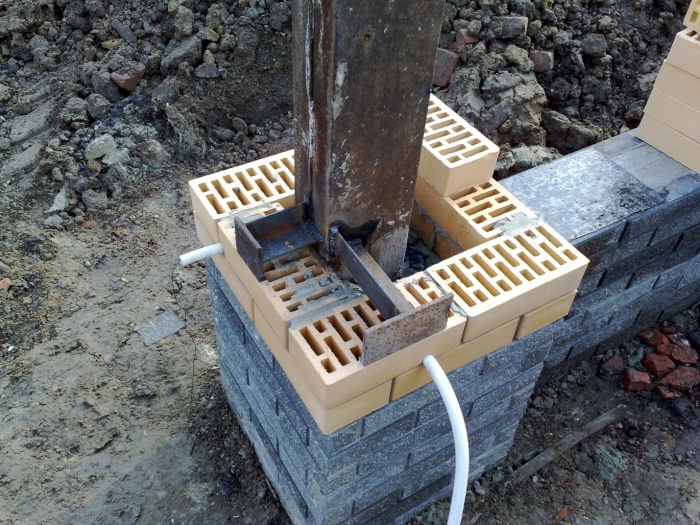
Tip: If you use not a pipe, but brick or concrete, the depth of the recess will also be 1 m.

For reliability, the racks need to be reinforced. And also, in advance, bring out two or three reinforcing mortgages for fastening the hinges.
Stage 2 - production of swing gates
The sequence of an independent device.
Installation location and appearance of swing gates
This is the starting point from which all work begins. Often the installation location has a direct impact on appearance designs.
For example, you need to put a gate in the backyard, at the entrance to the garden, or fence off the future construction site. Then both the material and the design will be as simplified as possible.
If it will be a front gate or a garage, then the costs will be higher.
Swing gate dimensions
Ideally, the gate is made together with the fence. However, if you have, for example, hedge or you are expanding the passage and need a new gate - you should accurately measure the dimensions.
Tip: Try to make swing gates in the same stylistic decision as the fence.
It is important to measure the height and width of the opening under the gate. When measuring the height, keep in mind that a technical clearance is usually left at the bottom of the gate. Its value depends on the coverage of access roads. If you have asphalt, tile or concrete in the gate area, then 5-7 cm of clearance is enough. If the soil is not strengthened (grass grows), and the surface is not even - then about 10 cm. A technical clearance is also needed in order to reduce the wind load, if the future gate is solid, without ventilation gaps.
It is also necessary to provide for the presence of a sufficient gap between the wings. This will level out the slight displacement of the racks.
swing gate drawing
Having at your disposal a drawing and a scheme for the design of swing gates, it is easy to calculate the amount of material needed.
Try to make such a frame for the gate so that its dimensions correspond to the dimensions of the intended finishing material. So you will facilitate the installation process and avoid connecting seams on the front surface of the gate. Eg, standard width corrugated board PS-10 1 100 mm.
Advice. When calculating, use the working, and not the total width of the finishing material.
The figure shows a diagram of a frame for swing gates, which we will take as a basis.

Using this drawing as a basis, you can calculate the amount of material, attachment points and parameters of pipes and finishing materials.
In our example, the frame is a welded structure. It will be made of a pipe or a metal profile. But you can also use wood. If, for example, you have a completely wooden gate.
The figure shows that the frame has a square appearance and internal jumpers. They are needed to give the frame rigidity.
Please note that this diagram is for swing gates that are not equipped with a wicket. The gate is located separately. If you decide to save space and cut the gate into the gate - foresee this need when creating a drawing of a frame for swing gates.
Swing gate calculation
For the frame shown in the diagram, you will need the following material:
- profile pipe 60x40 - 22 meters - for the perimeter of the frame and lintels. This pipe will be attached to the racks and hold the entire structure;
- profile pipe 40x20 - 15 meters - for the inner frame (perimeter reinforcement). Namely, the material of the gate sheathing will be attached to this pipe.
Pipes are usually sold running meters, so it's better to immediately take the sizes that you need. Among other things, this will make shipping easier for you.
Pipe cutting and grinding
At this stage, the frame components are manufactured. Pipes are cut off desired length and polished.
Grinding is needed in order to clean the pipes from rust. If the metal is lubricated with oil, it must be removed using a solvent (most often gasoline).
Swing gate welding
When carrying out welding work, remember melted safety precautions. It is better when this type of work is performed by a specialist. So the quality of welded joints will be higher. Yes, and the appearance is more beautiful.
When welding, it is important to make joints in such a way as to protect the pipe from water leakage. Otherwise, water or snow will get into it. In winter, it will freeze, and with warming it will begin to expand. This will inevitably lead to expansion of the pipe walls. And, as a result, to the deformation of the entire structure.
In our example, the inner pipes are welded in the form of squares. But this is of no fundamental importance.
The step of welding fastening of the outer and inner frame (pipes 60x40 and pipes 40x20) is 250-300 mm. Follow the checkerboard pattern. So pipes, during thermal expansion, will not tear the weld.
Some drawings of frames for swing gates are given below.


The more stiffeners, the more wind load your gate can withstand.
If you sew up the fence with a finishing material, then weld the pipe in the middle of the outer one. So, it is easier to designate the place of attachment of the skin.
Primer
It does not matter what material was used to make the frame - metal or wood - it must be primed. The primer will extend the life of the paintwork and make the application process more enjoyable.
Welding points are especially carefully primed.
Latch and hinges for swing gates

The hinges are welded to the frame and to the uprights (pillars). If the rack is made of brick, and the reinforcement was not provided, then you must first attach the channel to the brick with a dowel, and then weld the loop.
Varieties of loops are shown in the photo


The valve mechanism is chosen the one that you prefer. The most common and easy to manufacture is the one shown in the photo.

Swing gate finishing
- Frame painting
The frame must first be cleaned of dust. Any paint is suitable for coloring. It is better to apply paint with a spray gun, so it will lie more evenly, and the work will go faster. You can also use a brush. In this case, the process will be somewhat delayed, and the paint consumption will be less.
It is better to apply paint in several layers.
- Fastening of finishing material
Sheathing of the gate is possible before and after installation of the frame on the posts. For this on inner tube(40x20, in our example) we fix the skin. The method of fastening and fasteners depends on the finishing material.
How to sheathe swing gates
The following materials are used:
Decking
Advantages - low price, wide range of colors, light weight. The disadvantages include: the complexity of replacement (it is difficult to choose a color, because the sheet burns out slightly, plus, the shade depends on the batch and manufacturer). And also, the possibility of damage during installation and high windage.

Tree
Advantages - availability, beautiful appearance of natural wood, ease of replacement. Disadvantages - demanding care. Over time, the wood can dry out, leading to cracks.

A metal sheet
The advantage is strength. The disadvantage is significant weight.

Forging
Advantages - unlimited designs. The downside is what to do Forged gates with their own hands, only specialists can do it.

steel mesh
Advantage - low cost, high speed, low weight. The disadvantage is the low aesthetic properties, the transparency of the fence makes the entire territory of the yard available for viewing.

Rabitz
The characteristics are the same. More suitable for installation of technical gates.

Combined
The basis of such a combination is most often forged, which allows you to give the gate any shape. And they are closed by sheathing from the inside with wood, metal, corrugated board or polycarbonate. Examples of such gates in the photo

Swing gate installation
So, the racks are ready, the frame is welded, finishing material fixed. It's time to hang the gate.
Conclusion
We hope you are convinced that installing a swing gate with your own hands is a simple task. In the presence of material and tools - the installation of the gate will not take more than a week. From the installation of the pillars, to the installation of the gate. And if you consider that it takes 7 days for the concreted pillars to settle, then generally a day. I wish you success!
Swing gates - photos of different device options


Any household plot surrounded by a fence and a gate. Such structures ensure the safety of personal property. The choice and construction of the gate can be done independently. Before work, you will need to create drawings, take into account the basics of installing pillars and choose the right construction material. During the installation process, it is better to follow the advice of experienced builders. When installing the gate with your own hands, you will need drawings, photos and videos finished structures.
Benefits of swing gates
Regardless of the design, the owner of the site can choose the method of opening the valves - outward or inward. Installation of swing gates is carried out without any difficulties. If you correctly perform all the stages of construction, the structure will serve for a long time and regularly. Classic swing gates have a number of advantages:
- high functionality;
- compactness;
- no size restrictions;
- the possibility of using any materials;
- ease of use.
Also, such gates are easy to install, they are undemanding to maintenance, strong enough and can be erected in a variety of ways. design solutions. Also, swing structures are distinguished by a long service life. If necessary, an automatic control system can be installed on them.

The disadvantages of such gates include:
- the importance of taking into account the wind load that is relevant for a given region;
- the need to free up sufficient space for opening and closing the gate.
A simple consideration of these factors makes it clear that swing gates have much more pluses than minuses.
Swing gate design
Regardless of the size, finish, direction of opening and materials of execution, swing gates include:
- Support racks. The posts must match the type of gate.
- Frame. It is made of metal or wood. The main requirement for the frame is greater rigidity.
- Sheathing material. The metal profile is very popular.
- Loops. They are chosen in accordance with the weight of the gate and their design features.
- Locks and locks. They are devices that prevent intruders from entering the site. Also, such mechanisms have a variety of designs.
Every detail of swing gates performs an important function. Correct installation of each of them is a guarantee long service gate. When building a gate with your own hands, drawings, diagrams, sketches of structures are needed.
Gate from profiled sheet
Swing gates are the most popular among private developers. The doors can open in one or both directions. As a material that is attached to the frame, corrugated board is used. You can also make a gate in the door leaf.
The popularity of swing gates is achieved due to the long service life of such products. Metal structures do not require repair in comparison with wooden ones. Often complemented by automation systems. In addition, the profiled sheet has a number of advantages:
- low cost of materials used;
- simple manufacturing process;
- sufficiently long service life;
- external attractiveness;
- excellent features.
The disadvantage of profiled sheet doors is exposure to wind loads. Such sashes must be installed on reinforced hinges. It is also worth taking care of the correct installation of the pillars in advance. The disadvantages of such designs include the need to free up space for opening.
However, the advantages of metal profile gates significantly outweigh their disadvantages. Moreover, many problems are not so critical as to pay attention to them.
Swing gate installation
If swing gates are planned to be made from a profiled sheet, you will need to install sufficiently strong poles. For supports, it is better to choose pipes with a diameter of 80 mm or more. Also perfectly cope with loads and a square pipe.
The sashes are welded from square pipes. It is better to choose products with dimensions of 10x25x3000 mm. To connect them, you will need to use welding. The frame must be reinforced with diagonal tensioners. It is also necessary to provide a place for constipation, a lock and limiters.
Work begins with the installation of supports. This stage requires some preparation. It is also important to use ready-made photo gate drawings. From the video, on which the installation of swing gates is carried out in stages, you can also get a lot of information. Helpful information on the topic is in this material:
Pole installation methods
Support posts can simply be buried in the ground or concreted. In the second case, the supports will be much stronger and more reliable. Also, do not forget about the need correct installation loops. When driving, it is necessary to immerse the supports in the ground by 130 cm.
Using this method of installing gate posts saves time. Almost immediately after clogging the supports, you can fasten the hinges and hang the sashes.
Another way is concreting. It is better to combine it with the reinforcement of the support. The depth of the pits is 150-200 cm. The diameter of each pit depends on the section of the buried pipe. First, a pillow is prepared (from sand and gravel, and then concrete is poured).
Important! Before concreting, a waterproofing "glass" of roofing material should be placed in the pit. Thanks to this, the concrete milk will not go into the ground, which will make the solution more durable. Concrete must be compacted periodically, expelling excess air.
Manufacture and installation of sashes
After installing the pillars, you will need to complete the sash. This process should be given a lot of time. The work is carried out in stages:
- First, it is necessary to lay out a profile pipe or corners on a flat surface, and weld the shape according to the drawing.
- In order for the structural strength to be high, it is important to strengthen the sashes with diagonals.
- When the frame is ready, you can start lining it with a profiled sheet. The material must be 2 mm thick. Too thick metal should not be chosen - then you have to think about strengthening the racks.
- After that, install the hinges. First, one half of them is welded to the gate frame, and then the second to the pole.
- When all the work is done, you need to take care of safety - a lock and constipation are installed on the gate.

The same principle underlies the installation of the gate. The sashes can be painted both in the air and on the ground - even before mounting on the supports. The difference is that already installed gate streaks may appear during the application of paint. For this reason, you need to treat the work with special care.
sliding gate
Sliding gates have a special functionality. They do not take up much space, are silent, open quickly enough. There are several types of sliding gates:
- retractable;
- suspended;
- console .
Hanging type gates are the least in demand. This is due to the appearance of travel restrictions, the complexity of installation, the many requirements of such structures.
If severe frosts are regularly observed in the region, it is not worth installing sliding gates in your area. The guides will be covered with frost, which will reduce the functionality of the structure. Such gates will require constant care. Otherwise they are good enough.
Everyone can build sliding gates with their own hands. To do this, you need to have drawings and determine the size of the sash. Various videos and photos of finished structures can also help. The main condition for the installation of sliding gates is the need to free up space along the fence.
A special profile is installed on the surface of the soil. The sash will move along it. Special rollers are also installed on top of the gate. In order for the gate to stop in the right place, special fixing elements are installed. Useful information is in this video:
Cantilever gate installation
Cantilever gates are considered one of the most difficult. The advantage of such structures is that there is no need to equip a ground rail. The gate does not touch the ground during movement. Also, when installing cantilever gates, there are no height restrictions. In addition, only 1 support post needs to be installed. Such structures are used at any time and in any weather.
The fold is quite simple. It consists of a frame and a skin. A guide is welded to the bottom of the sash, inside which roller carriages are placed. On them, the gate can move in both directions.

Advice! As soon as the frame is welded, it is necessary to clean the welding seams. In addition, traces of corrosion should be removed from all surfaces.
The cantilever gate leaf is conditionally divided into two parts - the one that closes the opening, and the one that serves as a counterweight. The second part should have a length equal to 35-50% of the length of the first. A special foundation is installed under the cantilever part, capable of withstanding significant loads during the operation of the gate.
To equip the foundation, you will need to prepare a channel, which will be equal to the length of the cantilever part of the sash. It is also worth digging a pit into which the concrete solution will be poured. The length of the pit should be several tens of centimeters longer than the length of the channel. The foundation is poured to a depth below the freezing level of the soil. In addition, in order to securely fix the channel in the foundation, you will need to make a special reinforcing cage.
After the foundation is completed, the sash can be installed. Such work also has its own nuances and requires a special approach.
Required fittings
The elements necessary for the installation of cantilever gates are presented in a wide variety of hardware stores. To choose the right fittings, you will need to determine the weight of the sash and its dimensions. It is also important to know the width of the opening.
The standard set of elements for installing sliding cantilever gates includes:
- guide beam;
- plugs with which the beam is equipped;
- end rollers;
- additional device equipped with 2 rollers;
- roller bearings;
- roller catchers.
Such a set is necessary when installing a cantilever gate. In the selection process, it is important to get the opinion of a specialist.

Overhead gate
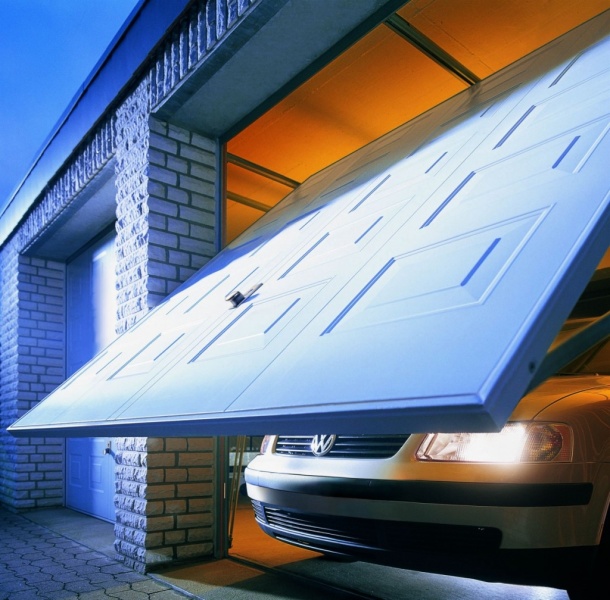
Similar designs are great for a standard garage. It is not recommended to use them as a gate on the site - they have a height limit. The principle of operation of the structures is quite simple - the canvas moves up, taking a horizontal position. These gates open and close quickly and are relatively easy to install.
When the up-and-over door leaf opens, it begins to protrude slightly outwards. This should be taken into account when driving the car to the garage. If you do not calculate the distance, the gate may hit the car.
Such gates have become popular in part due to their compactness. When folded, they take up almost no space. They also differ in availability. The frame is sheathed in wood, metal sheets or composite. If we compare such structures with hinged ones, they clearly have more advantages for installation in a garage.
For the manufacture of overhead gates, you will need to draw a diagram. Features of mounting structures:
- In preparation for the installation of a lift-and-turn structure, you will need to make 2 frames - for the sash and the one along which the gate will move.
- Inside the garage, the frame will be L-shaped.
- The canvas is equipped with flaps at the top and bottom.
- Also, levers are mounted to the frame, raising the canvas during the opening process.
- Be sure to provide shock absorbers that will soften the impact of the canvas during closing.
The support frame is attached to the opening with anchors. Installation of automation should be carried out only after all procedures for the installation of the gate. It is better to entrust the work to specialists who will help to carry out the power supply.

Installation of a lift-and-turn type gate will not take much time if you are well prepared for work. Also, the process will be accelerated if you invite an experienced master. In addition, it is necessary to use the design drawings to calculate in advance the dimensions of the sash and the guide frame. How such gates are installed, you can find out from the video:
Results
It is better to install gates of any type according to the drawings. Swing structures are more often used in individual construction, sliding structures - both for closing entrances to private territories, and for fencing industrial facilities. Lift-and-turn structures are ideal for garage entry equipment.
Each type of gate has certain advantages. They also have certain disadvantages. The simplest and most affordable option is a swing gate with two leaves. During the installation of such structures, special attention should be paid to the installation of support pillars.
Automatic control of the entrance gate makes it easier and safer for the car to enter the site or garage. The advantages of an electric drive are obvious - you can open and close the doors directly from the passenger compartment, and in order to let the guests' car into the snowy yard, you won't have to say goodbye (albeit for a short time) to a warm, cozy room. The high price of high-quality, factory automation is forcing craftsmen to look for more affordable options. And they are. Today, reliable automatic gates can be built with your own hands. Everything you need for this can be found in the garage or bought for nothing at the market collapses.
Automatic gates: features, advantages and disadvantages
If you do not take into account too original designs, then all existing gates can be divided into three groups:
- retractable;
- swing;
- garage.
Swing structures have the richest history and are familiar to everyone by their two wings, which are attached to the side support pillars with the help of hinges. Such gates are simple and reliable, but require a place to open before entering the site or yard. Swinging doors are an indispensable option for narrow passages and, in comparison with other designs, have maximum reliability. The biggest disadvantage of this type of gate is the increased requirements for the stability of the side posts. Insufficient rigidity of the racks over time leads to their tilt, and this, in turn, causes the sashes to jam. The disadvantage is that their automation will require a pair of synchronously operating drives, while other systems need only one actuator.
To automatically open swing gates, you need a pair of synchronously operating drives
Sliding gates have a canvas that can be pushed aside literally close to the fence. Depending on the supporting surface, retractable systems are divided into three types:

The sliding system is the most practical because it does not depend on the availability of space in front of the entrance.
Sliding gates are used today both in private households and for equipping parking lots, open areas and various industrial facilities.
As for the minuses, they include the need to equip the foundation and a more complex structure than that of swing gates. In addition, a canvas moving to the side cannot be installed in a narrow section - at least 5 additional meters will be required away from the passage. Despite this, it is sliding gates that are the easiest to automate and are distinguished by the highest convenience and reliability in operation.
Although all the structures described above are suitable for arranging a garage, lifting-turn, sectional and roller mechanisms are considered “true garage”. Such systems are the most difficult to manufacture in artisanal conditions, so they are practically not used by home craftsmen.
Drives for automation
There are several ways to convert the rotational movement of the electric motor shaft into the translational movement of the actuator:
- using a crank mechanism;
- screw or worm gear;
- by means of a rack and a gear;
- chain transmission.
Using these kinematic schemes, a reliable, efficient drive can be built even in a garage or a small home workshop.
For swing doors
To make swing gates automatic, linear or lever-type drives are installed on their leaves. The former include mechanisms with a worm or screw gear, operating on the principle of changing the length of the rod. Lever constructions are called, the principle of operation of which resembles the movement of a hand. They consist of two levers that are connected by a movable hinge.
Factory linear drive
Most often, linear drives are used - they can be installed on swing gates with leaves that open in any direction. If the canvases are hung on stone or brick pillars, then it is easier to use one of the lever mechanisms - they are not so demanding on the location of the fulcrum.
In artisanal conditions linear systems for automatic opening of gates, they are most often represented by factory actuators for satellite dishes or home-made drives with a screw gear. For lever structures, ready-made mechanisms are also used - they are drives of automatic window lifters or wipers. As for homemade products, on the network you can find original solutions from a geared electric motor and a compound lever.
At home, a swing gate drive can be made from car windows
Sliding curtain automation
For mechanization of sliding gates, you can use a factory automation kit, which includes a drive, a gear rack and a control unit with sensors. If you want to save money, then at least reliable system can be assembled from a suitable electric motor with a gearbox, a pair of sprockets and a long chain from automotive or agricultural equipment.
Scheme of a homemade drive for sliding gates
Production of automatic swing gates
For swing gates, the industry produces a variety of lever and linear type drives, designed for different supply voltages and opening forces. These mechanisms are distinguished by high strength, reliability and are able to ensure the operability of the structure in any weather conditions. They could be called the ideal choice, but there is one thing - for a couple of simple actuators and a control unit, you will have to pay more than 300 euros. That is why automatic swing gates are best done by hand.
Swing gate design
Preparatory activities
In order for the gate to be convenient and practical, several factors must be considered:
- installation location;
- opening method - inside or outside;
- sash dimensions;
- type and method of installation of support racks;
- type, as well as the method and points of attachment of drives;
- method of laying cables to actuators;
- type of power supply (only from the mains or with a backup battery);
- design features of the latch;
In addition, it will be necessary to take into account the characteristics of the materials from which the gate will be made. Only after answering this question, you can proceed to the design of the structure and the choice of the drive.
Leaf size
When determining the size of the gate, they are guided by the width of the cars that will drive into the site. An opening of 2.5 m will be sufficient for the passage of passenger vehicles, while trucks and tractors will require a roadway with a width of 3.5 m. In the case when a narrow road near the site does not allow making the necessary maneuver, the passage is expanded by 1.2 - 1.5 times. Also, pay attention to whether the open sashes protrude into the roadway. In the case when the design of the gate does not exclude such a possibility, the double thickness of one leaf must also be added to the size of the opening.
If the configuration of the site allows you to make a wide gate, do not neglect this opportunity. Who knows, maybe in a couple of years it will be necessary to drive a construction crane or a dump truck onto the site? As practice shows, an opening 4–4.5 m wide will be enough for the passage of any automotive equipment.
Material selection
For the manufacture of the frame of the gate, steel profile pipes are best suited - they have high strength, and, which is very important, make the structure as rigid as possible. For filling the door leaf are suitable:
- metal sheets;
- polycarbonate;
- corrugated board;
- boards or picket fence;
- forging.
Gates with a combination look elegant and original various materials. For example, forged elements with a base made of polycarbonate or wood.
Swing gates can be made openwork, filled with metal bars or forged elements
As a rule, the thickness of the wallet of their owner has the greatest influence on the choice of material for the gate. However, if you make the sashes with your own hands, you can save on the wages of a specialist and, due to this, choose more expensive forging or stamping.
For the manufacture of support racks, you can choose:
- steel pipes or channels;
- hardwood timber;
- reinforced concrete;
- stone or brickwork.
The choice of material from which the pillars will be made should take into account the weight of the canvases. Otherwise, under the weight of the leaves, the posts will converge and closing the gate will require considerable effort - the normal operation of automatic devices in such conditions is out of the question.
The manufacture of swing gates is not very complicated, and their design involves the use of original sketches. There is no need to follow any drawing exactly - it all depends on the imagination and financial solvency of the owner of the site. Nevertheless, we present to your attention the drawings and diagrams of automatic swing gates. We hope they help you create own project without hard-to-remove errors and annoying oversights.
Photo gallery: diagrams and drawings of automatic gates
 Swing gates with a gate embedded in one of the leaves
  Swing gates with double corrugated board filling
  Swing gates with wicket and reinforced frame
  Swing gates without wicket
  Swinging doors automation scheme
  Wiring diagram for swing gate drive
  Swing gate automation scheme
What will be needed in the process of work
For the construction of swing gates, you will need a lot of different materials:
- for mounting support posts - metal pipes, stone or brick. If the pillars are made in the form of masonry, then metal should be prepared for mortgages;
- for the manufacture of the frame - profile pipes with a cross section from 60x60 mm to 40x20 mm;
- to fill the frame - steel sheets, corrugated board, wood, polycarbonate or forged elements;
- loops;
- details of the locking mechanism.
Hinges with a mating plane and a support bearing are best suited for equipping automatic swing gates
Embedded parts are metal elements that are installed in masonry joints for subsequent fastening of sashes and other structural details. Made from thick sheet steel, metal corners, channels, etc.
For the stability of the structure, metal racks will need to be concreted, and a foundation should be built under the pillars of stone and brick. To do this, it will be necessary to bring sand, crushed stone and cement to the site.
It is possible to make a swing gate drive from new or used parts and assemblies from vehicles and household appliances. So, as parts of the automatic opening mechanism, the following are suitable:

system remote control it is very easy to make from a simple car alarm by connecting the drive motors through a conventional 12-volt relay. In addition to these parts, you will need limit switches, a signal lamp and mounting wires.
For the manufacture of the gate does not require special tools or any professional devices. As for the automatic drive, it all depends on its design - perhaps some parts will have to be machined on a machine or ordered from a familiar turner. For the rest, you should prepare or purchase:
- welding machine (best of all is a small inverter, which is convenient to move around the site);
- angle grinder (popularly "grinder");
- riveter;
- electric drill with a set of drills for metal;
- set of wrenches;
- roulette;
- building level;
- tool steel scriber.
In addition, shovels, containers for bulk materials and mortar, formwork materials and rammers will be needed for earthwork and concrete work. Don't forget that metal surfaces you will need to weatherproof it, so buy a rust converter, metal primer, and exterior alkyd paint in advance.
Construction stages
Step-by-step instructions for the manufacture of automatic swing gates will allow you to systematize the process and avoid errors in work.
Installation of support legs
Installation of support posts with and without reinforcement
Metal or wooden poles must enter the ground to a depth of at least 1 m, otherwise, under the weight of the wings, they will move from vertical position. In order to install supports, you must:

With a significant mass of each canvas, as well as in the case of making pillars of stone or brick, lower dressing of metal racks and arrangement of the foundation will be required.
Reinforcement of supporting pillars and foundation for the installation of automatic swing gates
The work is carried out according to the following algorithm:

After pouring, the concrete must stand for at least 10 days, which can be spent on the manufacture of sashes. Throughout this period, the base of the supports is periodically watered with water - this will increase its strength and avoid cracking.
Sash welding
So that the frame does not twist with a “propeller” during welding, it is recommended to equip a simple slipway on a clean and level place. For this use wooden blocks and slats, from which a flat horizontal structure is assembled.
Sash welding machine
The main reason that leads to a violation of the geometry of the valves during operation is wind load. Therefore, the door frame should be as rigid as possible - this is especially true for doors filled with materials such as polycarbonate and corrugated board. best material for the manufacture of the frame is considered profiled steel pipe. The procedure for mounting the carrier frame is carried out in several steps:

After that, the counterparts of the hinges are welded to the pillars and the sashes are hung in place. It is still too early to start painting work - this is done after the brackets for attaching the drive mechanism have been mounted.
When installing the sashes in place, you can use any suitable props
How to build a drive
After installing the gate, proceed to install the automatic drive. To determine which of the mechanisms - linear or lever, is suitable, measure the distance between the plane of the canvas and the outer edge of the column (marked with the letter M in the lower figure).
Scheme of installing a linear drive on swing gates
If the specified size exceeds 150 mm, then a lever mechanism is used. Otherwise, you can install a linear type drive. It is more modern and aesthetic. If linear automation needs to be installed on massive pillars made of stone or brick, then niches are made in the masonry with mortgages for mounting the drive.
Mounting the actuator in a niche is one way to combine a linear actuator with massive poles
A linear gate opener with leaf weights up to 100 kg can be made from two satellite antenna actuators. All that is needed for this is to attach brackets to the door leaves and pillars for their fastening. When choosing actuators, preference is given to devices with a stroke of at least 350 mm.
For heavier gates, a linear drive can be made independently. Here's what you need for this:

In the process of work, you will need all the same grinder, welding inverter and electric drill, as well as other metalwork tools that every owner has.
The manufacture of the drive is carried out according to the following scheme:
- The protective cover is removed from the jack, the handle and gears are dismantled. With the help of retaining rings and washers, a retainer is constructed that prevents the longitudinal play of the screw.
A used jack must be completely disassembled and cleaned
- Using the grinder, dismantle the support platform of the lifting device.
- The wiper mechanism is dismantled - in the future, only an electric motor with a gearbox will be needed.
Wiper motor assembly with gearbox
- From a piece of profile pipe 20x20 cm, 6–8 cm long, a connecting sleeve is made, which is attached to the jack screw.
Mounting of the coupling is carried out by welding
- In a square bar 18x18 mm, drilling is performed, in which a thread is cut for the gearbox shaft.
- Mount the mating part of the coupling on the wiper motor.
Mounting the connection plate
- A number of drillings are made at the corners of the plate, corresponding to the mounting dimensions of the gearbox housing.
- The electric motor and the screw part are assembled using long studs and nuts.
Homemade gate drive assembly
Another option for manufacturing a drive from a Zhiguli jack is shown in the figure below. The mechanism looks more cumbersome, but on the other hand, it will not be necessary to dismantle the planetary gear and think over the fixation of the working screw.
Another version of the drive from the motor of the wipers and the jack from the VAZ "classics"
In the case when only a lever mechanism is suitable for gate automation, you can use the power window drive of a GAZ car or modify any suitable gearbox with a pair of levers.
Power window drive for GAZ car
To connect the drive to a 220 V network, a step-down transformer with a 12 V rectifier is used. Limit switches are used to turn off the motor in extreme positions. In this case, it is necessary to consider how the engine will be reversed. Perhaps a few electrical circuits that are used on real structures can help you with this.
Photo gallery: wiring diagrams for automatic gate drive parts
 Electrical circuit diagram with relay for swing gate drive
  Scheme of connecting swing gate drive elements
  Scheme for the implementation of the reverse
Mounting and setting up the drive
To install the drive to the posts and doors, it is necessary to weld the usual U-shaped brackets, which will provide a movable connection.
Drive and gate leaf interface
As an axis of rotation, it is best to use hardened bolts with a diameter of 8–10 mm. It is better not to use galvanized Chinese hardware from the nearest construction store - too soft steel will wear out quickly, and this does not contribute to reliability and safety.
And now a few useful tips for installation and configuration of the drive from specialists who are engaged in the installation of automatic gates:
- the device is installed with an electric motor and a lever down, best of all along the upper edge of the web;
- first of all, the mechanism is fastened to the pillars, and then to the gate leaves;
- after mounting the drive, the gate must be opened manually and the operation of the limit switches adjusted;
- the power supply must be connected when the drive is locked;
- in order to avoid a breakdown of the electric motor when the doors are blocked, a device is introduced into the electrical circuit that turns off the network with a sharp increase in current strength;
- a signal lamp is installed in a conspicuous place, which will turn on when voltage is applied to the electric motors.
After installation, check the smoothness of opening and the clarity of operation of the "limit switches". The electric motor and gearbox are protected from precipitation with casings that can be made from improvised means.
Video: swing gates with a homemade electric drive
For a person who knows how to handle a welding machine and a grinder, making entrance or garage doors is a common thing. It is quite another matter to automate the process of opening them. Many give in to a more complex design due to the lack of a drive, others are frightened by the electrical part. Nevertheless, it is not difficult to make a reliable, workable opening system. The main thing is that its mechanism should correspond to the type of valves and their weight.