Several methods on how to properly glue non-woven wallpaper. Sticking non-woven wallpaper with your own hands How to stick non-woven wallpaper more firmly
Classic paper wallpaper cause consumers much less delight than modern finishing materials. Manufacturers produce an extensive range of wallpaper products, among which non-woven products are in great demand. They have high strength, wear resistance, a rich range of shades and textures and give the interior an original zest. But in order for the decoration of walls and ceilings to be impeccable, you need to know how to glue non-woven wallpaper, glue the corners correctly and apply the adhesive.
The complexity of working with non-woven material lies in the density of products. But this moment should not confuse anyone, because after a couple of glued strips comes experience and pasting skills. Vinyl wallpaper on a non-woven base does not have to be smeared with glue, it is enough to process the walls or ceilings in the rooms. Important advantages of materials are high plasticity and thickness, thanks to which minor base defects can be hidden.
The main nuances of how to glue vinyl wallpapers on a non-woven basis:
- Due to the composition of cellulose fibers and polymer binders, the material belongs to the universal type of coating, suitable for pasting any room.
- You can handle the work yourself, which allows you to save on services professional team. In extreme cases, you can glue wide non-woven wallpaper with an assistant.
- The surfaces to be glued must be prepared in advance. The color of ceilings or walls should be uniform and not contrast with the shade of the wallpaper, which has a translucent texture.
- It is easy to achieve a perfect coating without visible seams, thanks to the presence of a well-finished edge of the strip that is glued end-to-end. This also contributes to the meter width of the rolls.
- The wallpaper is fast and easy to install, no glue is required on the strips. It is enough to smear the surface with the adhesive mixture, attach the prepared piece of wallpaper and press firmly, expelling bubbles.
It is necessary to cut the material into strips of the required length after checking the products for defects and calculating the footage of the room. Domestic manufacturers produce rolls 53 cm wide according to the standard. Foreign companies offer consumers products with a large width of 106 cm (meter) and non-standard sizes of 70, 90, 100 and even 140 mm.
On a note! Very high quality non-woven vinyl is produced by Germany, Italy, Belgium and France. The width and length of the rolls varies, so when buying, you need to pay attention to the dimensions of the finishing material.

With the help of non-woven wallpaper, you can create the effect of a seamless coating on the surface. This is very much appreciated, so finishing materials are very controversial.
Meter width - fewer joints on the wall, but these are not the only advantages of non-woven fabrics:
- Simple and fast gluing procedure. Each person can handle how to glue wallpaper based on non-woven fabric with a little patience.
- You will spend less time and money buying and gluing one meter roll of vinyl than buying and gluing two rolls of narrow canvases, plus you save glue.
- A wide variety of textures and shades allows you to realize interesting design ideas. In the line of non-woven wallpaper there are options that imitate wood, natural stone.
- It is technically competent to call non-woven materials three-layer - an opaque base, non-woven fabric, vinyl coating as a decorative layer that gives texture and relief.
- Dense structure and elastic properties, thanks to which it is possible to mask the unevenness of the walls, microcracks, and slight differences in the surface in height.
- The high tensile strength provided by the non-woven backing and the resistance of the vinyl to abrasion and color loss.
An additional advantage of wallpaper is ease of maintenance. They can be cleaned dry and wet. If the humidity level rises in the room, the material does not stretch and “do not shrink”.
To give the room the new kind, renovate the design or implement a bold interior solution, the ceilings and walls covered with wallpaper can be painted in the desired shade.
Checked! Non-woven wallpaper can be painted up to ten times. It is unlikely that anyone will want to experiment with color so often, but the material withstands three times the staining for sure.

The first rule to follow before buying finishing material, - vinyl in a roll looks different than on a pasted surface. If you buy wallpaper in a specialized store, you can evaluate the appearance of the material according to the samples presented on the stands.
How to choose meter wallpaper:
- To obtain harmonious design interior, choose finishing materials from one collection, series and batch of one manufacturer.
- Since wallpapers are not cheap, you need to make sure that they correspond to the declared quality by asking the seller to demonstrate that they have a certificate.
- If several wallpaper options are displayed, they first look at the lower and upper rows, and then the middle - at eye level they often place a product that is not in demand or is more expensive.
- You need to choose a pattern and color to your taste, but it is necessary to take into account the general concept of the interior, compatibility colors and wallpaper textures with furniture and room decor.
To get a visually seamless surface without seams after pasting, it is better to choose wallpaper with a foamed vinyl coating. Non-woven materials do not shrink after drying, which greatly simplifies the work with the finish.

There are no significant drawbacks to non-woven wallpaper. To get the perfect coverage of walls and ceilings, it is important to properly prepare the base for subsequent pasting. It is necessary to level the surface if it has defects, and carefully cover large cracks, putty and sand with fine-grained sandpaper after drying.
Some inconveniences of how to glue non-woven vinyl wallpaper:
- Step-by-step preparation of the basis for the upcoming pasting. The surface serves as a base for wallpapering, so the quality preparatory work depends on the strength of the fixation of the canvases.
- You need to stock up on an additional roll of wallpaper in case there is not enough material or if the strip breaks during the gluing process and lies unevenly on the wall. It is important to choose rolls from the same lot.
- Wide wallpapers are glued quite easily, but you need an assistant for accurate pasting. He will be able to hold the edge of the strip so that it does not arbitrarily stick to the base smeared with glue.
- Air bubbles remain under the wallpaper, which must be driven out with a roller to the edges of the canvas. If this is not done, the material in such places swells and gradually lags behind.
- If the question arose, how to glue vinyl wallpaper on non-woven fabric in hard-to-reach places, it is necessary to leave allowances and then calculate the material consumption.
Non-woven canvases are obtained from cellulose fibers, so they are completely harmless to health. After applying a vinyl coating on them, the effect of vapor impermeability of products is not excluded, which can be attributed to the disadvantages of finishing materials.
Experts advise! There are non-woven and paper-based wallpapers on sale, which differ in characteristics, gluing technology and cost. How to check the layering of canvases? If possible, you need to tear off a small piece of wallpaper and see how many layers it consists of.
Tools and materials

One of the advantages of non-woven wallpaper is that the canvases themselves do not need to be coated with glue. This means that no additional space is required to accommodate wide bands.
To independently paste over a room with meter-long wallpaper, you need to prepare in advance necessary tools and materials for work, the list of which is presented below:
- Non-woven wallpaper and glue that fits them.
- Building level, preferably laser.
- Two clean containers: one for glue, the other for water.
- Narrow metal spatula, roller with a long pile.
- Plastic spatula, glue brush.
- Tape measure, pencil and cutting knife.
- Foam sponge, clean rags, sandpaper.
- Putty (start, finish), sickle mesh, primer.
Listed are the tools and materials that are required not only for gluing wallpaper, but also for high-quality preparation of surfaces for gluing.
For the final decoration of the room, you can buy a decorative plinth or corner made of gypsum, polyurethane foam, polystyrene in advance. It gives the room a complete look and hides the connecting seams between the canvases on the wall and ceiling.
Masters recommend! With the help of decorative fragments, you can hide minor defects in trimming the wallpaper. Therefore, it is easier to glue skirting boards and corners after gluing the canvases, and not to start the wallpaper with a spatula under the already glued finish.
Surface preparation

The base for gluing non-woven wallpaper must be carefully prepared. Ignoring this moment leads to a rapid lag of the canvases, material breaks in the places of cracks and an aesthetically unattractive appearance of the room.
The preparatory stage is the most difficult and time-consuming:
- Remove socket covers, switch cases from the walls, dismantle the fasteners and remove the chandelier, and carefully seal all the holes formed with masking tape.
- Before gluing meter-long wallpapers with your own hands, you must carefully remove the old coating - peel off the wallpaper by soaking it with water, blur the whitewashed ceiling, wash off the paint and plaster.
- Assess how the base looks like - the presence of joints, deformations, cracks. Putty all problem areas, laying a sickle mesh and allow the mixture to dry. You can apply finishing putty to the entire surface completely to smooth out the roughness and partially even out the differences in height.
- If the condition of the walls and ceilings is completely unsatisfactory, they are sewn up with drywall sheets, and the seams are covered with putty. Dark GKL need to be processed completely.
- To process the places of application of the starting and finishing putty with sandpaper. After that, carefully sweep away the dust, wash the walls or wipe with a damp cloth.
- Apply a primer in several layers, pausing to dry the compositions. The primer is selected depending on the material of the surfaces to be glued.
Ideally smooth walls create a good base for wallpapering. If you do not use a primer, then part of the glue will quickly be absorbed into the surface, and the wallpaper will stick worse. The durability of the finish depends on how well the preparation is done.
Attention! The primer on the walls and ceiling should dry well. The time for complete drying is indicated on the container with the primer.

Ideally, all measurements should be taken before buying wallpaper, since this is easy to do using a tape measure. If the material has already been purchased, it remains to cut the strips.
How not to make mistakes in the calculations for specific example if the dimensions of the room are 4 * 5 * 2.5 (length, width, height):
- Measure the height of the room from floor to ceiling = 2.5 m.
- Add 5-15 cm to this figure "in reserve" = 2.65 m.
- Check the length of the roll - it happens 10, 15, 20 meters.
- The number of whole strips in a roll is counted = 10/2.65=3.77 pcs.
- Round the value down = 3 bars.
- The perimeter is calculated - (length + width) * 2 \u003d (4 + 5) * 2 \u003d 18 m.
- Make a deduction for windows and doors, suppose = 1m + 1m + 1.5m = 3.5m.
- The width of windows and doors is taken from the perimeter = 18-3.5 = 14.5 m.
- The resulting value is divided by the width of the roll = 14.5 strips.
- Calculate how many rolls you need = 14.5 / 3 = 4.83 rolls.
For pasting the walls in a room with dimensions of 4 * 5 * 2.5 meters, you need five 10-meter rolls of non-woven wallpaper 106 cm wide. In this case, you need to buy one more roll for pasting the walls above the door, above and below the windows. The material is cut into strips of the required length (2.65 m). By the same principle, the material consumption for gluing the ceiling is calculated. The distance from the wall with windows to the opposite side is taken as the length of the strip. If a pattern is made on the wallpaper, each strip is adjusted to the previous one, carefully combining the pattern.
As an option, you can glue meter-long wallpaper on a non-woven base, directly from a roll without cutting.
After preparing the required number of strips for gluing, it is necessary to apply markings. On the walls, vinyl wallpaper begins to be glued from the window opening. With the help of a plumb line, a control point is marked and a vertical strip is drawn. On the ceiling, markings start from any edge perpendicular to the windows, since the canvases need to be glued end-to-end. In rare cases, the strips are placed along the length of the room, then it is convenient to mark the surface from the windows.
Important! So that in daylight the joints of the wallpaper are not visible, the strips are glued perpendicular to the windows. But if, according to the design idea, the pattern of wallpaper on the ceiling should run along the length of the room, you can glue strips along the wall with windows.
For vinyl wallpaper, choose universal compositions or special products for non-woven materials. Before mixing the product, you need to check the compatibility of the adhesive and wallpaper, as different compositions are suitable for light, heavy, dense samples.
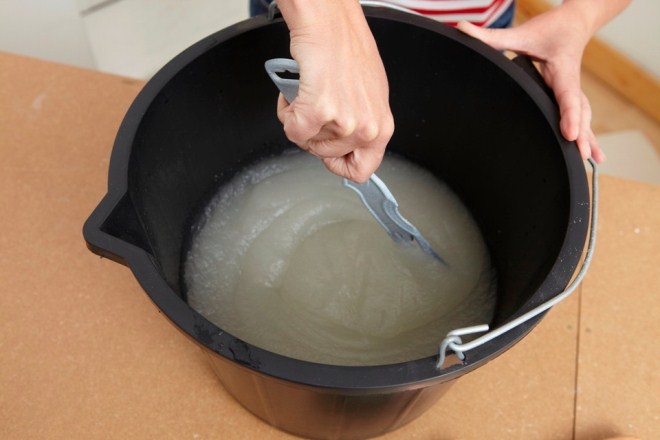
How to prepare glue:
- Pour clean water into the bucket in the right proportion.
- The liquid is stirred to form a funnel.
- Slowly pour in the glue and mix constantly.
- Allow the mixture to swell well for 20-30 minutes.
- Stir again before use.
The composition is applied only to the surfaces to be glued, but in order for the wallpaper to hold on to the ceiling more firmly, it is possible to coat the canvases themselves. It is worth adhering to this recommendation in the hot season, as the glue dries quickly on the wall.
Attention! Do not violate the proportions of water and glue indicated by the manufacturer on the package. Otherwise, the mixture turns out to be of an inappropriate consistency and loses its adhesive properties. For work it is better to use freshly prepared glue.
Gluing process

Each master will figure out how to glue non-woven wallpaper, since there are no fundamental differences from traditional work technology. It must be remembered that it is not necessary to apply glue to the strips, except for pasting the ceiling or carrying out repairs in a very hot season.
An important condition that must be observed is to exclude drafts so that heavy canvases do not lag behind the surface.
How to glue non-woven wallpaper correctly:
- Prepare the walls and ceiling, the necessary tools and glue.
- Choose the direction of the stripes on the wall, taking into account the angle of incidence of light.
- Withstand the pattern to get the effect of a continuous pattern.
- The main rule of gluing is that the canvases are combined strictly end-to-end.
- A strip is prepared, the wall is smeared with glue using a roller or brush.
- Immediately fix the canvas on the wall at the level of the control line.
- The canvas is leveled from the center to the edges, expelling the air with a roller.
- Cut off the excess part of the wallpaper and proceed to sticking the next strip.
To cut the canvas evenly, a wide spatula is applied to it and trimmed carefully with a knife. Products with a pattern are measured immediately, carefully adjusting the pattern, and the excess is cut off so as not to confuse the location of the ornament. Since the strips are glued end-to-end, before fixing the next strip, the edge of the previous sheet is not smeared with glue.
Master's advice! Until the glue is completely dry, do not open the windows or open the doors. If this situation happened by accident, the canvases are immediately glued.
On video: Master class for gluing non-woven wallpaper.
Pasting difficult areas
In every room there are places that cause some inconvenience when decorating with wallpaper. These are corners (and they are often uneven), door and window openings, niches or arches.
How to glue meter-long non-woven wallpaper on difficult sections of walls and ceilings:
- Internal corners. Measure the width of the strip from the edge of the previous canvas to the inner corner, add 1 cm for the allowance. They smear the corner with glue and glue the strip, grabbing part of the adjacent wall and wrapping the edge by 1 cm. The canvas is leveled and the excess is cut off. By the same principle, paste over the second part of the corner. The wallpaper is cut vertically so as not to touch the bottom strip. The edges are combined and after drying, an inconspicuous joint is obtained.

2. Door or window opening. If plain wallpapers or copies without pattern selection are used, it is easier to stick them, since you can skip the area above the doorway and then glue it in small fragments. When vinyl wallpaper on non-woven with a pronounced pattern, the pattern will have to be combined immediately, without missing the area above the door or under the window. The strip is carefully measured, a place for a window / door is cut out in it, and glued to the wall, combining the ornament.
3."Recessed" or expanded corner. If such a section in the room is located in a conspicuous place and attracts attention, overlap cannot be done. How to glue vinyl wallpaper based on non-woven fabric in this case? The strip is led onto an adjacent wall by 2 cm, but the overlap will not be the same. At the narrowest point of the overlap, they retreat from the edge to the corner of 1 cm, after which the width of the roll is measured from this point and a vertical line is drawn. The overlap in an uneven corner will be approximately 1 cm, but will not be very noticeable.

Some craftsmen use the double cut method when pasting uneven corners. How to glue non-woven meter-long wallpaper in this case: stick two strips with a large overlap of 5 cm, pressing them strongly into the corner; using a rigid profile, the wallpaper is cut vertically in the center of the corner, the excess is removed, the edges of the strips are smeared with glue and ironed with a roller.
On a note! In places where sockets and switches are installed, wallpaper is glued as usual, but the location of electrical devices is marked with a cross. Cuts are made along the marked lines, the wallpaper is folded inward, and after the glue has dried, the boxes are mounted in their original place.
Coloring

An important advantage of vinyl is its compatibility with paints and varnishes. Non-woven wallpaper is often glued as a base for further painting work. The type of paint is chosen in accordance with the instructions indicated on the package.
Staining nuances:
- Buy paint for interior work.
- Tinting the entire volume in the desired shade.
- Thoroughly mix the coloring composition.
- Apply with a roller on the wallpaper, wringing it out slightly.
Non-woven fabrics can be painted about ten times. It should only be borne in mind that painted walls and ceilings have low vapor permeability. Typically, consumers paint rooms covered with vinyl no more than three times.
New! On sale there are non-woven photo wallpapers that look interesting in interior design. With the help of a scale image, you can transform the living room or bedroom. The technology for gluing non-woven photo wallpapers on a wall does not differ from the standard process - surface preparation, glue preparation, strip gluing. The only caveat is that if the photo wallpaper does not fit completely, the picture is placed in the center and the canvases are trimmed along the edges.

Working with wide vinyl products does not require special skills. The material adheres well to walls and ceilings made of concrete, drywall, wood. You can cope with sticking alone, but this affects the speed of the work.
It is more difficult to glue wide strips on your own than with an assistant, but it is possible.
If the canvases lag behind the walls or fall from the ceiling, there may be several reasons:
- Poor surface preparation.
- Incorrectly selected and prepared adhesive.
- The glue had time to dry before gluing.
- The room is drafty or very hot.
- Air bubbles formed under the wallpaper.
Wide vinyl canvases decorate the room, creating the effect of an integral artistic composition without joints. The pasting process is not fundamentally different from the standard technology; you can do the work yourself. To get the desired result, choose high-quality wallpaper, glue and prepare the walls and ceiling well for pasting.
Stages of gluing wallpaper on non-woven base (2 videos)
How to glue wallpaper on non-woven base (20 photos)


Sticking tools:
- Roller with long pile;
- Roulette in 5 m;
- Pencil;
- Foam sponge;


- Wallpaper is light and papery.


- Tuck sleeves into gloves;
- Protect the floor from water.


Happy repair!

Non-woven wallpaper consists of cellulose fibers and a polymeric binder. Non-woven wallpaper is considered a universal coating, both externally and qualitatively, they will appeal to the average buyer. True, he may immediately have questions, but will it not be difficult to stick non-woven wallpaper, can you do it yourself, is it easier to glue meter or standard wallpapers? And how to prepare the surface of the walls for gluing?
How to glue non-woven wallpaper: important points
A big plus is that non-woven for walls in special care does not need. If it is for painting, then dispersion and acrylic dyes will look great on it. Most of these wallpapers are not afraid of moisture, so you can wash with soapy water.
As for the preparation of the walls before work, it is very important that the entire surface is of uniform color and, if possible, that its color does not contrast with the color of the wallpaper.

If you glue non-woven wallpaper correctly, they will look like a continuous coating and the seams will be invisible
Some important points in gluing non-woven wallpaper:
- Good non-woven wallpaper has a high-quality edge, which allows you to glue these wallpapers end-to-end. And the neighboring canvases will look like a continuous coating, and the seam, one might say, will not be visible.
- Wallpaper is prepared only after checking them for marriage. Follow this rule at all times: first inspect the entire unfolded roll, and only then cut.
After that, prepare the tools for gluing.
Non-woven wallpaper: how to choose (video)
Tools for sticking non-woven wallpaper
Everyone who glues the wallpaper himself, with his own hands, has his own list the right tools. But if you are doing this for the first time, or are unhappy with past experience, you can use the following universal list.
Sticking tools:
- Building level (if there is a laser - ideal);
- Roller with long pile;
- Roulette in 5 m;
- Plastic spatula for rolling wallpaper;
- Sharp knife for cutting wallpaper
- Narrow spatula (metal);
- Pencil;
- Foam sponge;
- A bucket for glue and a bucket for water.

Basic tools for comfortable gluing non-woven wallpaper
Perhaps some additional tools may be needed to prepare the walls. Wide wallpapers are glued using the same tools.
How to glue non-woven wallpaper
Non-woven wallpaper is remarkable in that it can be glued to virtually any surface - plaster, wood, drywall, chipboard, paper, concrete. Be sure to clean the surface of the walls from the previous coating, if the wall is painted - the paint must also be removed. If there are good reasons not to remove the paint, at least sand the painted wall so that the wallpaper adheres to the surface more easily.
Is it possible to glue non-woven wallpaper on old wallpaper
Theoretically, this is possible, but there are some nuances.
How to glue non-woven wallpaper on the past wallpaper:
- The former coating should be papery and thin;
- Old wallpaper should be firmly attached to the surface of the walls;
- Old wallpaper cannot be significantly darker than new.

It is worth warning that the risks of defects in this case are high. For example, bubbles may appear under the wallpaper, or the wallpaper may begin to delaminate. It is believed that the period of use of a new coating from such gluing is reduced.
Do I need to glue non-woven wallpaper with glue
It happens that during the repair a person is overcome by doubts, and he still smears both the strip and the wall. If, as it happens, you have already smeared the strip, then you do not need to apply glue to the wall. Just wipe it with a cloth at the joints.

It is not necessary to apply glue directly to the wallpaper, this is written both on the label and on the wallpaper paste. Glue is applied only to the wall
But it is easier to apply on the wall, and then glue the prepared strip. Mistakenly, many smear the entire surface of the walls, but you only need the area of \u200b\u200bthe nearest work. If the wallpaper is meter long, this zone increases.
Is it possible to glue non-woven wallpaper on non-woven wallpaper

Gluing non-woven wallpaper over other non-woven wallpaper is highly discouraged. The risk that the wallpaper will fall off is great
With a spiked roller, go over the surface so that as many holes as possible form on the old wallpaper, then the hitch with the new ones will be better.
Do I need to prime the walls before sticking non-woven wallpaper
Priming, of course, is always worth it, no matter what wallpaper you glue. And already non-woven wallpaper definitely needs to be glued to a primed wall.
A primer is not needed only if:
- If the repair is temporary, and the wallpaper, in principle, is not intended for a long service;
- Wallpaper is light and papery.

If the surface on which the wallpaper will be glued has a defect, then it must be primed
What is wall primer for? It's simple - it increases the adhesion (that is, adhesion) of materials, they will better stick to the base.
Is it possible to glue non-woven wallpaper on a concrete wall
Just like that, glue on concrete, of course, is not necessary. First, level the surface with your own hands, putty and primer.
How to prime a concrete wall:
- Take a liquid adhesive solution. In the first layer, apply the adhesive evenly, and in the second layer, the adhesive solution should be thicker.
- Double coating will increase adhesion, which guarantees successful wallpapering.

Without a primer, you can still relatively successfully cope with paper wallpaper, but you need to glue heavy non-woven wallpaper with a preliminary primer.
Is it possible to glue non-woven wallpaper with an overlap
If with your own hands you have not previously glued in this way, you can use the technique of the masters. They glue the non-woven wallpaper with an overlap, and then, as the glue is absorbed, they cut the line with a clerical knife along the level so that the excess tape is removed from the adjacent wallpaper.

The technology of pasting "overlap" is a method of pasting wallpaper, when the uncut edge of the canvas is covered with the next piece of wallpaper
It turns out that the joint will come out perfect, exactly in the middle of the "overlap". But, nevertheless, it’s quite difficult to glue like that, therefore The best way- butt.
How to glue non-woven wallpaper on drywall
Somehow this sticker will not be radically different. But there are features that are worth considering.
How to glue non-woven wallpaper on a plasterboard wall:
- On one wall, draw a vertical marking, and glue from there;
- When gluing the first canvas on drywall, adjust the height;
- Turn the second side of the non-woven wallpaper at an angle;
- If the wallpaper protrudes slightly above the plasterboard wall, they can then be trimmed.

You need to smooth the wallpaper on drywall without delay, completely expelling air bubbles from under them.
Cut off excess wallpaper with a sharp knife, and a flat spatula applied to the wall will be a guide for cutting.
The technology of pasting walls with non-woven wallpaper
After the wall is primed, the vertical markings are done, you can start gluing with your own hands.
Pasting non-woven wallpaper in steps:
- Mix the wallpaper paste and apply it with a roller to the wall section;
- Bring the cut canvas to the wall, you need to start pasting either from the window or from the corner;
- You can smooth the canvas with a plastic spatula;
- If vertical lines are drawn on the wall, the work will go faster;
- Cut off the excess at the floor with a sharp knife.

When pasting walls with non-woven wallpaper, the canvas must be smoothed with a special plastic roller or spatula
It’s good if the wallpaper goes 1 or 2 cm onto the plinth, which is first removed, and put in place after pasting.
In order for the surface of the corners to be even, even in the process of puttying, you need to draw the corners plastic corners. If the surface of the corners is uneven, it is there that the wallpaper will begin to flake off first.
How to glue non-woven wallpaper (video)
Features of gluing non-woven wallpaper
Even if in each instruction it is clearly written several times how to glue, with what glue, and in what sequence, people often decide to “amateur”.
However: always level and prime the wall. Always mark up and cut the canvases in advance. Always use special glue without experimenting with composing it.
Is it possible to glue paper wallpaper with non-woven glue
If there is glue left from a previous repair, or for some reason you decided to glue not non-woven, but paper wallpaper, then you can use non-woven glue.

Glue for non-woven wallpaper can also be used when gluing other types of wallpaper, but you need to dilute such glue big amount water
The only thing is that paper wallpapers are thinner in structure, so the glue for them should be lighter. In this case, when mixing non-woven adhesive, more water must be poured so that it is not so heavy.
Is it possible to stick wallpaper on non-woven wallpaper
You will need to remove old non-woven wallpaper, whether it be standard or wide meter. And you can remove them if you go through the wallpaper with a spiked roller, and then moisten.

Non-woven wallpaper is well removed by a steam generator, if you have one, this method will be the fastest
If you decide to use a steam generator, be sure to:
- Put on gloves (rubber);
- Tuck sleeves into gloves;
- Protect the floor from water.
If the old wallpaper is not removed, then fresh glue will begin to soak into the pores of the old wallpaper, softening the old layer of glue, which may cause bubbles.
Why do non-woven wallpaper peel off
There are several reasons that affect poor-quality wallpapering.
Why does non-woven wallpaper still peel off:
- Poor wall preparation. Even if there are small holes in the wall, the wallpaper may peel off. All defects must be removed, the wall leveled and primed.
- Use of unsuitable materials. Wrong glue - and already all the work can stand up.
- Wrong sticker. Glue only the wall, and only that part of the wall that will have to be glued in the near future. Glue butt.

Non-woven wallpaper can peel off if the surface on which they are pasted was poorly prepared
Also, do not resort to forced drying, then the wallpaper will definitely peel off. Sometimes this method is used if wide meter-long wallpapers are glued. But even such meter-long wallpapers are glued according to the same principle, and they are also afraid of forced drying.
Bubbles on non-woven wallpaper after gluing
How to glue non-woven wallpaper to prevent bubbles? They appear, as mentioned above, due to insufficient preparation of the wall.

You can carefully correct the deformation after gluing non-woven wallpaper with glue and a clerical knife
To eliminate bubbles, you need:
- Make an incision on the bubble with a sharp clerical knife;
- After that, try to gently straighten the wallpaper, draw glue into the syringe and squeeze it through the incision into the wallpaper;
- Spread the wallpaper fragment well, and press it against the wall with a clean cloth.
Wide meter wallpapers can also be with bubbles after gluing, do not undertake to glue them alone, the risk of bubbles and peeling will be high.
How to glue non-woven wallpaper (video)
If you understand how to properly glue non-woven wallpaper, the process itself will not be difficult. After a good primer and proper marking, the strips will stick easily, and the process will not be delayed. Quality materials And good preparation walls will provide a good result.
Happy repair!
Non-woven wallpaper is a beautiful finishing material. Their use allows you to hide minor defects surfaces in various premises. Created decorative coating has many advantages, and wallpapering for painting allows you to repeatedly update the appearance of the interior. The material can be selected for any design project. In order for the decor to last for a long time, you need not only to know how to glue non-woven wallpaper correctly, but also to pre-select high-quality products. An example of the harmonious design of a room with the help is presented in the photo below.
Non-woven wallpaper: pros and cons
Paper, non-woven - these are the most common types. The latter are divided into 3 following groups: completely from non-woven fabric or based on it, canvases for painting. Painted products have the lowest price compared to the first two types.
Non-woven photo wallpapers on the wall look great.
Products are available in a wide range and have excellent performance characteristics. The windows of building stores are full of an abundance of colors, patterns and drawings. One of the stands is shown in the photo below.

They produce wallpapers 100 and 60 cm wide. When using the former, fewer joints are formed, which is preferable for general appearance. The instructions on the packages often describe the technology for pasting non-woven wallpaper in this series.
Pasting non-woven wallpaper allows you to create a coating that has a number of advantages. Minor flaws do not affect the prevalence of the material. Its pros and cons are discussed in the table below.
| № | Advantages | Flaws |
|---|---|---|
| 1 | fabrics do not fade over time, do not burn, durable, wear-resistant | more high price compared to paper and vinyl counterparts |
| 2 | Adhesive strips are easy to remove for subsequent repairs | accumulate dust over time, get dirty |
| 3 | a wide variety of patterns, patterns, colors, shades, textures allows you to embody a variety of design solutions on practice | some varieties are not breathable |
| 4 | canvases allow you to hide the defects of the walls pasted over with them, they can be washed during cleaning |
The rules for pasting non-woven wallpaper do not contain any hard-to-implement recommendations.
The advantages of the material are undeniable. In order to achieve the maximum possible service life of the decorative coating, excellent interior design, it is necessary not only to know how to properly glue non-woven wallpaper, but also to select them for specific rooms. The instructions for pasting on the label contain all the necessary information for working with the selected material.
Applied pasting tools
Pasting non-woven wallpaper is carried out using a certain set of tools and devices. No special devices are required to be used. For pasting walls with non-woven wallpaper, you should prepare:
- scissors, knife;
- pencil, tape measure, ruler;
- a plastic spatula for smoothing wallpaper on the wall and a metal one to cover up surface imperfections ;
- roller with rubber nozzle, extension handle;
- brush;
- containers for glue and water;
- building or laser level (you can plumb);
- rags, soft sponge.

The photo above shows the tools needed to glue the canvas.
You will also need a ladder or other device for working under the ceiling. To prepare the walls for non-woven wallpaper, a perforator and a hammer may be required to dismantle the outer layers of plaster with defects.
It is better to assemble the tool in advance so as not to be distracted while working on trifles. To cut fragments from the roll and apply glue to strips 100 or 60 cm wide, you can use a special table .
Preparation of wall and wallpaper surfaces
Before gluing non-woven meter-long wallpaper, or 60 cm strips, the surface of the walls and the canvases themselves should be prepared. The duration of work at this stage depends on the condition of the base and the type of old finish. The preparation of the walls for gluing is carried out in the following order:
- remove old decorative layers completely (wallpaper, paint) or only exfoliated areas (for plaster);
- with significant irregularities, the entire work area is plastered;
- if there are small cracks, cavities, potholes, then only they are sealed with putty;
- protruding fragments are knocked down with a hammer or a perforator, and metal ones are cut off with a grinder;
- after drying, the coating is polished to the required state;
- cover the working base with a deep penetration primer, which improves the adhesion of the contacting surfaces.
Old wallpaper is removed with a metal spatula, soaking with water if necessary. It is also recommended to clean the base from paint.
Before the non-woven wallpaper is glued, the primer composition is expected to dry completely.

- measure the perimeter of the room and the height of the walls;
- multiplying these 2 parameters, get the area (S) of the surfaces;
- dividing it into S rolls of 100 or 60 cm of wallpaper, they get the required amount of material;
- the number of stripes can be calculated by dividing the perimeter of the room by their width;
- by dividing the length of 1 roll by the height of the room, the number of fragments into which it can be cut is obtained;
- dividing the total number of strips required for the room by the one obtained from one, the amount of working material is calculated.
The standard length of a roll is 10 m, so the area of meter-long ones is 10 sq.m., and products with a width of 60 cm - 6 sq.m.
It should be borne in mind that material should be purchased with a margin, because when wallpaper is glued in the corners or with a pattern (pattern), their consumption increases. Also, before gluing, fragments are cut off from the rolls (based on the height of the ceiling) with a margin of 10 cm. It is required to purchase material approximately 20% more than was calculated.
Before properly gluing non-woven wallpaper, it is recommended to cut them into pieces of the desired length. This is done like this:
- measure the height of the ceiling at several points;
- if there is no pattern on the material, then cut off the strips with a margin of about 10 cm;
- if there is a drawing: they cover the floor, adjust the fragments and number them sequentially.
After the considered manipulations, the walls and wallpaper are prepared, you can start pasting the rooms. The base must be processed before gluing meter-long wallpaper. This is one of the keys to getting a quality result.
The adhesive composition must be prepared in advance before gluing. This is done in the following way:
- clean water is poured into the container in the amount indicated in the instructions on the adhesive package;
- then, slowly, pour out the adhesive powder, intensively mixing the solution;
- 10 minutes, let the composition brew and re-stir, kneading the remaining lumps.
It is necessary to use specially designed for non-woven fabrics. Some types of adhesives are shown in the photo below.

The packages contain breeding instructions. For different compositions, they may contain some nuances of its preparation for work, therefore, when purchasing previously unused glue, you should study the instructions for it.
It may also contain recommendations for applying the composition: only on the strips or the wall, or simultaneously on both surfaces. Often applied only to the base. At the same time, especially carefully at the outer and inner corners, so as not to accidentally miss even small areas.
The use of special adhesives High Quality allows you to securely stick a regular canvas and photo wallpaper on the wall. As a result, they will last for many years. The adhesive itself has good adhesion, allowing it to be used on many types of surfaces. The composition does not leave stains and in a diluted state in a closed container can be stored for up to 10 days.
Sticking technology
Directly to start after pre-training tools, wall surfaces and cutting strips to the desired length. You can do all the work yourself. But it is better when there is an assistant, because it is more convenient to both glue wide strips and work on a stepladder. The process itself moves faster in this case.
When sticking non-woven wallpaper in the corners and throughout the room, windows should be tightly closed to avoid drafts. It is better to work during daylight hours to be able to turn off the electricity.
The technology for gluing non-woven wallpaper consists of the following sequence of actions:
- retreating slightly from the corner, draw a vertical line with a pencil along the level, which will be a guide for the first strip;
- lubricate the section of the wall under the fragment with prepared glue;
- lean the strip and adjust its location along the marked line;
- moving from top to bottom, smooth the fragment with a roller or plastic spatula to level it and squeeze out air bubbles;
- wipe the extruded glue with a damp cloth;
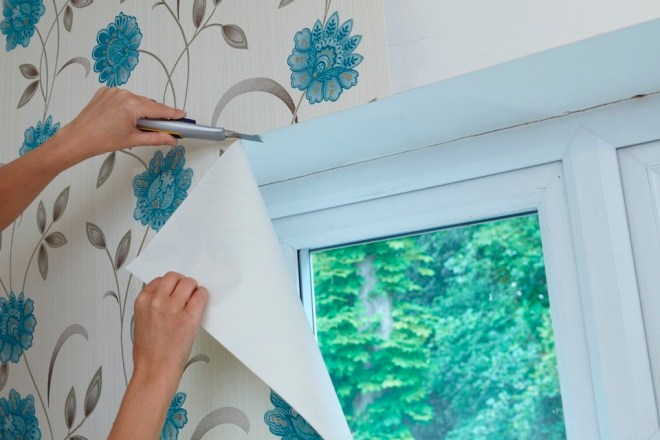
- extra centimeters are cut off from below and from above;
- butt joint glue the second strip so that the seam is not visible, at the same time there is no overlap;
- similarly paste over the entire room.

Along the ceiling plinth, cut off the excess from the glued strip as shown in the photo below. The main thing is that the knife is sharp and does not pull the canvas.
Features of gluing are that the created decorative coating must dry at a constant temperature.
Glue the wallpaper in the inner and outer corners, smoothing it especially well and leveling it with a plastic spatula to squeeze out all the air and avoid wrinkles and voids.
The above technology shows meter-long wallpapers and fragments of a different width. There is nothing difficult. Sticking wallpaper with your own hands is not difficult. The main thing is to consistently and correctly perform all actions. It is inconvenient to work with meter-long wallpaper alone. Better to have a partner. In the considered way, you can both glue walls and ceilings.
Taping corners and awkward areas
Hard-to-reach places and corners require special attention when working. The first includes areas behind radiators and heating pipes, areas with switches and sockets. The work will require a power outage for your own safety.
Before gluing wallpaper on sockets and switches, remove covers from them. After smearing the walls and applying strips. Holes are carefully cut out at the locations of the boxes. After fixing the cover, mount the covers back.
The corners are pasted over with non-woven wallpaper so that up to 3 cm of the strip goes onto the adjacent wall. This makes it possible to hide irregularities.
Glue wallpaper in the corners in 2 ways:
- monophonic types of products are combined with a slight overlap, after which they are cut along the corner with a sharp knife, removing excess;
- pasting the corners with wallpaper containing drawings is performed with an overlap of several centimeters (2-3), which hides the unevenness.
The technology of pasting ceilings is similar to the design of walls with wallpaper. It is recommended to glue the strips so that the lighting from the window falls along them. This will hide the seams between the fragments.
To make it less difficult, before gluing the corners, it is better to level them with putty. The selection of the right combination of wallpapers, together with their high-quality gluing, leads to an excellent result.

The photo below shows an example of a beautiful, stylish design premises.
A wide variety of non-woven fabrics allows you to perfectly decorate the interior. The material is highly practical. Working with him is not particularly difficult. A small problem can only arise with how to glue non-woven wallpaper in the corners. This is a consequence of the fact that they are almost always not even enough.
The technology of gluing walls and corners is shown in the next video.
A big plus is that all the work can be done by hand, without involving specialists. The presence of an assistant is desirable, and when pasting ceilings, it is simply necessary. Compliance with technology and proper preparation walls allow you to get a quality result.
You should know that there is no better and comfortable material for pasting walls than non-woven wallpaper.
If you plan to decorate the ceiling and walls with a fillet, then initially you need to paste them, and then proceed to wallpapering.
How to glue non-woven wallpaper: technology
This type of material has the following advantages:
- The width of the roll is approximately 1 m, resulting in much fewer joints in the room than with conventional wallpaper.
- Increased material wear resistance and abrasion resistance.
- You can hide small cracks and other defects on the base of the wall.
- If you want to change the wall decoration, the old material can be easily removed from the wall in a dry form, that is, you do not need to spend time soaking the wallpaper.
- High light fastness.
- You can paste over the wall from a roll. In this case working area will be reduced to a minimum.
- You can do wet cleaning with improvised means.
- The material is able to pass steam and air, while it will not change its texture and size, which cannot be said about ordinary wallpaper.
- Minimum amount of debris and dirt. This is due to the fact that the glue will need to be applied exclusively to the wall.
- You can paint many times, which allows you to change the interior design.
- The material is made from environmentally friendly raw materials.
- Wall-paper conforms to all norms of sanitation.
- The material can be glued both on the walls and on the ceiling.

The scheme of cleaning the wall from the old finish: a) cleaning, b) smoothing, c) moving the tool.
Before gluing meter non-woven wallpaper, you will need to measure the height of the walls. If the junction of the wall and ceiling is decorated with a fillet, then it must be glued before pasting the walls with wallpaper.
Height will need to be measured from floor to ceiling or fillet, if the latter is used. To the value that will be obtained, you will need to add 10 cm for a margin.
On the wall from which wallpapering will begin, at a distance of 1 m from the corner, you will need to beat off a strictly vertical line, for which you need to use a plumb line and a long ruler.
A plumb line can be made with your own hands from a cord of the desired length, while a heavy bolt or nut must be tied to one of its ends.
Elements that will be needed to glue the non-woven material:
- The wall decoration material.
- Construction sharp knife.
- Putty knife.
- Primer.
- Putty.
- Special glue.
- A plumb line or a long ruler.
- Rag.
- Meter.
- Roller or brush for wallpaper.
Completion of all preparatory work

Before sticking wallpaper, you will need to prepare the wall. You need to make sure that the wall is completely flat, there are no bumps, cracks or any other noticeable defects on it. The base will need to be thoroughly cleaned of the old coating.
To make it easy to remove old wallpaper, you need to wet the coating. This can be done using water and a rag. The wetted material can be removed from the wall with a spatula.
If the wall is not perfectly flat and you need to repair work before gluing non-woven material in the corners and other problem areas, you will need to putty. After that, the wall must be primed with glue or with a deep penetration primer. If glue has been chosen, it is recommended to make a weaker mixture.
Speaking about how to glue non-woven wallpaper, you should know that there are 2 basic rules that you need to follow:
- The surface on which it is planned to glue the non-woven material must be dry and even.
- There should be no drafts and air currents in the room, for example, from an air conditioner. All windows in the room must be tightly closed.
Next, you need to prepare the material for gluing and painting. To do this, cut them into strips. It is important to remember that you need to leave allowances of 10 cm on each of the canvases. It is important to remember about the observance of the drawing, if necessary.
How to apply glue on wallpaper?
The material must be glued from the corner, from top to bottom. In this case, you will need to consistently smooth it in the vertical direction using a roller or a wallpaper brush.
You need to press lightly so that the new layer lies end-to-end to the edge of the glued one.
Glue will need to be smeared not on reverse side material, as is done in the case of ordinary wallpaper but only on the wall.

The scheme of applying glue to the wallpaper: 1. Spreading the canvas with a paste. 2. Folding the canvas in half.
It is important to choose the right glue that is suitable for gluing non-woven wallpaper. Any employee of the store, which specializes in the sale of materials for construction and decoration, can help with the choice.
It is important to know that the advantage of such a material is that in this case it is not necessary to withstand a certain amount of time to impregnate the wallpaper.
Such a material is able to ensure the stability of the shape and size of the sheets. Before applying the adhesive to the wall, it is recommended that you familiarize yourself with the information that is indicated on the packaging of the adhesive mixture and on the wallpaper roll.
Glue must be applied to the wall, which was previously prepared.
How to glue non-woven wallpaper: a sequence of work
After applying the adhesive solution, you need to take the first strip of wallpaper, adjust it in height, and then stick it along the broken line on the wall. The second side needs to be tucked into a corner. Don't worry if you can't get an exact match at the top of the wall, because at the end the wallpaper that will protrude can be trimmed. First you just need to turn them up. Next, you need to start smoothing the material, expelling air from under it. To do this, use a wallpaper roller, spatula or a piece of clean cloth.
After smoothing, you need to take a large-width metal spatula and a sharp knife. The spatula is used as a guide for the knife, it is applied to the junction of the wall and ceiling. After that, cut off the excess wallpaper with a knife. If you can't cut the raw wallpaper, you will need to wait until it dries, and then try to cut it again. If the wallpaper in some places was not completely glued, it may be necessary to glue the material.
How to glue meter-long non-woven wallpaper end-to-end?

Each layer is glued end to end with the previous one. In this case, there will be no problems if the wall was leveled at the preparation stage.
In the process of gluing a new layer end-to-end to the previous one, you will need to adjust it in height. A clear joint is not allowed to be achieved by stretching the material. Even if it can be done at first, after the glue dries, the wallpaper will disperse.
If you can’t achieve a perfect joint and monotonous wallpaper without patterns is used, you can go for a trick. The canvas must be glued overlapping with the previous one, while the intersection should be about 2-3 cm. Then, using a sharp construction knife, it is necessary to make a through cut in the place where the canvases intersect. It is important to cut through 2 layers at the same time. At the end, you need to remove the trimmings, coat the joint with an adhesive mixture and straighten the layers, getting an even joint.
How to glue wallpaper in hard-to-reach places and corners?
Particular attention should be paid to the process of wallpapering walls in hard-to-reach places. In this case, we mean the location of sockets, batteries, switches and the ceiling. The edges of the wallpaper must be smeared with an adhesive mixture to ensure that they are securely attached to the base of the wall. It is highly recommended not to allow the adhesive solution to get on the main side of the canvas. If for some reason this happens, you will need to quickly remove the glue from the wallpaper using a damp cloth. Next, the wallpaper must be wiped with a dry base.

Glue non-woven wallpaper next to sockets and switches should be carefully, while the electricity will need to be turned off. Before that, you should measure what size strips will be needed, and then cut them out.
After the adhesive mixture has dried, a recess of the required size must be made in the place of the hole. At the end of all work, you will need to screw in place all the sockets and other elements.
If you plan to glue this type of material on the ceiling, then you should know that the technology is no different from wallpapering walls. The only difference is that in this case you need to find an assistant who can hold the wallpaper.
In the corners, the canvas must be glued so that the overlap on the adjacent wall is approximately 2-3 cm. If a large layer is tucked during the gluing process, then it must be cut with a sharp knife to the required size.
There are 2 options for how to stick a finishing material of this type in the corners of the room:
- The first method is used when you need to stick a material with a pattern. The canvas must be glued from the corner, while the overlap with another layer should be approximately 2-3 cm. The overlap can hide the defect if there is an uneven corner.
- Another way is for plain wallpaper. The canvas should be glued from the corner, after which cut 2 canvases with a knife, remove the excess and straighten the joint at the end.
How to paint non-woven wallpaper?
If after pasting the room with wallpaper you need to paint the material, then you need to know that water-based paints that are resistant to abrasion and cleaning are best suited. It is recommended to use latex or acrylic paints that have the effect of silk. If you choose these materials, you can emphasize the texture of the wallpaper.
The first coat of paint is applied approximately 24 hours after the adhesive has dried. To do this, you need to use a roller that matches the type of paint purchased. An employee of the same store will help you choose it. The second and all other layers of paint are applied after a few hours.
Gluing such wallpapers is quite simple, it is only important to prepare the base and follow the sequence of actions.
The question of how to glue non-woven wallpaper worries many who have chosen this practical and high-quality material. Its main feature is a thickened structure, thanks to which it is possible to successfully hide minor wall defects. The non-woven coating is wear-resistant, moisture-resistant, light-resistant, maintenance-free and has an original embossed surface. If you want to change the interior design, such a coating can be repeatedly painted with dispersion or acrylic dyes. The very process of pasting the walls is simple and does not take much time, you just need to familiarize yourself with some secrets of working with wallpaper.
Sticking non-woven wallpaper with your own hands has some features. To know how to glue non-woven wallpaper correctly, we advise you to familiarize yourself with the following recommendations to avoid mistakes during work:
- before starting work, be sure to read the instructions from the manufacturer attached to the rolls and to the packaging of the adhesive mixture;
- Before gluing the canvas, prepare the surface of the walls. Proceed to gluing only after the primer has completely dried;
- pay attention to gluing the first workpiece - the quality of the entire work directly depends on this;
- the glued sheet should be leveled with a rubber spatula (if the surface of the wallpaper is smooth) or a wallpaper roller (if the canvas has a textured surface);
- each next sheet must be glued without overlap - strictly end-to-end.
If this is not possible, for example, when gluing the canvas in the corners, use the double cut method: by laying two sheets on top of each other by 5-6 cm, you need to make an even cut with a clerical knife at the junction, then carefully remove the excess. Thus, the corners will be perfect; - the joints of the sheets (especially the corners) should be carefully ironed with a spatula or roller, removing excess glue to the side free from wallpaper;
- to remove excess glue, use a damp sponge, carefully wipe the seams in the corners, do not worry about the condition of the canvas - moisture will not damage it.

The preparation and marking of the walls is an important point that should be given special attention before gluing non-woven wallpaper. You should also cut the sheets correctly and choose the appropriate composition for gluing them.
Preparatory work
Non-woven wallpaper can be pasted over any surface. If you plan to paint the wallpaper in the future, you should take care in advance that the walls have a uniform color that does not differ much from the color of the selected paint, since the interlining is a thin material and the color of the base may be noticeable in the future.
VIDEO:
The walls should be pre-cleaned (remove the old coating) and eliminate existing defects. Then it is necessary to carefully treat the surface with a primer, it is better to apply a deep penetration primer - this will increase the adhesion of the adhesive. After the final drying of the primer, you can proceed to the marking of the walls. It is recommended to start pasting meter-long wallpapers from the corner - use a level to apply vertical lines to the walls at a distance of 1 m from each other, this will avoid irregularities and shortcomings in the work.
The next step is to prepare the canvas. If you have chosen a solid material, there are no problems with cutting. If you plan to glue a canvas with a pattern, make sure that it matches, for this you will have to periodically shift the next sheet up or down. Be sure to leave a margin of height of 5-7 cm when cutting - an allowance for the ceiling, cut off the excess part with a clerical knife after complete drying.

Sheet cutting must be carried out on a clean surface, rolling the roll face down. Having measured desired length blanks (taking into account the margin), make a notch, evenly bend the sheet (make sure that the edges of the lower part of the sheet coincide with the edges of the bent part) and cut it along the fold line. The next workpiece must be rolled out in the same way and before cutting, check the fit of the pattern. Further work is performed in a similar sequence.
After preparing the walls and the canvas, you can begin to solve the following question - how to glue non-woven wallpaper correctly? An important point is the choice of a suitable adhesive, the quality of the final work depends on it.
Choosing glue
For pasting walls with non-woven wallpaper, you should use a certain adhesive composition, which can be purchased at a specialized store selling building and finishing materials.
Before preparing the adhesive mixture, carefully read the instructions for the technology of the sticker process, which is attached to the wallpaper - some manufacturers recommend applying glue not only to the walls, but also to the canvas itself.

It has a number of advantages:
- does not contain toxic substances and is absolutely safe for human health;
- has excellent adhesive properties, allowing the mixture to be applied to any surface;
- convenient to use;
- does not leave stains;
- has a long shelf life in a closed container (up to 10 days).
The process of making the adhesive mixture itself is not complicated - the powder should be diluted in the amount of water indicated according to the instructions, constantly stirring until the mass thickens.
How to glue meter non-woven wallpaper
Sticking non-woven wallpaper with your own hands is not a laborious process, but if you have chosen a meter-long canvas, you should take into account a few nuances. Many prefer exactly meter rolls, since this greatly facilitates the pasting process, there are fewer joints and less material consumption.
VIDEO:
How to glue non-woven wallpaper 1 meter wide? Consider the basic rules:
- The main task is to carefully prepare the walls - their surface should be flat and smooth. The walls should be pre-treated with putty and primer - this will level the walls and improve the ability to bond the adhesive mixture to their surface.
- If you cut the meter wallpaper incorrectly, you can often encounter a lack of length last leaf. In order to avoid this situation and save material, before sticking the sheets, we recommend that you pre-stick ceiling plinth to a clean wall, avoiding the need to set aside allowances (if such a finish is expected in advance).
- If you are sure that the ceilings are even, it is enough to leave a 2-3 cm margin when cutting sheets. If the ceilings are uneven, you should leave more margin - up to 10 cm.
- You should not start gluing meters strictly from the corner, draw an orientation line in advance, stepping back a little from the edge of the wall - this will avoid distortion of the pattern if the corners of the room are uneven.
- Smoothing the canvas glued to the wall should start from the top, gradually moving towards the center and leveling the edges of the sheet.
- The edges of each subsequent sheet should be applied as close as possible to the adjacent canvas, aligning the seams and tracking the pattern if you chose a non-monochrome coating.
Before starting work, be sure to study all the recommendations and prepare necessary materials- This will greatly facilitate and speed up the process.
How to glue wallpaper in hard-to-reach places
The question of how to glue non-woven wallpaper in hard-to-reach places, especially in the corners, is important. Difficult places also include areas with sockets, switches, and near batteries. When sticking the canvas near sockets and switches, you must first de-energize them and unscrew the protective boxes. Thoroughly coat the wall with glue, attach the sheet, and only after the glue has dried, make a cut of the required size, remove excess wallpaper and screw the boxes into place. When sticking the canvas near the batteries, carefully process the edges of the sheet adhesive composition. Corners require special attention. There are two options for successful wallpapering in the corners:

A. If you have chosen a plain canvas, you need to stick it, starting from the corner, then glue the next sheet on the adjacent wall, capturing part of the glued canvas, and then evenly cut both canvases with a clerical knife, removing the excess.
B. If you prefer a canvas with a pattern, the sheet is also glued from the corner, and the overlap with the next canvas should be 2-3 cm - this will hide the flaw in case of an uneven corner.