Soft kitchen corner assembly instructions. Do-it-yourself kitchen corner: from drawing to upholstery. Prices for cordless drill/driver
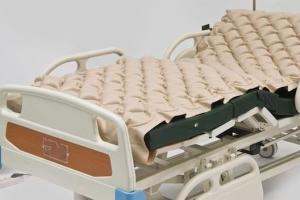
The sofa corner perfectly complements the set in the kitchen. This is a great option for using space rationally: this furniture is versatile, comfortable and functional. The soft corner consists of two small sofas and a connecting part between them. Sometimes chairs are used to match the color of the fittings.


Why is it necessary to equip such a corner in the kitchen yourself? The selection of factory furniture is often accompanied by difficulties. For example, standard headset settings are sometimes not suitable for individual layouts. In this case, the installation of a homemade kitchenette will the best option. Proper manufacturing will require drawings, materials for assembly with tools and a good mood.

photos
How to do: step by step instructions
There can be many reasons why you want to make a sofa corner on your own, but the primary one is savings. Corner from the manufacturers of "salon" furniture is much more expensive.


To start assembling such a structure yourself in parts, first you need to decide on some factors:
- understand exactly how the built-in corner will be located and in which direction it will be turned - to the right or to the left. After that, it is necessary to make drawings of the future project, which reflects all dimensions, from the height of the structure to the width and length. In general, all schemes must be spelled out thoroughly. This is important: this way there will be no errors when assembling and connecting parts;
- select coating materials. If it is necessary that the life of the sofa corner be as long as possible, you need to choose a classic filler and upholstery (synthetics, leather substitute or fiber). Synthetic coating is easy to clean, retains color and shape for a long time. Leatherette allows you to increase the life of the furniture, and the fiber has the properties to repel water and dirt. Internal fillers can be made of simple foam rubber or polyurethane foam material.


After these factors are taken into account, you can get to work. Your instructions will be as follows:
- First of all, based on the drawing, it is necessary to select all parts of the future corner, and assemble the frame from the rails. After that, it is necessary to attach other parts to such a structure, such as the bottom and the supporting wall.
- Once both sides of the frame are assembled, it is necessary to connect the corner through the modular part.
- Next, the soft part of the sofa is modeled - the upholstery. Foam rubber is glued to the outer part of the support.
- A cover is made (separately), based on the dimensions from the drawings - all the necessary pieces of the future surface are cut off and nailed in such a way as to cover the foam rubber. For such actions, a stapler is used.
- The manufacture of a separate part, which is located between the two sides of the corner, must be dealt with separately.
- After that, you need to fix the covers that act as a seat.

Necessary materials and tools
To collect quality furniture, you will need not only instructions for use with a short plan of action, but also certain tools with materials.


For construction corner sofa required:
- birch or pine layer measuring 2 by 4 centimeters - 100 centimeters;
- wooden block, the section of which is 4 x 4 centimeters - 140 centimeters;
- timber about 2.5 by 2.6, measuring 370 centimeters from pallets;
- an elongated part from an array 1.5 by 1.5 cm in cross section - 300 cm. For finishing the inner wall - a layer of chipboard;
- plywood sheet 1 centimeter thick for the bottom and sides;
- foam filler, 5 centimeters thick.
- fabrics for upholstery.


To assemble the above parts into a single structure, the following tools are needed:
- electric jigsaw;
- measuring angle;
- plane;
- construction fixer (stapler);
- screwdriver;
- automatic grinding machine;
- drill;
- bit;
- forceps;
- knives;
- yardstick;
- hammer.


Of the small accessories, confirmants and screws are needed, measuring 0.4 by 2 centimeters, 0.4 by 6 and 0.4 by 8 cm. It is necessary to purchase bolts, nails, balls, loop parts and bases. If the sofa is provided for a folding structure, then according to the scheme, a certain mechanism of the finished type is needed - straight sofas will go to it and the corner part will be fixed.


Interesting fact: you can cut DPS in special workshops. This is how a high-quality furniture frame is created. It is enough to come to the furniture studio with detailed drawings of the future project, and the master will do the rest. The specialist will enter the diagrams into the computer, draw up a map of the wood cut and calculate the dimensions of the chipboard. According to the drawings, all the necessary parts will be made.


However, some parts, nevertheless, need to be cut in your own workshop - for example, details of a figured purpose. In the lists, they are marked as blank rectangles.
For an additional payment, they can also cut curly parts and stick an end tape on the base. To reduce your own work, you can use this service. The processing of ABS tape on machines is much better than manual gluing of parts - you do not have to deal with milling and making additional templates.

Drawings and diagrams
In the drawings, it is necessary to prescribe all the exact data and indicators. Dimensions and dimensions of furniture should also be indicated on the footnotes. With the right explanations on paper, the sofa corner can be easily installed in the kitchen.


When choosing a ready-made drawing, skip diagrams that do not have a stand-alone module. Connecting two pieces of furniture corner with a simple harness is not a reliable method of assembly. Several racks that strengthen the structure must be present, otherwise the frame will not be properly protected. When used in the module circuit, the design will be easy to change, adjusting it to different sides. Certain schemes help in the future to install the sofa either in a corner or in a line, which is very convenient.


When determining the width and length of the corner, it is necessary to measure the area of \u200b\u200bthe room, the design of the kitchen and the location household appliances. After the contours are entered into the kitchen plan, it is necessary to check the ratios: they should not be less than 60 centimeters.

Assembly
If the work is supposed to be completely independent, without contacting the workshop for additional cutting of parts, then some rules should be considered:
- blanks, according to which the parts will be made, must be cut from a plywood sheet. The DPS material on log cabins is porous, non-uniform - the bearing of the cutter can come off uneven surfaces, and the line will turn out to be a curve. If plywood is missing, then the ends of the blanks must be pasted over with paper tape in several layers;
- at the final stage of assembly, the parts are not polished. Parts of the structure with a porous surface stick together better;
- the outer side of the drawers is located under certain angle. This is necessary for the comfort of seated people. The cutout of the rack parts on the sides must be done under a 10 degree bevel.


Please note: ABS tape in stores is presented in two versions - with and without a layer of glue. The adhesive is applied to the raw tape with a special machine - this complicates its use at home. It is better to buy tape with glue.


Further, after the cutters are applied and the tapes are glued to the frame, straight sofas can be assembled. On the materials themselves, it is necessary to make markings - indicate the size of the holes on the side racks. Given that the front part is recessed by a few millimeters, an indent from the edge will be required by 11 mm. By the way, the ends are installed with thrust bearings.


You can assemble a corner for the kitchen yourself thanks to confirmers and dowels. Cutters are best used in a smooth connection - so the frame will be stable. Screws can be used with other surfaces and parts. Thanks to this, the design will be correct and with a minimum of holes. It is also necessary to install the bottom of the support on the dowel structures.


The kitchen corner itself is designed in this way:
- dowels are installed in the slots for the upper part in the middle of the side wall. In the future, it is necessary to put a support bar on them;
- attach the supporting part at the back;
- add a panel part to the frame;
- screw the support under the back (this is the upper part of the frame).


The installation of the back of the sofa takes place after the upholstery. The modular part, which will connect the straight sofas in the corner, is designed a little differently.

Modular part
The scheme of the back of the future sofa is connected with the design of the modular part. For example, making a backrest in a semicircle is almost impossible without dividing the frame into three parts. Therefore, the back of the soft corner consists of three narrow panels. It is easy to remake such a frame - you just need to eliminate one of the segments - replace it or adjust another.


Repair of the support bars of the module is carried out during the disassembly of the structure. For example, it is known that the classic form of the modular part is presented in the form of a scarf. Applying this knowledge in practice, you can fit additional compartments into the triangle.


Vertical racks for the module are installed between two support bars of the back - this is how the corner is fixed. It is not recommended to make boxes in this segment, since upholstery in this case is problematic, and the use of a carriage screed is generally impossible.


It is necessary to attach a piano loop to the elongated part of the seats (the covers are mounted at the very end of the work). A bar measuring 4 by 4 cm is the basis of the frame for the module. When connecting the profile, it must be remembered that the three parts must be located at an angle of 45 degrees and 90 degrees to each other. After assembly, the module is sheathed with a plywood layer.


Next, you need to sand all parts of the future corner. The wooden parts are treated with a stain, and after drying, they are covered with several layers of varnish. The remaining parts are connected to the legs of the sofa and fastened with screws to the frame. The legs should be around the entire perimeter (number of about eight pieces).


The details that are responsible for the support structure of the sofa are checked when adjusting the legs. They also pre-mark the places of future fasteners and drill holes with a diameter of 0.8 cm. Bolts are needed with voluminous caps, and washers must be purchased in double quantity. Since one will go under the bolt, and the second - under the nut.


From a bar, 4 by 4 cm in size, hand stands are made. The grooves are made several centimeters deep, it should be remembered that the width of the surface is related to the thickness of the side walls. After the armrests are installed, they must be covered with glue and driven into the sides with screws. This is how the frame base is created and fastened with the module.


Padding
Sofa corner upholstery is The final stage decorating general design furniture. Not only the seat is made soft, but also the back. If the sofa in the corner is small, then foam rubber 5 centimeters thick will do. You can also cover the sofa with leatherette, and to make the seats softer, you can use a synthetic winterizer. It's simple: the material is mounted on glue and fixed on the back. The choice of upholstery depends on the location of the sofa itself in the kitchen: the closer to the sink or stove, the coarser and stiffer the fabric is needed.


The fitted foam rubber on the back is an excellent base for upholstery. It must be remembered that the synthetic winterizer or other fillers should be slightly larger than the total length of the sofa - for bending on the side parts. Soft parts for the seat are cut out more by 2 centimeters in width, since the material is turned only forward.


To sheathe a corner sofa with fabric, you must follow some rules:
- fabric can be cut along the contour of the synthetic winterizer. The material must be circled on the sofa itself, after which add another 5 centimeters to the resulting dimensions and cut out the resulting piece;
- the length of the cover must be made more by 10 centimeters than the design itself. It is necessary to drag the fabric with a twist in the corners and preferably with a stapler. The remaining parts can be covered in the same way;
- the kitchen corner is best twisted in parts with a furniture screed.

Updating an old sofa
Having an old sofa nook in the house, you can easily update it. Restoration of an old sofa into a new one is possible by changing the upholstery or the filler itself.


The first thing to do is to cut out the damaged fabric and replace it. If the corner is connected by several parts, then the replacement must be carried out alternately on each body part. What actions are needed?
- remove the top cover;
- remove the old foam rubber from all parts of the corner module;
- after that, drag the surface with new materials.


There are several ways to update an outdated corner sofa.
Use varnishes and paints. In this way, the restoration will be external - a change in color will affect the overall design of the kitchen and bring a note of freshness if bright and rich colors are used.


Change upholstery material. For example, velor, which has lost its shape during long-term use, can be replaced with a noble chenille fabric. Such material is able to bring comfort to the overall design, and is suitable for design in oriental style(thanks to ornate patterns).


Painting the sofa itself is used to hide damage, eliminate defects and simply refresh the design itself. Paints can both improve the overall space (for example, green color fills the space with calmness), and expand it (in this case, it is necessary to use light and white tones).

The kitchen corner is part of the design of the room that meets modern trends in interior design. This type of furniture is a functional addition to the standard kitchen furniture. It is installed in the corner of the room, serves as a certain number of seats and plays the role extra bed to store household items. The corner is delivered unassembled, which implies its subsequent assembly on site. In the absence of a qualified specialist, you can assemble a kitchen corner with your own hands.
Varieties
Corners for the kitchen can be produced in various variations. The differences between their models from each other are identified by the following features:
- constructive;
- functional;
- dimensional;
- stylistic.
The design of a separate kitchen corner may differ from the designs of other models and depend on the characteristics of the room in which it is installed.


Design parameters determine the ways of connecting component parts to each other, the presence / absence of certain constituent elements, a set of components.
The functionality of the corner is a characteristic that allows you to use it with maximum efficiency. A high level of functionality implies the presence of additional storage compartments, shelves, armrests and other elements. The constituent property of this parameter can be attributed to the wear resistance of the surface of the case and the soft part used for seats. The higher the degree of resistance of such furniture to operational loads, the higher the coefficient of its functionality.

The dimensions of the kitchen corners are determined by the individual parameters of the room. The more free space, the larger the corner can be placed on it. Size criteria are also taken into account when calculating the number of seats sufficient for everyday use.
To observe the best correspondence of the size with the declared needs allows the manufacture of the corner to order.

The style of corner furniture is determined by the design features of the entire room. When choosing a corner, take into account: its shape, the presence / absence of straight or curved lines, the color of the body coating, shades of the soft layer and other characteristics.
A corner made in the High-Tech style will not be combined with the interior, the decoration of which is made on the basis of the basic principles of the Art Nouveau style. A similar combination scheme is valid for all stylistic trends.


assembly tool
To assemble a corner in the kitchen, you need a minimum list of tools:
- screwdrivers (flat, cross-shaped);
- hex furniture key;
- masking tape;
- hammer;
- pliers;
- other related tools.
Screwdrivers are needed for screwing in screws and other screw fasteners.


The design of the angle model may involve the presence of fasteners with different slot configurations.
A hex wrench is required for screwing in euro bolts. These bolts are widely used in the construction of furniture. They have an internal hexagonal slot. In most cases, the required key is supplied with the accessories for the corner. To speed up the assembly process, you can use a screwdriver and a nozzle bit that has a hex profile, the size of which corresponds to the same parameters as a stock hex wrench. The use of a power tool allows you to reduce the degree of effort applied when manually screwing eurobolts.


Masking tape allows you to fasten the component parts together and hold them in position before the various threaded fasteners are twisted.
It protects the surface of the furniture from damage that may result from the contact of the tool with the decorative coating.
A hammer and pliers are used to mount elements made of chipboard. These can be parts of the bottom of the case or the back wall. In most cases, fiberboard is fastened with small nails when assembling furniture. To hammer them, it is better to use a hammer with a light weight, which will help reduce the load on the forearm muscles and tendons. Pliers help in removing spoiled nails and other assembly and disassembly work.

Features of a particular model of a kitchen corner may necessitate the use of additional tools.
Assembly
Before starting the assembly, it is necessary to inspect and unpack the boxes in which the corner is supplied. On one of the side surfaces of each package there must be a designation of its number. Boxes with the same numbers contain parts of the same type.
Inside one of the boxes there should be a diagram that shows the assembly order of the corner. Also, this paper contains a description of the list of structural components. It is necessary to make sure that the parts available correspond to the identical names indicated in the diagram. In the absence of any spare parts, you should contact the furniture supplier or purchase them in a specialized store.

Grouping will help facilitate the assembly process constituent parts corner. Details related to the same part of the structure should be placed together.
Next is the assembly of the main elements. Side walls, front and rear walls can act as them. Compared to other parts, these parts are the most dimensional. Thus, a bunch of parts that make up the main supporting structure is performed.
The parts are connected to each other with euro bolts. When screwing them, be careful and control the tightening force. An overtightened bolt head can damage the exterior decorative finish.
It is important to align the bolt holes in the parts with each other. This is necessary for correct assembly designs.

Displacement of the holes relative to each other can lead to a violation of the symmetry of the product and adversely affect the quality of the assembly in the final stages.
After the main dimensional parts, additional components are mounted. They can be upholstery elements, armrests, shelves, drawers and others.
Technological marks should be affixed to the surface of the parts, which determine the location of certain fasteners. It is important to adhere to the correspondence of bolts and screws to their mounting points. To provide best quality in this regard, it is necessary to periodically check the instructions.
The stroke that completes the assembly is broach all connections to eliminate the occurrence of backlash.
After that, all eurobolt caps are closed with special plastic plugs, the color of which corresponds to the shade of the furniture block coating.


Installation
Due to its oversized dimensions, the corner is assembled right in the kitchen. This will simplify its further installation and preparation for operation.
The kitchen corner should be installed in the corner of the room with the most advantageous location. At the same time, it should not touch the wall covering, which will protect them from wear at the points of contact.
How to assemble a kitchen corner, see below.
If the search for the desired set of furniture for the kitchen did not lead to anything, a great way to get exactly what you need is to make a kitchen corner with your own hands. You can choose the appropriate functionality, style and color of the sofa. This is especially important for those who need a custom-sized kitchen corner.
Small corner sofas for the kitchen have a number of advantages. A set of furniture occupies a small area, but provides a significant number of seats compared to chairs. In addition, kitchen corners can be equipped with voluminous storage spaces. You can purchase or make your own corner sofa for dining area in any style: from classic to high-tech.
Criteria for choosing materials for the manufacture of a kitchenette
When planning to make a kitchen corner with your own hands, you need to decide what materials it will be made of. The most suitable raw material is laminated or sanded chipboard, plywood, wood (solid pine). Chipboard is easy to work with, has the necessary strength (which is important when creating a frame), and is relatively inexpensive.
Choice optimal view upholstery material should depend not so much on the design of the kitchen, but on the proximity of the installation of the sofa to the stove, sink, etc. Ideally, the coating that has dirt and water-repellent properties and can be cleaned is ideal. Synthetic materials and eco-leather have proven themselves well. They are undemanding to maintain, have improved performance, and in case of serious damage, they are easy to replace (they are inexpensive).
Materials for the kitchen corner and working tools
Calculate how many materials you need to make a kitchen corner with your own hands. Carefully consider various ready-made drawings of similar sofas, draw diagrams of your product and separately its structural parts, indicating the dimensions.

For a standard model of a corner sofa, you need to prepare the following materials:
- joiner's shield made of pine (or chipboard) with dimensions of 2100x900x30;
- 1350 mm timber with parameters in the section 40x40 mm;
- 3600 mm timber with parameters in the section 25x25;
- 1200 mm timber with parameters in the section 15x15;
- 1200 mm timber with parameters in the section 30x30;
- 1000 mm boards for the rear pillar of the corner segment 20x350;
- 3000 mm boards 25x150 thick;
- two sheets of plywood for the backrest 10 mm thick - 1200x300 and 900x300;
- plywood sheet for seat covers with dimensions 12x450x2550;
- for the bottom of the inner boxes plywood 5 mm thick;
- 2100 mm slats 20x60;
- foam rubber with a thickness of at least 50 mm;
- upholstery;
- plugs for self-tapping screws or profile strip;
- metal corners;
- confirmations (Euroscrews), dowels, self-tapping screws;
- furniture glue;
- piano loops.

The following tools will be needed for the job:
- electric cutter;
- screwdriver;
- drill with drills;
- electric jigsaw;
- milling cutter;
- cutter for cutting foam rubber;
- roulette;
- level, pencil, ruler;
- sandpaper;
- scissors, stapler for fabric, centimeter.
Operating procedure
If you follow the instructions and rely on the correct individual drawings, there will be no problems. The design of the kitchen corner is not very difficult: a corner segment and two sofas. Each consists of two sidewalls, to which backs and seats are attached. Most of the load during use falls on the sidewalls. That is why they should be made whole from a carpentry board with a thickness of at least 30 mm.

Assembly of side sofas
- We cut out the blanks of the side parts of the product with parameters 450x370 mm. Sofa sidewalls will be installed on bars 40x40x450 mm, which are supporting. To reinforce the structure, almost at the level of the foam rubber that covers the seat, an additional bar of exactly the same size is attached. We make all connections with screws, additionally using carpentry glue.
- We make storage boxes, they will be located under the cover of two seats. It should be noted that these structures will further enhance the rigidity of the sofa joints. For the box, we use two boards with parameters 150x25x1200 mm and two 150x25x300 for the sides, the bottom is made of plywood. From the side of the facade of the soft corner, the parts are mounted on self-tapping screws 60-70 mm. We close the holes with a profile strip or plugs.
- We work with the back. We connect the sidewalls by installing horizontally 2 bars 25x70x1200 and one on top 25x60x1200 mm. We fix with screws to 4 racks located vertically. They should be made of timber in dimensions of 25x70x260 mm. After the back frame is prepared, we attach a plywood sheet to it, which we will then cover with foam rubber.
- We form the seat. We make the base from 2 longitudinal (40x70x1200 mm) and 4 transverse (40x70x160 mm) slats. To attach the longitudinal bars, we screw self-tapping screws into their ends through the side parts. We attach the transverse strips with the help of spikes. We fasten a pre-prepared plywood sheet on top of the frame with screws. Now you can attach the rear longitudinal bar with the seat cover to the piano hinges. It is necessary to make it so that the edge of the cover protrudes beyond the sidewall by approximately 20-30 mm. At the end of the assembly of a larger sofa, attach the backrest racks to the furniture to the same bar. metal corners.
- We assemble the smaller sofa in the same sequence. The difference is only in the length of the longitudinal bars - 900 mm. If there is no box under the cover of this part of the soft corner, then the seat (450x450 mm) should be attached to the beam (30x30x400 mm) using self-tapping screws.
Connecting part manufacturing
For the manufacture of the rear pillar of the backrest of the corner part, we use an edged board 30x350x1000 mm. Choosing the side edges at an angle of 45 degrees, we give it a conical shape. We fix with euro screws from the back. In the form of frames, we attach additional backs (on both sides), which we then sheathe with plywood and fasten each with self-tapping screws to the side parts of the sofa.

The end sides of the frame backs must match the ends of the rear pillar. And the angle of inclination of the back of the corner should be equal angles sofa backs.
Back and seat upholstery
To start upholstery with foam and decorative material, the corner must first be fully assembled - check the accuracy and correctness of the connections. Then disassemble the corner piece.
The blanks are cut out separately for each part, fastened with glue, covered with a cloth. We collect the corner of the finished holes.
We cover the details of the sofa with foam rubber, which should become soft. Do not forget about small allowances (20 mm each) to cover the outer ends. We fasten the edges of the foam rubber with a stapler so that the distance between the brackets is no more than 20 mm. When cutting the fabric, we apply markings on it after we measure each detail. To hem and fasten on the back of the parts, you need to leave fabric allowances. After stretching and leveling the upholstery, we fasten the fabric with a stapler.
We decorate open wooden parts with stain, varnish or paint. Leave to dry. Such step by step recommendations help you make a quality piece of kitchen furniture that will serve you for many years.
The design of the dining area should be not only practical, functional, but also as comfortable as possible. It is here that the whole family gathers together, eats, communicates. Many people prefer to make a kitchen corner with their own hands, then it fully corresponds to the parameters of the room. Products are versatile, convenient, do not take up much space. Standard designs consist of a pair of small sofas and a connecting element between them.
Before you figure out how to make a kitchen corner with your own hands, you need to clarify the main nuances of assembling furniture:
- The accuracy of the work directly affects the functionality of the products, and the final result depends on many factors.
- At the stage of designing a kitchen corner, individual tastes and preferences of people are taken into account.
- If used for manufacturing ready-made schemes, then you will have to work with the specified materials. Otherwise, backlashes and gaps will appear in the design. It will require strict adherence to the assembly order, as well as the selection of high-quality fittings.
- If there is no experience in creating furniture, you should give preference to the simplest straight-line models of kitchen corners with laconic decor.
- When selecting suitable drawings for a kitchen corner, you must be guided by the available tools. Yes, manufacturing wooden model can't do without grinder, electric jigsaw.
For the implementation of high-quality assembly, you should think in advance appearance kitchen corner, determine the place where it will be located. This information will help you choose the most suitable materials and accessories.
The secret of the popularity of the kitchen corner lies in its aesthetic self-sufficiency. Corner sofa with a table form a separate comfortable area.


Material selection
A self-made kitchen corner should be practical, convenient and attractive. In many ways, these properties depend on the selected material. In the old days, furniture was made exclusively from wood, today there are other options.
frame
First of all, a kitchen corner frame is made - a supporting structure on which all other elements are fixed. The configuration, strength, capacity of the product depends on it. Suitable for creating kitchen corners with your own hands natural wood and chipboard. You should first evaluate the features of each material, the nuances of working with them:
- Chipboard is the cheapest and most affordable option. The advantages are that it has environmental safety, reliability. Difficulties in working with particle boards arise at the cutting stage. In production, the procedure is carried out using special machines. At home, work is often done with a jigsaw, which can lead to the formation of uneven edges and chips. Moisture gets into the damage, as a result, the sheets swell and deform. To prevent trouble, you will need special edges that are fixed on the cuts.
- The wooden corner is characterized by durability, strength, resistance to wear, environmental friendliness - these are pluses. When working with the material, it is necessary to follow the drawings exactly; before assembly, treat the panels with special compounds that prevent decay.
For independent production of furniture, such species as linden, Christmas tree, birch, pine are best suited. They are the softest, easier to process and assemble. If conifers are used, it is important to take into account one more nuance - they must be thoroughly dried so that the resin does not stand out.
Natural wood is one of the most expensive materials, so it is better for beginners to train on simpler and cheaper raw materials. Chipboard will do.
 Chipboard
 natural wood
Upholstery
A soft corner for the kitchen is not only functional, but also decorative element environment. To create upholstery, you can use various fabrics, the color and design of which should be combined with the interior:
- Tapestry. Dense textile, resistant to wear and mechanical damage. Differs in a wide variety of colors, serves for a long time, looks presentable.
- Velours. Pretty durable material with a short pile. It looks beautiful, but over time it can rub off and lose its attractiveness, it requires special care.
- Flock. Often used in the manufacture of kitchen corners with their own hands. Reliable beautiful fabric endures mechanical stress, has a waterproof impregnation, thanks to which dirt is easily cleaned.
- Jacquard. Luxurious material, pleasant to the touch, but has significant drawbacks. It wears out quickly and loses its original appearance, stains are difficult to remove from the surface.
The most popular type of upholstery for kitchen models is high-quality leatherette. In terms of structure, properties and appearance, this material practically does not differ from natural, but the cost is several times lower. It also has some disadvantages: lack of breathability, susceptibility to mechanical stress. For covering furniture, it is better to choose thick canvases, thin ones can quickly become cracked and torn.
 Tapestry
 Velours
 Flock
Flock
 Jacquard
 Leatherette
Measurements and drawing up a drawing
First of all, the length of the walls of the kitchen is measured, as well as the corners of the room. The dimensions of all sofas are determined. The default settings look like this:
- Seat height - 40-50 cm.
- Depth - about 50-70 cm, so that it is comfortable to sit at the table, and the legs do not rest on it.
- The height of the entire structure, together with the backrest, can reach 95 cm, but this is not the limit.
The easiest way is to use ready-made drawings and diagrams, especially for people who are faced with making furniture for the first time. You just need to choose a plan that matches the desired size. If you adapt the model you like to individual parameters, it is easy to make a mistake, and you will have to spend a lot of time on alteration. The scheme should reflect all the design features: the presence of a bed, drawers and the nuances of their opening, the structure and location of the folding mechanism. It is important to be able to clearly assess the correctness of the drawings, not to take the first example found on the net.
 Take measurements of the length of the walls and corners of the kitchen
 Standard parameters of the kitchen corner
Corner manufacturing algorithm
Traditional kitchen corners with dimensions of 110 x 160 cm are optimal for accommodating three people. Products are convenient for a full-fledged meal by people without crowding and touching each other with elbows. Creating furniture according to individual parameters has the advantage of matching the dimensions of the room. Upholstery is selected based on your own taste preferences and the overall style of the interior. The product can be supplemented with the functionality that is needed: folding sofa for sleeping, storage space, or both.
Chipboard with drawers
To make a do-it-yourself kitchen corner from chipboard, complemented by drawers, you need to follow several steps:
- preparation;
- measurements of parameters;
- drawing up a detailed drawing;
- purchase of accessories and fasteners, upholstery;
- sawing wood chip sheets in a furniture shop.
Design starts with a choice optimal location where the sofa will be located. It is on the basis of its area that the appropriate configuration and dimensions of the future product are selected. It is necessary to act according to the instructions:
- All elements are cut according to the template, polished.
- The edges are taped.
- The assembly is carried out with the help of dowels and confirmations. First, the short and long parts of the sofa are connected, then the seat with the back, which are attached to the sidewall, then the boxes are made.
- The connections responsible for the rigidity of the product are fixed with metal screws.
- The final step will be the upholstery of the furniture. The filler is cut from polyurethane plates. The size is needed larger than the elements for which it is intended. The filler is attached to the seat and back with glue.
To make the corner correctly, it is necessary to take into account the size of the kitchen, placement household appliances and furniture. At the narrowest point, the width of the passage must be at least 60 cm. The parameters indicated in the diagram may vary depending on the optimal dimensions of the model.
The default values remain unchanged:
- seat height - 45 cm;
- depth - 50 cm;
- the length of the large and small sofas is 120 and 200 cm.
The height along the upper edge of the backrest should not exceed 95 cm. The do-it-yourself kitchen corner is made from polished laminated chipboard with a thickness of 16 mm. To process the cuts, you will need an ABS edge.
 Cut out all elements. sand, glue the edges with tape
 Collect the first part with the help of dowels and confirmations
 Craft boxes
 Attach second part
 Glue the filler on the walls of the seats, attach the seats
 Fix the backs
simple wood
To make a simple set of wood, you must first draw a plan, carefully measure all the parameters. You can buy ready-made furniture boards according to the received sizes. In total, 3 types of elements are required: 6 identical sidewalls, 3 upper and lower boards. The model is created according to the instructions:
- All parts are cut across.
- The bottom board is located between the side boards, the top board rests on them, like a lid. This feature should be taken into account when calculating the width of the material.
- The surface of the elements is carefully polished.
- Holes are drilled into which dowels are inserted.
- The kitchen corner made of wood is painted in a color that will be in harmony with the decor.
When making furniture, we must not forget about the importance of the location of the dowels. It is necessary that they coincide with the holes in the mating parts.
The product is painted twice to increase resistance to wear. After drying, the boxes are installed in the right place, optionally fastened to each other. A soft seat is placed on top, which you can purchase or sew yourself.
 Corner diagram
 cut details
 Assemble sofa frame
 Lacquer
 Install bottom boards
 Cut the foam to the size of the top board
 Glue filler
 Upholstered seats with fabric
 Install drawers, attach seats
With sleeper
Before assembling a kitchen corner, it is necessary to take measurements. The parameters of the proposed product are 1.5 x 2 m. For work you will need:
- timber 30 x 5 cm, as well as 50 x 50 cm;
- foam rubber 60 mm;
- plywood 15 and 4 mm.
Actions are carried out according to the scheme:
- The material is carefully polished, cut into elements according to the sample.
- You can assemble using self-tapping screws or a spike.
- To create a bed, you will need to purchase and install a retractable mechanism.
- Armrests, frame are produced.
- The upholstery is created from materials that you like more: leatherette, furniture suede, textiles. It will take at least 7 running meters.
The kitchen corner with a berth should be soft enough. For this, fillers in the form of synthetic winterizer or foam rubber are used. When unfolded, a full-fledged resting surface is obtained with a size of 1.9 x 0.9 m. The parameters, together with the armrests, are 155 x 210 cm.
The process of creating and assembling kitchen corners is a difficult but exciting job. Beginning craftsmen should use ready-made drawings, experienced ones will be able to make them themselves or change the parameters at their own discretion. Self-manufacturing allows you to create unique products that fit perfectly into the space, in harmony with the interior.
 Sand the material, cut into elements according to the pattern
 Assemble the frame
Video
To make a kitchen corner with your own hands, you do not have to be a professional. Anyone can do the job, armed with patience and the necessary tools.
Similar articles:
Deciding on design and construction
Before self-manufacturing corner you need to decide on its size. This will help with maximum efficiency use the space. U-shaped set is appropriate in a spacious room. A corner of individual modules is recommended to be installed in studio apartments. In a cramped kitchen, it is better to install only the L-shaped design.
Before you make a kitchen corner with your own hands, you need to purchase materials for the frame and sheathing, given that the set will be intensively used. Its appearance should not be discordant with the design of the room. The upholstery is selected from materials that are easily cleaned of dirt.
When developing a furniture design, it is advisable to make a sketch that will help you imagine how it will look surrounded by other interior items. It is better for an inexperienced craftsman to make kitchen corners according to ready-made drawings.
modular corners
Furniture of this kind is of interest to those who like to experiment with its location in the room. Headset items do not fasten to each other. More often, a modular corner consists of 2-3 sofas. Sometimes they are supplemented with corner seats, which are a chair with 3 legs or on a 3-coal base.
The modular set belongs to the category of direct kitchen corners, the main disadvantage of which is the discomfort experienced by a person sitting in the corner.
With sleeper
You can build corners in the kitchen that will sometimes be used as beds. The classic design of the headset is complemented by a couch. During the day it serves as a seat. If necessary, it is moved to the rest of the elements. It is important not to make a mistake with the size of the couch. Its height should be the same as that of the sofas. It is better to put it on furniture wheels, the size of which must be taken into account when developing a drawing. A kitchen corner with a berth can be modular.
With storage boxes
The best option kitchen set there will be a corner with sofas equipped with storage boxes. They should be spacious and easy to open. It should be borne in mind that the drawers may not allow people sitting on the sofa to sit comfortably. Boxes standing on the floor should not interfere with the legs, therefore it is recommended to make their front walls beveled or recessed.
Often, when making a kitchen corner with their own hands, craftsmen place drawers not only under the seats, but also behind the backs of the sofas. In this case, the space occupied by the headset increases. Sometimes, instead of storage boxes, the frame is equipped drawers. The assembly of furniture of this kind, in comparison with the installation of sofas with seat covers, is more complicated.
For a small kitchen
When making a corner for a kitchen with your own hands, designed for use in a limited space, you have to think about saving space. The dimensions of the room allow you to build a right corner with small sofas.
Furniture is made in such a way that things, utensils, etc. can be stored in it. The design is limited in width and length so that it does not clutter up the room. It is complemented by light chairs or stools. For a small kitchen, you can make a modular set.
Necessary materials and tools
To work on the manufacture of a wooden kitchen corner, you will need the following tools:
- circular saw, hacksaw or jigsaw;
- drill;
- screwdriver;
- square;
- roulette;
- pencil and chalk;
- mallet;
- stapler;
- surface grinding tools;
- scissors;
- construction knife.
Fasteners will serve:
- self-tapping screws;
- confirmations;
- furniture bolts with washers and nuts;
- dowels.
You need to purchase materials such as:
- 80 mm thick foam for seats;
- thin polyurethane foam for finishing the backs of sofas;
- leatherette, jacquard fabric, etc. for upholstery;
- masking fabric;
- piano or furniture hinges;
- plywood or chipboard;
- bars 40x40 mm;
- staples;
- ABS or PVC edging for finishing ends;
- steel corners with holes.
For a kitchen corner made of solid pine, you need to buy boards 100x40 mm, plywood. Wood is planed with an electric or manual planer. The final polishing is done with sandpaper or a belt machine. Only smooth, dried wood without signs of decay and cracks is suitable for work.
Drawings and diagrams
A detailed drawing of the kitchen corner will help to avoid waste of materials and design errors. Except general scheme products, the drawing must indicate exact dimensions structural elements, hole diameters and fastener cross-section. It is recommended that the novice master not deviate from the implementation of those proposed in the drawing specifications. It should be borne in mind that the replacement of materials will affect the performance of the headset.
Based on the drawings for the manufacture of a kitchen corner, an experienced carpenter can make changes to its design, but you should not experiment with the height of the furniture. You can equip the sofas with additional storage spaces or adjust the length of the seats. With an increase in the size of the headset, it is necessary to strengthen the details of the frame. Reducing the length does not affect the strength of the design of kitchen corners.
Assembly
exact following step by step instructions assembling furniture will help the novice master to complete the work without unnecessary material and time costs. The process is divided into several stages, including:
- frame construction;
- cutting and tailoring of covers;
- upholstery of backs and seats;
- headset assembly.
Before you make a corner in the kitchen with your own hands, you need to free the room from furniture and foreign objects.
Installation and fastening of the frame
The frame of the kitchen set can be built from oriented strand board, chipboard or plywood. When assembled, wood panels are a spacious and sturdy box. For the manufacture of the frame, it is necessary to choose laminated chipboard. The ends of the elements prepared for assembly must be sealed with edge tape. This will protect the chipboard from moisture, and the room from the release of harmful fumes from the chipboard.
Often only the sidewalls of the frame are made of wood panels. These parts of the structure are interconnected by bars. For reliable tightening of sheets with each other and the crossbars, through connections should be used. Steel corners are best used in the manufacture of a headset from boards. In these cases, its elements are assembled with bolts.
Before screwing fasteners into OSB, chipboard and plywood, it is necessary to drill holes that are slightly smaller than the section of confirmats or self-tapping screws. Dowels will give additional strength to the structure. The connection of parts is best done after processing the holes, fasteners, spikes and contact surfaces with glue.
Installation of facades and seat base
The bars between the sides of the kitchen corner can be sheathed with plywood or fiberboard. Sheets of facades are attached to the frame with self-tapping screws. For the base of the seat, plywood with a thickness of at least 10 mm and 16 mm chipboard is suitable. The lid is connected to the body with piano or furniture hinges. The fixed seat can be fixed with confirmations and self-tapping screws.
Back and seat upholstery
Upholstery of headset elements is sometimes more expedient to perform before they are assembled. The inner walls of the boxes are often covered with a thin fabric and the backs of the seats and backs are covered. The masking material is nailed with furniture nails or staples after upholstery.
Filler for a soft kitchen corner
Those who make a soft corner for the kitchen with their own hands use foam rubber as a filler. A 20 mm thick sheet can be placed on the back. It is better to close the base for the seat with foam rubber with a thickness of 40 to 80 mm. Durability and elasticity are distinguished by polyurethane foam with a density of at least 30 kg / m³. Softer foam rubber will crumble after a short time.
The filler is fixed on the base with glue, which is applied to the contact surface of the wooden plate in a zigzag or checkerboard pattern. At the edges of the base, polyurethane foam can be fixed with a stapler.
Sometimes the seats and backs of the corner are original mattresses and pillows. The cases can be filled with crushed foam rubber, siliconized fiber, etc.
What fabric to choose
The most common upholstery fabric for a kitchenette is leatherette. Contaminants are easily removed from it. The material imitating expensive leather is cheap, wear-resistant and does not fade for a long time. For upholstery, you can choose microfiber. It is not inferior in its main characteristics to leatherette, but, unlike it, "breathes". The disadvantage of microfiber is a short service life.
Those who choose flock should be aware that inexpensive material is not practical, since its pile accumulates dust well. Beautiful, durable jacquard upholstery will cost a lot. Teflon fabric is not cheap either, although it surpasses other types of upholstery in its properties.
Least of all, natural fabric is suitable for finishing sofas: it gets dirty faster. It's harder to clean. The material wears out quickly.
Cutting fabrics and assembling
Before you make the upholstery of the corner with your own hands, you need to accurately determine the dimensions of the seats. When cutting the fabric, you need to take into account the thickness of not only the base, but also the lining. When designing a sweep, 1.5-2 cm must be added to the dimensions of the material. The side parts of the upholstery are sewn together. You can make a coating by combining fragments of materials of different colors and composition.
upholstery material
On the upholstery fabric lying on a flat surface (face down), a seat or back plate is placed. The material is stretched and attached to the base at 2 points, in the center of the long sides. Then, avoiding distortions, it is fixed with brackets or furniture nails in increments of no more than 3 cm.
Corner
most challenging task it may seem like making a corner of a kitchen set with an arched back.
What do you do with old furniture?