Do-it-yourself incubator at home from all sorts of things. The ideal maternity hospital for chickens, or how to make a do-it-yourself incubator at home What you need for a homemade incubator
It happens that a person loves animals and wants to start breeding them - to become a breeder of any birds, for example. Beginning entrepreneurs do not always have the funds to purchase expensive equipment, namely an egg incubator. Many of them resort to a less expensive option: making the device on their own, it is not difficult and many can do it. There are several manufacturers offering ready-made home incubator kits. Professionals talk about 90% brood quality with the most standard incubator.
Homemade design has big amount advantages:
- Minimum money spent.
- Simplicity and durability, even an inexperienced beginner can create an output device.
- How many places for eggs to do is up to the breeder to decide, you can even deviate from the standard.
- It is easy to do it yourself with the help of improvised means that everyone has at home, for example, plywood or a cardboard box.
- The ability to automate the process of turning eggs yourself.
A few generations ago, in the villages, people used buckets or large basins for lack of other means. Nowadays there are more humane and effective ways. And this article will talk about these methods in more detail.
What are the options for creating at home
There are many options for what to base on:
- Cardboard box.
- Fridge.
- Freezer.
- Styrofoam container.

It rarely happens that a breeder has a mother hen at home, hatching eggs. This forced us to invent and design incubators from the most different materials and in different parts of the house. And the next option is an old refrigerator.
Fridge
If you or someone you know has an old unnecessary refrigerator or freezer, then do not rush to throw it away and put an end to it! These devices can be an excellent basis for creating a mini incubator. In addition, the frame is already there and does not require modifications. The body is very durable and easy to clean.
At the very beginning, it is worth removing the freezer compartment and compressor from the refrigerator to make room for several light bulbs with a power of 100-220 watts. Light bulbs will become a kind of battery and heating. But be sure to remember that they should be located at a distance of 20 centimeters to the eggs. Small holes can be cut in the door to keep an eye on young offspring. To increase the evaporation of water, it is worth placing bowls with liquid on top. Place a thermometer next to the egg container.

The next step, we put compartments for the eggs themselves, and how roomy it will be, everyone decides for himself. All trays are fixed on an axis made of any metal exactly in the middle, a bar is placed along the edges, which should extend beyond the body. At the very bottom, you need to install a device that maintains air flow - a fan.

Different varieties need to be kept at a certain temperature. Below is a table for the most common types.
| Egg variety | Day | temperature | day | Temperature |
| duck | 1-12 | 37.7 | 13-24 | 37.4 |
| Chicken | 1-2 | 39 | 3-18 | 38.5 |
| indoutine | 1-30 | 37.5 | ||
| Goose | 1-28 | 37.5 | ||
| Turkey | 1-25 | 37.5 | 25-28 | 37.2 |
| Quail | 1-17 | 37.5 |
Manufacturing option using the box as the basis
If there was neither a refrigerator nor a freezer at hand, you can even use an ordinary box, it should be sheathed from the inside with a material that retains heat inside. The dimensions of the box must be at least 50*50*50. You can also install windows here to watch the process.

And several 25-watt lamps at a distance of sixteen centimeters can serve as a small battery to maintain the desired temperature. For favorable conditions, you should put a bowl of water to humidify the air.
Trays can be made from any material, for example:
- Tree.
- Aluminum.
- Plastic.
Important! You need to install such an incubator not on the floor, but on wooden bars, at a height of 15-20 cm from the floor in a place in your house where there are no drafts.
Expanded polystyrene is very popular with manufacturers because it has a low cost, does not release heat to the outside, and also weighs relatively little.

To make the desired device, you need to find or purchase all the items:
- 2 sheets of five centimeter thick foam;
- strong tape;
- stable paste;
- several 25 watt light bulbs;
- cartridges suitable for lamps;
- any compact cooling system;
- thermostat;
- several trays.
Once all the components are ready, it is worth referring to the instructions for further actions. First, you need to divide one of the sheets into four equal pieces, which will serve as support for the side walls. The remaining sheet must be cut into two equal parts, then one of them in half. respectively. The larger part will become the bottommost part, the smaller upper part, which will allow the space to be hermetically sealed.

At the lid, we remove the part for the window that serves as ventilation. The four parts of the first sheet are glued together, after the glue has hardened, the bottom is already attached. The structures must be allowed to dry thoroughly, then glued tightly with adhesive tape, further strengthening the frame. Here you will need a stand made of books for better circulation and the same heating of trays and eggs in all parts. Instead of books, you can use the same foam plastic 4 centimeters wide, 8 cm long. It is advisable to fix them on double-sided tape under the bottom. It is worth taking care of high-quality ventilation by cutting a couple of holes in the side walls.
For a snug fit of the lid to the incubator, it is worth adding small two by two cm bars of the same material to its edges. The next step is to install the lamp sockets by placing them on the grid. The thermostat is an important part of creating a high-quality device, it is installed on the outside, its sensor is placed inside the box. The hole is best drilled with an awl. It is definitely worth checking how far the trays are from the walls, the distance should not be less than 5 cm. The whole structure and all the work can go down the drain if the distance is less. When installing the ventilation system, follow the direction of the air flow, which should come from incandescent lamps, and not from eggs that are subject to drying.
- For chickens, the temperature of our environment is different from the temperature in the egg, so they are very sensitive to this at first. After they appear, you need to place the chickens in boxes with newspaper and paper on the bottom. In no case do not use a cloth, because the chicks can easily get confused and block their access to oxygen. Over time, they will get used to it, and newspapers will be useless.
- At the very beginning of life, cubs can only be fed with boiled eggs and only in the correct proportion: ½ eggs per 1 chick. After a couple of days, millet can be included in the diet.
Important! Since the foam is very poorly cut with a knife, creating a large amount of debris and crumbs around, it is better to use a soldering iron to work with it.
Conclusion
After all the information studied, it becomes clear that there is nothing complicated. You just need to follow the instructions and not refuse the advice of professionals and experts in their field.
/ 02 Mar 2019 at 06:52
Good afternoon, experienced and novice poultry farmers. How to make a homemade incubator with your own hands at home? You can use any trash! And don't waste money you don't have yet. If you get involved in the process of incubating eggs, then buy a high-quality and “smart device”. Automatic, yes with humidity and temperature control.
A home incubator will allow you to lay as many eggs as you see fit. And hatch the chickens at any time convenient for you: at the end of winter and in early spring. If you keep crosses or pedigree layers with a lost maternal instinct? Then it's time to learn how to make an incubator with your own hands at home. The costs will be minimal.
You will not find detailed instructions and drawings here. I will show you just a photo of an idea from which you can make a homemade incubator with your own hands. From all sorts of things!
Somehow I came across a photo on the Internet ... It is a pity that I could not find it. They made an incubator with their own hands from a box with sand at the bottom! Can you imagine? And in the photo, a hatched chick. If I find it, I'll add it to the collection.
Incubation rules chicken eggs:
- Temperature: 38ºС for the first couple of days, then 37.6-37.8ºС, the last three days - 37.3-37.5ºС;
- Humidity: 60-70% during incubation, humidify to 75-85% for the last couple of days.
In all the cases described below, heating is carried out by conventional light bulbs, not energy-saving.
In the meantime, look at the photo and short description. These are homemade incubators from all over the world, whoever is in what much!
Wooden box incubator
To create this "incubation chest" you need to find a wooden box.
Styrofoam home incubator
Styrofoam from packaging, such as from a refrigerator or washing machine.

Home incubator from the box
Assemble from OSB, chipboard, old furniture, the nightstand will do. In the photo from drawers from the desk.

Do-it-yourself incubator from a broccoli box

Do-it-yourself incubator at home from foam
From a ready-made foam cooler bag. Cut out a window on the lid to make it convenient to observe.


Incubator from the closet of your beloved mother-in-law
Everything is clear and understandable here. Thank you dear mother-in-law! Huge space, correct viewing windows. Powerful ventilation and obviously great appearance. In addition, such a cabinet can hold more than 200 eggs if you are in the mood to fill your entire family with chickens!

Small do-it-yourself incubator
For 5 eggs? But also an idea worth trying.

cardboard box incubator
Here's the highlight: we put a small box in a large box. We warm the space with rags, synthetic winterizer. A lid is a must! Zero investment.

Large do-it-yourself incubator
A real carpenter can build this! We see that this poultry farmer has grandiose plans.

Plywood Incubator and Styrofoam Box
Eggs lie on the grill grate from the microwave. It's real for a family hobby, keep the kids entertained!


DIY incubator with automatic rotation
In this case, you will have to buy "offal" from a Chinese incubator on Aliexpress. Of course, it’s so convenient, but isn’t it better to buy the entire incubator at once?


solar powered incubator
What they can't think of! Funds were found for solar panels. But there was not enough money for a normal box. Suitable for homebody physicists.


Incubator from an old cooler


small fridge incubator
Such refrigerators for cooling drinks were in the hotels of the USSR. You can also fit a small freezer.

Do-it-yourself incubator for 300 eggs
If you need a large brood of chickens at hand in all seasons! Wooden structure cabinet will fit up to 300 eggs. It has an automatic time counter, temperature control. Fan to circulate the air and tilt the shelves automatically.
The glass door allows you to see the whole process and control the degrees and humidity with an internal thermometer. Great for placement in an unheated garage or shed.

Do-it-yourself incubator with all the gadgets
For such a spacious box, 2 bulbs of 15 watts are enough. Suitable for fans of their business.


Do-it-yourself incubator at home with drawings.
You can make a homemade incubator with your own hands, even from an ordinary cardboard box, and there is nothing complicated about it.
In this article, we will look at some of the most simple options homemade incubators with drawings, photos and videos, which details how to make an incubator.
When the temperature rises above the set value, the relay is activated and turns off the heating elements. When the temperature drops below the set value, the relay turns them on again. It is quite difficult to make a thermostat on your own, it is easier to buy it in a hardware store.
Egg trays.
To place the eggs, trays are used in the incubator, since the incubation process requires periodically (2-3 times a day) to turn the eggs, then this has to be done manually, or using an automatic rotary mechanism.
Air circulation.
Air temperature around heating elements will be slightly higher than in the far corners of the incubator chamber, in order to ensure uniform heating of the eggs, you need to install a small low-power fan that will circulate warm air inside the incubator.
humidity in the incubator.
The incubation process requires maintaining humidity in the incubator chamber; for this, it is enough to place water containers on the bottom of the incubator.
This is the simplest version of a homemade incubator, any thick cardboard box will do, for example, from household appliances. The walls of the box must be insulated with any available heat-insulating material.
For convenient control, behind the incubation process, a small Plexiglas window can be made in the wall of the case.
For heating, you can use 2 - 3 electric lamps of 25 W each, the lamps must be connected to a 220 V network through a thermostat.
Egg trays can be made from welded metal mesh, plastic, wooden slats; to install trays on the walls of the case, you need to install side rails. To evenly distribute warm air in the incubator, it is advisable to install a small low-power fan, you can adapt a 12 V cooler from a computer power supply.
To maintain humidity in the incubator, it is necessary to put a small wide container of water at the bottom of the box.
How to make an incubator from an old refrigerator.
An old refrigerator can also be converted into an incubator, the refrigerator body is ideal for this, it already has thermal insulation and a convenient sealed door. It remains only to remove the freezer, and install heating lamps with a thermostat, a fan, a container of water, a control thermometer and egg trays from above and below.
In order not to turn the eggs manually, you can make an egg turner.
The operation of the incubator needs to be tested; it must accurately maintain the set temperature on the thermostat, after which eggs can be laid and incubated.
For the successful incubation of eggs, it is very important to constantly maintain the desired temperature, if the lights suddenly turn off at home, you need to put a pot with hot water, and cover the body of the incubator with a blanket. This will allow you to maintain an acceptable temperature for some time until the houses turn on the lights.
Drawings and description of manufacturing in the article.
How to make an incubator with your own hands from the refrigerator video.
How to make a quail incubator.
For incubation quail eggs you can use the same incubator as for chicken eggs, it has the same design and works on the same principle.
Quail eggs are much smaller than chicken eggs, and they require less space in an incubator, so you can make an incubator for small quails, the scheme and principle of its operation are the same.
How to make a quail incubator video.
Collapse
Guided by the instructions in this article, you can make an incubator with your own hands. It will have the same functionality as a store-bought device, but will cost you much less. In order to assemble an incubator with your own hands at home, you do not need to have special skills and knowledge, follow our advice and everything will work out.
Where to start, what tools do you need?
Before you start assembling, decide on the main material of which the product will consist. If you have an old refrigerator, then you can take it as a basis. Also suitable are large pieces of foam, no less than 40 by 25 centimeters, or a simple cardboard box. The determining factor in the choice of material is its thermal insulation ability.
For heating, you will need to equip the device with a lamp or a heating device, take care of temperature control. In incubators, you can configure auto-rotation by adding additional mechanisms.
Automatic turning of eggs in the incubator is needed to save time. It is usually installed on large devices designed for 200 or more eggs.
All you need to assemble:
- Refrigerator (if you are planning to build an incubator from an old refrigerator), box or foam.
- Standard incandescent lamps with a power of 25 to 40 watts. The number of lamps depends on the size of the incubator, a small device for 100 eggs can be heated with four lamps.
- As an alternative to lamps, you can use electric heaters.
- An incubator tray made of metal mesh or similar. The mesh should hold the eggs tightly. Wooden trays can be installed in the refrigerator.
- Thermometer, fan.
- Temperature controller (if you are designing an automatic incubator). For this you can use bimetal plates, electric contactors or barometric sensors.
- Motor reducer (what the coup mechanism consists of). If necessary, bearings - 4 pieces, clamps for their tie.
- Sealant for sealing gaps for insulation purposes, screws, various fastening materials, metal corners.
- A hygrometer is used to monitor the humidity level.
Attention! Heating lamps must be installed at a distance of more than 25 centimeters from the eggs.
Decide on the size of the incubator, decide what you will collect it from. Then pick up all the necessary components from the list above, and you can start assembling.
How to decide on the size?
The dimensions of the incubator must be planned in advance. This parameter depends on the volume of your production, the number of chickens. The decisive factor in this matter will be the number of eggs that you plan to lay in the device. Also, the size of the incubator is affected by the type of heating system, the location of the lamps and the material from which the device is made.
For more accurate work, you will need drawings with dimensions that will look something like this:
Fig1. Drawing example
Here is a drawing of a small size incubator (for 45 eggs) 25 cm wide and 40 cm long.
Model dimensions for 100 eggs
When forming the dimensions of the incubator, keep in mind that the temperature 2 cm from the egg should be in the range of 37.3-38.6 degrees Celsius. Usually they make a medium-sized device, designed for 100 eggs. The cells make about 45 millimeters in diameter and 60-80 millimeters deep. It is recommended to make a replaceable grille so that you can adjust the dimensions under different types eggs.
By assembling a home incubator with your own hands for 100 eggs, you will receive a device measuring 60 by 60 centimeters. The device weighs about 3 kilograms. It can be converted and used to house duck, goose, turkey or quail eggs.
If you are building an incubator at home from an old refrigerator, it will take up more space and hold more eggs than a Styrofoam or cardboard product.
How to calculate the size?
The dimensions for the incubator with your own hands can be determined using the table below. The table shows the dependence of the length, width and height on the number of eggs to accommodate.
When making an incubator for chicken eggs with your own hands, you should take into account that with the same capacity, the foam construction will be more voluminous than cardboard.
Larger models are usually made in several floors, using other technologies. Therefore, the calculations there are made differently.
How to make an incubator from a refrigerator with automatic egg flipping?
The device of the incubator has many similarities with the device of the refrigerator. Therefore, you can easily make an egg incubator out of the refrigerator. The case of this device retains heat well. It can accommodate more eggs, each incubator tray will lie on a separate rack.
In the role of racks will be the shelves of the refrigerator. Inside there will be optimal humidity thanks to the fluid exchange system located at the bottom household appliance. In this chapter, you will learn how to make your own incubator from the refrigerator by adding a thermostat, heater and rotary mechanism.

Fig 2. Scheme of a homemade incubator from the refrigerator
Consumables and their price
Knowing how to make a homemade incubator, you will save 70% of the store cost of the device. The simplest incubator from the refrigerator can be assembled without investment. But if you want to make it convenient and efficient, you will have to buy a few additional items.
- An old refrigerator - usually purchased for free, you can buy it on an ad for no more than 1,000 rubles.
- Light bulbs for 220 volts - from 25 rubles apiece.
- Thermostat - from 300 rubles.
- Fan - from 200 rubles.
- Chain with sprocket or metal rod.
- Drive for turning eggs - from 500 to 5,000 rubles. You can get it for free. any gear motor is suitable, for example, from a car windshield wiper.
Basic camera requirements
A homemade incubator from the refrigerator must meet minimum requirements that will make it possible to hatch chickens. It takes about twenty days to hatch the cubs. During this period, incubators maintain humidity at 40-60 percent. As soon as the chicks begin to show up, the humidity is raised to 80 percent. At the final stage, before the chicks are selected, the humidity is returned to the original level.
Eggs require temperature control. Therefore, your device must be manufactured with this fact in mind. Temperature requirements vary depending on which eggs you place in the incubator tray. Select the mode according to the table below.
Temperature table
Ventilation system
Making an incubator from a refrigerator involves installing ventilation system. Ventilation affects the temperature and humidity inside the device. Prevents the formation of an unfavorable climate for eggs. The average ventilation speed should be about 5 m/s.
A do-it-yourself home incubator from the refrigerator should be equipped with two ventilation holes that are drilled in the case. One of them is located below, and the other above. Plastic or metal tubes are inserted into the holes in order to air masses did not interact with the glass wool under the casing of the cooling device. Ventilation adjustment is carried out by partial or complete overlapping of openings.

Fig 3. Ventilation system
Reference: the embryos begin to consume oxygen from the outside already on the 6th day of incubation. In the third week, the egg consumes 2 liters of air per day. In the last days before hatching, each chick consumes 8 liters of oxygen.
Ventilation is of two types:
- Constant is a system that involves the creation of a continuous movement of air, with a constant exchange and smooth distribution of heat.
- Periodic - a device that operates once every 24 hours to actively change the air in the chamber.
Please note that even the highest quality ventilation does not allow you to completely abandon the egg flip. Therefore, a mechanism for turning eggs in an incubator is needed in any case. The auto-flip prevents the embryo from sticking to the shell.
Constant
Permanent ventilation for the refrigerator has the following principle of operation:
- A fan installed inside the chamber drives the air flow into the openings. Due to this, the air comes out. When making a home incubator with your own hands, you should pay maximum attention to this moment.
- As it exits, the air flow mixes with fresh air passes through the heaters.
- Then air goes down, where it is moistened by a container of water.
- The device of the incubator contributes to the heating of the air, which subsequently gives off heat to the eggs.
- After heat transfer, the air returns to the fan.
The design of an incubator with constant ventilation is more complicated than with a periodic system. But this allows you to simultaneously solve three problems: air humidification, ventilation and heating of eggs.
periodic
Periodic system. If you are making an egg incubator with your own hands, then most likely it will be a manual mechanism. You will need an electronic controller to set the automatic switch on. The use of a controller is not always justified, especially if you are making a simple homemade incubator with automatic egg flipping. Ventilation in such a system occurs as follows:
- Heating is turned off.
- The fan is started, which replaces the air and cools the eggs.
- After 30 minutes, the fan is turned off and the heating system is started.
The characteristics of the fan are determined depending on how many eggs the chamber is designed for. If you are making an average do-it-yourself incubator with an automatic flip with a capacity of 100-200 eggs, then you need a fan:
- working from a network of 220 Volts;
- diameter from 10 to 45 centimeters;
- with productivity from 35 to 200 m 3 /hour.
In addition, the device of the incubator must assume the presence of a filter for the fan. The filter prevents dust, dirt and fluff from getting into the blades of the device.
Refrigerator incubator case
This is an important aspect of the topic "how to make an incubator out of the refrigerator with your own hands", since from proper preparation body of the device will depend on the efficiency of its operation.
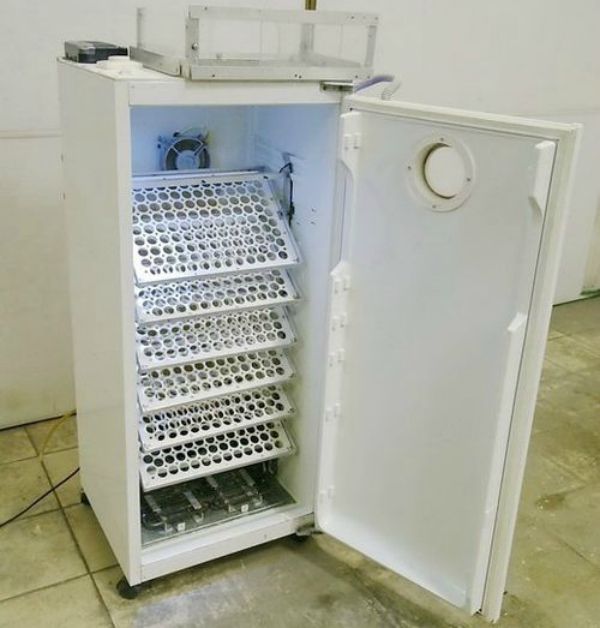
Fig 4. Case from the refrigerator
First you will need to remove the freezer and other built-in equipment. Then make holes for ventilation, as described above in the text about installing this system. Install shelves and trays as you see fit.
Heating system installation
When making an incubator with your own hands with an automatic flip, you will have to organize the heating system yourself. To do this, use 4 incandescent lamps of 25 watts or two bulbs of 40 watts. Lamps are equally distributed between the bottom and top of the refrigerator. The lower lamps must not interfere with the installation of the water container intended for humidification.
Before you make an incubator at home, you need to make the necessary calculations and prepare the tools. Do not rush in the process of work, as this can lead to disastrous results.
Choosing a thermostat
Many are interested in the question of how to make a home incubator with optimal temperature regime. To do this, you need a high-quality thermostat. There are three types that poultry farmers use:
- An electric contactor is a mercury thermometer with an electrode responsible for turning off the heating when a certain temperature is reached.
- Bimetallic plate - closes the circuit when the desired heating parameter is reached.
- Barometric sensor - closes the circuit when the pressure is too high.

Fig 5. Finished thermostat
If you are thinking about how to make an incubator with convenient controls, then install an automatic thermostat. This will greatly increase convenience and save time.
Flip mechanism
According to generally accepted technology, the egg turning mechanism in the incubator should work 2 times a day. Some experts recommend turning eggs twice as often.
Turning eggs in an incubator is of two types:
- framework;
- inclined.
The frame rotary device for the incubator functions by pushing the egg with a special frame, which rotates it about the axis.
Incubator tilt swivel involves periodically tilting the egg tray under certain angle. Due to this, the position of the embryos inside the eggs and their location in relation to the lamps change.

Fig 6. Rotation mechanism
The main principle of the automatic turning device is that the motor drives a rod that acts on the egg tray.
How to make a simple turning mechanism for a refrigerator:
- Install the gearbox inside the refrigerator at the bottom.
- Installed inside the refrigerator wooden frame that will hold the trays. The trays must be fixed in such a way that they can tilt 60 degrees in the direction of the door and also in the opposite direction.
- The gearbox must be firmly fixed.
- A rod is attached to the engine, connected to the tray on the other side.
- The motor drives the rod, which in turn tilts the tray.
Video
Making a device out of the box
Consider the question of how to make an incubator out of the box. This option will be the cheapest of the proposed, production will take several hours. Cardboard is a fragile material, but at the same time, it retains heat well and is easy to work with.

When breeding in a private household or on a bird farm, an incubator is simply necessary in which the chicks are hatched artificially. For a small number of eggs, it is not advisable to buy it. Therefore, many poultry farmers who know the device of this device prefer to make it with their own hands.
If you know how to hold a tool in your hands, then it will not be difficult for you to make an incubator, especially since it is also cost-effective. The whole process of breeding chicks in the incubator will be supervised, and the young will grow up healthy and strong.
Advantages of homemade incubators
Many poultry farmers believe that the incubator is a complex device Therefore, it is unrealistic to make it yourself at home. In fact, making an incubator with your own hands is quite simple, and you can do it at minimal cost.
At self-manufacturing You can choose the desired dimensions of the device and supplement it with the necessary functions in the form of temperature control or egg turning. Since such a design will consist practically of improvised materials, it be cost effective, which is one of the advantages of the device.
Other benefits of a DIY incubator include:
- reliability in application;
- possibility of breeding various kinds birds;
- obtaining chicks at the required time;
- ensuring the survival of young animals up to 90%;
- self-selected sizes for laying the required number of eggs.
- small power consumption.
Preparatory work
Special materials and tools for the manufacture of the structure are not required. Suitable materials that are in almost every home.
First of all, it is necessary determine the dimensions of the device for hatching chickens. They depend on the type of future poultry being grown, the number of young animals and the conditions for placing the incubator itself. So, for example, the design for quail eggs should be smaller than for chicken and duck. The slope of the trays is also taken into account, which should be different for each type of bird.
To provide the eggs with constant heat and the necessary humidity, the incubator is best made with a case that can be homemade or taken from an old refrigerator.
The main components of the incubator are:
- case with insulation;
- egg trays;
- heating system;
- devices for monitoring temperature and humidity in the structure.
Making incubators with your own hands
At home, the body can be made from cardboard boxes, a basin, chipboard sheets, polystyrene, wooden beams. Using imagination and using improvised materials, you can make a high-quality incubator.
From a basin or bowl
The easiest to manufacture device for breeding chickens can only be used if power outages are possible. An incubator is being made from two containers of the same size, as which you can take basins or bowls. It is desirable that they be metal.
Bowls are placed one on top of the other, and on the one hand they are fastened with furniture canopies or other devices. There should be space between the bowls in which the eggs will be placed. The top bowl in this design will serve as a lid. Since the containers are round, the eggs in them will be heated evenly.
A 2 cm layer of sand is poured into the lower bowl, which is covered with foil. Hay or straw is laid on top. To evaporate moisture, several holes are made in the foil.
A cartridge will be inserted into the upper bowl, for which a hole must be made. If the capacity is large, then you will need several light bulbs.
A thermometer should be placed in the center of the assembled structure at a height where the eggs will lie. The incubator is installed in a place where constantly the same temperature. Then it should be warmed up, after which it can be filled with eggs of quails, chickens or other birds.
If the lights are turned off at home, then the device will need to be covered with a blanket and placed in a pot of warm water. In summer it can be taken out in the sun, and in winter it can be placed near the battery.
Sand in this design serves as an air humidifier and a heat accumulator, so it needs to be moistened regularly. Turn and spray the eggs daily.
incubator out of the box
You can make such a cost-effective device with your own hands quite quickly.
Manufacturing steps:

Styrofoam incubator
Good thermal insulation material available in almost every private house. Therefore, it will not be difficult to make an incubator for eggs of chickens or quails from polystyrene with your own hands. In addition, you can choose the size of it yourself.
Manufacturing steps:
- Cut out pieces of foam are fastened in any convenient way.
- Light bulbs are inserted into the top cover at a distance of 15 cm from each other. You can buy a special heater for the incubator. However, light bulbs do their job quite well, and are the most budget option.
- The tray can be purchased or made from wooden planks. For quails, the cell sizes should be 5x5 mm.
- The tray with eggs is placed in the middle of the structure so that the distance to the heating elements is equal to the distance to the water container.
- Space must be left between the laid eggs and the walls of the homemade box for air ventilation.
Using an old refrigerator
 Making a device from an old refrigerator is the best option. This is explained by the possibility of using several cameras and ready-made thermal insulation. It is very convenient to use the refrigerator in the event that if there is a power outage in the house. You can simply put a closed container with hot water in it, which will keep the eggs warm for a long time.
You only need to make ventilation holes, install incandescent lamps, a fan, water trays and a thermostat.
Stages of work:
- The freezer and other extra parts are dismantled.
- A window is cut out and sealed with glass in the door.
- Egg trays are fixed.
- Two light bulbs are installed at the top of the refrigerator, and four at the bottom.
- The gyroscope and thermometer are mounted so that they can be seen through the window.
- A water container is placed at the bottom of the refrigerator.
Can buy special trays with egg turning mechanism and install them in the incubator from the refrigerator. They will facilitate the work of those who cannot pay enough attention to the hatching of the bird. In addition, when installing an automatic flip, the number of openings will be reduced to a minimum, which is very important when breeding birds.
Quail incubator
Many poultry farmers are interested in the question, what should be the incubator for quail eggs? Designs for birds of this species are made according to the same principle. They differ only in size.
The quail incubator should be two to three times smaller than the chicken incubator. In a ready-made incubator, which was intended for chickens, quail eggs will enter three times more.
When making an incubator with your own hands, it should be borne in mind that its assembly requires attention and accuracy. The slightest violation of humidity or temperature can lead to spoilage of eggs.


