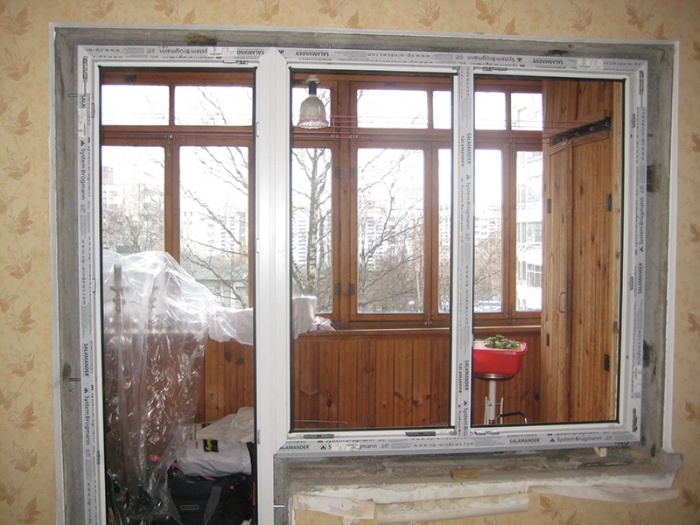
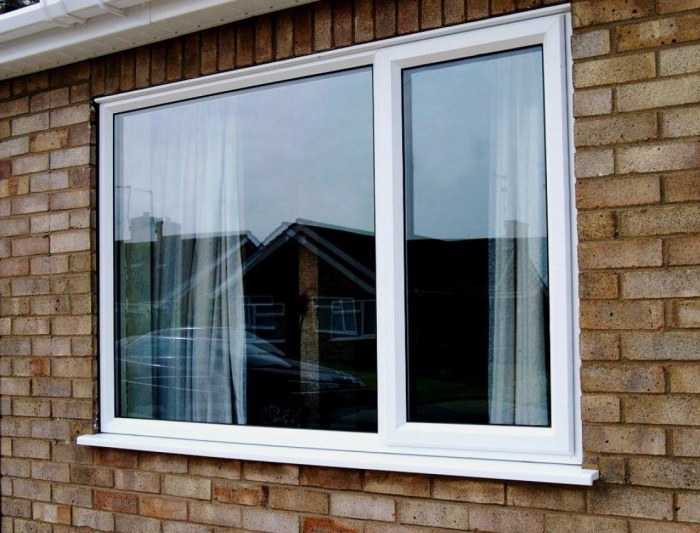
Plastic window insertion technology. How to install a plastic window yourself - tips and tricks. Does it make sense to mount windows with your own hands
Plastic windows are considered aesthetic, functional, reliable and solid constructions. Due to these qualities, they have become widespread. Currently, plastic windows continue to gain popularity. Installation of structures, as a rule, is carried out by the company where the order was made. Experts, of course, know how to properly install metal-plastic windows. To carry out the work, professionals have at their disposal all the necessary tools.
Before installing plastic windows, make measurements. They are also carried out by specialists of the selected company. This work is not recommended to be carried out independently. This is due to the fact that the block will be manufactured along the opening. Inaccuracies in measurement can cause the structure to stand unevenly, or there will be difficulties with its fastening. But if it is best to entrust the measurements to a professional, then the installation of the module can be carried out House master myself. How to install plastic window? Let's figure it out in the article.
General information
It used to be that it was very difficult to mount a plastic window with your own hands. As a rule, they entrusted this matter to a professional. Nevertheless, now many consumers decide to mount the plastic window themselves. Do-it-yourself installation allows you to significantly reduce costs - up to 70 USD. e. But at the same time, fastening the structure requires certain knowledge. Next, we will analyze in stages how to properly install a plastic window.
Preliminary calculation of dimensions
The decision to mount a plastic window with your own hands is a very responsible one. In this case, the correct selection of the design and the quality of the work are of great importance. Before installing metal-plastic windows, measurements should be made, as already noted.
Important Features
It should be noted that there are two types of window openings. There is a quarter, and there is without it. A quarter of the window opening is a kind of ledge stretching along the entire perimeter of the window. For accurate sizing, these features must be taken into account. Let's consider them in more detail.
quarter design
In this case, the size of the window block can be determined by the following algorithm. It is necessary to measure the width of the corresponding opening between the quarters. This should be done in the narrowest place. Up to 40 mm should be added to the measurements obtained. Thus, the value of the width of the structure will be obtained. Additional verification is also required. In this case, the width of the window opening and the distance between its vertical quarters are compared. The first must be greater than the second.
The height of the window is also easy to measure. To do this, it is necessary to calculate the distance from the upper quarter to the lower plane of the opening. The desired value will be the resulting size.

Second option
In this case, we mean a window that will be installed in an opening without a quarter. It is quite easy to get the overall values. To do this, subtract 50 mm from vertical dimension opening. This is done in order to be able to install a window sill. Also, 30 mm must be subtracted from the size of the horizontal opening. In addition, it is required to determine the dimensions of the window sill and low tide. It doesn't take much effort to do this. However, certain factors must be taken into account:
- The width of the tide is calculated taking into account the proposed sheathing or insulation of building envelopes. It is required that it protrudes from the plane of the wall at a distance of up to 100 mm.
- The width of the window sill should be calculated taking into account its functional features. For example, some will want to install flower pots and so on. Basically, the element is selected so that its free part can block the heating radiators.
- The length of the window sill is calculated approximately 100 mm more than the width of the window opening. Thus, the edges of the window sill should go into the cavity of the slope. The recommended minimum is 50 mm.
Module
The next step is to place an order in a specialized store. First of all, you should specify the size of a suitable block. It is also necessary to take into account the following indicators:
- Type window profile.
- Type of glass.
- Mounting elements.
- Associated accessories.
Dismantling works
Before installing PVC windows, you should prepare the opening. Start installation work in the operated premises is impossible without the removal of old structures. It is worth noting that this procedure requires accuracy and thoroughness. There is a very high risk of injury. In addition, care must be taken to ensure that the product does not fall out. This is especially true in high-rise buildings.

Algorithm for deleting an old structure
- First of all, it is required to free the window unit from opening windows and sashes.
- The structure must be free of all glass. In this case, all retaining glazing beads are first removed.
- Further, in the horizontal and vertical elements of the frame, it is required to make cuts. It is advisable to use a hacksaw or grinder with a cutting wheel for concrete.
- Then you need to remove the structure from the opening. To do this, you can use such improvised means as a mount, crowbar or hammer.
- In certain situations, the structure can be removed without deformation. In particular, this applies to those cases where the consumer wants to maintain the integrity of the frame. It is worth noting that this removal option will require great skill. In addition, this process will take quite a long time.
- The frame is not the only element to be removed. This also needs to be done with an external ebb and a window sill.
- At the final stage, the opening should be cleaned of dust and debris.
Mounting diagram
Following the technology, it is enough just to fix the plastic window. Do-it-yourself installation is carried out in several stages. In this case, it will be necessary to implement a number of relevant measures.
initial stage
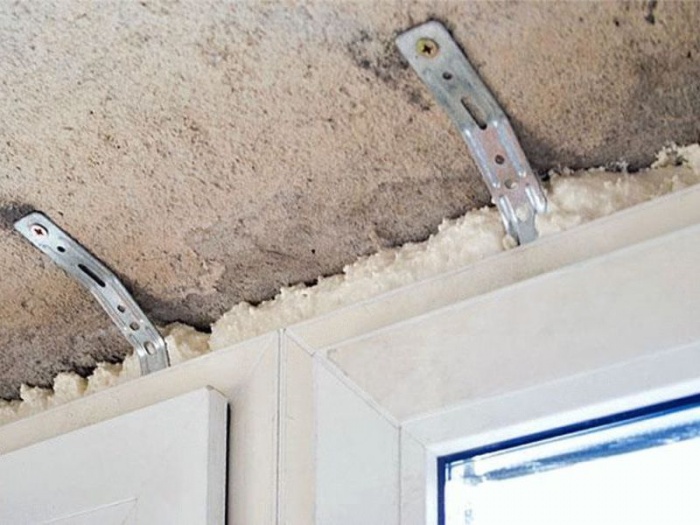
Before installing PVC windows, you should prepare the structure. This applies in particular to the mounting plates. They should be located on the top and sides of the frame (toward the end). Mounting plates play a very important role. In the future, the entire structure will be held on them in a given position. Most specialists prefer to use hangers for this purpose. They, in turn, are widely used in the installation of drywall systems. Nevertheless, in this case, the most appropriate is the use of reinforcing mounting plates. The fact is that they are distinguished by high mechanical strength.
Irreplaceable self-tapping screws
When installing the mounting strips, care must be taken. They are fixed on the end of the frame. It is necessary to ensure that the fastener enters the metal profile of the window block. At this stage, it is very important to prevent deformation of the double-glazed window. The plates are fastened with self-tapping screws. They are selected taking into account the size of the window block.
The standard design involves the use of self-tapping screws, which will have a diameter of 4 mm. A larger window block requires other fasteners. In this case, it is advisable to use products having a diameter of up to 6 mm. Anchor strips must be fixed in the end part of the frame. The recommended step of their location is up to 80 cm. The indent from the corners of the structure should be within 100-150 mm.

Structure position adjustment
Speaking about how to properly install a PVC window, it should be said about the alignment of the module. It is carried out after the preparation of the window block. This procedure may seem quite simple at first glance. However, a lot depends on the correctness of its implementation. The installation of the block is best done in pairs. One person will maintain the structure while the other will carry out the procedure. alignment window frame involves the installation of the block in a pre-prepared opening. It is also recommended to take care of the wedges in advance. With the help of them, the position of the module is regulated.
Highlights of adjustment
When performing work, you must be guided by the following recommendations:
- The design is wedged not only at the bottom. This is also done on the sides.
- All vertical elements must be aligned in the same plane.
- If there is an impost, then the wedges should be located under it.
The PVC window is leveled. After that, the fixing process begins. Anchor plates are attached to the cavity of the window opening. This is done using special bolts and dowels. It is very important that the elements are fixed on the building envelope. Thus, it may be necessary to remove the plaster that is located where the anchor plates will be located.
Design assembly features
Of course, the easiest way to mount a window in the analysis, without a sash. It is fixed before starting the sealing of the seams. How to install a plastic window sash? Before hanging, it is recommended to put decorative caps on the hinges. Doing this after installing the sash will be inconvenient. In addition, the handle must be moved to the open (horizontal) position. To install the sash, it is first put on the lower hinge, and a corner loop is inserted into the upper one. The elements are fixed with a pin. It should be pushed up until the latch is released. In order for the pin to easily enter the hole, the sash at this moment should be pressed (or almost pressed) against the frame.
Seam sealing
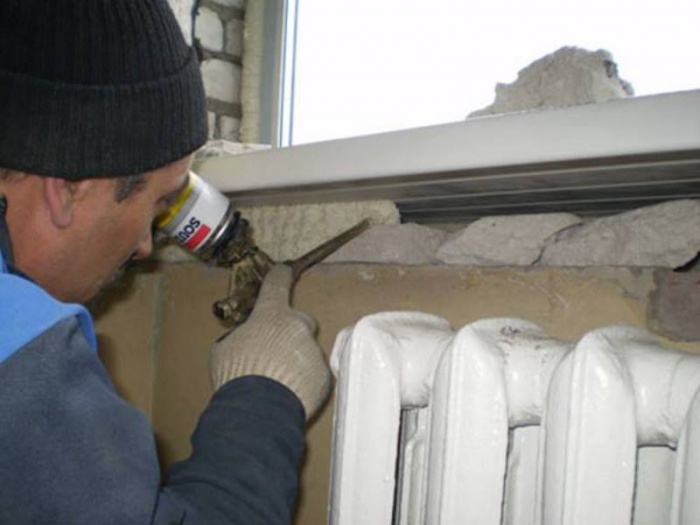
Speaking about how to properly install a plastic window, it should be said about the sealing of the structure. So, the block is well fixed. Next, the assembly joints are sealed. For this, a special foam is used. At this stage, certain material properties must be taken into account. When hardened, they increase in volume. Thus, work must be carried out with the sash closed. You can open it only a day after the installation is fully completed. The use of foam also has its own characteristics. In this case, it is worth considering the humidity and temperature indicators. Before applying the foam directly, prepare the surface. It needs to be moistened with water.

How to install a window sill
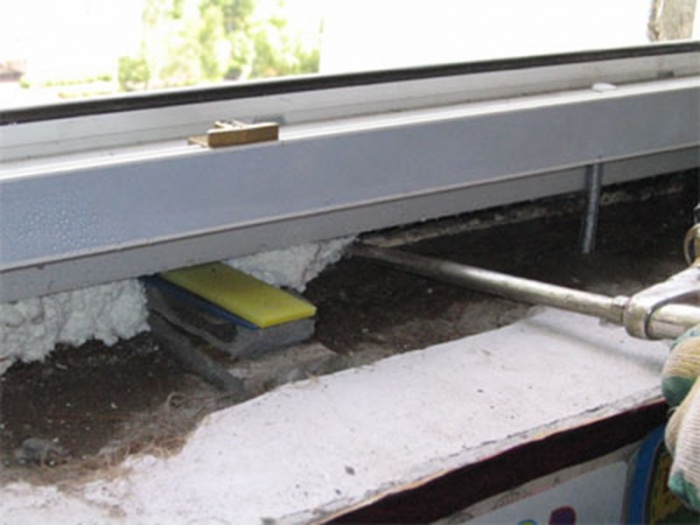
The plastic element must be securely fixed. For this, mounting foam is used. Before installing the window sill, plastic element must be pre-cut to the required size. To do this, it is best to use a hacksaw with fine teeth or a grinder. The product is closely installed to the stand profile. The window sill must be level. Wedges are used for this. It is worth noting that a slight bias is quite acceptable. Condensate drain is implied. However, the slope should not exceed 3 degrees.
The free plane, which is located between the underside of the element and the opening, must be filled with foam. Exclusion of window sill deformation is required. It often occurs due to the expansion of the foam. This requires the installation of weights (5 kg) on the windowsill. They should be in three different locations. This is done immediately before foaming.
High-quality installation of a window sill requires the following rules:
- Z-plates must be fixed to the support profile. This will allow you to achieve a tighter fit of the product to the frame.
- Special recesses are made in the opening. This is necessary in order to position the window sill outside the slope.
- The gap located between the block and the product must be sealed. This is done with silicone.
- The end caps are attached with superglue.
Here's how to install a plastic window sill correctly.
Low tide installation
The above are the main recommendations on how to properly install a plastic window. Installation of the ebb, as a rule, is considered final. Initially, the element must be cut according to the given size. The use of metal shears is recommended. Only then can the tide be fixed. To do this, you need to use at least three screws.
How to install plastic slopes yourself
It is worth noting that when hiring professionals, you will have to spend a large amount on this type of work. In addition, in this case, the quality is not always commensurate with the price. First of all, you need to do the selection of suitable material. It is recommended to use window sills. They will sit very tight. Such slopes are very durable. In addition, they are quite difficult to scratch. It is worth noting that the curved edge will save the owners from having to look at the peeling wallpaper, which is very common at the joints.
Many craftsmen offer their customers the installation of slopes from sandwich panels. This material is quite thin. It should be noted that in most cases the slope has a completely non-ideal surface. Often there are concave areas and bulges. It is recommended to set plastic corners at the junction with the wall. However, they often peel off. In addition, their joint docking leaves much to be desired.

Tools
Before installing plastic slopes, it is worth arming yourself with all the necessary devices. Among them:
- Screwdriver.
- Perforator (impact drill).
- Mounting gun (for foam).
- Electric jigsaw.
- A saw with a sharp tooth.
It is not difficult to calculate the amount of material required. It is necessary to measure the length of the window sills and sides of each window. This also applies to balcony door. It is best to determine the required amount of materials for installation together with a consultant. In addition, a count of end caps is required.
Also, do not forget about the following elements:
- Self-tapping screws with a press washer.
- Hangers.
- Dowel-nails.
- Professional polyurethane foam.
The number of all of the above products is calculated depending on the parameters of specific window frames.
Mounting process
It is recommended to carefully measure the distance from the wall to the frame. 4 cm must be added to the obtained value. Thus, the slope will be led behind the frame. Sawing is recommended to be done with a jigsaw. In this case, you need to leave a small margin for overlapping the wall. After completing work with the slope, it is the turn of the fasteners of the elements that are fixed directly on it. In this case, suspensions are used. It is recommended to purchase them in advance. Two corners come out of one suspension, which attach the slope to the wall. They are fixed at a distance of about 35-40 cm from each other. For this, self-tapping screws with a press washer are used.
In the event that the top element is small, only one mounting bracket can be used. Slope fitting required. This must be done after all the elements are fixed. It is required to note the location of the mounting bracket. Further, this place is poddalblivaetsya. A corner is sunk into it. It will need to be plastered later. After applying the foam, the slope must be carefully brought behind the frame. Then you need to fix the corner. In this case, you can use a puncher or impact drill. Fastening is carried out using a dowel-nail.

Next, proceed to the side slopes. In some cases, they need to be "opened" a little. This requires drawing a perpendicular along the window sill and the upper slope. This is done with a large square. Side slopes are bred from the resulting straight line. The distance must be the same. It should be noted that open slopes have a more attractive appearance.
Similar elements that are at right angles to the frame look different. In this case, the fastening of the slopes occurs in the same way. It is worth noting that their main advantage is rigidity. Thus, they do not need spacers and other similar devices. Unfortunately, sandwich panel slopes do not have such properties.
Plastic windows are increasingly being installed by owners country houses because they have many advantages over wooden products. Also, they are reasonably priced. But before you install, you need to carefully prepare for such work. To do everything yourself, you need to know the features of performing all operations.
All plastic products are equipped with parts for installation, so with proper preparation, you can install the window without outside help. It is necessary to perform all actions very carefully so as not to damage the structure. In order to fix the windows in the opening more accurately, it is worth working with an assistant. In some cases, before carrying out work, it is necessary to strengthen the opening.

Materials required for work
Before starting the installation, you need to prepare the following materials:
- wedges inserted for the correct location of windows;
- mounting foam;
- sealant;
- hydroparo insulating material necessary to protect the joints from moisture;
- anchor bolts.
Wedges are used during the installation process for more precise installation plastic profile. Without these materials, it is much more difficult to follow. Mounting foam is an insulating material that fills the space between the wall and the frame. When choosing a foam, it must be borne in mind that it must correspond to the temperature at which the work will be carried out. If you purchase material intended for use in summer time, its use in winter can lead to the creation of a poor-quality insulating layer.
Also during the work you will need a self-expanding sealing tape. This material is glued around the perimeter of the window from the outside, after which it expands. Sealant is used to fill the space between the slopes and the window sill.
How to determine the correct position of the plastic window
Before carrying out installation work, it is important to correctly determine the position of the frame in relation to the wall thickness. The plastic window should go inside about a third from the street side. This rule is not mandatory, but when shifting the window in any direction relative to the specified distance, it should be borne in mind that the length of the ebbs and window sills must correspond to the project.
It is important to consider the size of the radiator and its position. The window sill should not overlap it by more than ½ of the width. If the radiator is completely shut off, this may adversely affect the room temperature in winter time, as well as on the window state. If installed incorrectly, plastic windows usually begin to fog up.
The length of the window sill should be approximately 15 cm longer than the window opening. Thanks to this, it is possible to process the edges of the window sill during the finishing of the slopes. Side plugs are included with the window sill, which should also be fixed after installing the window.
Methods for fixing plastic windows
The choice of a particular fixing method depends on parameters such as the size of the window opening and the material of the walls. This should also be taken into account when choosing fasteners for a plastic structure.

Fixing plastic windows can be done in several ways:
- With dowels or anchor bolts. They are fixed in pre-created holes in the wall.
- Serrated plates that are outside the window profile. They are mounted on a spacer and fixed with self-tapping screws.
The first described method is considered more reliable. That is why with the help of dowels, plastic structures that are large in size are fixed. The fastener passing through the window block is more reliable and able to withstand impacts.
If you decide to install a plastic window that has small size, they can be fixed using anchor plates. These fasteners can be hidden by slopes and finishing materials. But before carrying out the work, small recesses should be prepared for them. This will avoid plane alignment problems.
It is worth noting that when installing plastic windows, professionals combine these methods. In this case, anchor bolts are used to secure the base of the profile and its vertical parts. The upper part is fixed with plates.
Basic rules for installing plastic windows
To properly install windows, you should follow a few basic rules:
- Installation of plastic double-glazed windows should be carried out using polyurethane foam. This material allows you to give the structure additional rigidity. It also acts as a fixative and heat insulator.
- To protect the space between the window and the wall, it is necessary to fix a waterproofing material on the outside, and a vapor barrier on the inside.
- Windows can be installed at any time of the year. Many professionals recommend that work be carried out in the winter, as this will allow you to immediately see if mistakes have been made.
- Before purchasing foam, you must carefully study the features of the composition. These materials differ in several ways. One of them is the solidification temperature. The instructions on the bottle indicate the most favorable conditions for using the foam. If they are ignored, the material may begin to break down during the operation of the building.
- During the foaming of the gaps between the plastic windows and the walls, it is necessary to fill in small portions. This allows you to use less foam.
- If the opening crumbles, it is necessary to clean the surface of old materials and reinforce it.
By following the rules described, you can install windows with your own hands without making the mistakes that people who do not have experience in such work make. The technology for installing plastic windows in a brick house is quite simple, but it is important to carefully follow each step so as not to make a mistake.
How is the preparation of the opening
Before performing work on the installation of windows, it is necessary to thoroughly clean the opening from dirt and dust. It is important to remove all paint residue and building materials. Before installation, it is also important to compare the dimensions of the opening and the plastic frame. If the gap is more than 4 cm, it is necessary to use not only foam. This is due to the fact that when using it, it will not be possible to create an even and high-quality seam. In addition, a lot of foam will go away.

Before installation, it is necessary to remove the sashes from the frame. To do this, just pull the pin out of the loops. If it is necessary to remove the double-glazed window from the frame, the glazing beads holding the glass are removed. These steps must be performed very carefully so as not to scratch the glass.
After removing the sash and double-glazed windows, place them on a soft pad and lean against the wall so that they are in a stable position. Double-glazed windows are not laid flat, as this can lead to scratches on the glass surface.
After that, the protective film is removed and markings are applied to the places where the fasteners will be located. The distance between them should be about 40 cm. It is important to consider that the indents from the corners should be more than 15 cm.
Installation process
After carrying out the described actions, insert into the window opening into brick wall spacers to create the necessary clearance. The alignment of the frame should be done using the building level. It is also important to control the side clearances.

In the openings of brick houses, it is necessary to mark the installation sites of anchors. After that, holes are created in the walls. If fixing is done with anchor plates, it is necessary to bend them in such a way that they lie well on the wall.
The next step is to install the frame. It is important to check the horizontal and vertical structure of the structure before. How will it be finalized? After that, the bolts are finally tightened until the cap protrudes above the surface by no more than 1 mm.
After all the described work, the installation of sashes and double-glazed windows is carried out, as well as the functionality of the entire structure is checked. If you installed the products with your own hands for the first time, you should carefully inspect the opening and make sure that no mistakes were made during the work.
Slope installation
Before installing external slopes, it is necessary to measure the width and length of the opening. Cutting plastic slopes is done using a circular saw.
Important! It is necessary to fix the slopes only on clean and leveled surfaces.
At the first stage, the upper horizontal part is fixed. It needs to be drowned as deep as possible, and the space must be filled mounting foam. Worth remembering. That it should not be released too much, since when hardened, the material can change the shape of plastic products.
After that, the installation of vertical slopes takes place. During these works, it is important to check the verticality of the elements. In the same way, the installation of the lower slope occurs. It is important to ensure that all elements are properly docked, and there are no gaps between them. corners between plastic slopes closed with a special detail.
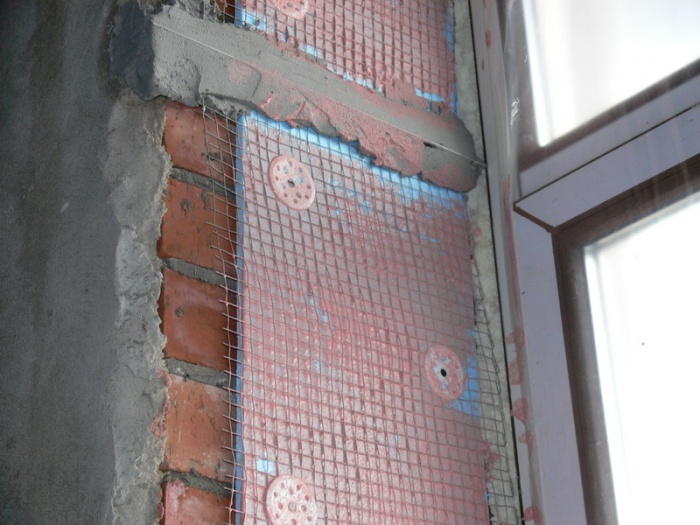
The installation of internal slopes should be carried out only after careful preparation of the surface. If the opening crumbles, it is better to clean it up to the main wall and only after that carry out further work. After that, the opening is leveled and filled with insulation. If necessary, strengthen the window opening.
Almost every novice master wants to learn how to install a plastic window himself. The advantages of such windows include not only operational characteristics, but also ease of installation. These designs are completed with fasteners and additional parts, so even a novice master will be able to install windows with his own hands. However, to do everything right, you should take into account the existing nuances. First of all, it is worth noting that it is very difficult to do the work alone, so it is recommended to involve an assistant.
Elements that will be needed in order to install plastic windows:
- screwdriver;
- pliers;
- mounting foam;
- self-tapping screws;
- anchor;
- building level;
- plumb;
- slopes;
- windowsill;
- ebbs.
Before purchasing windows, you will need to measure the opening, taking into account what the design is. It can be with or without a quarter. Openings with a quarter are characteristic of the construction of foam blocks. It is worth knowing that such designs significantly reduce heat loss.
In the opening without a quarter, it will be necessary to order windows whose length is 5 cm less than the length of the window opening. The width should be less than the corresponding indicator of the opening by 3 cm. Slots of 1.5 cm should be provided along the contour, which in the future will need to be sealed with foam. Below you will need to leave 3.5 cm for the windowsill.
Windows with a quarter and without a quarter
Windows must be ordered by adding 3 cm to the width. The length remains unchanged. Insulating tapes will need to be applied not to the plastic frame, but to the place of contact of the quarters with the PVC window. The frame should be pressed to the quarters.
In the opening without a quarter, external and internal slopes will be used as protective and decorative elements that can prevent the influence of external factors on the technical properties of the mounting foam.
It should be borne in mind that the larger the gap, the greater the consumption of expensive foam. If you want to save money, gaps larger than 4 cm can be partially filled with polystyrene foam or bricks. Slots from 1 to 4 cm are blown out exclusively with foam.
Windows in most cases are not placed in the middle of the opening, but retreating from the outer base 1/3 deep.
However, those who wish to mount the window with their own hands can use options with an offset in the direction they need. This must be taken into account when buying a window sill and related fixtures. To the width, which will be calculated based on the placement of the windows, you will need to add approximately 5 cm.

Existing frame fixing methods
The technology for installing windows will depend on the material from which the walls of the structure are built, as well as on the dimensions of the windows. Based on these factors, you need to choose the method of fixing the elements.
You can fix structures as follows:
- Fixation with dowels, which are inserted into the wall through the prepared holes in the profile.
- Plates with teeth that will need to be pressed into the profile. The elements are not mounted into the wall, but are installed by surprise and fixed with screws. When the installation is done, we foam the mounting seams and install the slopes, under which it will be possible to hide the anchor plates. The space between the opening plane and the slope must be filled with foam. To reduce the consumption of foam, part of which will go to additional alignment, a recess can be made under the plate.
The first method is considered the most reliable. It is used in most cases for the installation of heavy window structures. If the fastening is through, the window will resist various shock loads, which may occur, for example, during the use of windows with sashes that open in several directions. Anchors that pass through the frame will allow you to adjust the structure vertically and horizontally.

Fixing the frame when installing the window
For people who are interested in self-installation of plastic windows of small sizes with blank double-glazed windows, the method of fixing with anchor plates is suitable.
For the installation of plates in an opening made of concrete or brick, it is recommended to prepare small recesses so that it is not necessary to apply an extra layer for leveling before installing the slopes.
In some cases, wizards use both methods. The anchors are immersed in the walls through the side parts of the frame and the base of the structure, and the upper part is fixed with plates. Instead of anchors, galvanized self-tapping screws are sometimes used.
Window and opening preparation
The opening must be cleaned of dust, debris and paint residues. If the installation of plastic windows will be carried out in an existing opening, then upper layer need to be sharpened. The foam will need to adhere firmly to this layer.
The gaps between the frame and the opening can only be filled with foam.
To prepare a window, do the following:
- We release the frame from the sash. To do this, remove the pin, which is mounted in the upper loop. Next, you need to carefully pick it up at the bottom. The element must be lifted and removed from the bottom loop. Double-glazed windows must be removed from blind windows. To do this, you will need to first remove the longitudinal, and then the transverse glazing beads. To remove the glazing beads, you need to insert a knife or spatula into the slot, and then slowly move it. It is worth noting that a small window can be installed even without dismantling the sashes.
- The double-glazed window at an angle must be leaned against the wall, then placed on a flat base, which is covered with cardboard. It is not allowed to install the window flat, as cracks may appear due to the ingress of pebbles.
- Remove the protective film from the outer base of the frame. In the future, this will be much more difficult to do, so it is recommended to remove it at this stage.
- Finally, you need to place a place for mounting fasteners. The recommended installation step for these devices is 40 cm. If you plan to use mounting plates, you will need to attach them to the frame in advance with self-tapping screws. Holes must be made under the anchor or self-tapping screws, while the drill should be placed on the outside of the frame.

Window structure after installation
The sequence of steps for installing windows
The frame will need to be inserted into the opening. First you need to lay plastic corners or small bars around the perimeter. These elements will be needed to provide a technological gap. The blades need to be moved slightly so that it is possible to clearly set the frame horizontally and vertically with the same slots. The location is recommended to check the building level. Blades should be placed close to the fixing point with screws or anchors.
Speaking about how to install plastic windows, you should know that installation can be done in several ways. Therefore, at this stage there will be differences. The sequence of actions will be as follows:
- A self-tapping screw must be screwed into the opening of a wooden house through the recesses in the frame. In this case, you do not need to screw the fasteners all the way.
- On foam concrete or brick walls, points should be marked through the recesses in the frame, after which the frame should be removed, holes should be drilled with a drill that matches the material. Then we put the frame in place and install the fastener.
- There is no need to perform any complicated steps when installing on anchor plates. They will need to be bent so that they adjoin the place that is intended for their attachment.
- The final fixation is performed after checking the horizontals and verticals with a plumb line. It is not necessary to tighten the elements strongly, as the frame may bend. Screwing must be completed when the hat is level with the frame.
- The parts that were removed will need to be returned to their place in the reverse order, and then the product should be checked for functionality.
- The gaps need to be filled construction foam. The seams are closed with a protective tape. From the outside, the insulation tape must be drowned.
- Foam needs to fill the gap under the drainage system.
- At the next stage, the window sill is mounted. A plastic structure of several centimeters will need to be brought under the sweet clover.

Plastic windows deservedly enjoy the reputation of functional, reliable, durable and aesthetic structures. They are becoming more and more popular and are confidently replacing the wooden windows that are familiar to many people.
Plastic windows have gained a reputation for being strong, durable and reliable designs.
Their additional advantages include the fact that with a great desire, almost anyone can install plastic windows on their own. And this is a big plus, because. For the installation, experts ask for quite a lot of money. In addition, having figured out how to install a plastic window, you will independently control the entire process and be able to do everything in accordance with the technology.
How to determine the size of the future plastic window
Before ordering plastic windows, you need to figure out what exactly the design should be. And this one starts preparatory stage from taking measurements. When taking measurements on your own, the home master should know that there are window openings without a quarter and with it. The procedure for measuring openings of two different types will also differ.

The quarter option involves taking measurements in the following order. First you need to measure the opening between the quarters in the narrowest place and add 3-4 cm to the resulting value. This will be the width of the structure. Additionally, make sure that the specific width of the future plastic window exceeds the largest distance between the vertical quarters. To determine the height of the future window, measure the distance between the lower plane of the opening and the upper horizontal quarter. So you determine the amount you need.
In the case when a plastic window is installed in an opening without the quarter mentioned above, to determine the appropriate size, you simply need to subtract 5 cm from the height, and 3 cm from the width.
Additionally, determine what size the window sill and ebb should be if you plan to replace them. There should be no complications with this operation, you just need to consider the following important factors.
When determining the width of the ebb, future thermal insulation or sheathing must be taken into account. According to the standards, the ebb should protrude from the vertical wall by 5-10 cm. The width of the window sill is calculated taking into account its future functional purpose. For example, if you want to install potted flowers on it, it is better to order a wider design. In most cases, when choosing a window sill, the calculation is carried out so that the free part of this element overlaps the radiators.
The length of the window sill should be 8-10 cm longer than the width of the opening. The edges should be recessed into the slope cavity by at least 5 cm.
Back to index
Window ordering and preparation for work

At the next stage, you need to go along with the measurements received to a company specializing in the production of plastic windows. By the way, if you do not want to waste time measuring or doubt that you can do everything right, order this service from the same company. Most companies offer it for free, provided that the window is ordered from them.
In addition to the window size, you need to define the following parameters:
- The number of chambers in a double-glazed window.
- The number of cameras in the window profile.
- Availability of fittings and necessary fasteners.
The consultant will talk in detail about the features of each option. You can prepare ahead of time. So, if winters in your region are not very cold, and it is not very noisy outside the window, a window with two glasses and a profile 60 mm wide will be enough. Next, be guided by the features of the climate and the environment.
For self-assembly plastic window will need the following:

To install windows you will need: a hammer, a drill, a screwdriver, a building level, etc.
- Foam gun and foam itself.
- Drill with speed control and perforation mode.
- Small ax and hammer.
- Metal scissors.
- Sharp knife, office knife is also suitable.
- Building level.
- Chisel.
- Grinder.
- Nail puller.
- Electric jigsaw. In the absence of such, you can use a hacksaw with fine teeth.
- Putty knife.
From materials additionally buy:
- Multipurpose construction adhesive.
- Wooden beam with a total length of 150-200 cm and dimensions of 2x4 cm.
- Dowels.
- Plastic corners and panels from the same material.
- Self-tapping screws of different sizes. Usually used 6x40, 2x16, 2x80.
- Solvents.
- Mixture for plaster.
- silicate adhesive.
Back to index
Do-it-yourself old window dismantling

Actually initial stage changing windows, it is necessary to dismantle the old window structure.
If windows have already been installed in the room, then before starting the installation of a new window, you need to get rid of the existing structure. If in the future you do not plan to install the old window anywhere, you can not try to be careful, but caution does not hurt. Do everything so as not to get hurt and not to drop the window out. The last rule is especially relevant for apartments in multi-storey buildings, because. the window could fall on someone or damage someone else's property. And in a private house, cleaning glass will not give you any pleasure.
First, remove the opening windows and sashes. Remove all glass from the structure, having previously removed the retaining glazing beads. Take a grinder with a circle on concrete or a hacksaw. Using the tool, make cuts along the horizontal and vertical elements of the window frame.
With the help of an improvised tool - a mount, a crowbar, a hammer will do - remove the product from the opening. In some cases, when the owner wants to keep the old window, the structure can be obtained without deformation and damage. But this will take much more time and certain skills.
At this stage, both the external ebb and the window sill are dismantled. In conclusion, the window opening is thoroughly cleaned of dust and all kinds of construction debris.
Back to index
Step-by-step instructions for installing a plastic window

Gradually, you came to the main stage of work - installing a new window. This work requires careful and consistent implementation of a whole list of various activities.
First, the window is prepared for further installation. At this stage, you need to fix the mounting plates to the end of the upper and side parts of the frame. In the future, it is thanks to them that the structure will be held in the desired position. Quite often, installers replace plates with hangers, which are usually used in the construction of various plasterboard structures. But when installing a plastic window, it is much more expedient to use plates. They are stronger than hangers.
The slats must be securely fixed to the end of the frame. When installing, the fasteners will have to enter the body of the metal profile of the block. And this should be done in such a way that the double-glazed window is not deformed. Fasteners are made using self-tapping screws. Select the diameter of these products, taking into account the size of the window. Standard-sized structures are usually installed using self-tapping screws with a diameter of 4 mm. For larger blocks (from 2x2 m), it is best to use larger self-tapping screws - 5-6 mm in diameter.
The fastening of the anchor strips to the end of the frame should be carried out so that they are installed in increments of 6-8 cm at a distance of 10-15 cm from the corners of the product.

After that, you need to correctly set the prepared window construction. On the surface, this procedure may seem quite simple, but take it seriously. It is best to enlist the help of an assistant at this stage. One of you will maintain the block, and the other will deal with its alignment.
Install the block in the opening and adjust its position using pre-prepared wedges. It is important to set the block strictly vertically and horizontally. At this stage, follow the recommendations:
- Wedged the module not only from below, but also on the sides.
- Make sure that all vertical frame members are in the same plane.
- If there is an impost, place wedges under it as well.
Check the evenness of the installation of the block using a level. If there are slightest deviations, correct them. And only after that proceed to fixing the module. To do this, use anchor bolts or dowels to fix the anchor plates to the opening cavity. It is important that the elements are attached strictly to the building envelope. To do this, it may be necessary to remove a layer of plaster where the anchor plates are attached.
After you securely fix the module, seal the seams with foam specially designed for this job. It is important that the material is intended specifically for the installation of plastic windows. Carefully read the instructions and make sure that it can be used in the humidity and temperature at the installation site of the module.
Moisten the surface of the seam with water before applying the foam. If you need to fill an area wider than 3 cm, do it in 2 stages with a half-hour break.
It is difficult to dispute the advantages of new plastic eurowindows over old window systems: their installation guarantees reliable thermal protection and sealing. Let's discuss the process of replacing old windows with new double-glazed windows.
The desire to save on the installation of structures and cope with the installation with your own hands is quite logical. Although plastic windows are a complex structure, you can handle their installation yourself and without specific equipment.
We take measurements
When taking measurements, one should take into account the features of the opening - with or without a quarter, other parameters and details, including the window sill and the presence of ebbs.
In the first case, one opening is measured in the vertical and horizontal directions.
The second option involves measuring the distance horizontally between the quarters in the narrowest place, adding 3 cm to the obtained value. The net distance from the bottom of the opening to its top is measured vertically, which determines the height of the planned glazing.

We make the required calculations
To perform installation without a quarter, it is necessary, in addition to measuring the distance between the surfaces of the window opening, to calculate its optimal dimensions. To do this, subtract 5 cm vertically to obtain the optimal height, and 3 cm horizontally to calculate the width. These gaps include a 1.5 cm layer of mounting foam around the perimeter of the window opening and 3.5 cm for installing a window sill. Another 5 cm is added to the measurements of the window sill with a low tide, so that there is a margin for mounting into the wall.
Before visiting the store and purchasing materials, you should obtain six dimensional data:
- window height and width:
- window sill dimensions (width with length);
- tide settings.

Preparing supplies and consumables
What is needed for self-installation of a plastic window? From the inventory you will need the usual set of tools:
- building level;
- set of hexagons;
- screw driver;
- jigsaw;
- perforator;
- knife;
- tape measure pencil.
Watch a video on how to install a plastic window in accordance with GOST standards:
The package of necessary consumables includes: foam for mounting, silicone composition, putty, screws.
To perform installation work, you need to prepare the profile of the future window, handles, window sill, fasteners and ebb.
Dismantling the old window
If the frames are deaf, the first step is to remove the elements that hold the glass. The opening sashes are removed from the hinges simultaneously with the glass. If the double-glazed windows are worn, the frames in them are loose and move in a horizontal direction, in order to avoid unnecessary problems and secure the glazing, it is recommended to dismantle them in advance.
After that, the frame is pulled out, sawn with a hacksaw in separate places. Sometimes the use of a grinder is required.
Having divided the frame into parts by sawing, they are removed with a crowbar, a hammer and other auxiliary tools, disconnecting from the window opening, with which they have “grown together” over the years of operation. If the frame is in good condition, you can do without dismantling. But it is still better to perform this action so that it is possible to install new glazing directly to the wall.

The procedure for dismantling the old window sill is the same, and if it is made of wood, such a measure is a necessity. The concrete structure is beaten off with a hammer or a crowbar and a sledgehammer are used. But if her condition is normal, you can do without a crash. But be aware that plastic construction is warmer than concrete, and if there is a lack of heat, it is preferable to install it, besides, a worn construction is not able to provide optimal contact with the new frame.
After dismantling the intermediate components, inspect, clean from dirt and, if necessary, repair the bearing parts of the opening.

Preparation of a new eurowindow
If the sashes open, lock them securely before installation so that they do not accidentally open during installation work. The window must remain closed even when foaming, sealing gaps, installing in a frame - its flexible ribs can bend in a semicircle under the action of the foam that increases during solidification.
Before opening the sashes, wait about 12 hours after the installation work is completed - this time is required for the fixing compounds to harden.
Important! Inexperienced installers make the mistake of removing the protective membrane before installing the window. But the film is required just to protect the window from damage and dirt during installation.Remove the film after finishing work related to finishing: puttying, painting, installing slopes.
Installation steps
Installation begins with marking the frame for fixing elements placed on all sides of the frame at a distance of 70 cm. If the double-glazed window is single and has a small weight, you can increase the distance, but by a maximum of 100 cm. . But double-glazed windows with a stand profile in the design do not require fixing from below.
In accordance with the marks on the frame, fasteners are mounted. They are combined with it so that the screw passes through the iron that is in the frame (it is called a bent channel). For this, special screws designed for iron are used, 0.4 cm in size, with a tip that looks like a drill.
On a note! It is permissible to use ordinary 0.5 cm screws, but then you will need to do extra work, drill 4 mm recesses for self-tapping screws with a drill, and then screw them in. They cost approximately the same, but differ in the thickness of the metal: the plates are 1.1-1.5 mm thick, while for suspensions this parameter is 0.5-1 mm.
At the selected points of installation of fasteners on the window opening, holes are made. This action is not performed by eye, but the frame already equipped with fixing parts is placed to the installation site and, in accordance with the mounting perimeter, holes are made 2-4 cm deep in their “imprints” on the outer side of the opening - a stone or brick wall. Fixing parts are immersed in these holes.
The window is placed in the opening using a level, if necessary, placing wood chips under the frame. The wedges can only be inserted opposite the transverse components of the frame: under the horizontally lying strips at their intersection with the vertical ones.
Simple installation instructions for the wedges: insert two at the bottom and one at the top to adjust the bottom edge and top horizontal. After that, two at the top for fastening the frame. Then the remaining wedges on the right and left sides, top and bottom. If there is an impost, it is wedged in the same way - so that the plumb lines are parallel to one another. The installation of wedges takes a lot of time - this is an important part of the installation work, on which the correct placement of the frame in the window opening in the vertical and horizontal directions depends.
The next step is fixing the double-glazed window in the opening.

Having adjusted the placement of the window, it is fixed with anchor bolts. Anchor fasteners are more reliable, but also more expensive. Any fastener can withstand a load of up to 60 kg - this is enough for a window. The cross section of dowels for fastening in concrete, foam concrete, brick and shell surfaces is 6-8 mm, and the length is 75-80 mm.
At the end of the installation work, the gaps between the window opening and the frame built into it are foamed so that there are no cavities.
The foaming technique in the presence of gaps larger than 2 cm involves the application of several layers of foam at 60-120 minute intervals to solidify each of the layers. This reduces the deformation of the foam mixture with its increase in volume and reduces unnecessary costs, since the excess will still have to be removed.
Important! If during the performance of work the temperature is less than +5, the foam must be used universal, suitable for all seasons, or intended for winter work.In most cases, window sills have standard parameters with the necessary margin, they are adjusted during installation to fit the dimensions of a certain opening. These actions are performed using a grinder (a hacksaw with small teeth is also suitable) and a jigsaw.
Then the trimmed part is adjusted in accordance with the substitution profile design: it is set exactly level - according to the same method as the window. As for the plugs on the window sill, it is preferable to install them so that they fit into the opening in the wall. To fix them, it is recommended to use a special glue, and not rely on silicone and acrylic compounds.
Watch another video that tells about the features of self-installation of PVC windows:
The design of the window sill should be placed evenly so that a cup filled with water can be placed on the surface without splashing. Make sure that the window sill does not change position even with excessive pressure.
It happens that the window sill is mounted with a slight slope (less than three degrees in the direction of the street). The slope prevents the accumulation of condensate on the windows, thanks to which the water flows to the ground.
Having finished the adjustment and fastening, proceed to foaming and seal the space under the window sill by placing a load on top so that the foam does not lift the structure. 24 hours after the foam has completely solidified, the excess is removed with a knife.
It happens that due to the unevenness of the window sill, after its installation, a cavity appears between its upper part and the frame. It is filled with a silicone mixture, but keep in mind that the silicone will darken over time due to the formation of mold, which will spoil the look of the white euro window. Try to avoid the formation of such a defect at the installation stage. Before mounting the plastic profile, screw Z-shaped plates made of galvanized sheet metal. Such elements will make the process of setting the window sill structure easier.
Installation of slopes with platbands
WITH inside windows on self-tapping screws 9.5 cm long install wooden slats, controlling their location with a level with a square.
The next step is the installation of the initial profile, which has a U-shaped configuration, on mini-screws screwed directly into the frame. This profile is intended for inserting slopes, when installing it, you need to be especially careful when combining its outer edges.

A profile similar to the letter F is attached with a stapler. Its groove must match the groove of the previous one; they will hold the slopes.
After the double-glazed window is equipped with two types of profile, slopes are installed in them.
The final step is the sequential installation of platbands: one at the top and two on the sides. To ensure mutual contact, their edges are cut at 45 degrees.
Adjustment of fittings
To adjust the sashes, the hexagons located next to the hinges are used. To do this, use a bit with six edges or adjust the flaps with a small wrench. Due to this, during their rotation, a position is created in which the flaps can be easily closed and opened without damaging other components of the system. The flaps must not open and close randomly, their position must remain stable.

Often, during manipulations with the sashes, there is a strong contact with the locking fittings, which is accompanied by characteristic sounds. The problem can be solved by unscrewing the self-tapping screw that fixes a certain fitting element, shifting the latter by 5-10 mm.
Installation of ebbs
In most cases, ebbs are mounted at the end of all installation manipulations. It is recommended to fix them directly under the window: thanks to this, you will prevent moisture from entering the gaps between the ebbs and the frame. But in some cases this is impossible to do, and the tide is attached to the frame with miniature iron screws 0.4 cm in diameter and 0.9 cm long.

Let's calculate the costs - these are the labor and financial costs of the installation itself.
The technique of self-installation of a window involves two main types of work: the dismantling of an existing window and the installation of a new one. In order to remove the old window, it will take from 0.5 to 1.5 hours. Installation of a new double-glazed window with average dimensions will take about a couple of hours.
On average, it takes 2.5-3.5 hours to replace one double-glazed window. Working in this rhythm, you can install several windows at once in one day.

Thanks to do-it-yourself glazing, you can save on the services of specialists, because professionals require payment in the amount of 2-4 thousand rubles. - for glazing one opening. When ordering this service from any company, you can spend even more if the prices are formed as a percentage of the price of double-glazed windows (from 10 to 40%). And if you do everything yourself in accordance with the step-by-step instructions, you will get not only savings, but also confidence in the quality of the work performed.
Does it make sense to mount windows with your own hands
Self-assembly of plastic profiles is not as difficult as it seems. Almost all double-glazed windows have a modular design that does not involve the assembly of individual elements and is almost ready for installation. In order to insert and secure them in the opening, it is not necessary to be a professional; expensive tools are not required for this.

But please note that the installation is carried out under your responsibility - this means that you will have to take measurements and purchase materials yourself.
The manufacturer's warranty will apply exclusively to double-glazed windows and fittings. The person who installed the window will be responsible for the quality of installation work, the tightness of the seams, the correct location of the structures and the performance of the window system.
If you use the services of an installation company, the guarantee for the work performed and consumables will be from 1 to 5 years.
But if you have the time and desire to install the plastic window yourself, do not be afraid: you will cope with this task if you follow the step-by-step instructions. You will be able to mount the glazing yourself, enlisting the help of one of your relatives or friends so that you are given the tools.
You do not have to pay professionals, because their services are not cheap, and the work on installing a new window will not last much longer than if it were done by specialists.
Another detailed video about how to properly install a plastic window:
Common Mistakes
Newbies installing for the first time plastic double-glazed windows often make the same mistakes. Such shortcomings are not critical, but can affect the service life and ease of use of the window system.

- The window profile is installed with glazing beads on the street, thereby opening the way for intruders to enter the house. To get into the room, unauthorized persons only need to remove the glazing beads, pulling out the double-glazed window will not take them much time and will not require much effort.
- Installation is not always performed correctly, as is, without checking or correcting the level; This results in design failures.
- When sealing cracks with building foam, they ignore the instructions attached to it. Many do not even suspect that the foam is destroyed under the action of sun rays, and this is stated in the instructions. To maintain the tightness of the window system, the foamed slots must be closed with a finishing material.
- The double-glazed window is fixed exclusively with mounting foam without additional fasteners in the opening. A similar mistake, if an opening with a quarter, can cause cracks on the slopes, due to the fact that the foam cannot provide full fixation of the frame, and when it shifts, it will begin to break the slopes. A double-glazed window installed in an opening without a quarter, over time, under the influence of vibration and other influences, may fall out altogether.
 Read about: the main causes of fogging windows and how to deal with it.
Read about how to properly install the thermostat on the battery.
It is undesirable to use an iron cutter when dismantling any wooden structures, including a worn frame - this tool is not suitable for this work. Thin disk with a rotation speed of 7 thousand revolutions per minute. easily damaged by a knot - this is very dangerous for the performer. The use of a toothed disc should also be abandoned - for the same reason.
Until the foam has completely hardened, do not install the handle to open the sashes so that the household does not unknowingly ruin your work.


