How to make a backlit mirror with your own hands? LED strip for bathroom mirror DIY deep mirror with LED lighting
It is unlikely that there will be such an apartment in which there would be no mirrors. All human life is accompanied by these reflective glasses. Leaving the room on the street, everyone will definitely look at how he looks. Well, for a woman, often spending a lot of time in front of him is almost a vital necessity.
Of course, for most men this is not so important, but, on the other hand, how to imagine the same shaving, morning toilet without a mirror in the bathroom? And of course, everyone wants it to look aesthetically pleasing and beautiful. Of course, you can order a mirror of any curly shape, but still by far the most interesting and non-standard option This is his backlight.
However, for many, buying ready-made glass can be too much. expensive pleasure, and therefore we will try to figure out how difficult it is to make a do-it-yourself illuminated mirror for a bathroom or hallway.
First you need to decide in which room you need a mirror and what type of lighting will be used.
Types of mirror illumination
This work can be performed in three specific versions or in a combination of several of them. The main types of illumination are as follows:
- Spots at the top or sides of the mirrors. Such lamps can be rotated, thereby it becomes possible to direct the light flux to a particular area. They are produced in various versions, both in a single version with adjustment, and in the form of small sconces with 2, 3 or 4 lamps, which can be directed independently of each other. With such a backlight, you can illuminate the person standing in front of the mirror or a certain part of the room.
- In the form of LEDs placed behind the mirror and directed outward. With this option, the light flux is directed to the person standing in front of him, perfectly illuminating the face. The illumination of the mirror in the bathroom made in this way will be very functional.
- LED lights in the form of a tape is also located behind the mirror, but the direction of the light flux is opposite to the second option. Such illumination performs only a decorative function, gives the glass unusual view and when installed in a bathroom or hallway decorates the interior.
Well, now it makes sense to consider making each of the types separately with your own hands.

Spots
This type of lighting is the easiest to manufacture. The main thing that is needed is to calculate the number of spotlights, the total lighting power, and, depending on it, choose the thickness of the wiring section.
After acquiring the necessary parts, you can proceed with the installation. The mirror to be illuminated should already be in its place, or its exact location should be noted. It is also necessary to note the places of the future location of the spots, and then dismantle the glass in order to avoid damage to it. It is possible to bring wiring both in special boxes and hidden, by gating, which is more acceptable.
After laying the wires, the shtrabs are puttied, cosmetic finishing is performed. Well, now it remains only to fix the spots in their places and hang the mirror.
This option requires more effort. First you need to order a mirror with a frosted glass frame around the perimeter. Of course, you can remove the inner mirror layer yourself, but this will require accessories, although this work is not too difficult. The main thing is accuracy, because glass is a rather fragile material.

To do this, you will need a sandblaster with a compressor, reinforced tape and, of course, an accompanying tool in the form of a metal ruler, knife, etc.
Having turned the mirror over, on its back part it is necessary to mark the boundaries of the future matte surface and, leaving them uncovered, glue the rest of the surface with reinforced tape. After that, using a sandblasting machine, the reflective layer is removed from the unprotected reflector.
Next, a frame is made of thick plywood or boards (the thickness is chosen by the master, based on his preferences). Its size should be such that the mirror fits exactly inside. It is assembled using liquid nails and screws, it does not hurt to fasten it metal corners. It is also necessary to fix the furniture corners from the inside, on which the canvas will lie.
An LED strip is attached to the wall around the perimeter. The power supply for it can be hidden behind a false ceiling or in another convenient location where no water can get in.
It remains to fix the plywood frame on the wall in any convenient way, insert the mirror into place, securing it with wooden glazing beads, and enjoy the resulting product.
Decorative lighting
 DIY decorative mirror lighting
 This option is a little simpler than the previous one, since special preparation of the mirror sheet is not required. It will take the manufacture of almost the same plywood frame, with the only difference being that it should be smaller than glass. It should be 2–4 cm larger on all sides around the perimeter. inside mirrors, with the help of liquid nails, a wooden base is attached, from the outer end of which an LED strip is glued.
After complete drying, the mirror is hung in its place and the power is connected. On this, in fact, the work on making a mirror with illumination with your own hands is over.
Of course, everyone can come up with their own lighting options, here, of course, you need to rely on your imagination, but the main ones, basic options highlights we discussed.
Basic Rules
The basic rules that you need to know in order to make a mirror with LED backlight with your own hands:
- compliance with safety regulations when working with glass;
- knowledge of the principles of electrical safety when connecting the power supply, as well as attention to its location - water should not get on it. Doing so may cause a short circuit, burn out the device, or damage the electric shock;
- accuracy and care at each stage of production and strict adherence to instructions.
And then you get a wonderful hand-made product that will delight you with its appearance and functionality for many years.
A mirror is an indispensable attribute of every person's life. Indeed, in every apartment these reflective glasses can be found. It is necessarily present in the corridor, because before going out into the street, everyone evaluates their appearance. Well, for a woman, a mirror is a necessity of life.
And for men, this attribute is also important. After all, it is impossible to imagine the process of shaving or morning toilet without reflective glasses. Of course, many people care not only about their appearance, but about the aesthetic design of this irreplaceable attribute. Today you can order a mirror of any shape and finish. But the most interesting options must have a mandatory component - good lighting.
Unfortunately, not everyone can afford to buy finished glass, so you need to figure out how you can make a mirror with LED backlight with your own hands.
Types of mirror lights
There are several options for lighting mirrors. They can be performed both in a combination of several, and in certain variations.
Mirrors with such highlights look spectacular:
- spots;
- LED Strip Light;
- LEDs.
Spots are often placed at the top or on the sides. The advantage of such lamps is the ability to change their position. Thanks to the turns, the light can be directed in the desired direction. Manufacturers offer various options execution. You can use a single version with adjustment. Especially popular are options in the form of small sconces with 2, 3 or 4 lamps. They can be directed in different directions independently of each other. Such illumination allows you to illuminate a certain part of the room or a person standing near the reflective glass.

Most often, a mirror with LED backlight can be found. It is placed behind a mirror, pointing outward. This method of installation allows you to direct the light flux to the person standing in front of the mirror, perfectly illuminating the face. This lighting option will be the most functional.
In the bathroom, a mirror with LED lighting in the form of a tape is often placed. It is fixed in the same position as the previous version. But here the luminous flux performs only a decorative function. Thanks to this, the glass takes on an unusual look. Often such a mirror is installed in the hallway.
So, let's take a closer look at how to make a mirror with LED backlight yourself.
This method is the easiest to make. The main thing is to correctly calculate the required number of lighting elements. In addition, you should pay attention to the overall power of lighting. This information will help you select the required wire section thickness.
Got everything you need? Now you can start installing the elements. Attach the mirror first. permanent place. If you are not sure that you can handle the installation in vertical position, it is necessary to note its exact location.

We determine the places of future placement of spots. We dismantle the glass to prevent damage during installation. lighting fixtures. Wiring can be laid using special boxes or hidden using gating. The last option is more convenient.
After that, it is necessary to putty the streaks, to perform a cosmetic finish. The final step is to install the spots in their places. The mirror is attached to the base.
Outside LED illumination
Of course, everyone can come up with their own lighting options, here, of course, you need to rely on your imagination, but we discussed the main, basic lighting options.

Features of the manufacture of backlight
Decided to do all the work yourself? Be sure to know the basic rules for the manufacture of mirror illumination:
- Observe safety precautions when working with glass.
- Make sure you are familiar with the principles of electrical safety when connecting the power supply. In addition, pay attention to its location so that water does not get inside. After all, this can cause a short circuit, electric shock, burnout of electrical appliances.
- Be careful and accurate at every stage of the manufacture of the mirror with LED light for the bath. Follow the sequence of installation work exactly.
Conclusion
IN modern houses The sizes of mirrors can be varied, as well as their location. Such glasses can occupy the entire wall, and sometimes they are even placed on the ceiling. LED lighting creates an attractive and unusual design. In addition, such lighting works reliably and significantly saves energy consumption.
Without a mirror modern apartment impossible to do. You can find hundreds of models of this desired item in stores. There are even instances various types illumination. The backlight itself is most often a purely decorative attribute, especially in the bathroom. But sometimes she does practical functions. Decorative lighting is built into the mirror. Functional - illuminates the person in front of him. Factory-made mirrors are quite expensive and do not always meet the aesthetic preferences of consumers. In this case, a backlit mirror can be made by hand.
Illuminated mirror drawing.
Backlight Options
There are several lighting options:
- Installation of outdoor spotlights. Spot is spotlight, which can be rotated from side to side on a specially designed bracket. It can be single adjustable lamps, light sconces small size. They are able to illuminate the person at the mirror, some part of the bathroom.
- A backlight that illuminates the person standing in front of him, his face. Here, modern LEDs often perform the function of lighting devices. Their light is softened by the frosted glass built into the mirror. Most often, such a backlight is installed in mirrors, made in the form of a small cabinet.
- Placement of illuminators behind the rear wall of the mirror. They perform a decorative function. LEDs illuminate the mirrored glass, giving it an unusual appearance. At the same time, illuminated mirrors of this type serve as decoration for the bathroom interior.
DIY backlighting
Making a backlight for a finished mirror with your own hands is a fairly simple task. For work you will need:

Illuminated mirror mounting tools.
- electric jigsaw;
- screwdriver;
- screws;
- ruler;
- screwdriver;
- metal corners;
- glue;
- electric wires;
- light bulbs;
- bulb holders;
- mirror glass;
- thick plywood or processed board.
After the repair, the question arises of decorating the rooms. Properly selected decor will help in creating an individual image of your apartment. Futuristic illuminated mirrors are gaining great popularity, because this solution gives a special charm to the bathroom or dressing room. Mirrors are incredibly convenient to use for both men and women.
In furniture stores and mirror workshops there is a huge selection of such mirrors for every taste, but their prices are somewhat overpriced. To make such items yourself, you do not need any special knowledge or expensive materials and tools.


How to do?
Thanks to the variety of lighting equipment in stores, there are hundreds of ways to create such a mirror with your own hands without overpaying. Of course, you can make a special frame, drill holes for the plinths in it, buy wiring and light bulbs, and then conduct electricity, assemble the entire structure. This option is quite expensive, and a person may simply not have time to fuss with all these stages.
There is also an option to buy a ready-made decorative garland on batteries, carefully attach it around the perimeter of the mirror with a glue gun, and simply remove the excess length. But the switch in such garlands is not always convenient, and if you leave the structure burning all night, you will have to spend money on new batteries too often.
You should disassemble a practical way that not only saves money and time, looks stylish, but is also safe.


Tools
For quick and high-quality work, you should acquire the following tools and devices in advance:
- screwdriver;
- screws;
- ruler;
- scissors;
- screwdriver;
- metal corners;
- glue, sealant or glue gun;
- electric wires;
- LED LED strip;
- connectors;
- power unit;
- mirror glass.


Choosing an LED strip
First you need to purchase a special LED strip in the store desired length. So, you need to take a tape measure and measure the mirror around the perimeter, adding a small margin "for every fireman." You should also decide on the function of the mirror, because the choice of the color of the glow will directly depend on it. Blue lighting in the bathroom looks creative, but it will be quite problematic for a lady looking into such a mirror to apply makeup. In this case, it is better to take a color as close as possible to daylight. Your wife or daughter will appreciate such care.


If you are going to illuminate a rather large mirror, and the length of the tape turned out to be more than 5 meters, you need to purchase special connectors. Also, do not forget to buy a power supply, at least half as much power as the total tape. It is necessary to match the tape to the mounting surface by color. It is by the color of the tape, and not by the color of the glow. So, when the electricity is off, it will not be noticeable on the mirror.
Recently appeared on sale LED strips with double-sided tape to facilitate its fixation on the surface. So, if you overpay a little, then you will need much less glue to work.
If you want to get a bright hallway, then just wrap a diode tape around the mirror. This is for the lazy ones.


Mounting method
The easiest way is with a glue gun. The process is extremely simple: apply droplets of glue at a short distance, fasten the tape behind the mirror - you can on the back of the mirror itself, or you can directly to the wall. This option will covertly illuminate the contour of the mirror and bring novelty to the interior. If this method is too simple for you, then you can buy a special aluminum profile, thread the tape into it, attach it to the edge of the mirror with the right side. Do not skip the step with degreasing the surfaces to be glued - the reliability of fastening will increase significantly. No one wants to glue a falling off tape with enviable regularity, and a sagging tape will look very careless and cheap.
Be careful, because when attaching any parts directly to the back wall of the mirror itself, there is a danger of damaging its amalgam
For such manipulations, it is better to use a neutral sealant produced specifically for glass surfaces.


Network connection
In order for the LED strip to glow, electricity must be supplied to it. It is not possible to immediately plug the plug into a 220V socket. Especially for this, a power supply was purchased. If the product is intended for the bathroom, carry out all installation work in compliance with safety regulations. Do not neglect your health, because high humidity and the close proximity of electrical wiring can be dangerous.
All electrical wires must be securely insulated. For example, you can use a regular sealant, and it is preferable to buy a tape with moisture protection. It is cut in certain places. They are usually labeled by the manufacturer. Failure to follow these labels may result in part of the product not working.. Next, the tape, connectors and power supply are assembled into one network. It is recommended to do this by conventional soldering. Considering that the tape itself is quite tiny and fragile, you need to be a real soldering master, have a lot of patience, otherwise there is a risk of taking quite a lot of time with work, or even completely abandoning it.


For such a case, connectors are needed. They will provide great assembly speed combined with its simplicity. The connector is a plastic "trap" into which the two ends of the LED strip segments are inserted, and then snapped into place. The contacts inside the connector are closed, and the tape can work as a whole. There are three types of connectors on the market:
- non-bending ones are used to connect two straight pieces of tape.
- Corner fasten the tape at a right angle.
- Conditionally bending can be replaced with both straight and angled connectors, depending on which one is needed in a given place.


During the connection procedure, it is important to observe the polarity, because sometimes the markings on products from different manufacturers may not match, so it will not be superfluous to check the direction of the current.
Fastening
After completion of all work, the mirror must be hung in its rightful place. To do this, you can use special glue for mirrors, simply gluing it to the wall. You can also hang the mirror on pre-attached wall mounts. So, drill holes of the appropriate size, insert dowels into them and screw in large screws in the form of hooks. Don't forget to level the location of the holes in the wall so that the mirror hangs evenly. This will definitely be more reliable, and if necessary, you can always remove and hang the mirror back in a matter of seconds.


Illumination as decor
Due to the variety and availability of various lighting fixtures, the choice of backlit decoration option depends only on your imagination. If you wish, you can create a multi-colored backlight, but you will also have to buy a special controller in the store, which will allow you to collect all this multi-colored beauty into one network. Also, the tape can be attached not just along the edge, but to create a specific pattern. The shape of the mirror can be chosen absolutely any. It all depends on your preferences.
If desired, you can purchase a special touch or infrared sensor. With it, you can adjust the strength of the glow, brightness, and also set up several glow modes. This option requires additional knowledge, so it is better to take the help of a specialist in this matter. It would be appropriate to supplement such a mirror with various shelves, choosing as a material strained glass. On the shelves it will be possible to place various cosmetic accessories. It looks stylish, and this option is incredibly convenient to use.
Such an unbanal design move, as the addition of an illuminated mirror to the interior, will create a bright, eye-catching accent for a bedroom or bathroom.
The space is noticeably expanded due to the soft reflected glow. If desired, it is also possible to install sensors and several lighting modes. But first of all, let's look at a few simple instructions that describe how to make a luminous mirror. All the materials needed for this are easy to find and purchase. This is, first of all, the power supply and the tape itself, connecting wires and sealant (preferably silicone).


 LED lighting in Teneri mirror
As you can see from the photo, thanks to the use of lighting, the room looks even lighter and more airy, and the interior does not seem to be heavy.
It may seem that making a mirror with LED lighting on your own is quite difficult, but this is not entirely true. A pleasant result of your efforts will be a more modern and complete look of the room.
Following a simple instruction, you can make an illuminated mirror, creating an elegant luminous decor element that will definitely suit you in everything and fit perfectly into the interior.
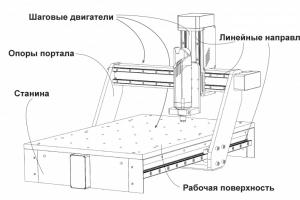
 Standard arrangement of rear mirror elements
After you have decided on the external requirements, you should think about how exactly to provide light - with ordinary light bulbs or a diode tape. The second option is preferable, especially if you need a contour glow of an object of complex shape. The lighting design can be placed in a box or simply glued.
Mounting the LED strip around the mirror
 Mirror LED strip
The photo shows a tape where each LED is soldered to a flexible board with resistors, and this whole structure, in turn, is attached to double-sided tape.
Choosing an LED strip
When thinking about how to make a backlit mirror in the bathroom, you should first make sure that the diodes have a moisture-resistant coating. The more powerful the diodes, the brighter they will shine and the more electricity will be lost.
There are also diode strips in which the lighting color can be switched. An important criterion is the power of the tape power supply. To calculate it, multiply the power of one meter (usually 4-8 watts) by the length of the tape.
In order to make the backlight of the mirror LED strip, you must:
- Attach the tape to the mirror with double-sided tape.
- Solder the wires to the LED strip, observing the polarity. If necessary, seal the joints with sealant. Homemade mirror lighting is ready. Additional light sources are not required, which means that you can fix it almost anywhere. A properly installed structure will work effectively for a long time.
- Fasten the power supply outside the bathroom and connect it, paying attention to the need to ground the unit case.
 You will need: LED strip, soldering iron, double-sided tape, sealant
 Secure the tape with double sided tape
 Solder the wires to the tape, observing the polarity
 Treat the joints with sealant
 Fix and connect the power supply
How to cut your own LED strip
Understanding how to make a do-it-yourself illuminated mirror is impossible without knowing the rules for working with LED strip.
It is divided into many segments. Manufacturers usually mark with a line the places where disconnection is possible. If there is no marking, you can independently calculate the pads between which a cut is possible.
When cutting a tape with waterproofing, it is necessary to process after connection silicone sealant locations of contact points.
 The correct option for cutting the LED strip
How to make a mirror with led lights in a box
 Headset and mirror with led light
- It is necessary to strengthen the mirror on the frame, which can be a plastic base or a box made of timber. It is worth immediately considering the way in which the mirror will be attached to the wall. The plastic base is glued to reverse side mirrors, a wooden box is attached with self-tapping screws through pre-drilled holes.
- The next step is the installation of a backlit mirror. It is necessary to place an LED strip on the outside of the prepared frame and install the power supply inside the frame.
- Next, attach the tape to the power supply. To do this, the wire from the block must be brought out of the frame.
 Fix the mirror to the frame, which can be a plastic base or a box made of timber

 Attach the tape to the power supply