Do-it-yourself urn from tin. We choose a metal urn. Types of garbage cans, urns and handmade ashtrays
Not everything that we consider garbage is as useless as it might seem at first glance. In some cases, this very garbage can serve as an excellent material for the implementation of the most daring design ideas.
1. Window shutters

Are you thinking of replacing your shabby wooden shutters in your country house? Do not rush to send them to the trash. Quality painting, a piece of plywood, a wooden countertop and furniture fittings will turn a rag into a charming locker.
2. Brackets for shelves

From unnecessary brackets left after repair and a small piece of chipboard, you can make a beautiful and original organizer for correspondence, books and the press. Such a craft will look especially stylish and noble in white and gold.
3. Skateboard

While cleaning out the garage, did you find your son's old skateboard? Use it to create an original shelf, which is not difficult to make. You need to unscrew the wheels from the board, using aerosol can paint it in a trendy copper color and drill holes for the rope. The original shelf is ready, you can hang it on the wall.
4. Wooden window frame

Decided to replace the windows in a country house? Use the old wooden frames to create original and functional gizmos for the home. For example, high-quality cleaning, bright paint, a narrow shelf and a few hooks will turn an old window frame into a stylish and functional note board that will be a stunning hallway decoration.
5. Floor lamp

A lampshade from an old hopelessly broken floor lamp can be turned into a charming basket for laundry, toys or magazines.
6. Banks

Too many jars in the pantry? Turn them into cute storage containers for tea leaves, sugar, salt, cereals, cotton swabs and other little things. The process of creating such containers is very simple. Decorate the jars with colored enamel, painting or appliqué, and decorate the lids with beautiful furniture handles.
7. Stand for knives

An unsightly old knife holder can be turned into a fantastic desk organizer for stationery. You only need to slightly modify the holes and give the stand a new bright color.
8. Suitcases

Many have suitcases from the times of the USSR on the mezzanine, but few know what to do with them. But the options non-standard use loads of suitcases. For example, parts of old travel bags are obtained original shelves, which will become a real highlight of any room.
9. Wooden boxes

Bright shelves for the hallway - lovely way use unnecessary wooden boxes. This storage system will fit perfectly in the hallway. country house and is perfect for storing shoes, hats and bags.
10. Kitchen cabinet

Ordered a new one kitchen set? Take your time to get rid of all the parts of the old one. For example, from a small kitchen cabinet you can get original table for children's games or creativity.
11. Stool

An old stool that absolutely does not fit into the interior can be turned into an unusual organizer for creativity. Paint and several rag pockets will allow you to store rolls of paper and fabric, scissors and other stationery in it.
12. Vase

Painting and a little decoration will turn an ordinary plastic bucket into an exquisite flower vase.
13. Planters

When changing lamps in the apartment, save a few glass shades from which you can make stunning flower pots. Colored enamel will allow you to transform nondescript details of lamps and turn them into bright home decor items.
14. Table
A discarded cast iron bath can be turned into a comfortable chair for the home or garden. Of course, the process of creating such a chair is quite complicated and time-consuming, but as a result, you will be able to get an exclusive piece of furniture that will decorate any space.17. Hose

A vacuum hose is an excellent basis for creating a wreath that is fashionable today, which can be used to decorate a door or wall.
Typically, a summer cottage is made up of various garden buildings and small architectural forms that complement the landscape design of the territory. Strange as it may seem, but most owners of a summer cottage forget about such a useful element as a trash can. The urn is not only a container that serves to collect various garbage, but also a small architectural form, the correct design of which will uniquely decorate the backyard territory. In addition, the urn is an indicator of the culture of the owners, which emphasizes the attitude not only to the garden, but also, in general, to environment. Let's talk about how to make a trash can with your own hands!
Buy an urn or make your own?
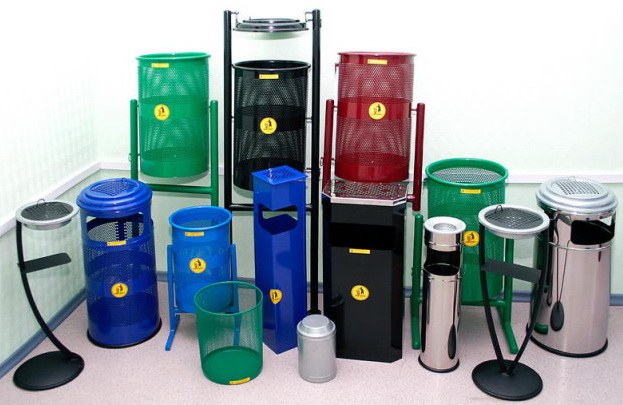
If you do not have creative thinking and imagination, but still want to equip your summer cottage with a couple of beautifully designed bins, you can buy them at any specialized store. To date, manufacturers of garden sculpture and provide consumers with the following types of urns:
- Metal (chrome-plated) - suitable for arranging city streets, entrances to shops, office buildings, banks, etc. It is recommended to equip a summer cottage with chrome urns only in high-tech style.
- Metal (forged) - this type of waste bin is also suitable for arranging parks, urban gardens and streets. For giving forged urns are a very good option, because. their appearance is always original and striking. The disadvantage of metal forged urns is the high price.
- Concrete - this type of bins with right choice outdoor pattern is suitable for an antique garden. Their advantage is high durability and a luxurious look. The disadvantage is the high cost and weight (it is difficult to move a concrete urn from place to place).
- Plastic bins are the most economical option for trash bins. Due to its low price and wide range of color shades, it is popular among summer residents. The disadvantage of plastic bins is cheap appearance, which very often worsens the overall composition of the garden plot.
- Wooden urns - products made of wood with engraving and varnishing will decorate very luxuriously garden plot giving it elegance. The problem of wooden urns is low durability, although if the tree is treated in advance with antiseptic agents, this shortcoming recedes into the background.
DIY trash can: original ideas for creating and designing
Creating an urn with your own hands has the following advantages:
- You save money
- You increase your level of creating fakes with your own hands
- Creating an urn with your own hands brings pleasure and develops imagination
- Can make the urn of suitable size, shape, color, style
As you can see, the benefits of making a do-it-yourself urn are significant, so this work makes sense. In order to inspire you to create an urn, here are some original ideas for you:
Idea No. 1 - Urn from car tires
Creating an urn from car tires will take quite a bit of time.
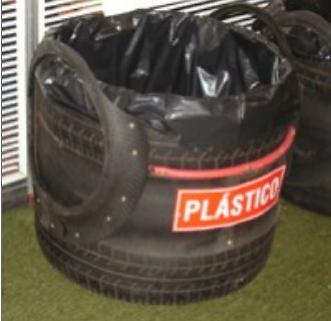
To begin with, we look for used tires (at least 2), wash them from dirt and dry them. After that, we fasten together with metal brackets (from the inside) and close the outer joint with a piece of the car chamber, or something suitable. In the end, we paint the finished product with bright paint and set the urn in a suitable place, preferably on.
Idea number 2 - Urn from improvised materials
Anything can be used to make an urn with your own hands - wooden barrel, a plastic or metal bucket, an air filter from a truck, etc. The main thing is to decorate the base with suitable material. To do this, you can use wooden pickets, planted on glue, mounting foam, from which you can later cut out shapes, as well as ordinary paint.
We will provide you with the most interesting photos examples of urns from improvised means:


Idea No. 3 - Urn with a lid
In order to prevent rainwater from getting into the bin, and to make the process of removing garbage from the bin faster and easier, it is recommended to add a small visor and racks with a rotating axis to overturn the container to the standard design of the bin.
In this example, we will provide you with an urn construction made from the following materials:
- Car disc 1 pc.
- Street lamp housing 2 pcs.
- Bolts with nuts 2 sets
- Metal channel 40*20 mm 2 pcs.
Also, to create this urn, we need a welding machine, spanners for bolts and nuts of the appropriate size, paint, brush.
A photo example of this urn will replace all the necessary explanations for creating the urn:

Here we have provided the most original variants do-it-yourself urns for giving. We wish you more creative ideas and we recommend that you read the article how to do it yourself!
Garbage cans, trash cans, ashtrays. You can’t tell right away that these are essentials. But imagine cozy Vacation home without such familiar and inconspicuous parts of the interior is impossible.
The easiest way to get a trash can or trash can is to buy it at the nearest store. This is the path of lazy people. Isn't it better to make a trash can with your own hands? And it's not even about saving. A little patience and imagination, and suburban area will decorate not a standard nondescript bucket, but a real masterpiece.
Do I need to make trash cans and bins with my own hands?
Garbage cans, photos of which are posted below, will decorate any country house:
Do-it-yourself bins and trash cans have a number of advantages:
- Saving Money. Even if buying a trash can or an ordinary trash can does not hit the budget hard. A little savings won't hurt.
- Similar products are more beautiful, brighter than store ones. They are individual, unique, fit perfectly into the interior.
- Their creation develops imagination, gives pleasure and joy in the process of creation.
- Possibility to make litter bins and waste bins, the sizes, colors, shapes and styles of which are ideal for a specific location.

Garbage can decoration
The easiest way to get an original trash can is to purchase an inexpensive factory-made bin and decorate it. All that is needed for this - acrylic paints, a brush and a little imagination.
Even special artistic talents are not required to decorate the tank. There are many simple patterns that everyone can do. For example, geometric patterns. Choose a sketch according to your abilities and desires and forward to the goal.
- Garbage can from a barrel. If the household has an old unnecessary barrel, there is no need to buy a garbage container. Repair it. Decorate to your liking. Install in convenient location. The dumpster issue has been resolved.

- Garbage cans from plastic bottles. To make a trash can with your own hands, any materials at hand will do. For example, old plastic bottles. This is a wonderful material that constantly accumulates in any home.
Tip: To get beautiful and neat trash cans, choose plastic bottles of the same shape. Moreover, they can be both one color and multi-colored.
Having prepared a sufficient amount of the main "building material", proceed directly to the manufacture of the trash can:
- Make the base, middle and top of the future trash can. Take 3 elements of any convenient shape. It can be a rectangle, circle or oval. They can be made from coarse wire or aluminum plates. In extreme cases, even a metal profile for drywall is suitable. Try to keep all three elements the same size and shape.
- Make a tank frame. To do this, take from 2 to 4 pieces of reinforcement or a metal profile of the same length. The length of one piece of reinforcement is the height of the future tank. Use rebar or profile as side posts. Attach the bottom, middle and top of the tank to the racks. For fastening, wire, clamps or rivets can be used.
Tip: The height of the tank should be a multiple of the height of one plastic bottle.

Build the walls of the tank using the plastic bottles prepared earlier:
- Cut the steel wire into pieces that are 30 cm longer than the height of the tank.
- Make holes in the center of the bottom and lid of all plastic bottles. Use a nail or an awl.
- Using pliers, secure the end of the wire to the bottom of the frame. For reliability, make 2-3 turns.
- Thread one or more plastic bottles onto the wire. The number of bottles depends on the expected height of the tank. With correct calculations, the neck of the upper bottle touches the middle of the frame.
- Fasten the wire to the middle part of the frame by making 2-3 turns.
- Put the required number of plastic bottles on the wire.
- Attach the wire securely to the top of the frame. Use pliers to secure.
- Repeat the above procedures until the entire frame is bottled.
- Try to carefully stretch the wire. Neighboring bottles should fit one to the other very tightly.
- When using multi-colored bottles, try to achieve a harmonious pattern when placing them. This may be an alternation of bottles - a white stripe, a brown stripe. It is possible to perform the lower part of the tank in one color, and the upper part in another. Feel free to show your imagination.
- The trash can is ready. Of course, it is not designed for burning waste and heavy debris.
Usually such tanks are devoid of a bottom. For cleaning, it does not need to be turned over, just tilt it slightly.
If you think this is inconvenient - build the bottom in any convenient way:
- Tightly braid the lower horizontal part of the frame with wire. The bottom will not be solid. The smaller the weaving pitch, the smaller the debris it will hold.
- Cut the bottom out of any material. It can be aluminum, steel sheet. Even moisture resistant plywood will do. The option of using thick cardboard is also not ruled out. In this case, the tank must be installed in a place protected from moisture. Drill holes around the perimeter of the bottom. Attach the bottom to the bottom of the frame with wire.
Excellent urn from a barrel or bucket
Do not rush to throw away an old bucket or a barrel that has served its time. They will make an excellent urn. If the source material is an old bucket:
- Modernization of an old, but a whole bucket under the urn is very simple. enough to buy bright colors and decorate it as you wish.
- If the bucket is rusty, clean off the rust thoroughly. Put a patch of aluminum or tin over the hole. Tape the outside of the bucket, and if necessary also inside, with self-adhesive tape in one neutral shade. To decorate the urn, use pieces of multi-colored self-adhesive tape or paint.

How to make an urn from an old barrel:
- Cut the barrel to the correct size.
- Remove rust, patch holes.
- Beat the barrel with any building material. It can be wood, plywood, plastic, thick cardboard.
- Color the resulting urn. Feel free to fantasize.
Urn from old car tires
A beautiful urn is obtained from old car tires. Even if there is no car, any station Maintenance will be happy to provide them to anyone who wishes, and completely free of charge. Making a tire urn is very easy. It won't take long:
- Take 2-3 old car tires.
- Thoroughly clean them from dirt and soot.

- Rinse tires with water and dry.
- Fasten the tires together from the inside with metal clips.
- Outside, mask the joints. A piece of a car camera is a good fit.
- Paint the urn with any bright colors.
- Since such an urn has no bottom, use garbage bags.
Tip: it is advisable to use garbage bags with any design of the bin. This will make cleaning easier and eliminate the need to wash the urn.
Urn with lid
Often the urn is installed in an open area. In this case, it is desirable to protect its contents from rain. Make an urn with a lid:
- Take the disc from the old wheel. It will make an excellent stable base for the urn.
- Using aluminum strips or a metal profile, connect the disc to a regular bucket. For connection, use bolts or self-tapping screws. The bucket is fastened in such a way that the strips or profile protrude above its upper edge by at least 10 cm.
- Attach the lid to the top of the structure. It can be a lid from a bucket or any pan of the appropriate diameter.

DIY ashtray
One type of urn is the ashtray. Ashtrays, both desktop and floor, are an indispensable attribute of any private home. Even if the owner does not smoke, an ashtray will not hurt. It successfully performs the functions of a miniature urn. In addition, not all guests lead a healthy lifestyle. Install outdoor ashtrays near the barbecue, at the entrance to the gazebo.
What table ashtrays are not made of. Wood and plastic, plaster, clay, metal. The quickest and easiest way to make an ashtray is to use a regular beer can:
- Take an empty soda or beer can.
- Wash it thoroughly.
- Cut off the top of the jar with a sharp knife. Trim the edges.
- Make vertical cuts to the bottom of the jar with scissors. The cut should not reach the bottom by 2-3 cm. The width of each strip is about 1-1.5 cm.
- Roll each strip down into a roll, or fold them into a weave.
- The simplest desktop ashtray is ready.

Do-it-yourself floor ashtray:
- An old milk can or a piece of ventilation pipe is perfect for making a floor ashtray.
- Cover the can with a fine mesh, decorate. Install in the right place and start using.
- With cutting the pipe will have to tinker a little longer. Place an old bucket inside the pipe or use its bottom. Cover the pipe with a fine removable mesh, decorate. The ashtray is ready for use.
Tip: When working with metals that need to be cut, be very careful. There is a very high chance of injury.
If you do not have creative thinking and imagination, but still want to equip your summer cottage with a couple of beautifully designed bins, you can buy them at any specialized store. To date, manufacturers of garden sculptures and small architectural forms provide consumers with the following types of urns:
Metal (chrome-plated) - suitable for arranging city streets, entrances to shops, office buildings, banks, etc. It is recommended to equip a summer cottage with chrome urns only in high-tech style.
Metal (forged) - this type of waste bin is also suitable for arranging parks, urban gardens and streets. For giving forged urns are a very good option, because. their appearance is always original and striking. The disadvantage of metal forged urns is the high price.
Concrete - this type of urn, with the right choice of external pattern, will suit the antique garden. Their advantage is high durability and a luxurious look. The disadvantage is the high cost and weight (it is difficult to move a concrete urn from place to place).
Plastic bins are the most economical option for trash bins. Due to its low price and wide range of color shades, it is popular among summer residents. The disadvantage of plastic bins is their cheap appearance, which very often worsens the overall composition of the garden plot.
Wooden urns - products made of wood with engraving and varnishing will decorate the garden plot very luxuriously, giving it elegance. The problem of wooden urns is low durability, although if the tree is treated in advance with antiseptic agents, this disadvantage fades into the background.
Garbage bin with your own hands: original ideas creation and design
Creating an urn with your own hands has the following advantages:
You save money
You increase your level of creating fakes with your own hands
Creating an urn with your own hands brings pleasure and develops imagination
Can make the urn of suitable size, shape, color, style
As you can see, the benefits of making a do-it-yourself urn are significant, so this work makes sense. In order to inspire you to create an urn, here are some original ideas for you:
Idea No. 1 - Urn from car tires

To begin with, we look for used tires (at least 2), wash them from dirt and dry them. After that, we fasten together with metal brackets (from the inside) and close the outer joint with a piece of the car chamber, or something suitable. In the end, we paint the finished product with bright paint and set up the urn in a suitable place, preferably on a playground.
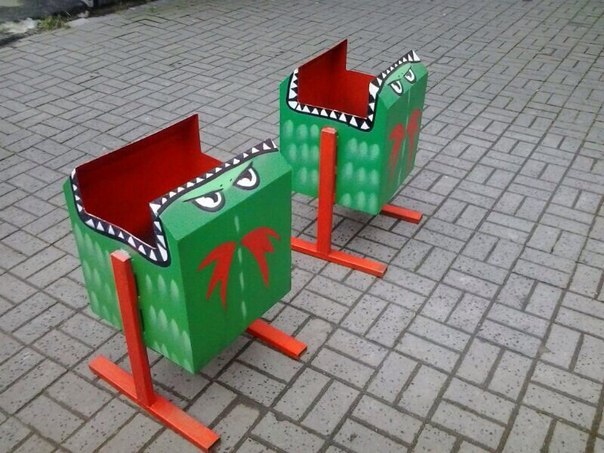
Idea number 2 - Urn from improvised materials
Anything can be suitable for making an urn with your own hands - a wooden barrel, a plastic or metal bucket, an air filter from a truck, etc. The main thing is to decorate the base with suitable material. To do this, you can use wooden pickets, planted on glue, mounting foam, from which you can later cut out figures, as well as ordinary paint.


Idea No. 3 - Urn with a lid
In order to prevent rainwater from getting into the bin, and to make the process of removing garbage from the bin faster and easier, it is recommended to add a small visor and racks with a rotating axis to overturn the container to the standard design of the bin.
In this example, we will provide you with an urn construction made from the following materials:
Car disc 1 pc.
Street lamp housing 2 pcs.
Bolts with nuts 2 sets
Metal channel 40*20 mm 2 pcs.
Also, to create this urn, we need a welding machine, wrenches for bolts and nuts of the appropriate size, paint, and a brush.
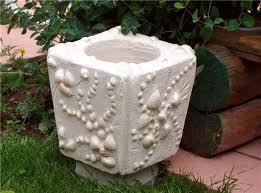
Do you want to equip household plot? Here you can find a lot of original and simple decor ideas. For example, you can make a creative path from a leaf-shaped bud, but today we invite you to create a stylish concrete urn decorated with burdock leaves. You can also choose a ready-made urn in a particular style.
To create a waste bin you will need:
Boards (old trim);
Cement + sand;
Polyethylene film, adhesive tape;
Nails, hammer, grinder;
Burdock leaves (for pattern);
Lacquer for yachts + color.
Waste bin step by step:
Initially, you will need to put together a trapezoid or square from old pieces of boards. The size of the trapezoid (square) should be a larger diameter than the bucket (container) that will be inserted in the center of the wooden form. Then nail the wooden base to the mold walls. Cover the bucket, walls and bottom of the mold with plastic wrap, secure with adhesive tape.

Do cement mortar: three parts of sand and one part of cement (in this case m-500). The consistency of the solution should be thicker than sour cream. Tear off the burdock leaves and put them in a container of water for a while so that they do not wither. Also, as a pattern, you can use another print at your discretion.
Next, pour cement mortar into the mold, creating the bottom of the future urn (about 8-10 cm thick). Insert a plastic-wrapped bucket in the center into the mold, attach the burdock leaves to its walls (the mold itself). Here you may need the help of a second person. Start slowly slowly pouring the solution into the mold, while holding the leaves so that they do not slide down, and aligning the bucket in the center.
Cover the urn with plastic wrap and leave for a few days (about 5-6). Then turn the urn over, unscrew the screws in the bottom, disassemble the walls. The leaves are perfectly removed under the pressure of the water jet.

If necessary, you can grind the upper part of the urn and the sharp edges with a disk (in this case, a grinder). Paint over with yacht varnish, to which you add color.