How to make a garden table out of wood with your own hands. Do-it-yourself table for giving: we do it together. Detailed lesson with photos. Assembling the table legs
Even if furniture production is far from your area, making a country table with your own hands to gather with family and friends on warm summer evenings is quite a feasible task.
Its main advantage, in contrast to the purchased one, is undoubted savings. It is not necessary to make a table from scratch: simply by assembling purchased parts, you will save 30-50% of the cost. If it is possible to use materials left over from construction or repair, the costs will be limited to the purchase of fittings.
To choose a design, you need to decide where the product will be used.
Using for country or kitchen table cheap off-grade boards - substandard - you will get benefits that are not available for mass production. Sounds doubtful? But this is true: knots, due to which the boards are rejected, have interesting decorative properties. If you succeed in emphasizing them successfully, you will become the author of a completely unique design product, which is a pity to leave in the garden in the rain.

Making a country table with your own hands to gather with family and friends on warm summer evenings is quite a feasible task.
To choose a design, you need to decide where the product will be used: on a grassy lawn under a tree, to complement an arbor, to stand in a workshop or in a house.
The simplest country table can be assembled in a few hours with a minimum of materials, but it will not last long either. To get a product that will be really pleasant to use, you need to carefully prepare the boards and perform all technical operations at each stage with high quality.

Its main advantage, in contrast to the purchased one, is undoubted savings.
If you find a large stump in the woods, it can make an easy-to-make garden table. It is only required to remove the bark from the stump, make an even cut along the top, sand it, treat it with an antiseptic and varnish it. It is enough to nail or fasten to the "leg" of the stump ready furniture board- and you're done.
Worktops made of boards fastened at the bottom with transverse slats look good. If you prefer a glued worktop, you can do it yourself, but this will require a lot of effort.

If you succeed in emphasizing them successfully, you will become the author of a completely unique design product, which is a pity to leave in the garden in the rain.
It is difficult for a novice master to fix the legs securely, so try to choose a design by correctly evaluating your skills and taking into account the cost of labor and time. The easiest way to make cruciform and L-shaped legs. To attach straight legs - you need to carefully connect the parts.
One of the coziest options for a garden is a collapsible table with benches that can be installed in a gazebo or on a veranda. It's easy to do, the main thing is to choose quality materials and properly prepare them for work.

The simplest country table can be assembled in a few hours with a minimum of materials, but it will not last long either.
How to choose a tree?
For a garden or kitchen table, wood of many species is suitable, both soft (pine, spruce, cedar, fir) and hard (oak, birch, ash, walnut, maple, apple, pear, acacia, etc.). The exception is too soft woods wood (poplar, alder, aspen, willow).
One of the main parameters of the suitability of wood for making furniture is resistance to decay: the species listed above meet this requirement.
If you do not plan to engage in furniture work all the time or are just starting to practice, give preference to the most common types of wood - pine and birch.

Worktops made of boards fastened at the bottom with transverse slats look good.
Wood can be used for the tabletop, frame and legs different breeds. At the assembly stage, you will need dowels: they are usually made from acacia or boxwood. Birch wood has an inexpressive pattern and can significantly warp due to spilled liquid - it is better not to use it as a countertop material, but due to the hardness of this breed, legs can be made from it.
The countertop is best made of oak or pine. If you know how to brush wood, the surface of the kitchen table can become a real work of art. Brushing lends itself to soft wood: the wood is burned with a gas burner, and the soft fibers are removed with an iron brush. Work is best done in the yard due to the large amount of dust. If you managed to burn the wood evenly, the result will please you. The brush can be tinted with stains, stains, diluted artistic water acrylic paint. Of course, wood brushing is not required: it is only a finishing option.

If you prefer a glued worktop, you can do it yourself, but this will require a lot of effort.
The choice of paints and varnishes and glue
Before proceeding with the installation, the boards must be protected from decay. The tree must be impregnated with a water-polymer emulsion (WPE): the treatment is carried out twice with an interval of 3-5 days. This is enough for the product to last a long time.
Some models require glue. Along with special carpentry adhesives (BF-2, etc.), building PVA can be used: it is applied to both glued surfaces, dried to a “tack-free”, then the parts are connected and kept under pressure for up to three days.

It is difficult for a novice master to fix the legs securely, so try to choose a design by correctly evaluating your skills and taking into account the cost of labor and time.
The choice of paint and varnish materials is determined by where the product is planned to be used: in the yard or indoors. For a garden table that is inevitably exposed to precipitation, alkyd, alkyd-urethane, nitrocellulose varnishes and oil paints are suitable. For the kitchen table, as well as for any furniture that is constantly in the room, it is better to use acrylic paints and varnishes: they are more environmentally friendly and do not have a strong smell. Lacquers marked with the "blue angel" mark are recommended for children's furniture and toys.
If you decide to cover the wood with stain, paint or just tinted varnish, this must be done before assembly. Material compatibility must be considered. The lacquer is tinted with a paint of a suitable composition: if the lacquer is alkyd, the paint should be oily, if you use acrylic lacquer, it can only be tinted with acrylic paint. First, a small amount of varnish is thoroughly mixed in a separate container with paint, and then the resulting mixture is added to a larger volume of varnish.

One of the coziest options for a garden is a collapsible table with benches that can be installed in a gazebo or on a veranda.
What tools are needed
For work you will need:
- hacksaw,
- circular saw or jigsaw;
- drill;
- screwdriver;
- hammer (if you decide to use nails).

For a garden or kitchen table, wood of many species is suitable.
This list includes only the most necessary tools, but in order to make the work more comfortable and the finished product look aesthetically pleasing, it is advisable to buy or rent a rotary miter box, an eccentric grinder and milling machine.
The rotary miter box makes it possible to make cuts exactly at the right angle. An eccentric sander will allow you to prepare parts simply, quickly and efficiently: you will sand the boards in an hour, instead of doing it all day manually with sandpaper. For high-quality processing of the ends, a belt grinder is useful, and a milling machine allows you to select a tree for the necessary grooves and process the edges.

If you do not plan to engage in furniture work all the time or are just starting to practice.
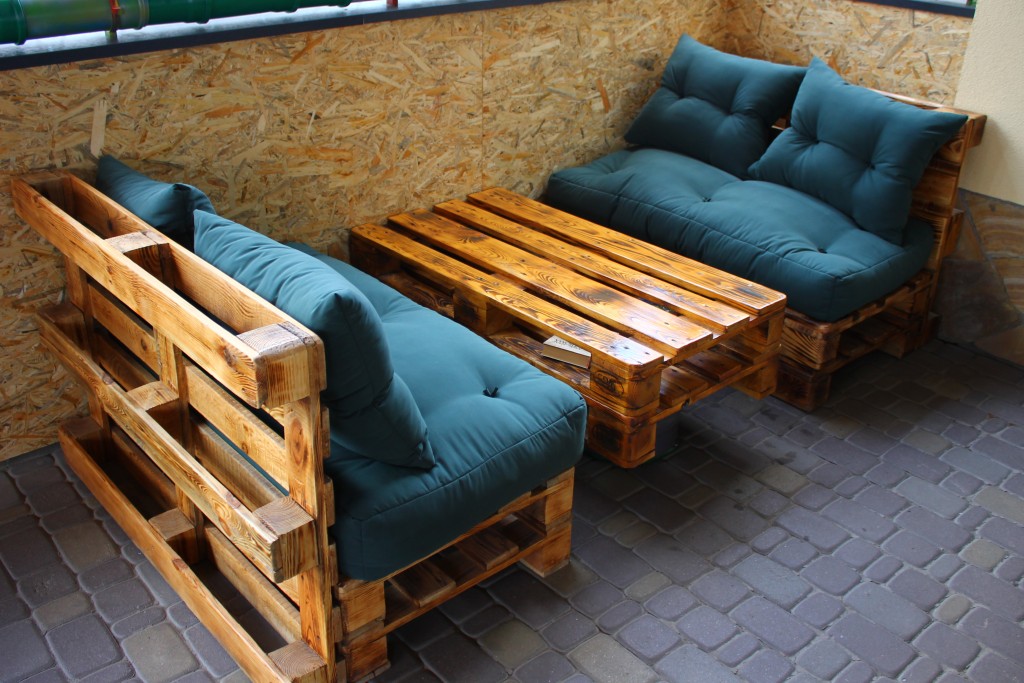
Homemade pallet table
A spectacular rustic table can be constructed from pallets (wooden pallets). If you happy owner such a container, especially a double-deck pallet - just disassemble it: there is no problem in purchasing boards!
Think it's always better to buy new boards? You probably have not worked with wood before: raw wood cannot be used (the product deforms after a few months), and dry boards are much more expensive. To dry raw wood boards, they are stacked in a well-ventilated area: this required process delay your project by 4-6 months! A good option for the kitchen table can be the already mentioned rejected boards, also dry.

It is possible to use wood of different species for the table top, frame and legs.
Let's go back to the pallets: they are dismantled. Now at your disposal are strong boards with different patterns and colors, it is possible that from trees of different species. These features should not be considered as disadvantages: they will give the product a zest: you just need to create an interesting composition from them, alternating boards of a similar shade.
The sides of the pallet will make an excellent frame, and the remaining planks will be used to assemble the countertop.

Work is best done in the yard due to the large amount of dust.
To make the legs, you will need a bar with a thickness of at least 5 cm. All the details must be prepared: sanding strictly along the fibers with sandpaper, first coarse (No120-150), then finer grit (No400-600), carefully removing dust.
Some boards can be painted with acrylic or oil paint. Loft style fans can use stencils in the form of numbers or simple graphic symbols. Boards with a beautiful natural pattern “morim” or simply varnished. After staining or the first layer of acrylic lacquer, the soft fibers rise; they need to be sanded with medium grit sandpaper and a new coat of varnish applied.

A spectacular rustic table can be constructed from pallets (wooden pallets).
If a non-aqueous varnish is used, it is enough to apply 2-3 layers, and if acrylic, the number of layers can reach up to ten.
A good option for the kitchen table can be rejected boards, also dry.
We fasten the tabletop boards with planks, which we place at the joints of the boards. Using a drill, a screwdriver and self-tapping screws, we fasten the boards to the planks (we use two self-tapping screws at the joints, one on solid boards). The use of a drill is necessary so that when screwing in the screws, the wood does not crack. We assemble the frame from the prepared sidewalls of the pallets. Using a drill bit suitable for self-tapping screws, we drill holes at the joints. We coat the joints with glue and fix with self-tapping screws. We install the legs: simply fasten the boards to the frame, screwing in the screws diagonally. To strengthen the structure, we make jumpers at the bottom in a similar way.

To make the legs, you need a bar with a thickness of at least 5 cm.
Wooden table with glued top
For a glued worktop, you need to choose boards of the same width. If the table is intended for a workshop and its appearance is not of great importance, you can use old floorboards: there are already grooves there. To make the grooves yourself, you need a milling machine.
To assemble the countertop, a flat surface is required. We simply coat the sidewalls with glue, join the boards without gaps and tighten the resulting structure with clamps. Depending on the glue used, the countertop should dry from 1 to 3 days. If everything is done correctly, you will get a countertop with a completely flat surface without cracks. It remains to work out the ends - first trim with a jigsaw, and then sand. In the absence of a belt grinder, this must be done manually - with sandpaper, first large, then medium grit.

After varnishing the parts, you can proceed to the installation, which consists of several stages.
If you don’t want to mess around with glue and clamps, you can use a ready-made furniture board from a hardware store. Then the countertop remains covered with a transparent or tinted varnish.
For a good result, you need to apply 5-7 (for acrylic varnish up to 10) layers. After each third layer, the working surface of the countertop must be sanded with fine-grained sandpaper, carefully removing dust with a damp cloth. At the varnishing stage, it is important not to rush: each layer of varnish should dry well.
It remains to make the legs of a garden or kitchen table: let's focus on the option with L-shaped legs. You will need boards with a thickness of at least 22-25 mm.

For a glued worktop, you need to choose boards of the same width.
L-shaped legs consist of two parts connected at an angle of 90. On the boards to be joined, it is necessary to make a selection, coat the joint with wood glue, and then install self-tapping screws.
When the glue dries, cover the legs with varnish and after drying, simply fasten them to the countertop with screws.

The connection of the legs with the tabletop has several options.
Table with straight legs
To make straight legs, it is enough to file a thick beam into pieces of the same length. The connection of such legs with the tabletop has several options.
In order for the straight legs to be installed securely, at home, you can use the connection on the dowels. You can make them yourself from acacia wood or buy ready-made ones. To assemble dowel joints, you need quick-drying wood glue (BF-2).

To make straight legs, it is enough to file a thick beam into pieces of the same length.
Table with X-shaped legs
Sequence of work.
- On the inside of the tabletop, we fasten two strips on each side with self-tapping screws.
- To make the table look good, the edges of the planks must first be cut at an angle of 52.
- We fasten the paired planks so that the legs fit, we make laps of 2-3 mm on each side.
- We lay the boards on a flat surface, crossing them at the right angle. We measure the distance between the ends of the boards: it should correspond to the width of the table.
- We circle the intersection with chalk: here it is necessary to choose half the thickness of the boards so that after assembly they lie in the same plane.
- We coat the recesses with glue and place the parts under the press for 1-3 days. For greater reliability, the connection can be strengthened with self-tapping screws.
- We varnish the legs.
- It remains to attach them to the table top, placing them in the grooves formed by the slats - and the table for giving with your own hands is ready.

X-shaped legs are made of bars or boards with a thickness of at least 50 mm.
Table with benches
The best solution for a gazebo - dinner table with benches attached to it. It is better to make such a design collapsible in order to clean it indoors for the winter.
The table will require thick boards (from 32 mm), which must be cut into pieces according to the drawing. In this version, two benches are attached to the table. When all the parts are cut, they must be sanded, paying special attention to the ends. We varnish each board separately.

The best solution for a gazebo is a dining table with benches attached to it.
To connect the parts of the structure, we will prepare the studs (length 160 mm), nuts and washers - 24 pcs each. For other connections, use self-tapping screws or nails of a suitable length. Using a drill, it is necessary to prepare all the holes for the fasteners.
According to the drawing, we assemble the countertop and the upper parts of the benches. We cut the cross rails along the edges, the angle should be 45. This is convenient to do with the help of a rotary miter box.
We make and fasten all the legs to the screws. We fasten the parts cut at an angle.

We varnish each board separately.
We tighten the product with studs with bolts. The holes for the studs must be pre-drilled with a drill. When installing the stud, you need to put washers on both sides and tighten the nuts using a wrench.

We tighten the product with studs with bolts.
Seat boards are fixed with gaps of 5 mm. When the seats are connected to the sawn supports, we attach them to the assembled base with 160 cm boards: you will need 4 boards.
We install the remaining studs and enjoy the result.

Using a drill, it is necessary to prepare all the holes for the fasteners.
VIDEO: Do-it-yourself wooden table in the gazebo
50 photo ideas: how to make this table with your own hands


What could be better summer holiday at your own cottage? Indeed, the popularity of this kind of recreation from year to year not only does not decrease, but also attracts more and more people with its accessibility. The dacha for many has turned from a backyard plot with beds and greenhouses into a full-fledged place of rest, a full-fledged culture of country rest is being formed in society. And, you see, what rest without convenient and comfortable furniture? The dacha has already ceased to be a place where all the junk from the apartment is brought, and the arrangement of the dacha requires full-fledged functional furniture created specifically for the dacha.
Advantages of making outdoor furniture

The choice of furniture for a summer residence, of course, will not be difficult, given the variety of furniture that manufacturers offer. But besides the trivial purchase of the items of country interior you like, there is another way out - the independent production of country furniture.
This approach to arrangement country house will not only save you money, but also bring a lot of positive emotions. If you like to do something “with your own hands”, then making furniture yourself will help you realize your creative inclinations, enjoy working with wood, and the result of the work done will be a useful and necessary thing in the household. You can rightfully be proud of the result of the work done, because there is nothing better than to see the thing you personally created. If you are already on fire with the idea self-manufacturing country furniture and firmly decided to try their hand at this business, then, for sure, you are now tormented by a lot of technical issues. But first things first. Let's try to conditionally divide all the questions that concern you into 2 large groups: "what to do?" and “how to do?”.

The answer to the first question is actually the most important. This is the area of strategic planning. You should not take on work that you cannot do, otherwise, instead of the pleasure of work and an excellent result, you will get another headache. If you do not have special work skills and a special tool, you should not take on very difficult work.
An indispensable attribute of a country house is a large wooden table with the accompanying set of chairs. A large comfortable table, at which all family and friends could gather, will never be superfluous - this, one might say, is the basis of a set of country furniture. It is his creation that can be dealt with in the first place.
Material selection

Now it's time to answer our second question. And first of all, you should decide on the choice of material for the future table. Naturally, a person comes to the dacha to take a break from the bustle of the city, to spend some time in nature, so in our table you will refuse all artificial materials used in contemporary furniture. Our table will be comfortable, beautiful and environmentally friendly, and the most environmentally friendly material is, of course, wood. It is from wood that it is best to make a table for giving with your own hands, because in addition to environmental friendliness, wood is also very convenient for processing. After choosing the material, you should focus on creating a table design. To create a table, you can use ready-made design solutions or take a few hours to create your own original design project. Alternatively, you can use the simple table design shown in the diagram.

Materials and tools for work

After choosing a table model, you should calculate in detail the need for materials to create a table: the number of boards, timber, fasteners and paint. The required materials, of course, are best purchased with a small margin. Before starting work, you need to acquire everything essential tool, preferably electric. Your tool list should look something like this:
- Electroplaner. For primary surface treatment of boards.
- Electric grinder. For "finishing" the surface of the boards, sanding the board.
- Drill driver. It is used for installing fasteners, drilling holes.
- Electric jigsaw. For curved surfaces, cross cutting boards.
- Roller and brushes for painting, hammer, set of chisels.

The assembly order will look something like this. First of all, the tabletop boards are cut and prepared. They can be installed close or leave a distance of 3-4 mm, which is somewhat easier. We fasten the processed boards to two bars with self-tapping screws or special furniture bolts, while the heads of the self-tapping screws must be recessed into the tree. For the manufacture of cruciform racks, we cut the ends of the boards at the right angle, docking the boards is done in half of the board. To select the docking grooves, we perform cuts limiting the groove, and select an extra tree with a chisel or a milling cutter with a “barrel” type cutter. We securely fasten the assembled supports to the tabletop, after which we measure the required length of the longitudinal stiffener. It is desirable to fix the finished and processed stiffener on furniture self-tapping screws, which will allow you to adjust it in the future if necessary. It is desirable to cover the finished product with a natural stain on a water or oil basis.
The table is a necessary attribute of comfort, without which modern man impossible to do. As soon as the conversation turns to eating away from home, a person begins to think of what to build a table from. In nature, they find a convenient stump, at a construction site they lay boards between stools. Well, what about the dacha? For a comfortable snack suburban area outdoors, you can build a wooden garden table with your own hands. This does not require extensive knowledge or special skills.
The main criterion for a country table is durability and convenience.
There are several options for making a wooden garden table. Let's consider both the simplest and more complex ones, but first, let's find out what tools may be needed for this job.
List of required tools
- Wood - the choice of material should be approached very carefully, we will dwell on this point in more detail, the main thing when preparing it is to take into account that its rigidity and weight will depend on the thickness of the working surface of the garden table;
- Planer - perhaps it will not be needed, but if the countertop is type-setting (consists of several boards), then with its help they can be fitted closer to each other;
- A hacksaw for wood - it is much faster and more comfortable to work with an electric jigsaw, but not everyone has it, and electricity is not always available in the country, so we will strive for minimalism;
- Chisel - no carpenter can do without it, making a table is no exception. A chisel is needed for cutting patai;
- Nails and hammer;
- Roulette and level;
- Screwdriver - some elements of the garden table are best fastened with screws or studs;
- Sandpaper - needed for the final grinding of the garden table;
- Lacquer - After the garden table is assembled and sanded, you will need to protect it from exposure environment if you do not want to hide it under a canopy before it starts to rain.
How to determine the size of the outdoor table
In this matter, one should proceed from the number of family members and guests who regularly take part in feasts and add a couple more places to them just in case.

When deciding on the size of the table, take into account how many people you need to place behind it.
For a company of 4-6 people, the size of the outdoor table for giving will be 1200x800 mm. If the company gathers up to 10 people, then it will fit at the garden table from 1600 mm in length, and the width can be left the same.
It should be borne in mind that too large a wooden outdoor table will be difficult to bring into the room for the winter. To avoid inconvenience, its design can be collapsible.
The second important parameter is the height of the garden table. But everything is standard here, the countertop from the floor should be at the level of 70-90 cm, for people of average height.
Drawing preparation
If you have never made a table for a summer residence with your own hands before, then it is better to download the necessary drawing from the Internet. The abundance of simple and complex wood designs will give you wiggle room.
A couple of tips for those who want to make a drawing with their own hands or make changes to the finished scheme:
- Take dimensions not from the ceiling, but focusing on a table of suitable dimensions in a store or at home;
- If the dimensions are already set, then it is easiest to make changes to them by multiplying or dividing all the parameters horizontally and vertically by a constant factor.
Example: if you need to slightly increase the table in height and length, then you can take the indicator “1.2” as a coefficient. Multiply the height and length by it, and do not touch the width. You can do the same with any parameter.
We assemble an outdoor table for a summer residence in size
The easiest way to assemble the most common design of a country table will be to show an example with specific dimensions, in which you can make changes based on your preferences. First, let's designate all the details and their dimensions.
Tabletop for country table
We will take its size based on a large family of eight people. Length 1800 mm, standard width 700 mm. The thickness should be chosen based on the type of wood, but even from the most durable wood, the thickness should not be less than 20 mm.

The scheme of the country table.
legs
The legs of the table will be at a slight angle for better stability, their length will be 750 mm. The bar itself for the legs should be 100x50 mm in width and thickness.
Bottom rails
If it is assumed that the lower crossbars will serve as a support for stationary benches, then their length should be 1500 mm, the width and thickness are similar to the legs. If the benches for giving will stand separately from the table, then you can limit yourself to a crossbar length of 1000 mm. There should be 2 such elements in total.
Top rails
There should also be two of them, according to the cross section, the beam for them can be taken, as well as for the bottom one, but it can also be reduced, because there will not be a large load on these elements, they should be the width of the table top, that is, 700 mm long.
stiffener
This element is attached in the middle of the tabletop to its lower part, spacers will rest against it, in terms of dimensions it must be completely identical to the upper crossbars.
Spacers
Their manufacture takes place last, and the dimensions are selected upon the fact of measuring the structure. Initially, only their cross section is known - 50x100 mm.
Fixed benches for wooden garden table
If you decide to combine a table and benches in one design, then the length of the lower crossbars should be 1500 mm, as mentioned above. Two boards on each side are laid on the edges of these crossbars, the length is equal to the length of the garden table, and the width is 125 mm each.

A variant of a country table combined with benches.
In the case of a smaller width of the existing boards, they can be slightly moved apart, leaving a gap. The thickness of each board must be at least 30 mm, so that they do not break under a person.
In order to avoid sagging of benches for summer cottages during long-term operation, the boards in the middle must be reinforced with a stiffener.
Table assembly process
Knots of supports of a wooden garden table
- Make cuts on the leg blanks at the top and bottom at an angle of 22 degrees.
- Place the legs at an angle so that one of their sides overlaps with the upper crossbar, and the distance along the centers of the other ends is 1400 mm.
- The lower crossbar must be placed at a distance of 300 mm from their lower part.
- Both supports must be completely identical. It is necessary to drill two holes at each junction of the legs with the crossbars.
- After that, you can completely fasten them with bolts or studs.
Assembling the countertop for the country table
- Having previously processed the ends of the boards with a planer, number them with a pencil with reverse side. Lay out all the boards on a flat surface according to the affixed numbering. Find the center of the future countertop and use self-tapping screws to fix the stiffener to it.
- The length of the screws must be sufficient for secure fixation to the table surface. But screws that are too long can pierce through it, so measure the thickness in advance and select the optimal self-tapping screws.
- Turn the tabletop over and, with the help of a partner, hoist it onto the installed supports. Temporarily fasten it to the supports using nails or self-tapping screws.
- Then, when the structure is rigidly connected, you can drill holes for the bolts after the fact. Each board should have one hole connecting it and the top rails on both sides. In the countertop, make patai under the bolt heads, using a larger diameter drill. Insert metal washers into them to prevent the board from being squeezed by the bolt during fixation with a wrench.
Installation of spacers for an outdoor table for a summer residence
After the table is assembled, measurements should be made with a tape measure between the edge of the tabletop stiffener on each side, to the bottom crossbar, and sawed off with a small margin of a workpiece from a 100x50 mm beam.

An example of using spacers as a footstool.
The stock is needed to wash down the corners of the struts. Saw off one side of the spacer at the desired angle and, after attaching it, measure the second angle. Do the same with the second spacer.
They are fastened with nails or self-tapping screws, but you can try and make a bolted connection, in which case you will get a completely collapsible outdoor table for a summer residence. It remains to sand it with sandpaper and open it with varnish.
Other options for country tables
Garden table on a stump
You can do it even easier and assemble a country table with your own hands from improvised materials. Many people in the garden have unuprooted stumps from cut trees. The tabletop can be adapted just to such a stump. And put small logs around, using them instead of garden benches.
Country table made of pallets
After the work construction works pallets from brought materials (brick or tiles) often remain on the garden plot, they can be used as material for a country table. You can build it with your own hands in 20 minutes. To do this, in addition to pallets, you will need 4 more bars.

Variant of a country table from pallets.
Fix them on the first pallet, and put the second one on top, and fix it too. The table is ready, to give it a more presentable look, you can process the burrs with sandpaper and varnish or soak with oil. Instead of legs, screw on the wheels from old chairs and a comfortable mobile garden table is ready.
As you can see, there is nothing complicated in making a table for giving with your own hands. It is enough to strictly follow the instructions and adhere to the specified dimensions. Well, if you want to do something simpler, or with less time, then there are also plenty of options for how to build an outdoor table for giving from improvised means.
Video: do-it-yourself wooden table
One of better ways to make the adjoining area truly cozy - to make a table for giving with your own hands. There are several types of country tables, but the most popular are designs made of natural wood. They are distinguished by aesthetics, environmental friendliness and reliability. Products made of combined materials (wood and metal) are also in demand. You can assemble an outdoor table yourself. To do this, you will need boards, carpentry tools and drawings.
The choice of materials for the outdoor table
To make a garden table with your own hands, you need to choose the right materials. Particular attention should be paid to wood:
- Coniferous species (spruce, pine) are characterized by flexibility and ease of processing, but are characterized by increased flammability.
- Hardwoods (aspen, birch, oak, larch, ash) are more difficult to process, but strong enough, durable and attractive.
For a country table, it is recommended to take a board with a thickness of at least 3 cm, as it can withstand serious loads. The optimal length of the table is 150-200 cm, this must be taken into account when choosing boards or a furniture board for the tabletop. For the manufacture of legs from a bar, it is necessary to choose boards with a section of at least 5x5 cm. The optimal table height is 75 cm.
Convenient picnic table
You can make a table for giving with your own hands using the simplest drawings. However, such a product will be bulky, it will be quite difficult to move it. But the folding structure can not only be easily rearranged from place to place, but also taken with you on a picnic. At the same time, even a novice master can make an outdoor table of this type according to ready-made drawings.
This table is not only compact and attractive appearance, but also strength (the product can withstand weight up to 100 kg). At the first stage of work, it is necessary to cut out the structural elements in accordance with the drawing. The dimensions of the folding product can be changed, the main thing is to maintain proportions.

The edges of the legs and footboards need to be rounded off. If you are just learning the craft of a furniture maker, then it is better to cut the corners of the elements at a right angle, and then smooth them out with a grinder. This is easier than rounding the edges with a jigsaw.
To connect the structural parts in accordance with the drawings, you need to use bolts of any diameter (preferably 6 mm), 35 mm long and with a screwdriver thread. If the bolts are longer than 35 mm, they will create obstacles in the operation of the future mechanism. When all the elements are prepared, you can pre-assemble the folding table. The legs should be connected to each other in the central part, and then screwed to the supports as shown in the drawing: the left leg - to the front support, the right one - to the back.

If everything is done correctly, then you can attach the supports to the tabletop using self-tapping screws 50 mm long. But first you need to make markings on the countertop and drill holes for the screws. Then you should check the performance of the structure, it should easily fold and unfold. When folded, the folding summer table looks like this:
If you are convinced that everything was done without errors, then the structure can be disassembled by signing each part so as not to get confused when reassembling. After that, all elements must be carefully sanded, coated twice with an antiseptic, and then varnished. This is necessary in order to protect the folding table from environmental influences when used outdoors. When everything is done, the structure must be assembled. Now she is ready to use!
Porridge from an ax ... or rather, a table from a stump
Another great idea for a garden is a stump table, you don't even need a blueprint to make it. But you will need to find a stump of a suitable size. You can search for a stump on your own personal plot, at neighbors or in the nearest forest area. For the manufacture of countertops, you can take boards or a furniture board with a thickness of 20 mm or more.

The stump for the future table should be dried, with whole, not rotten and not damp wood. You can dry a fresh stump on outdoors or in a warm dry place. Drying time - at least 2 months. Determining whether the stump has dried is quite simple: if the bark easily separates from the wood, then the stump is ready to go.
For assembly, you will also need a building level, tape measure, wood varnish, sandpaper, grinder, chisel, hammer, nails, screwdriver, self-tapping screws.
Stages of work on assembling a table from a stump
First, the dried workpiece must be cleaned of bark with a chisel or chisel. This must be done carefully so as not to damage the wood and not provoke the appearance of cracks. All soft and rotten areas are removed. The recesses and cracks in the trunk are cleaned of dirt with a chisel, and then processed from the inside with double-folded sandpaper (grained layers outward).

Then the stump needs to be leveled from the bottom side so that its bottom becomes even. The protruding parts are removed with a planer. This is necessary so that the table can be installed on a horizontal surface. By means of a planer, other shortcomings of the hemp are also removed, in particular, large rhizomes.
After that, all cuts are carefully polished. Handle grinder you need the rest of the surface of the workpiece. Hard-to-reach areas are sanded with coarse sandpaper. When the treatment is completed, the stump is covered with an antiseptic, and then with varnish. To make the table move easily from place to place, you can attach metal or wooden legs, wheels or rubberized coasters to the bottom of the stump.
Then you need to make a countertop. To do this, the boards are fastened to each other with glue, screws or planks nailed from the underside. If you want to make the countertop round or oval, then the corresponding drawing should be applied to the fastened boards, and then the product should be cut out.

To attach the countertop to the stump, you need to make a frame. To do this, two parallel strips are stuffed on the sidewalls of the hemp, and two more rows of holders on top. The result is 6 planks connected to each other with nails. The tabletop is attached to them with screws or nails.
Then finished construction processed again grinder and covered with two layers of varnish. To prevent the varnish from peeling off, it is recommended to process the intermediate layers after complete drying with fine-grained sandpaper. The table is ready!
If you dream of having a good time on your personal plot, then you just need a large table that can accommodate a company of your friends and relatives. And you can do it yourself, spending quite a bit of time on it. In some cases, you may need an assistant, sometimes an extra pair of hands will not hurt.
This article is a detailed step-by-step instruction for making a wooden table for a summer residence.
So that you have a choice, we offer you four options for country table projects at once - two ordinary picnic tables, a table with benches, which are a single structural unit, and, finally, a round table. You must think through all the details in advance and choose the type and size of the table that suits your needs and matches the style of decoration of your backyard.
Folding picnic tables - mobility is paramount
Folding tables are very convenient, and most importantly, practical and simple. They don't take up much space. At any moment, such a table can neatly fit folded into the garage, and if necessary, move again to the street. Furniture mobility is especially appreciated in small areas.

How to make a garden wooden table with your own hands
A dacha is the place where a master wakes up in a person, a carpenter, a carpenter, a gardener, in general, a master. Buy furniture for suburban area- a simple matter, but not everyone can make a wooden table for a summer residence with their own hands. You should immediately be ready to make a garden table with your own hands for several days. But the tips below will help you make a solid table yourself.
Today we will design a fairly simple country table with our own hands in the Provencal style. Such tables not only look great, but also have a fairly reliable design. It is worth paying attention to the boards. They must be even, since the appearance of our country table will directly depend on this.

When designing a table for a summer residence, it is necessary to prepare lumber in three dimensions:
- Bearing frame - section 38 X 90 mm.
- Tabletop - section 38 X 140 mm.
- Supporting bars - section 19 X 64 mm.
- Drawing
Before starting work, the most important thing is to find it on the Internet, or to independently make drawings of a table for a summer residence with your own hands. An accurate schematic designation will allow you to select lumber that will be most suitable in cross section to the dimensions indicated on the diagram. It doesn’t matter if the dimensions don’t exactly match each other, because you can always make an adjustment with an electric planer.

- Material preparation
When deciding how to make a garden wooden table, approach the issue responsibly, as the life of the furniture will depend on this:
- purchase of blanks. Professionals advise to purchase lumber from coniferous trees, which was previously well dried. Its main advantages are:
- price;
- simplicity and ease of processing by hand;
- beautiful structure;
- glue for furniture;
- 4 X 65 mm screws;
- 3 mm drill;
- drill;
- tape measure, pencil, sandpaper for grinding.
- Further actions
We will need:
- two upper transverse beams, dimensions 38 X 90 X 978 mm;
- four legs for a country table with your own hands, size 38 X 90 X 695 mm;
- two bowstrings - 38 X 90 X 921 mm;
- one longitudinal lower and one upper beam - 38 X 90 X 1575 mm and 38 X 90 X 1473 mm, respectively;
- two pieces of braces of 38 X 90 X 772 mm;
- blanks for countertops - seven pieces, size 38 X 90 X 2337 mm;
- six support bars - 19 x 64 x 432 mm.
Tip: Start work on a level surface. It is imperative to observe the angles of joining parts. The blanks, which will later become the legs of our country table, should be cut on both sides at an angle of 10 °. The slices must be parallel. But the blanks of the bowstring, which are similarly cut at the same angle, should be cut one towards the other.
Stage 2. The legs of our country table should be attached to the cross beams and fasten this entire structure with screws. Each connection has two screws.

Diagonally fasten the bowstring to the leg with inside, in the same way fastening the structure with two screws.
The lower beam must be connected to each other by both bowstrings. As mentioned above, with the help of screws.

Further, in the upper longitudinal and transverse beams, holes are first made under fastener, called a dowel, after which we again diagonally connect the blanks of our country wooden table with the available screws.

Tip: when connecting all the elements, use glue for extra strength. Remove excess immediately.
We plant the braces on the screws.

Tip: workpieces intended for braces should first be cut at an angle of 45 degrees
Do-it-yourself blanks for the table top are fastened with screws to the transverse beams.


How to make a rectangular table for a summer residence
After developing a work plan and approving the drawings of a table for a summer residence, purchase all the materials needed for this project. Choose outdoor woods such as pine, cedar, mahogany, or pressed wood. When buying, check each board: they must be perfectly even and without any visible defects. Do not save on the quality of lumber, because your structure will have to withstand all the weather.

There are a few important points, which you must take into account if you want the result to be high professional level. Do not forget about the accuracy of measurement and the use of professional tools when cutting boards and bars and drilling holes. To increase the reliability of the design, you can additionally use waterproof glue to fasten the parts. Round open edges with a router or sandpaper.
Attention! Dimensions are translated from the inch system and may not match metric system measurements. Choose lumber that is as close as possible in size. Or just customize yourself.
Tools needed to implement the project:
- hacksaw, jigsaw;
- milling cutter;
- drill and drills;
- chalk cord, tape measure, spirit level, pencil;
- safety goggles and gloves.
Time:
- From one day to a week, depending on the chosen project. If you have power tools at your disposal, you can finish the job even faster - in just a few hours.

Adviсe:
- A milling cutter will help smooth the edges of wooden bars and boards.
- Before screwing in screws and self-tapping screws, drill guide holes in the wooden structural elements.
- The heads of the screwed self-tapping screws should not protrude above the wooden surface, and for this the inlet parts of the holes must be countersinked.
- Do not use cracked or warped lumber.
- Do not apply excessive force when tightening the screws, otherwise the wood may crack.
DIY picnic table. Step-by-step instruction
Materials:
- A - Legs: bars 5×10 cm, 106 cm long (2 pcs.), 43 cm long (2 pcs.) and 56 cm long (2 pcs.);
- B - Frame: bars 5 × 10 cm, 87 cm long (2 pcs.);
- C - Table top: boards 5×15 cm, length 180 cm (6 pcs.);
- D - Table top base: boards 5x15 cm, length 87 cm (2 pcs.), bars 5x10 cm, length 62 cm (2 pcs.).
The first stage of the project is the manufacture of table legs. saw off the bars required dimensions. To speed up the process, you can use a circular saw. Smooth out the edges of the bars and saw-off lines with sandpaper.
Connect the bars so that you get an X-shaped structure, and fasten them with 60 mm self-tapping screws, remembering to pre-drill the pilot holes. Lubricate the joints with glue. Make sure there are no cracks or gaps left.
Fasten each pair of legs with a horizontal bar using 60 mm self-tapping screws for this purpose. Cut off the ends of the bars, as shown in the figure.
Lay the boards intended for the manufacture of countertops on a flat surface. We advise you to place pieces of 6 mm plywood between them, this will allow you to form uniform gaps. Place the assembled table sides on the table top and secure them by screwing in the self-tapping screws at an angle of 90 mm. Before fixing, make sure that the legs and the tabletop are perpendicular using a spirit level.
Place the sawn pieces of 5x15 cm board on the underside of the table top and fix them with 60 mm self-tapping screws.
Saw off the ends of the bars, which will act as reinforcing supports for the structure, at an angle of 45º. Install the supports in their place and secure with 90mm self-tapping screws at an angle.
And finally, last but not least: check if the heads of the screws protrude above the wooden surface, and fill all the cracks and holes with wood putty.
Tip: To protect wooden surfaces from the damaging effects of atmospheric moisture, cover them with several coats of exterior paint or stain.
Table with benches. Instruction with drawings
Materials:
- A - Legs: bars 5x10 cm, length 95 cm (4 pieces);
- B - Crossbars: bars 5 × 10 cm long 160 cm (2 pcs.);
- C - Tabletop fastening: bars 5×10 cm, 75 cm long (5 pcs.);
- D - Inclined supports: bars 5 × 10 cm long 84 cm (2 pcs.);
- E - Worktop: boards 5×10 cm, length 180 cm (14 pcs.).
It is worth starting work with the manufacture of legs. Since this table the legs will be inclined, the ends of the bars 100 cm long should be cut at an angle of 30º. Connect the elements with 90 mm bolts.
Make sure the surface you are working on is fairly level. The mounted sidewalls of the table must be identical, only in this case you can hope for an excellent end result.
When the sides of the table are ready, you can start making a wooden table top. We recommend that you put it together on the ground (floor), and then fasten it to the legs with self-tapping screws.
Tip: Don't forget to check the verticality of the side walls of the table with a spirit level, otherwise the end result of your work is unlikely to satisfy you.
Rigidly fix the entire structure with inclined supports. Their ends must first be cut at an angle of 26º.
Now it remains only to build benches. saw off the boards right size, place them on both sides of the table and, having previously drilled several pilot holes at a distance of at least 1 cm from the edges, secure with self-tapping screws.
Tip: To keep the seat boards evenly spaced, place nails or pieces of plywood between them before fixing them. Thanks to this little trick, all the gaps will be the same.
At the end of the work, pay attention to small, but very important touches. Fill all cracks and holes with wood putty. After the putty has dried, sand the wooden surfaces with medium-grit sandpaper.
Tip: Be sure to apply several coats of paint or stain to protect wood surfaces from water and sunlight.
Round table. We do it on our own in the country
Materials:
- A - Base: bar 5x10 cm long 102.5 cm (1 pc.) and 47 cm long (2 pcs.), bars 2.5x10 cm 9 cm long (4 pcs.);
- B - Racks: bars 10 × 10 cm, 60 cm long (4 pcs.);
- C - Tabletop base: 5x10 cm bars 82.5 cm long (1 pc.) and 52.5 cm long (2 pcs.), 2.5x10 cm bars 47.5 cm long (4 pcs.) and 60 cm long (2 pcs.) ;
- D - Tabletop: boards 2.5×15 cm long 195 cm (9 pcs.).
The first stage of the project is to create the base of the table. To articulate its constituent elements, use waterproof glue and self-tapping screws. Make sure that the corners formed by the joined beams are straight. To protect the assembled table base from rotting from rainwater, place it on small stands made from 2.5x10 cm board scraps.
Now you need to attach four posts made of square bars to the base. Before fixing, make sure they are vertical with a spirit level. The height of the legs may differ from those proposed by us, in this case, you should, first of all, focus on your own needs.
The most difficult stage of the project is the manufacture of countertops. Place the boards on a flat surface and mark the center of the square. Fasten one end of a 60 cm rail at this point. Rotating the second end of the rail, mark the outlines of the circle. A jigsaw with a sharp blade will allow you to make circular cuts at a high professional level.
After sawing the boards of the future tabletop, we recommend that you fasten them together with waterproof glue and additionally fix them with a few clamps. Attach the bars that serve as the base of the tabletop, as shown in the picture (yellow elements should be made from 5x10 cm bars, green - from 2.5x10 cm bars).
Tip: Use waterproof glue and galvanized self-tapping screws (30mm self-tapping screws for 2.5x10cm bars and 50mm screws for 5x10cm bars) to fasten the bars to the countertop.
After the glue has dried, you must attach the legs to the base of the tabletop with 90mm self-tapping screws, pre-drilling pilot holes. Use a spirit level to check the perpendicularity of the legs and the tabletop.
To ensure that the result of your work corresponds to a high professional level, make sure that the heads of the self-tapping screws are recessed deep enough. Cover all cracks and holes with wood putty, after it dries, sand the surface with sandpaper.
Tip: Apply several coats of outdoor paint or wood stain to protect the table from moisture damage. To ensure that the base supports are also untouched by water, place the table on a concrete surface and insulate them hermetically.
Now you know how to make your own picnic table. One has only to make a little effort, which will subsequently be rewarded with enthusiastic exclamations of friends and pleasant summer evenings spent with the family at a large table.