Do-it-yourself magnetic board at home. How to make a magnetic board with your own hands: a step-by-step master class. Benefits of a whiteboard
An indispensable thing in the house is a magnetic board! She keeps memories of the life of a single family. How to make it with your own hands? We will tell you how to do this necessary thing on your own in just a few hours.
Materials and tools
Wooden frame;
Board or piece of hardboard;
Magnetic soil;
Finishing varnish;
Shells;
Sponge for grinding;
Acrylic white paint;
Decorative cord;
Hot glue gun;
magnets;

How to make a magnetic board with your own hands: a step-by-step master class
1. We cover the surface of the hardboard or thin board with acrylic primer. We are waiting for the layer to dry properly.
2. Over ordinary soil apply primer with a magnetic effect. In total, you need to apply at least 5-6 layers of this primer with intermediate drying of each. If you apply fewer layers, then the magnets will not stick to the surface.
3. Let's start decorating the frame. Sand it with a sponge and remove dust with a damp cloth. Paint the frame with white acrylic paint. To do this, it is best to use a flat synthetic or bristle brush.
4. We decorate the frame with a decorative cord, but first we tie a beautiful marine knot at one end of it. We fold the cord into a loop. The short end should be under the long one. We make the same loop, but in reverse side. In the process, we twist the loops together.

5. Fasten the sea knot to the frame with a hot glue gun. We also glue the cord, adjusting and fixing its tension in the process.
6. Also, you can easily make your own original magnets. To do this, simply glue small magnets inside the seashells.
You can make such a board of any shape and size, as well as any color. Many people use a special paint for Tikkurila blackboards - there are black, and green, and other colors.
The shape of the board can be made in the form of any animal - an elephant, for example, or in the form of a racing car. Interesting idea- a magnetic board in the form of a pillar for posting announcements and posters. The main thing here is that the color and shape fit the overall design of your apartment.
I would also like to note that now there is a special magnetic primer and magnetic paint on sale. Use them to make the process easier.
Video materials on the topic of the article
Magnetic board in a couple of hours:
Tutorial video - homemade marker board:
Another interesting master class about this theme:
Maybe you will also like a DIY magnetic stirrer:
No matter how hard I tried to write only about travel, but somehow the site turns into a blog about how to be a boring mom) Traveling with a child, playing, working and just a mom of all trades. Just the same, I’ve been constantly testing for curvature lately, taking up home improvement, and in particular the baby’s room. After a trip to India, I got a second wind and poured heaps of ideas for the nursery. One of these ideas is a magnetic board for children, or rather one child and his young guests, on which you can sculpt magnets and draw with chalk.
I made it for my son with my own hands back in December. And it's time to tell how I did it;) I dreamed of a large magnetic board for a child for a long time. We had all sorts of magnetic construction sets that could be perfectly used on such a board. The little ones didn’t suit me at all, I didn’t particularly disperse on a small square, boredom :/
When I started monitoring this topic, I realized that large boards are not cheap at all. Plus, if it’s a huge board, then it immediately seems like a school one, on which you can write with chalk =) Moreover, wooden and black are classic, and so soulful! Not those creepy greens that are everywhere these days. There is no soul in them, no. Yes, and in magnetic boards it is not there, they look cold and do not attract at all, but with a child it is very important that it is cozy and attracts attention. In general, you understand the course of my thoughts;)
And maybe all this would have remained just a desire, if I suddenly didn’t accidentally find out that in nature today there are special paints for blackboards. And just for sale for home use. No, of course, I have repeatedly seen completely black walls on which you can draw with chalk, but somehow I didn’t think about what they were covered with. And here, wow, the paint is exclusively for blackboards !!
The idea began to take on some more concrete shape. I realized that you can cover a magnetic board with such paint and I will be happy :) But the prices for magnetic boards I was turned away. Then I Googled "how to make a magnetic board with your own hands." And then another shock hit me. It turns out that in nature there are magnetic soil and magnetic paints!!! That is, he just moved the brush and the piece of wood suddenly became “metal”! Well, aren't they miracles? For me personally - miracles :) And even more so for my child, because now you can’t tear him away from this wonderful board;) Do you want one for your kids? Then welcome under the cut for a detailed recipe;)
estimate
Let's start with the budget. That is, from what materials I needed to create this board, how much they spent, and how much it all cost. I think the question of price worries many.
Main materials:
1. Tikkurila paint for blackboards (black) - 1069 rubles
2. Marabu magnetic soil - 986 rubles for two cans of 225 ml. This price, together with delivery by Russian post, I did not find this primer in Perm. Perhaps you will find this soil in your city, then the cost of delivery is taken away. The average price for a jar of soil is 350 rubles. I needed two (depending on the size of the board).
3. Plywood (standard sheet: thickness - 6 mm, side length - 1525x1525 mm) - 408 rubles + 30 rubles for cutting plywood, because I needed a size of 1200x800 mm. That is, the price depends on the size of the plywood you take, as well as its thickness, it seemed to me that 4 mm would be too thin.
→ Intermediate cost: 2493 rubles*
* In principle, you can already get by with this set. Everything listed below is purely my initiative and idea. The functionality of the board is fully functional even if there are three points above.
Additional materials:
4. Wooden slats for the frame (3 m x 2 pcs) - 60 rubles
5. White paint to cover the frame - 406 rubles. I took Tikkurila Pesto 10, but it makes no sense to take a whole can of 1 liter paint, I just needed it for other purposes, and, of course, I spent quite a bit on painting the frame. You can take any white or whatever color you want, depending on your room design. Small jars cost around 100 rubles.
→ Intermediate cost: 2493 + 466 = 2959 rubles**
**I decided to make a border around the board to give it a more finished look. In addition, as it turned out later, thanks to the frame, the chalk powder does not pour onto the floor under the board, but remains on it, from where it can be easily wiped off with a damp cloth. I chose the white color because all the furniture in the child’s room is white, and also with orange walls, the white frame should look much more advantageous in my opinion.
Finishing elements:
6. Railing Byugel - 129 rubles. I took 100 cm, but if the board were smaller, you can choose a railing 55 cm long, and it will be cheaper.
7. Kushiner hanging pockets for storing magnets - 199 rubles. It is very convenient that nothing is lying around the house, because There are more and more magnets and they are quite small.
8. Bugel containers for crayons and sponges - 78 rubles. The price is for 2 pieces, in white we have multi-colored crayons, and in black - a rag for washing the board.
9. Byugel hooks- 49 rubles for 10 pcs. I'll still write it in the expense, because. I bought it specifically to hang pockets on the railing. But in the end, they turned out to be inconvenient for us, because. because of the hooks, the pockets of Kusiner reached almost to the floor (the board hangs at the level of the child's height, that is, not high), it looked very ugly. And also the pockets were constantly falling, because. the child was haunted by the hooks :)) Therefore, I removed them and simply tied the pockets with strings. Now they are securely fixed, they don’t roll back and forth on the crossbar, I like everything)
→ Final cost: 2493 + 466 + 455 = 3414 rubles***
***It is necessary to take into account the size of the board. I needed a fairly large one - 1.2 m x 0.8 m. Well, plus, not everyone needs all these bells and whistles from pockets and frames) Therefore, the cost can vary greatly depending on your requests. Well, do not forget that I took the prices to the maximum, although the consumption of materials is much lower, for example, 1 liter of black paint is not needed at all. That is, you can team up with friends who also want such a board for their children, and divide the cost of materials in half.
Manufacturing process
1. We prepare the basic materials. Namely, magnetic primer and blackboard paint. 
I chose black, because. I really wanted a classic board, but Tikkurila also has a standard green one. That is, you can make the board green.
2. Plywood is also waiting for transformation)) 
As I mentioned above, I took a sheet standard size and ordered cutting, so that she herself would not cut it all out. Because plywood was brought home to me already right size. I chose 6 mm plywood thickness, because. 4 mm is too thin, it bends and it will be inconvenient for a child to write on it, and 8 mm is already thick and it is more difficult to attach it to the wall, because. She's noticeably heavier.
3. I sanded all the edges of the plywood. And then proceeded to cover with magnetic soil. 
The plywood itself was High Quality, there were no noticeable splinters and roughness on it, therefore it was not necessary to process the entire surface with sandpaper. But it is recommended to wipe with a cloth in order to remove dust and dirt from the surface. If you are wiping with a damp cloth, then of course you will need to wait for the surface to dry before applying the primer.
4. The magnetic soil is very thick. It consists of small particles of metal, a kind of "iron" powder, so crushed almost into dust that it is not visible to the eye. It is very surprising to take such a small jar and suddenly find that its weight exceeds half a kilo. Due to the metal in the composition of the soil, the mass greatly increases. It is applied in a thick layer, reminiscent of cement both in color and in consistency. I covered with a regular paint brush, smeared a layer horizontally, and the next one vertically, so the surface overlaps better. The soil dries quickly, so the jar should not be left open for a long time. 
The magnetic soil has a feature that the more layers you apply it, the stronger the magnetic properties. In principle, this is easily explained, because in this case there are much more metal particles on the surface. Therefore, I decided to use both jars I have completely. As a result, two cans of 225 ml were enough for me to cover with three layers of plywood measuring 1.2x0.8 m.
I applied each subsequent layer after the previous one had dried well. As I said, it dries very quickly, but still I gave the first layer time for deep drying during the day. The next layer was applied only a day later, and the third a few hours after the second.
5. After the layers were completely dry, I tried to attach the magnets that were at hand. Hold on!!! Magic! :) 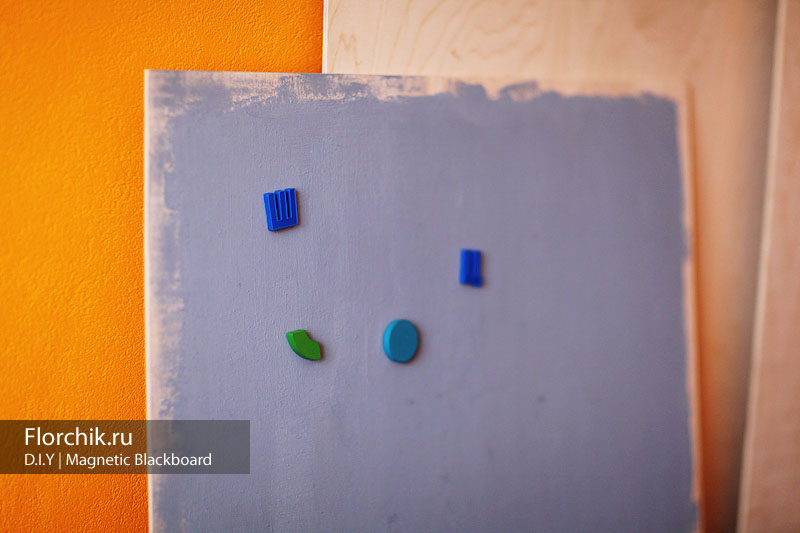
Please note that the edges of the board are not painted over with primer. I just already knew that there would be a frame, so I felt sorry for wasting magnetic soil on these unused areas in the future. I got it with great difficulty, because at first I looked for it all over the Internet, then it turned out that it was not available anywhere, in the end I ordered the last two cans and how many more they got to me by mail. In general, I was shaking over this magnetic soil =))) Because I tried to save as much as I could)
After coating, the surface was very rough, the primer was applied with some kind of small crumbs, I really wanted to sand the board at least lightly, but as I imagined how much soil would fall off, and that the magnetic properties would weaken, I preferred not to touch anything at all. After all, it is also worth considering that under the layers of paint, these properties will also weaken.
6. Well, we got to the paint) Unfortunately, I didn’t have a photo of how I painted, although this is surprising, because I remember exactly what I was filming. I will show only the result after this stage. The child and I immediately began to test, without waiting for other trinkets to be attached)))

Tikkurila paint is easy to apply. I only needed one layer for a dense, even coverage. She has a specific smell, but not to say that it is sharp, and disappears very quickly. It looks like shoe polish)) It dries within a couple of hours, but I left it for a day, afraid to try it right away =) But the next day after painting, we already drew and washed it with chalk, and everything was fine;)
As a result, I spent only 1/3 of a liter jar. I’ve already figured out where else to use it) But you can just save it and over time, if the board loses its “marketable” appearance, just cover it with a new layer, and it will sparkle like new again;)
7. The next step I sawed frames required size. Two pieces of 1.2 m each and two of 0.8 m each. Using a special nozzle, I sawed out diagonal corners. White paint covered these slats. The railing was also painted with the same paint. Tikkurila Pesto 10 dries for almost two days and smells sharp at the same time. The child had to sleep in another room. But it is ideal for both wood and metal, it does not need to be varnished after and can be safely washed, which is why I chose it.
8. I screwed the railing with a screwdriver to the board below, measuring its location with a laser level. And I planned to glue the frames with glue, but after the board would hang on the wall. I wanted to cover the drill holes with frames.
9. So, we got to the stage of attaching the board to the wall. I thought a lot about how it would be better to hang it. And there were thoughts about the hinges and glue, but in the end it was decided that we would drill two holes at the top and bottom of the board. The same amount in the wall, we hammer in the dowels there and screw the board onto the screws. Why and below, too. Because if the board is fixed only from above, then when drawing on it, it sways and jumps noticeably. If it is also fixed from below, then it fits very tightly to the wall and there are no movements.
10. I completed the fastening stage with frames, which I glued along the edges of the board with liquid nails. This is what they look like up close. Can you say that under this frame drilled hole? All holes are hidden) Self-tapping screws, by the way, are chosen not with a round, but with a flat head, because the frame can easily fit snugly against the board. 
11. I hung pockets and containers on the railing. I put in them all the magnets and crayons we have. 
Focus on magnets with animals from books by Eric Karl. If you look closely, you can see wooden magnets of various geometric shapes above, and even letters and numbers that we inherited from my sister) We also have plaster magnets, which we make ourselves according to molds, and then decorate, there also a huge flight for fantasy, tk. there are sea animals and vegetables/fruits and heroes of fairy tales. In general, there are a lot of variations for games.
12. Here, for example, they literally composed an educational game on the spot. Mishutka learned to draw waves and imitated the sea on the board. 
When I saw this, I simply asked to find it among all the magnets of those animals that swim in the sea. The child was not mistaken even once, the octopus and goldfish selected by him have not yet entered the frame. And I suggested to him to take a polar bear, because. he also swims in the sea and catches fish. This is how a child develops, just learning everything new in the game.
Well, in the end, to complete this post, I post a view of the finished result from the outside. The photo is not staged, sorry, but only such a frame was found, where the whole board is visible) The child writes the letter A =)) 
I will make a reservation that I do not teach him letters. I don't think it's necessary at that age. But he played the ABC a couple of times on his phone and this is the result. Well, again, knowledge in the game is not forbidden;)
With all the convenience of a marker board, not many dare to decorate their home or workplace with it - after all, the prices for this simple device are unreasonably high, and even for an inexperienced mathematician it is obvious that they are many times higher than the cost of goods. Therefore, the most creative people refuse to overpay for the brand and make inexpensive marker boards or their analogues on their own. There are several light and quick ways, among which the reader can choose the best option for himself.
Benefits of a whiteboard
The advantage of using such a board, like chalk boards, is the large and easily wiped surface. However, unlike the "school classics", the marker board fits well into any interior due to the variety color solutions. It will be equally appropriate in an office space and a conference room, in a cafe and a restaurant, an educational audience and a children's room, a home office or a kitchen.
In the office, a marker board is, first of all, a way to optimize the workspace, a great way to transform office walls and make them an active assistant in your work. Here is the place for presentations, brainstorming results, current company news, schedules, plans, notes, various working moments. You no longer need to use notepads, stickers, and various reminders.
In a child's room, a marker board is a fun and beautiful compromise between a child's desire to draw anytime, anywhere, including on the walls, and a parent's desire to keep the wallpaper safe and sound. In the kitchen, she will help you make shopping lists, plan menus, distribute household responsibilities, leave notes, and much more (however, often this role is taken over by the refrigerator).
Photo frame with glass
Perhaps the most convenient option: on glass and markers write perfectly, and the inscriptions are most easily erased. In addition, you can choose according to your taste and style of the room both the frame itself and the background of the future marker board - white, pastel colors, bright and juicy ... The color depends on the paper under the glass (you can choose it in stationery or photo printing salon) , or from paint applied directly to the back of the glass.
Painting glass is a fairly simple matter, although it requires certain skills. We take rubber gloves, a can of spray paint, get settled on fresh air or open balcony- and go! It is worth spraying the paint at a distance of no closer than 10-15 centimeters, otherwise smudges will form. The same thing happens when applying too much paint at one time, so it's worth working in several stages. Spray paint dries fairly quickly, about 7-10 minutes per coat.
Adhesive tape
With a little googling, you'll find that there are two types of vinyl that make sense for our project: plain glossy white and whiteboard specific. The first costs a penny, they ask for more for the second - but even it is many times cheaper than ordinary marker boards. Judging by the reviews of jacks of all trades, both show excellent results (so why overpay?)
Very convenient to use. They are ideal for children at the stage of learning to read, help to "put" a hand, learn to write and draw. In the work they are used to create flowcharts, lectures and training. However, the cost of such boards is quite high and starts from 1500 rubles. Therefore, many people have a question: is it possible to make a magnetic whiteboard with your own hands?
Materials and tools
You will need:
- for measurements.
- Nails, hooks for attaching the board.
- Screwdriver and hammer.
- Melamine or other suitable type of plastic.
During operation, be extremely careful not to cut yourself when processing sheets.
Option one. transparent board
First you need to decide on the size of the future product. Depending on the purpose, the dimensions can be any. A magnetic marker board 90x120 centimeters is suitable for teaching schoolchildren, drawing small diagrams. Smaller children can make a smaller board. For placement in a large office and lectures, the dimensions of the product should be from 150 cm on the narrow side.

The hardware store sells melamine in various sizes. This material has a durable plastic coating on one side, which will ensure the durability of the product. It is better to choose sheets with a smooth surface, as they are easier to wipe off and the inscriptions will be easier to read.
If you want to make a clear whiteboard, you can purchase Plexiglas or Lexan. The latter option is thinner and more resistant to damage, weighs less, does not crumble and has a beautiful glossy finish.
If you decide to make a magnetic whiteboard with your own hands, please note that the material is very thin - only 6 mm thick. You can hang the board on the wall, but if you plan to move it, then you need to glue the backing sheet. To use magnets, it's best to choose a sheet of steel and add plywood or corkboard.
Please note that such a board should be placed on a flat wall. If the surface is not flat enough, then the board will not be stable, it will not be very comfortable to write on it. Also, for convenience, you can attach a shelf for markers and rags to the finished product.
Now stores sell glider boards, divided by day of the week. Automotive self-adhesive strips 3-6 mm wide are ideal for marking. If you make a magnetic whiteboard with your own hands, you can decorate it as you wish and depending on the purpose of use.
Option two. Board white magnetic marker
To make a whiteboard, you can take any smooth material and cover it with several layers of paint and varnish. But steel sheet is ideal. It is cheaper, heavier and magnets are well attached to it.
Cover the sheet with white paint in several layers. It is white that is used, since all the colors of the markers will be clearly visible on such a surface. Each layer should dry well.

After all layers of paint have dried, coat the sheet with a thin layer of clear gloss varnish. One of the best coatings again there will be melamine, which is not only solid, but also liquid.
Now you can frame the product, make shelves and hang the board. The shelf is made of a thin strip of metal and is attached to the bottom edge of the product. Framing will hide the uneven edges of the board.
- Wash the markers with a dry sponge or soft cloth. It is better to use special markers designed for whiteboards. Light streaks may remain on the surface after erasing the inscriptions. They are removed with alcohol. To avoid streaks, you can cover the surface of the melamine with wax, which is used for polishing cars.
- cutting material better with a saw for laminated materials or plywood.
- To facilitate sawing, you can draw a line with a ruler and a knife. Then the material will not break during the cutting process. To prevent crumbling and grinding, adhesive tape can be applied to the cut line.

By making a magnetic whiteboard with your own hands, you can save a lot. Such a product will fully meet your wishes and requirements.
Don't buy until you read this!
Most of us, when we see a chalkboard on a wall or a wall painted with magnetic paint in the interior, wondered: “Maybe I can do it!”. Well, here's the inside story on what works and what doesn't, and how to get the effect you really want.
A chalkboard on the wall can easily create the look of a bulletin board or faux display in just about any room. True, for this you do not need to use special chalk paint, which is presented in a limited palette of colors and is quite expensive.

Here is the secret formula for creating a chalkboard: in each jar of regular paint(any color), add 2 tablespoons of grout for ceramic tiles and stir thoroughly to break up any lumps. Apply the paint with a roller, sponge or brush, using several coats for even coverage. After it dries, it is necessary to remove the crumbs of sand from the surface with sandpaper No. 150 and wipe off the dust. Now your chalkboard is ready - write on a piece of chalk, then wipe off the chalk with a barely damp sponge.
Magnetic paint can turn a wall into comfortable spot for announcements, drawings, photographs, or an area requiring constant exposure changes. In a word, you can magnetize everything that you want to display on a magnetic board using magnets without glue and buttons, and if necessary, quickly move or completely replace everything. True, magnetic paint will not replace a magnetic board, because. the adhesion of magnets to magnetic paint is weaker. A couple of years ago, one of my friends wanted to create a magnetic wall for his daughter's interior, where she could display her drawings and hang up important reminders. After 3 layers of magnetic paint were applied to the wall, the painted area was not large enough to hold most magnets. Some of the magnets were so weakly magnetized to the wall that the magnets could not even hold a sheet of paper!

Everyone has seen tiny super strong neodymium magnets! They are highly magnetic, but their use is somewhat dangerous for children, because. these magnets are easy to swallow. Watch an episode of Grey's Anatomy about a child who swallowed several magnets, they began to attach themselves to each other, thereby tearing the walls of the organs abdominal cavity. Such cases also occur in real life. Despite this, my friend decided to use these very light and strong magnets to attach sheets of paper to the wall, with the creativity of his daughter.
Here's how they magnetized the words in the shape of a Christmas tree last year:

So, forget about magnetic paint. If you want a magnetic space that actually works, go to the store and buy a large sheet of galvanized steel (make sure this sheet is magnetic before purchasing). You can even use a metal baseboard or a strip of steel. After that, you can paint in any color you like - the paint will not affect the magnetism. Attach the fasteners and mount the steel on the wall.

Now you know all the pros and cons, the whole truth about the chalkboard and magnetic paint. If you have done something similar in your room based on this article, please write to us about it. We will mark the best works with magnetic prizes;)