Why seedlings do not drop seed. Why does the seed coat not fall off the sprouts. They are cold! Or hot
Have you encountered a problem when the seedlings could not throw off the seed coat in a timely manner? You probably noticed that such plants looked frail and lagged far behind their relatives in development.
Most often, the situation is resolved by the natural death of weak plants. When looking at such deadlings, my hands just itch to help them quickly get rid of seed caps;). In the article I would like to discuss with you whether it is worth doing it? And if so, how to carry out the operation with minimal damage to a tiny seedling?
Seedlings that have difficulty shedding the seed coat are rightly considered weaker. So they are such plants are less promising in terms of productivity.
I often had to observe even the death of such seedlings, since the remnants of the seed completely block their growth. The most obvious cause of trouble is bad seeds.
But a few more versions come to my mind why seedlings are unable to shed their seed coat on their own:
- the seeds are planted too shallow;
- seeds are covered with too loose substrate;
- the soil was not compacted after sowing;
- the film, which creates an optimal microclimate in the container, was removed early, and the seed coat dried out in dry air.
I note that you should not sound the alarm ahead of time. Give your green pets a chance to do it themselves.
However, if the case is clearly stalled, then the poor fellows can be helped a little.

It is better not to try to remove the seed coat with your fingers - the cotyledon leaves of peppers and tomatoes are fragile and can be easily damaged by careless manipulations. Drop from a pipette or syringe onto the leaves with warm water and wait until the cap softens a little. And only then try to gently pick it off with the blunt side of the needle.
And so that seedlings with a stuck seed coat appear to a minimum, adhere to the following recommendations:
- Before sowing, soak the seeds so that they are saturated with moisture and swell. The seed coat will become soft and pliable and the plant will easily get rid of it. Comprehensive information about methods pre-sowing treatment seeds can be found here.
- Sow dry seeds to a depth of at least 1-1.5 centimeters, and be sure to compact the surface of the substrate. Thus, the seedlings themselves will easily throw off the interfering “clothes” when they make their way to the light through a rather thick layer of compacted soil. But here it is important not to overdo it and not to plant the seeds too deeply, otherwise you can be left without seedlings at all. And one more thing: the seeds of such crops as celery and many other herbs are so small that they are sown almost without powdering with earth. Therefore, the second advice does not apply to them.
Let's not forget that in nature there is nothing useless or superfluous, and the seed coat up to a certain point performs an important function. It supplies the plant with nutrients that it needs at an early stage of growth, when the root system is still poorly developed. Therefore, carefully monitor the condition of the seedlings and intervene in the work of Mother Nature only in case of emergency.
It is very rare for beginners to have a seamless grow. If you are going to grow cannabis, you must be prepared for the fact that you will encounter a lot of incomprehensible things. To make it at least a little clearer, we have prepared for you a guide on the most common problems hemp. And since no one has yet been able to embrace the immensity the first time, this guide will be constantly supplemented and updated.
Seed / sprout / seedling
I planted a seed, but there are still no shoots and no
If you are confident in the seeds, then most often you don’t need to worry, on average, it takes from 2 to 4 days from planting to germination, sometimes longer. A lot of factors affect the germination of seeds: their age, storage conditions, genetic features, planting depth, whether you germinated them well or not, whether the earth was too dry or vice versa - you planted a swamp there and the seed rotted. With experience, you will learn how to plant properly. Until then, you need to be patient. In no case do not climb into the ground. Panic is worth after 7 days. If the sprout did not appear, well, now you can climb and see what happened. But more often than not, everything sprouts fine if you planted quality seeds.
The sprout came out along with the shell from the seed
Sometimes sprouts appear "in a helmet", this is when the shell from the seed is not separated from the embryo in the ground, but appears on the surface with it. Often the sprouts are clamped by this shell. In order for it to separate safely, the sprout should be moistened with a spray bottle and covered with a transparent plastic cup. From moisture, the shell becomes soft and it is easier for the cotyledons of the sprout to break through it. However, in some cases, the shell remains. Then you need to remove it yourself - very, very carefully separate it with tweezers.
The sprout came out, but not green, but yellow
Most likely, nothing bad is happening. Immediately after germination, the sprout has not yet begun the correct metabolic processes, such as photosynthesis. You should not worry, after a few hours you will see how the sprout turns from pale yellow to green and, in general, is filled with life. If this does not happen and after a day the sprout is still yellow and does not show signs of life, then either the seeds you got are of poor quality, or the sprout began to rot in the ground from excess moisture. However, there are other reasons as well.
The sprout stretches on the stalk and remains thin
This phenomenon is called stretch and occurs with absolutely all sprouts. An experienced grower leaves a place in the pot in advance and pours earth into it in the first few days of active sprout stretching. After a few days, the sprout stops stretching and begins to form the first leaves. However, if active stretching continues, then this is most likely a signal that there is little light for the sprout - move the lamp lower.
The sprout slows down and develops slowly
There could be many reasons for this. Sometimes these are features of genetics (check in the grow reports for your variety), but more often these are jambs with conditions and care. What to pay attention to first of all? The main thing: temperature, humidity, frequency and volume of irrigation, is there enough light, is the composition of the soil optimal. For example, too greasy soil can lead to “brakes” in the early stages of seedling development. It is also important to understand that your own cannabis always grows very slowly, watching it every day, you sometimes do not perceive the dynamics of its growth so clearly. Look through other people's grow reports for your variety and compare the appearance of plants. If your pet is clearly and very different, then this is a reason to think hard. If the differences are not significant, then there is no need to panic.
New leaves appear twisted and deformed
Leaf mutation on early stages the life of a seedling is not so rare. And even old and proven varieties of hemp suffer from it. For example, Blueberry from Dutch Passion. Mutation is not always a death sentence. Most growers keep the mutants and grow them successfully. If you see that, in general, despite its unsightly appearance, the plant is developing at a good pace, then such a bush can be left. If the mutant is growing really poorly, then it is wiser to make room for a healthy bush.
The cotyledons of the sprout turn yellow
The death of cotyledons is a natural process. It begins with the beginning of the active growth of the bush, when it forms several internodes on the main trunk (floors) and the foliage hides the cotyledons in dense shade. However, if the cotyledons began to turn yellow at the earliest stages of sprout development, then this indicates serious problems with growing conditions. And most often the wrong composition of the soil and water for irrigation, including the wrong pH level, is to blame. The sprout may also turn yellow from excessive watering. What can be done in this situation? In the cotyledons of the sprout, a supply of nutrients for the sprout is concentrated, until the leaves appear and the photosynthesis factory starts at full power. This means that if the cotyledons are damaged when there is no foliage, then this can be fatal for the sprout. If problems with them began in the presence of any leaves, then the plant will survive, provided that you find out and correct the reasons why the premature death of the cotyledons began. Otherwise, the foliage will soon start to hurt.
The bush is too long - the internodes are long, there is little foliage, and it grows on long skinny stems
Very common for newbies. Everything is simple here - if your bush looks like this, then you have too little light. Increase its power.
The seedling began to suddenly turn yellow and died
Most likely, problems with the pH of the irrigation water or soil, or a combination of both. And possibly - and light stress. Sprouts do not like too bright lighting. At first, it is better to hold the lamp higher.
mature plant
The leaves wither, even despite abundant watering, the tip and edges of the leaf are bent inward
Most likely, this overflow is one of the most common "sores" of those who grow for the first time. It is generally accepted that plants love water and no matter how much lei, it will not get worse - but this is not so. Plant roots need oxygen. That's why hemp loves moderate watering. The pot should not be too wet, otherwise the roots do not receive oxygen and there is even a danger of their rotting if you plant a non-drying swamp in the pot. If your plants overflow, then do not water them for several days until the soil dries. If after this the problem does not go away, then most likely the overflow persisted for such a significant time that the roots of the plant were affected.
The tip and edges of the sheet are bent inward

The bush is outwardly healthy, but for some reason, on some branches, the leaves are bent inward, similar to the symptoms of overflow, but are you ready to swear that you didn’t shed heavily? In this case, check if the fan is hitting your bush too hard. Prolonged exposure to a powerful current can lead to windburn and one of its initial symptoms is the tips of the foliage that are bent by a claw. It is better not to blow the plants with a direct strong stream.
You also need to pay attention to how saturated the green leaves are. If the leaves are normal green, it is most likely a windburn. If the greens are very thick, dark, most likely, the bend of the tips is caused by an excess of nitrogen. In addition, windburn rarely appears on the entire bush at once. Usually only one small part, located closest to the fan, is affected. With an excess of nitrogen, "claws" appear throughout the bush.
Leaves turn yellow and fall off
If the foliage suddenly began to turn yellow on a seemingly adult bush, then this is a sign that your plant does not have enough nitrogen - one of the three main nutrients (nitrogen, phosphorus, potassium). With a lack of nitrogen, chlorophyll - it is he who gives the foliage green color- is not produced in sufficient quantities. As a result, the foliage dies off and easily falls off even with slight manipulation with it.
If you find such a picture, then you should immediately resolve the issue with nutrients - adjust the composition and doses of fertilizers. However, this is not always easy to do if you grow, for example, on organic. The most reasonable thing is to initially approach the issue of fertilizers responsibly and from the very beginning use correctly calculated compote from mineral fertilizers, of course, having a pH meter and a TDS meter. And learn how it all works.
But not always yellowing and dying off of foliage is a deficiency symptom. If the oldest foliage, which is in the dense shade of young growth, turns yellow and falls off, then this is a natural process. Without receiving light, the leaf dies off as unnecessary.
Foliage too dark to black
Too much nitrogen.
Leaf stalks turn pink/purple
This is a deficiency of the second of the three most important plant nutrients, phosphorus. It is wiser to increase the dosage of this element.
However, sometimes this color of the stems is a feature of genetics. To tell one from the other, check for other signs of phosphorus deficiency - colored leaf spots, rich greens, and fleshy, rough foliage.
The tips of the leaf brightened / turned brown
This yellowing of the leaf tips and denticles most likely indicates a potassium deficiency. Third key element in hemp nutrition.
Rusty brown spots on old leaves.
Deficiency of calcium and magnesium. Calcium plays a huge role in plant cell division, along with potassium. A fairly common deficiency that occurs if the grower, due to inexperience, is limited to applying only NPK. The choice of means for feeding the plant with calcium and magnesium is wide: from specialized products in grow shops, such as CalMag, or magnesium sulfate - as the cheapest option for replenishing magnesium.
Another sign of calcium deficiency is that the leaves look dry, brittle and begin to "twist".
"Burn" the tips of the sheet.
Most likely, this is an overdose of fertilizers. It is recommended to reduce the dosage of fertilizers, and if the symptoms are accompanied by others, for example, yellowing of the foliage, then it is wiser to wash the soil.
In chat rooms they constantly write about some kind of “micro”. What is this?
In addition to nitrogen, phosphorus and potassium - the three main nutrients for your plants - they also require trace elements: calcium, magnesium already mentioned above, as well as sulfur, manganese, boron, zinc and copper. Cannabis requires a complete set of nutrients. It is these trace elements that growers call "micro". Quite often, micra can be found in the composition of fertilizers. If yours do not contain them, then you will have to add additional micro.
I apply fertilizer, but the deficits do not disappear
Eliminating a plant's nutritional problems will not cause old, deficient foliage to magically turn green again. New foliage will be healthy if the plant is in veg. If the young foliage is also sick and at the same time you seem to be fertilizing, then there may be several reasons for this - either you have problems with pH and the plant does not absorb the elements, or if the piash is in order (and you calibrate the piash meter often), insufficient dosage of fertilizers.
The composition of the soil can also play a bad joke. For example, if one of the elements in it is small (for example, phosphorus), then the application of complex fertilizers does not work well. Such a deficiency must be treated manually - with an individual compote of fertilizers with a properly selected composition.
The leaves are bobbing up
If the edges of the sheet are bent upward, then this is a symptom of temperature exposure - heat. Check the temperature in the box, and also if your thermometer is working. It should not be forgotten that the actual temperature of the soil and on the surface of the sheet may differ significantly in some cases from the “average for the hospital”. And if the thermometer shows a seemingly acceptable +28, then under the rays of a powerful DNAT-600, for example, the soil in the grow bag can warm up to +30 in top layer, which is fatal for the roots located there.
Leaves reach for the light
Although it may be intimidating for some beginners, if a cannabis tree lifts its leaves as if stretching out for light, opening the bush, it is exactly the opposite - evidence of the health of the bush. Watching him, you will see that more often he does this at the same time - somewhere in the second half of his daylight hours.
But if the upper leaves stand upright, this is an attempt by the plant to protect itself from an overabundance of light and heat from the lamp. Move the lamp away.
Leaves drooped
And vice versa. If before turning off the light you see drooping foliage, then you should not be afraid. The hemp is tired and already asleep. All in all.
Foliage twists as if from heat, but the temperature is normal / discoloration of the segments
If, in addition to this symptom, you also found spots of an incomprehensible genesis, then we can talk about a tobacco mosaic virus. Brownish eruptions appear on the foliage and buds, and the foliage twists as if exposed to heat. Also, some segments of the leaf may turn yellow, as with nitrogen starvation. Unfortunately, this scourge is practically not treated, it is recommended to remove the affected areas. In addition, the disease can spread to your other plants. Fortunately, the virus is not so rare.
Foliage twists also with a lack of calcium. At the same time, rusty spots appear on the leaves (see above).
Broken stem/trunk
If during bending or for some other reason a branch or even the main stem of a plant is broken, then you should not be afraid - if the branch has not come off completely and the connecting tissues remain, then the fracture site will heal on its own. Branches with more serious damage can be tried to grow together with adhesive tape or even ordinary household tape.
Mold has grown in a pot of soil
This happens if you have a habit of planting a swamp in a pot or storing dead leaves there. If there is also high humidity in the box - here it is, a ready-made recipe for mold formation. What to do? If you find mold, then you should act immediately - first, manually remove all lesions and run to the garden store for specialized mold preparations. If you missed it late and the lesion is very strong, then a plant transplant with treatment with mold preparations may be required.
The bush is very different appearance from those in the reports
It is most likely that this is a scatter in the phenotype. There are cannabis varieties that can have several phenotypes at once.
Flowering plant
The bush does not show signs of flowering after the transition to 12/12
Flowering is a very slow process. In order for you to see distinct changes in the appearance of your bush, it may take 7-10 days, sometimes longer. Therefore, do not rush to the grower's chat or the forum with a question when the bush still does not bloom a week after the timer is set to 12/12. Your cannabis will definitely bloom, you just have to give it time. Late flowering can occur due to excess nitrogen in the soil. It may also be genetically determined. It is recommended to speed up flowering by washing the soil from the charge of fertilizers on the veg and applying the composition for flowering. The plant can also be left in pitch darkness for a few days before switching to a 12/12 light cycle.
Slow flowering may be due to a violation of the 12-hour darkness regime. For example, if the grow box is not completely airtight and a small amount of light from outside gets in at night. Another one common mistake- the grower looks into the box after turning off the lamps. Neither one nor the other can be allowed. Darkness at night during the flowering stage should be complete and uninterrupted for the full 12 hours.
Leaves are starting to turn yellow and die.
Flowering is the peak of a plant's life, when its appetites are rapidly increasing. And if things are not going well for you with feeding, then transferring the plant to flowering will reveal all these jambs. However, even ideal nutrition will not help the leaves. Do not forget that hemp is annual plant and after flowering, death awaits her. Flowering is the autumn of your bush's life. And by the end of the cycle, in any case, it will suit the “tired” - those who have lost their abundant leafy cover. At the same time, your task is to keep the plant healthy for as long as possible and keep an eye on the addition of bud mass.
There is mold on the buds
A terrible misfortune that can put an end to the crop, because it is strictly not recommended to use those affected by mold. The affected areas must be removed immediately, as well as the factors of mold occurrence (excessive humidity, water ingress on the bumps, poor ventilation and airflow) and eliminate them. Good results are obtained by using the drug phytosporin to combat mold and prevent its occurrence. Especially in the outdoors.
How to understand that hemp is ripe?
Nothing without a microscope. You can truly judge the maturity of cannabis only by examining the state of its trichomes with a magnifying glass. Half of them turned amber - it's time to clean up. By the appearance of the cone itself, maturity cannot be determined.
Trichomes are not amber, although the maturation period according to the passport has come
The ripening time according to the passport is a very approximate indicator, which can differ dramatically depending on the growing conditions and even on the specific phenotype of the variety. But on average, in practice, one or two additional weeks are required for the aging time according to the passport.
Tired Skipper
Subscribe to our Telegram channel and you will be promptly informed about new publications on the site, and we also have a lot of useful information there for the grower.
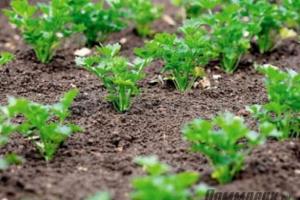
In order to successfully grow healthy seedlings, it is necessary to regularly monitor growth and timely eliminate possible errors, as well as prevent their occurrence. Consider the most common seedling problems which you may have if you do not follow the basic rules for growing seedlings. Our recommendations will help you avoid the most common mistakes and will be useful for both experienced gardeners and beginners in this field.
In order for the seedlings to develop well, it is necessary to create optimally comfortable conditions for it, namely, carefully monitor the following parameters:
- Sufficient soil moisture.
- Optimal temperature.
- Proper air circulation in the room.
- Sufficient lighting.
- Nutrients in the required quantities.
Even amateur gardeners know this information, but knowledge does not help all gardeners in growing full-fledged seedlings.
Reasons Seeds Don't Always Germinate
There are many reasons that affect seed germination. The main reasons are the following:
First and main reason: Using unlife old seed. In order to determine whether it is good, a cursory check is made by experienced gardeners. They first soak the seeds in a stimulant and then place them on a damp cotton towel and put them in a plastic bag for a while. It is better to place the bag in a warm place until small sprouts appear.
If a week passes and you do not notice any changes, then the seeds are not viable. Then go to a specialized store or to the market for fresh seeds, which, after purchase, check in the same way. Seeds of many plants remain viable for at least two years if properly stored.

Common problems with seed germination.
The second reason for poor germination is the sowing of seeds at a great depth. During planting, it is imperative to take into account the specifics of sowing each plant. Some of the seeds need to be placed on the surface, the soil must be moist, and they will germinate only under a film (for example,), while other seeds like to grow under a thin layer of substrate, and so on.
The third reason is sowing in cold, moisture-saturated soil. In this case, the seeds rot and seedlings do not appear. For this reason, it is necessary to equip drainage system and make holes in containers for ventilation.
And finally, the fourth common reason for non-germination of seed is the steaming of seeds. It is not recommended to place containers in which moistened crops are planted in too warm places (for example, on heating batteries). In order to avoid steaming, you need to put magazines or books under the container or use special thermal mats.
Seeds that have hard coatings (spinach, radishes, beets and others) are best germinated in a room with a cool air temperature. And it is best to plant them in open ground.
Why sprouts do not shed their shell
If you have sown seeds and waited for seedlings, but they do not want to shed their outer shell, then the sprouts appeared from weakened, completely unformed seeds that should not be dived - it is better to throw them away.
Sprouts do not shed their shell for several reasons, the main of which are the following:
- Strongly superficial crops.
- The film was removed from the container in which the seeds were sown, which caused the seed coat to dry out.
To eliminate errors, it is necessary to periodically moisten the "caps" - then the sprouts themselves will shed their shells. You can also try carefully, without injuring the delicate sprout, to pry off the shell with a needle. You can’t touch it with your hands, because the seedlings can die because of this.
For what reasons seedlings are elongated and pale
If you got elongated and pale seedlings, then this was due to:
Lack of lighting. If the seedlings are not getting enough light, they will reach for nearby light sources. Therefore, you need to place them under the lamp itself or purchase special lamps for indoor plants, which are able to provide a wide range of lighting spectrum required for plants. Best of all, seedlings develop and grow if you provide it with 15 hours of lighting during the day.
Remember! Germinating seeds do not need light, but high temperature, but sprouts cannot develop with lack of light, and they need to lower the temperature. For this reason, a couple of days before shoots appear, try to lower the temperature and create maximum lighting. In order for the air to circulate constantly, you can use a fan.

Elimination of possible errors in the cultivation of seedlings.
Close location. In order to eliminate this drawback, you can push the pots apart or pick the plants by choosing a larger container for them. However, it should be taken into account that with each picking, the plants slow down their growth and development for 11-15 days. Sometimes, if necessary, with the help of a pick, you can delay the planting of seedlings in open ground (if you need to wait until suitable weather conditions come).
Too much fertilizer. In this case, the seedlings are transplanted into the soil in which nutrients be contained in a smaller amount, and then it must be treated with the Athlete preparation - either water the seedlings under the root, or spray them. Sprouts begin to water when two or three leaves are formed.
Why shoots are uneven
Friendly shoots of seeds are observed if the seed of the appropriate quality is used. However, sometimes sparse seedlings are obtained for other reasons:
If the seeds are covered with an uneven layer of substrate. At the same time, the seeds that turned out to be deeper can either sprout defective sprouts, or they will not be able to get through thick soil at all, therefore they do not sprout.
If the seeds are sown in a clay weighted substrate. After watering, a “crust” is created on such soil, which prevents the sprouts from developing - they cannot even break through it.
For sowing seeds, it is necessary to use a light substrate, and it is best if the base of the soil is composed of high-moor neutral peat or crushed vermiculite. The mulching layer should have a thickness equal to the diameter of the seeds to be planted.
As soon as shoots from large seeds appear, many gardeners try to quickly proceed to the next step - they remove the film, lower the temperature, and increase the amount of water when watering. These abrupt changes can inhibit the development of seeds that have not yet sprouted.
Due to maintaining the wrong temperature regime in soil moisture.
When supersaturating the seeds during the initial treatments, which were supposed to "improve germination."
What causes lodging and death of seedlings
If you notice a darkening and thinning of the basal part of the sprouts, then they are affected by the "black leg". The disease is provoked by fungi of the genus Fusarium. The problem occurs when the soil is overcooled, watered excessively, or the substrate is contaminated.
For neutralization of new ascending sprouts, it is necessary to steam the soil before sowing. As soon as the initial signs of the disease appear, it is necessary to remove the diseased seedlings with lumps of soil around them and stop watering. Pour calcined sand under the stems. Then water the plants with a solution of potassium permanganate or one of the preparations: "Fundazol" or "Topsin". However, the most reliable way is to transplant young shoots into new soil that has been previously disinfected.
Unexpected lodging of seedlings can occur due to:
- Untimely watering.
- Excessive moisture, in which seedlings suffocate in the soil.
- Low soil temperature, which contributes to the decay of the roots.
- Bad drainage.
- Excessively acidic or alkaline soil.
- Overabundance of trace elements.
- Urine of cats, which is reflected in the color of the seedlings and is the cause of their lodging.
Why does the color of plant leaves change?
If the leaves of the seedlings are pale and dull, then they do not have enough light or they need nitrogen fertilizers. In this case, it is necessary to rearrange the seedlings to a lighted place or apply illumination (a 40-watt fluorescent lamp is needed for half a meter of area, which should be installed at a distance of 14-25 cm above the plants). Seedlings grown from seeds are of higher quality if the seeds are sown later and grow under natural light, and not with early crops under lamps.
The room temperature should be lower the darker the room. However, the indicator should not be lower than +13.5 ° C. If the temperature is too low, the seedlings will stop developing and even die in such conditions.

Conditions necessary for the proper development of seedlings.
When nitrogen deficiency is noticed, plants should be fed with a solution ammonium nitrate or urea (the proportions should not exceed 7-10 grams of the substance per 10 liters of water).
If blue-red spots appear on the leaves of the sprouts, it means that the soil is supercooled and phosphorus, which is so necessary for their roots, is not available to the plants.
The appearance of a dry border indicates a lack of potassium. In both cases, the sprouts should be fed. For this, complex fertilizers are used. Also take care of creating favorable conditions for seedlings.
Why do plants stop growing after picking
After picking, sprouts often stop developing for a while. This is influenced by the following reasons:
Mistakes made when diving. For example, long roots of seedlings were not pinched, and when they were planted in the substrate, they bent or intertwined, which led to rotting or suspension of plant growth or their death from fungal diseases, the pathogens of which can easily penetrate the plant if its root system is damaged.
When an air cavity formed around the roots during planting, the root hairs began to dry out, which at the same time cannot function well.
Low temperatures and lack of nutrients.
The picking process is negatively perceived by some types of plants. These are plants with a taproot and weak root system - cucumbers, peppers and others. vegetable crops. The planting of such plants is carried out in open ground, and it is necessary to sow peppers and cucumbers in separate containers in just a few pieces.
Before planting in open ground, seedlings must be hardened off. Hardening begins on a cloudy day so that the seedlings gradually become accustomed to direct sunlight.
Growing seedlings, no one can give an absolute guarantee that there will be no problems in this sometimes difficult process.
And it is likely that there will simply not be time to solve these problems.
Therefore, it is necessary at the first signals that something is going wrong, it is necessary to urgently take measures to save the seedlings.
We want to offer you the main problems encountered when growing seedlings and ways to solve them.
Possible problems with seedlings
- The first thing you may encounter is when the seeds cannot sprout. Why?
Old seeds are the main reason. Check the shelf life of seeds.
To reduce the chances of such a problem when growing seedlings, you need to soak the seeds in a stimulant before sowing.
- However, deep sowing can also cause seed failure. If you remember about, then there is generally a superficial sowing. But the seeds and peppers close up only 0.5-1 cm.
In waterlogged and cold soil, the seeds begin to rot, so drainage and holes in the container for ventilation are very important here.
In waterlogged and warm soil, if the bowl is on a radiator, the seeds can become steamed, so you can put a stack of books under the bowl. And to reduce soil moisture, holes are made in the bowl, placed on newsprint and sometimes the film is removed.
Do not place pepper seeds on a windowsill for germination, as they prefer a higher temperature.

This behavior of seedlings is possible for several reasons:
- in weak seedlings, which must be removed when picking. A strong seedling may also have a “hat”, then you do not need to remove it, help him get rid of it;
- seed sowing was too shallow;
- they hurried to remove the film or glass from the seedling box.
There is an exit! Moisten the “hats” every hour so that the plant itself can shed them or pry them very carefully with a needle. Do not try to remove (even very carefully) with your hands, since the risk of seedling death in this case is very high.

Uneven shoots can be from:
- seed quality;
- seeds of unequal size, large ones sprouted, and you moved on to the next stage of growing seedlings, without giving the rest an opportunity to ascend;
- sowing at different depths;
- low temperature and soil moisture;
- heat and soil moisture;
- the seeds were oversaturated with pre-treatments for "better germination";
- they covered the seeds with dense soil, through the crust of which not all seedlings ascended;
- the use of heavy soil (clay), when watering, a crust forms, which prevents the seedlings from developing at full strength.
What to do? For planting seeds, use light soil based on fine vermiculite. The thickness of the layer should be the same as that of the seed.

It’s good when the seedlings sprout together, but what a surprise when they start to lie down one after another.
Why did such a problem arise with seedlings and what to do?
Quickly transplant plants () into another container with a new steamed substrate or, in extreme cases, treat the soil with protective preparations.
The reasons for the early lodging of seedlings can be:

- And everything seems to be fine, but they carried out a pick, and the problem with the seedlings is that the seedlings have stopped growing, why?
 First, you need to pay attention to the fact that there are plants that are better not to dive - peppers, cucumbers with a weak root system, with a core system of lupins, gypsophila. Based on this, the best option for such plants, seeds will be sown immediately in separate bowls of several seeds. For thinning, use ordinary scissors - cut weakened seedlings with them.
Possible reasons that the seedlings stopped growing: they did not pinch long roots, as a result of which the roots were injured during picking, moreover, such a plant increases the risk of attack by fungal pathogens. When picking, it is important to compact the soil around the seedling, if this is not done, then an air space is formed, from which the root system will begin to dry out.

For seed germination, light is not important, but high temperature is important, but light and low temperature are important for seedlings. Therefore, make it a rule for yourself that 3 days after the shoots have appeared, you lower the temperature and provide maximum illumination.
Seedlings can stretch:
- if dirty glass;
- containers with seedlings are far enough from the window;
- dense plantings, as a result of which the seedlings cast their own shadow on each other;
- did not conduct a pick on time;
- tomatoes can stretch from frequent watering.
- When seedlings change color - this is a problem, you need to find out why. Why?
Pale leaves show that they either have little light or require nitrogen fertilizers. Then, you need to rearrange the seedlings to a brighter place, if this is not possible, then use artificial lighting at a distance of 15-20 cm from the tops of the plants, by 0.5 sq.m. a 40 watt fluorescent lamp is sufficient. The lowest allowed temperature is 14°C.
If the light is not the issue, then apply nitrogen fertilizers (urea 10 g per 10 liters of water or ammonium nitrate).
If spots purple, then the soil for plants is cold, so you need to remove seedlings from the windowsill and apply complex fertilizer.
If dry edges appear on the leaves, add potassium monophosphate.

In this case, carry out 2 treatments with Phytoferm, the second is carried out 7-10 days after the first, during which time the pest populations are reflected.
- Seedlings are ready for planting in open ground, but a problem with weather conditions? Well, you need to delay the development of seedlings.
Pinch off plants 20-25 days before planting, leaving 2-3 pairs of leaves. Measure the removed part, if it is the length of a matchbox, then root and get even more seedlings.
Leaving her out of line sunbeams, start at 2 o'clock, gradually increasing until the seedlings on the balcony can be left overnight, without frost.
- If colorless spots appear on the leaves, this is a sign sunburn, therefore, for the first time, it is necessary to expose seedlings in the sun under paper.
Something lately I have been increasingly unpleasantly surprised by the seedlings of seedlings. I do not know for what reason the seed coat does not fall off the leaves of many sprouts. This phenomenon is very unpleasant, because if it is not removed, the seedlings will lag behind in development and may even die. How to help the seeds to throw off the shell?
Usually, the remaining seed coat signals that the sprouts are weak. But do not rush to reject crops, since a similar phenomenon occurs with small crops. So, when sowing tomatoes, peppers and eggplants, they should be buried only 1 cm deep. It is undesirable deeper, and smaller too. If planted smaller, then many seed coats will not subside after germination. Such plants can be helped to get rid of the seed coat. To do this, you need to create conditions of high humidity and strengthen the plants by watering them with Kornevin's solution.
Advice from "Economy"
It is impossible to remove the peel manually, as this will inevitably damage the cotyledon leaves. Not to mention the fact that in the seed coat the leaf blade is not hardened and after opening it can suffer from sunburn.
But if the seeds are old, then there can be especially many seeds that have not been freed from the shell. It makes no sense to save them, since weak sprouts will not give a high yield. Such sprouts just need to be removed.
Another reason for such non-standard shoots is a loose or dry substrate. It is usually loose due to great content peat. Therefore, when composing the mixture, add at least a third of garden or sod land. It will give you the right density. If there is little land, and peat prevails, then the sprouts, without meeting resistance, will carry the seed coat to the sun.
Most popular on the site

New amendments to the law on water protection...
Again I touch a sentimental question for the fishing lads - the question ...
03.04.2020 / Hunting and fishing

01/18/2017 / Veterinarian

BUSINESS PLAN for breeding chinchillas from P...
In modern conditions of the economy and the market as a whole, to start a business ...
01.12.2015 / Veterinarian

If you plant potatoes with sprouts and small roots, then seedlings will...
04/03/2020 / Garden

If you compare people who sleep completely naked under the covers and those ...
11/19/2016 / Health

Spring is steadily coming into its own. Before the summer season starts...
04/03/2020 / Garden

GUYOT AGAINST WOOD At one time I was fond of single-shoulder shaping...
03/01/2020 / Grapes

Moles are not our enemies, they are just unwanted guests on the site. Between p...
26.03.2020 / Kitchen garden

Lunar-sowing calendar gardener-gardener...
11/11/2015 / Kitchen garden

The doctor who contracted the coronavirus...
British doctor Claire Gerada has recently been ill with coronavirus and...
24.03.2020 / Health