Practical recommendations for creating a podium with your own hands. We make podiums for acoustics on a car door How can I make a podium for speakers
To the sound of your favorite songs and musical compositions. To do this, many drivers buy expensive amplifiers, subwoofers, and a stereo system. At the same time, the speakers are installed not only under the rear window, but also on the doors of cars, which allows you to get a clearer and better sound. However, installing the speakers in their original form does not look so beautiful. To decorate even ordinary speakers and install them on doors, you can make podiums with your own hands, which we will do now.
So, in order to make podiums for speakers on the car door, we need:
- cardboard;
- stationery knife;
-saw;
- chipboard;
- glue;
- sandpaper;
- file;
- self-tapping screws;
- Carpet.
We figured out the materials, now you can start making our podiums. We take a piece of cardboard and use a clerical knife to make a template for future podiums.
Now we will use our template to make three podium layers. To do this, we take 15 mm chipboard and cut three pieces according to the template with a saw. Of particular note is that last layer from chipboard should be 5 mm less than the other two.


Now, with the help of sandpaper and a file, we process the corners of the podium blank. The layer that was 5 mm smaller than the rest will actually be the top one. After processing, the workpiece should turn out to be slightly rounded and narrowed at the top, which will give it more beauty and showiness.
For greater reliability at this stage, you can additionally strengthen the chipboard layers with self-tapping screws.


The time has come for the aesthetic part, namely, the lining of the workpiece. To do this, we need a small piece of carpet, with which we will glue the future podiums. Again, it is advised to do everything very carefully and without too much haste, so that there are no wrinkles and irregularities.


It remains only to cut off the middle part of the carpet, install the speakers, attach our podiums to the car door and admire them beautiful view, as well as elegant sound.
To improve the sound quality of the audio system installed in the car, it is necessary to install additional speakers or replace the original ones with better and more powerful ones, and you can also make efforts to refine the speakers. To do this, you will need to independently make a podium for the salon for new or updated speakers. Each design is made according to an individual sketch.
We will analyze in detail how to make a podium with your own hands and install it yourself in a car.
Preparations for work
For self-manufacturing you will need a number of materials and devices:
- plywood or chipboard from 8 to 12 mm thick and with an average size of 800 by 800 mm;
- putty;
- mounting foam;
- epoxy glue, PVA glue;
- aerosol varnish and paint;
- electric drill;
- jigsaw;
- Bulgarian;
- Screwdriver Set;
- sandpaper;
- drawing materials (pencil, crayon, ruler, compasses).
Required information before installation
- The installation of an acoustic podium is necessary, since a speaker without a structure, for example, in a car door, will not give a clear sound, in addition, you will hear the vibration of the metal;
- thanks to the changeable shape of the workpiece design, it is easy to attach it to the car without cutting through the body iron;
- the podium, in addition to eliminating third-party sounds, will add low frequencies and improve the transparency of the sound. This also requires a good acoustic system, for which the factory design of the car does not have a place. That is why you will need to make it yourself;
- the best constructions are made of wood, which is the highest quality acoustic material;
- the podium also contributes to the creation of surround sound in the interior of your car;
- at the same time, the installation of this design provides you with services in improving and modifying the interior design of the car. They allow you to focus on the speakers and hide unsightly views of the system;
- in addition to wood, chipboard, podiums are made of carbon fiber and fiberglass. Any design can be additionally finished with leather, carpet or any other material.
IMPORTANT! When installing the podium, it is necessary to fix the speakers firmly enough. The better and stronger they are fixed in the structure, the better and deeper the sound will be. To give rigidity, acoustic shelves are sometimes used.
Stages of manufacturing and installation of the podium
1. Mold making
First of all, before starting the installation of the structure, you need to decide on a suitable place for it. When designing a form, you are limited only by your own creative imagination, but you must not forget not only the aesthetic, design side, but also the practical one.
IMPORTANT! When developing and installing the structure on their own, very often beginners do not take into account that the podium may interfere with the rear view (podium to the rear speakers) or make it impossible to open the doors or operate the power window. Pay attention to this when making the model.
- We take a sheet of cardboard;
- we apply a drawing of an invented form;
- cut out the template;
- attach the template to the plywood and circle it with a marker;
we drill holes in the plywood for the jigsaw blade and cut out the base blank of the future product.

Advice. For the audio system, experts advise using birch plywood, as this tree provides a richer and better sound.
2. Preparing the base for the speakers
IMPORTANT! Chipboard or plywood used should be at least 6-8 mm thick.

3. Assembly and filling of the podium

Advice. The stiffer the future frame of the podium, the better. Most often, mounting foam is used for filling, and some professionals also use epoxy resin, but working with resin requires skills, while everyone can handle the foam, with its help the podium can be given any shape.
- After the foam has dried (the period is indicated on the can), we remove the excess with a knife, giving the workpiece desired shape;
- then we take sandpaper and grind the product to a smooth surface;
- we level the surface with a thin layer of putty (the putty can be mixed in advance with PVA glue to prevent shedding);
- repeat the polishing process.
To give the podium structure greater rigidity and protection against mechanical damage, the workpiece can be treated with epoxy resin or glued with fiberglass.
- Apply a thin layer of resin to the surface of the workpiece;
- we put fiberglass on top, gently smoothing, without leaving wrinkles;
- treat with another layer of resin and let dry;
- cut off the excess and grind.
4. Painting or fitting the workpiece
- Painting
The finished structure can be primed and painted with spray paint, applying it in several stages, the main thing in this matter is to prevent smudges. After the paint has dried, the surface must be covered with an aerosol varnish.

- tight fitting faux leather
Faux leather is best suited as an upholstery material because both in appearance and physical properties most similar to the interior upholstery. Most often, the stretching runs from the ring to the ends of the product, where each side must be tightened more than once. To complete this task, use a building hair dryer. At the end of the work, the skin must be fixed with a stapler, and the excess pieces must be cut off.
5. Installation of the podium
The most common method of fastening is screwing with self-tapping screws with reverse side car upholstery. Before doing this, do not forget to install the speakers in the workpiece seats and fix them securely.

IMPORTANT! IN homemade design you can mount a variety of speakers, however, as the professionals advise, you need to make sure that the sound is good and the bass is powerful before the final mounting.
Ideally, to ensure the perfect sound in the car, you also need to deal with soundproofing. If the podium is installed, for example, in a car door, it is necessary to isolate them with special sound-absorbing materials. Also in the design of the podium itself, it is required to foresee and build an acoustic stage, choosing the position of high and low frequencies, you can also consult installation studios regarding the correct placement of the speakers in the car.
You may not achieve the perfect studio sound, however, installing a podium with your own hands will cost you many times cheaper, by trial and error you can choose the best place in a car that will provide you high quality sound.
For a more dynamic and visual overview of the procedure for creating and installing the podium, you can see the attached video:
Acoustic racks for high-frequency and mid-range speakers are the face of any car audio system. By their execution, you can determine the degree of qualification of the installer, his accuracy, and competence in the field of installing car audio.
In personal mail, I am often asked about the process of making racks, how to make acoustic podiums with my own hands, the same as I do. Therefore, I decided to show you the process of making acoustic racks using the example of a popular mass-produced middle-class car VW Touareg.
The speakers were also selected as average speakers with excellent sound quality characteristics and a high price / performance ratio - the Audison Voce Tri-Way System, which includes:
To fine-tune all the speakers, you need a processor that allows you to correctly organize the control of all bands, as well as an amplifier with which you could implement the idea of channel-by-channel amplification. Usually such devices are physically located in different cases, but, based on aesthetic and compact considerations, the choice fell on a nine-channel sound processor with a built-in eight-channel power amplifier
A direct relative of the front acoustics was chosen as the LF Dynamics - and the Alpine mrp-m1000 amplifier.
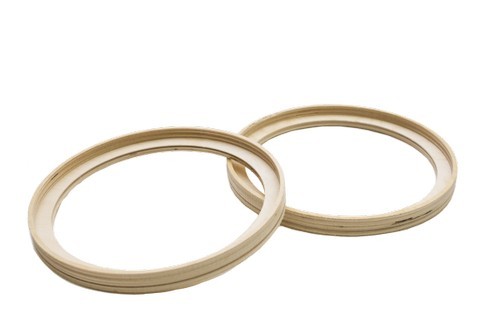
The design of acoustic racks begins with the placement of the speakers - for this we cut out support rings from plywood (8-10mm) with a jigsaw and then work with them.
Cut out the rings
Here, excessive accuracy is dictated solely by the degree of perfectionism and, by and large, is not so critical: it is important that the speaker does not fall into the ring and at the same time the ring does not stick out much. It is highly desirable that the outer diameter matches the diameter of the speaker. To make the ring, I used a jigsaw with a thin file.
After 4 rings are cut out, we begin to expose.
This is one of the most crucial moments. In the Tuareg, we decided to install both bands in the windshield pillars, although there are still options for installing midranges or tweeters in the corners of the doors to unload the structure and affect the geometric parameters of the scene. However, in the Tuareg, the midrange dynamics would be crowded, it would be difficult to gain volume, so we put them in racks:
Exposing the right sideSo. Where to exhibit? Where to send? Surely these are the most FAQ, exciting a novice amateur who wants to make podiums on his own. The answer is both simple and complex: in order to understand how to place a speaker, you need to understand the scope of the technical limitations dictated by design features and, based on them, choose the optimal location of the speakers, based on a number of criteria, which we will talk about now.
The first thing to understand is the location. Consider the option proposed in the photo. We lift the midrange speaker from the panel by a few centimeters and, since we need more space for volume, the speaker installation plane can practically not be recessed. With a tweeter, things are different: it must be placed as high as possible (within reason), wider and deeper. In total, we have determined three vectors, based on which it is necessary to choose the optimal point, not ignoring, moreover, both the aesthetics that play an important role, and the possibility of subsequent covering.
If you set the tweeter too high, it will be close to us and too far from the midrange driver. Such an arrangement will give great difficulties in setting up, the near tweeter will have a strong binding to itself, it will be extremely difficult to make correct docking with midrange speaker. It is better to stop such mistakes in the bud!
On the other hand, if the tweeter is set very deep, it will sit very low. Fitting such a design will not be easy. Although, the options for the "monitor" location are quite acceptable in terms of sound, but kmk, they are bulky and less aesthetically pleasing than the option shown in the photo ...)
In order to install the tweeters as wide as possible, you just need to cut out the plastic of the stand and lean the ring against the metal - this will be the widest place ... then the excess plastic will be cut off so as not to block the tweeter, and an aesthetic groove will form.
The second important question is: “Where to send?”. The rule that I adhere to is essentially the same - you need BOTH speakers to look at the listener from the same angle! The characteristics of the speaker are not linear, and the dispersion, especially at high frequencies, varies greatly with frequency. That is, if we point the right speaker at ourselves, and the left speaker at the passenger, then the right one will radiate high frequencies without blockage (if it can) and the left one will be heavily blocked (see the datasheet of the speaker in the illustration, the frequency response graph on the axis and at an angle ). It is almost impossible to correct such an error with an equalizer - adjustments often only aggravate the situation.

 Frequency response and impedance plot of the Audison Voce
 Frequency response Red line - on the radiation axis, green line at an angle of 45 *
Thus, we are left with two options: direct both speakers towards ourselves, but this is not symmetrical, which means that the aesthetics that is so important to us is lost, or deflect each speaker from itself by the same degree: left to the right by 15 *, right to the left. Smart people will say: “I would have said so: at the intersection in the center of the cabin.” But, if you look at it, they will be directed to the center in any case, if they are symmetrical.
Important! Make sure that the far speaker is not pointed at you when you assume a listening position, leaning back against the headrest. (approximately this position will be with the referee)
OK. Having placed 2 rings on 1 rack, remove the rack, and put the second one symmetrically on the table, using rulers, plumb lines, protractors, Kolyan- in general, everything that will benefit you.
Second rackWe mark with a marker so that the holes are the same as on the first rack.
Marking the second rackWe cut the plastic with a knife, a jigsaw - which is not scary ...
We cut the second rackWe put the ring under the second twitter:
Submitting a second tweetWe expose the ring under the second midrange:
We expose the second midrangeWe sit in the car interior - we measure, check, look, we sit in the driver's seat, then in the passenger's seat ...
Trying out the second rackWe foam with a plentiful amount of polyurethane foam. It is necessary to foam on both sides!
FoamingAfter drying, cut the foam:
Outside, everything is simple. cut off perpendicular to the edge of the ring. Straight down.
Cutting the foamThere should be a lot of foam on the inside so that the rack does not take away when there is little left of the factory plastic.
FoamWe cut out the plastic, make some kind of recess, cut out everything that will subsequently interfere.
 Cut out the plastic
 We apply aluminum tape as a separator for the polyester resin so that it does not eat the foam and that after all the operations the foam can be easily removed. Aluminum tape can be additionally lubricated with wax, grease, any oil.
We wrap with tapeWe prepare polyester resin and glass mat (fiberglass).
 Cooking fiberglass
 We apply glass mat (fiberglass) and impregnate with resin - ready. We are waiting 15 minutes.
We apply fiberglassWe cut the sharp edges with a knife until they are completely hardened so as not to catch a splinter (extremely unpleasant)
We cut the fiberglassWe sand the fiberglass for better adhesion of the putty (in other words, so that it sticks well and does not fall off).
 skinning fiberglass
 Now we raise the sides in order to drown the speaker. We wrap any blank with a diameter like that of a tweeter and a midrange. If you are not afraid, you can also wrap the components themselves in a thick layer of adhesive tape (important: keep in mind that you need a close-fitting gap of about 1 ... 1.5mm (+ 2 ... 3mm to the diameter), depending on the material). The main thing is to get it on time!
We raise the sidesThrow in fiberglass. And again the main rule: get it on time!
We getOn the reverse side of the rack, remove the adhesive tape and sand the surface of fiberglass and plastic.
Skinning from the backWe throw fiberglass to strengthen the structure. After that, no cracks will appear in the structure during further preparation.
 Throwing from the back
 Now we apply a polyester putty based on fiberglass.
We puttyWe cut with a knife until it stands up: then it will be incomparably more difficult to remove the excess
We cut the spatulaWe skin with coarse sandpaper with grit P80. when preparing racks, only this grit is used.
 Skinning
 We foam the volumes, in advance at least approximately calculating the volume necessary for the midrange dynamics. If you can’t meet the cherished numbers, then the problem can be partially solved by filling the volume with materials such as synthetic winterizer, making a PAS, or increasing the frequency of the high-pass filter on the crossover. But, of course, it is better to reach the calculated volume.
Penim volumeWe throw in volumes: the layer must be made thicker, since the surface turns out to be quite flat, which is why the appearance of case resonances is possible, which will give color to the mid frequencies, which adds a lot of problems to the overall picture. If for some reason you do not want to thicken the walls, you need to make additional stiffeners and glue the walls with mastic vibration to reduce the resonant frequency beyond the range reproduced by the mid-frequency speaker.
 Throwing the volume
 We glue the volumes on the polyurethane sealant:
We paste the volumeApply glue to the rack and Alcantara.
We apply glue Beauty! Left side of the car
  Right pillar in the car photo on the background
 All successful installations! I hope my article will help you make acoustic podiums with your own hands, otherwise you can always contact me for advice, questions, manufacturing, and of course tuning.
Hello dear friends! Today we will speak and discuss the podium for speakers. I will try to tell you what it is, what it is used for and what they are.
We will also separately study the issue of installing a similar design with our own hands. You can learn how to make a podium without involving specialists. Although in reality it is always possible to buy a suitable design from the manufacturer without spending time on assembly, measurements and other procedures.
The catwalks will show good decision for those who are not entirely satisfied with the work of a regular audio system. Such an installation may sound bad, not fully give out the acoustic effect. As a result, the driver does not get the proper pleasure from listening to his favorite songs.
To correct this injustice, the installation of the podium helps. Moreover, you can make it for speakers from a standard audio system, for 2 speakers purchased separately, etc. The choice is yours.
What it is
In fact, every car is equipped with an audio system as standard. Some of them are extremely simple, others are advanced and powerful.
Being a fan of high-quality and loud enough music, regular speakers often cannot satisfy the needs. Therefore, a decision is made to purchase more solid speakers. And here comes another problem. The large dimensions of the equipment can interfere if it is not properly installed on the rear shelf or in the door of your vehicle. That is, you need to place everything so that the speakers do not interfere with the driver and passengers, but at the same time the sound of the highest quality and much cleaner than before is created. And podiums come to the rescue. They improve the sound and bring even standard acoustics to a new high level.
The podium is called the base or base for the dynamics, due to which it is fixed in the required position. That is, in fact, this is a mount that can be used as standard and practical in doors, in the cabin on the rear shelf or directly in the pillars.

By mounting the podium, the sound becomes deeper and richer, high and, accordingly, low sound frequencies are clearly distinguished.
Podiums have several rather useful features and functions:
- appearance improves the visual perception of the speaker system in the car;
- improves the quality of the speakers;
- increased acoustic comfort in the cabin;
- podiums serve as mounts for custom-shaped speakers;
- structures hold large devices;
- become a decoration of the whole interior;
- change people's perception of music for the better.
Do you need a podium or not, decide for yourself. Here you should consider what to buy finished structure in St. Petersburg or any other city, including Almaty, is not a problem. But for some reason, many strive to do everything with high quality and with their own hands. Numerous homemade products on Drive2 are a direct confirmation of this.

Varieties
Podiums are not divided into rear or front, respectively. They are classified by location, and distinguish internal and, accordingly, external.
External mounts include mounts that are installed directly in the cabin. A prime example can be called placement on the rear standard shelf of a car. But more often, motorists prefer internal structures that are inserted into the doors. They hold up well and improve the sound.
Both options can be easily installed or purchased for machines such as:
- VAZ 2110;
- Ford Focus;
- Chevrolet Niva;
- Chevrolet Lacetti;
- Daewoo Lanos;
- Lada Priora;
- Nissan Qashqai;
- VAZ 21099;
- Lada Kalina;
- Mitsubishi Lancer etc.
Cars usually already have standard standard, that is, factory speakers, or at least mounting holes for them. The dimensions and shapes themselves depend directly on the specific brand of vehicle. Domestic cars usually have speakers with a standard diameter of 13 cm, and on foreign cars there are 10 cm, 16 cm, 16.5, 20 and even 25 cm. 6 × 9 podiums are also in high demand.

For doors, speakers are used that have oval or no less common round shapes. Depending on what kind of car you have, you need to consider the shape when choosing a speaker. Although in reality, any form is allowed. After all, the main task of the podium is to ensure reliable and strong fixation. This is what gives the sound volume and improves clarity.
And if you are still thinking whether to do it yourself or buy, I advise you to study the range finished products, look for podiums in the rear or front doors for your car, compare prices and decide.
Homemade designs will be cheaper. But here you have to work hard, take the production into your own hands and try to achieve the maximum result. Otherwise, you will be disappointed.

We do it ourselves
If you try, then a home-made podium will not differ much from the factory one. But the price will be much less. Plus an extra reason to be proud.
You will need a kit to complete the job, consisting of:
- plywood (take a thickness of about 6-8 mm);
- PVA;
- epoxy;
- cardboard;
- degreaser;
- kapron tights;
- mounting foam;
- paints;
- putties;
- leather or fabric (will be tight);
- scissors;
- pencil
- hacksaw or jigsaw;
- sandpaper;
- spatula;
- stationery knife.
I will say right away that in this case we are considering the option of making a home-made column podium, which will later be installed by your own hands in the front or front doors available in the car. rear doors. Often a speaker is used here, the diameter of which is 13 cm. But no one bothers to make a design for the rear shelf.

But size doesn't matter. The whole preparation procedure looks like this:
- think over the shape of the podium;
- take measurements of the speaker and its special protective grid;
- the diameter of the ring here will be exactly equal to the diameter of the corresponding seat or place on the future podium;
- the external diameter of the existing ring that we need, in turn, corresponds to the diameter of the tread (protective) mesh;
- a sketch is applied on cardboard;
- the template is cut out;
- applied to plywood;
- circled and cut out;
- a perfectly even hole is cut out under the podium.
Do everything as accurately as possible so that later there are no problems.

If you are done with this, proceed to the next step.
Manufacturing process
You have already made the preparation. But it's too early to relax. There is still a lot of work ahead.
- A layer of mounting foam is applied to the surface of the workpiece;
- The foam hardens, and the necessary shape is given with a blade or a sharp knife;
- Next, 1-2 layers of putty are applied;
- When it dries, make the product smooth with sandpaper;
- The product is painted in a suitable color;
- Paint is best applied in 3 layers;
- An alternative to painting is hauling with fabric or leather;
- The strap is attached with glue.
This completes the installation process. The most optimal method of fastening is considered to be mounting using self-tapping screws on inside existing door trim. This will preserve the sound quality, ensure reliable fixation, and at the same time will definitely not spoil the appearance of the cabin and the design of the podium in particular.
In many domestic cars, one day there comes a moment when the sound quality of the audio system begins to decline. Owners Vehicle They are trying their best to fix the problems that have arisen. However, if you bypass the alteration of the cabin, then it is simply impossible to solve this problem.
This article shows and tells how to make special podiums with your own hands, with which you can install speakers on car doors. The podium can be made for any speaker and for any car. The creation of these podiums is considered on the example of the VAZ 2106.
Creating the foundation for the future podium.
Before making the base for the podium, you need to decide on its shape. Much depends on the shape of the podium, because it is the basis of the entire device. The podium should not interfere with the handle that opens the door and the window handle. It is also important that the podium does not interfere with tightly closing the doors. First of all, we draw the chosen shape for the base on cardboard and cut it out.
Cardboard template for the base.
Speaker area.
The speaker needs a ring-shaped base. Before doing it, you need to measure the dimensions of the speaker itself, as well as its protective mesh. Usually the inner diameter of the ring seat is equal to the inner diameter of the ring itself, and the outer diameter of the protective mesh is equal to the outer diameter of the ring. It is also worth considering that five to seven millimeters must be added to the outer ring to obtain a decorative ring in the future. With the help of a decorative ring, the speaker will be slightly deepened, which will give a more beautiful and aesthetic appearance to the structure.
scheme of the ring for the speaker and the decorative ring.
The next step is to cut out the template and transfer it to the plywood. Plywood should be the same thickness as for the base, that is, six to eight millimeters. After transferring the template to plywood, you need to cut out two parts. We glue the decorative ring coated with glue tightly to the base; for reinsurance, you can pin it on small carnations.
received blanks
Attaching the ring to the base.
In order to attach the ring to the base, it is necessary to make spacers. Any material is suitable for the manufacture of spacers, the main thing is that it ensures the rigidity of the fastening. In this case, a conventional rail was chosen. desired length. All spacers, there are four of them, must be of different sizes. Their size depends on how much the ring is tilted relative to the base and how much it protrudes forward. It is best to point the speaker at the gearshift lever. Self-tapping screws are used to secure the spacers.
scheme for fastening spacers with self-tapping screws.
Shaping the podium with mounting foam and frame. Mounting foam- most the best option for shaping, because it can be easily processed, to make beautiful rounded corners. Foam is applied neatly, in even layers, starting from the ring and ending with the corners. Any pipe of suitable size is inserted into the hole (ring) for the speaker. This is necessary in order not to waste the foam, because the ring will still have to be cut out.
Finally, you should check whether the foam is correctly applied to the decorative ring, it should not be below it. If it is still below the ring, some more foam should be applied before it dries.
applying foam.
Shaping the base or feel like a sculptor.
As soon as the foam dries, you can begin to cut it off and give the desired shape to your future podium. This is a very interesting and unusual activity, during which you can feel like a creator and a great sculptor. Excess foam is removed with a clerical knife, it should be sharp enough. First, the base is cleaned of excess, then the top. And only after that you can proceed to the derivation of the form.
After the base of the podium has acquired a clear shape, you need to bring it into the best condition. It is best to sand the base with coarse sandpaper.
almost finished design.
Surface leveling.
The surface of the podium must be leveled. For this purpose, a mixture of putty and pva glue is prepared, which is then applied to the surface of the podium. Apply in thin layers, then dry well.
podium with applied putty.
After the design is completely dry, you can start processing with sandpaper.
Creation of a protective layer using epoxy resin and fiberglass.
Fiberglass must be properly impregnated with epoxy resin so that it can fully fulfill its protective functions. epoxy resin you need to apply on the podium, then wrap it with fiberglass. Apply resin again on top of the fiberglass.
After the base of the podium has dried out, you can cut off excess pieces of fiberglass and use the skin to remove the remaining glue.
Podium design.
To give the podium a "serious" look, you can fit it with artificial leather. The color of the skin must be matched to the color of the door trim. In the photo, using arrows, the order in which it is best to stretch the skin on the podium is shown.
At the ring, the skin is stretched last, then fixed with a stapler. Excess skin is removed. As a result, after many hours of painstaking and laborious work, the following design is obtained:
Podium installation.
Several self-tapping screws are screwed into the base of the podium, on the other side of the skin. Using them, you will need to attach the podium to the door trim. After the podium has been attached to the skin, you can put it in place. You can then screw door handles and all other elements.
It is also possible to pull the base of the podium close to the door. This can be done through small protrusions that were provided at the base of the podium.
Podium in place.
Impression.
The effect of using these designs is simply amazing. All sound will be in front, will be transmitted by strong loud bass. However, if you soundproof the doors and close up the technological windows, the effect will be many times stronger!