Do-it-yourself glass ball with snow - a step-by-step master class with a photo. DIY snow globe How to make a snow globe with your own hands
New Year- it's time to give gifts! And what could be nicer than handmade gifts, especially if they are Christmas balls with snow and a beautiful interior composition.
Nobody argues that it's easier to go to the store and choose New Year's balls for all your friends and relatives, leaving a lot of money on the counter. But this option has several disadvantages: firstly, it is expensive, and secondly, it is not. individual approach, in the third - too short pleasure.
Isn't it better to buy Christmas sparkles, tinsel, toys and start creating a snow globe with your own hands?!
At first glance, a round New Year's souvenir with fairy-tale characters and falling snow inside seems very difficult to make, especially when it has an impressive size. But this impression is deceptive, making a ball is quite simple, if there is necessary tools and accessories.
In order to make a snow globe with your own hands you will need:
- Glass vessel. You can take the original jar from under some products. It is very good if its lid is screwed. The jar needs to be emptied and washed thoroughly.
- Glue gun, glue "Moment" or "Super glue".
- Pharmaceutical glycerin. How much glycerin is needed depends on the size of the jar. Glass balls are usually filled with 2 parts water and 1 part glycerin.
- Purified water.
- Decorative cardboard.
- Scissors and pencil.
- Acrylic paints, brush.
- Christmas tree tinsel, decorative wire, glitter for manicure, stars, sequins, artificial snow.
- Toys or figurines small size(it is necessary that they pass into the neck of the jar).
The main thing in the manufacture of New Year's snow globes is accuracy.
All internal elements must be carefully glued so that they do not fall off when the glass ball is shaken, and the jar threads should be additionally coated with silicone glue.
How to fix the figurine inside the snow globe
 The fabulous composition includes one decorative figurine or several small toys that harmoniously combine in a festive ensemble.
The figurines are fixed directly on the jar lid or placed on a small pedestal. A small plastic glitter box, multi-colored plasticine or polystyrene is perfect for the role of a stand.
In order to make a plasticine stand, you need to select pieces different colors, knead them in a creative mess and sculpt a small pedestal. Plasticine is usually chosen in those shades that are present on the miniature composition inside the ball.
Cut out a stand from foam right size and glued to inside screw cap. Figures are placed on the upper part of the stand, the lower part of which has already been processed with a glue gun. You can use both "Super glue" and "Moment" glue.
 If the stand is made of some kind of box or unsightly material, it can be hidden by wrapping it with Christmas tinsel and pre-greasing it with glue.
The foot of the figurines is decorated with artificial snow, sparkles and sequins. Decorative pebbles, beads, snowflakes look good. Marbles are perfect - multi-colored glass balls that are used in decorating aquariums.
A magical and festive New Year's look is given to a miniature ensemble with the help of decorative wire, the pieces of which are easily inserted into stands made of plasticine and foam. All the details that make up the balls with snow inside must be glued with special care. This applies even to the smallest elements.
How to make a snow globe mortar
When the composition is finished, it is set aside and they begin to conjure over a water-glycerin solution. As already mentioned, the composition for Christmas snow balls is made from 1 part glycerin and 2 parts water. It is better to mix it in a separate bowl and only then pour it into a bowl or jar.
At first, the solution will look cloudy, but after stirring, the water will completely mix with the glycerin and become clear. The resulting liquid must be filled in a jar, leaving some space for the composition. The solution is added as needed.
 Now you need to add artificial snow, sparkles, small stars or sequins to a jar with a water-glycerin composition. If the composition inside the New Year's ball consists of colored figures, then it is better to take multi-colored sparkles and stick to the existing shades.
In order for the finished product to look neat, glitter is added with a damp brush. To do this, its tip is alternately dipped in sparkles of the desired color, transferred to a vessel with a solution and stirred. Stars and other tinsel are added in the same way.
The smaller the sparkles and stars, the slower they will settle and swirl in a glass ball. The amount of glycerin also affects the rate of fall of the sparkles.
This can be checked in a separate container and, if necessary, increase its concentration.
How to install a snow globe on a stand
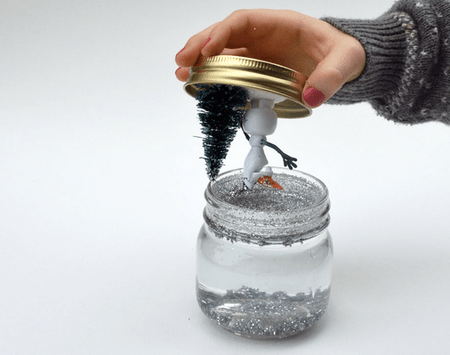
After the water-glycerin solution is ready, it is poured into a glass jar. Then they add everything necessary for a sparkling snowfall and close the jar with a lid with figures glued to the bottom. Before screwing the cap on, a layer of "Superglue" must be applied to the threads.
Glue should be applied if there is enough water and there is no need to add it. The lid must be closed very tightly, and the edge that is adjacent to the glass must be covered with silicone from a glue gun. Now we can say with confidence that the New Year's snow gift will please the eye, and not leak.
 In order for the picture to be completely completed, the construction with a magical snowfall is placed on a stand. It can be made from plastic or clay. And to make the Christmas balls beautiful, coasters of the required diameter are cut out of foam or wood and painted acrylic paints. Such paints do not stain hands and clothes at all.
The painted stand must be allowed to dry and only after that a New Year's snow souvenir should be inserted into it, which requires a little refinement. Usually gift balls with snow inside fit tightly into a wooden or foam stand and are firmly located in it.
So that they do not inadvertently jump out, reverse side the coasters at the junctions with the lid must be carefully poured with "Super Glue" or treated with silicone from a glue gun.
The lower part (for aesthetics) is covered with decorative cardboard. To do this, you need to put the ball with a stand on a sheet of thick beautiful paper, circle it with a pencil and cut out the resulting circle. The bottom of the stand is smeared with "Superglue" (can be replaced with PVA or a glue gun) and a circle of decorative cardboard is placed on the bottom of the stand. The paper is carefully smoothed, there should be no air bubbles under it.
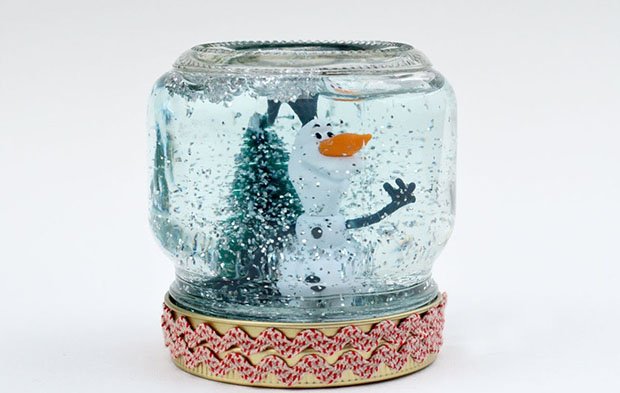
A decorative adhesive tape is glued to the vertical edge of the stand, and glue-based rhinestone jewelry will look good on the horizontal upper plane.
Now the New Year's snow globe is ready and you can start making the next one.
What should dads do with their children while moms carefully cut salads for the New Year? Let them make a magic glass ball with them! After all, Santa Claus with gifts is already on his way, and you still have time to prepare a wonderful surprise for him. Moreover, making a snow globe at home is not at all difficult.
To create a ball of snow you will need:
Base - it can be a small glass jar with a tightly screwed lid;
A small piece of styrofoam;
Decorations, figurines, figurines of the New Year theme or the symbol of the coming year (Yellow Dog). It is advisable to treat metal jewelry with an anti-corrosion agent, and if you want to put a photo inside, it must first be laminated;
Glycerin solution;
Distilled water;
Artificial snow, sparkles, stars. You can make "snow" with your own hands. To do this, it is necessary to clean the eggshell from the film and grind it. You can also use finely chopped rain;
Oil paint-enamel white (optional);
Epoxy adhesive (waterproof, transparent), silicone sealant.
When you find all the necessary components, you can start creating a glass ball with snow inside.
Snow globe making process:
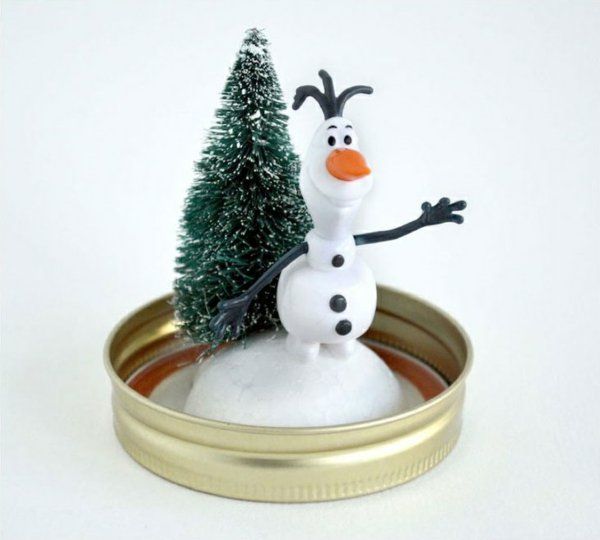
1. We make a platform for the figure from foam plastic, glue it to the lid. We paint in White color. Leave until completely dry.
2. Lubricate the platform with a thin layer of glue and generously sprinkle with sparkles. Carefully shake off those that are not stuck.
3. We compose a composition of figures so that it fits on the platform. Then glue them on and let dry.
4. After the epoxy glue is completely dry, pour distilled water and glycerin into the jar (glycerin should be slightly less than half of the entire jar liquid). If you pour in a little more glycerin, the snowflakes will fall more slowly.
5. Add sparkles, stars and artificial snow.
6. Coat the thread of the lid with glue and close the jar tightly. Let the glue dry.
7. We process the joint with a sealant so that water does not leak out.
Your snow globe is ready, shake it and enjoy the magical spectacle.
Such a toy can become a decoration of your interior or an unusual gift for guests and loved ones.


To complete the composition, decorate the resulting snow globe around the edge of the lid with decorative braid or ribbon. A small New Year's souvenir is ready!
According to the Internet.
Whatever one may say, the best gift is the one made with your own hands. The snow globe will be an excellent present for a friend on the eve of the winter holidays and a unique christmas decoration your room.
Create a small Christmas miracle with your own hands - give your friends a festive mood. And I will share with you the secrets of making a snow globe.
Ready to surprise everyone around with a rich imagination and talent of a wizard? Then go ahead!
For work you will need:
- small glass jar with a tight-fitting lid
- any plastic or ceramic figurines and a small artificial Christmas tree,
- good glue (ideally epoxy),
- artificial snow and sparkles,
- distilled water,
- glycerol,
- Oil paint white enamel (optional)
- polymer clay, foam (optional).
Instead of artificial snow, you can use: coconut flakes, small foam balls, grated paraffin, etc.

1. From foam plastic or other material that is not afraid of water, we make a platform for the figure (snowdrift), glue it to the lid. We paint white. Leave until completely dry.


2. Lubricate the platform with a thin layer of glue and generously sprinkle with sparkles. Carefully shake off those that are not stuck.

3. On the "snowdrift" we glue a serpentine Christmas tree and a figurine of an animal or a favorite fairy-tale character. By the way, you can mold a unique polymer clay figurine.


4. It's time to fill our jar with distilled water and add glycerin (it should be a little less than half of the entire jar liquid). Glycerin You will find in any pharmacy. It is needed so that the sparkles slowly and beautifully sink to the bottom of the jar.
Pour enough liquid so that a full jar comes out with the figures. Do you remember the law of Archimedes?


5. Add sparkles and artificial snow. Buy sparkles of a large size (or in general - in the form of stars), then they will not float up, but will spin, smoothly descending "to the bottom" of the can, like real fluffy snow.

6. We cover the jar with a lid and twist it tightly, having previously lubricated the outer side of the neck with glue. It is necessary to do this, because over time, water can seep.

Look how beautiful you and I have turned out! Shake the can, turn it upside down and enjoy the magical snowfall.

See what else your snow globe can look like:


And how do you like the version of the New Year's ball with snow without water? For its manufacture, in addition to traditional figurines, a jar and a serpentine Christmas tree, you will need fishing line and cotton wool.

Do you want to make a New Year's glass ball with snow yourself? Can be used for interior decoration various design, depending on what you want symbolic to represent there. It can be a Christmas tree, deer or a snowman for the New Year holidays.
A snow glass ball can be made both for yourself and as a gift, which will be especially nice to receive, since it is made by yourself.
Christmas ball with snow
Required equipment:
A jar with a lid of any shape, preferably an aquarium type;
Figurines and various decorations;
Distilled water or, in extreme cases, boiled water;
Sequins or artificial snow (purchased in stores where there are a lot of all sorts of things for needlework);
Glue must be waterproof.
How to make a glass ball with snow
1. Glue figurines and decorations to the lid with glue. Leave to dry completely.
2. After that, fill the jar with distilled or boiled water.
3. Add glycerin to the liquid. Adjust the ratio of water and glycerin to your preference for the settling rate of the particles. The more glycerin, the slower this process will go.
Remember that you do not need to fill a very full jar. Please note that when closing the lid, the figures will push out excess liquid.
4. Add sparkles. The size and number of them is also at your discretion - what kind of weather do you want to make inside your container: more snowy or quiet.
5. Close the lid of the jar as tightly and airtight as possible. It is better to use a seaming machine or add a little glue for reliability.
6. Now you can flip our beauty and admire the result. And mask the cover at your discretion.
Do-it-yourself can of snow
This is another simple Christmas craft idea. This souvenir resembles a snow globe, which we have already written about, but without water. Just a winter composition in a glass container. A wonderful gift or decoration for your window sill, shelf, etc.
Materials:
glass jars;
Decorative ribbon-thread or decorative metallic thread (the more convenient it is to work with);
Spruce branch;
Balls or bells of small diameter;
Toy - Christmas tree on a stand;
Salt or dry artificial snow.
Manufacturing process:
It is better to take jars of a beautiful, unusual shape that will look unusual and stylish.
Also, the composition will look better in a medium-sized or small jar, so choose a smaller one.
You can glue to the bottom of the jar or to the very lid of the figure and decorate them with pom-poms on top.
1. Glue the figurine of the Christmas tree and the spruce branch to each other.
2. Apply glue to the bottom of the Christmas tree stand and glue the jar to the bottom. Leave until completely dry.
3. Pour salt into about 2/3 of the container. Close the jar tightly.
4. Glue one small ball to the ends of the thread. Tie a thread around the jar.
Snow globe from a wine glass
A snow globe can also be made from a glass wine glass. The decoration will turn out to be very unusual and beautiful, and can serve as an original candlestick.
Materials:
Small figurines of Christmas trees or other toys,
Artificial snow or snow substitute,
Hot glue.
How to make a snow globe
For a snow globe, choose a beautiful wine glass with a long stem. Usually, red wine is served in this.
Lay the glass on the cardboard and circle its diameter with a pencil. Then this circle must be cut with scissors.
Glue small figurines of Christmas trees to the cardboard with glue.
Take one tablespoon of artificial snow and pour it into a glass.
Glue the edges of the cardboard with hot glue and attach it to the glass.
You can stick an additional beautiful layer of wrapping paper on top to make it beautiful.
For strength, you can apply several layers of glue around the edges so that the base sits firmly.
It is not difficult to make it with your own hands, and at the same time, almost all of its components can be found at home.
DIY snow globe | Components

- Jar with screw cap. Ideally, the lid should seal tightly. If you take a jar and a lid from ready-made canned food, do not count on tightness. I took a jar of compote, so I had to reinforce and glue the threads to prevent leakage.
- Decorations. Christmas decorations are well suited for this role. Houses and Christmas trees look especially good with snow from above. I didn’t take this moment into account right away, so I had to take a lot of shots so that Grandfather Frost’s face would not hide in the snow.
- Glue. Glue is needed to stick the decoration to the lid. Many praise the glue gun, but I didn’t want to buy it specifically for the snow globe. I used a tube of super glue.
- Snow simulation. It can be artificial snow, glitter, or even shredded white plastic dishes. I bought ordinary silver sequins, but in the process I realized that they do not fit color scheme to our ball. Artificial snow in a small town is not so easy to find, so I had to limit myself to homemade "snow" from plastic packaging from toys.
 Homemade artificial snow
 - Glycerol. It is needed so that the "snow" falls slowly. It does this by increasing the viscosity of the water. The amount of glycerin depends on the type of "snow" chosen. Large "snowflakes" will require more glycerin. I have a 400 ml jar. it took 4 bottles of glycerin 25 gr. With the proportions of water and glycerin 1: 1, snowflakes will float in the water almost without sinking to the bottom.
- Water. If you decide to make a ball for long-term storage or as a gift, then you will need distilled water and some kind of disinfectant for jewelry. There is no guarantee that the jewelry is sterile and their microbes will not cloud the water. For a ball that is not going to be stored for a long time, any clean, clear water will do. I used tap water. The first time I was unlucky, there was a whitish precipitate in the jar, which spoiled appearance. For the second time, I used pre-settled water.
- Rubber medical gloves . They are needed if you are not sure about the tightness of the lid. Gloves are convenient to use as a sealant for threads.
DIY snow globe | Assembly algorithm


At this stage, the ball is ready, and the next portion of the New Year's mood has been received.