Hozblok for giving do-it-yourself drawings. From what to build a barn in the country cheaply and quickly? What you need and how to make a frame barn
The barn belongs to the type of outbuildings for non-residential purposes, so the process of its construction is much simpler than building a house. There are several technologies for building a barn, which differ in the materials used in the process of work and in the final result. About how to independently build a barn, we will consider further.
Do-it-yourself frame shed construction
The barn is most often used to store various supplies in the form of building tools and materials. In addition, sometimes unnecessary things are stored in the barn or even livestock, so the building erected as a barn must be durable and reliable in operation.

Initially, it is necessary to determine the place of construction of the barn. Most often this is a plot behind the house, located away from the main entrance. Some owners set up a barn next to the house so that they always have access to it. This is especially true in the case when firewood or coal will be stored in the barn.
If there is a place on the site that is in the shade, then feel free to equip a barn on it. Since it is here that some plants or horticultural crops are unlikely to take root.
Try to choose a place for the barn, depending on its purpose. If garden tools will be stored in it, then let it be located closer to the garden or vegetable garden.
In any case, the barn should harmoniously fit into the overall exterior, and not contrast with it. Next, decide on the shape and appearance of the future structure. It can be a small square or rectangular house with no windows or a massive structure with windows of some complex shape.
For the construction of the simplest shed, an ordinary edged board is often used. In this case, all work takes several days, which is very convenient with limited time resources.
To improve the appearance of an already finished barn, flower beds are made near it, trees and climbing plants are planted. You can also paint the walls in different colors.
Most often, a shed roof is equipped on the barn, for the decoration of which slate or any other finishing material is used. However, the construction of a barn with a gable roof makes the room more attractive and holistic. For example, a barn with a gable roof, finished with shingles and siding, looks great.
Some owners equip a combined barn, one side of which is a place where inventory is stored, and the other serves as a small room for growing flowers.
The choice of material for the construction of a country barn should be determined by the functional features of the building. So, if living creatures live in it, for example, chickens, then the walls should be made of stone or brick. Wooden walls are also suitable for storing tools.
We propose to study the technical features of the independent construction of a frame barn. This is a simple option for an outbuilding that can store various tools or solid fuel for the winter.
Initially, after drafting the barn, it is necessary to proceed with the construction of its foundation. First, use the peg to mark the construction site of the barn, clean it of foreign objects, the topsoil and proceed to create the foundation. For frame construction, a columnar foundation is most often used. Although the option of erecting a slab or strip foundation is possible. However, since the frame structure is quite light, the column-type foundation will become a reliable foundation for it.
However, if the level of groundwater is too high, then you need to stop at a different type of foundation. In order to build a columnar foundation, prepare recesses for installing pillars with a gap of 160 cm. At the same time, the depth of the recesses will be about 80 cm. Most often, pipes made of asbestos or brick perform the function of pillars.
After installing the pillars, check the evenness of their installation with a building level. Next, fill the pillars with sand and gravel, pour concrete. The foundation must stand for at least three days, until the concrete mortar sets.
In order to extend the life of the pillars and increase their resistance to moisture, it is necessary to cover them with a special waterproofing mastic before backfilling.

The following works are related to the construction of a frame made of timber, which will be laid on a previously prepared foundation. Previously, the bars must be coated with an antiseptic compound that will protect them from moisture, mold and fungus. Focus on impregnations containing color in their composition. Thus, areas that have not been processed will be visible to the naked eye. A base made of timber is mounted on the foundation, the size of the perimeter of the future structure. Pre-lay roofing material on the columnar foundation to provide additional protection from moisture. Boards are mounted on the floor, the thickness of which is 3-4 cm. In the process of laying the boards, carefully measure and cut out the areas near the racks, then the process of mounting the walls will be greatly facilitated.
A planer will be used to further level the floor. Therefore, fix the boards to the joists using the hidden fixing method. To determine the number of supports, one should proceed from the number of corners in the shed, as well as the number of window and door structures. For the correct and even alignment of the bars, use slope sticks. They will help to set the bars in a certain position. Install the sticks with nails, but do not drive them in completely, so that later it will be easier to remove them. On the lower trim, with the help of a log, racks are installed that hold the walls.
The construction of a wooden shed is also carried out on a brick base. In this case, after erecting the foundation, it is necessary to build several brick rows of walls on it. A wooden frame is mounted on this base. Vertical bars must be processed using an electric planer. If in the future sheathing is carried out outside the barn, then this side of the bars should not be processed.

At the next stage of the construction of the barn, the truss system should be installed and the roof should be mounted. On the previously exposed racks, the upper part of the barn is fixed, made of timber. To fix all connections, use steel corners and self-tapping screws.
Barn construction video:
When equipping a shed roof, try to install vertical racks in such a way as to get a slight slope. Thus, it will be possible to avoid the accumulation of rainwater and snow on the roof of the barn. As a roof truss system, use boards about 4 cm thick, the length of the boards should be half a meter longer than the length of the frame bottom base. On a frame previously covered with special impregnations, a crate is mounted.
In order to sheathe the walls of the barn, use boards whose size is 2.5x15 cm. It is imperative to install waterproofing on a wooden roof, use roofing material for this purpose. To improve the presentability of the roof, cover it with shingles, although if the appearance of the barn is not important to you, then it is enough to install ordinary gray slate on the roof.

In the process of wall cladding with boards, try to first install them in the center, and then move on both sides. Install boards with a minimum spacing between them. Next, treat the outside of the shed with an electric planer, so not only will their appearance improve, but rainwater will not linger on the walls.
In order to improve the attractiveness of the finished structure, as well as provide additional protection for the boards from external influences, coat the shed with varnish or paint that matches the exterior of the house.
The technology of building a barn from foam blocks
If you want the barn to serve you for at least thirty years, then we recommend building it from foam blocks or bricks. Since not everyone can master brickwork, foam blocks are still a more acceptable option. Please note that under such a barn, it is necessary to build a reliable foundation, while material costs will increase compared to a frame structure.
Among the main advantages of foam blocks, we note:
- impressive size and at the same time lightness of the material;
- quick work, compared with brickwork several times;
- excellent thermal insulation properties;
- high vapor barrier;
- ease of processing the material and ease of its installation;
- environmental and fire safety of the material.

However, a foam block shed requires an exterior finish, since this material is unstable to moisture and is prone to destruction under its influence.
The construction of a barn in a country house from a cinder block involves the following actions:
- remove debris from the site under the barn, and also remove the top fertile layer of soil;
- make markings under the trench, the depth of which will be about 50 cm, adhere to perfectly right angles;
- build a trench under a shallow foundation, the lower part of the trench is covered with sand, which must be carefully compacted;
- install the formwork, it should rise above the base by 200 mm;
- concrete the foundation tape along the entire length;
- the hardening time of the concrete solution is about three weeks, only after its expiration, it is allowed to proceed with further work;
- for waterproofing the foundation, use roofing material.

Building a barn with your own hands from foam blocks is quite fast. The main thing is to make a foundation with high quality and wait a certain time for it to gain the necessary strength.
The number of foam blocks required in the process of building a barn is calculated according to a previously developed project. In addition, there are special programs that will help calculate the amount of material, taking into account window and door openings.
The laying of foam blocks is carried out according to the same principle as the installation of bricks. The stacked rows must be strictly horizontal, and the walls vertical. The correct location of each row is checked using a level and a plumb line. Initially, before starting laying, it is necessary to remove the corners, between them you need to install a cord that will allow you to lay the foam blocks evenly.
In order to connect the material to each other, two types of solutions are used:
- special glue;
- composition of sand and cement.

The first option is more expensive, but also more reliable. In this case, the thickness of the seams between the material will be minimal. Thus, it will be possible to reduce heat losses. If the shed is intended for storing tools and heat saving is not the main factor in its arrangement, then it is quite possible to connect the foam blocks with an ordinary solution, for the preparation of which sand and cement are used.
Try to observe the dressing, that is, above each joint of two foam blocks, there is a whole foam block on top. Remove adhesive or mortar that protrudes after joining the material with a spatula, both inside and outside the wall. To install the foam block, use a rubber mallet to help fix it in the desired position.
After making the walls, the process of arranging the roof in the barn follows. If the roof in the shed is shed, then one wall should be higher than the second. When arranging a gable roof, the walls will be the same. A gable roof has more advantages, as it also allows you to build an attic where you can store old things. Also, the appearance of a gable roof is more attractive than that of a shed roof.
In order to equip the roofing system, install the Mauerlat, under which there is a roofing material. Next, the transverse beams are laid, which will become the basis for the ceiling in the barn and the floor in the attic.

To assemble the rafter legs, use the transverse bar. At the same time, it is recommended to perform all work on the ground, and then raise the finished structure to the roof. The ridge board will help connect all the details of the truss system. All wooden materials are treated with antiseptic agents to prevent their decay. Next, the previously selected roofing material is laid and the floor is installed, which is most often mounted on logs.
Do-it-yourself barn construction video:
Arrangement of a summer cottage begins with a barn. The owners of the land allotment erect an outbuilding right away so that there is a place to store inventory, garden tools and other everyday trifles. Modern materials have greatly simplified the construction of country sheds with their own hands, ennobled them.
How to build a barn with your own hands, what materials to use? More on this below.
Barn in the country: when you can not do without it?
There are summer residents who build a barn "just in case", but their site remains uninhabited. Such situations are rare - usually country cottages are used as weekend homes or seasonal housing. In both cases, a barn is indispensable - garden furniture, lawn mowers, tree pruning tools, swings, decorative figures and other items are stored in it.

The pond or pool on the site should be periodically cleaned of silt, algae, sand, dirt. It is convenient to store inventory for cleaning pools in a barn. By the way, it can be built under the same roof with a bath or a recreation area near an artificial pond.

Sheds often store chopped wood for a fireplace or stove, hay for horses, animal feed and fertilizer for plants. Sheds in the summer cottage often replace the owner's workshop.
Samples of sheds in the country: photo
For the construction of country sheds, different materials are used:
- plastic;
- wood-polymer composite;
- brick, foam block or gas block;
- unedged board;
- wooden beam;
- corrugated board.
The aesthetic result largely depends on the material chosen by the summer resident.
plastic shed
Such sheds are sold as a set and assembled in a few hours - the scheme is included. Plastic structures are used to store garden tools, tools, irrigation hoses. Their advantage is a stylish design that fits perfectly into any landscape design.

There are also disadvantages. You can use plastic sheds only in the warm season - they are not suitable for late autumn and winter, as the material is deformed in the cold.
The second minus is the fragility of plastic, so you need to use the outbuilding carefully. You can not discount the high cost - not every summer resident can afford the acquisition.
Sheds from WPC
WPC is a wood-polymer composite, lightweight and durable material. It is used for arranging open terraces. Sheds and other auxiliary buildings made of WPC are delivered disassembled and assembled according to the same principle as plastic counterparts.

Stylish design and practicality are the two main advantages of WPC structures. If the summer resident takes care of ventilation, then the barn will serve him for decades. Hanging shelves and hooks for tools can be fixed on the inner walls.
brick buildings
Brick, foam or gas block sheds are capital buildings that have been built for decades. Their advantages are obvious:
- They are not afraid of snow, rain, wind, frost and summer heat.
- The interior space can be divided into zones.
The area of the barn is limited only by the requests of the owner of the summer cottage.

The construction of a brick object requires certain physical and financial costs, basic knowledge of arranging the foundation, laying walls and erecting a roof.
Shed from unedged boards
A wooden structure is a simple and economical solution. For its construction, it is not necessary to fill in the capital foundation, let it stand, and then build walls. You can build such a barn in 4-5 days. It does not look as impressive as plastic constructions, but the costs are many times less.

Shed from profiled sheet
A minimum of physical costs will also be required for the construction of a barn from a profile sheet. A frame is erected from a wooden beam or a metal corner, and then sheathed with a profile sheet.

We build a barn in the country with our own hands according to the drawings
Today, as an example, consider the construction of a frame country shed, built from a wooden beam and sheathed with a clapboard board. The drawing of the barn is shown below.

Foundation
The frame building is light in weight, so a low-depth tape base is enough for its construction. The width of the foundation should be 15 cm more than the thickness of the wall, and the foundation should be deepened by 40 cm.

When pouring the foundation, formwork is used - it can be removable and fixed. The tape is poured with concrete mortar - after the concrete has dried, waterproofing mastic must be applied to the outer parts of the foundation.
frame
For the construction of the frame, a wooden beam of the following section is required:
- for the main vertical construction sites - 50x100 mm or 100x100 mm;
- for connecting elements - 40x40 mm or 60x60 mm.
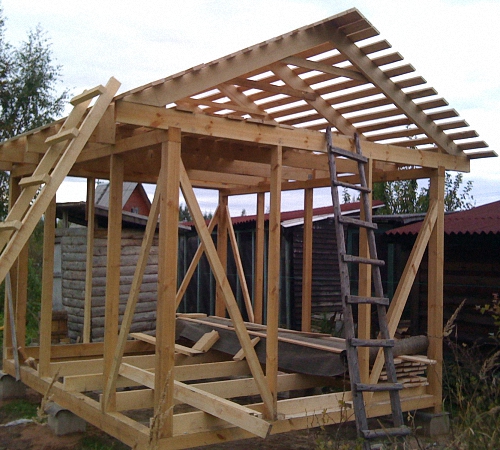
Below is a drawing of a barn with dimensions of 5000x2000x2000 mm. Vertical racks for the frame are installed at a distance of 1-1.5 meters from each other.

It is better to fasten the frame elements to each other with metal corners on self-tapping screws - this type of fastening is more reliable than nails. With the help of metal corners, the barn frame is also attached to the base - this is shown in the diagram below.

Before assembling the frame, you need to determine the places for window and door openings. It is important to remember the slope of the roof - for this, the front wall of the structure must be 20-30 cm higher than the back.
After assembling the frame, the timber is treated with special solutions that will protect the wood from ignition, decay, and swelling.
roof lathing
The distance between the bars for the crate depends on the roofing material used. For arranging a soft roof, a wooden beam is not suitable - you need solid sheets of plywood.
But flexible tiles are used in the construction of country sheds in isolated cases - more often the roof is equipped using corrugated board, slate or metal tiles.

All of the listed roofing materials have wide sheets that are attached directly to the crate. The beam is laid perpendicular to the slope at a distance of 50-60 cm.
The profile sheet and the metal tile are attached to the crate with self-tapping screws with rubber gaskets so as not to damage the polymer layer and not to spoil the decorative properties of the roofing material.
Frame sheathing
The frame can be sheathed from the inside and outside or only from the outside, using different materials for this. It is advisable to open a barn lined with wooden clapboard with a special varnish for wood.


Untreated, it looks faded. But if you open it with dark varnish, the effect will pleasantly surprise summer residents. Log cabins in Norway are often built from unedged boards. In Russia, they are gradually adopting this fashion and using this material to decorate the facades of private houses.

When the frame is ready and sheathed, the roof is mounted, you can install window frames and a door frame.
Construction of a barn for a summer residence on video
Summer residents are confused by the fact that the barn can spoil the impression of the site. There are two ways to solve the problem:
- Allocate a place for the construction of a farm building in the back of the site behind the house so that it is not visible.
- Ennoble the barn, turning it into a recreation area, landscaping with climbing plants.
To help summer residents - a video on how to build a lean-to shed in the country with your own hands:
And for inspiration - a few photos with ideas on how to ennoble a barn in a summer cottage.


Are you a suburban owner? If yes, then you know that in the country it is simply impossible to do without a utility block (or barn). In it you can store auxiliary materials, various tools, agricultural implements and garden items. This is a necessary building, and if you do not have it, you can think about building it. Moreover, you can build a do-it-yourself hozblok for a summer residence, since special labor and special skills are not required. We suggest you study the material that will help you make a barn from start to finish.
Stage 1: design

Building a hozblok can help you solve several problems:
- the room will serve you as a workshop and storage for tools and equipment;
- the building may have additional areas, such as a shower and toilet;
- it can be equipped not only with a bathroom, but also with a place to relax - a room with upholstered furniture and amenities.
All this can be achieved through planning. The barn can be one of the 3 types of buildings listed above, or it can include all of them. It all depends on your needs and desires.
Do not assume that the barn should be inconspicuous and ugly. You do not need to set the task of doing it at minimal cost. Thanks to the efforts and work, you can make a wonderful hozblok that will not be inferior in beauty and functionality to your country house.
When making drawings, think about the size, height and number of compartments you need. Moreover, when designing a building, remember that it must meet the following criteria:
- The most correctly distributed space.
- Long service life and reliability.
- Carrying out the necessary communications: electricity and water. If your hozblok with a toilet, you need to provide.

You will not spend a lot of money on the construction of such a change house, therefore, when choosing a material, stop at a wooden beam. This is the most common and suitable material. For example, buildings from an ordinary board will not stand for a long time. But the hozblok on a foundation with a frame made of timber meets all the requirements and will serve you for many years.
If you can not draft your change house, use the World Wide Web. Especially for those who do not know how to make projects, people put up ready-made drawings. They can be downloaded for free or purchased for a nominal amount.
To create a hozblok, prepare the following tools and materials:
- ax, shovel, screwdriver, hacksaw, electric drill with a set of drills, planer;
- beams, cladding boards, metal anchors;
- finishing material for roofing and walls, sheathing panels, thermal insulation (if necessary).
Stage 2: procurement of material

To make a utility block, the dimensions of which are 6 m long, 3 m wide and 3 m high, with a shed roof and two internal rooms, you need to prepare the following materials:
- plywood - 28 m 2;
- roofing material - 28 m 2;
- timber 150 × 150 mm - 0.65 m 3;
- timber 150 × 100 mm - 0.37 m 3;
- timber 100 × 100 mm - 1.2 m 3;
- timber 50 × 100 mm - 0.15 m 3;
- edged board 30 mm - 2.2 m 3;
- floorboard 40 mm - 0.37 m 3;
- asbestos-cement pipe Ø 150 mm - 6 pcs. 1200 mm each;
- gravel, sand, cement;
- fittings - Ø 10 mm, length 350 mm, 4 pcs.
This completes the preparatory work. The next step will be the correct location of your change house.
Stage 3: choosing a place

Definitely, in order to build a hozblok on your own, you will not need special financial contributions. But be prepared for the fact that the construction process will take your time and effort. To get the job done faster, ask for help from family members or neighbors. However, right before construction, you need to choose where to place the barn in a way that is convenient and meets the requirements. Building codes and regulations (SNiP) in paragraph 30.02.97 state that:
- in the case when the household block will contain pets, birds, or it will serve as a restroom, it must be placed at a distance of 12 m from the walls of a residential building and 4 m to the border of the neighbors' plot;
- if it will be used as a shower cabin, it must be placed at a distance of 8 m from a residential building and 1 m to the border of the neighbors' plot.
If you ignore these requirements, you may be in serious trouble when you want to sell your property. In this case, the state will refuse to execute a sale transaction with buildings until their placement complies with the standards that are in force on the territory of the Russian Federation.
Having chosen the optimal place, we smoothly moved on to the main question, how to build a hozblok in the country. Let's find out.
Stage 4: laying the foundation

So, our goal is to build a building 6 × 3 × 3 m. Since the building itself will not produce a special load on the foundation, it can be made columnar. To make it easier for you, we will divide all the work into separate stages.
- At the place where the barn will stand, you need to remove the top layer of fertile soil around the perimeter of the building, having previously marked out the future site based on the project.
- The prepared place needs to be tamped, 10 cm of sand is poured on top and tamped well again.
- For such a building, six pillars are needed. In the intended place, you need to drill or dig a hole Ø 20 cm, 120 cm deep. Please note that the poles to be installed also have a length of 120 cm.
- At the bottom of the holes, you need to fill in a layer of sand 10 cm or gravel, and then tamp this pillow.
- Lower sections of asbestos-cement pipes into the holes. Set them strictly vertically. To fix the pipes, the remaining space between the hole and the walls must be filled with sand and compacted.
- It's time for the first stage of pouring the pillars. Prepare the concrete and pour it inside the asbestos-cement pipe for 1/3 of the entire length. Then the pipe must be raised by 10-15 cm, leveled, fixed and wait 2-3 days. Such manipulations made it possible to form a concrete base at the bottom of the pits. The diameter of the base will be larger than the diameter of the pipe, which will not allow the columnar foundation to rise when the ground wakes up in winter.
- After the concrete has dried, the rest of the pipe cavity can be poured. But before that, prepare 4 reinforcement rods Ø 10 mm, thanks to which the grillage from the timber will be securely fixed on the poles. They will need to be drowned in 4 corner posts. Of the total length, trimming reinforcement - 15 cm is needed for immersion in the pipe, and 20 cm will protrude.
- If you consider reinforcing fixation unreliable, anchors can be fixed in such a foundation. A frame is placed on them and fixed with nuts. In this case, the end of the anchor and the nut must be sunk into the grillage.
- After preparing the solution, fill each pipe with it. As you pour, compact the concrete with a bayonet to expel air from it. Then install the embedded reinforcement exactly in the center.
- It remains to wait for the solidification of the solution, which will occur after 2-3 weeks. During this time, you need to cover the poles from the sun and moisten them with water in dry weather.
This completes the foundation work.
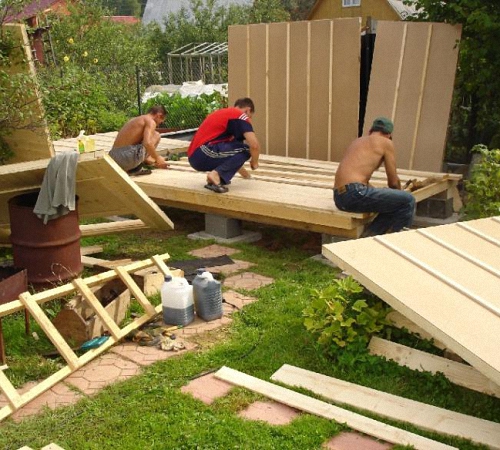
Stage 5: assembly and installation of the grillage (frame)

The frame must be assembled from bars, the cross section of which is 150 × 150 mm, its size will be 6 × 3 m. The frame will consist of four sections, 1.5 × 3 m in size. The bars that form the frame are connected to each other by half-tree grooves. They need to be fixed with special two (if the frame is installed on an anchor) or four (if installed on reinforcement) wood screws. To install the frame on the foundation, holes should be made in the right place for the protruding reinforcement or anchor.
In order to ensure sealing, 1-2 layers of roofing material should be placed on the pillars so that its edges protrude by 10 cm. They need to be bent down so that the water drains and does not accumulate under the wooden beam. Before placing the frame on the foundation, the wood should be coated with an antiseptic - apply at least 2 layers of drying oil. The frame is then installed and attached to the foundation. Along the length of the frame, you need to install three “half-tree” logs from a bar 100 × 100 mm, in increments of 135 cm.
Stage 6: frame of the economic block

To build a frame, you will need wooden bars with a section of 100 × 100 mm and 100 × 150 mm. For the convenience of further roofing work, it is necessary to mount the frame timber of different heights. The front side of the frame will be 3 m high and the back side will be 2.4 m high. In this way, it will be easy for you to install rafters for a shed roof.
 The first step is to assemble the same end walls. Each of them will have an opening for a window. Racks are fastened vertically to the frame using galvanized steel corners, 130 × 10 mm or 105 × 90 mm in size and self-tapping screws. First you need to put a corner post, the height of which is 3 m, and the section is 150 × 100 mm, with the narrow side towards the end. To do this, it is necessary to make a hole Ø10 mm and a depth of 50 mm in it from below in order to put the beam on the reinforcement that protrudes from the frame. The same holes must be made in the remaining three corner bars. Stepping back 1 m from the corner, you need to fix the other two bars, the section of which is 100 × 100 mm, and the length is 2.4 m. The distance between them should be 0.6 m. The last on the end wall will be the corner beam, which sits on the reinforcement. Its height is 2.4 m, and the cross section is 150 × 100 mm. All racks are attached with corners. And in order for the structure to be strong and rigid, between 1 and 2, 3 and 4 racks you need to make struts, the cross section of which is 100 × 100 mm. To do this, the ends of the struts must be cut at an angle of 45 ° and attached to the frame and uprights using a bolted connection. Remember to put a washer before tightening the nut. Between 2 and 3 racks, you need to insert window crossbars, the cross section of which is 100 × 50 mm. The first crossbar is installed at a height of 1 m from the frame, the second - at 1 m from the first. The second end frame must be assembled in the same way. As a result, you should get, as in the figure.
 Now you can assemble the front frame. Set up the main racks 3 m high. There should be four of them, two of which are already in the corners. It remains to install two middle racks. From the extreme racks you need to step back 1.8 m and fix them. So that they do not stagger, temporarily connect them with a board on nails or self-tapping screws to each other. Since the hozblok will be divided into two separate sections, you need to make a window opening in the middle and doorways on the sides. The door frame will be 2 m high and 0.85 m wide. Therefore, take a stand 2.4 m high, with a section of 100 × 100 mm and set it at a distance of 0.85 m from the end stand. Do the same on the other side. In order to strengthen the structure, place diagonal braces between the 2nd and 3rd rack. On the other hand, do the same. Next, you need to install window racks. Again, take a beam 2.4 m high with a section of 100 × 100 mm and fix it at a distance of 0.37 m from the third post (which is 3 m high). Then step back 0.85 m from the installed rack and set up a second one, exactly the same. It remains only to insert the horizontal crossbars. Fix the first at a height of 0.8 m from the frame, the second - 1 m from the first. Now the front side is ready, you should get it as in the picture.
 Now make the back facade. Since the corner posts with a height of 2.4 m are already standing, it remains to put 2 intermediate ones, with the same height and a section of 150 × 100 mm. The step from the end post is 1.8 m. Then install two braces between the 1 and 2 posts and 3 and 4.
It remains to make the upper trim, for which you need a beam of 100 × 50 mm. It must be mounted at a height of 2 m from the grillage (frame). To do this, the pieces of timber must be fixed vertically between all the posts around the perimeter. It is necessary to connect them end-to-end, securing with a reinforced steel corner and self-tapping screws. As a result, you should get such a wooden frame, as in the figure on the right.
Stage 7: attaching the rafters

It is more convenient and easier to collect rafters on the ground. It turns out that you will mount them on the frame racks in finished form. In order for the roof to have a visor that will protrude along the perimeter, take rafters 5 m long with a section of 100 × 50 mm. They will be connected to each other by a crate of 30 mm edged boards. The rafters are placed in increments of 0.85 m. The crate does not have to be fastened tightly to each other. It all depends on the roofing material. If its mass is small, the distance may be greater, but if it is large, the boards are stacked more tightly.
To install the roof, the studs on which it will rest must be cut into grooves at an angle of 10°. Why 10°? Because the difference in height between the front and rear pillars creates exactly this angle. Before installing the roof, you will have to sew up its overhangs and cornices with a 30 mm edged board. After that, make the floor using a floorboard. You can use both nails and screws. Make holes in the racks for self-tapping screws. To lift the finished roof up, you can use logs that must be placed at the back of the building. According to them, the structure is lifted up, the rafters are installed in the grooves on the racks and everything is fixed with self-tapping screws.
Stage 8: sheathing and interior work

Now that the frame is completely ready, it remains to complete the outer skin. A lining is suitable for this purpose. After that, you need to lay the roofing that you choose, insert windows and install doors. To separate two sections inside the hozblok, make a frame-panel partition using a half-tree connection. The ceiling of the building is sheathed with fiberboard or plywood (you need to fix the materials with self-tapping screws). Optionally, you can sheathe the base using an asbestos-cement sheet. And if this is done from the inside and outside, filling the space with expanded clay, then it can be insulated with mineral wool or foam. Then the building will be much warmer, which will allow it to be used not only as a warehouse.
Video
Watch a video on how to build a barn for a summer residence yourself:
This video shows the construction of a wooden hozblok:
Photo


Blueprints


Reading time ≈ 3 minutes
It is not always possible to allocate a place in a private house for storing residual materials, firewood or inventory. And to store all this in the open air is simply unacceptable. In addition, any owner may need a special corral for animals, which will require the allocation of a significant area on the site. In all these cases, without a doubt, it is necessary to build a high-quality barn with your own hands, and carry out its proper arrangement.
Foundation pouring for a shed
In any case, for such a building you will need a solid foundation. It is advisable to completely fill the foundation when building a do-it-yourself animal shed, and when creating a small outbuilding.

The most correct option would be to create a monolithic foundation. It is characterized by ease of pouring and low cost of the required materials.

Detailed drawings of the barn will be the best help for a quality job. You will need to accurately measure the site for construction, mark the walls and partitions. Then, to prepare the foundation, it is necessary to mark the foundation on the ground, put up the formwork, and prepare a sand cushion.

The next step will be reinforcement, and the final one will be pouring. At this stage, the base will be ready, and you just need to wait for it to completely solidify.

Construction of walls and partitions


It is important to remember that building a barn with your own hands requires careful study of each stage. Therefore, after pouring the foundation, you need to prepare a brick for laying out the walls. This material is suitable for the construction of a shed for a summer residence, a home shed-extension or a shed-pen for animals.


Brick installation is quite simple, the video of brick laying will help you to get acquainted with its features. It is also possible to build a barn made of wood, such a building will cost much cheaper than a brick one.


Roof installation, door and window installation


Once the walls are erected, you can carry out the crate under the roof. To complete the task, you will need strong slats. It is necessary to securely fasten them to / in the walls. As a material for the roof, metal tiles are ideal. It is affordable and easy to install. It is advisable to attach a waterproofing layer to the crate to protect the building from moisture ingress. With a photo on the construction of a barn with your own hands can be found in the article. A detailed report will allow you to easily carry out all the work.


The last step will be the installation of window and door openings. To do this, you need to fix the boxes in the left openings. As soon as the base is prepared, the installation of the door leaf and window frames with glass is carried out. You can also use double glazing. They will protect the building from blowing.
Features of the construction of a barn in the country

It must be remembered that in the barn, especially where the animals will be, there must be normal ventilation. To do this, in the upper part of the walls you need to make a couple of holes with a diameter of about 10-15 cm. The fumes will be removed, and the unpleasant smell will not linger in the room.

When building an extension for animals, it is important to make a sloping floor for easy cleaning out of waste. Additionally, you will need to create a thick bedding of hay or straw to protect the animals from the cold. It is also important to correctly divide the barn so that the animals are in separate rooms that open to a common corridor.
The general principles for the construction of an ordinary barn for a summer residence, and buildings for animals are to use only high-quality materials. A reliable building will last a long time and will not require repair, and its benefits will be maximum.
DIY barn construction video
It is impossible to find a suburban area where there would be no such building - a barn. A house has not yet been built and a land plot has not been developed, and any zealous owner erects a small building in which one can wait out rain and bad weather, store garden and construction equipment. It is better to build a capital shed right away, subsequently its functionality will only expand. Before you build a barn with your own hands, we advise you to study this article.
Location selection
Usually, a place where land is located that is unsuitable for growing crops is allocated for the construction of a barn. This may be an area with infertile land and poor lighting.
Note! Do not locate the barn in a lowland. Rainwater will constantly heat it, this will lead to rapid deterioration of the structure.
It is necessary that the place for construction be sufficiently even. If this is not the case, then it must be leveled.
Types
The barn may look different. The most common building is a rectangular house equipped with a pitched roof. If you have building skills, then the barn can be equipped with a gable roof. It is more difficult to build, but covered with tiles, it will decorate the building. Having finished the walls with siding, you will get a building that resembles a small garden house.
In the barn, several functions can be combined. Which? It depends on your imagination. For example, one room will serve as a place to store garden tools, and the other will be a flower greenhouse.
Building materials

If your shed's main function is to store inventory or keep poultry, then timber is the best material to build. If your building is intended for year-round use, for example, raising pets, then the building material should be brick or foam block. Metal sheds are built quickly, but they cannot decorate a personal plot.
barn base

So, let's start building the foundation:
- Dig a trench half a meter deep around the entire perimeter of the future structure.
- Cover the bottom with a mixture of sand and gravel, tamp, pour an even layer of rubble on top. The thickness of this pillow should be 150 mm.
- Lay a grid made of reinforcement bars on the pillow, assemble the formwork.
- Prepare the concrete solution and fill the formwork with it. In the process of drying the concrete solution, it is necessary to periodically water it with water. Remember, the reliability of the entire building depends on the strength of the foundation.
building frame

If you use timber for the construction of walls, then the timber frame is subsequently upholstered with finishing materials.
The walls of the barn can be made of brick or combined. If you are inclined towards the construction of combined walls, then first you need to lay out several rows of bricks, and then mount a wooden frame on them. Such buildings are durable.

In more detail, this process is as follows:
- Lay out five rows of bricks. Start laying from the corners of the building.
- Between the last row of bricks and the first beam, install waterproofing from a double layer of roofing material.
- Fasten the timber on the bricks with an anchor stud.
- Set the number of racks provided by the project. The step between them should not exceed 150 cm. Next, you begin the installation of the upper harness.
- Sheathe the frame with processed boards. Do not forget to cover them with antiseptics first. Attach the boards to the frame vertically, then they will not put pressure on each other, but will play the role of additional supports. If the project provides for windows, do not forget to leave openings for them.
Building roof

The roof of the barn can be covered with sheets of asbestos cement, iron, metal tiles. All these materials have excellent waterproofing properties.
Finishing

You can make the interior of the barn according to your own taste. The number of shelves and racks will depend on the functions that it will perform. They are attached along the walls. Make the bottom shelves bigger than the top ones. Then large items can be easily placed at the bottom, you do not need to lift them up.
Be sure to place a large desktop in the barn. On it you will perform various chores.
There are many options for building a barn, everything will depend on your labor skills, desire and financial capabilities.
Read also:
Video
A barn can be built from OSB boards:
Photo