Do-it-yourself ottoman - a simple instruction for creating stylish and high-quality furniture (110 photos). Do-it-yourself ottoman from old things: step-by-step instructions for those who want to save money Do-it-yourself soft ottomans
If you want to update the interior of your home, but the plans do not include large financial investments, then such a wonderful piece of furniture as a soft ottoman will be an excellent solution. It will refresh the atmosphere of your home, as well as add coziness and comfort.
Poufs are not only a beautiful element of decor, but also have wide functionality. They are used as a footrest, upholstered seat, pillow for a beloved animal, for storing things, etc. And if it would be better to buy an armchair or a sofa in a furniture store, then you can make an ottoman yourself using various improvised means. Today on the net you can find a lot of ideas for self-manufacturing poufs. And what kind of materials are not used, you read and just wonder how you could think of it before! But once you try to bring one of them to life, you immediately ask yourself: why didn’t I know this before?
First of all, we bring to your attention a master class for making a cylindrical ottoman with your own hands. A pouffe of this classic shape can be placed in the hallway, living room or bedroom.
For its production we need:

Cylindrical ottoman
- chipboard sheet with a thickness of at least 16 mm;
- wooden blocks 30x20 mm - 8 pcs.;
- furniture stapler;
- self-tapping screws;
- screwdriver;
- sheets of foam rubber and synthetic winterizer;
- glue for foam rubber;
- furniture fabric (tapestry, velor, capitonné, etc.);
- legs or rollers.
Having decided on the required size of the future pouffe, cut out two circles from sheet chipboard and one of the same from foam rubber.

We cut chipboard circles of the required sizes and lumber parts
Connect the bars and circles, fixing them tightly with screws - the frame for the pouffe is ready.

We connect circles and beams with self-tapping screws into a frame
Then, a rectangle should be cut out of the chipboard sheet with a width equal to the height of the frame and fixed around the perimeter, making a wall.

We fix a sheet of chipboard around the perimeter

Fully anchored wall
A circle of foam rubber is glued on the seat, and a synthetic winterizer around the structure.

Fastening of foam rubber and synthetic winterizer
A cover is sewn from the selected upholstery fabric according to a scheme similar to the one we used to make blanks for the frame.

We make a case

Finished case
Finished cover - the upholstery is put on a wooden structure and fixed at the base of the pouffe with a stapler or nails.

We put on a cover and fix it from below with a stapler or nails
It remains to attach the legs and the homemade pouffe is ready!

We fasten the legs

Ready product
Following our step-by-step instructions, you can easily sew a comfortable, original pouffe with your own hands. In the same way, a square pouffe is made, photos and video examples of which can be found in Runet in large numbers.
Fashionable and modern: pear ottoman

Scheme pear ottoman
Next, we will talk about how to sew an ottoman bag with your own hands - a very fashionable piece of furniture in modern interior decor. You think, is it not easier to buy such a corner ottoman in a store? Certainly easier, but much more expensive! And it is for those who value their money and at least a little versed in the field of cutting and sewing, this step-by-step instruction is dedicated.
To make a soft ottoman pear you will need:
- dense upholstery fabric - 320x150 mm;
- fabric for the inner cover - 300x150 mm;
- expanded polystyrene filler with the addition of holofiber - 0.5-1 cu. meter.;
- pattern paper;
- dense threads;
- lightning - 60 cm.
The sizes of ottomans are determined mainly by the height of the people who will use them. It is better to equal the tallest member of the family, since people with a smaller stature will in any case be very comfortable on a large bag.
Upholstery fabric should preferably be dense to support the shape of the bag and more resistant to wear. An excellent option would be tapestry, suede, jeans, capitonné, eco-leather, etc.
The inner cover of the pouffe should be made of smooth, sliding, synthetic fabric. Thanks to this choice, the filler will freely move around the bag, taking the form of a person sitting in it.
Tailoring
The pouffe pattern consists of six wedges of the bag itself and one lower part for its base.

Bean bag pattern
First, you need to draw the required details on paper, and then transfer them to the fabric for the inside and outside of the pouffe.
Cutting is carried out taking into account seam allowances of about 1.5 cm.
The parts of the upholstery bag should be slightly larger than those intended for the filler - this will make it much easier for you to put the outer cover on the filler bag.
The second stage of work will be stitching all the fabric elements of the bag. First, sew the wedges together, and then proceed to the base. Don't forget to leave room for the zipper on the outer cover - the zipper will make it easier to care for the bean bag chair and allow you to update the cover at any time. When both bags are ready, fill the inner bag with filler to 2/3 of its volume and carefully sew the remaining sections. Put on a decorative cover from above and fasten the zipper. The pouf is ready!

Ready pouf pear
Despite the fact that such soft ottomans with a back are made at home, they will look great in any of the rooms of your house, adding coziness and comfort to them. In a similar way, you can equip a soft spot for a dog with your own hands, only much smaller.
A practical piece of furniture - a pouffe with a storage box

Ottoman with drawer
We bring to your attention a brief description of the manufacture of a do-it-yourself ottoman, which will combine several practical functions:
- pouffe transformer with one movement of the hand is able to turn from a soft seat into a storage place for many different items;
- an ottoman with a drawer is perfect for dressing tables, because you can not only sit comfortably on it, but also put a lot of hairdressing accessories inside, such as irons, curlers, hair stylers and other items;
- you can not only sit down on a homemade ottoman, undressing in the hallway, but also use it at the same time as a cabinet for shoes or for storing shoe care products.
Materials for work:
- chipboard sheet;
- wooden beam with a section of 4x4 cm;
- wood glue;
- self-tapping screws;
- hacksaw;
- construction stapler for furniture;
- screwdriver or screwdriver;
- foam rubber;
- synthetic winterizer;
- upholstery fabric (velor, eco-leather, suede, capitonné, etc.);
- butt loops;
- furniture rollers.
Stages of work
From a chipboard sheet, it is necessary to cut blanks of the following sizes:
- 37x40 cm - 2 pcs;
- 37x37 cm - 2 pcs;
- 40x40 cm - 2 pcs.
Cut out four pieces of 37 cm from a wooden beam - this will be the height of the ottoman. Next, you should assemble the box - all the side fragments are joined together, after which the bars are glued in the inner corners.

Ottoman frame
From the outside, all parts of the structure are fixed with self-tapping screws. Glue is applied to the bottom of the timber and the bottom of the box is glued. Then you need to let the glue dry well, after which, for reliability, screw in the screws.

Small bars-stoppers for the cover of the ottoman
The box is pasted over with synthetic winterizer, and then, using a furniture stapler, it is sheathed with upholstery fabric. For mobility of the product, rollers can be attached to its underside.
The manufacture of the cover, which acts as a soft and comfortable seat, is carried out as follows: we glue a synthetic winterizer, and then foam rubber, to one of the surfaces of a chipboard sheet measuring 40x40 cm.

We stick foam rubber
Thus, the pillow will be soft, but at the same time keep its shape.

Cover upholstery
On this do-it-yourself wooden ottoman is ready!
New life for old furniture - pouffe from a stool

Pouffe from a stool
Next, we will talk about how to make an ottoman from a stool yourself. If you have an old stool that has lost its presentable appearance, but is still strong at the same time, you should not write it off. Using a little fabric and foam rubber, you can transform it with your own hands from improvised materials into a magnificent, soft and comfortable pouffe.
So, how do we make an ottoman from an old stool:
- We cut out a cut from the upholstery fabric measuring 120 cm by 34 cm for the side and a circle with a diameter of 48 cm for the pillow. To make the seat soft, cut out a circle of foam rubber and glue it to the top of the chair.
- We sew a cover from fabric blanks: first, it is necessary to make a running seam along the edge of the circle and slightly pull it off. Next, you need to sew a circle to the long side of the rectangular cut, and decorate the seams with a decorative cord or ribbon. Sew adhesive tape along the open edge, the bottom edge must be hemmed.
- From pieces of fabric, make 4 pockets and sew them to the cover at a uniform distance from each other. Pockets can be decorated to taste with different decorative elements.
- The finished cover, the manufacture of which took no more than an hour, is put on a stool.
Today we told you about how to make an ottoman with your own hands step by step in several ways - a pouffe from stools, a pouffe made from chipboard and soft filler. You are given the opportunity to choose the most optimal and acceptable option for yourself, which will depend on your abilities, financial capabilities, as well as the design style of your rooms. In any case, such an original detail in the interior will not go unnoticed and will not only decorate the house for many years, but also make your rest and life more comfortable.
Do-it-yourself ottomans can be made even by a beginner who did not hold a hammer in his hands. And for this it is not at all necessary to cut and screw something.
The ottoman itself came to us from eastern countries, where it was used both as a table and as a small chair. The ottoman, which gained popularity, served as a footstool for royalty, and in Soviet times, not a single small apartment could do without an ottoman, because it did not take up much space.
A do-it-yourself ottoman has many advantages over ready-made models. Firstly, for the manufacture, you can use used things, for example, plastic bottles. Secondly, you can choose the desired color and shape of the ottoman.
This ottoman is lightweight, portable and easy to use. It can be carried from place to place without much difficulty. But to make it, you will need at least some skills in owning a needle and thread.
So, for sewing a soft ottoman with your own hands, you need:
- selected fabric;
- filling material (synthetic winterizer, holofiber);
- scissors, thread, needle;
- large decorative button;
- pattern.
How to sew a soft ottoman with your own hands: a master class.
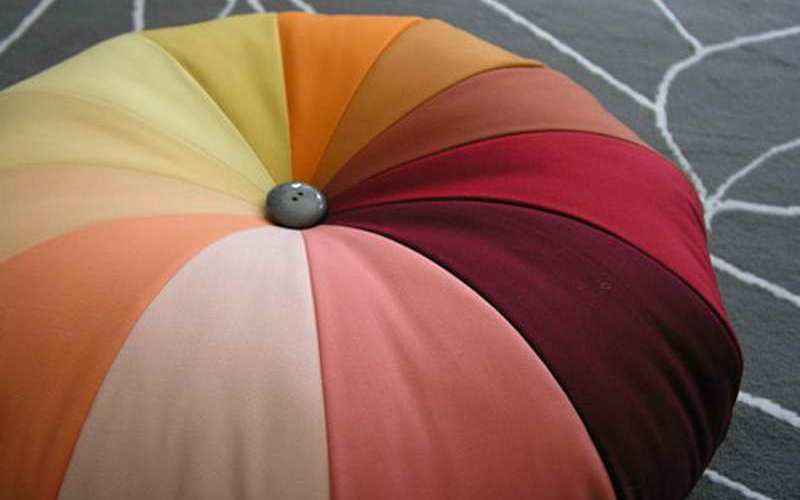
 ottoman pattern
 - Cut out the details of the ottoman: in our example, there are only 12 pieces for each side of the ottoman. Cut corners on each piece as shown. Using this example, you can sew an ottoman from 6-8-10 or more parts by dividing the circle into the required number of sectors. The diameter of the circle depends on the desired size of the ottoman.
- Sew all the details first on one side, then repeat the same on the other.
- Sew both sides of the pouffe together from the inside, leaving a small opening for stuffing, turn the pouffe on the front side.
- Place the stuffing inside and sew up the opening with a blind stitch.
- Sew a button in the middle, pulling it a little inside the ottoman.
 How to sew an ottoman with your own hands: a master class
 A soft ottoman can be sewn differently. To do this, 2 circles of the same diameter are cut out of the fabric and a strip of fabric with a length equal to the circumference of the circles, and a width equal to the desired height of the ottoman. Don't forget to leave seam allowances. A synthetic winterizer, holofiber or old clothes are also used for stuffing. The cover is sewn like this:
- Sew the long part to one of the circles of the future pouf around the circumference.
- Do the same with the other circle.
- Fill the ottoman with the selected material and sew up all the holes. If desired, a handle can be sewn on the side, for which the ottoman can be carried.


You can also sew a soft ottoman with your own hands in another shape, for example, a cube, or a hexagon. The main thing is to choose fabrics that are suitable for the interior of the room, dense and not elastic. You can also decorate the ottoman in different ways: sew on a canvas along the edges, embroider, sew on all kinds of ribbons and lace.

Pouffe from plastic bottles
Another original way that conquered the Internet, how you can make your own pouffe is the use of plastic bottles to make an ottoman. Or one large PVC container with a volume of 19-20 liters.
For the manufacture of the ottoman you will need materials:
- plastic bottles (about 30 pcs);
- scotch;
- cardboard or plywood;
- cover fabric;
- synthetic winterizer;
- foam rubber.
Foam rubber is desirable to use thicker. so that the frame of the product is not felt through it. To decorate such an ottoman, ribbons, embroidery, lace, buttons, canvas are also suitable.
By the way, a cover for an ottoman can not only be sewn, but also knitted!
The procedure for making an ottoman from bottles will be as follows:
- The containers are wrapped with adhesive tape. The shape can be either round or square.
- Cut out a circle or square from cardboard or plywood, slightly larger than the bottle frame, and connect with it.
- Wrap around the perimeter of the ottoman with foam rubber, and on top with padding polyester. A synthetic winterizer is needed in order to hide the irregularities of the foam rubber.
- Sew a cover. For the cover, you can use any dense fabric of a suitable color.

Instead of a large number of plastic bottles for the frame, you can use one large bottle with a volume of 19-20 liters:
 Do-it-yourself ottoman from a plastic bottle
 Bus ottoman - master class
Who would have thought that an old car tire could serve as a piece of furniture! There are many ways to make an ottoman from a tire: use a plywood bottom and top, glue the tire with a rope, sheathe it with fabric or fur, even attach legs. However, one thing must be remembered: before use, this item must be thoroughly washed.
 Do-it-yourself ottoman from a tire
 So, to make an ottoman from a car tire, you will need:
- old tire;
- plywood;
- twine or fabric cover;
- glue gun;
- screwdriver;
- wood screws;
- varnish and brush.
The master class for making an ottoman from a wheel is quite simple:
First you need to cut out 2 circles from plywood: one is slightly smaller in diameter than the tire, the other is in diameter (but so that the plywood does not protrude beyond the edge).
Then, with self-tapping screws, attach plywood circles to the bottom and top of the ottoman. Using hot glue, glue a rope or decorative cord in a circle. And then cover the product with varnish. Legs can be attached to the bottom if desired.

There is another option for making an ottoman from an old tire, without using plywood (for those who are not friends with a jigsaw) and a screwdriver. In order to make the ottoman soft, it is wrapped with padding polyester, gluing it directly to the tire. Then the cover is sewn, as in the previous versions. In order to close the hole in the tire, you can use the same foam rubber or a regular pillow, having previously decorated it:

Transformer ottoman 5 in 1 belongs to multifunctional furniture and is a panacea for modern people who are accustomed to convenience and spaciousness at the same time. You won’t surprise anyone with furniture on the principle of nesting dolls, as in the photo, the proposed apartments for living are becoming smaller, and the furniture market is replenished with cutting-edge inventions that allow you to create a comfortable atmosphere in the room without taking up much space.
The phrases 2 in 1, 3 in 1 have become familiar, but 5 in 1 makes you think. The video in this article demonstrates the advantages of a small-sized transforming ottoman, which turns into a table, sofa, armchair, bed, couch, TV stand, mini-bar, etc. with a flick of the wrist.
At first glance, the differences between a simple ottoman and a transformer are not striking. It seems to be the same regular in the bedroom, living room, hallway, but 5-7 extra centimeters in size allow you to get amazing results.
So:
- The transformer ottoman can consist of 5 stools and then, when assembled, a soft cube-shaped pouffe appears before your eyes. Ease of movement is ensured by wheels-rollers. All seats and stool heights are the same size. For the manufacture, a stainless mirror pipe, artificial leather of various colors and shades are used, allowing you to choose an ottoman for a specific room interior. The dimensions of this design in the assembled state are 47x47x47 cm, the seat of the stool is 42x42 cm, the height is 41.5 cm.
- It is quite difficult to compare transforming ottomans with a full-fledged sleeping place for daily use, but they are quite sufficient for short-term accommodation of overstayed relatives. Such a product includes a rather simple design of a transforming ottoman, it is also a tea table, a couch, a bed, a sofa and other necessary pieces of furniture. It is made in the form of a hollow structure, reminiscent of a packing box for fruit, that is, the bottom is made of planks stuffed through 40-50 mm. Inside the box, 3 interconnected soft pillows comfortably fit, moreover, one of them is fixed to the other two with a zipper, and these two are laid out like a book. From above, the soft insides are covered with a lid, which, when removed, acts as a small table. The legs are recessed into the lid of the table and, if necessary, are simply removed into the light. All other elements freely transform into the above items.
- A cheerful company of almost a dozen kids will easily fit on one comfortable, soft ottoman, as in the picture above, reminiscent of a tangerine. Comfortable poufs are connected by a zipper, and the insides are filled with soft filler. The top is decorated with a two-tone removable fabric cover. It can be easily removed and washed, and its main feature is that its “slices” can be combined in completely different ways. By connecting several slices with a zipper, you can comfortably relax on a sofa, armchair, bed, or just sit on horseback. Children are simply delighted with this invention, and when guests suddenly arrive, you can borrow this item from them and arrange gatherings, remembering youth. An unusual combination of colors and a unique design can decorate any space, even in the office, country house, kindergarten or school. Although it can be assumed that at school such a subject is unlikely to last long in good condition.
- Transformer ottoman bed - a newfangled invention, consists of a wooden base, ceilings and soft upholstery. Various materials serve as upholstery: upholstery fabric, leather (see), leatherette, leatherette and many other products. The given opportunities to order a padded stool allow you to get a product that meets the wishes of customers. The price of a pouffe bed will increase if it is equipped with a folding mechanism, the cost of which depends on the complexity of the design. Sales statistics show that designs that allow you to sit near a table have gained the most popularity, which then quickly disappears, turning into a constituent element of an ottoman.
Guess what's hidden there
So:
- Transformer ottoman table is a puzzle for friends who are pleasantly surprised when a small piece of furniture turns into a roomy product that allows a large company to relax.
- Comfort and functionality are the foundations of a thoughtful interior, but the external design is also of no small importance, allowing this cozy piece of furniture to effectively and organically fit into the overall picture. It doesn’t matter what is hidden inside the ottoman and how it transforms, because it is much more often assembled, so there are 5 simple decorating rules when choosing.
- The ottoman table is matched to the color of the walls. Those who like to plan mentally and select accessories before arranging furniture must use this technique. When all the furniture and walls are in harmony with each other, those entering immediately feel it and understand that the owners have a sense of taste and proportion.
- A ready-made set of furniture is purchased and with the help of a banner of the ottoman you like or by making it with your own hands, it is easy to fit it into the interior.
Attention: The selected upholstery does not necessarily harmonize only with upholstered furniture, its coloring can reflect a wardrobe, cabinet, table.
- An example is a combination such as a table top in the kitchen and an ottoman, a transformer table, a headboard, an ottoman or a bench, table legs, an ottoman or an ottoman.
- Textiles are a win-win option and a magic wand that can transform a room beyond recognition. Pillows, a bedspread, curtains (see), bed linen are selected to match the ottoman.
- The ottoman and accessories fill the room and give it personality, being a link in the overall environment. The color of the pouffe emphasizes the picture at the head of the bed, the pattern on the vase, the carpet, or, on the contrary, creates the appropriate atmosphere around the bright ottoman.
- The instruction recommends using an ottoman as a bright accent, which is sometimes so lacking in a room.
Aesthetics and practicality
- and it is not necessary to use fabrics of the same color.
- An ottoman made of plastic bottles allows you to save on stuffing material.
- Ottomans from old clothes that are out of fashion are not a fairy tale or fantasy, but a very convenient and noticeable element of the situation.
- Soft ottomans are made of any shape from a ball to a pear, more complex designs have boxes for all sorts of little things, but all these products have one thing in common - they cannot be transformed.
- “Brevity is the sister of talent”, the statement also applies to simple forms in the furniture business. Take at least 4 soft pillows of a square shape and the same size. These simple shapes can be folded into any combination as needed. Armchair, couch, sofa, bed, ottoman and - a minimum of space occupied.
Attention: The right choice would be the decision to acquire two such ottomans in order to accommodate everyone at the right time.
- Some models are equipped with wheels, which makes it easier to move around the room.
When the old interior is already boring, and you want changes, it is not necessary to start repairs. Various additional items can change and revitalize the interior. Do not immediately go shopping in search of something new and unusual. Do not forget that with your own hands at home you can create many masterpieces. One of the practical and interesting things in the room is the ottoman. It comes in all shapes, sizes and colors.
You can fit it into any of the rooms and in different styles. If you are thinking about how to make an ottoman with your own hands, you will need some useful ideas in this regard. But the main advantage of such an item lies in the wide choice of materials for creation.
Multicolour fabric ottoman
Sewing a bright ottoman from fabric is not a difficult task.
Before starting work, prepare:
- fabric of different colors;
- lining fabric;
- filler;
- sewing machine;
- a needle and thread;
- 2 large buttons.
As a filler, you can take a synthetic winterizer or thick foam rubber. Then the pouf will turn out to be moderately soft and will keep its shape.

The first stage of work is a pattern. Draw a circle on paper the size you want the pouf to be. Divide this circle into 12 equal parts. Do you have fewer colors? You can alternate them or make a division into 6-10 parts. Finished patterns are applied to the fabric and triangular patches are cut out. Cut them out with a margin that will go to stitching. The fabric for the lining is cut in the same way.

The next step is stitching. Grab the petals of the circle between each other with threads on the sides, and then sew them on the sewing machine. You should get two round multi-colored bases - the top and bottom. They need to be sewn from the inside out with high quality. Leave one piece open to fill the pouffe.

The final step is filling. Put the required amount of filler inside the cover. The pouf will immediately become voluminous. There should be a lot of synthetic winterizer or foam rubber so that the pouffe does not significantly change shape when pressed. Carefully sew the last piece. And close the place of stitching the petals in the center of the circles with large buttons. Do-it-yourself multi-colored pouffe is ready.

Plastic bottles as a basis for a pouffe
Plastic bottles have many uses in everyday life. When a considerable number of them have accumulated, you can make an ottoman with your own hands.
You will need:
- about 40 pieces of bottles with caps;
- soft foam lining;
- cardboard;
- wide tape;
- cover fabric;
- needle, thread.

Take bottles with tightly screwed caps and use tape to connect them to each other so that they form a filled circle. Cut out 2 circles from cardboard. Their diameter should match the diameter of the bottom of the glued bottles. Tape the cardboard tightly to the plastic containers with tape. The frame for the ottoman is ready.

Then you should prepare the foam for the lining. 3 blanks are cut out: 2 circles of the same size with cardboard blanks and 1 rectangle. It will wrap around the ottoman vertically. You can fix the blanks with the help of threads or a construction stapler. It remains only to sew a cover for a pouffe from the desired fabric. This is not difficult if you have minimal sewing skills. A cute do-it-yourself ottoman is obtained quickly and cheaply.

Non-standard use of a plastic bucket
An old unnecessary plastic bucket can easily turn into a useful and beautiful thing - an ottoman.
For the ottoman you will need:
- jute rope or rope;
- construction glue gun;
- cardboard;
- textile;
- stapler;
- big button;
- microfiber cloth.
A bucket without a handle should be turned over and tightly wrapped around with a rope. When winding, each stitch must be planted on glue so that the rope subsequently sits tightly.

When the task is completed, you can begin to build a soft seat for the pouffe with your own hands. Take the cardboard, attach it to the ottoman and cut out a circle from it the same size as the bottom. It is also necessary to cut a circle from the fabric, but with a diameter larger by 10 cm. Connect the fabric to the cardboard in the middle with a button. Roll the microfiber into a tube and start wrapping it between the cardboard and the fabric around the button. Use a glue gun to fix. Wind the fabric until you reach the edges of the cardboard. Attach the top fabric with a stapler to the back of the cardboard. The ottoman is ready, it remains only to connect the lid and base with glue or Velcro tape.

Functional ottoman with a box inside
The task becomes a little more complicated if you want to do it yourself and use the ottoman as a place to store things. Having a ready-made box will greatly facilitate the task. But it is also possible to do it yourself.
Prepare for him:
- 4 rectangles of chipboard of the same size. They will be the faces of the pouf;
- 2 squares of chipboard for the base and cover;
- wooden blocks for fastening and small legs;
- screwdriver and screws.
If you do not have the skills of a carpenter, then it is better to ask for help in collecting the box from a more experienced and strong person. Assemble the structure from the parts, use self-tapping screws and glue to fix.

The seat is not attached to the ottoman, it must be freely removed and put on. So that during operation the seat does not move out, stops are attached to it on the inside. It is necessary to attach the stops at such a distance that when removing and putting on the cover, they do not rub against the edge of the chipboard and do not touch the bars inside.

The frame of the box must be covered with a cloth, you can fix it with a stapler. Inside the box is sheathed too. Thick foam rubber should be laid in the cover under the fabric for comfortable seating. This is how it turns out a practical ottoman with legs that will fit into any style of interior. You just have to choose the right fabric.
Video gallery