Detailed description of the work process
In anticipation Defender of the Fatherland Day the urgency of the issue grows exponentially. The most valuable gift for men will be a thing made with a pure heart, with your own hands. In this article, we will tell how to make a postcard by February 23.
The main thing in the article
Postcards for February 23 to paper kindergarten: photo ideas and instructions for implementation
In kindergarten, kids are just beginning to develop creative skills. Homemade holiday cards for dads, grandfathers or brothers can be for kids. Depending on the age of the children, you can offer the following gift cards that children can make themselves.
For the little ones
The smallest ones can give dads a drawn postcard. It can be brush strokes with different colors or finger painting. Relevant postcards with the palm of the baby. The main thing is that the teacher or mother should sign the children's creativity, and the kid will be happy to present a gift made by his own hand to dad.
For the middle group
Children from the middle group not only draw, but can also handle glue, so they can be offered to make an application as a gift by February 23. If the kids have already learned how to handle scissors, then let them cut out the details for the future postcard on their own. If they do not yet have such skills, then prepare the necessary blanks for the composition in advance. The application can be folded in the form of a rocket, ship, tank or car. 
For the senior group
Children from the older group can prepare different postcards for February 23. The following options will look great:
- Drawn postcard.

- Application.

- Creativity using semolina, which is glued on glue and painted in different shades.

- One of the new directions is compositions from napkins.

Any of the options will look great and inconspicuously please the defender of the fatherland, who will get such a homemade postcard as a gift.
Postcards for Defender of the Fatherland Day to school: photo instruction
We offer primary school students to make postcards in the form of medals. They can be simple or complex with many elements.
Simple gift medal
We prepare the following tools and necessary materials:
- template for a medal;
- decorative parts;
- colored pencils or paints;
- scissors;
- lace or ribbon for a medal.


Medal for February 23 in origami technique
To make such a gift you need:
- colored cardboard;
- green colored paper in two shades;
- scissors;
- glue (preferably in a pencil);
- string or ribbon.

How to make a DIY card for dad: templates and photos
You can make a postcard for your beloved dad with. The idea is original and not difficult to execute, so even a child can cope with making such a gift.  To work you need to have:
- colored cardboard;
- paper (blue, red, white);
- scissors;
- ruler;
- glue, for children it is better to take in a pencil.
Now you need to make the following blanks:

How to make a three-dimensional postcard for February 23?

There is nothing difficult in gluing a three-dimensional postcard. We describe its step-by-step production. The main element of the postcard will be the boat. For a voluminous boat, blue colored cardboard should be prepared. This will be the base. Next, fold a sheet of white paper in half, make a boat according to the template. 
Line designation:
________ - cut lines;
_ _ _ _ _ _ - fold lines.
For decor, you can use the following patterns. 
Now it only remains to decorate the resulting postcard by gluing the prepared decor.  A gift card can be with any three-dimensional element. So, for example, you can make an interesting option with an airplane.
Application cards for February 23: instructions for making
For postcard-application, you need to prepare the following:
- colored cardboard, which will be the basis of the postcard;
- colored paper;
- glue;
- scissors.
Now to the process of work:

You can make another application with a boat.

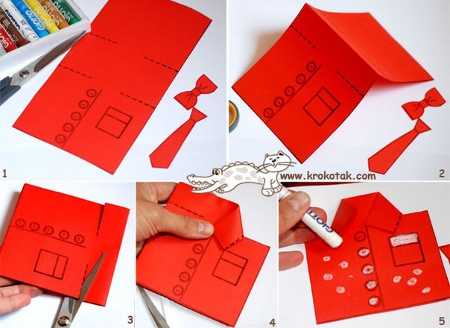
Postcard-shirt for February 23: how to do it yourself?
There are many options for folding a card-shirt. Its manufacture and color are not limited. The photo below shows two ways to fold such an unusual postcard as a paper shirt. 

Cool postcards for February 23: photo ideas


Postcards with congratulations on Defender of the Fatherland Day


Children's cards for February 23
The kid can give his dad or grandfather a postcard with congratulations, made with his own hand. A postcard with a tank is perfect for children's performance. For its manufacture will need:
- cardboard base;
- colored paper;
- scissors;
- glue stick.
Initially, you need to print stencils for the tank. 
Transfer the details (elements) to colored paper according to the template. Let the child cut them out. Parts of the tank must be glued onto pre-prepared cardboard. Postcard is ready! You can also use felt or any other suitable material. 
How to make a video card for February 23?
Today, even a schoolboy can make a video postcard by February 23rd. All you need is a phone with a camera.
Video postcard can be:
- in the form of changing pictures or photos for a song;
- just a recorded video of congratulations.
After such a postcard is finished, it can be written on a flash drive, which you can give to the defender of the fatherland, or it is quite possible to send such a congratulation through social networks.
Making beautiful cards for men for Defender of the Fatherland Day: video
Summary: Postcards for February 23 do it yourself. Do-it-yourself cards for dad and grandfather on February 23. Defender of the Fatherland Day. Postcards for the day of the defender of the fatherland.
On February 23, dad or grandfather will be pleased to receive a hand-made postcard from the child. Postcards for February 23, which we offer in this section, are decorated with plain or voluminous applications made of colored paper. There are very simple applications available even for children 3-5 years old. There are more difficult crafts for children of senior preschool and primary school age. For young children, prepare in advance, cut out all the details of the picture so that they only have to stick them on the postcard. Adult children can cut out parts of the application themselves. It will be interesting to make an origami postcard for a child for dad or grandfather. You can find origami schemes on our website.
Dads love technology, so postcards for February 23 with her image will come in handy. Make an application with a typewriter, airplane, rocket. The application can be both simple and voluminous.
Boat application. applique ship
Even a three-year-old can make a simple paper boat application. On the site Pochemu4ka.ru you can download a ready-made template for making a simple application of a paper boat. See link >>>>
And here are examples of more complex three-dimensional applications depicting ships. How to make such postcards by February 23 with your own hands can be guessed from the photographs.


Application machine. Application machine
We invite you to decorate a postcard for dad on February 23 with an unusual application in the form of a typewriter made of candy wrappers. Master class on making this postcard on February 23, see the link >>>>

applique plane

Application rocket
Finally, from transport, a rocket application is also suitable for decorating a postcard for dad or a postcard for grandfather. In the window, the child can paste his own photo or a photo of his beloved dad / grandfather. You can download a ready-made rocket template.


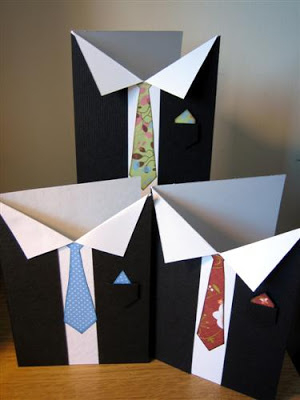
Another interesting option for a do-it-yourself postcard for dad is an origami shirt postcard. There are many ways to make this type of postcards, we will talk about the main ones, starting with simple options and ending with more complex origami postcards.
The easiest way is to fold a rectangular piece of paper in half. From the back of the card, cut off a strip of paper from the top. In front, make two shallow cuts on the sides and bend them towards the center to make a "collar" of the shirt. Separately cut out a tie, decorate it with pieces of colored paper, and then stick it on a postcard.

But everything is the same, only the "collar" of the card-shirt is made on the other side (that's why it is double) and decorated with buttons. For detailed instructions (with photo) on making this postcard by February 23, see the link. A ready-made tie template can be downloaded.

When making such a postcard by February 23, you can use a ready-made template from the Krokotak.com website. Download template.
How to make an elegant card with a child in the form of a business suit with a tie as a gift for dad on February 23, see and read on this site.


Making such an original origami card for February 23 as a gift to dad or grandfather is much easier than it might seem at first glance. With a little help from an adult, even a child of preschool age can do it. See the detailed master class below.

1. Fold a piece of rectangular paper in half.
2. Bend the sides towards the center.
3.4. Bend the edges of the sheet as shown in photos #3 and #4. Now you are making the sleeves of the future shirt.
5. Turn the paper over and fold over the top edge.
6.7. Turn your workpiece back and bend the top corners towards the center as shown in photos #6, #7 and #7a. Now you are making a collar.
8. You just have to fold the bottom edge and tuck it under the collar. Postcard for February 23 is ready!


Or you can write a congratulation for dad or grandfather directly on a piece of paper from which you will fold a shirt using the origami technique.


You probably noticed that the paper shirts in the photo are decorated with ties. A tie can simply be cut out of paper, or you can fold it, like a shirt, using the origami technique.
An interesting idea is to decorate a postcard shirt with real buttons, and instead of a tie, make a pasta bow tie of the same shape. Pre-paint the pasta with paint, preferably waterproof acrylic.


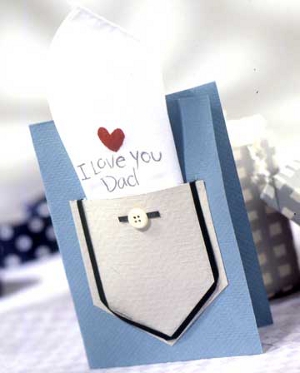
Instead of making a card-shirt, you can glue a pocket on a greeting card, decorate it and put a congratulation in it. Simple and tasteful!
3. Do-it-yourself postcard for dad. How to make a card for dad
Another do-it-yourself postcard for dad can be made in the form of a suitcase with tools. You can download ready-made tool templates. Print and cut them out. Let the child color the instruments and on the back of each of them write one positive quality of his dad. You will understand how to make a suitcase from a sheet of colored cardboard if you carefully consider the photos below.

4. Postcard for grandfather. DIY card for grandfather
If your grandfather or dad is fond of fishing, then the following do-it-yourself postcard by February 23 will be appropriate for him. To make it, in addition to colored paper, you will need a thin rope. From it you will make a fishing line for a fishing rod.
You need to congratulate your beloved men, grandfathers and dads on Defender of the Fatherland Day in a special way. Love and respect will be perfectly expressed by a handmade postcard. Some of them will require the hard work of the mother, others can even be made by a child. Choose to your taste!
A card in the form of a men's suit, shirt, tie is a classic option that is suitable for congratulating the father of the family not only on February 23, but also on his birthday and any other holiday.
You can make a complicated postcard with many details that your imagination will tell you. And you can limit yourself to a simple scheme, which children can easily cope with under the guidance of an adult. So, stock up on colored paper - and get to work!


Inside the card, you can put a congratulation on a separate sheet, or write it on the card itself.

An origami shirt can be glued onto a regular postcard.

The simplest option for making a postcard-shirt: we make cuts on the sides and bend the edges of the "collar" to the middle.


It is somewhat more difficult to make a card in the form of a man's jacket. Below is a diagram of paper folding.

Another folding scheme - this time you will get an envelope in the form of a shirt. Inside you can put cookies of your own baking.

A real man looks great in a tie. Here is a scheme for folding a colored paper tie.

A tie can be fastened under the collar of a paper shirt.

The green shirt is suggestive of a military uniform. Still, the holiday is dedicated to the Defender of the Fatherland!

The symbolism of the holiday on February 23 suggests a military theme. Therefore, stars, ribbons, weapons and military equipment will be appropriate. Khaki color and colorful camouflage complete the look.


With the help of the proposed scan, it will be easier to make this spectacular postcard.

Postcards that acquire volume when opened look interesting. Hidden inside this postcard is a ship rushing through the waves straight at the viewer. The main difficulty in manufacturing is to correctly stick three-dimensional elements so that the postcard can be folded and unfolded; Therefore, before sticking, check the performance of the elements. Rubber glue is good for this purpose, because. it allows you to adjust the position of the glued parts without damaging the paper.

Invite your child to decorate the card with the sun, clouds, flying seagulls. And it will be useful to supply the ship with an anchor and a life buoy!

This postcard using the through cutting technique () is within the power of more experienced needlewomen, but it is very effective and will decorate dad's desk!

Below is a template for cutting out a postcard with a sailboat.

The vytynankas look very good on a contrasting background. Such a card can be made together with the child: the mother will cut out the thin details, and let the baby stick the letters and numbers.

A white backing sheet is glued in order for the vytynanki to be perceived against a smooth contrasting background. And on the next page you can place a congratulation.


The popular quilling technique can also become the basis of a postcard. Look how fun the congratulation looks on the background of the fireworks!

Silhouettes cut out of paper (colored or white) can be pasted on a contrasting background and get an original postcard.


Cutting patterns can be selected according to your mood. For example, in a serious style.


Or in a humorous way.


Or even historical.


You can also use military equipment.


If these drawings seem too complicated for you as templates for cutting out, then just print them out (most of the pictures will be larger than on the screen when saved), and offer the child as a coloring book. Colored drawings can be pasted on a postcard and presented to dad or grandfather.
Defender of the Fatherland Day is a holiday that is loved and respected in our country, and every year the young generation makes greeting cards for dads, grandfathers and older brothers with their own hands. Of course, you can also buy a postcard in a store - they are inexpensive, however, do-it-yourself postcards for February 23 are much more pleasant to receive, and for a child this is an interesting and exciting activity.
You will not need any expensive or hard-to-find materials - only what is on the desktop of every student.
Postcard-uniform
To work you need:
- colored paper - white, black, red, yellow and green
- PVA glue
- scissors
- pencil and ruler

Do-it-yourself postcard for February 23 - military uniform: step by step photos and description:
- A sheet of white paper should be cut into 4 even parts. On one of them we make two neat cuts from above, and bend it so that we get a kind of “collar”, like on a men's shirt. Cut out a small tie from black paper and glue it to the right place. At this stage, our postcard looks like this:
- We cut out a rectangle from green paper - its height should be the same as that of the shirt from shoulder to base, and twice as wide as this shirt. We carefully bend the paper to get lapels on the uniform, we also bend the corners from above a little. From yellow paper, we need to cut shoulder straps and buttons - three small circles. Now we connect the uniform and shirt together - and the postcard is ready! You can congratulate dad or grandfather.
You can make a simple application - it is easy to perform and even a small child can handle it.

To work you need:
- colored paper
- PVA glue
- scissors and pencils

Detailed description of the work process:
- The main sheet can be of any color - not necessarily blue, it is better to take thick paper. We bend it twice;
- Getting to the flowers - carefully cut out future flowers from red or pink paper;
- Then the stems - of course, from green paper, you need three of them - according to the number of flowers, and you can cut out a couple more leaves - in order to make the postcard look more interesting;
- We glue the leaves on the base first - carefully, the glue, even when it dries, becomes transparent, but you should not smear it on the paper;
- Now we glue the flowers - first the middle part, larger, then the side petals;
- On top, with colored pencils or a marker, we will make the inscription “dad” - it’s clear that mom can make everything more beautiful and neat, but the most important thing is to let the child feel that this card is the work of his hands, and show dad how he tried;
- Now that the glue has dried, the card is finally ready for the solemn presentation!
Be creative, experiment, do not be afraid to give children more freedom in choosing colors, materials and patterns - the result will please the whole family!
By February 23, not only adult boys, men and grandfathers are preparing. Even very young sons also want to be fully armed. Together with responsibly learned poems, the kid can ask his mother to make a voluminous postcard with his own hands for dad or grandfather.
Now we will make an original gift Boat for dad. You can draw or find any other template on the web, such as a tank.
Do-it-yourself voluminous postcard for February 23: master class
For work you will need:
- printed template
- colored cardboard
- white cardboard
- stationery knife
- simple pencil
- fine signature marker

Getting Started with Postcards
- According to the template, we draw the details on colored cardboard. If your printer prints on thick paper, you can print the diagram directly onto colored cardstock and then cut it out.
- In the middle of a white cardboard sheet, we push a groove - this is the place of the fold. To do this, you can use a knitting needle, a ballpoint pen that no longer writes, or another object. Be careful not to cut through the cardboard!
- We glue the colored part of the postcard to a white sheet, leaving the boat free.
- We wait until the product dries, write a congratulation with a marker, and then bend the postcard in the marked place. Along the contour of the entire postcard, you can make a line with a marker. You can glue colored buttons on the sails, and bright paper twine on the ship's hull.


With the help of multi-colored blanks and foam tape, you can make other items. They can be glued to cardboard or put on a stand as an independent postcard.


Do-it-yourself simple postcard for February 23: photo
For work you need:
- thick paper or cardboard of any color
- corrugated cardboard (colored or self-painted)
- metal fittings - brads
- leg-split
- miniature wooden clothespin
- an asterisk stamp (if you didn’t manage to get one, you can cut out a few stars from colored cardboard)
The process of making a postcard is quite simple.