Homemade crossbow at home. Drawings of a wooden crossbow or how to make a crossbow out of wood with your own hands. How to make arrows for a crossbow
Now a very popular weapon is a crossbow. Despite the complexity, a crossbow can be made at home. In ancient times, it was used as a formidable weapon. Now the crossbow is used in sports at shooting ranges at short and medium distances. Nowadays, you can buy everything, including a crossbow. But it is much more interesting to do it yourself. For those who are skilled, know how to use machines and tools, this will not be a big deal.
Earlier we described how to do it, if you are interested, take a look.
For a crossbow, we need a wooden blank and iron.

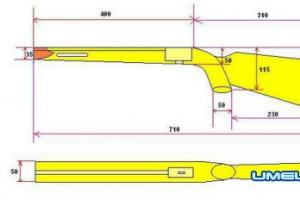
A wooden blank is cut to such dimensions.

We take a spring plate measuring 650 × 100 × 8. Cut off the excess with an angle grinder. In we make an arc with a size of 35 mm - this is in the middle and with edges of 18 mm.

With an emery machine, we reduce the edges from the middle to the edge, reaching up to 5 millimeters in thickness. We pull a steel dart onto the arc (you can use a cable). We firmly fix. In order not to interfere with the arc to bend exactly in the middle, we put a wooden round timber. Simultaneously with the tension, we look at the stresses and the tension gap.
These dimensions are the basis of our work on the manufacture of a crossbow at home.

We cut the iron billet and get the part that will be the main one in our crossbow-hook, it is also called the “cat”.


To make a lock, we need a trigger and a sear. On top of the axis we make a hole into which the bolt of the strip spring should fall, which fixes the pin from moving


Next, we will make the lock and the case.

We carefully measure and make holes for the pins.

Then we make protection for the trigger and measure it to a wooden base.

Cut out a hole for the lock.

We insert the lock


We fix the whole. We make a "dovetail" and solder an aiming device to it. Depending on the heating temperature during burnishing, this can be done with POS or PSR.

It is necessary to drill holes in the arch, this must be done with a victorious drill. All this is necessary for fastening the clamps.

We sharpen the rollers to the required dimensions.

We cut the clamps to the size we need and then we fix the clamp to the arc of the crossbow.


Making stirrups

I clamp the bowstring (cable) with a vise. Tip, do not try to rivet, you need to squeeze!

In the process of manufacturing.

Detail made.

We make an opening for the guide from a wooden blank

We glue the metal bar in the form of a groove.

With the help of cutters and chisels on wood, we make a butt.

I do not think that when we decide to make a crossbow, we will have at hand all the tools that we want, and a lot of raw materials. Therefore, it is difficult to predict what our crossbow will be made of, so let's just consider the main components made with minimal complexity. And also, if possible, we will refuse metal parts.
In order to present a general view of what should happen, I will give a picture from the site www.daslife.ru.
Naturally, I'm not suggesting to do everything in size, just take into account the overall device.
One of the most important parts of the crossbow is the arc. As you might guess, it has a decisive influence on the speed of the arrow, and therefore on the combat power of the crossbow. You can make an arc from both wood and metal. A wooden arc can be either from a single piece of wood or combined.
The option using one type of wood is the simplest, but also the most underpowered. Almost any type of wood is suitable for manufacturing: ash, maple, hazel, juniper, birch, oak, yew, elm, white acacia. You can use both thick branches and trunks of young trees. Ideally, take the harvest in the winter when there is no sap flow, the worst thing is naturally in the spring. As it is not difficult to guess, a blank with knots is a completely inappropriate option. In general, making an arc is in many ways similar to making a bow and you can read about it on the Hobbit's blog.
Making a composite arc is not a cheap pleasure, because pasting the arc with tendons and horn plates is required. Most likely, neither one nor the other, nor glue will be at hand =)
Although we agreed to use wood, it is worth noting that the springs of Soviet cars will make very powerful arches, and if possible, they should be used.
The fastening of the arc to the stock is usually carried out to the end of the crossbow with ropes, through a window 10-15 centimeters from the arc. The picture shows examples of fastening the arc, as you can see, wooden wedges can be used to fix the arc. 
Another important element is the trigger mechanism. Consider the simplest option - a pin lock. 
When erecting, the bowstring is hooked on the ledge, under it there is a pin (1), of a cylindrical shape, resting against the body of the trigger lever (2).
Also, in order for the arrow not to leave the crossbow before the shot, it is recommended to make a small clamp. Similar to what is shown in the photo. 
The crossbow stock, the recess in which the arrow is located, is perhaps the most time-consuming and filigree part of the crossbow. If we do not have a metal bed processed on a milling machine (and we do not have one), we can replace it with a carefully sanded wooden one. Do not forget that the advantage of a combat crossbow over a wooden bow is not only in the power of shooting (although a homemade crossbow without rollers and a system of blocks is unlikely to exceed the bow in this indicator), but first of all in the convenience of design and the ability to conduct aimed fire. To do this, it is necessary, taking into account the trajectory of the flight of the arrow, to adjust the bed so that it is located at an angle. The average value is 5, 6 degrees, but we advise you to decide on the distance at which you will send arrows, and what is called “shooting” the finished product, after each series of shots changing the angle of the bed until your homemade crossbow starts sending arrows exactly at target.
Well, the last moment, this is a bowstring tension device. Since the tension force of the crossbow arc can exceed 100 kg, at least the simplest device for tensioning the crossbow should be brought. 
And finally, a photo of a homemade crossbow. 
Making a string for a crossbow(taken from www.turmaster.com/)
The bowstring during the shot receives significant tension and rupture pressure; therefore, one of the conditions for it is its ability to withstand a large number of shots, i.e. to have durability, "survivability". In addition, the bowstring should be light and slightly stretchable.
For the manufacture of bowstrings, threads are used: lavsan, dacron, kevlar, deinema, CBM, fastflight and other synthetic fiber threads.
In this case, you need to have a simple device.
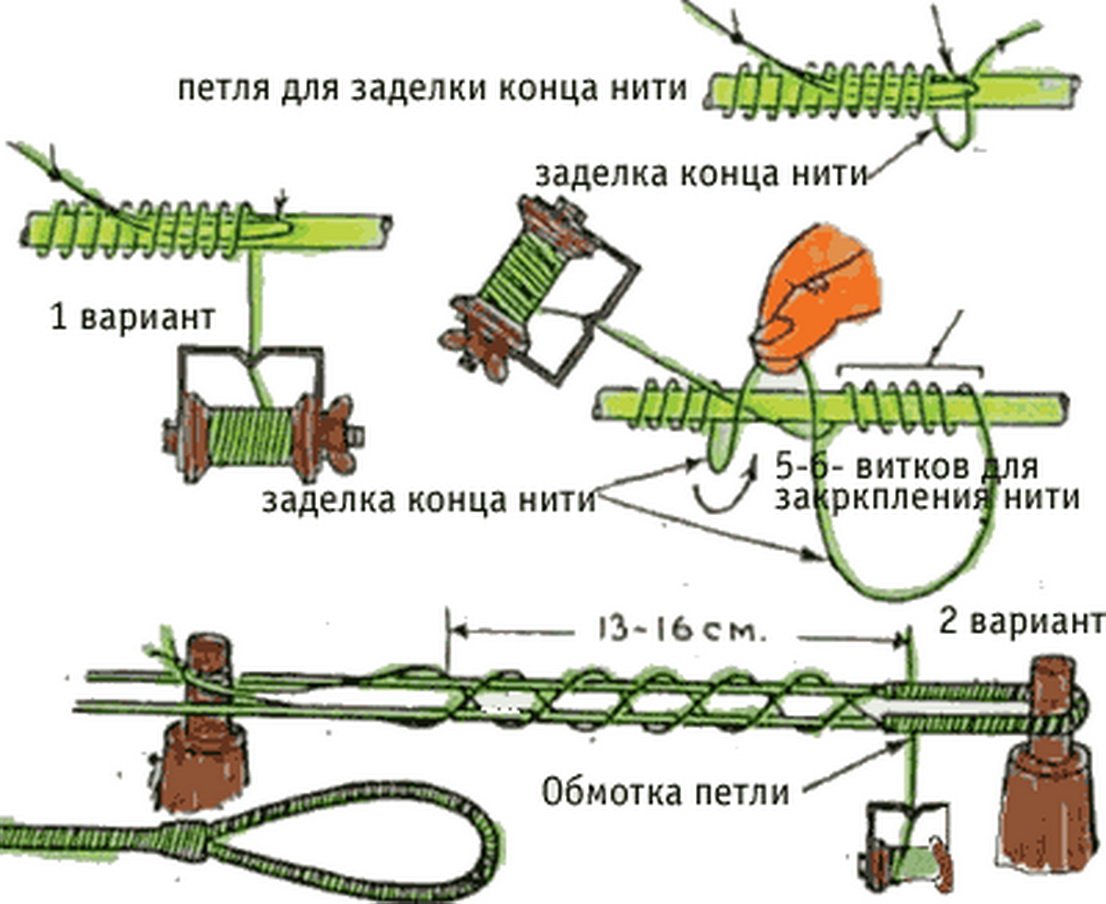
As can be seen from the figure, it consists of a wooden plank, in which on one side there is a slot and a moving threaded rod that allows you to install and fix it in various places, on the other end of the plank on the axis there is a V-shaped part made of plywood or wood with a thickness of about 10 mm. Two rods are permanently fixed at the ends of the part. The V-shaped part is fixed in two positions. The first position is shown in the figure, in the second position the two rods are in line with the moving rod.
In the absence of such or similar device, the winding of the bowstring can be done between two nails driven in at the required distance along the length of the bowstring. The winding of the thread is carried out with a circular motion of the hand with a uniform tension of the thread. The number of strands depends on the strength of the bow.
After the bowstring is wound, a safety winding of the loops and its middle is made.
The safety winding is made with twisted silk thread, kapron, nylon, cotton bobbin thread. When making a bowstring from Kevlar threads, it is necessary to strengthen the loop, either by making an additional lining of threads and weaving them into the bowstring, or by doubling the number of threads in the loop. After winding the middle of the loop, the V-shaped plate is rotated to its original position and the winding of the end of the bowstring is done.
Thus, the second loop is also wrapped. In this case, it is necessary to accurately maintain the middle of the winding. The bowstring worn on the bow should not have sagging threads, their presence indicates poor-quality manufacture of the bowstring. As a rule, this happens if the windings are not produced with the same tension.
The safety winding in the middle of the bowstring is done at the moment when it is put on the bow. The safety winding should not be made too tight: this significantly lengthens the life of the bowstring.
To protect the bowstring from moisture, it is lightly rubbed with beeswax. Rub the wax carefully so that the threads of the bowstring do not break or deform. It must be remembered that lubrication increases the weight of the bowstring and leads to a decrease in the speed of the arrow, so it should be lubricated with a small amount of wax.
The threads from which the bowstring is made, under the condition created by the work of the shoulders, lengthen (from lavsan or dacron by 2-3%, from kevlar by 0.8%). In this regard, when making a bowstring from Kevlar, it is recommended to make it a little longer than from lavsan and dacron.
The practice of shooting involves the replacement of bowstrings after 5000-10000 shots. Kevlar strings last much less and withstand about 2000-5000 shots.
By twisting the bowstring, you can change its size until the accuracy of fire is satisfactory. The maximum number of turns to change the length of the bowstring is 30. If more turns are required, then the bowstring is too long and a new one should be made.
Making a string for a crossbow 
Metal cable string
A cable with a thickness of 1.5 - 2.5 mm is suitable for making a crossbow bowstring. But it has a number of features that must be taken into account. In general, a string made of synthetic threads is more preferable.
Features of using a metal cable:
Structurally, the cable is designed for static loads. Under dynamic loads, it collapses much faster.
Over time, the cable will stretch and, accordingly, the bowstring will weaken.
The mass of a bowstring from a cable significantly exceeds the mass of the same bowstring made of synthetic materials. This indirectly affects the speed of the arrow, since the arms require more energy to accelerate the massive cable.
When grinding, excessive stresses, the cable, as a rule, breaks in places of kinks, tied knots, fasteners
You can get loops at the ends of the cable by tying it with an ordinary oak loop. Soldering, as a way of connecting the ends of the cable, is less reliable in operation. The riveting of the ends of the cable in a copper or brass tube has proven itself well. 
Loops for attaching a bowstring to a crossbow.
Some examples of more complex triggers 


Video instruction on how to make arrows for a crossbow
Video instruction on how to make a toy crossbow
One of the most popular types of small arms is the crossbow. And although hunting with such a device is prohibited in our country, there are still many who want to acquire such a “toy” in order to shoot at targets. At the moment, you can buy such weapons on many sites or in stores, but such a purchase will be very expensive. It is much more profitable to make a crossbow with your own hands at home, and you will find out what is required for this.
Preparation
To date, there are many varieties of this sporting weapon. First of all, these are classic models familiar to us from historical films and block crossbows - modern weapons equipped with complex mechanisms. The last option to create houses will be quite difficult, so let's focus on the classic.
What parts does a crossbow consist of:
- Trigger mechanism;
- bowstring;
- Crossbow stock;
- Bolts and arrows.
Making a crossbow at home will be much easier if you immediately stock up on all the necessary materials and tools. For this you will need:
- Well sharpened knife;
- Hammer;
- Drill or brace;
- An ordinary hacksaw, which can be replaced with a grinder with a wood disk;
- Plane;
- Chisel.
How to make a crossbow with your own hands
In addition to the tools, you will need a piece of wood 900mm long and 30mm thick to make this ranged weapon. In this case, fit:
- ash;
- hazel;
- poplar.
- birch.
First of all, you need to prepare a wooden blank. To do this, cut the branch of the desired size and paint over the cuts. This is necessary so that the liquid from the wood comes out slowly and evenly. Please note that the wood must lie in a dark place for at least a year, only in this case the weapon will shoot with special power. After that, the bark is removed from the workpiece and left to dry for another week. Further, the log is sawn into two parts and from the northern - the most durable, they make the actual crossbow.

Draw the stock of the weapon on the board and cut it out with a hacksaw or grinder, then make a small arrow chute on the top of the workpiece. From the front side, cut a groove in which you will fix the arc. If knots or chips appear on the bed during the process, then remove them with a knife and treat the place with sandpaper.
How to make an arc
This part will require a flat board with a length of at least 750 mm and a width of 200 mm, a thickness of 60 mm. We dry the workpiece well and stand for several days, and equalize it. The width of the part in the middle is 40 cm, and narrows at the edges to 15 cm.
At a distance of 100 mm from the cut groove for this part, we create a through hole through which we stretch the rope - it will become the main fixator for the crossbow arc. Then we insert the part into the groove and firmly fasten it with a rope, as shown in the lower figure.

This detail plays a rather significant role in the “lethality” of the weapon, and to create it you will need the following materials:
- kapron threads;
- wooden plank;
- two nails without a hat;
- rubber glue.
First of all, you need to make a special machine for weaving this part: take a rope and measure the length of the bowstring. After that, saw off a board with dimensions slightly larger than this parameter. Next, mark the length of the string on the board and drill two holes in these places - this is where you need to insert your nails.
Take a thread, tie it to one of the nails, and leave a margin equal to the length of the bowstring. After that, start wrapping the threads evenly around the nails (lavsan ones are best). Continue this process until the base of the string reaches 5mm. To do this, you need to make 5-6 full turns. Try to keep the threads evenly stretched.
Next, wrap the base several times near the nails on both sides with wrapping material. This will give you loops at the ends. You can understand how to do this from the diagram above. Don't forget to wind the middle of the bowstring, because this part suffers a lot from friction. Tie the cut ends of the threads with a marine knot and grease well with glue so that the whole structure is strong. After that, you can pull the bowstring on the arc and adjust the degree of its tension.

How to make a trigger
The simplest option would be a pin-type lock, which we will choose for our weapons. Pull the bowstring to the maximum distance and drill a through hole in this place. Also make a small transverse recess in the upper part of the crossbow bed. Now fasten the lever at the bottom of the part. Make a wooden axle and secure it with wire.
Fix the stock and lever with ropes so that the latter moves with maximum friction. The depth of the “ammunition” groove should be equal to 1/4 of the volume of the arrow, and this recess must be “cut through” from the top of the lock to the front edge of the crossbow.

How to make arrows
In order to get ammunition for your small arms, you don’t have to run to a sports store, because they can be easily made at home. To do this, you will need several ordinary wooden blanks that need to be well planed and processed with fine sandpaper. For arrows, it is better to choose light woods, in which case the shooting will be more accurate. As for the tip, if you don’t have special ones, then sharpen the tip of the arrow - it will be quite possible to shoot at targets with such ammunition. You should not drive nails into the head, because in this case there is an increased chance that the arrow will be able to split when it hits the target.
Be that as it may, you should remember that in our country shooting from crossbows is equated with the use of firearms. So if you want to make such a device, then in no case do not use it for its intended purpose. Treat the crossbow as a beautiful souvenir, and then there will be no claims from the law against you.
The crossbow is a throwing weapon that is an advanced design of the bow. Its advantage is the ability to aim without any extra effort. The technical characteristics of the gun increase the lethal force and accuracy of fire. In our country, the use of this type of throwing weapon is unpopular, since it is difficult to find the necessary design. There is very little inventory, but user interest is quite high. Crossbows are quite expensive. However, the device of the tool is quite simple, so you can easily do it yourself.
What is a crossbow used for?
First of all, it is worth noting that the use of throwing weapons with a pull force of more than 43 kgf is illegal, whether they are homemade or bought from official manufacturers. Today, the main use of the crossbow is sports competitions and outdoor activities.
The device itself was first created two and a half thousand years ago in China. In Europe, the gun gained popularity only by the beginning of the twelfth century and was used exclusively for military purposes. Later homemade crossbows were used for hunting. However, only rich people could afford expensive mechanisms and special arrows.

Arrows for this type of weapon are much heavier and are more commonly referred to as bolts. Their use is necessary, since the tension force of the bowstring is much higher and requires the use of heavy projectiles. They, in turn, provide increased power when hit. Now, the ban on hunting with throwing weapons in Russia and the CIS countries does not allow the use of a crossbow to catch game. Throwing weapons are used exclusively for sporting purposes.
Differences and adaptations
The bow and crossbow have several obvious differences that must be taken into account when creating weapons with your own hands. The main differences are:
Tension force. Since the design of the crossbow allows you to pull the bowstring with more force, a reliable mechanism is required that does not fail. When buying it, you should not skimp, because it guarantees not only safety, but also durability. It is also convenient to use a device for string tension.  Use of bolts. By adding a spring to hold the projectile, the gun can be used at any desired angle. Aim. The installation of additional equipment will ensure accuracy and make it easier to shoot from the shoulder, by analogy with a firearm.
In addition, when creating a throwing weapon with your own hands, you should pay special attention to the method of pulling the bowstring. There are several of them. The most reliable and popular are:
Leg or hand braces. A very popular type of tension. However, its use is only available for crossbows with low power. Belt and hook. This method allows you to fix the tool machine with your feet, like the first example. When bent, the hook clings to the bowstring, and restoring the position produces its tension and fixation. An improved type of the second method is a rope with the use of rollers. The mount is also mounted on the belt. The use of two curved levers stacked on pins is called a "goat's foot". Pins protrude on both sides of the stock. The owner pulls the opposite side towards him, thereby exercising tension. Pull lever. The essence of the method lies in the coupling of the hook and bracket on the front of the box. Thus, the bowstring is pressed back. Use of rack and pinion. A very ancient technology that appeared in the fifteenth century in Germany. The tension is carried out by a collar, which allows the method to be applied to very powerful crossbows. Very suitable for hunting, because it has lethal force.
There are also many other ways to stretch the bowstring for certain types of weapons. However, they are used much less often and were used in ancient times. Their safety is much lower, which does not guarantee the correct use of weapons. To create a crossbow with your own hands, it is recommended to use one of the above methods.
How to create a throwing weapon
When creating a crossbow with your own hands, it is important to understand that the design must be strong and reliable. Making homemade throwing weapons is not difficult, but it requires a very responsible approach to work.
First you need to decide on the purpose of using the tool. If it will be used for hunting, then special emphasis should be given to the tension mechanism and the bed. If you make the design correctly, then it will be much easier to cope with the shooting technique.
After determining the required characteristics, you need to make drawings of the future weapon or find ready-made ones on the Internet. They will not only facilitate the creation process, but also organize the workflow. It is best to use carefully designed drawings with dimensions..
Devices and materials
Before you make a throwing weapon for hunting with a small tension force, you need to organize a workplace and prepare the necessary materials. Here are the main items you will need:
- two meter bars of coniferous wood; thin rail 6x1 cm; polyurethane tube with a diameter of 3 cm; nylon fishing line; wheels with a groove in the middle of the rib; screws and nails 5 cm long; glue; wooden dowels (6 pieces); adhesive tape and foam; vise and rasp; hammer, chisel, saw and drill; pen or pencil.
Also, in the process of work, additional materials may be needed to give an aesthetic appearance to the tool. However, you can do this at your own discretion. When using a crossbow for hunting, appearance is not so important. However, it can be polished and decorated as desired.
The working process
First of all, you need to make a tool bed. This is the main part to which the rest of the structure is attached. Take one of the prepared bars and attach it to your shoulder to determine a comfortable length. Make a mark with a pencil and saw off the unnecessary part. With your other hand, mark the comfortable position of the trigger. When creating tools with your own hands, it is worth considering that power depends on the length of the stock. The longer the length, the stronger the tension force. For hunting, it is better to use a longer bar. At the location of the trigger, with a chisel and a rasp, cut a rectangle measuring 10x2.5 cm. Cut a strip across the resulting hole in which the bowstring will be located.


Now along the timber it is necessary to cut a chute for the arrow. Since the work is done by hand, it is extremely important to approach this stage responsibly. The accuracy of shooting depends on the correct position. Using a drill and a hammer, knock out a 5 mm deep gutter exactly in the center and grind it.
Saw off another bar to a length of 60 cm and glue it to the main part of the crossbow. Let the glue dry. After complete fixing, if desired, parts can be polished. You can make it with your own hands, or with special polishing devices.


Now that the main part of the structure is ready, you need to make the shoulders. To do this, use two polymer pipes, each 90 cm long. Make cuts at the ends of one side into which the bowstring will be placed. Their width should correspond to the prepared screws. Insert them into the cuts made and attach the wheels with the chute.


Get some nylon line. Fasten it to one of the screws, then wrap it around each wheel, going from one side to the other. After winding around the wheels, fasten the fishing line to another screw with a stretch. The result should be a curved structure with three rows of strings. When tensioned, the pipes should bend, if this does not happen, repeat the procedure again.


After completing the stage, it is necessary to fix the resulting structure on the main part of the crossbow. To do this, cut a hole at the end of the beam into which the arc will be attached. Insert the pipe into the hollow and wrap it securely with tape. Keep in mind that one string (more stretched) should be on top, and the other two on the bottom.


Now you can move on to the trigger mechanism. Take the prepared rail and cut out the letter "L" from it. At the base of the bend, cut the gutter so that it is centered and has a width equal to one-third of the full base. Now you need to cut the part so that it matches the hole in the stock. On the bend, on the side, drill a hole the thickness of the nail. Place the part in the hole in the stock and drive a nail into it so that it goes through the drilled hole in the part.

It remains only to focus. A sawn-off 20-centimeter bar will serve as it, which must be sanded for convenience. It can be attached to the main body with nails or glue. Wrap the stop with foam and secure with tape.
This completes the creation of a crossbow for hunting. It remains to make only arrows. They are easy to make from wooden dowels, cut to the desired length. On the one hand, an incision is made for the bowstring, on the other, the end is sharpened.
The main thing is not to use the tool in public places and near places of residence and objects of possible presence of people. By following the safety rules, you can have a great time not only hunting, but also doing outdoor activities.
Do you want to make a real crossbow that will not only look like it, but will also shoot? Then do not pass by and read our article on the topic of how to make a crossbow with your own hands. In the article, we will not only talk about the intricacies of this case, but also show the whole process in the photo. The topic is especially relevant in the summer, when you can go out into nature and shoot at targets. And a hand-made thing will please not only the eye, but also your friends or acquaintances, who, having seen such a product, will certainly set themselves the goal and desire to possess it!
How to make a crossbow with your own hands
Among the simple tools created by oneself, the bow definitely wins. However, crossbows are also very popular. If you want to do do-it-yourself crossbow, You just need to read the instructions below.
As an example, a medieval construction was chosen due to its simplicity. Such a crossbow does not require metal welding, it can be made at home, it also does not require the presence of springs, as in its other, more advanced variations. All it takes to make a simple medieval crossbow is the desire to craft.
Initially, you need to find a suitable stick for the base of the structure. It is recommended to use bird cherry, as after drying the wood retains good elasticity characteristics. When a suitable branch is found, it should be carefully sawed off, the bark completely removed and left to dry in a warm place.
Usually the drying time is about 5-7 months.
Step-by-step instruction:
In addition, it is recommended to immediately bend the stick so that in the future it does not crack during processing and fixation, as well as during operation. If there is no bird cherry in the area, you can use elm or other alternative wood.
It should be remembered that for good strength, durability and elasticity of the launching part of a home crossbow, you need to stand well. Moreover, in this case, the chances of a crack during the operation of the crossbow will be significantly reduced.
To be able to practice and to eliminate the need for repeated waiting, it is recommended to prepare several sticks at once.

On the bed of a homemade crossbow, you can use any type of board or dry wood. It all depends on how accurately you want to repeat the medieval model of the gun.

When the wood is selected and processed, a recess must be made in its front part to accommodate the crossbow bow. You can make a recess with any tool from a metal saw to a regular knife.
The next step in making a do-it-yourself crossbow at home is to drill holes for the bow bolts. They are placed at a distance of 8-10 cm from the front of the bed. Previously, holes were made with red-hot metal, so you can also use this method if you don’t have the right tools at hand.
Moreover, if you don’t have bolts at hand, you can use the same tree.

The upper plane of the bed should have a groove in which the crossbow bolt will be placed. Often such a groove is made round, but it is recommended to cut it triangular in order to increase the accuracy of the bolt.

When everything is ready, you can fix the bow. It is applied to the cut made in the front of the stock and tied tightly with a rope to the previously installed bolts or their wooden alternatives. This will be enough, but for a tighter fixation, it is better to use glue.

The last element of a homemade crossbow is the organization of the trigger mechanism. Usually the simplest lever type is used. The crossbow drawing below shows how such a system works.

When the lever bracket descends, the pin instantly starts up, and it launches the bolt forward. It is important that this system does not have any safety mechanisms, so you need to install the bolt only before firing.

The created crossbow must have a pulling force of about 40 kg, so the design will not fall into the list of melee weapons. The tension of the bowstring is carried out by hand, so additional mechanisms are also not required.
Drawings for making at home

The photo above schematically shows a crossbow with all the necessary dimensions. Its main value is to understand what size its parts should be in relation to each other. Its entire length is 732 mm, with a height of 223 mm at the point of attachment of the sight.
The drawing shows a “pistol” handle (shaped like a pistol), for a secure and comfortable grip. The second hole is made to facilitate the construction, since the total thickness of the plywood handle (can be made of wood) is 30 mm.
Shoulders with a length of 302 mm, are a universal option, their total length is 532 mm. For the first time, it is enough to make exactly according to the dimensions indicated in the diagram, and after testing, make adjustments.