What is band saw rolling. Preparation for rolling wide band saws. Band saw preparation operations
Differ band saws two types: narrow saws(up to 50 mm.) and wide(from 80 mm to 250 mm)
As we know, any saw cuts with a tooth, and how the saw will cut depends on the shape and type of the tooth. It is the saw tooth that determines the characteristics of the saw blade itself.
What to choose?
Compare narrow and wide saws.
Tearing Narrow Band Saw not such a rare occurrence. The saw became blunt, clogged in a cut with sawdust and burst, there is no longer a ring, but a piece of torn canvas is hanging on pulleys or lying around the machine. But on wide saws this is extremely rare!
Wide saws can often surprise with the appearance of cracks in the cavities of the teeth. Often this is due to the selected tooth preparation parameters (depending on the type and condition of the wood and the speed of feeding the saw blade into the log). But to break wide band saw, it takes a lot of effort.
On narrow saws to avoid tape jamming, carry out the so-called tooth setting. When setting the teeth, the first to the left, the second to the right, the third straight and repeat, while only the left and right teeth are sawn (the straight teeth only take out their part of the sawdust), forming a cut width in which the saw body itself does not jam.
With this preparation of the teeth, each of them removes its third of the sawdust (33%).
The best preparation is when each tooth works 100%, but on narrow saws this is not possible due to the small height of the tooth. Thus, narrow saws severely limited in sawing speed due to the problem of carrying out all the same sawdust! With the cut available for a narrow band (about 2.5 mm), at the same time it does not have (unlike a wide saw) a stabilizing body, and can hang out in the cut.
With an increase in the feed rate, it will be diverted to the side, after which an overload will follow, an overpressure and, as a result, a break. And again repair (welding), and welding is shortening the length, and all pulleys have restrictions on the length of the saw blade ring.
The only solution isincrease the width of the saw blade itselfwithout forgetting the 20/80 ratio. Wide blade already from 80 mm. allows you to understand the height of the tooth, for example up to 11mm.
At the same time, with a step of 35 mm, the area of \u200b\u200bthe cavity increases by 2 times, which makes it possible to more effectively carry out sawdust, which caused us so much trouble. Such a tooth can already be prepared in a more modern way, starting with flattening its tip to create a widening in the cut and ending with the most technologically and economically advantageous, such as stellite hardfacing!
After sharpening such a tooth, it begins to work at 100%, completely coping with the removal of sawdust. The wiring in this case becomes completely unjustified.
Narrow band saw. Every third tooth works.

Wide band saw. Every tooth works.
When working on wide ribbons with almost the same kerf width, the saw does not dangle, works stably at high speeds, greatly increasing productivity.
Using wide band saws, can be fine-tuned tooth parameters, changing it shape, cutting angles, as well as changing kerf width. For each species and condition of wood, you can select your optimal tooth preparation parameters, which can add up to 25% more to the sawing speed and increase the yield of finished products.
Narrow saws use simpler and cheaper equipment, and are also easier to install and pull on pulleys than win back their positions a little. wide saws. As we know, during operation, any saw heats up, especially its cutting part. The narrow belt heats up completely, as it has a small width, and its linear expansion is compensated by the pulley tension mechanism. But in the case of using a wide tape, several problems have to be solved. talking plain language, wide saws have to be pulled several times stronger than narrow ones, because of this, the saw unit is used more complex and massive. Since the width of the saw is much larger than the cutting part, it heats up unevenly (the cutting part heats up much more than the rest of the saw). At the same time, the cutting part lengthens and weakens, which may cause a “wave” in the cut. The guide rollers in this case cannot securely hold the wide band on the pulleys, since the sawing speeds are much higher than with narrow saws, and the load on the material side is higher. To get rid of these difficulties, it was necessary to complicate the design of the machines, which could not but affect the cost of the equipment, as well as the level of training of personnel working on this equipment.
The result of this was the use of profile pulleys and their turn relative to each other. Thus, the surface of the pulleys has several profiles, the most common of which are convex in the center of the pulley (1/2), convex with an offset to that part of the pulley where the cutting edge of the saw will be (1/3 or 2/5) and flat ( saw rolling 1/3 or 1/2). The pulleys are not located in the same plane, but are turned towards each other. When using these features, the tensioned saw is securely fixed on the pulleys and compensates for the elongation of the leading edge when the saw heats up during operation. Placement of a wide band saw on pulleys.
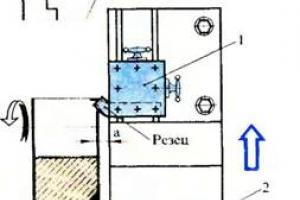
We roll sh heavy saws
During the rolling process, the body of the saw is rolled longitudinally with rollers harder than the saw itself under pressure. Rolling paths are formed on it. Rolling is done depending on the profile of the pulley, on which the saw will then have to work. In the process of rolling, the body of the saw acquires a deflection corresponding to the shape of the pulley. Also, which is very important, by rolling they achieve the extension of the rear edge of the saw, which corresponds to the rotation of the pulleys. The tape stretched over the pulleys repeats their shape, and the deployed pulleys pull it. During operation, the saw moves back a little towards the trailing edge and pulls up the front, compensating for the elongation of the cutting part due to heat. With the correct angle of turn of the pulleys, the rolling of the saw body and its tension, the removal of the saw from the pulleys becomes impossible.
The saw will last a long time. But do not forget that during continuous operation, the saw “gets tired”, therefore, after a maximum of 2-3 hours of sawing, it must be removed, wiped, turned inside out and hung up to rest for a day. Periodically, the saw must be sharpened (a dull saw stops sawing normally and can cause problems when cutting). The pulleys must be wiped so that there are no sawdust and other debris left on them (check the condition of the scraper cleaners), since cracks may form in the center of the saw body. Also, the saw needs to be rolled over time in order to return it to the desired shape. After grinding off the flattening or welded plate, you can re-prepare the tooth and continue to work on the saw until its width is less than the allowable fit on the pulleys. Such saws, when used correctly, pay for themselves without any problems !!
Preparation band saws includes joining their ends by welding or soldering, control of the tension state of the saw blade, correction of defects in its shape, rolling, final control of the tension state of the saw blade.
The stresses arising in the web as a result of welding are removed by rolling.
The control of the stressed state of the saw is carried out on the basis of the deflection of the blade, similarly to frame saws. In addition to local defects, similar to frame saws (tight place, bulge, etc.), the tape can be twisted, have wingedness, longitudinal waviness, warping, bending of the trailing edge of the blade, non-straightness. Twisting is eliminated by light forging, other defects - by rolling. If the trailing edge is not straight in the joint area, the web is cut and re-welded or soldered.
Methods for identifying and eliminating defects in band saw blades

a, b - transverse warping; c, d - wingedness; e, e - longitudinal waviness; g, h - bending of the edge; 1 - saw, 2 - calibration plate; 3 - ruler; 4 - probe; 5 - calibrated plate
More information onprices, discountsand other questions you are interested in, you will receive when contacting our specialistsby phone:
22.05.2015
Purpose and types of band saws
Band saws are the cutting tool of band saws: carpentry, dividing and log saws. The saws used in these machines differ only in size, tooth profile and are divided into three types: carpentry (narrow), dividing (medium) and log saw (wide). The first two types are produced in accordance with GOST 6532-53, and log saws - in accordance with GOST 10670-63 "Band saws for sawing logs and beams." Band saws are used for curved and longitudinal sawing of boards, beams, logs and board wood materials.
Design of band saws
The design of band saws is characterized by the dimensions of the blade (width B of the band, including teeth, thickness 5, length L), profile and dimensions of the teeth of the cutting edge. The dimensions of the band saw blade mainly depend on the design of the band saw machines: the distance between the axes of the saw pulleys k, their diameter D and width.
Band saw length can be determined by the formula
Since the tape is supplied by the manufacturer in rolls, when cutting the estimated length, it is necessary to take into account the soldering allowance, and maintain the total tooth pitch at the soldering point.
Band saw thickness depends on the diameter of the saw pulley and must satisfy the dependencies
The value of bending stresses depends on the ratio of the thickness of the saw and the diameter of the pulley, which in the general balance of stresses have a large specific value. The magnitude of the stress from the bending of the saw
The magnitude of stresses from bending at s/D=0.001 will be
The tensile strength at the soldering point does not exceed 70-80 kgf/mm2. Therefore, with a minimum margin of safety equal to 2, the stresses in a working saw should be less than 35-40 kgf / mm2. In this regard, tend to use the smallest possible thickness of the saw and large diameters of the saw pulleys.
The width of the band saw blade depends on the width of the saw pulleys and can exceed the latter only by the height of the teeth. When choosing the width of joiner's band saws when sawing out curved parts, it is additionally necessary to take into account the radius of curvature R mm of the cut and the widening of the teeth on the side Δs mm. Then the saw width
Wider saws will flex into cross section, which will lead to their cutting and even sliding off the pulleys.
For sawing parts with a very small radius of curvature, jigsaw machines, in which jigsaws are used as a cutting tool. Dimensions of jigsaws L = 130/140 mm, B = 2.3/8 mm, s = 0.26/0.5 mm, t = 0.6/1.5 mm. Angular parameters of a tooth with a straight back face: α = 5/10°, β = 40/45°. The dimensions of carpentry, dividing and log saw band saws are given in Table. 25.
Each type of GOST saw has its own tooth profile. For example, for dividing saws there are two: profile I - with an elongated cavity and profile II - with a straight back edge (Fig. 41.6). Reciprocating saws with tooth profile I are used when sawing hard and frozen soft woods, with tooth profile II - when sawing soft woods. The dimensions of the teeth of band saws depend on their thickness, width and sawing conditions.
For joiner's band saws with a width of 10-60 mm, the dimensions of the teeth are determined by the following approximate expressions (mm):
For reciprocating and log saw band saws, the tooth dimensions are (mm):
For saws with a set tooth, the pitch is reduced by 25-30%. The angular values of the tooth profiles provided by GOST are shown in fig. 41. The front angle of the teeth must be made as large as possible, since in this case the cutting power decreases and the pressing force in the horizontal plane decreases, which shifts the saw from the pulley. However, with an increase in the front angle γ, it is necessary to take into account the properties of the material being sawn and the strength of the tooth, which depends on its dimensions and the angle of sharpening β. The angle γ should be kept within 20-35°.
Band saw soldering
Welding of band saws is carried out in case of preparation of new saws from a rolled band, repair of saws in the presence of significant cracks (over 0.12V) or breakage. It includes the following operations: marking, trimming, chamfering, soldering, heat treatment of the soldered seam, its cleaning and straightening. Proper soldering requires that the seam is half the distance between the tops of adjacent teeth of the soldered saw. To do this, before cutting, the saw is marked with a ruler, square and scriber.
Marking and cutting out defective places (when repairing a saw) must be done according to the scheme shown in Fig. 42. The width of the seam B depends on the thickness of the saw s and is approximately taken equal to 105. After marking, the saw is cut along the marked lines ab and cd with scissors or a chisel. The cut ends are straightened with a hammer on the anvil and cleaned with a file. The ends of the saw are soldered with an overlap. To keep the thickness of the soldered seam equal to the thickness of the saw, its ends are beveled (chamfered) within the marked strip. Chamfering is performed manually with a file on a special device, or on milling or grinding machines. The honed ends are carefully cleaned with sandpaper and degreased.
The ends of the saws are soldered in special presses with soldering bars, electric soldering machines, or the flame of a blowtorch. Presses with soldering bars are heated up to 830-1000°C in PM-6 muffle furnaces. The ends of the saw to be soldered are installed in a soldering press, and solder is laid between them in the form of a plate with a thickness of 0.075-0.15 mm, together with a flux - dehydrated borax. The flux is necessary to protect the soldered surfaces from oxidation, as well as their better wetting. Then, heated soldering bars are inserted into the press and tightly pressed with screws to the place of soldering. After melting the solder and cooling the bars to a dark red color, they are removed, and the place of soldering is cooled in the cold section of the press. After some time, the saw is tempered for 1-2 minutes using the same bars, but already heated to a temperature of 650-700 ° C. Silver solders P-Sr-45, P-Sr-65 or brass L62 with a temperature of melting point 605-905 ° C. After cooling, the soldering site is cleaned of scale and filed on both sides with a personal file to a thickness equal to the thickness of the saw blade. Then the soldering place is rolled.
To connect the ends of the tape, you can use the method of butt welding using ASLP-1 devices. The ends of the saws are cut at an angle of 90 ° C, fixed in the clamps of the welding machine, brought into contact and the current is turned on. As soon as the ends of the saws are heated to a plastic state, the current is turned off, and the ends of the saws are shifted even more tightly by moving the clamps until they are welded. This method has not yet been widely used, since it requires special equipment.
Straightening and rolling of band saws
At editing band saws detect and repair defects in the same way as when editing frame saws. Given the large length of the saws and their small thickness, defects should be eliminated with great care, mainly with the help of a rolling machine. The less the band saw is dressed with straightening hammers, the longer its service life. Therefore, dressing should be resorted to in case of emergency, replacing it with rolling if possible.
Rolling band saws is performed in two ways.
The first way: symmetrical rolling is performed similar to rolling of frame saws and consists in lengthening the middle part of the blade (Fig. 43, a). Rolling starts from the middle part of the blade and ends, not reaching 10-15 mm on one side to the line of tooth troughs, on the other - to the rear edge of the saw. Rolling, straightening and quality control of the preparation of the saw is carried out on special tables equipped with a rolling machine, an anvil, a test plate and supporting rollers for moving the saw. The degree of rolling is determined by the arrow of transverse curvature when the saw is bent using a short test ruler. The sag should be approximately 0.2-0.4 mm for straight rim pulleys and 0.3-0.5 mm for convex ones. Larger deflection values apply to wider and thinner bandsaws. An accurate check of the cross-curvature of the saw can be made with a convex template with a radius of curvature corresponding to a correctly machined saw. In addition, the straightness of the rear edge of the saw is checked by placing it on a test flat plate and applying a long straight ruler to the edge.
The second method of rolling band saws is called cone rolling (Fig. 43, b). Rolling starts at a distance of 15-20 mm from the line of tooth cavities. Closer to the rear edge of the saw, the pressure of the rollers is increased. The last track of the rolling rollers must be located no further than 10 mm from the rear edge. As a result of this, the cutting edge is shorter than the rear and, when pulled, receives greater stresses than the rest of the saw. The back edge of a saw that has been tapered and placed on a flat proofing plate will be located in an arc of a circle with the center placed towards the teeth. The value of the convexity of this edge over a length of 1 m serves as a characteristic of the degree of rolling. The bulge arrow is determined by a test ruler with an indicator along the entire length of the saw. The convexity of the boom should be 0.3-0.5 mm over a length of 1 m, with larger values referring to wider saws. If a part of the blade along the length of the saw has a convexity greater than required, this place must be rolled with an increase in the pressure of the rollers from the rear edge to the cutting one. On the contrary, if the convexity is small, roll with increasing pressure of the rollers from the cutting edge to the rear. The second rolling method is the best for wide band saws, especially when heating is uneven across the width of the blade.
Installing band saws in the machine
normal operation band saw machine depends not only on the quality of the preparation of the saw, but also on its correct tension and installation in the machine. For this, the following conditions must be met:
1. The band saw during installation and operation must be placed on the saw pulleys so that the cutting edge protrudes beyond the edge of the pulleys by at least half the height of the tooth, but not more than its height.
2. The tension of the saw should be sufficient to ensure its rigidity in the lateral direction and, on average, be at least 5-6 kgf/mm2.
3. Guide vanes for the saw must be fitted and adjusted to the saw with a gap not exceeding 0.1-0.15 mm.
In order to exclude the displacement of the saw blade along the pulley due to the horizontal components of the cutting forces, the discrepancy between the resultant tension of the saw and its center line, heating the saw, etc., a number of preventive measures are used. Saw pulleys are made with convex rims, while the bulge is not located in their middle, but closer to 25-40 mm to the cutting edge. Flat pulleys to prevent slipping of the tape are tilted (on the worker) relative to the horizontal axis at an angle of 10-15", and the saws are rolled into a cone. In addition, most modern machines allow you to turn the upper pulley around its vertical axis due to the lateral displacement of the front support of the pulley shaft. Such a turn (with the working branch outward) allows you to hold the saw with strong heating and cutting during inside. Guide vanes make it possible to protect the saw from strong lateral bends, slipping from the pulleys and dampen resonant vibrations. In the process of work, it is necessary to carefully monitor the cleanliness of the surfaces of the saw pulleys, promptly cleaning them from dust, sawdust, resin, etc.
Technical requirements for band saws
Limit deviations in the dimensions of band saws should not exceed the values \u200b\u200bspecified in Table. 26.
The roughness of the side surfaces of the saws must be at least class 7 according to GOST 2283-57. Cracks, delaminations, scratches, burns from grinding are not allowed. The canvas must be straightened and rolled evenly. On the saw, every 10 m there should be a stamp indicating the type of saw, its dimensions, GOST. For example, for log band saws according to the scheme: “Saw PLB Bхsхt GOST 10670-63”.