Ice outdoor decorations or ice Christmas decorations for the street. How to decorate the yard in winter? DIY multi-colored ice balls Photo of various ice candlesticks
With the onset of a cold and snowy winter, everything around is transformed. Leaving the house on the street, everything around is admirable, because there are fluffy snowdrifts around, which create a fabulous landscape.
If you are the owner country house, then you should definitely worry about the question - How to decorate the yard in winter, especially on the eve of the New Year and Christmas holidays.
 To make these unusual jewelry, you will need the following materials: water, any coloring (food coloring or conventional paints) and balloons.
As you may have noticed, very few materials are required to make such a wonderful decoration.
To make these unusual jewelry, you will need the following materials: water, any coloring (food coloring or conventional paints) and balloons.
As you may have noticed, very few materials are required to make such a wonderful decoration.
So let's get started...
In a separate container (this can be an ordinary three-liter glass jar or bucket), you dilute water with any dye you like. Depending on how much dye you add to the water, the color saturation of future ice balls will depend.
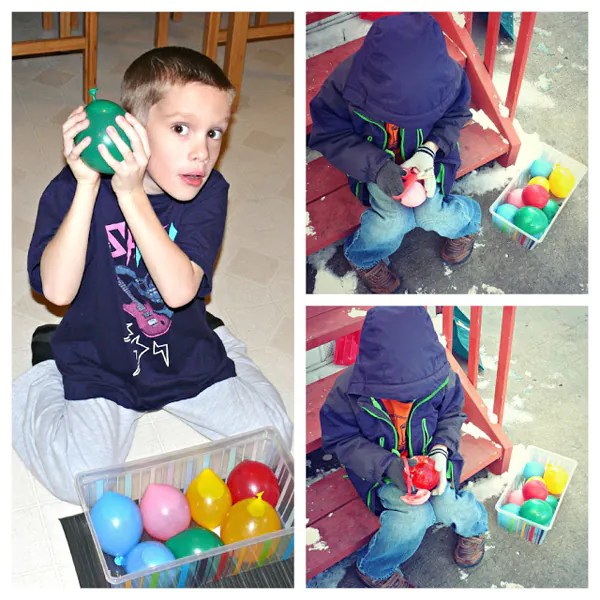 So, colored water is ready! Now use the help of your relatives, friends or children and use a watering can or tube to fill balloons with colored water. If you plan to make huge colored ice balls, then it is better to fill Balloons right on the spot, since a balloon filled to capacity will be difficult to move from place to place.
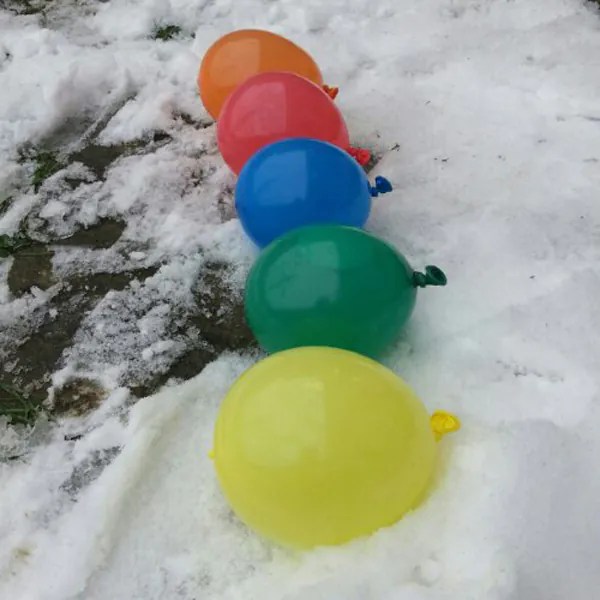 Tie a balloon filled with colored water tightly and leave it outside (in the cold, of course) until completely frozen.
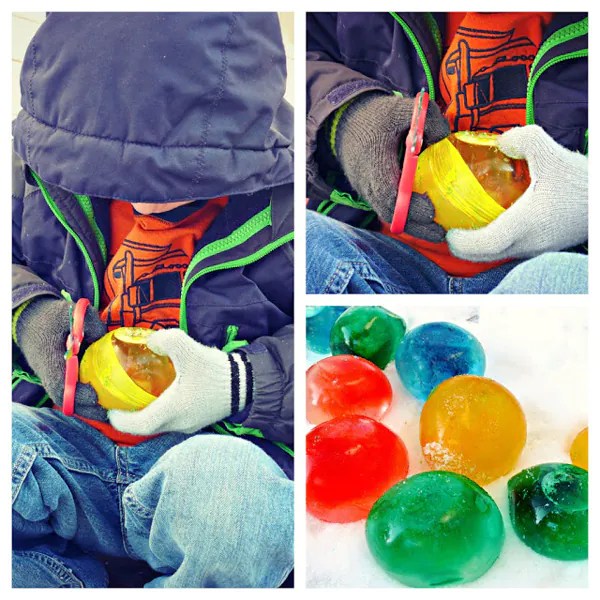 When colored water balloons freezes, you use scissors to release the colored balls of ice from the rubber shell.

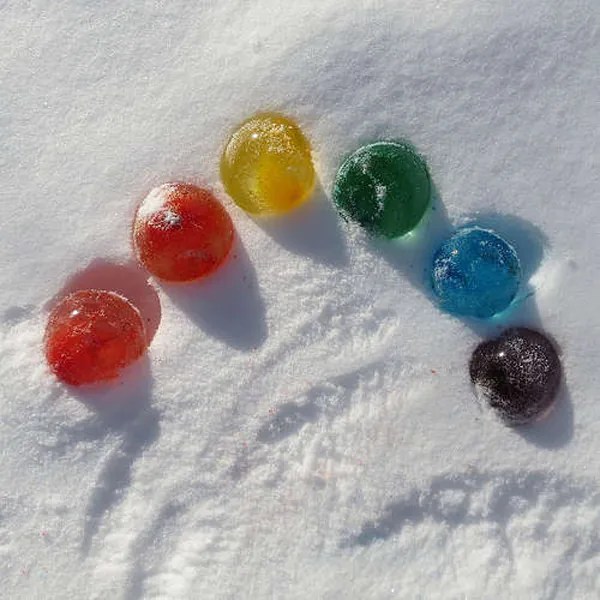
 With such bright unusual ice balls, you can decorate paths, a playground, railings and steps.
Ice balls are multifunctional, easy to manufacture, do not require serious material costs and are very beautiful.
The area around a private house can be decorated with whole compositions of such balls, decorate the paths to the house with them, and even randomly laid out in the snow, ice balls completely transform the yard, giving it holiday look.
Such balls look very nice in the role of candlesticks - small “tablet” candles during burning heat the surface of the ball and a natural depression is obtained that does not allow the candles to slide.
To decorate the territory of the courtyard of a multi-storey city house, ice balls are suitable as unusually beautiful tree pendants.

The creation of ice balls begins with the preparation of a dye - it can be gouache diluted in water, culinary food dyes, pigments for interior paint.
The dye is diluted in water poured into plastic bottles, or poured directly into the mold for making balls.
The most common balloons are used as a form. Using a household funnel, a small amount of dye is poured into the ball or it is poured dry, after which water is added from the tap until the ball is inflated to the desired size.
It is best to carry out the procedure for filling balloons with water over the bathtub - if the “form” breaks, then you don’t have to remove it from floor coverings colorful puddles.
If ice balls are planned to be used as hanging decorations, then it is recommended to put a long, strong thread into the mold before tying.
The last step in making ice jewelry is freezing. The blanks are laid out on the snow, trying to avoid contact of the balls, and left until the water completely freezes in the form.

If possible, after one and a half to two hours, it is recommended to turn the balls over to the other side - this way they freeze faster.
If jewelry is made in a city apartment, then the blanks are placed in the freezer.
A day later on ice balls slightly incise the rubber shell and completely release the jewelry from the mold.

Alternatively, you can use rubber gloves instead of balloons as a form - very original and funny ice “palms” are obtained.

For the manufacture of colored ice blanks of square or rectangular shape, 5-liter plastic bottles can be used.
If there is no dye at hand, then you should not be upset - you can put sprigs of spruce, flower petals, rowan berries or leaves of indoor plants in the form.
DIY colored ice balls - original winter fun!
It's still a long way before winter, but when you accidentally stumbled upon such funny balls, it was hard to resist =) Winter is often white and gray, and so you want to make a little bright colors. Here, bright ice balls can help you, which you can easily make with your own hands together with your child. And the very next day you can head to the park or courtyard, where you will create an interesting composition on the snow-white snow. Or maybe you want to leave them in a snowman =) (exclusively in a snowman!)
To create colored ice balls you will need:
small balloons
plastic bags
Food colorings
Something like a metal sheet for baking cookies
Old newspapers or towels
Scissors
Below is the process of creating colored ice balls:
Be prepared for the fact that you and your child can get so carried away with the creative process that you will stain everything around. To do this, it is advisable to put on old clothes and lay everything with newspaper sheets.
1. Start gently filling the balloons with tap water (Figure 2).

2. Pour a little food coloring into each ball, 1-2 drops will be enough (Figure 3).
3. Place all balls in the freezer. You can put them in a large bag to avoid getting colored droplets on the walls of the freezer (Figure 4).
4. Also, the balls can be frozen in the courtyard of the house (Fig. 5). In general, they will more or less remain round or slightly oval, which will not affect the effect of the result. You can also dig round holes in the snow for them, so that the desired round shape will certainly come out. Removing the ball will be quite simple, since its rubber does not freeze.

5. When the balls turn into ice cubes, go with them and your baby to the yard, do not forget to wear gloves that you don’t mind painting in all sorts of rainbow colors. Connect your imagination - create circles, decorate snowmen with them, decorate the yard with them. Do not forget to take a picture of your creation and send an MMS to your grandmother, let her be happy for you.
Photo Sources: trendhunter.com, hurrayic.blogspot.com
Western countries have long been practicing decorating for the New Year not only the interior of houses, but also the streets, paying special attention to the decor of the backyard territory. For example, they are very popular ice new Year decoration for the street, but such decor is quite suitable for our latitudes. Moreover, making street decorations from ice is very easy, as well as fun, entertaining and completely inexpensive. In fact, to make ice street decorations, you need water, a couple of decorative elements(we’ll talk about this in more detail below), a suitable shape, as well as a roomy freezer or severe frost outside.
How to make street decorations out of ice.
How to make an ice wreath.
Festive wreaths can decorate the branches of trees or shrubs.
Method number 1. We take a ready-made pudding mold with a vertical insert in the center. We spread bright berries and green twigs (spruce, fir or arborvitae) along the bottom of the form, fill the form with water. We send the form with water to the freezer, until the water completely solidifies. After the water turns into ice, pour into a bowl hot water and immerse the form with ice in it, with a sharp change in temperature, the ice inside the form will melt along the edges, and you can easily pull out the wreath. Backwardness is only to hang a wreath on a satin ribbon.

Method number 2. We take ready-made small forms for puddings, lay out the composition from the berries and branches of the arborvitae on the bottom, fill each mold cold water and put in the freezer. After the water turns into ice, the form can be immersed in hot water for literally one minute, pull out miniature wreaths and hang them on trees with ribbons.

Method number 3. In the center of a round deep shape, we set a glass or a jar, put twigs, berries, leaves, citrus peels around, and pour in water. To prevent the jar in the center from floating into it, you can pour water or pour stones. It remains to set the form in the cold, wait until the ice hardens, pull out the wreath and hang it on a ribbon.

Method number 4. In a baking dish with a vertical insert in the center, lay out acrylic snowflakes and Christmas balls, pour in a little water, put the product in the freezer. When the first layer of water freezes, lay out a few more balls in a circle, pour in water again and put in the freezer, after freezing add more balls and put the mold in the freezer for the last time, take out the wreath, tie a ribbon and hang the product on a street tree.


Photo of ice wreaths.


How to make ice balls.
Method number 1. We prepare the required number of balloons, pour water into them and pour out the food coloring, mix the water inside by shaking the balloons. We tie the balls and set them in the freezer or on the street frost. When the water inside the balls hardens, cut the shell with a knife and take out the colored ice balls.


Method number 2. You will need a special form for making ice balls (for drinks), you can put berries or sprigs of spruce on the bottom of this form, as well as put hanging ropes, pour in water and put in the freezer until completely solidified.


How to make an ice candlestick.
Method number 1. In the center of the food container we put a glass with stones (for weighting). We pour in water and lay sprigs of spruce or arborvitae on top, and also pour viburnum, lingonberry or dogwood berries. We put the mold in the freezer, after the water hardens, we take out the candlestick and put a lit candle in the center.


Method number 2. We take two different-sized bottles of 1.5 liters and 0.5 liters, cut each bottle in half, put the smaller bottle into the larger one, fix them with adhesive tape, put berries, leaves and tree branches between the walls, pour in water, and send the product into the freezer. After turning the water into ice, we take out the future candlestick from the mold, and put a lit candle inside.

Photo of various ice candlesticks.


Ice tree pendants.
Round flat pendants are made as follows, various berries, twigs or flowers are laid out on the bottom of a flat round plate, everything is filled with water, a pendant thread is laid on top, the composition is placed in the freezer, then pulled out, separated from the plate and hung on trees.


Ice stars.
- To make stars, you can use ice molds in the form of stars or baking dishes, to create ordinary stars, fill the molds with water and freeze in the freezer.
- To create colored stars, you must first add food coloring to the water.
- For bright compositions, you can put berries, various twigs, leaves, or add glitter into the molds.

Ice cubes.
In ice molds square shape lay out various flowers or fruit slices, pour water here and freeze. Then we take out ice cubes and decorate them with street flowerpots, tree branches and other yard elements.

Ice shards.
We paint the water blue, pour it into rectangular shape in a thin layer, send the form to the freezer, after solidification, hit the ice surface with a kitchen hammer, select beautiful fragments and put them somewhere on the street.

Frozen heart.
Method number 1. At the bottom of a round plate, lay out the pebbles in the form of a heart, fill it with water and put it in the freezer, then take out the product and place it with an edge on a flat surface.

Method number 2. We put berries and pine needles in a heart-shaped baking dish, send the form to the freezer, then remove the product from the form and put it somewhere in a conspicuous place in the yard.


How to make ice garlands.
In the ice mold, lay out a thick woolen thread in a circle, pour in water, and put the mold in the freezer, after the water hardens, gently pull the end of the string, all the ice should pop out of the mold after it. To get a colored garland, the water must first be tinted with food coloring.
Instead of an ice mold, you can take the base from a box of chocolates.


How to effectively decorate the house for the New Year:
Christmas decorations made of ice will help you quickly, simply and inexpensively decorate the site for the upcoming holiday. If you have not yet tried to create street decorations from ice, then we recommend that you urgently correct the situation, we assure you that you will definitely like this pastime.
The website "Dekorol" reminds its readers that you have the opportunity to receive notifications regarding the release of new reviews to your mail (fill out the subscription form in the sidebar).