Installing underfloor heating under tiles
The arrangement of underfloor heating is especially important for rooms with high humidity, such as a kitchen, bathroom or hallway, where ceramic tiles are used as flooring. Tiled floors can also be installed in the sauna, on balconies and verandas, where the installation of a warm floor under the tiles would be no less appropriate. Moreover, underfloor heating under tiles can be an effective addition to the main radiator heating. The advantages of ceramic tiles are obvious: they are characterized by moisture resistance, practicality and durability, as well as an original appearance. It is unpretentious in care, but at the same time, it remains cold to the touch even in summer, which creates discomfort when walking barefoot on a tiled floor. However, due to the high thermal conductivity of ceramic tiles, a solution to this problem was found - it involves installing a warm floor under the tiles. It should be noted that ceramic tiles are an ideal floor covering in the case of arranging a “warm floor” system, since the heating elements that are located under the floor covering contribute to warming up the room, due to which, the coolness of the tiled floor, which is valuable in summer, is replaced by comfortable warmth, which is necessary in autumn . There are several ways to arrange the "warm floor" system, and the choice of the most suitable one depends on many factors, each of which must be considered in more detail.
Advantages and main types of underfloor heating systems
- Compared with a traditional radiator heating system, a heated floor under a tile, the arrangement technology of which will be discussed below, is characterized by a number of advantages:
- During the operation of the "warm floor" system, the natural humidity of the air in the room is preserved;
- A uniform distribution of warm air in the room is created;
- The arrangement of a warm floor is an ideal option if ceramic tiles are chosen as the floor covering, which is characterized by high thermal conductivity and is a kind of "accumulator" of heat.
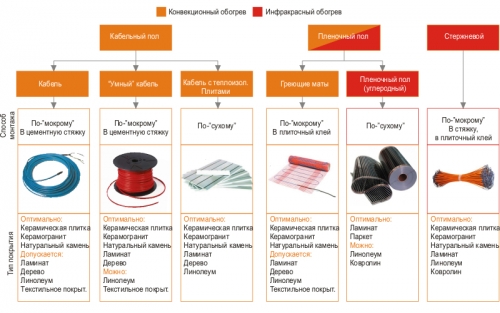
The main types of the "warm floor" system:
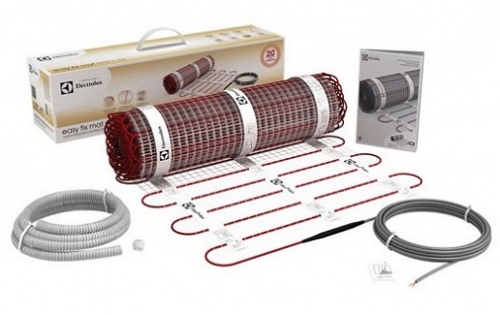
- Electric underfloor heating, the design of which involves the use of:
- heating mats;
- electric cable.
- Infrared (film) underfloor heating, which, according to some classifications, is a type of electric underfloor heating;
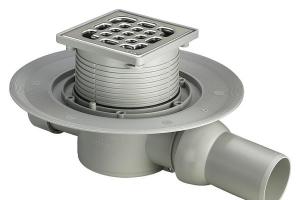
- Water heated floor.
What should be considered in the process of installing an electric underfloor heating?
Heating floors made of ceramic tiles can be done in several ways, and therefore, choosing the best warm floor for tiles, you need to answer a few questions, which will allow you to make the most accurate choice. First of all, it is important to find out the following:
- Is the system you are installing the main or additional source of heating?
- What is the maximum thickness of the "warm floor" system, taking into account the height of the ceilings in the room?
- What is the type of heating system in the residential facility where the underfloor heating will be installed (central or autonomous)?
- Are you planning to install a concrete screed?
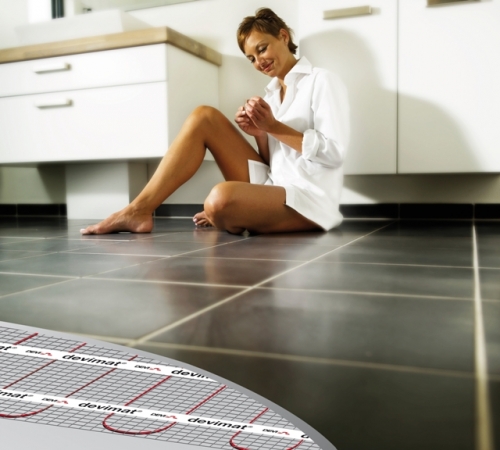
Warm floor under the tile photo
Electric underfloor heating: arrangement options
Laying a warm floor under a tile based on an electric cable or heating mats is carried out mainly in apartments where it is not possible to install water floors that are more efficient. In addition, electric underfloor heating is characterized by ease of installation and is one of the most economical options for tile underfloor heating.
During the installation of electric underfloor heating, there may be variations, depending on the conditions in which the laying will be carried out.
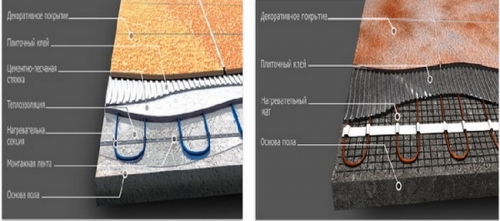
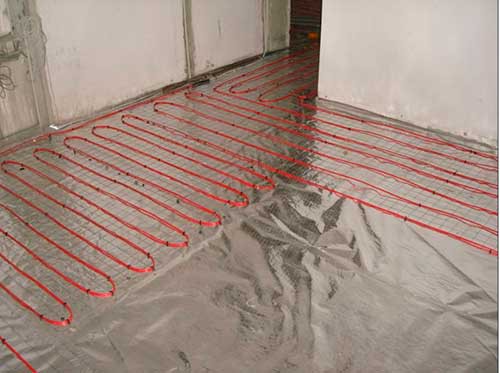
- Installation of a warm floor can be carried out in a layer of screed, after the arrangement of which the floor covering will be laid. This option will be most successful in the case of installing underfloor heating in residential areas, for example, a kitchen and a loggia. It involves the installation of a system based on an electric cable, under which a layer of insulation and waterproofing material is placed. After laying the cable, a small layer of concrete screed is mounted on top of it;
- Underfloor heating can be laid over a layer of concrete screed without additional heat-insulating material. Installation of a warm floor directly into the screed is possible only if there is an insulated living space on the floor below. This is due to the fact that ceramic tiles and a layer of tile adhesive will be able to provide proper protection to the heating elements without the use of additional materials;
- Laying a warm floor can be carried out directly under the floor covering, however, this method is considered the most suitable in the case of arranging one of the types of electric floor heating - film floors. If you are faced with the need to install a heated floor under the tiles, and you do not have the desire to carry out major work related to replacing the concrete screed, this method will be the most preferable. However, it is important to remember that it involves the installation of a heat-insulating layer, which is used as polyethylene foam with a foil surface, which is laid on top of an existing concrete screed. The next stage is the installation of electric heating elements and, if necessary, the laying of waterproofing materials.
Important! A film floor is a type of underfloor heating that cannot be laid under tiles and mounted in a layer of concrete screed.
Varieties of electric underfloor heating: advantages and disadvantages
Laying an electric floor under a tile can be carried out using an electric cable or heating mats (thermomats). Each of them has its own advantages and disadvantages, which will be discussed below.
- Underfloor heating based on an electric cable is a variety that appeared before anyone else, but still remains relevant and competes with installation methods based on more modern heating elements.
Benefits of underfloor heating based on heating cable:
- Low cost of materials used;
- After a power outage, it retains heat for a certain period of time, which saves electricity.
However, it also has disadvantages:
- If repair of the system is required, difficulties may arise associated with the need to dismantle the concrete screed;
- Difficulties associated with the correct calculation of the length of the conductor;
- If the cable does not fit tightly to the concrete screed or if furniture is placed above its location, there is an increased risk of overheating of the system and its failure;
- Low electrical safety of the system.
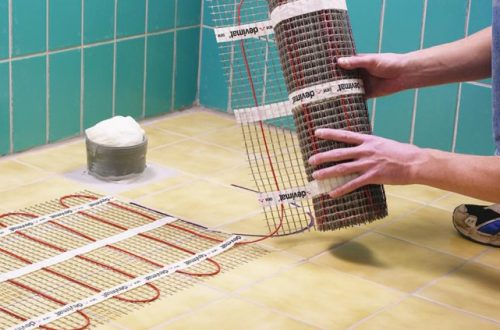
- An improved option for arranging the "warm floor" system is the use of thermomats, which can be both convection and infrared. Convection mats are a more modern version of a heating cable fixed on a mesh base.
Advantages of underfloor heating based on thermomats:
- Facilitated calculation of the required amount of material;
- Smaller thickness of the required concrete screed;
- Less time-consuming installation combined with a more affordable price.
- Disadvantages of the "warm floor" system of this type:
- Difficulties arising in the process of repairing the damaged area;
- Fire hazard, which is characteristic of any type of electrical wiring.
- Installation of a warm floor based on a film coating is another option for arranging a warm floor, during which laying a concrete screed is not allowed.
Advantages of the method:
- Low electricity costs;
- In the process of laying the film coating, specialized professional skills are not required;
- No need for complex preparatory work;
- Can be used for arranging underfloor heating.
Disadvantages of the method:
- The high cost of the materials used;
- The need to equip a waterproofing layer, due to the low moisture resistance of the film coating;
- Higher fire hazard associated with the lack of a fire-resistant concrete screed;
- High risk of damage when exposed to mechanical loads;
- Instant cooling after disconnection from the network.
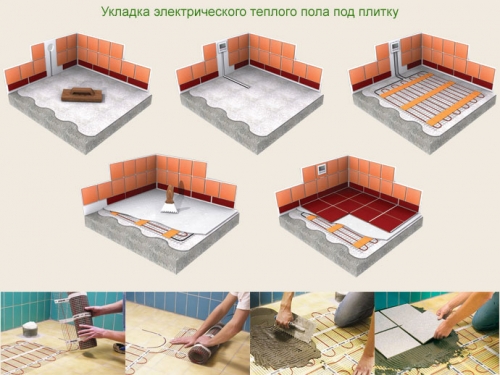
Installation of a warm floor under a tile: step by step instructions

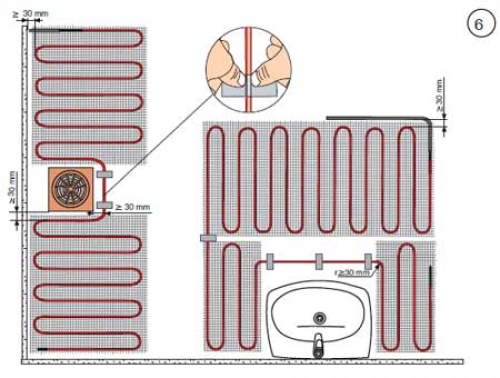
The initial stage of work involves the creation of a warm floor scheme on paper, during which it must be taken into account that the heating elements should not be laid in places where massive furniture and household appliances are placed. In places where pipes and other heating devices are located, it is necessary to organize a buffer system, which implies the absence of floor heating elements. This is due to the peculiarities of electric heating systems, the heating elements of which, unlike hydraulic systems, are heated in the same way and, if there are obstacles to the release of heat in the form of furniture without legs, the elements of the system will overheat from the outside with its subsequent failure. Furniture can also overheat and fail.
As a result of the development of a scheme for laying underfloor heating under tiles, reviews of which can be read on specialized construction forums, an incorrect figure is obtained, inscribed in a rectangle depicting a room. The contour of this figure is a guideline for laying electric underfloor heating. This feature of the system can subsequently become one of its biggest drawbacks, since rearranging furniture can cause breakdowns in the "warm floor" system.
Important! If you plan to install underfloor heating in several rooms, you need to take care of organizing several heating circuits with separate regulators and a power source (even if the delimitation of rooms is symbolic). In the process of pouring a concrete screed, if any, a damper tape is laid between the heating circuits on the floor surface.
Before proceeding with the calculation work, drawing up a diagram of a warm floor, consider the step of laying an electric cable or heating mats. In doing so, try to focus on the following recommendations:
- It is necessary to retreat at least 10 cm from the walls;
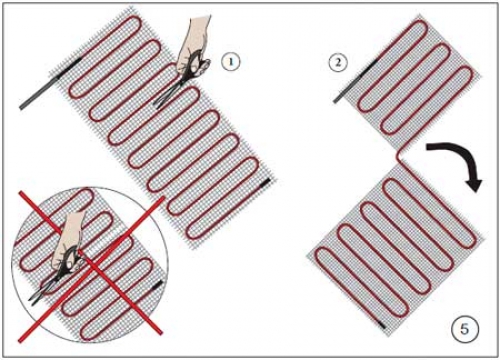
- If the configuration of your room does not allow you to lay the heating elements in a straight line, you can cut the mesh, which will allow it to bend in the correct direction. Using this installation option, you can reduce energy consumption and create accents on the necessary heating areas.
Calculation of materials for the installation of the "warm floor" system
If you decide to install a heated floor under a tile, the price of which can be roughly calculated already at this stage of installation, and use it as the main source of heating, calculate the materials, taking into account that 1 sq. m of surface needs a heater with a power of at least 140-180 watts. If the underfloor heating under the tiles is used as an auxiliary source of heating, the power of the heating devices should be no more than 140 W and, on average, does not exceed 80 W, provided that the building is well-insulated.
To calculate the required amount of materials, it is enough to calculate the area of \u200b\u200bthe room (length x width) and subtract the area of \u200b\u200bthe room occupied by furniture without legs and household appliances from the resulting value. As a result of these calculations, the area to be heated should be obtained. Next, determine the total power of the heating element and its length. Remember that the linear power of one meter of heating cable can vary from 16 to 21 W/m.
For example! The area of the room is 10 square meters. m., and the power of the heating cable you use is 100 W / kV m. As a result, the calculated power is 1 kW. If the power of the selected cable is 20 W/m, its length must be 50 m (1000/20).
The choice of a heating mat is carried out according to the same principle, taking into account the usable area and the required power. In addition, you need to purchase a mounting tape that will be used to attach the heating elements to the concrete screed.
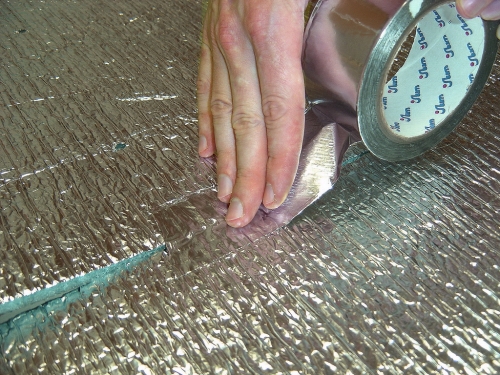
Surface preparation: features of the choice of insulation
First of all, the old layer of concrete screed is dismantled to the base, followed by surface cleaning. Next, waterproofing materials are laid, which should go onto the wall by at least 10 cm. A damper tape is fixed along the perimeter of the floor on the wall, the use of which will compensate for the thermal expansion of the floor during the heating process. At the end of these activities, cut off excess waterproofing and damper tape.
To ensure that during the operation of a warm floor, thermal energy does not go down, insulate the base of the floor. The choice of thermal insulation material depends on the location of the room in which the installation is carried out, the type of flooring and the target orientation of the heating system.
- If the "warm floor" system is used as a secondary source of heating, polyethylene foam, characterized by a reflective foil coating, will successfully cope with the function of a heat-insulating material;
- If a heated room is located on the floor below, expanded polystyrene or extruded polystyrene foam with a thickness of 20 to 50 mm can be used as a heat insulator;
- If the installation of a warm floor is carried out in a room that has not previously been heated (veranda or loggia), care must be taken to form a more solid heat-insulating layer, the thickness of which can reach 1000 mm. The material can be expanded polystyrene or mineral wool of similar thickness.
A reinforcing mesh is laid on top of the insulation layer. Theoretically, you can do without a reinforcing mesh, but in this case you will have to add microfiber or plasticizer to the solution.
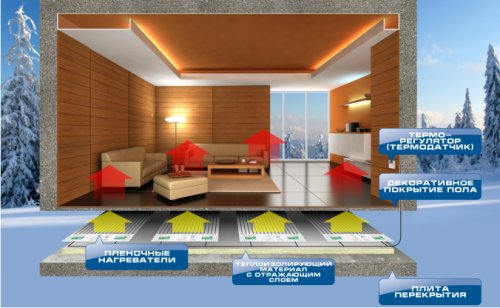
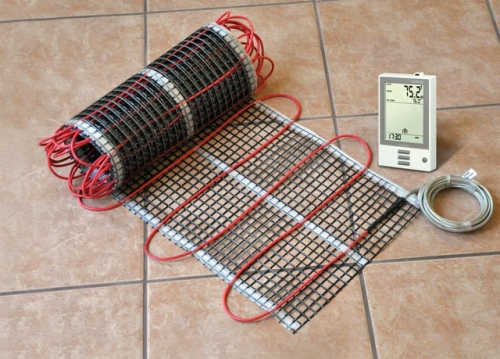
Installation of the temperature sensor and control check of the heater
In order to monitor and control the system during the operation of the underfloor heating, it is necessary to install a temperature sensor and a special thermostat, which is an electronic or mechanical regulator designed to set the optimum temperature and turn the system on / off. It is mounted in the wall, in close proximity to the sockets, while the temperature sensor is mounted on the floor. To carry out the installation, a special strobe is created in the wall from the thermostat, which is brought to the ceiling in a vertical direction. The sensor is placed in a corrugated pipe and led under the tile to the temperature control point of the electric underfloor heating, which is the middle between two turns of the cable. The corrugated pipe will protect the sensor from damage and, at the same time, provides free access to it at any time, for example, in case of need for repair. The end of the corrugation, which is in the screed, is filled with sealant to prevent the solution from entering the corrugation.
Immediately before laying the electric cable or heating mats, its resistance is measured, the final result of which should not differ from the declared passport data by more than 10%. To do this, use a multimeter, which will also allow you to determine the phase in the absence of color marking of wires. If the measured resistance corresponds to the declared values, you can proceed with the installation of a warm floor under the tile.
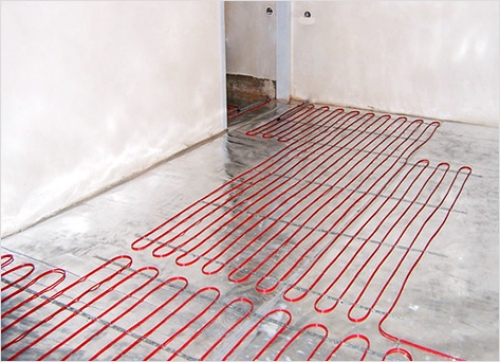
Fixing the heating cable or thermomats
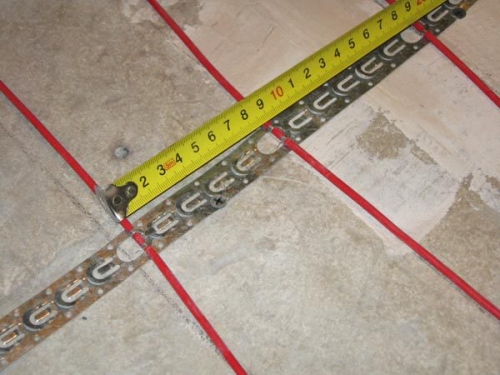
After preparing the surface, proceed to fixing the heating element. If you use an electric cable as a heating element, which must be fixed with mounting tape, as shown in the photo.
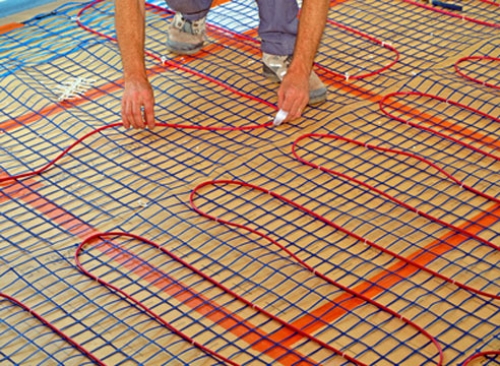
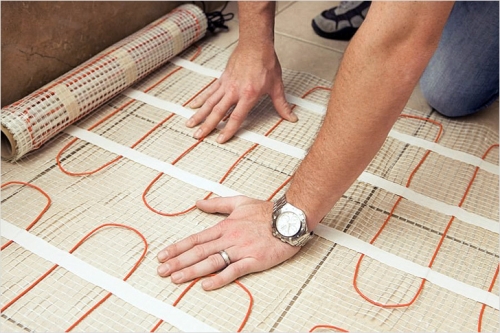
To facilitate the process of attaching the cable, use plastic clamps that simplify the installation process. In order for the heating to be uniform, it is necessary to ensure that the distance between the turns of the cable is the same over the entire floor area. In the case of laying heating mats, you do not need to monitor the distance between the turns, since it is already maintained along the entire length. When using heating mats, it is enough to spread the material in accordance with the diagram and connect to the thermostat.
After completing the cable installation, check the connection by measuring the resistance using a multimeter. The resulting value should match what you measured before laying.
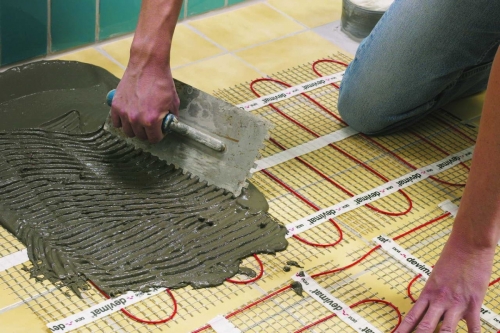
Pouring concrete screed and laying ceramic tiles
For the preparation of concrete mortar, use materials in accordance with the proportions indicated below:
- 1 part cement;
- 4 parts of sand;
- 5 pieces of crushed stone;
- 0.6 parts of water;
- 1% by weight of cement - a plasticizer that gives elasticity to the concrete mortar.
Important! The amount of water should be small, which will prevent the appearance of cracks in the concrete screed. Expanded clay and perlite must not be added to the concrete solution, since the use of these materials contributes to the disruption of heat transfer, which causes system breakdowns.
The thickness of the concrete screed layer should not exceed 3-5 cm. After pouring the concrete screed, wait until the solution has completely solidified. Despite the fact that the initial hardening will occur after 2 days, it is recommended to turn on the electric floor heating no earlier than 4 weeks later, when the final solidification of the solution occurs.
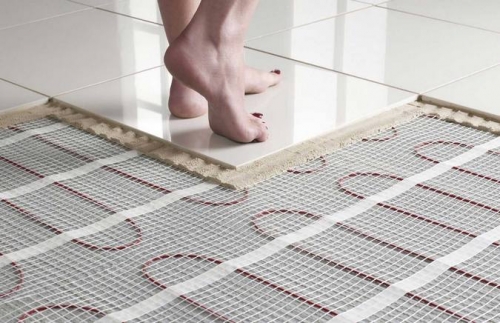
Important! The installation of a concrete screed is only necessary if an electrical cable is used, while the heating mats themselves are the basis for tile adhesive.
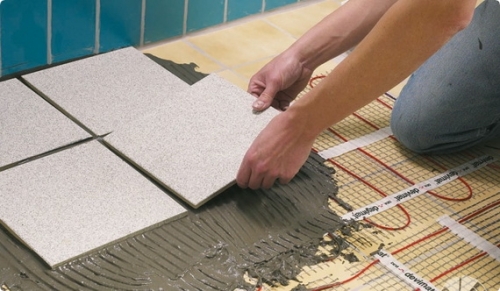
After the initial setting of the screed, proceed to finish the floor with ceramic tiles.
Warm floor under the tile video