Features of the design of the shower drain in the floor under the tile
Many of us today prefer to dismantle the tub bowl and install a shower stall. It helps in the morning to wash quickly and go to work, and in the evening to relax, standing in the shower. In order for the cubicle to work well, it is important to correctly install the shower drain in the floor under the tiles. Its function is to collect and drain waste water. You can install such an important element on your own if you study the following instructions in detail.
Why are shower drains installed under the tile? It refers to plumbing devices that provide a drain of sewer communications. But their functions do not end there. They are helping:
- Prevent blockages. The extremely simple design of the shower device ensures that the used water is filtered and retains large particles. A conventional shower device with a dry shutter allows periodic cleaning of the plumbing unit.
- The sanitary shower drain provides a hermetic connection between the structure and the floor covering.
- Such a device prevents the penetration of an unpleasant sewer odor into the room.
The described element is made of plastic and metal parts made of stainless steel. The shape of the shower drain can be oval, square or rectangular. The form of the structure determines the scope of the described element. So, for example, a point element can be laid on the floor at any point on the surface. A simple linear drain and wall floor element is installed in the corner of the described room.
Modern manufacturers offer a line in which there are all types of the described products. Among them, there are samples that are simple in design, and complex designs with a cascade of valves, dry and wet. There are certain performance standards. They are determined by the height of the ladders. It is this indicator that is taken into account when choosing and buying ladders. The height of the ladder is selected taking into account the height of the floor screed. The following photo shows how the two indicated indicators correlate.
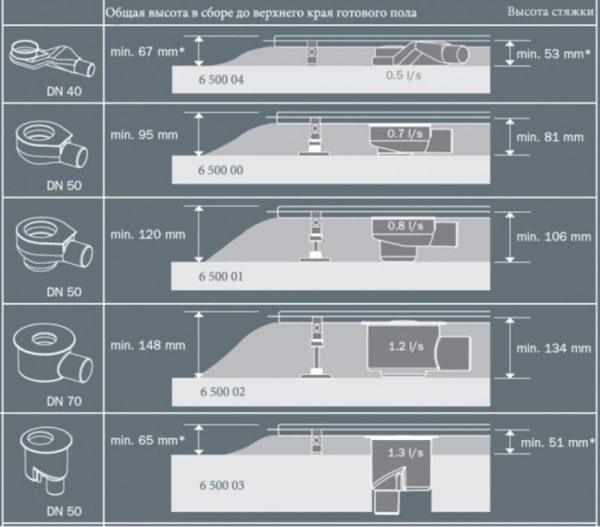
Note! On sale there are samples with a design that allows you to adjust the height of the described product. This circumstance greatly facilitates the process of installing a shower cabin with a ladder.
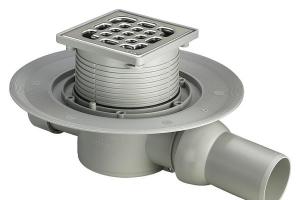
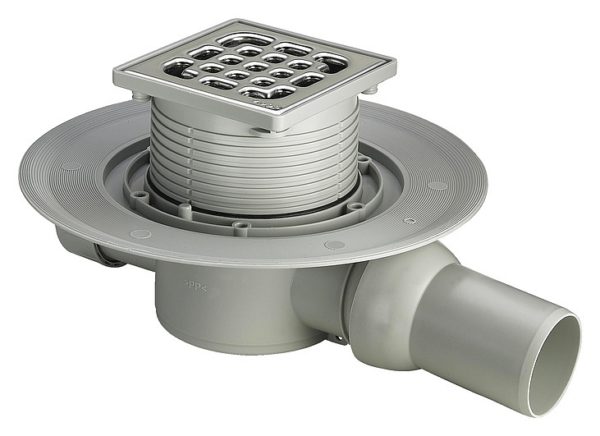
The photo shows that outwardly the shower drain looks like a funnel. On the one hand, it has a fixing flange, on the other, it has outlets. There are designs in which releases are single and through. Pass-throughs are used if not only a shower stall, but also other plumbing fixtures are connected to the drain.
Each ladder has a special coupling mounted at the end. It is designed for hermetic connection of the described element with the outlet sewer pipeline. Inside any ladder there is a siphon equipped with a filter grate.
When buying products, you must immediately purchase a complete plumbing unit and make sure that its dimensions correspond to the dimensions of the sewer pipes. Each item must not have any damage.
What are the advantages of a shower cabin with a built-in drain?
You can equip the drain in the bathroom with the help of different devices. Interest in such devices is explained by the fact that today many people prefer to give up bathrooms, but they are not ready to buy ready-made cabins with all the necessary equipment and expensive electronics.
![]()
It is easy to assemble the cabin yourself. What is she like? Hose with shower, plastic sliding doors, tiled floor and connected communications. It should be carried out when laying tiles in the bathroom. It is at this time that you need to lay the ladder for the shower.
Note! If it is correct to immediately lay the floor tiles with a slope and ensure the outflow of water into the installed drain device, it will not be necessary to install restrictive sides in the booth. Water will not flow outside the equipped cabin.
Why is a cabin with a shower drain more and more often began to appear in typical city apartments? It is quite easy to explain the popularity of such a solution.
- The described design allows you to equip a bathing booth of different sizes, different configurations.
- This design can be installed in rooms of non-standard sizes.
- With the help of a self-assembled cubicle, it is easy to create your own unique bathroom design.
- Inside the spacious cabin is comfortable for older people to swim.
There is one indisputable advantage of installing a ladder. If necessary, it is able to provide emergency drainage of water. If an open faucet was accidentally left in the bathroom, it will not cause flooding of the neighbors' apartment from below. Water under the action of natural forces will rush to the ladder, and go through it into the sewer pipe.
Installation Features
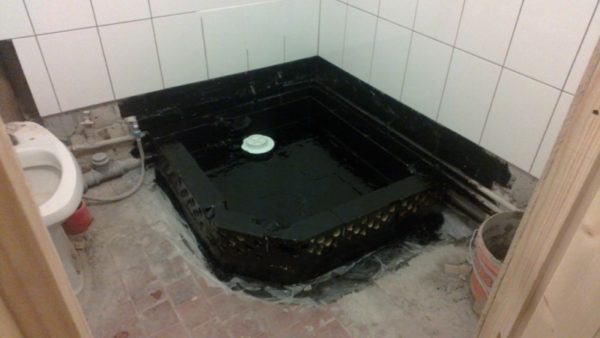
So, describing the stages of installation of a ladder for a shower stall, it is necessary to recall once again that its installation must be carried out at the stage of laying sewer pipes. At the same time, the floor is being prepared. In order to get a complete picture of the upcoming work, you need to study the following photo in detail.
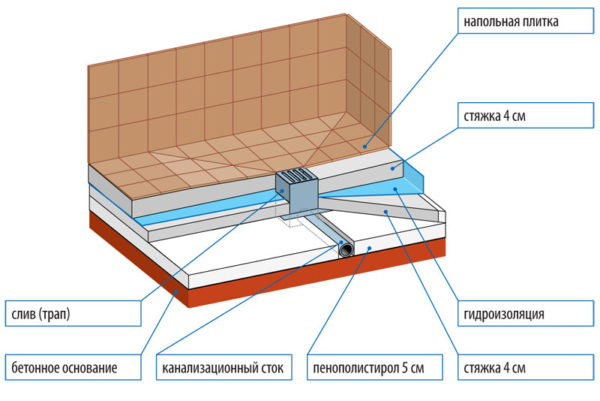
It becomes clear from it that the sewer pipe must pass through a layer of insulation, it captures both two layers of screed and a layer of waterproofing. And only the upper decorative strip is above the surface of the ceramic cladding. Now we will describe in more detail how best to assemble such a pie.
Preparatory stage
Work on the installation of the ladder must begin with the selection of the necessary tools. Since they run parallel to the preparation of the floor, there should be trowels, a building level, a tape measure, and a marker at hand. The list of required materials will be much longer. We will need:
- Sheet expanded polystyrene (for thermal insulation).
- Dry cement-sand mixture (for screed).
- Waterproofing membrane (and mastic to it).
- Plastic pipes with all accessories.
- Floor tiles with anti-slip coating (and tile adhesive to it).
- Fugue for finishing grouting.
Note! When buying a ladder for a shower stall, it is better to give preference to standard models, those products that can easily withstand the weight of a ton, as well as exposure to temperatures from +80 degrees and above.
Drain assembly
To install a drain drain, you must first mount the sewer drain. It is assembled using a plumbing pipe, the diameter of which is 40 or 50 mm. Such pipes, as a rule, have a gray color. In the configuration there are siphons that allow you to connect two or more branch pipes.
The drain drain connection algorithm is as follows:
First, the floor is waterproofed. To do this, the joints of the walls, all corners and the floor are treated with waterproofing mastic. It is desirable to carry out a similar procedure after each stacked layer of the cake. Such a move will help eliminate the possibility of moisture penetration into the lower layers, the accumulation of water and the appearance of mold.
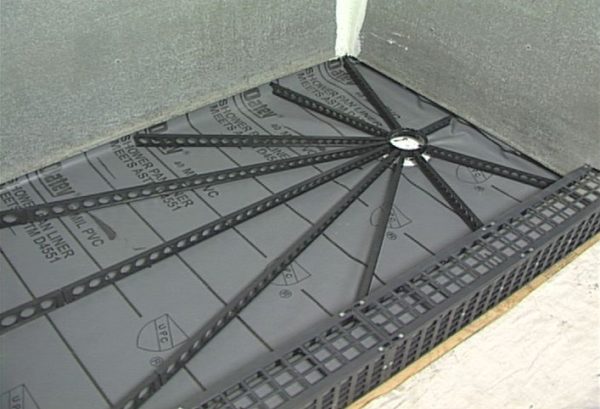
Note! It is rather laborious to independently carry out all the stages of work, which will be described below. Ready-made drain drain systems help to facilitate the task. They are shown in the next photo. The design of the finished systems consists of metal rails. Their thickness gradually decreases as they approach the drain hole. With the help of a ready-made system, it is much easier to control the slope of the drain.
If you do not buy a ready-made system for installing a drain device, you will need to make a number of calculations. To do this, you need to find the place where the pipe is inserted into the sewer pipe. Draw a line from it to the installation site of the ladder. It is important to make sure that the described product is on the edge of the tile. It is better to immediately purchase a ladder, the size of which will match the size of the tiles used for flooring. Then the described element is simply replaced by one module. If a rectangular tile or large tile is chosen for flooring, the drain product must be installed at the junction of two or four modules.
Note! Recently, trays have appeared on sale - long decorative lattices that are installed along the wall opposite the front door of the booth. But it is better to install square counterparts exactly in the middle of the booth.
Any drain element has a tap. At the beginning of the work, he crashes into a sewer pipe. The connection points are treated with silicone sealant. After that, you can lay heat-insulating material on the floor. Previously, holes are cut out in the expanded polystyrene sheet, into which the contours of all pipelines are then inserted.
Please note that if it is not necessary to insulate the floor in the bathroom, a cement-sand screed is immediately mounted on the waterproofing layer. In this case, all engineering nodes will be immured in it.
How to make a screed with a slope?
A damper tape is attached around the entire perimeter of the walls. It will serve as expansion joints when the screed begins to dry. If a multilayer cake is mounted, it is necessary to choose a tape 15 cm wide, if there is a need to abandon the insulation and make a single-layer screed, you can buy a tape 10 cm wide. To simplify the process, it is better to purchase a tape with a self-adhesive base.
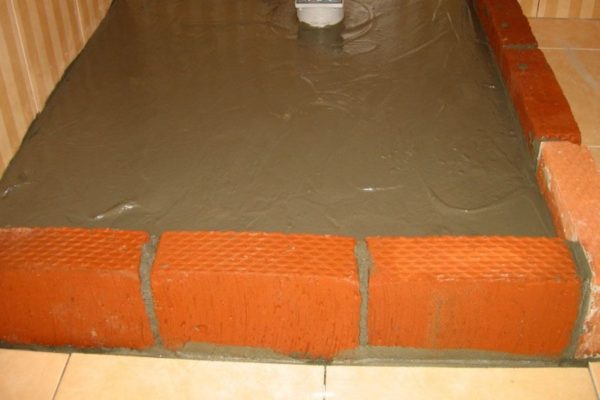
After the tape is glued, the pouring of concrete will come to the fore. The solution is prepared from sand and cement. The screed is laid in such a way that it covers the entire drain except for its flange tiles.
To ensure draining, the screed must be made with a slope. In order to form it, you need to take the rule. If the drain is located in the center of the bathroom, all edges of the screed must be raised by 5 mm. How to do this, the following photo will clearly show.
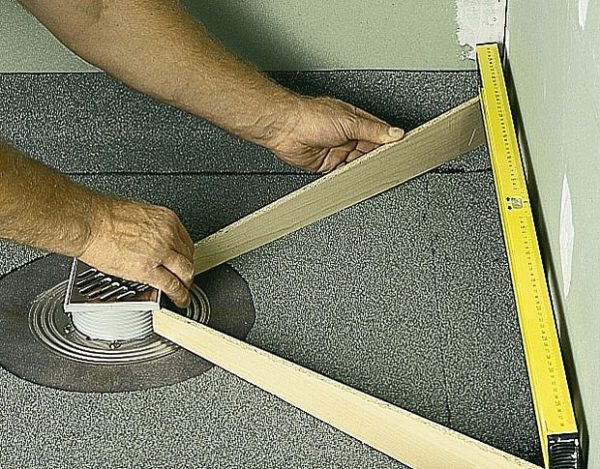
From the rule to the ladder, wooden beacons are installed, their width at the wall is greater than the width of the faces located at the drain. The slope is considered correct if the slope is carried out according to the scheme of one centimeter per one meter of floor area. If the drain is mounted against a wall, the slope is only towards it.
And again waterproofing the floor and building a screed
After the screed has dried, it is necessary to waterproof the floor. A membrane is first laid on top of the concrete for this purpose. A hole is made in it for the ladder. Bitumen-polymer mastic is smeared over the membrane. Not only the floor is processed, but also the joints of the walls, corners and the lower part of the wall (about 15 cm). Layer of mastic -3 cm.
After that, a siphon with a decorative grille is screwed to the body of the ladder structure. Between them, a rubber sealing ring immediately fits. After the waterproofing mastic is completely dry, another layer of screed is poured on top. It can be thin, only 2-3 cm. In order for a thin cement screed not to crack during drying, it is important to moisten and level it as it dries, using a grater. At this time, you can remove the wooden guides, the grooves remaining from them are laid with cement mortar.
If plastic guides were used as beacons, they can not be removed and left in the screed. After the cement base dries, the finishing stage begins - laying the tiles.
Generalization on the topic
Assembling your own shower stall is easy. Its heart will be a drain hole in the floor; for its arrangement, a ladder is most often used - a device whose design plays the role of a siphon. In order to install it, it is necessary to prepare the base: insulate the floor, make a screed and waterproof the base. The safety of operation of the booth depends on the accuracy of reproduction of such works.