Do-it-yourself installation of a warm floor under a tile
The popularity of underfloor heating as an alternative or addition to central heating is difficult to overestimate. The main advantages include the comfort of the inhabitants, ease of use and time to heat the room. This system is not as complicated as it seems at first glance, and it is quite possible to cope with the installation yourself.
The main rooms where it is recommended to lay underfloor heating are the bathroom, children's and bedroom, kitchen, hallway. The principle of operation is the same everywhere. The main difference in work lies in the features of the selected system - electric or water.
Before you start work, you need to understand the nuances of work, the sequence of actions and installation of each type of underfloor heating.
Preparatory stage
This set of works is aimed at preparing the subfloor for underfloor heating and subsequent laying of tiles. In general, all surfaces can be divided into 2 groups - concrete and wood. The preparation of each of them has its own characteristics.
Video 1 We make the base of the warm floor
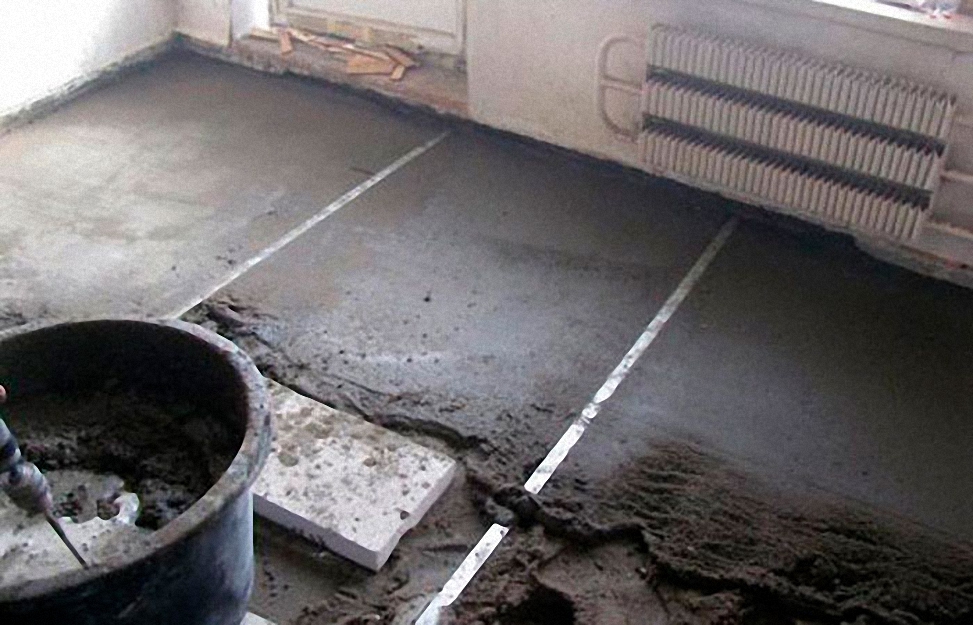
concrete base
The simplest and therefore affordable way is to pour a concrete screed, which is sold in hardware stores. It is enough to dilute the already prepared dry mixture with water according to the instructions.
For mixing, use a construction mixer. In the absence of an ordinary drill, insert a broom into the drill chuck for knocking down.
Such mixtures are resistant to high temperatures, and therefore do not crack even after several years of operation.
After the concrete screed dries, it will need to lay the substrate. This material is made of expanded polystyrene, inside of which a metallized layer (screen) is laid, and then closed in several layers with a film.
In principle, the substrate can be replaced with foamed polyethylene or polystyrene - in any case, the main task of such a material is to compensate for the expansion of the screed on the sides. If this is not done, the screed will begin to rise from the heat and “take away” the tile with it. After 3-5 years, you will have to redo the floors again.
More preferable is a different way of laying layers under a warm floor, where first a waterproofing (polyethylene film) is laid on the floor surface, then a screed, and then a heater.
If the waterproofing is not laid in one sheet, but in pieces, overlap at least 5-8 cm at the junction and glue it with wide adhesive tape.
wooden base
The procedure in this case depends on how smooth and solid the floors are. If the surface is absolutely flat, you can use chipboard sheets with grooves already cut for the pipe structure. This material acts simultaneously as a vapor and water insulator and no additional materials are required.
If there are some errors on the surface (level difference or significant defects), then you will have to use a separate vapor barrier to neutralize the effects of air vapor and waterproofing.
The vapor barrier - foil or gas-filled polyethylene foam - is always placed in the interlag space. Next, the vapor barrier is closed with boards and after that a plastic film is already applied for waterproofing.
The allowable difference in the level of the "black" floor is 5 mm.
After carrying out the preparatory work around the perimeter of the entire room, be sure to lay the damper tape, which will prevent cracking of the concrete screed. Its height is calculated in such a way that after laying the entire system there is a gap of at least 3 cm. After the installation is completed, simply cut off the excess with a construction knife.
Instead of a tape, it is quite possible to use foam, the essence of which will be the same. In any case, the entire perimeter must be closed.
Installation of a warm floor
This step is different for each individual case. To begin with, we note that all floors are divided into 2 main groups:
- water;
- electrical.
In turn, electrical are divided into:
- convection;
- infrared.
Infrared floors are a more preferable option, since they provide uniform heating of the entire floor surface, while in convection, as you move away from the heating element, the temperature of the coolant is lost.
Video 2 Installation of a warm floor under a tile
In addition, electric floors differ in the method of execution, namely:
- using electric heating cable;
- electric heating mat;
- film floors.
Let's start the description of the installation stage with a water floor that has already become traditional, although there are much more problems with it than with an electric one.
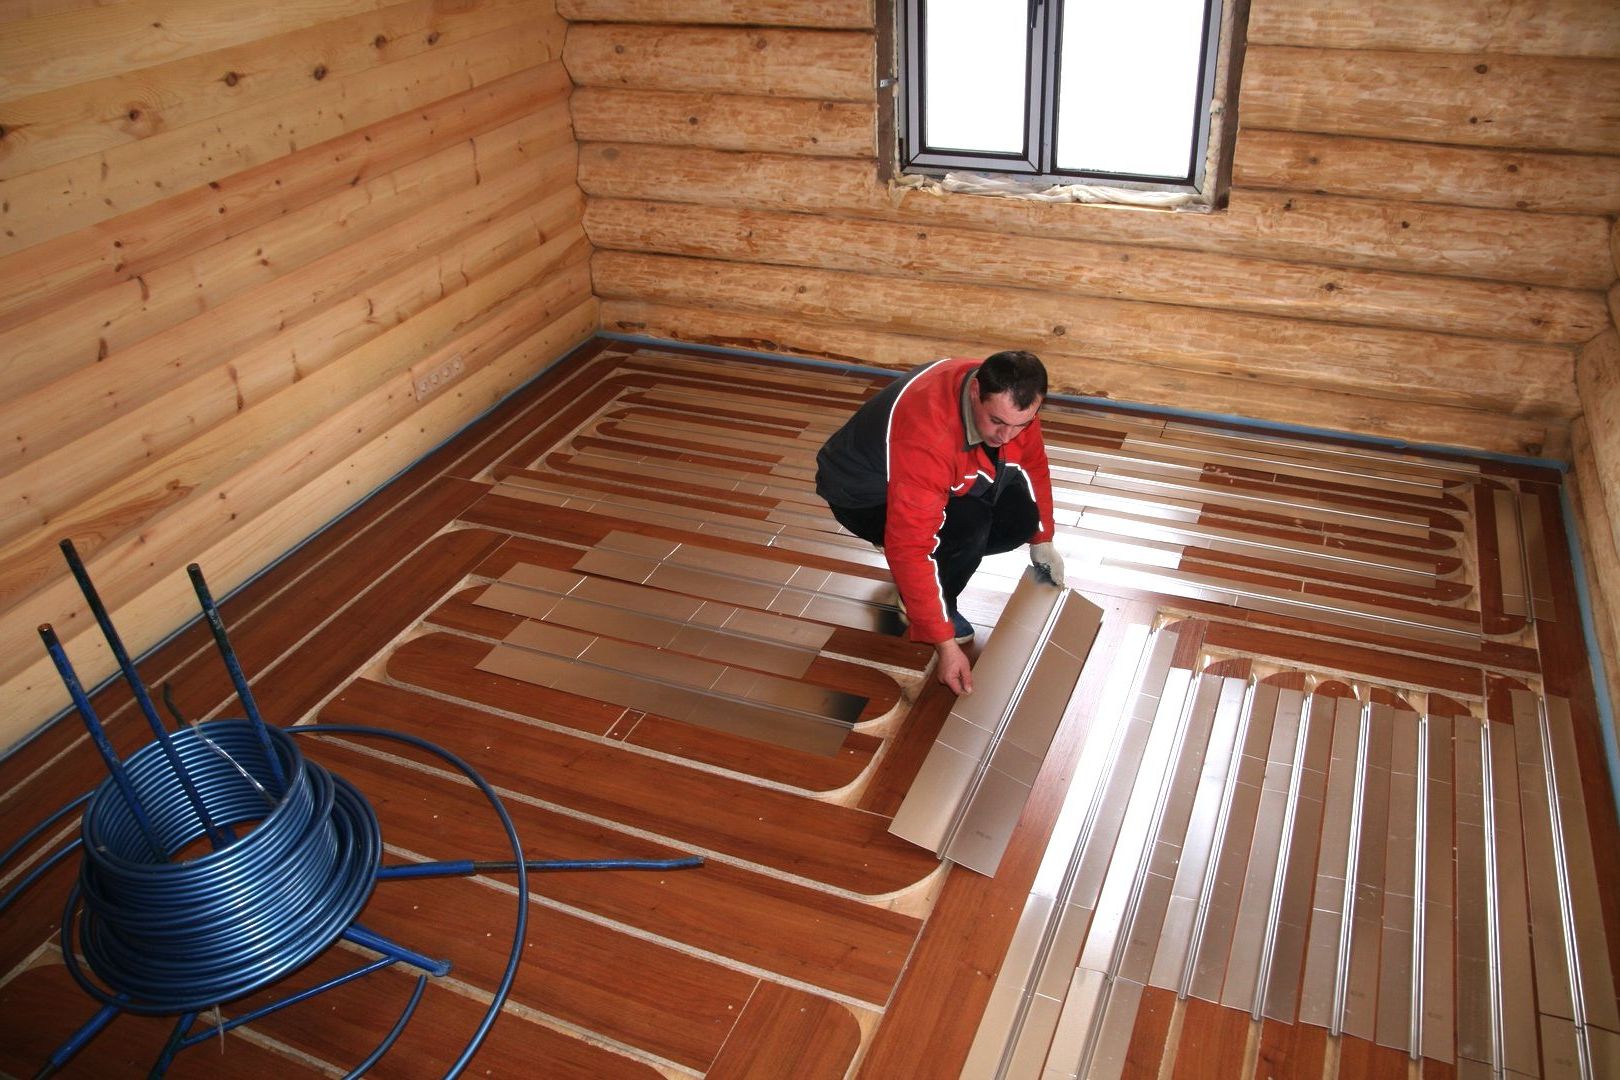
Water floor installation
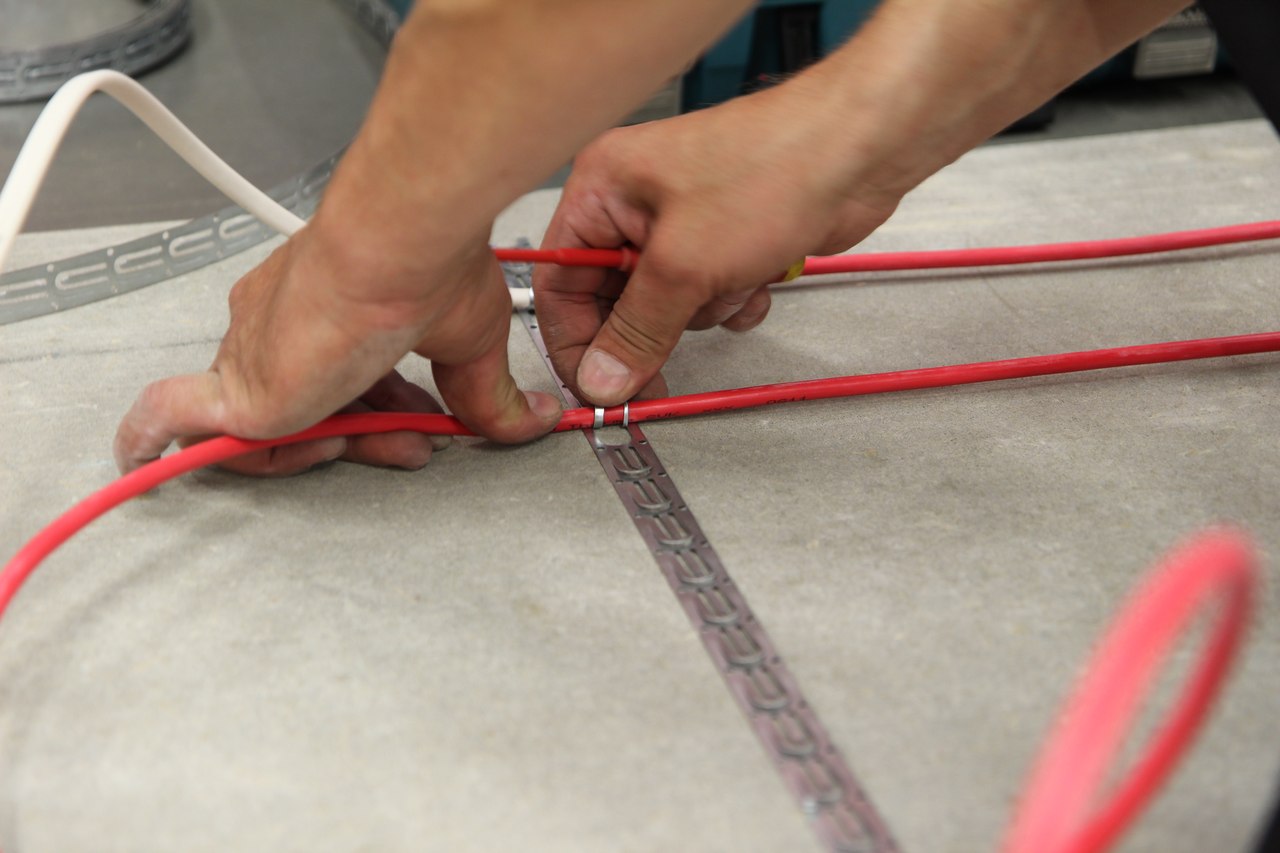
The main difficulty that arises with this system is how to attach the pipes to the already prepared base.
Initially, you decide on the laying scheme:
- serpentine (double serpentine);
- spiral (double spiral).
After you have decided on the scheme, choose the method of attaching the pipes to the base. There are three main options, of which the simplest is the last.
- pipes laid and fixed around the perimeter of the metal mesh are fixed with clips, clamps or pieces of flexible wire;
- screw the guides to the floor with self-tapping screws, and already attach the pipeline to them separately;
- polystyrene foam panels with cut protrusions are laid on the floor, between which pipes are laid;
- tape attached pipes directly to the floor.
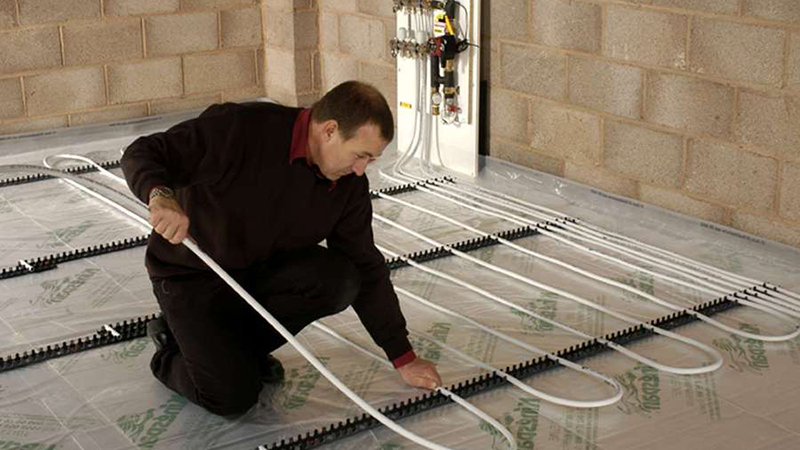
Photo 4 The process of installing a water floor
Installation of electric heating cable
To call the process of laying an electric heating cable simple means to say nothing. Here you do not need to think over the schemes, look for where, how and how to fix the cable, think over the system of vapor and waterproofing. Not at all. It is enough to attach the cable to the floor with ordinary adhesive tape or adhesive tape and that's it. Some masters begin to be wiser and fasten clamps with self-tapping screws - this is all superfluous. Adhesive tape is no worse and does not affect either the temperature or the service life.
The electric heating cable under the tiles does not need to be waterproofed.
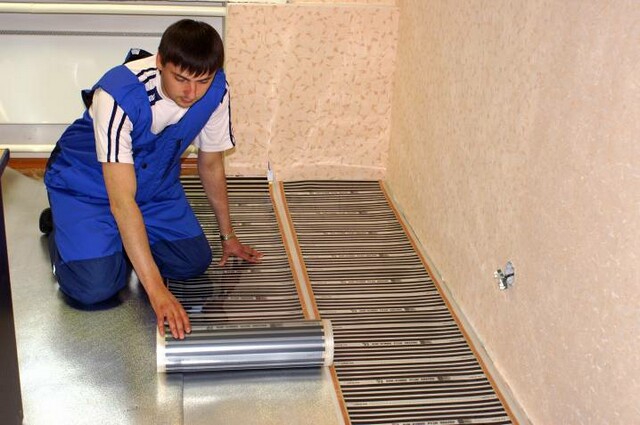
Alternatively, you can purchase electric heating mats, which are laid out on a prepared surface and, if necessary, trimmed. In this case, it is necessary to connect the strips in series with each other.
Electric heating mats for tiles do not need to be waterproofed.
Installation of IR floor heating
An equally simple laying operation, which differs in that you need to decide how to lay the flexible panels - in parallel or in series. Experts recommend laying in parallel, as it allows the entire system to work even if one fragment fails.
IR warm floor must be waterproofed with a polyethylene film before laying ceramic tiles.
Preparing for laying tiles
Difficulties and additional expenses arise only with a water floor, which, after installation, must be filled with a screed for underfloor heating. It is also a ready-made dry mix that will need to be diluted with water.
Laying tiles is possible only after 2-3 days, when the screed is completely dry. Otherwise, when it dries, it will pull the tile along with it.
No screed is needed on electric heating cable, mats or IR floors. Moreover, it completely neutralizes the operation of the system!
The tile is laid on the cable or mat without any preparation. One condition is to use tile adhesive. Some tile makers use cement mortar, but this is an overkill that will reduce the thermal effect.
Infrared floors must be covered with waterproofing (polyethylene film), after which ceramic tiles are laid on tile adhesive.
Video 3 Preparation of underfloor heating and tiling
Features and secrets of each stage
Using optional equipment
To control the heating temperature, be sure to mount a collector. According to the principle of operation, it is a pipe wiring, where two different-temperature heat carriers are mixed - from the supply and return circuits. This is due to the limitation of the temperature for the warm floor, which should not exceed 50 0 C, despite the fact that the coolant leaving the boiler exceeds this threshold by at least 40 0 C.
Simultaneously with laying, a temperature sensor and a thermostat are mounted. The sensor fits into the floor directly with a branch, and the thermostat - on the wall.
Location scheme and laying area
Even before you start installation, you need to carefully consider the installation scheme. Firstly, a warm floor is not needed in those places where furniture is installed. And although some experts say that water-heated floors can be laid under a wardrobe or beds, this is not necessary, in addition to the fact that additional pipes and insulating materials will be required.
The issue of installing underfloor heating near heating radiators is still open. More rational is a distance of 15-20 cm from the radiator, since in this place the floor receives heat from it, and regardless of the material from which the radiators are made. More details can be found in the corresponding article.
Checking the system for defects
After the installation is done, but the screed and, especially, the tiles are not laid, it is necessary to check the system for operability.
Run water heated floors and let them work for at least 30-40 minutes. Check over the entire area of the pipe for leaks, whether heating is uniform everywhere.
The same applies to the electrical system, which you check at the time of operation of all sections.
At a price, a water-heated floor is slightly lower than an electric one, but the difference in price cannot be called fundamental. At the same time, water heated floors are difficult not only to lay, but also to operate. The fact is that such a system works according to convection types, respectively, the distribution of heat will never be uniform. Closer to the point of supply, the temperature will always be higher, the farther from it, the lower. If we are talking about small rooms - a bathroom or a kitchen, the difference in temperature difference may not be noticed - the area is small enough, so the coolant will not even have time to cool down. But in large rooms, such a difference can even be critical, which will not fully give the level of comfort that is expected from using the system.
Video 4 The process of laying tiles on a warm floor from Electrolux
In the event that it is not possible to choose another type, lay out the pipes according to the double helix pattern. In this case, the supply and return pipes run in parallel, respectively, the heating level will be more uniform.