How to competently lay the underfloor heating under the tile - the nuances of the installation process
Underfloor heating is a quality heating solution. Therefore, today more and more often this system appears both in city apartments and in private houses. But here the question arises which of the warm floors offered by manufacturers is better, because they are represented by three positions: water heated floors, electric and infrared. Probably, one cannot say that some option is better, and some is worse, you just need to accurately select the model that will work effectively under the operating conditions. In addition, you will have to take into account the moment that you can install a warm floor only under floor coverings with high thermal conductivity, which include ceramic tiles. Therefore, in this article, only one question will be considered: how the underfloor heating is laid under the tiles.
Of course, all options will be considered in terms of the use of each model. But it is necessary to point out one point - all types of technologies for laying a warm floor under a tile have one identical stage - this is preparation. Let's start with her.
The main requirement for laying a warm floor under a tile is an even and solid base. Therefore, before proceeding to the main installation work, that is, before making a warm floor, it is necessary to level the floor surface.
If it is a concrete floor, then a concrete screed or any leveling mixture (on a cement or polymer basis) must be poured over it. It is clear that the concrete screed will dry longer, but its price is less than that of ready-made leveling mixtures. At the same time, its thickness under the warm floor should not be less than 3 cm, which increases the consumption of the solution, while increasing financial costs.
If the floor is wooden, then it is recommended to level it with board wood materials, for example, plywood, OSB boards, chipboard, and so on. It is better to give preference to inexpensive, but durable products, for example, chipboard, the plates of which are interconnected by a tongue-and-groove lock, which provides a surface without gaps. At the same time, it is optimal if the slabs are laid with an offset, which will ensure an even distribution of loads on the wooden floor itself.
There is another point related to the preparatory stage. This is the insulation of the floor surface, which will reduce heat loss. Since the installation of underfloor heating under tiles is associated with the laying of heating elements on the floor base, care must be taken that the heat emanating from the underfloor heating elements does not pass through this base. Of course, you can guarantee that a wooden floor is immune to this, because wood itself is a good thermal insulator. But when it comes to concrete floors, then you can’t do without a separate heat-insulating layer.
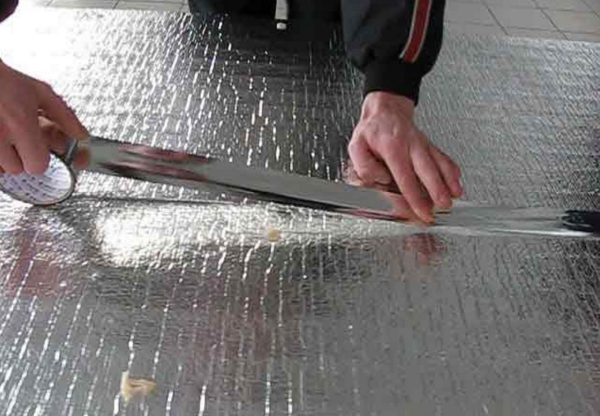
Experts recommend that the thermal insulation layer be made of more than just foam or fibrous material. But, so that it contains a reflective layer that will retain infrared radiation emanating from the elements of the heating structure. Therefore, before installing a warm floor, it is necessary to lay a heater with a foil layer on one side on the floor base. Fortunately, there are a huge number of such today in the modern market of building materials. But here it is necessary to take into account such a moment that this material should not be thick, because the thicker the layers being laid, the lower the height of the ceilings in the rooms. Of all the materials offered, penofol insulation is suitable for this.
So, foil penofol is a roll material made of polyethylene foam with a thickness of 5 mm. For example, its thermal insulation qualities are equal to a mineral wool slab, the thickness of which is 80 mm. Lay the strips of penofol end-to-end, closing the gaps and cracks with aluminum adhesive tape.
Mounting technology
So, before you put a warm floor under the tile, you need to carry out a fairly large amount of preparatory activities. True, doing all this with your own hands is not the biggest problem. Much more difficult to carry out the main process itself. But if you understand everything and understand the scheme of laying a warm floor under a tile with your own hands, then you can get by with small forces without investing a lot of money in the services of professional specialists.
Now you need to deal with each underfloor heating separately. That is, you need to figure out what a device for underfloor heating under a tile is.
Electric floor heating
Currently, manufacturers of warm electric floors offer two types of it. This is a heating cable, as a separate element, and mats. The latter are still the same cable, only installed and fixed on a special polymer mesh. In fact, this is a finished product that you just need to unwind, lay on the floor and make a connection to the power supply. At the same time, the distance between the cable sections of the mats is the same, that is, there is no need to think over the laying scheme with maintaining the required dimensions between the turns.
But there are certain requirements for the electric underfloor heating regarding its installation.
- The heating element must be at a distance of 10 cm from the wall surfaces.
- You can not install a warm floor (electric) under heavy furniture, household appliances and household items.
- If this design is planned to be used as the main heating, then it is necessary to choose heating elements at the rate of 140-180 W per 1 m² of floor area. If the underfloor heating is used as an additional heating system, then low-power structures with a power of up to 140 W / m², for example, 80 W / m², can be laid. The thing is that the main requirement for the heating system is 1 kW of thermal power per 10 m² of surface. And that's not taking heat loss into account.
Now you can proceed to the main stage - how to properly lay a warm floor. So, in addition to the cable or mats, the composition of the electric floor heating also includes a thermostat, with which the temperature regime is set, and a temperature sensor that will monitor that very temperature.
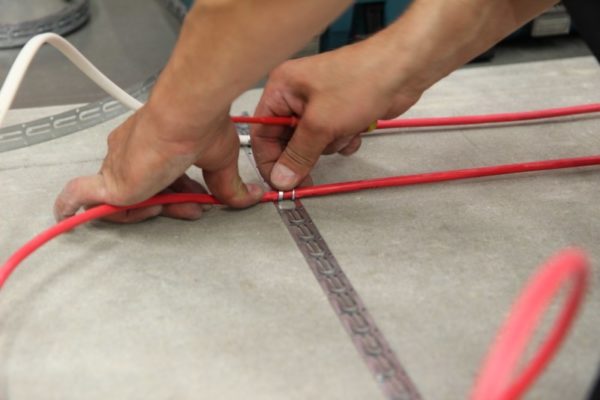
- First of all, the heating cable or mats are laid. The cable is mounted with a snake and fastened to plywood, chipboard or concrete floor using special clamps. Some craftsmen even use construction tape, because the main thing is to fix and mount the circuit, and the fastening will be done with tile adhesive. Mats are evenly distributed on the floor surface, covering the entire floor. Fastening, exactly the same as that of the cable.
- Then a temperature sensor is installed in a special corrugated hose. Its location is on the floor between two turns of cable.
- The thermostat is mounted on the wall at a height of 1.5 m. It is simultaneously connected to both the temperature sensor and the heating element. Ideally - if the connecting wires are hidden in the strobe on the wall.
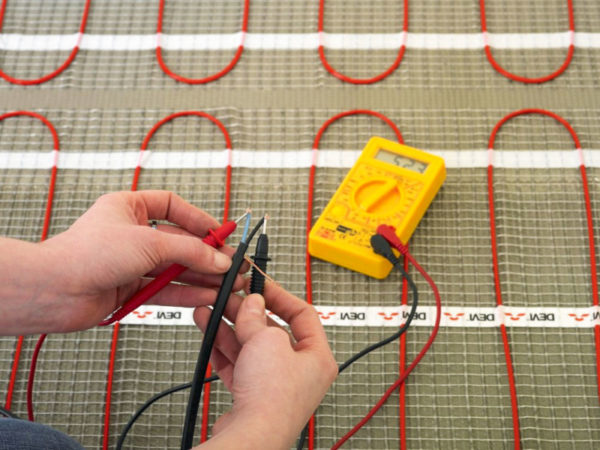
In principle, everything is ready. But before laying tiles on a warm floor, you need to test the latter.
Attention! You can’t plug it into the network, it can immediately burn out. It must be checked for resistance, which is indicated in the passport. The check is carried out with a multimeter, the readings of which during testing must match the passport data. If the deviation was no more than 10%, this is normal.
The laying of tiles on a warm floor with their own hands is carried out according to standard technology. That is, marking is first done, it is better to start the cladding process from the most prominent corner of the room, farthest from the front door. The adhesive composition is applied to the base with warm floors, on which the tile itself is mounted. Be sure to maintain a gap between the tiles with the installation of plastic crosses. And at the end, grout is necessarily applied to the tile to decorate the seams.
Water heated floor
Usually, the installation of a warm floor under a tile (meaning water) is carried out only in private houses. In apartments, this design can be assembled, and even connected to a central heating system, but this undertaking will be very expensive. Yes, and it is not always possible to do this, and even more so, with your own hands, if you are a non-specialist in this matter. Plus, the floor of the high-rise building is a concrete slab, which will have to be not only leveled, but also well insulated, especially for apartments on the ground floor.
Therefore, the thickness of the entire multilayer cake, together with underfloor heating and ceramic tiles, will be at least 10 cm. And this is the minimum indicator that will affect the reduction in ceiling height, which is too significant for city apartments.
As for thermal insulation, much will depend on the material from which the floor itself was built. If it is plywood or chipboard, then it is recommended to use the same foil foam. If this is a concrete base, then polystyrene slabs can be laid on top of the concrete, in which grooves are made for laying pipes for a water-heated floor. In order for infrared radiation to be reflected not towards the floor, but upwards, special aluminum alloy inserts are installed inside the grooves. This option is called the floor method. To date, it is the highest quality and fastest in the installation of underfloor heating.
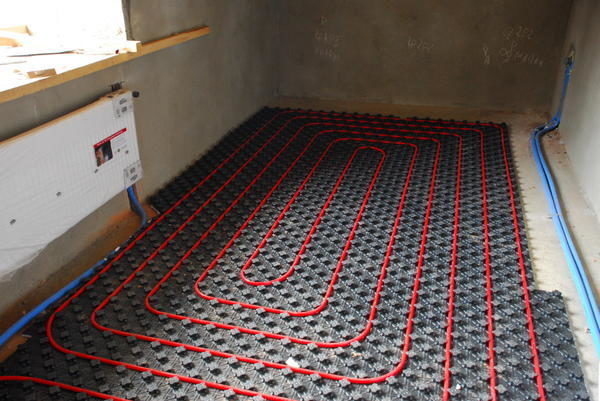
By the way, if the floor is made of plywood or other wood-based panels, flooring technology can also be used. The main thing is to choose the right adhesive composition, with which the expanded polystyrene plates will be attached to plywood or other board materials. More recently, this insulation was attached to surfaces with special mushroom-shaped self-tapping screws made of plastic. In principle, today they can be used, but glue is better. Easier and faster.
After the preparatory stage, you can proceed directly to the assembly of pipes. These are plastic pipes that are connected to each other by fittings using welding technology. They scatter the assembly scheme with a snake or spiral, the ends of which are brought out to the wall, and subsequently connected to the installed collector. The latter itself is connected through pipe wiring to the heating boiler.
Before laying the screed on the underfloor heating system, it is necessary to check the latter. Typically, pressure testing is carried out using the pressure inside the system, which should be 1.5 times the normal pressure. There are two options here:
- Pump up water with a pump.
- Pump in air with a compressor.
The heating system should be in this state for a day, during which defects in the connections will be revealed.
![]()
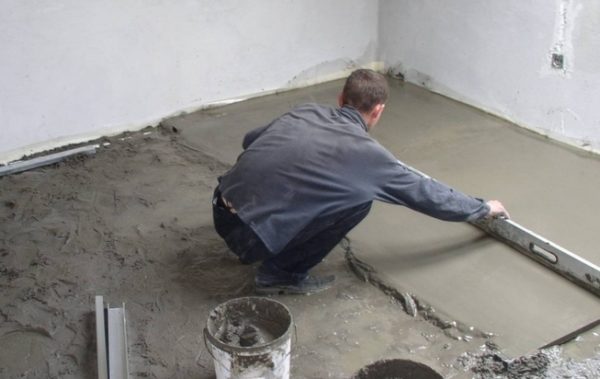
If the pressure test did not reveal any flaws, you can proceed to the screed. This is the question of whether it is possible to lay tiles on pipes. Unfortunately, this layer cannot be dispensed with, because the underfloor heating pipes have a minimum diameter of 20 mm. And this is a large size, which creates large differences in the plane, and they will have to be hidden. And here are two options:
- As a screed, usually use a cement-sand mortar. Economical, but you will have to wait 20-25 days for the laid layer to dry out.
- Self leveling compounds. Expensive, but this material dries for 10 days.
And after this stage, you can lay the tiles on the floor. The technology is the same as with electric underfloor heating. But before laying the tiles, it is recommended to treat the screed with a primer in order to increase the adhesion of the surface.
Conclusion on the topic
The article discussed the topic of how to properly lay a warm floor under the tiles with your own hands. Not the easiest process. Therefore, starting to understand it, it is necessary to take into account all the nuances and rules of all stages. Any incorrectly conducted process will ultimately affect the quality of the final result. For example, even if the screed was incorrectly poured, or the plywood was incorrectly laid, or it was loosely fixed. There are no trifles in this matter, everything is important and important.