Self-installation installation of the toilet bowl
Wall-hung toilets have firmly entered the lives of citizens due to their compactness and interesting appearance. Unlike ordinary specimens, they are not attached to the floor, but to the wall. With this attachment, the tank is hidden, and the connection to the sewer and the drain system are hidden in the toilet installation itself. So, the hinged design of the toilet bowl looks aesthetically pleasing and modern. In addition, it is very reliable and can withstand weights up to 400 kg.
Hanging tank design with installation
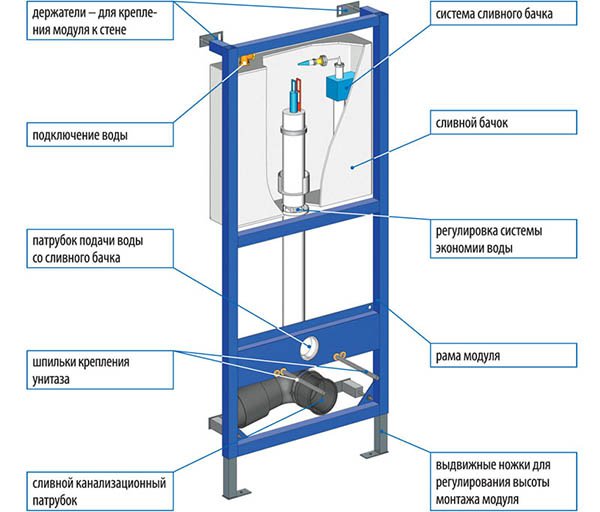
Before considering how to install a hanging toilet with an installation, you should choose it (about the rules), as well as determine the main components of the attachment mechanism.The life of the plumbing device will depend on the quality of the chosen design. In general, the hanging toilet bowl consists of the following parts:
- steel frame;
- toilet bowls;
- tank;
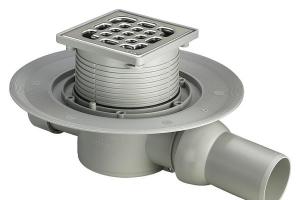
- exhaust pipe;
- sound insulation;
- flush keys;
- fasteners.
The sturdy frame is attached both to the floor and to the wall with special studs. It has rods for adjusting the height of the product. The drain tank of the structure is made of plastic, coated with a coating from condensate. On the front of the tank there is a special cutout in which the drain system is installed.
The choice of location and installation scheme for the toilet
A good location for the device is considered to be an impenetrable place away from the door, so you can choose the far wall. But at the same time, it should be borne in mind that all communications should be near the toilet so that they do not have to be brought across the whole room.As preparatory work, the layout of the location of the future structure is being carried out. On the floor and wall on which the toilet will be mounted, the lines indicate the location of the frame and its connections to the surface. Start marking from the place where the central axis of the device will be located. Finally, you need to mark the mounting points of the installation frame on the wall and floor.
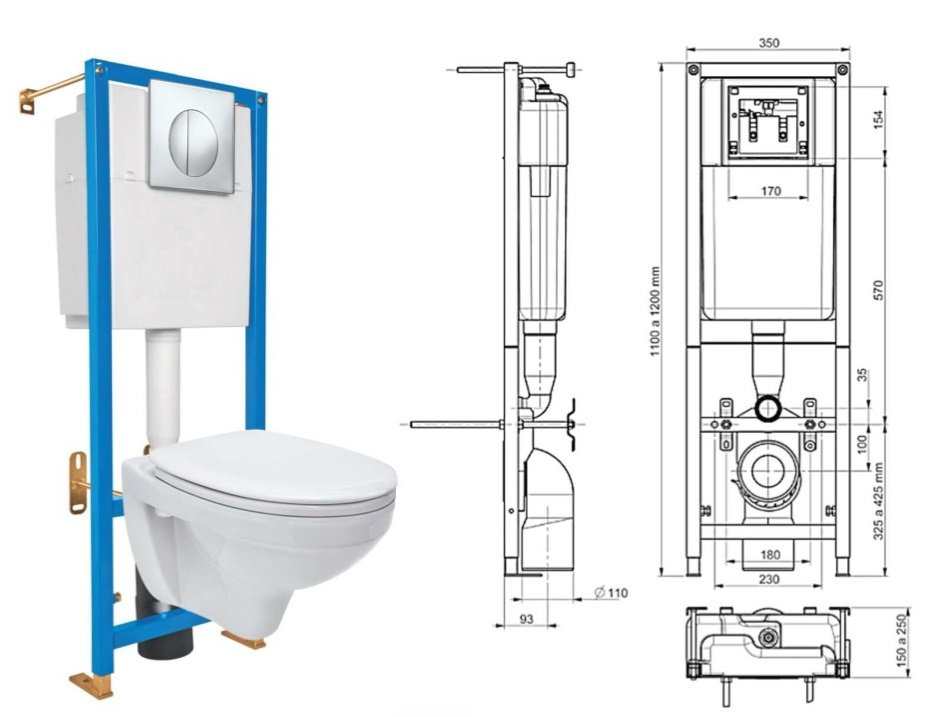
Before carrying out installation work, it is worth studying a typical toilet installation installation scheme.
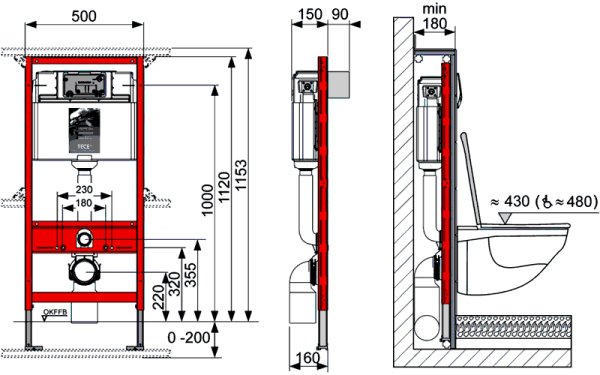
The main parameters for fastening the structure are:
- the height of the toilet bowl - the average size is 430 mm;
- the drain button should be approximately 1 meter above the facing floor;
- the minimum distance from the wall to the outer surface of the installation frame is 150 mm;
- between the drain tank and the wall you need to maintain a gap of 20 mm.
Installation Tools
To perform all the work on installing the installation for the toilet, you need to have the following tools:- laser or regular level;
- marker or construction pencil;
- perforator, concrete drill;
- yardstick;
- overhead wrenches.
Installation Installation Instructions
Before carrying out installation work, first you need to bring a sewer pipe with a diameter of 110 mm, and then - water pipes.Here are the step-by-step steps on how to install the installation for the toilet:
- Fastening preparation . Holes are made in the wall at previously marked places using a perforator. Dowels are inserted into them. In this case, fastenings can be performed both diagonally and vertically. The installation frame has 4 mandatory fixings: 2 on the wall and 2 on the floor.
- Installation of a metal structure . Produced by fastening, starting from the floor. Then the location of the frame is checked by the level and adjusted using the retractable devices provided on it.
- Fixing the frame to the wall . It is carried out using special brackets, and in some cases you can use self-tapping screws or anchor screws.
After installing the frame, it is necessary to check the reliability of the structure, exclude its vibrations to the sides, otherwise it may tilt under heavy loads. After these steps, the do-it-yourself installation of the frame is completed.
Connection of water pipes and sewerage
This is the most critical part of arranging a new toilet bowl, because if a leak appears in one of the pipes, then the entire structure and wall cladding on which the hanging toilet bowl is located will have to be dismantled.For such a toilet, only time-tested materials are used - it is better to choose pipes made of copper, and if material possibilities do not allow, then they should be replaced with polypropylene counterparts. The seams are sealed with tow. If it is necessary to use flexible hoses, they must be made of stainless steel.
The last step is to check all connections, which can be done by running water. Confirmation of the correct installation of the installation for the toilet - a clear operation of the entire system without leaks.
After the test run of the water, you need to install the pipes to which the toilet will be connected. The frame is provided with a crossbar, to which a special plate with a diametrical recess is attached. Thanks to him, the drain pipe is fixed on the installation. All actions for connecting pipes are performed according to the instructions.
False panel cladding
It is carried out after all plumbing work before installing the toilet. Since the structure is located in a kind of niche, it does not matter what material it will be sheathed with. Usually drywall is used for these purposes, and it is moisture resistant.With this material, you can easily close the front wall with the frame placed on it. Drywall can be mounted on self-tapping screws, or on a pre-made frame of guide profiles.
After completing the lining in front of the tank, you need to insert a restrictive cuff, and then close the tank with a safety lid.
Any tile or other facing material can be laid on drywall.
Fixing the wall hung toilet
Do-it-yourself installation of a toilet bowl installation should be carried out taking into account the following rule: a rubber backing must be laid between the tile and the toilet bowl, which will protect not only the facing material from cracking, but also the bidet itself. If for some reason the factory substrate is lost, it can be replaced with a thick layer of sealant. When solidified, it will play the role of a cushion cushion.Tightening the nuts and bolts on the toilet is also fraught with cracks and subsequent chipping, so softening substrates must be used when fastening them.
The final stage of the installation work is the installation of the drain button. How to install it correctly is described in the installation instructions. Before carrying out the necessary work, it is necessary to open the water and insert the cables from the tank into the holes located on the button.
The installation process ends with a check of the operability of the structure, this is its commissioning.
How to install a toilet installation? (video)
You can clearly see the installation of the installation for the toilet in the video below:The wall hung toilet is aesthetically pleasing, stylish and reliable. All work on its installation can be done by hand, taking into account the above tips and instructions for installation.