How to fix a toilet cistern if water flows out of it?
Constantly flowing water from the tank to the toilet - this, on the one hand, does not look like a big problem. At least until the liquid is on the floor. But at the same time, you will have to pay large bills for housing and communal services. And finally, it's just annoying.
Fortunately, modern drain systems are simple enough that most problems can be fixed by hand with minimal replacement parts.
Why is water flowing?
The toilet flush system has several weak points. These are nodes with moving elements, as well as sealing zones of various kinds. In a modern tank, a problem can be created by:
- float valve system, which is responsible for supplying water and shutting it off;
- the place of attachment of the drain mechanics to the bottom of the tank;
- sealing zone at the outlet of the main flow of water into the toilet bowl.
If water does not flow outside the tank, most problems can be solved. This will require care and a few simple tools.
Neutralization of breakdowns
In order for the repair process to be understandable and for beginners, not to frighten with unnecessary details in the description of the process, we will outline the possible causes of water leakage in the toilet bowl from simple to complex. We only note the list of works that should always be done so that the repair is easy and convenient:
- Shutting off the water supply is a reasonable step, this should be done after the initial check of the valve system.
- After removing the water from the tank, you can easily get to the attachment points of the drain system, adjusting bars, and inspect the parts for damage.
- Do not dismantle everything at once - checks must be carried out sequentially.
Work with the toilet is best done by carefully wiping and cleaning the inspection sites. This guarantees a good result and an accurate diagnosis of problems. 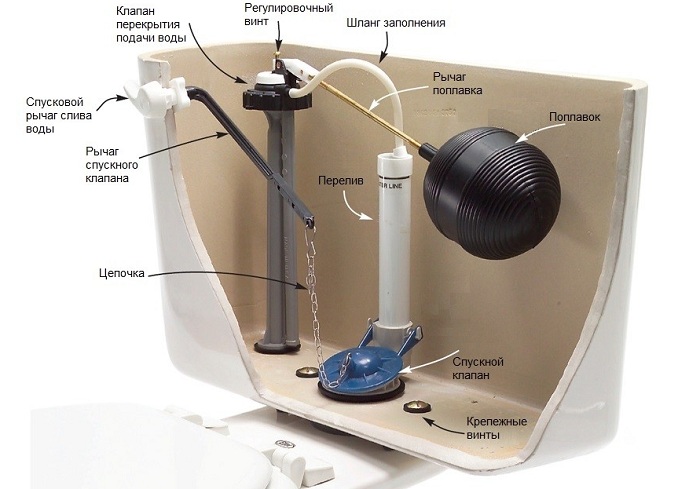
Valve system
This system consists of:
- the valve itself, on which the water supply pipe is screwed;
- a float that transmits force to the rod;
- the main gasket - a membrane located inside the valve and responsible for shutting off the water.
In such a system, a whole series of problems may arise. To make sure that water is running in the toilet due to poor valve operation, an easy check should be made: raise the float as high as possible with your fingers. If the water continues to flow or has stopped, you need to start repairing.
Float
The cause of the loose valve closing may be a float. When its walls are damaged, water enters. As a result, the part does not float to the desired level, and the liquid overflows over the edge of the emergency outlet tube. 
The problem is neutralized as follows: you need to find the place of damage and glue it. If it is significant (for example, a long crack) - the float can be replaced or placed in a strong plastic bag. If there is no damage and water inside, it is reasonable to try to move the floating block lower along the adjustment bar.
Place of attachment to the stem
The adjusting bar, on which the float is fixed, transmits force to the rod. The parts are connected with a plastic pin. It can split and fall out, and the hole where the fastener is located can also be badly broken.
A worn stud is easy to replace, you should not use a rusting wire, a piece of plastic or a small wooden chopstick will do. If the mounting hole is badly broken and it is not possible to achieve a reliable water shutoff, it is easier to replace the valve.
valve membrane
If during the initial check (moving the float with your fingers up) the water supply does not stop, valve will need to be replaced., since the membrane cannot be repaired or replaced. Over time, it cracks and loses flexibility, which can cause leakage.
It’s worth going to the store with the valve removed, because today there are such a variety of options that you can only accurately guess the right model by direct comparison.
Dismantling is carried out as follows:
- you need to turn off the water supply,
- unscrew the underwater hose,
- remove the clamping plastic nuts,
- remove the float
- after that, the valve is pulled out without difficulty.
Cracks may occur in the plastic system. Expensive tanks, where there is a brass knot, do not experience such problems. We note right away: it is useless to glue, try to melt or otherwise repair damage to the valve body, the part must be replaced. 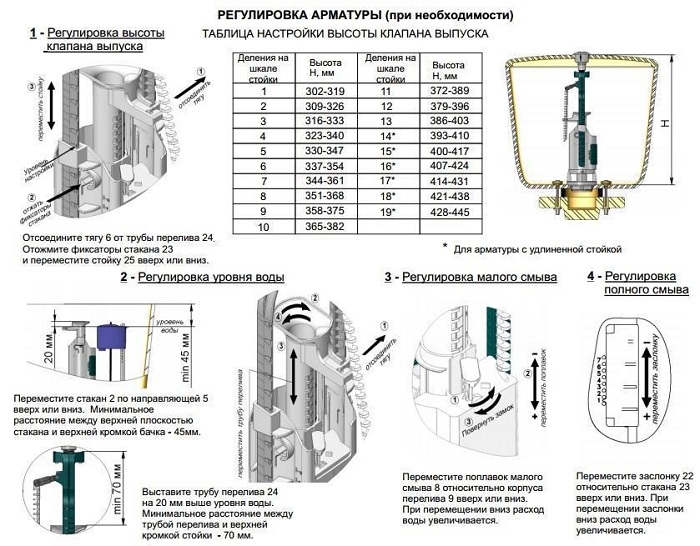
Pear and sealing cuff
The toilet is drained as follows: pressing a button or lever causes a pear with a semicircular tip to rise, after which the main volume of water is released. The part is automatically lowered, pressing against the sealing collar. It is this part of the mechanism that is subject to the action of time. Rubber loses elasticity, cracks may appear.
Seal failure can occur due to bad water. Salt deposits form on the surface of the cuff, and the pear does not close the outlet tightly. Checking the zone is done like this:
- you need to activate the trigger mechanism;
- after draining the water, the pear should be lifted with your fingers, carefully wipe it and the cuff;
- it is necessary to check the elasticity of the seal, as well as the cleanliness of its surface.
You can clean the cuff with a fine sandpaper or file. However, if the part has lost flexibility or cracks have formed, it is better to replace it. To do this, you will have to remove the tank and dismantle the drain system, and how to do this will be described below. 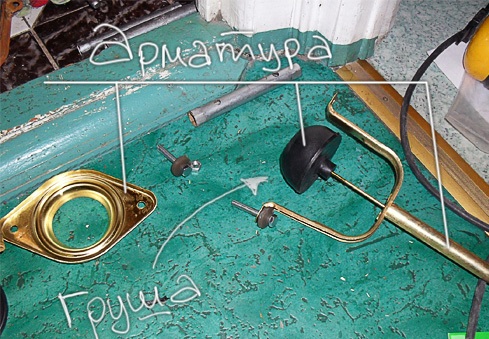
Drain system installation area
Leakage can occur due to wear and damage to the gasket located at the very bottom of the tank, where the main stem of the drain system is attached. Over time, rubber loses its elasticity. In addition, some brass fittings are equipped with iron bolts, which can rust.
A broken threaded rod or cracks in the gasket can only be repaired by replacing the corresponding parts, for which you will have to remove the tank and partially dismantle the drain system.
All work should be done carefully:
- The tank is removed after unscrewing the fixing bolts at the bottom. If they are made of plastic, wipe the nuts thoroughly and apply some force. Rusted steel parts can create a problem. It is not necessary to act with a chisel, so as not to split the tank. A wrench, adjustable wrenches, an impeller, possibly a hacksaw will come in handy.
- After removing the fixing nuts, the tank is removed and carefully placed on its side.
- Using pliers and other hand tools, fasteners are removed that prevent the removal of the drain system. In this case, it is not necessary to dismantle the valve and the float.
- After the disassembly is completed, it is enough to purchase parts to be replaced in the store.
Installation of the entire system is carried out in the reverse order and is not difficult.
Conclusion
Repair of any area of the toilet drain fittings is not difficult, it requires only accuracy and care. It is enough to follow simple rules, avoid distortions in threaded connections, do not apply excessive force to plastic parts, do not rush - and after a while the toilet will again delight with excellent work without the slightest sign of emergency leakage or overflow of the tank.