Do-it-yourself shower cabin assembly photo + video
The growing popularity of shower cabins is influenced by their economy and ease of installation. Assembly of a shower cabin, different models is carried out according to one plan. The instructions will show you how to install.
Assembly steps common to all cabin types
The shower enclosure is delivered from the point of sale disassembled and packed. A lot of packages with parts at first introduces confusion with their variety. All components are sorted, grouped and laid out in packages in such a way as to suggest how to properly assemble the shower cabin in order to sequentially follow all the steps to assemble the kit.
Some box models are designed to allow self-assembly from the inside. This is convenient in the case when the installation of a shower enclosure takes place in cramped conditions of a small room.
Installation of the corner provides for a certain sequence. Assembling a shower cabin with your own hands is done alone within a few hours. This provides the user with some advantages in case minor repairs are required.
The owner of a modern device, who independently completed the installation, will not be at a loss before the question: how to disassemble the shower cabin. At any time, he can partially disassemble, carry out minor repairs, and reassemble the structure without resorting to paid cabin repair services.
Extracting and sorting the shower room components
The cabin is delivered to its destination in several bundles. Separately packed:
- back walls;
- Glass, doors and vertical profiles;
- Central panel;
- Pallet, roof, horizontal profiles and accessories.
The marking on the boxes allows you to determine what components are in them without looking inside. Assembling a shower cabin with your own hands begins with opening the packages with the necessary details one by one. Manufacturers recommend that after buying a box, unpack it and check the contents.
Pallet preparation
The set of corner with a high pallet includes load-bearing structures, a screen, and fittings for fastening. In some models, it is sold already attached to the support frame. In this case, it is enough to mount the siphon and adjustable heels. To avoid damage to the surface layer, the protective film should not be removed before the end of all work related to the installation of the shower. The installation of the box with a low pallet is carried out on the scaffold.
Proper installation ensures the stable position of the corner cab and the ability to withstand the impressive weight of the person in it. The assembled pallet is sent to the place.
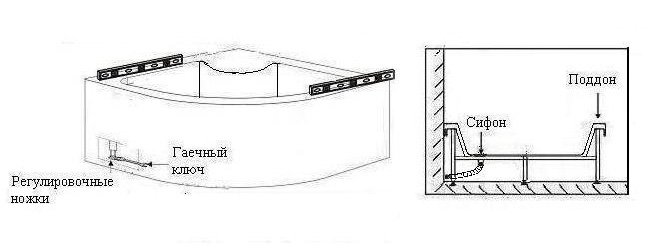
With the help of the building level, by screwing in / unscrewing the heels, it is set to a horizontal position while ensuring the stability of the entire structure.
Frame assembly
Horizontal rails are placed on the pallet. They are shifted to the rear side and fixed with self-tapping screws. Vertical corners and top rails are mounted on them. Attach door opening guides. The resulting structure forms a frame on which the rear and center panels are installed. Observing a certain order, it is quite possible to assemble the cabin yourself. If the assembly of the frame is carried out in 4 hands, preferably the assembly order can be changed. After reviewing the instructions, which describes in detail how to assemble a shower cabin, they mount a spatial structure from a corner and profiles, then fasten it to a pallet.
Mounting the center panel and rear walls
 The central panel requires the most attention. Before installing it, all attached parts are mounted. A mixer, hose connections, control panels are fixed on it. When assembled, the panel is placed in a frame, previously connected to the pallet, and screwed with self-tapping screws.
Shelves are mounted on the back walls. By means of special brackets, the rear panels are attached. Depending on the design, silicone sealant or special profiled gaskets are used for this.
Dome preparation
Attach a rain shower, backlight to the dome. Speaker with decorative overlays and fan. The dome is installed on the cab and fastened to the rear walls. According to the designations, the backlight, speaker, fan and power supply are connected. The ends of the wires are equipped with locking connectors, which eliminate installation errors.
Completion of assembly
Before hanging the doors, they should be prepared. Rollers are attached to the canvas, two at the top and two at the bottom. For their installation on the doors there are corresponding holes. The upper two-wheeled rollers have a regulating device, the lower ones are spring-loaded. Installation of door locks on the lower rail is necessary to prevent a fight against the rear walls when moving.
Travel stops are attached to the door guides. The door is brought inside the cabin, the upper rollers are brought into the upper profile. The lower rollers are placed in the guide rail, secured with a spring-loaded latch. The end parts of the doors are provided with magnetic strips with splash-proof moldings.
Hanging the doors ends the assembly of the shower cabin. Before you start using it, you should make sure that the assembly is correct and that all connections are secure.
Health check
- Guided by the instructions on how to assemble the shower cabin and the rules of use, by alternately pressing the buttons on the control panel, they also make sure that they are working.
- Be sure to make sure that the pallet is in a stable position. If staggering is detected, it is eliminated by turning the adjustable heels of the legs.
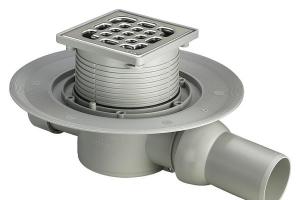
- The drain should be inspected especially carefully. Its reliability will protect against leaks, which lead, at a minimum, to unpleasant explanations with the neighbors below. Reliable draining is ensured by special gaskets on the threaded connections of the siphon. Silicone sealant is used for best results.
Some nuances
In some cases, it is advisable to perform pre-assembly to familiarize yourself with how to assemble a shower enclosure. It is useful to do this in order to understand the principles of installation, mark the holes, and, if necessary, purchase the missing fittings.
The mounted drain must be equipped with additional outlets for connecting other plumbing fixtures. We should not forget about the inclusion of a revision in the sewer system.
The process of operation of plumbing fixtures provides for periodic inspections and current repairs. Loose fasteners, leaky joints, replacement of doors or a rain shower necessitates complete or partial dismantling. If the assembly was carried out independently, the question of how to disassemble the shower cabin is not bewildering. When disassembling, the reverse order of installation is observed. Do-it-yourself cabin assembly saves money and increases confidence in the correct use of this handy plumbing fixture.
Shower assembly video:
More detailed video: