How to Assemble a Shower Cabin with an Acrylic Tray: A Step by Step Assembly Guide
Practical shower cabins are gradually replacing traditional bathtubs from bathrooms. Shower equipment attracts with the opportunity to save usable space and at the same time get the opportunity to comfortably take water procedures. In addition, devices are constantly being improved. Their package may include all kinds of hydro massagers, audio complexes, systems for creating the effect of a sauna, etc. All this attracts buyers even more. But not only the model or equipment, but also the assembly of the shower cabin affects the durability of the device and its ease of use. We will figure out how to properly install equipment with an acrylic pallet.
Before proceeding with the installation, you need to carefully inspect the device. This must be done in the store or in the presence of the courier who delivered the order. Particular attention should be paid to inspecting the parts for the absence of chips and scratches, as well as checking the integrity of the glass elements. In addition, the complete set of the device is checked. Assembly instructions must be available without fail. If any problems are found, you must demand the replacement of the equipment and under no circumstances sign the acceptance document. Otherwise, all subsequent claims will be useless.
Before installation, you need to prepare the necessary materials: a sewer adapter, antibacterial transparent silicone and hoses for connecting to the water supply. From the tools you will need a flat screwdriver, a screwdriver, a small diameter drill bit, an adjustable wrench and a silicone gun. You also need to carefully read the instructions. If something is not clear, you can search the Internet for a training video. However, all shower cabins, regardless of their modification, are installed according to the general scheme. Let's consider it in more detail.
Shower cubicle - a practical device that saves space in the bathroom
Shower tray installation
The floor on which the pallet will be assembled is covered with cardboard or film so as not to scratch the device. The box with parts is unpacked. It should contain the pallet frame, pallet, apron, siphon and various fasteners: brackets, studs, nuts and screws. The protective film is removed from the pallet, it is turned over and placed on the prepared cardboard. Next, the assembly of the frame begins. It can be welded, then nothing needs to be done with it, or a team, in which case it must be assembled.
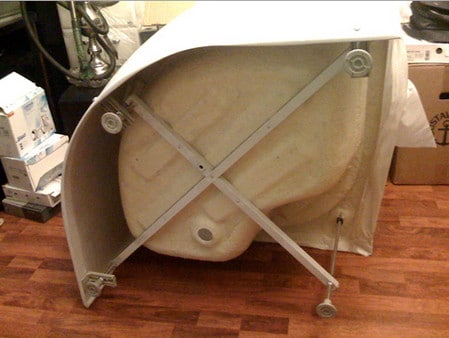
The frame is an essential component of the acrylic pallet design.
The prepared frame is placed on the pallet so that the holes coincide with the mounting tabs. With the help of studs, the elements are connected and securely fixed. So that there are no gaps between the parts. Tighten the nuts very carefully. The element can bend, which will break the rigidity of the structure and make the cab unstable. Then, with screws, we finally fix the frame on the pallet. Next, an apron is installed. It is fixed with the help of special brackets that come with the device.
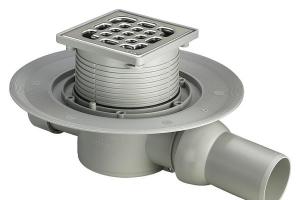
The next step is to install the siphon. All elements of the device are carefully coated with silicone before installation. Be especially careful when screwing the lower plastic part of the siphon. If you apply excessive force, you can break the thread and then you have to purchase a new part. After installing the siphon, the pallet is turned over and installed in place. At this stage, it is very important to accurately level the device using a level. The slightest distortion will adversely affect the operation of the cabin.
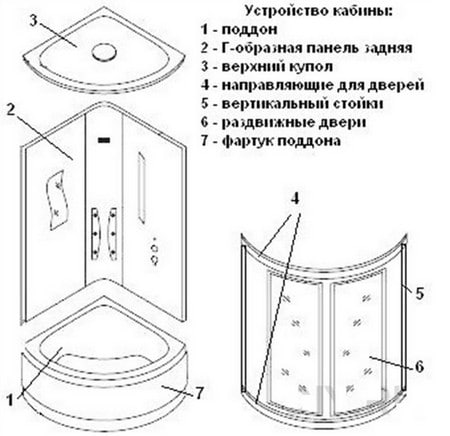
Standard cabin arrangement
Shower cabin assembly
Each unit comes with a shower cabin assembly diagram. She should be guided in the process of installing equipment. Most often, immediately after the pallet, they begin to assemble the roof. The protective film is removed from it and the speaker, lamp, rain shower and other elements provided for by the model are replaced. Then proceed to the assembly of the frame, consisting of vertical and horizontal profiles. In corner systems, semi-circular profiles are usually marked so as not to confuse the lower and upper element.
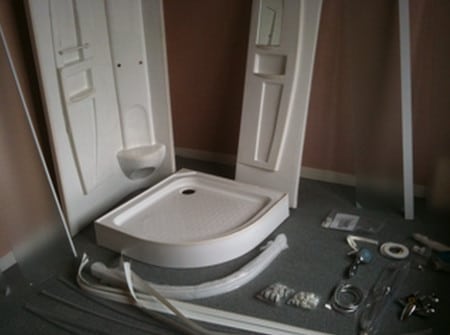
Before assembly, all necessary equipment is installed on the side panels
After assembling the frame, you can take the side panels. All equipment provided by the model is installed on them: shelves, shower head, mirrors, etc. Completed panels are placed on a pallet and fixed. Lastly, a frame with doors is mounted. Most often they move using a roller mechanism, but there may be other options. The design is aligned so that there are no distortions and large gaps. The roof is being installed. All joints are carefully sealed.
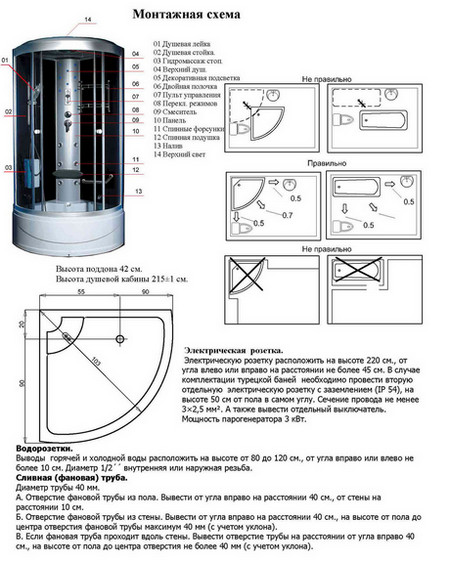
Installation diagram of a typical shower cabin
Connection to water supply and sewerage
The cabin, ready for operation, is connected to the inlet and outlet pipelines. The drain hose is attached to the pallet. Its free end is displayed in the sewer socket. Do not forget about the need to connect to the sewer drain outlets coming from the sink, bathtub, washing machine, etc. Therefore, a tee must be mounted. Particular attention is paid to the tightness of the connection. The gasket installed in the assembly must be of high quality. For greater reliability during the installation process, it is best to use a sealant.
The next step is to connect the water supply. First, a tee is mounted for cold and hot water, to which the supply hoses are connected. All connections are also carefully lubricated with sealant. At the end of the work, leave the cabin until the sealant has completely hardened. The curing time is usually indicated on the packaging of the composition. If necessary, a socket is installed to connect the cabin elements powered by electricity. Experts recommend choosing only special moisture resistant models. After a successful test run, the device is ready for operation.
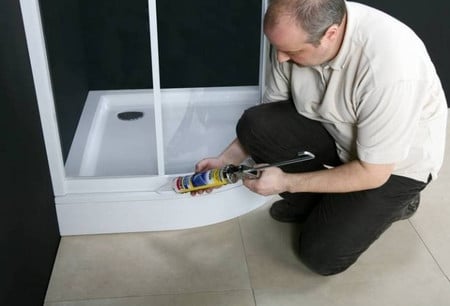
All joints and seams are carefully sealed
Recommendations on how to assemble a shower cabin are quite simple. It may seem that installing the equipment yourself is quite simple. But in reality this is far from the case. There are many nuances that complicate the process, and the quality of components, especially those made in China, often leaves much to be desired. Therefore, for those who do not have experience in such work, it is better not to take on the assembly, but to entrust it to specialists. And after a short time, enjoy the excellent work of your brand new shower cabin.