How to joint tile on the floor.
The final stage in laying tiles is grouting (grouting). This provides a beautiful appearance to the laid tiles, and also gives it waterproofing properties. Most modern grouts also have antifungal properties, which is important for wet rooms.
You will need.
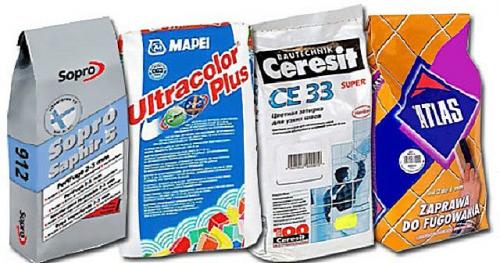
Grout (cement, silicone or epoxy);
Capacity for breeding grout;.
Masking tape (for working with silicone or epoxy fugue);
Rubber spatula for jointing;
Foam sponge and water container;
Protective gloves.
Instruction.
1. First, the surface must be prepared for jointing. To do this, you need to wait until the tile adhesive is completely dry, then clean the seams of dust and debris that could get into them (this is especially true for floor tiles. It is best to vacuum the seams to clean them, and wipe the tile itself with a damp cloth or sponge from dust. 2. if you use cement grout, then first you need to dilute it with water.To do this, pour dry grout into a container, then add the right amount of water (the ratio of the mixture and water is indicated by the manufacturer on the package. Dry cement grout has a very fine fraction, almost like a powder, so you need to stir it for a long time and carefully.At first, the powder will float on the surface of the water and not mix with it, then gradually it will begin to form a "dough".Make sure that there are no lumps left, otherwise the seam will be untidy and the grout will not be able to fully 3. Unlike cement grout, silicone and epoxy mixtures are sold ready-to-use, so you just need to open the package and get to work. 4. The easiest way to fill the seams with cement grout. To do this, take a rubber spatula for jointing and put the mixture into the seam so that all voids are filled. Part of the mixture will smear on the tile, and there will be excess on the seam. It's okay, that's how it should be, since this is the initial stage. Next, you need to remove the excess with a rubber spatula. To do this, place the spatula across the seam, tilting slightly in the direction of movement, and press along the seam with pressure. After that, the grout in the joint will become flush with the tile or slightly lower, due to the rounded edges of the tile and the softness of the rubber spatula. Now you can either leave it as it is, or make the seam a little more prominent if that suits your idea. To deepen the seam, simply insert the spatula into the seam to the desired depth and run along the seam, removing excess. 5. when working with silicone and epoxy grout, there is a problem of subsequent cleaning of the tile from smeared excess mixture. These types of jointing are very difficult to remove from the surface, especially if the tile is unglazed or with a relief surface structure. Therefore, it is necessary to work with these types of grout carefully, and the tiles along the edges of the seams must be sealed with masking tape. The very principle of operation is the same as with the cement fugue: put the mixture into the seam, remove the excess, deepen the seam if desired. 6. When the grout is completely dry, the tiles must be cleaned of excess. In the case of cement grout, you need to wipe all the tiles with a damp sponge, and when working with silicone or epoxy, remove the dirty masking tape pasted near the joints. Real estate construction renovation.
How to joint the seams of tiles on the floor. The sequence of grouting
Knowing how to properly grout the seams on the tiles, you can try to avoid the most common mistakes. If you need to perform this operation yourself, it is useful to pre-prepare all the tools necessary for this. You will need a container in which the solution will be diluted, a small rubber spatula, a regular foam sponge, a molar brush. For beginners, an ordinary pastry bag will help to grout the seams with high quality. The algorithm for performing work is as follows:
- First, the space of the seams is carefully cleared of dust and dirt.
- Then they are pre-treated with antifungal compounds. If tiling is done in the bathroom, the use of such compounds becomes mandatory.
- To ensure better adhesion of the fugue with the material, it is necessary to moisten the seams with a brush with water.
- Further, according to the instructions, a small portion of the grout fugue is diluted. If the space between the seams is large, you can place the finished mastic in a pastry bag and use it to try to evenly and very accurately fill the space between the tiles. In the case when the space between adjacent tile tiles is only a few millimeters, it is better to grout the tile joints with a small rubber spatula. It is important to try to compact the mastic tightly, to make sure that the grout composition completely fills the inter-tile space.
- Excess grout is immediately removed with a rubber spatula.
- When the applied composition dries slightly, it is important to wet it well with a damp sponge. Otherwise, it will dry out quickly and crack.
How to joint the tiles on the floor. How to cut tiles correctly
Seam preparation
The grouting process is allowed only after at least a day after laying ceramic tiles, because. jointing provides a certain physical impact on the seam. It is also necessary to moisten the seams by running a foam rubber sponge soaked in water over them. If there is a solution in the seams, then with the help of a thin metal object (for example, a nail), it is removed, like tile crosses.
Tip: the surface of the tile along the seams is sealed with masking tape - this is especially necessary for tiles with a relief pattern, which can accumulate excess grout. And it will be very difficult to remove it from there.
Grout preparation
If a ready-made mixture is used for jointing tiles on the wall and on the floor, then this step is skipped. The dry solution is mixed with water in proportions according to the instructions.
Tip: If you have little or no experience with puffer, do not mix large volumes. Since the mixture hardens quickly, it is necessary to work with it at the appropriate speed.
The composition is thoroughly mixed, after which it is left for several minutes so that the mixture can brew. Then you should stir again and then start grouting.
planing procedure
The finished solution is placed in a container convenient for holding in one hand, a spatula is taken in the other hand, with which the fugue is scooped up. The spatula should be moved perpendicular to the seam, holding the tool at a slight angle. In this position, pressure is applied to the mortar, due to which it is literally pressed into the seam, which enhances the setting and gives the grout the desired thickness.
Tip: If you decide not to use masking tape, then keep a damp foam sponge on hand to immediately remove excess fugue. But without touching the seam!
It is also possible to carry out circular movements with a spatula, for example, for planing large areas. However, this technique is allowed only for ceramic tiles that do not have a relief pattern.
Grout removal
Excess fugue along the seams is removed at the same time as it is applied. Experts advise, especially if silicone grout is used, to follow the “one square meter” rule: having grouted such an area, immediately clean it. The seams themselves are processed the next day.
How to joint a tile on a floor. jointing of floor tiles
We have finished with the probe and now we will look at how to joint a real floor tile.
In the beginning, you need to carefully clean the seams from the remnants of glue, but it may happen that in some places the glue has time to grab. It is mechanically dangerous to clean it. To do this, you can look in the store for a special alkaline product to remove dirt from tiles. Now I will demonstrate with a small example how it works. The agent is applied with a cotton swab to the contamination.
Also, this tool does a good job of cleaning the seams.
After using chemistry, be sure to rinse it off, and then moisten the seams.
You can apply the fugue into the seams of the floor tiles with the same rubber spatula.
Also on sale are special graters with handles. They allow you to cover a large jointing area at a time.
And now I'm showing how to close a deep seam on the floor. With this movement, I push the fugue as deep as possible.
I draw your attention: in order to work out the seam to its full depth, the fugue should not be too thick.
As with the probe, we use diagonal movements at the end of the reveal.
For the various holes in the floor that need to be jointed, the same technique is used.
The fugue must be brought into the entire depth of the cleaned cavities.
This technique will make the seams more durable, and they will not crumble.
I advise you not to disturb the worn seams of the floor tiles for several days. I will add that cement-based grouts gain their initial strength in no less than two weeks.
Often, home craftsmen are interested in why grouting is needed between the tiles on the floor and on the wall. The fact is that according to the laying technology, when arranging the lining of the floor surface, it is necessary to leave space between individual fragments at the junction. On average, this parameter, according to standards and norms, should be 2-5 millimeters.
The size of the seam largely depends on the size of the tile - the larger it is, the wider the distance between adjacent elements can be.
Grouting the junction of fragments is done for a number of reasons:
- Walls often shrink, as a result of which the tile begins to shift, albeit slightly, which means that it will need space to move.
- Due to the presence of cracks, the wall can breathe through them.
- Grout for floor tiles protects walls and floors in the kitchen and bathroom from the penetration of excess moisture into them. If this is not done, pathogenic fungi will begin to multiply in the seams between the fragments and mold will appear, and dirt will accumulate in the joints, which will not be easy to remove.
- Grout also improves adhesion between tiles and performs a decorative function. Evenly and neatly designed joints look aesthetically pleasing, while masking small defects (notches, chips) present along the edges of the tile.
- The duration of the operation of the coating without repair depends on how the grouting of the floor tiles is done with your own hands.
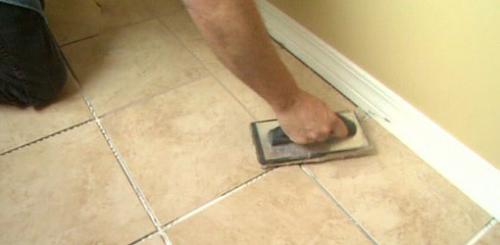
The most common is the method using a rubber spatula. Since it will not be necessary to work immediately on the entire territory, but to process tiles literally per square meter, experts recommend moistening a couple of “squares” with water again immediately before the process itself. In general, professionals process 2-3 square meters. m in twenty minutes. A novice master will not be able to achieve such a speed, but this is not so important. The main thing here is accuracy and careful observance of technology. Well, the fact that you finish the work an hour or two later does not really matter.
So, how to properly grout tiles? Apply a puffer to the rubber spatula and begin to fill the seams with diagonal movements. And do not just smear on top, but try to press the composition, as it were, so that it fills the seam completely. Remove excess with the same spatula. At the same time, make sure that the filled joint coincides in level with the level of the tile. That is, if there are any recesses or voids, be sure to immediately add a fugue there. Since you need to grout the tiles on the floor in stages, work this way for about half an hour. After that, proceed to cleaning the jointed area.
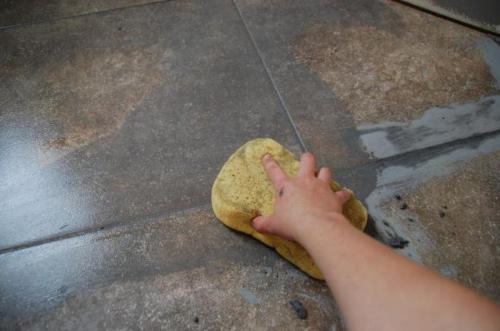
To do this, arm yourself with a bucket of water and a sponge. Constantly wetting it and squeezing it well, go through the foam rubber over the entire surface, making movements in a circle. Your goal is to remove excess from the tile itself and the seams. If there are stains on the tile - it's not scary. They will be removed during the final cleaning process. Now the main thing is not to leave pieces of dried fugue on ceramics. It won't be easy to remove it later. After you have processed one area, proceed to the next. And so on until all the seams are worn.
The grout is a homogeneous dry or already diluted to a paste-like mixture, made on the basis of polymers or white and gray cement. Some of the grouts are produced only in white or gray, and tint dyes are added only before work begins, others are already produced in finished colors. The right grout color can help to unite the tiles into one plane or, conversely, highlight the elements, emphasizing their shape, or frame them with a color similar in tone, darker or, conversely, lightened. Therefore, the choice of tint option will depend on what effect you want to achieve upon completion of the work.
The color of the grout is important, but in the first place should always be the criteria for assessing the quality of the material, its protective properties
The direct purpose of the grout mixture is to prevent moisture (direct or from its high content in the air), debris, dust, from the penetration of various insects, sometimes ready to take a fancy to voids for their nests, from getting into the seams, and from there - under the decorative coating, as well as from the development of microflora colonies in this space. Without the use of this material, the tile will not linger for a long time on the surfaces of the wall or floor and will begin to separate from them. And this, in turn, means that the repair will have to be repeated very soon, spending a decent amount on it.
The quality of the material should always come first, ahead of even the decorative features of the grout. Carelessness in this matter can lead to sad results. For example, you should know that if mold or fungus managed to penetrate into the gaps between the tiles and take root there, then it will be extremely difficult to get rid of them, since this “disease” quickly captures the space and can even penetrate into the pores of the walls.
Choose material only from trusted brands and avoid cheap fakes!
Therefore, when choosing a grout mixture, it is necessary to pay attention to the manufacturer's brand and purchase only the material that has won a stable reputation for quality among consumers.
You have made a beautiful repair, laid tiles or porcelain tiles on the floor, and now the final touch is left - to buy a suitable grout and finish the work you have begun. A few tips from professional tilers will help you to beautifully and neatly arrange the seams so that the floor looks like new even after 5-7 years.
Types of grout for floor tiles
Since the premises can be used in different ways, different requirements are imposed on the grout (fugue). For example, for swimming pools, bathrooms, laundries, it is important that the floor is resistant to dampness and water, so that mold and fungus cannot catch on and ruin a beautiful tiled carpet. In living rooms, housewives want dust not to rise from the floor. And for hallways, it is important that dirt does not clog into the pores of the grout.
- Cement. The basis of the mixture is white cement and sand. The solution is not plastic. Grabs quickly. Sold as a dry powder, which must be diluted with water before use. The proportions are indicated by the manufacturer on the packaging. When working, you need to use "petals" to protect the respiratory system from fine cement dust. So that the fugue does not absorb moisture and is not covered with fungus, after the solution dries, the seams are treated with water-repellent impregnation.
- Polymer. Produced on the basis of a silicone mixture. Elastic, not afraid of water. Well suited for natural stone, porcelain stoneware, as well as for floors under which a heating system is mounted. The seams tolerate thermal expansion and contraction of the tiles well. Also used for finishing the so-called. seamless tiles. It is applied through the gun directly into the seam. The edges of the tiles are protected with masking tape, because. Fugue has high adhesion.
- Epoxy. One of the most durable. It can be used for facing industrial premises. Weather resistant. Good for loggias and balconies. It does not live mold and fungus. She is not afraid of water. It sticks firmly. Abrasion resistant. Sold as two ingredients to be mixed immediately before use. Grabs quickly.
- Polyurethane. Ready-to-use polymer mixture provides reliable protection against moisture. Elastic. Can be used for tiles laid on "warm floor".
Proper grouting of tile joints. The process of grouting tiles
Proper tile grouting process
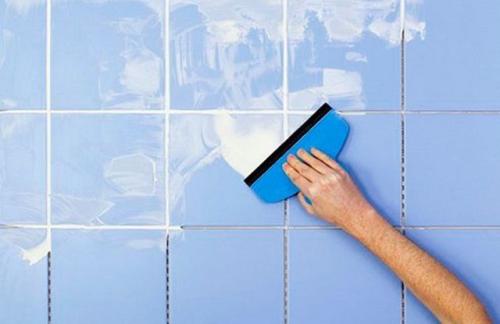
After you have prepared the mixture for use, you can apply it between the tiles, pushing it into the seam.
To do this qualitatively, the mixture is collected with the end of the spatula and applied across the seam - this way you can achieve the deepest penetration.
If you apply only along the joint, then over time it will crack, and in some places it will simply fall off - it is for this reason that I do not recommend the use of hard spatulas, graters and semi-trowels in such work.
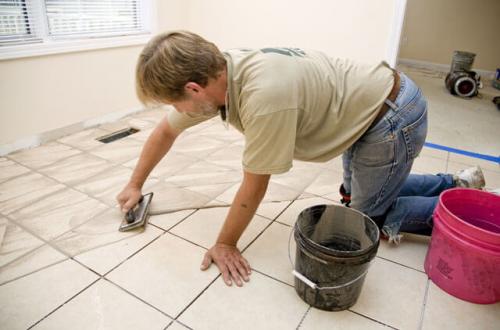
Having applied the mixture to the area between the two tiles, they pass along the joint with a spatula, removing the excess, as the master does in the top photo. But that is not all. To make the seam look beautiful, it should be finalized with your finger (without a glove).
That is, when about a square of finishing is ready, a finger is passed along the seam with a light pressure, and it turns out to be slightly in-depth, clearly leveling in width.
If you are afraid for the skin, then use hand creams every working day, although the masters, as a rule, do not do this, but simply wash their hands often.
Considering that this is a step-by-step process, after you have worked out one batch, do not rush to wipe the tile, but immediately make another batch and proceed to finishing the next section. You can start the final wiping of the tiles only after 1-1.5 hours (this is the optimal time).
If you leave the wiping the next day, then you will run into serious problems. Such substances, especially Ceresit CS 33, dry quickly, have excellent adhesion to ceramics (including glaze) and excellent hardness.
Therefore, by removing the completely dried mixture, you not only complicate your life, but also risk damaging the tile.
The grout in the bathroom is done starting from the walls even before the first (bottom) row and floor were laid out. Everything is simple and logical here: the first row is laid after the floor is laid out - this is technically correct and convenient, and the floor is laid after the walls are grouted to make it less dirty.
Of course, the first row has to be overwritten after the tiles have been laid on the floor.
The floor is overwritten according to the same principle as the walls, that is, they prepare the same amount of the mixture and apply it first across the seam, and then pull it along the longitudinal line. Depth and evenness are leveled with a finger in the same way.
Errors when grouting tiles. How to replace grout on tile
Decide what type of grout you will use. It depends on the size of the seams between the tiles. There are 2 types of grout for tiles: with sand and without sand. If the joints between tiles are larger than 3 mm, use grout with sand to fill them; if the joints are less than 3 mm, use grout without sand, as it is more compact.
Remove old grout. If necessary, remove existing grout before applying a new one. This will keep the surface looking clean and prevent the spread of mold.
Apply tile sealant. Apply sealant to the surface of your tile if it is porous so that the grout does not soak in when you apply it. Do this with a sponge, roller, or simply rub the tile with caulk and let dry for 24 hours.
Prepare a grout solution from the dry mix. Mix the grout in a 20 liter bucket with a spatula.
- A spatula is a small hand tool used to apply paste-like materials to walls, countertops and floors.
Apply grout. Apply a generous amount of grout to the joints along your tile floor tiles using a trowel. Make sure the grout has completely filled the joints. Rub the entire surface of the floor, except for the connecting seams; these are the areas between the floor tiles and the bathroom, wall, door, cabinet or sink.
- A trowel is a rectangular flat tool with a steel handle and a rubber surface that is used to apply grout. Hold the trowel at a 30 degree angle and apply the grout to the entire surface of the tile floor.
Remove excess grout. Remove excess grout from tiles after all joints have been filled. To do this, go over the surface of the tile with a trowel, only this time keep it at an acute angle and move diagonally to remove excess grout.
- Diagonal movement avoids damage to the grout in the joints.
Leave the grout and prepare a bucket. Leave the grout on for approximately 10 minutes. While the grout dries, fill a second bucket with water and use a sponge to wipe the grout off the tile.